The WinForms Notepad Project: First Steps (Premium)
- Paul Thurrott
- Oct 17, 2019
-
22

In investigating the history of Windows application programming, I’ve renewed my interest in software development. To be clear, I’m many years removed from my time writing code, so I probably have as much to learn as anyone reading this series. That will be disappointing, I know, to some experienced developers. But for those looking to take the next step past the basic code examples I use in the Programming Windows series, this might be just the ticket. It’s something we can do together, basically.
A few ground rules.
First up, I’m not going to teach you the basics of any programming language. There are tremendous written and video resources for that, and I’ll point you to a few as needed, as we go.
For this initial project, I’m going to try to duplicate the Notepad application as faithfully as possible using the Windows Forms (WinForms) framework and the Visual Basic (VB) programming language. This combination, while somewhat out-of-date today, is probably the simplest and most readable for non-developers. Future projects will use more modern frameworks like Windows Presentation Foundation (WPF) and Universal Windows Platform (UWP) and C#, an inarguably superior language. I may even re-implement Notepad using WPF and C# (or whatever); we’ll see where this takes us.
I chose Notepad because for the same reason I chose WinForms and VB: It’s a simple application, though as you’ll see as we step through the process of creating our own version of it, there are still complexities and obstacles to overcome. As I write this, I’ve not yet duplicated Notepad on my own, so we’ll have to see how it goes. (I have worked up quite a bit of it, however.)
To get started, you’ll need Visual Studio 2019 Community, which is free and available from the Visual Studio website. In the Visual Studio Installer, be sure to select the “.NET desktop development” workload under “Windows.” This includes everything we’ll need to create a version of Notepad using WinForms and VB.
While that’s installing, let’s consider Notepad for a moment. It is indeed a simple application. So simple, in fact, that its main application window uses only three controls: A menu, a textblock of some kind, and a status bar. That’s it.
Well, that’s not really it, of course. The Notepad menu system is surprisingly dense, especially the File and Edit menus.
And Notepad can launch a variety of system dialogs, including Open, Save/Save As, and Font, plus its own About dialog. So there is a lot to wire up, and we’ll need to figure out the best way to create our own dialog.
Given the simplicity of this application, the way I’d start this off is to create the basic user interface first. That is, attach a menu, a textblock (or whatever), and a status bar to the main application window, called a form in this environment (a nod to the classic VB versions of the 1990s). Then, once that’s done, we can start filling in functionality, making it more and more complete—more functional—as we go.
So let’s start there.
When you launch Visual Studio for the very first time, you’ll be asked to sign-in to your Microsoft account. But subsequent launches will display this window, which lets you choose from previously-created projects, if present, or other options.
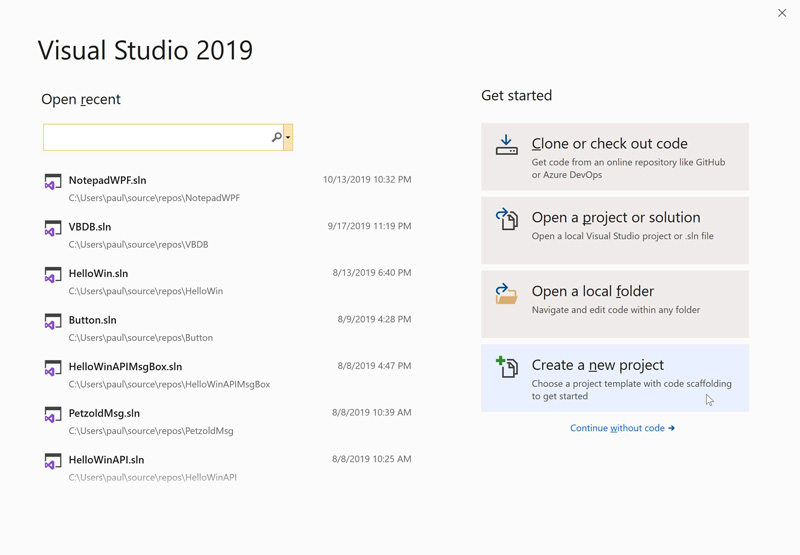
Select “Create a new project.”
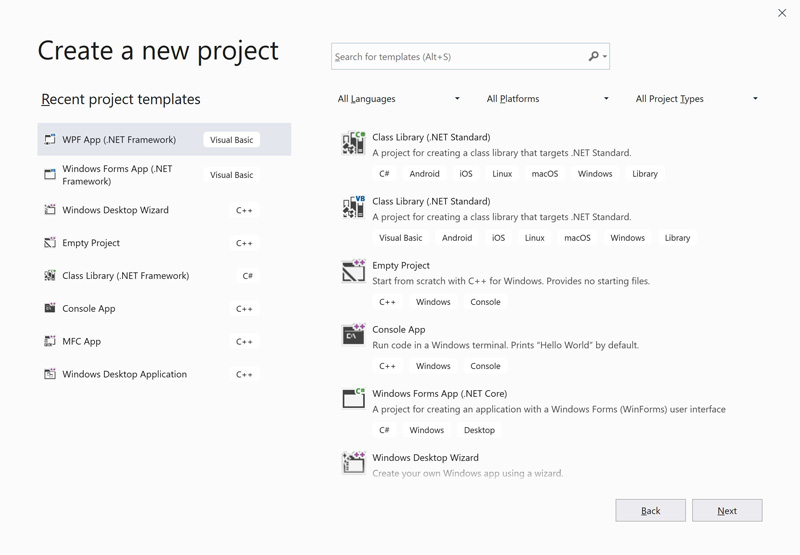
Here, you choose between different project templates. To simplify the choices, use the Languages, Platforms, and Project Types filters at the top right: Select Visual Basic, Windows, and Desktop, respectively. Then, select “Windows Forms App (.NET Framework)” from the project templates list.
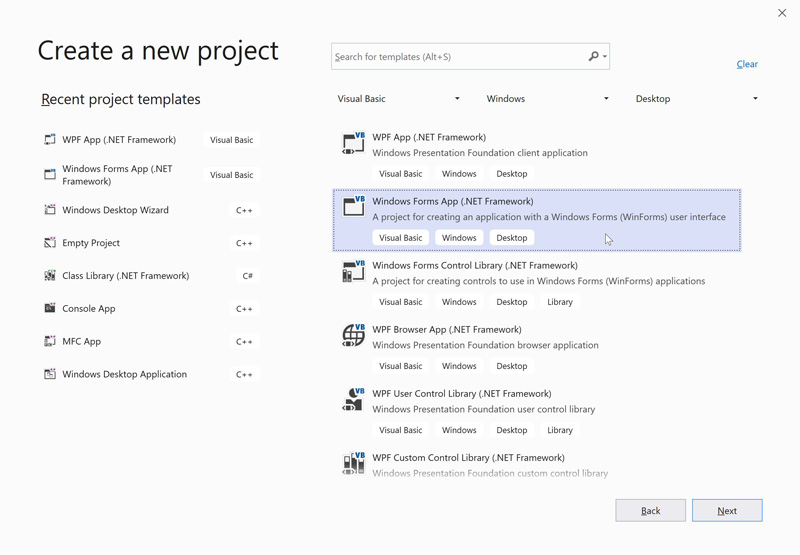
Then, click Next.

Here, you can configure the name, location, and other details for your project. I made two changes: I changed the name to NotePadWF and I selected (checked) the option “Place solution and project in the same directory.” The terms solution and project are used to describe how Visual Basic organizes the files that comprise the application, in this case, that we’re creating. (There’s only going to be one project in this solution, but more complex solutions can include multiple projects.)
Now, click Create.
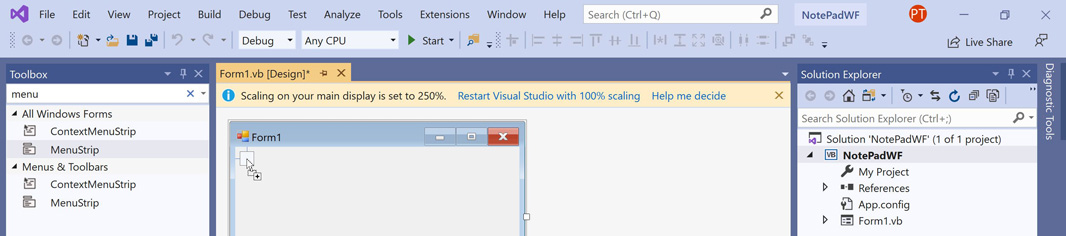
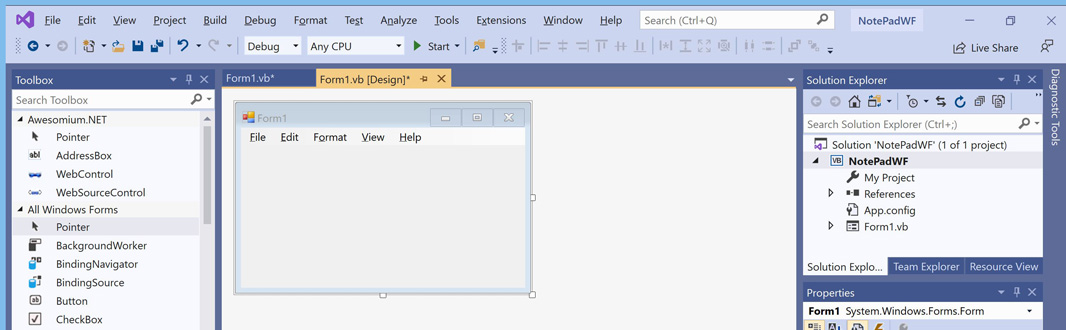
After a bit of work, the Visual Basic IDE will appear with an empty form window designer representing our new application and some other sub-windows for controls (Toolbox), files and resources (Solution Explorer), and properties (which is context-sensitive).

If you’re using a high-resolution display and have configured Windows 10 display scaling above 100 percent, which is common these days, you’ll notice the yellow warning about scaling at the top of the form design window. That’s related to a limitation of WinForms, which was first released in 2001-2002 with the first version of .NET, back when Windows XP was still shiny and new: Windows didn’t natively support display scaling until years later, so the WinForms designer used by Visual Studio doesn’t either. For the most part, we don’t need to worry about this too much, though we will see some scaling issues in the menu, especially. For now, just ignore it: Click the Close button to hide the warning.
OK, let’s visually build the basic Notepad user interface.
First, the top-level menu: Using the search box in the Toolbox, type menu to find the MenuStrip control. Then, drag it directly from the Toolbox and onto the form window in the designer. When you do, an empty menu appears at the top of the form window.
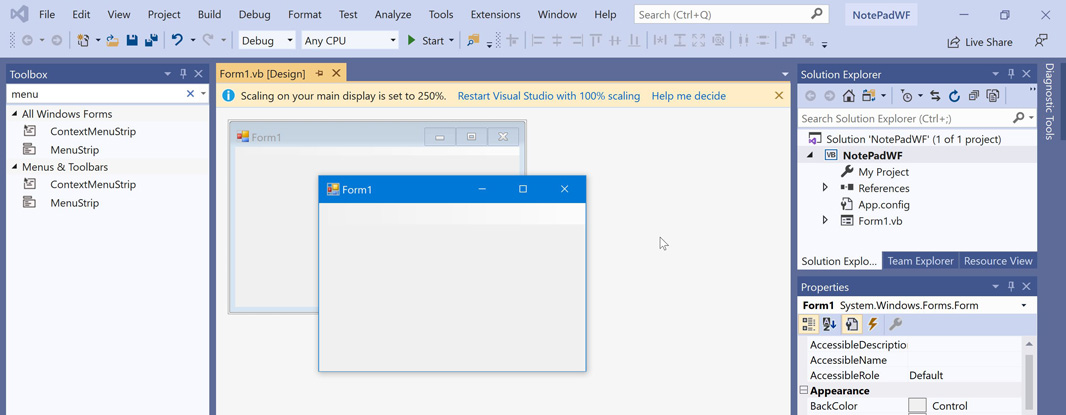
To see what this looks like in the actual running application, click the Start button in the Visual Studio toolbar (or type CTRL + F5). It’s a little subtle, but the menu bar is present, but empty.
Close the application. Now it’s time to build out some of the menus. In my previous early attempts at duplicating Notepad, I laboriously recreate all or most of the complete Notepad menu system. This time, we’ll just create the top-level menu items—File, Edit, and so on—and then add other menu items as needed, and only when we can write code that will bring them to life.
The MenuStrip control includes a built-in editor that helps you build out the menu, both horizontally and, below each top-level menu item, vertically. When you mouse over it, you’ll see an empty box with the words “Type Here.” So do so. Select that box and type &File.
That & character is used to indicate the keyboard accelerator that can be used by typists to select the menu item. The & character will disappear after you type ENTER or otherwise select an area outside of the box, and the character after &—F, in this case—-will be underlined. So, in this case, typing ALT + F while using this application will select the File menu item and, eventually, will open the File menu.
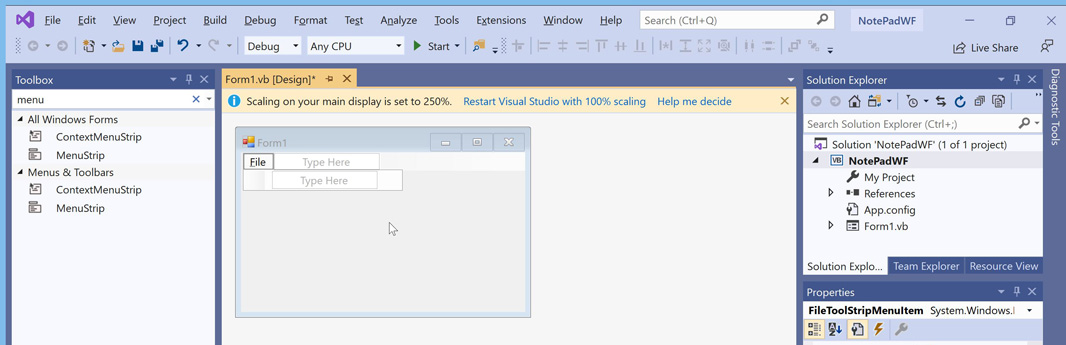
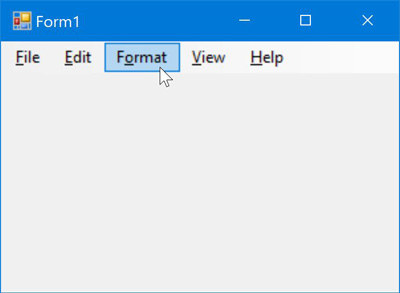
Once you’ve created the File menu item, you will see two new empty boxes with “Type Here”; one to the right of File and one below it. Let’s fill out the top-level menu by adding new items to the right of File: &Edit, F&ormat, &View, and &Help. When you’re done, it should look like so:
Click Start to see how the menu looks in the actual application. As you can see, you can mouse over each item and a selection box appears. Selecting a menu item does nothing, of course, since we haven’t created the rest of the menu or otherwise determined what happens when you do that.
Since we should probably at least write one line of code, let’s add an Exit menu item to the File menu next and then handle the event that occurs when the user selects that item. This time, select the File menu in the form designer to display a new empty “Type Here” box below File. Enter the text E&xit and then type ENTER.
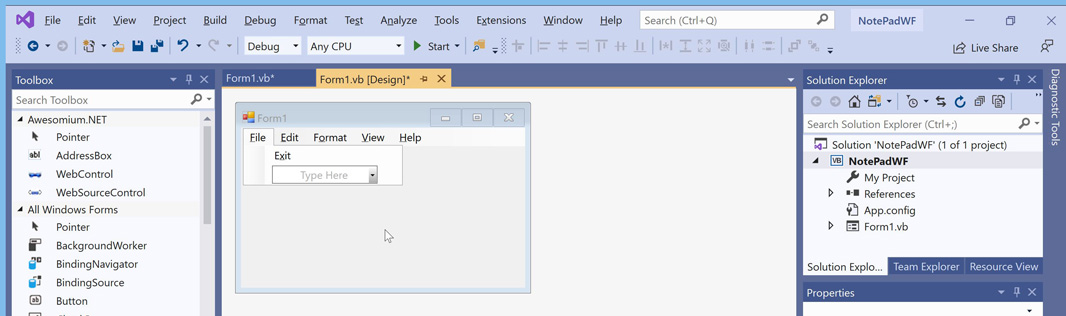
Now, double-click the Exit menu item in the form designer. When you do, a new window called Form1.vb opens, giving us our first peek at the code behind this application. What we’re given is an empty event handler for the menu item’s Click event. It looks like so.
Private Sub ExitToolStripMenuItem_Click(sender As Object, e As EventArgs) Handles ExitToolStripMenuItem.Click

End Sub
Obviously, what we need here is some code that will close the application. (And, in the future, prompt us to save the current document if there are any changes that haven’t been saved. We’ll get to that later.)
I didn’t know the exact command needed to make this work off the top of my head. But based on my prior and perhaps ill-remembered VB and C# experience, I figured it would be something like Form1.Close or similar. As it turns out, more modern VB versions offer a top-level Application object. And you can use that object to exit the application.
How do you figure this out? In my case, I tried typing Form1. inside the event handler to trigger Visual Basic’s IntelliSense code-completion functionality. This displays a list of all of the properties and methods that the object before the “.” (“dot”) can use. (And you can filter it to just methods, if you want.) There was no Close function or similar that I could see.
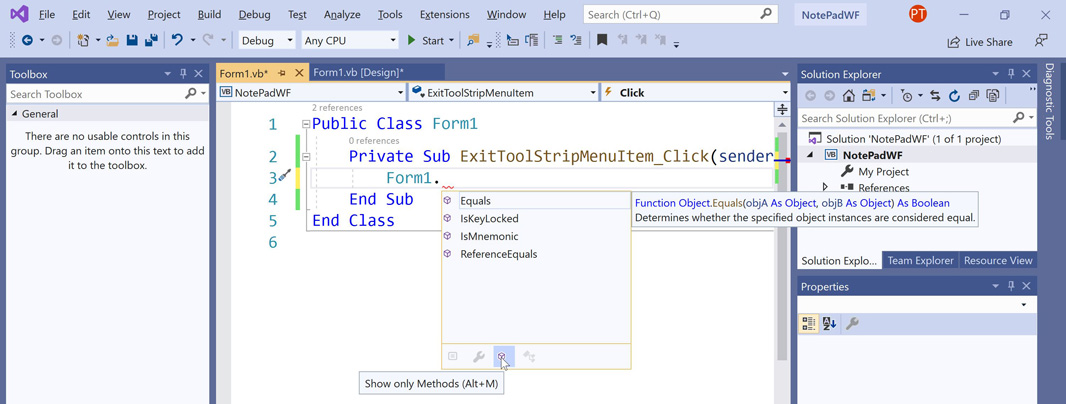
So I Googled it.
As it turns out, you can just type the following inside the event handler:
Close()
Or you could use the Application object and its Exit method:
Application.Exit()
Either works fine.
Now, when you run the application, you’ll notice two things. One, the keyboard accelerator hints (the little underlines under one letter in each menu item) are not visible by default; instead, you have to press the ALT key to display them. And two, when you select File > Exit, the application closes. Voila.

That tiny coding success behind us, let’s add the status bar and whatever textblock-type control we need.
First, the status bar. Select the form designer (Form1.vb [Design] as opposed to the code-based Form1.vb) to display the Toolbox. Then, as before, filter the list of controls by typing status in the Toolbox’s search box. You’ll see a control named StatusStrip. Drag it into the form window in the designer.

When you release it, you’ll see that it automatically attaches itself to the bottom of the form, just like the MenuStrip attached itself to the top. That’s the default behavior for this control and is what we want for our Notepad app.

If you look at the real Notepad application now, you’ll see that its status bar has four areas for cursor position, zoom level, line break style, and encoding, and that these areas are aligned to the right of the status bar.
![]()
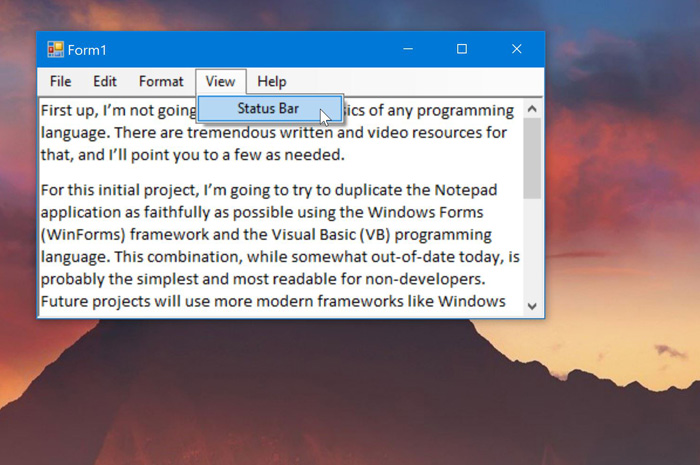
We will be adding and positioning those items at a later time. For now, there is one other status bar feature can be added even more easily: Using the View > Status Bar menu item, you can toggle the display of the status bar. That is, you can hide it and then unhide it.
To make this happen, we need to add a Status Bar menu item below View in the menu (where Status Bar will be written as &Status Bar). You know how to do this: Select View in the menu in the form designer and then select the empty “Type Here” box below it.
In Notepad, this menu item is a toggle. When the status bar is visible, the Status Bar menu item is checked. When it’s not visible, it is unchecked. So we need to configure our menu item the same way. To do so, right-click the Status Bar menu item in the designer and then select “Checked” from the context menu that appears.
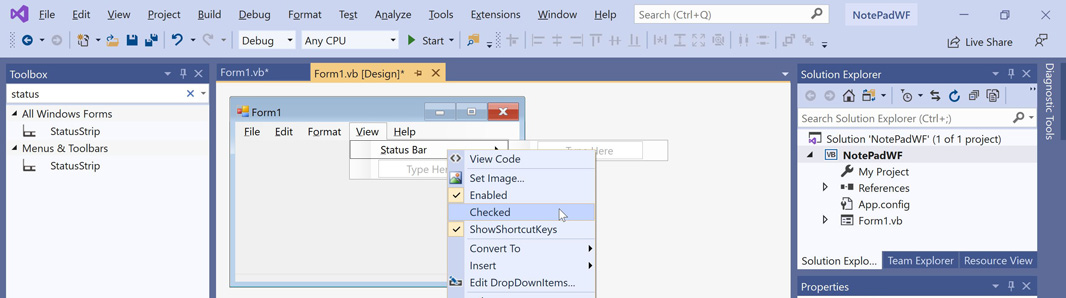
Now, the Status Bar menu item will be checked by default. You can see this in the designer, and you can see it when you run the app. (When you do run the app, you will see that the checkbox, like the menu itself, suffers a bit from the same display scaling issue.)
When that’s done, double-click that new menu item to display its Click event handler. Here, we need to check whether the status bar is visible and, if so, hide it. Otherwise, we will display it. That will require a simple If-Then-Else code block and some IntelliSense. Let’s do the IntelliSense first, since we know the status bar is visible when you first run the application. Inside the Click event handler for the Status Bar menu item, type StatusBar1. to display the properties and methods associated with the actual status bar (as opposed to the Status Bar menu item).
Scrolling down the list, which is easier if you display only the methods, you’ll find a Hide method. That looks promising, so the completed line of code looks like so:
StatusStrip1.Hide()
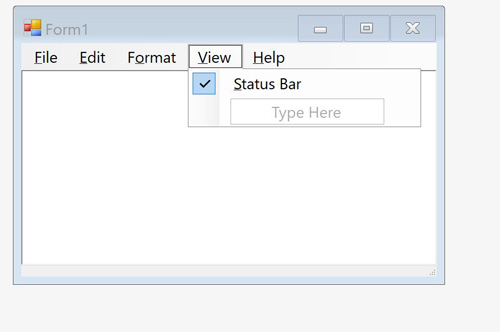
Click Start to test this change. When the application starts, it displays a menu and a status bar. And when you select View > Status Bar, the status bar disappears.
That’s nice, but we need to hide that checkmark on the Status Bar menu item too. And we want to toggle the status bar. So let’s add that If-Then-Else code block to handle the other instance: The status bar is hidden and now we want to display it. That code looks like so:
If StatusBarToolStripMenuItem.Checked Then

    StatusStrip1.Hide()

    StatusBarToolStripMenuItem.Checked = False

Else

    StatusStrip1.Show()

    StatusBarToolStripMenuItem.Checked = True

End If
In each case, I used IntelliSense to find the correct methods associated with each object. As it turns out, they were pretty much just common sense, so that came together quickly.
OK, one more piece and then we’re done for the day. We need to add some way to edit text. And that textblock, as I think of it, must occupy the entire remaining surface of the application window between the menu bar and the status bar. Meaning that, if the user resizes the window, the textblock resizes with it.
First, we need to find the right control.
Using Toolbox search to search for text, you can see that there are a few results, but only one, RichTextBox, is truly applicable. (TextBox is one of the more common VB controls, I think, but it’s used for entering a single line of text, like a name or phone number in an online form.) So drag that into the middle of the form in the designer. By default, you’ll get a small square-looking control.
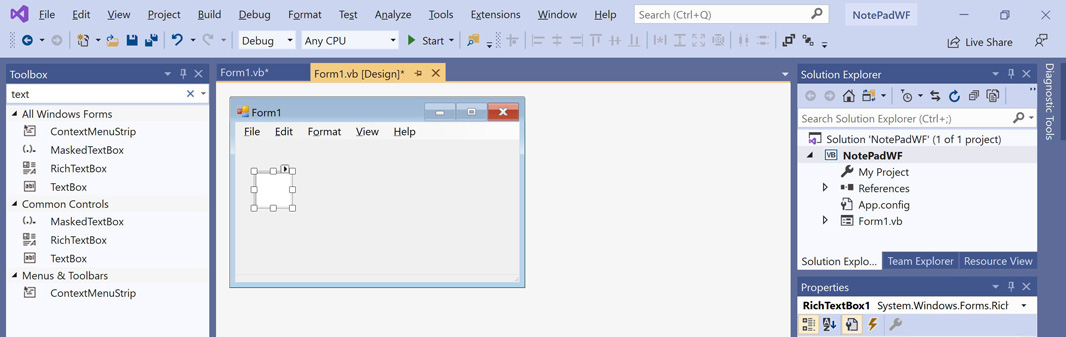
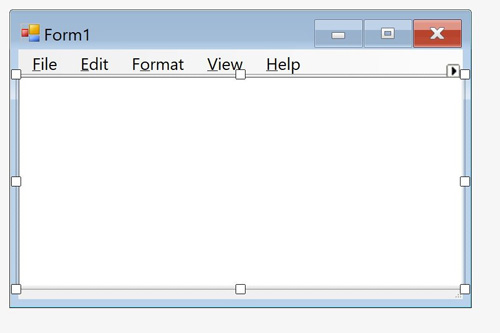
You might think that getting this control to resize with the window is hard, that it requires some coding or perhaps some properties manipulation. But as it turns out, this will be one of the easiest things we do: Just select the little triangle/caret at the top of the control and then choose “Dock in Parent Container” from the RichTextBox context menu that appears. When you do, the control resizes to fill the entire remaining space on the form.
To test that it works correctly, press Start to run the application. Type some text in the form. (Or, better yet, paste in a lot of text.) Then, resize the window. Then, hide (and unhide) the status bar. It should always work correctly.
Not too shabby, right? Of course, the application has some serious problems still, and a lot of missing functionality. We’ll get there. Rome wasn’t built in a day. And neither was Notepad.
More soon.

Gain unlimited access to Premium articles.
With technology shaping our everyday lives, how could we not dig deeper?
Thurrott Premium delivers an honest and thorough perspective about the technologies we use and rely on everyday. Discover deeper content as a Premium member.