Programming Windows: Hello, WinFX, Avalon, and XAML (Premium)
- Paul Thurrott
- Feb 13, 2022
-
3

For developers, it was a unique pleasure seeing Don Box and Chris Anderson write Longhorn/WinFX code live during Jim Allchin’s PDC 2003 keynote. But what was this strange new software code? And is it possible that this now-ancient technology still works today?
Why yes. Yes, it is possible. And yes, it does still work.
With a few modifications, of course: in the years since this event, WinFX evolved into the .NET Framework 3.0, and Avalon became Windows Presentation Foundation (WPF). And during that shift some .NET namespaces and other features changed, as did some capabilities. But the code that Box and Anderson thrilled us with in October 2003 is, fundamentally, still viable today. And that says a lot, I think, about the quality of the developer environment that Microsoft created 20 years ago.
On that note, we should take a moment to reflect on this incredible achievement today, especially given how terrible and disjointed things became for Windows developers in the intervening years. As it turns out, WinFX, like Longhorn, represented an apex of sorts, in this case for Windows app development. And it’s been a steady downhill ride ever since then.
Are you back? Cool. Let’s look at that code.
The initial version of the app that Box and Anderson created is sheer simplicity. It had a single C# file that contains a single namespace, and that namespace contained the app’s Main() method, which is its entry point. They included three WinFX libraries to get their contained functionality, and inside of Main(), they instantiated a new window after populating its Text (the title bar caption) and Visible properties.

To compile this, they needed to add references to three DLLs— PresentationCore, PresentationFramework, and WindowsBase—and specify that the target app was a Windows application (as opposed to a console app). After a quick churn of the C# compiler, voila, a blank window that required just a few lines of code.

Recreating this simple app today in C#, the .NET Framework, and Windows Presentation Foundation (WPF) requires only small changes to the code. In fact, the biggest problem is getting around Visual Studio’s innumerable niceties, which include prebuilt project types for WPF (and other app types) with canned code spread out over multiple files. (Getting to a blank window in Visual Studio literally requires zero lines of code, since all the boilerplate is provided for you.)
I experimented doing this using different methods. Via the command-line and with a plain text editor, which is tedious. (You can even create a blank WPF app now from the command line using dotnet new wpf -o [project name], which is fun.) Via Visual Studio Code, which works but is surprisingly slow. And via Visual Studio, of course. That latter choice has many different starting points, but what I finally settled on was the following:
- Use Visual Studio 2022 to create a C#/.NET Framework console app. This provides the least overhead, and you get a project with a single C# file called Program.cs with a minimal amount of code.
![]()
- Using the project’s Properties interface, change the output type from “Console Application” to “Windows Application.”
- Right-click References in the Solution Explorer and add those three required references: PresentationCore, PresentationFramework, and WindowsBase.
- Remove most of the usings from Program.cs, leaving only using System, and adding one for System.Windows. System is unchanged from the Longhorn days but the MSAvalon libraries were moved into System when WinFX became .NET Framework 3.0.

- Replace the class definition for Program and replace it with a new class definition called MyWindow that is of type Window. In the Longhorn days, this type was named “window” (small w), but it was changed at some point to Window (I assume for consistency). It will now look like so:
public class MyWindow : Window
{
    static void Main()
    {

    }
}
- Now, we just duplicate the code inside of Main() with only a few changes:
Application app = new Application();
MyWindow window = new MyWindow();
window.Title = "Hello, world!";
window.Visibility = Visibility.Visible;
app.Run(window);
- Add [STAThread] above the Main method as per the Box/Anderson demo. This is a requirement for Windows Forms and WPF apps because .NET controls often use COM interop to communicate with OS components, and STAThread forces the application’s primary thread to initialize as the proper thread type the first time the application does any interoperability work with COM. You can learn more about this topic from this 2005 MSDN article. Box joked in 2003 that it was for “developer continuity.”
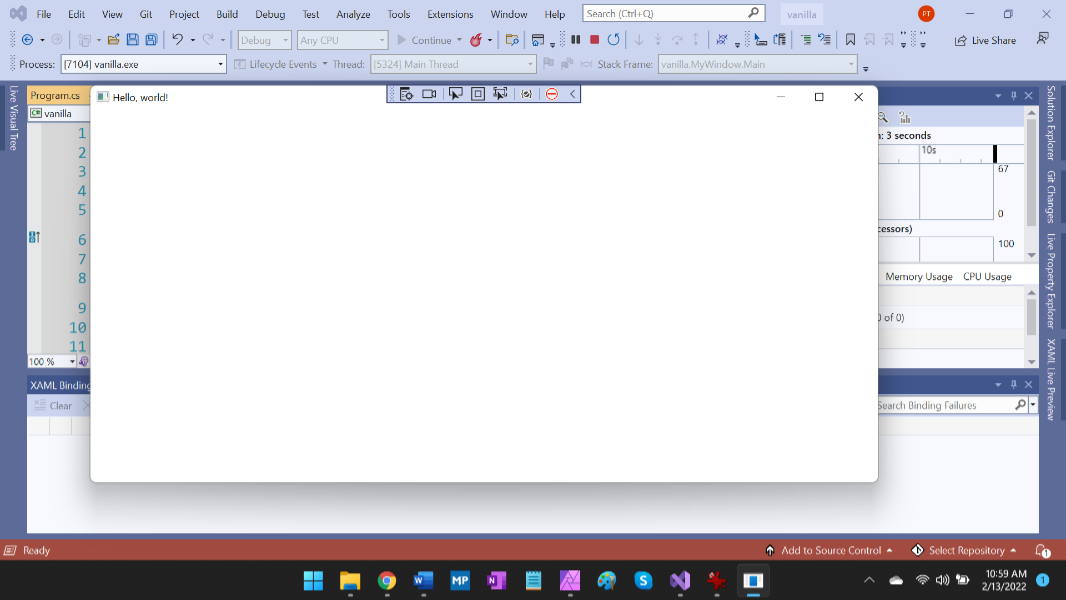
- Compile and run the app. Voila, an empty window with just several lines of code. And no need to mess with compiler settings at build time.
For the second iteration of this app, Box and Anderson added an XAML file to the project. This part was particularly interesting to me because Visual Studio does this for you automatically when you create a blank WPF app: you get a C# code file and a corresponding XAML file, the two are linked, and you can specify UI code in either file, or in both. But more to the point, each of these files is just a partial definition for the class underlying, in this case, the main application window. So the full class definition requires elements from both, an innovation that required changes to the C# language back in the early 2000s.
Anyway, this requires some additional steps too, as you might imagine.
- First, we need to add a reference to System.xaml using the Visual Studio Reference Manager, as before.
- Then, we can add the XAML file. Right-click the project and choose Add > New Item and then choose the XML file type in the Add New Items dialog. Change the name to Program.xaml (or whatever, as long as the file extension is .xaml, not .xml.) By default, Visual Studio will try to display this file in a split view with its visual designer, and it will throw an error because the boilerplate XML code it contains is not valid XAML. So just change the view to just code (by double-clicking the XAML tab) and then delete that one line of code.
- Now, we need to create the basic code for the XAML file, much as Box and Anderson did in 2003, and here things really haven’t changed much. The basic code looks like so:
<Window x:Class="vanilla.MyWindow"
xmlns="http://schemas.microsoft.com/winfx/2006/xaml/presentation"
xmlns:x="http://schemas.microsoft.com/winfx/2006/xaml"
>
</Window>
- All of that is important and necessary, but the first attribute, x:Class, is what specifies that this file is a partial definition of the class MyWindow, which is found in the vanilla namespace. To consummate this union, we will also need to make the class definition in the C# file a partial definition. And make a few other changes so that when the MyWindow object is instantiated, it uses the full definition, including the XAML file. So the MyWindow class will now look like so:
public partial class MyWindow
{
    [STAThread]
    static void Main()
    {
        Application app = new Application();
        app.Run(new MyWindow());
    }

    public MyWindow()
    {
        InitializeComponent();
    }
}
The MyWindow() method is the constructor for the MyWindow class, it runs when the object is created. And the InitializeComponent() method that it runs is required for partial window classes involving a XAML file.
Anyway, you can run this now and the window will appear, but the title will be empty because we deleted that code from the C# file. And the XAML file isn’t doing anything yet. So we can do as Box and Anderson did by migrating UI code that used to be in the C# file and putting it into the XAML file. The visibility bit isn’t required—WPF windows are visible by default—but we can at least set the title. So the XAML file will now look like so:
<Window x:Class="vanilla.MyWindow"
xmlns="http://schemas.microsoft.com/winfx/2006/xaml/presentation"
xmlns:x="http://schemas.microsoft.com/winfx/2006/xaml"
Title="Hello, world ... from XAML!"
>
</Window>
And, sure enough, when you run this application now, you’ll see the new title text.

From there, Box and Anderson added a textbox and a button to their apps. Here, a lot has changed in terms of controls and their defaults, but to replicate their results as reasonably as is possible, I made a few changes and arrived at the following. (Note that I hardcoded the window height and width to more closely approximate the aspect ratio of the Longhorn version.)
<Window x:Class="vanilla.MyWindow"
xmlns="http://schemas.microsoft.com/winfx/2006/xaml/presentation"
xmlns:x="http://schemas.microsoft.com/winfx/2006/xaml"
Title="Hello, world ... from XAML!" Width="800" Height="600"
>
    <StackPanel Orientation="Horizontal">
        <TextBox VerticalAlignment="Top" BorderThickness="2" Width="200" Height="40" />
        <Button Width="200">Push me</Button>
    </StackPanel>
</Window>
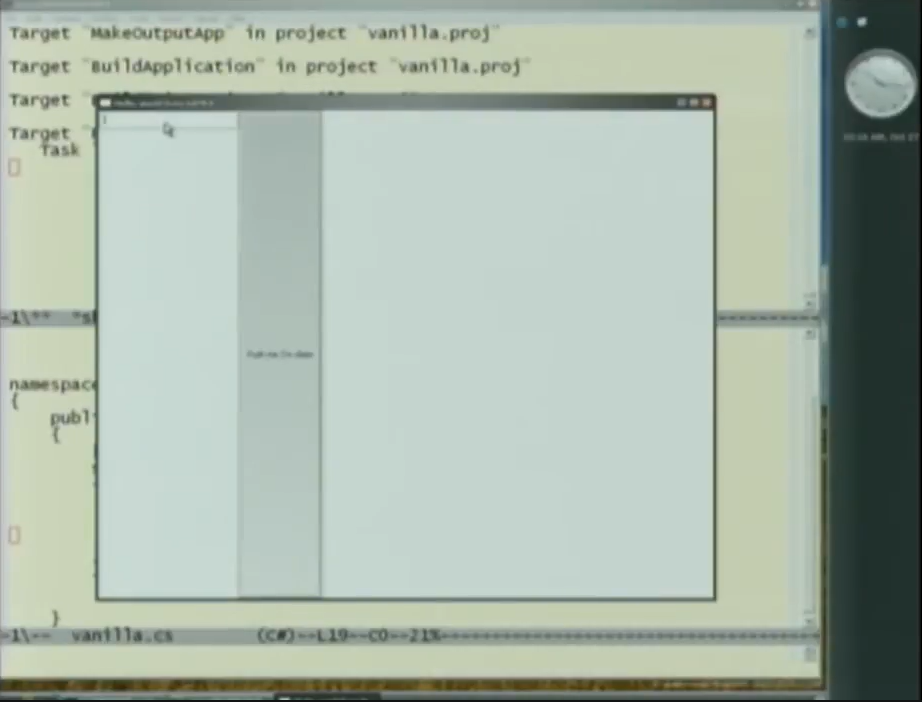
For comparison purposes, here’s the Box/Anderson version:
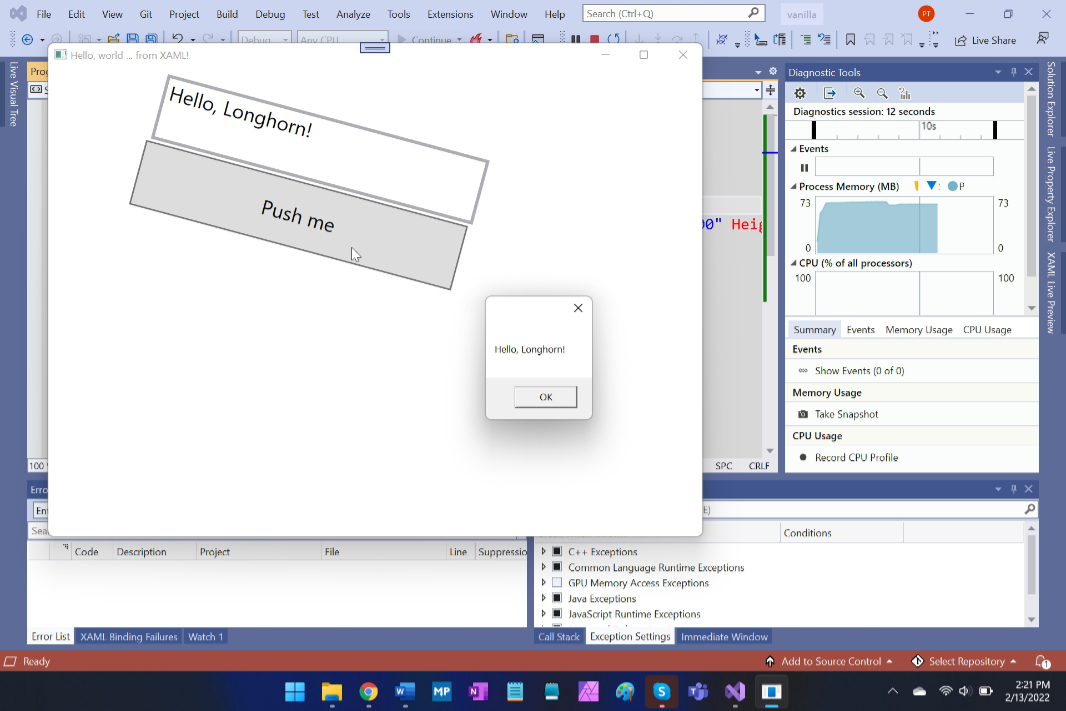
And here’s my version:
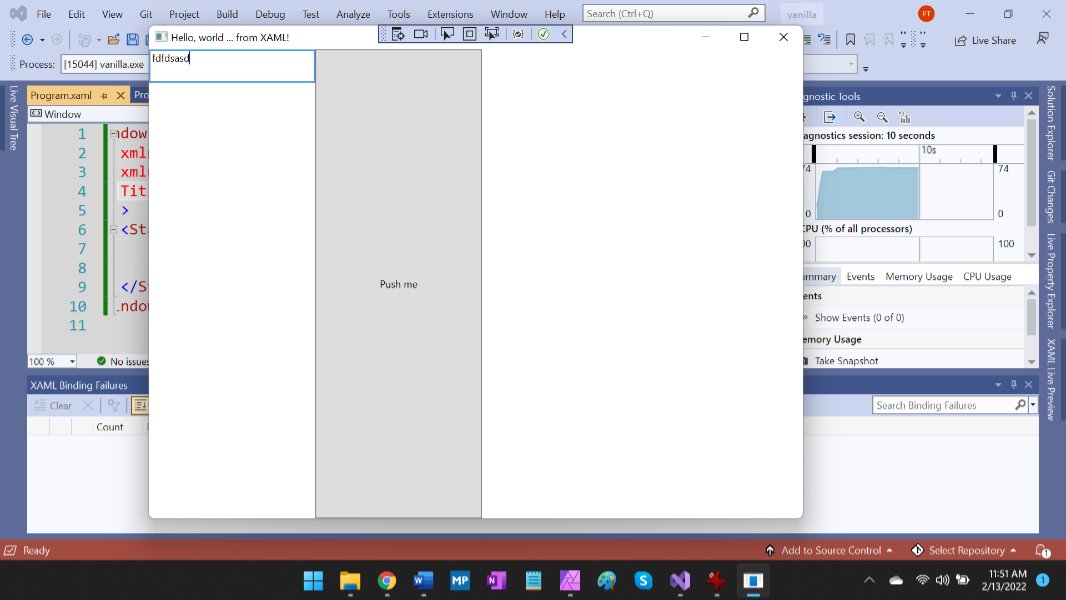
(There is one major difference. The button in the Longhorn version of the app features a “Jell-O effect” when clicked. This was no doubt part of a Longhorn visual style related to 3D and transparent windows that is no longer a thing in our flat, 2D Windows 11 world.)
Wiring up an event handler for that button works nearly identically to 2003 as well, go figure. They added an ID attribute to the TextBox in XAML; that’s now Name, but I used the same silly name, “Bob.” And then they added a Click attribute to the Button, for which they used “Pushed.” So I basically duplicated that like so:
<TextBox Name="Bob" VerticalAlignment="Top" BorderThickness="2" Width="200" Height="40" />
<Button Click="Pushed" Width="200">Push me</Button>
Then, they created an event handler in the C# file, inside of the partial class definition, using the name, Pushed, that they had specified in the XAML file. This could be named anything, of course, the only important bits are that it has the same signature as a control Click event handler, meaning it must pass the right parameters and return the correct value type. The modern version of that looks like so:
public void Pushed(object o, RoutedEventArgs e)
{

}
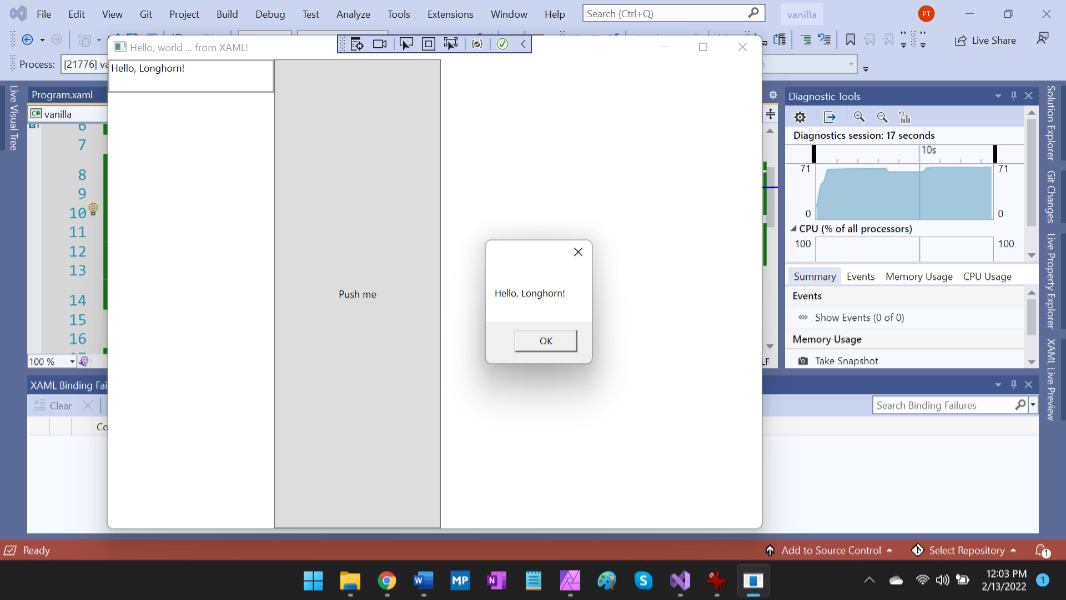
And then they wrote the code for the event handler, which displays a Message Box with the text from the text box:
MessageBox.Show(Bob.Text);
And sure enough, in the words of Chris Anderson, we have interactivity.
From here, Box and Anderson make the application more visually impressive. And while I’ve not spent much (or, really, any) time looking at animations or special effects in WPF, I was still able to duplicate most of what they did. Probably inefficiently, but whatever. This isn’t something I’m super interested in for my own apps.
First up, they scaled the text box and the button, and then they applied a rotation. (They also wrapped the two controls in a text block and added some styled text to that, but I ignored that bit because it’s distracting.)

My version of that looks like so:
Then, they added a background video to the window with an opacity.

And my version of that looks like so. (Yes, the video, which I found on YouTube, plays correctly, but I didn’t add code to loop it as that requires a storyboard and more work.)

Close enough.
Here’s the XAML code I created for all that.
<Grid>
    <Grid.Background>
        <VisualBrush>
            <VisualBrush.Visual>
                <StackPanel>
                    <MediaElement Source="Bliss.mp4" Opacity="0.3"></MediaElement>
                </StackPanel>
            </VisualBrush.Visual>
        </VisualBrush>
    </Grid.Background>
    <TextBox Name="Bob" VerticalAlignment="Top" BorderThickness="2" Width="200" Height="40">
        <TextBox.RenderTransform>
            <TransformGroup>
                <RotateTransform CenterX="20" CenterY="0" Angle="15" />
                <ScaleTransform ScaleX="2" ScaleY="2"></ScaleTransform>
            </TransformGroup>
        </TextBox.RenderTransform>
    </TextBox>
    <Button Click="Button_Click" Width="200" Height="40" Content="Push me">
        <Button.RenderTransform>
            <TransformGroup>
                <RotateTransform CenterX="350" CenterY="-100" Angle="15" />
                <ScaleTransform ScaleX="2" ScaleY="2"></ScaleTransform>
            </TransformGroup>
        </Button.RenderTransform>
    </Button>
</Grid>
And yeah. That’s pretty much how I spend my free time these days.

Gain unlimited access to Premium articles.
With technology shaping our everyday lives, how could we not dig deeper?
Thurrott Premium delivers an honest and thorough perspective about the technologies we use and rely on everyday. Discover deeper content as a Premium member.