Digital Decluttering: Photo Collection Consolidated Through 2012 (Premium)
- Paul Thurrott
- Dec 19, 2023
-
3
In late November, I discussed my new strategy for consolidating my three photo collections into a single archive that I would then replicate to multiple locations. This past Saturday, a bit over two weeks later, I finally finished the first phase of that work by completely consolidating all of the photos we’ve taken through 2012 into a single archive.
I probably could have finished this first phase a bit earlier. But as I wrote in the previous update in this series, I was interrupted by a ridiculous issue with Google Workspace and its inept support team. As a result, I spent an entire weekend two weeks ago moving my documents archive and Google Photos-based photo collection out of Google Workspace and into my personal Gmail account. But with that work completed, I was able to turn my attention back to the photo collection consolidation project. I don’t believe a single day passed since then when I didn’t spend at least an hour on this.
And while there is still a lot to do—there are more photos from 2013 through 2023 than all of the earlier years combined—this is still a big milestone for me. I’m not sure how long it will take, but I am sure that I finish this work in time. How much time? Let’s check back in a month or so. We’ll see.
But in the meantime, I figured it was time for a brief break. During which I can explain how the work went, how I did it, and how the automation tools that put this process over the top will only become more and more important as I move to consolidate the photos taken in the more recent years into that one complete photo collection.
As you may recall, I started with three photo collections, one in Google Photos and two in OneDrive, with the latter being a barely organized Camera roll folder that Microsoft created for smartphone backups and a very organized Photo collection folder that I had created. So the first thing I did was find a laptop with enough storage to contain all of them at once. And then I extracted a Google Takeout download of the Google Photos collection to its desktop and synced OneDrive’s Camera roll and Photo collection folders locally.
Then, I worked to consolidate those three collections down to just two collections (through 2012) by organizing Camera roll and then integrating its contents into Photo collection. And then I began working to integrate the photos from Google Photos, year-by-year, into Photo collection too. Most of this work is what I’d call semi-automated. That is, I did adopt two free tools, Bulk Rename Utility (BRU) and AllDup, very early on to help automate this work as much as possible. But I also did a lot of manual work by snapping two folders side-by-side, Google Photos on the left and Photo collection on the right, so that I could compare their contents and act accordingly.
The goal was always the same: To empty the Google Photos folder (whichever year I was working on at the time) one way or the other. That is, in some cases, I needed to move photos from Google Photos into Photo collection because they were not present in the latter, and in other cases, I had to replace photos in Photo collection because the versions in Google Photos were better in some way (higher resolution, etc.). But if the versions in Photo collection were identical, I would simply delete the versions in Google Photos.
This may sound like a slog, and it is, but I got good at it through repetition. And to help you understand what this work looked like, and will continue to look like as I tackle the newer years in the collections, here I will step through the process in a bit more detail.
The first step was to use BRU to batch move the dump of photos in a Google Photos year-based folder (like “Photos from 2012”) into a newly-created folder on the Desktop (in this case named “2012” to match the source year).
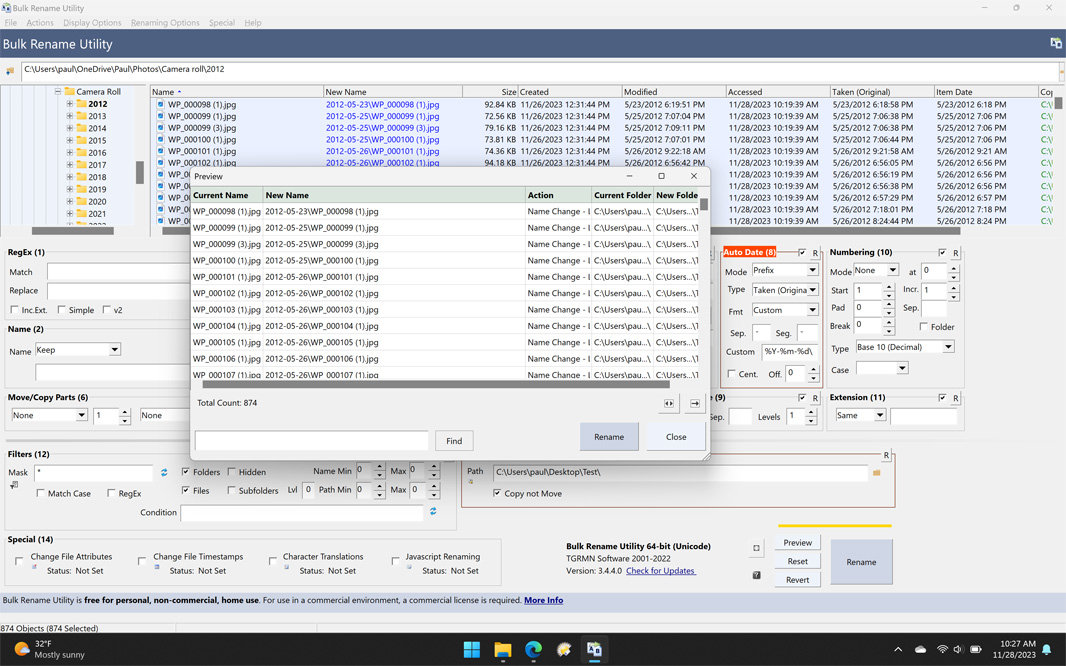
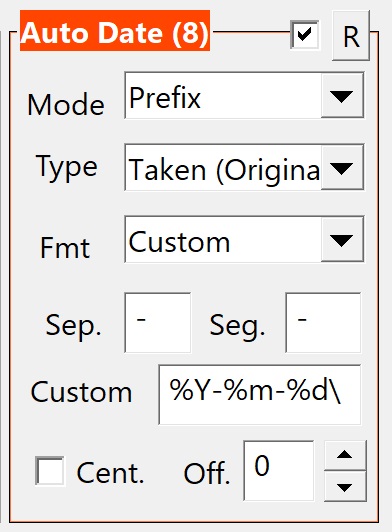
As noted previously, I automate this using BRU’s Auto Date feature in prefix mode, using the “Date taken” meta-data in the source files to organize them into date-based folders with a YYYY-MM-DD format (like 2012-01-02) similar to what I use in my organized Photo collection folder. Auto Date requires a specific format to make that happen, and I’ve done it so much that now I know it by heart.
The issue, of course, is that not every file has “Date taken” meta-data. I never added that to some of my early scans, which needs to be fixed, and some image types, like GIF and PNG, do not use this meta-data. Neither do video file formats like MOV, MP4, and others. And so each year folder of organized photos would also have some number of loose files that I’d need to go through. For the earlier year folders, sorting the loose files manually wasn’t all that onerous. But those years in which I had scanned paper-based photos but not applied the right meta-data were horrible. And generally speaking, the volume of loose files increased as I went, in part because the photos from newer years were taken on smartphones and the file dumps include lots of other file types.
Some files are easy enough to triage and then delete as needed: Smartphone screen shots, for the most part, fell into this category, though I had some shots of humorous text messages that I saved. But as the volume of loose files increased, I first started organizing the loose files into their own subfolders, with one each for GIFs, JPGs (also loose photos with no “Date taken” tags), MP4s (which contained all movie file types), and PNGs. This helped a bit, but I soon realized I’d need to automate the organization of the loose files that BRU could not handle. There were just too many of them in many of the years I worked on.
BRU isn’t perfect, and among its functional gaps is its support for meta-data. That Auto Date feature can sort by only a few date-based types of meta-data, and the ones used by video files (typically “Media created”) is not among them. And this meant that while BRU was great for organizing properly tagged photos, it wasn’t so great for other types of files (and for non-properly tagged photos).
I spent a lot of time trying to find something that would handle this better, would ideally, work with any meta-data. But as I moved into the 2000s, this problem became more acute. And then I finally found something. It’s called MediaSorter, and it made working with the remaining loose files (now organized in those four subfolders) in each Google Photos year folder much easier.
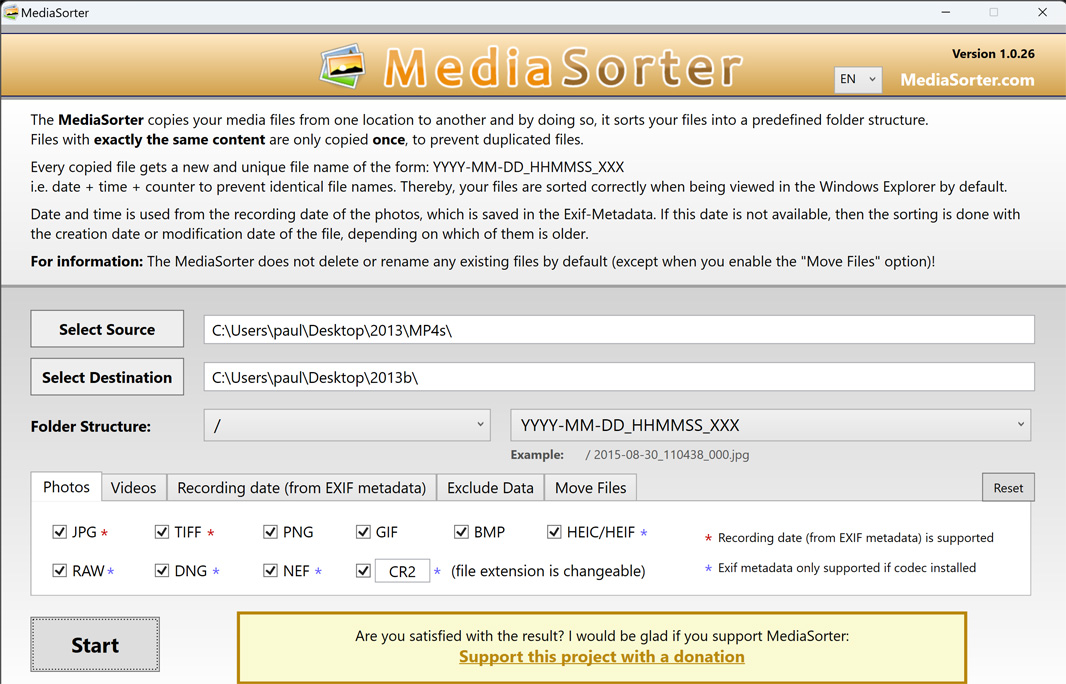
Like BRU, MediaSorter examines a folder full of files and then copies them to a new location (so you don’t overwrite the originals by mistake, just in case). It can rename the files as it copies them, or it can just copy the files to a specific folder structure (as I had been doing with BRU). In this case, I decided to simply rename the files so that the date they were created were now part of the name.
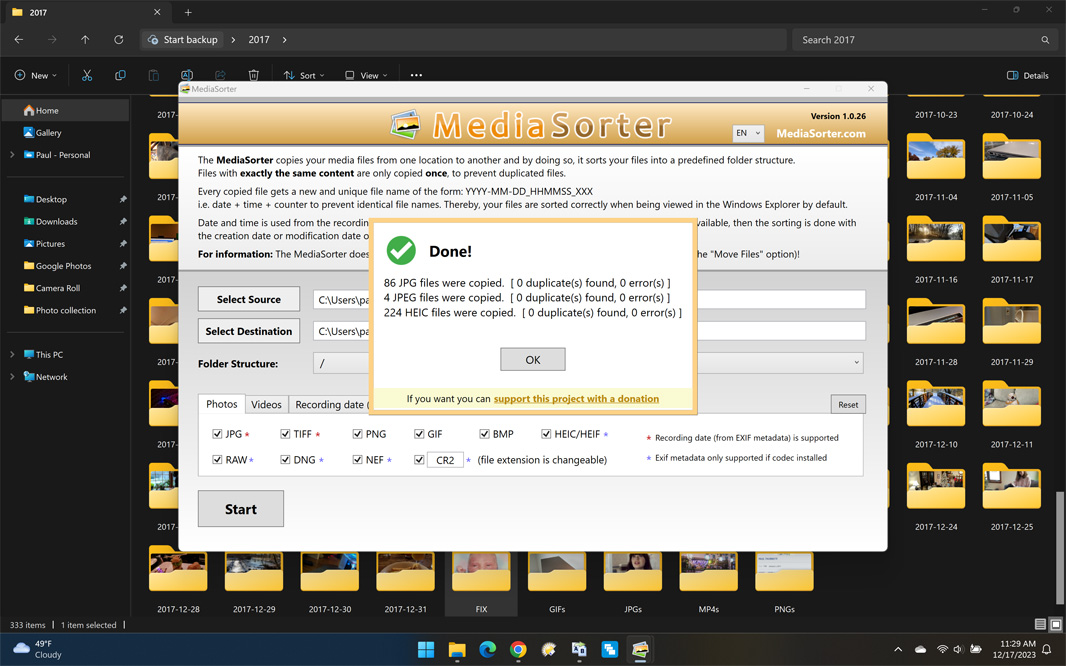
I don’t believe I’ve yet run into any loose files that MediaSorter didn’t rename properly, and because it ignores duplicates, it actually did a little bit of extra work for me as well.
Put simply, I ran MediaSorter against the GIFs, JPGs, MP4s, and PNGs folders in turn, putting renamed copies of each into a temporary folder. For GIFs and PNGs, I deleted the originals after verifying that I hadn’t lost anything and then moved the renamed versions into the appropriate folder. And for JPGs and MP4s, I ran BRU and its Auto Date feature against that temporary folder, using a different format that looked at “Item Date,” which was now built into each file name. This copied them into a YYYY-MM-DD folder structure, so I could then move that whole thing right into the folders of photos I had created for that year.
In other words, I would now have date-based folders for photos and videos and then two extraneous folders, GIFs and PNGs, for the other stuff. This dramatically simplified the work of integrating these items from Google Photos into the master collection in the Photo collection folder in OneDrive.
Of course, there were other complications too.
For example, as I got into the smartphone era, I started encountering phone backup folders in Photo collection that would need to be dealt with. I knew this was coming: Every time I stop using a phone, I manually back up its photos to a folder, and I had been moving those folders to the NAS. As part of my early work decluttering in the late summer, I had pulled out those backup folders and moved them into Photo collection so that I could later compare them with the organized collection and consolidate them too. And so I’ve been doing this as needed as I move from year-to-year. It’s no different from the work I do to organize the Google Photos-based photos in that the first step is using BRU to organize them into folders, as they’re just loose photos in a single folder.
But this brings me to the final bit of automation I’ve used. I have two folders of photos, however they’re organized, from the same year. I want to integrate or consolidate them somehow, but in addition to the organizational concerns I have, there’s another major issue looming over all this work: I want to eliminate duplicates. That is, it’s not enough to just bulk move the 2012 photos from Google Photos into the 2012 photos from Photo collection and call it a day. This has to be done right.
The issue is manyfold. In many cases, filenames will be the same on each side and those files really are the same (meaning the same image at the same resolution and quality level). But in many cases, those files with identical names are not identical, and I always want the better version to survive. In other cases, there are identical photos but with different names, for any number of reasons. And so on. Manually comparing each file would “work” in that me or any other human could do it. But with so many files, I would never live long enough. So this would need to be automated as much as possible.
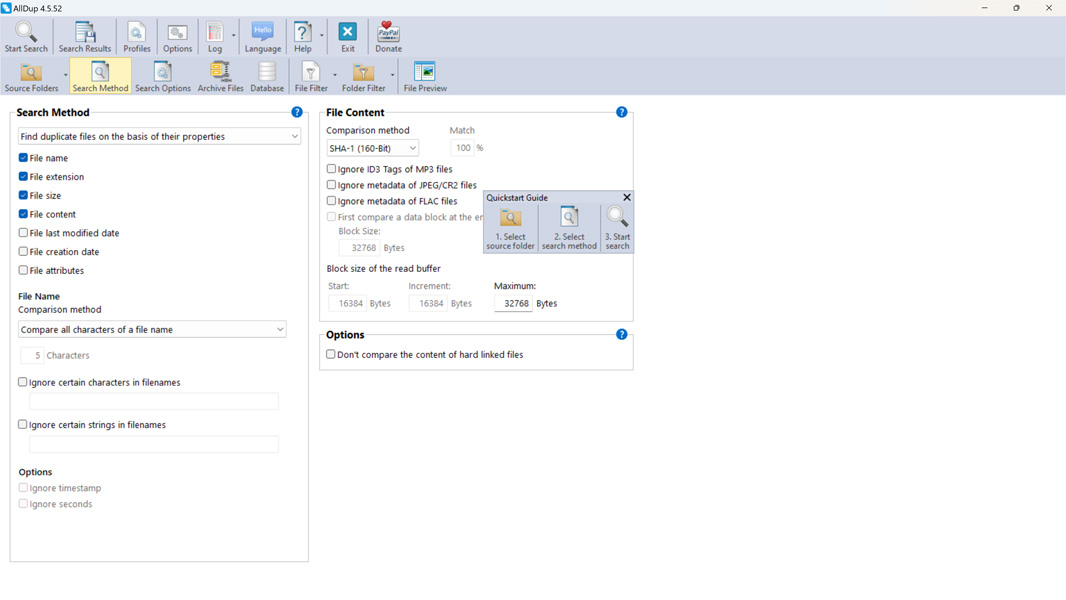
For that, I used AllDup, as mentioned previously. This is a powerful and complex tool that can compare files in any number of folders using any number of criteria, but I kept it simple: In each use, I pointed it at two folders, say the “2012” folders from Google Photos and Photo collection. And I had it compare not just the file names, but also the file extensions, size, and content to eliminate the issues noted above.
In the results view, you can compare each set of duplicates, but there was little need since the outcome was clear.
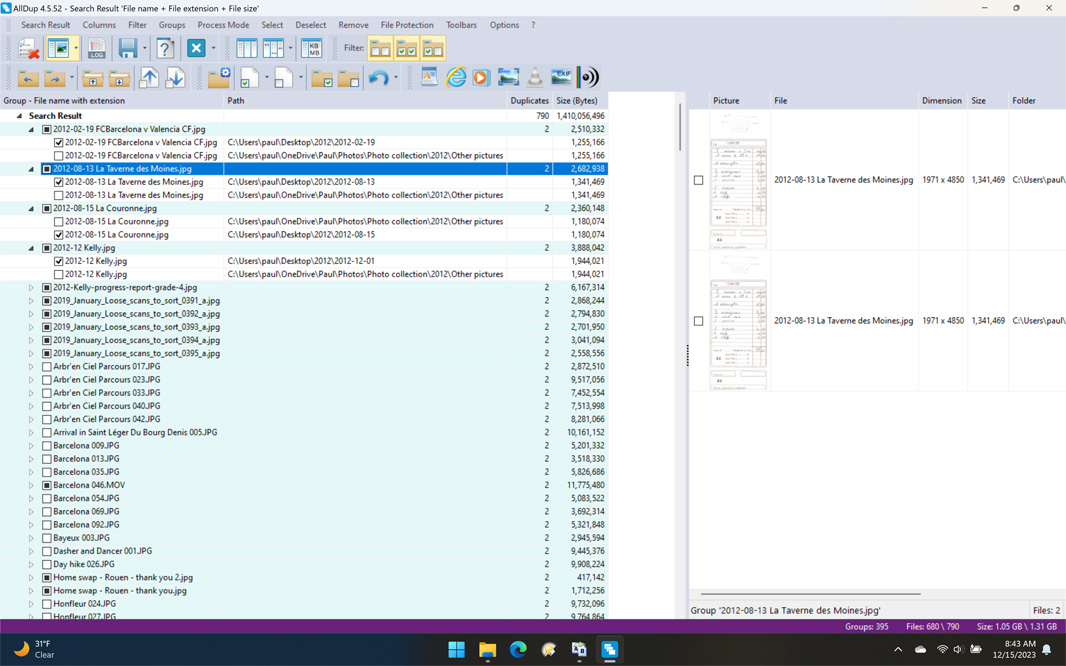
That is, it was simply a matter of selecting all the files that were not in Photo collection and deleting them. (Well, moving them to the Recycle Bin. You never know.) What was left after all this were two folders with no duplicates.
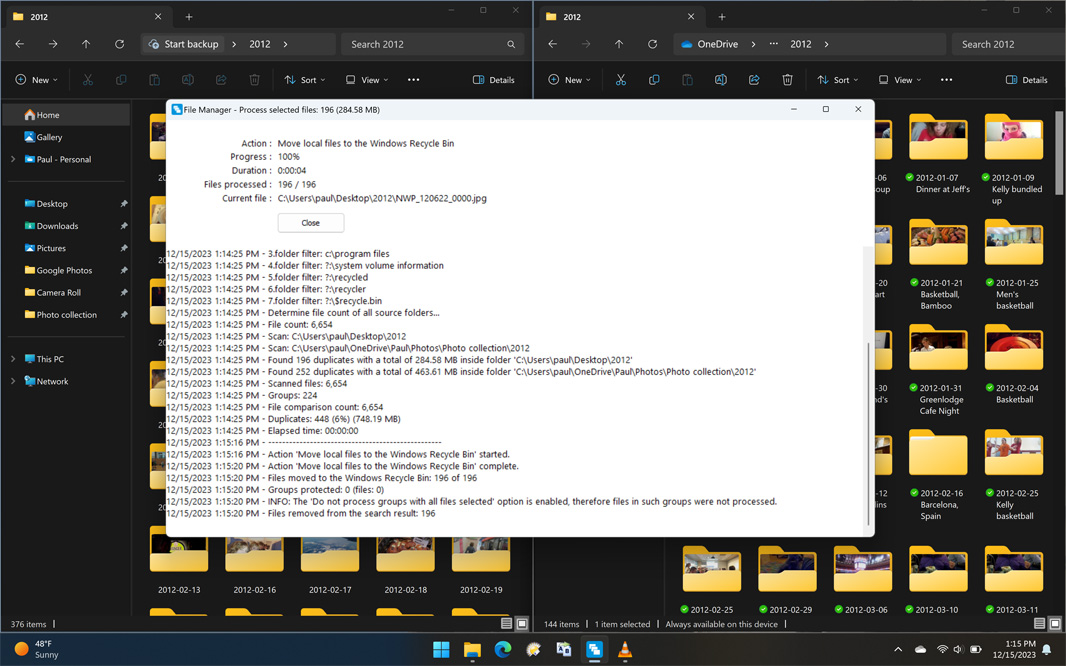
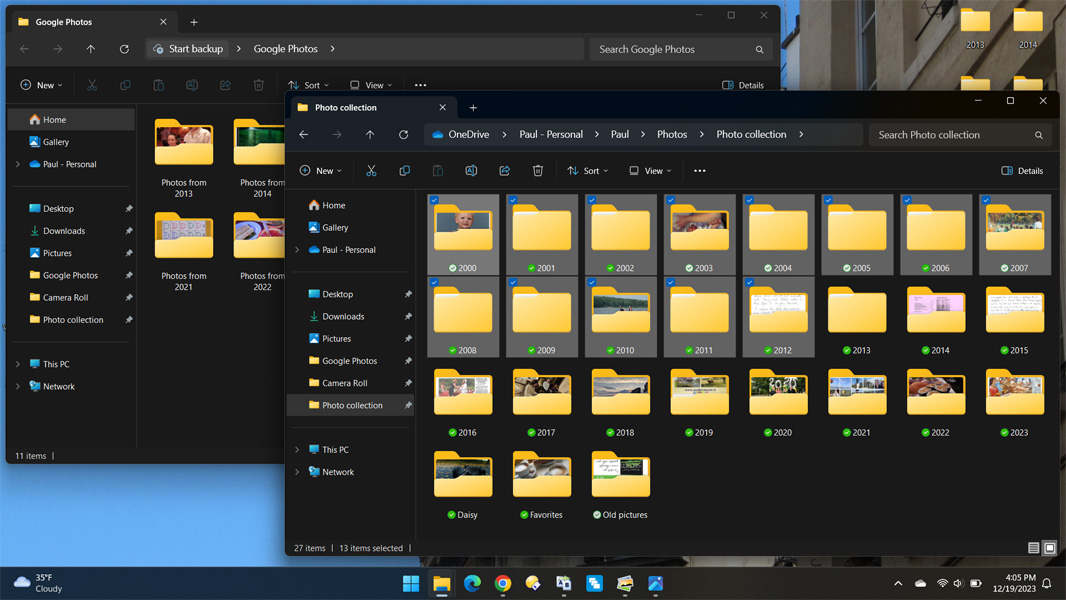
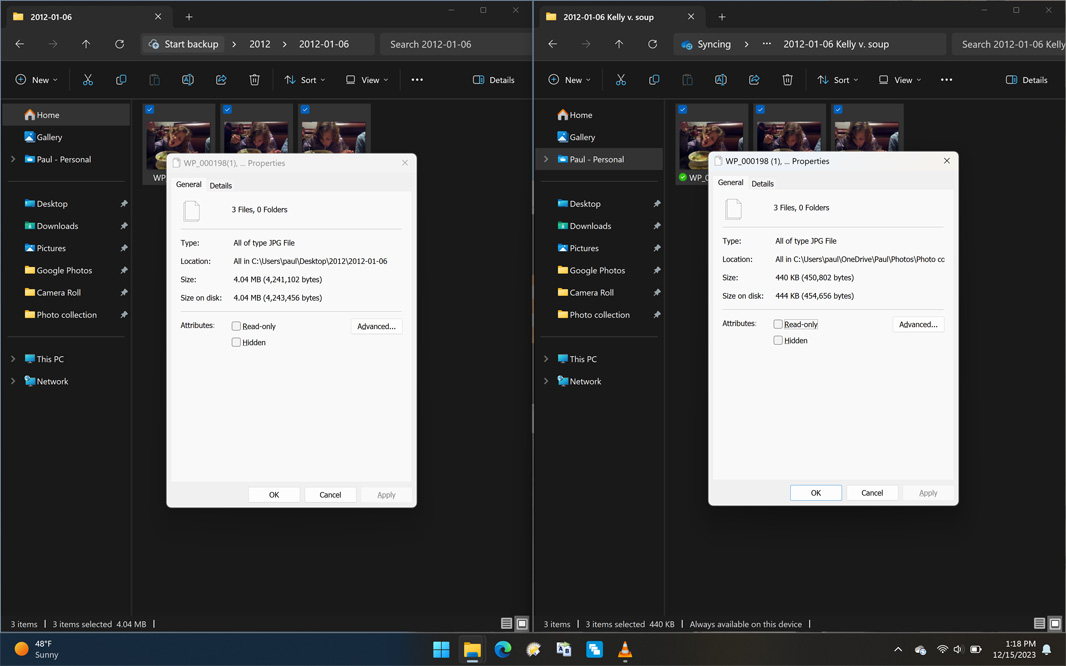
After that, it was back to the manual work. I would open the Google Photos year folder (2012) or whatever other folder I was integrating on the left, and then I would snap the same year folder from Photo collection in OneDrive (the master collection) on the right. Each was full of similar folders, and when they were the same date (say, 2012-01-06 on the left and 2012-01-06 Kelly on right), I would compare them and move or delete the files on the left as needed. Here, for example, you can see one of those weird cases noted above where there are three files with identical names in each, but the versions on the left (Google Photos) are of much higher quality than those on the right (Photo collection). So I moved the versions on the left to the right, overwriting the low-quality versions in the master collection.
In many other cases, there were folders on the left that did not exist on the right. And so those were integrated in and given event names (instead of just date-based names).
And … that’s pretty much it.
Manually comparing the contents of folders one at a time, folder by folder, is time consuming, even after the de-duplication. But in doing so, I uncovered all kinds of photos that were in one place but not the other. Which, again, is what makes this work worthwhile.
There’s so much more to do. I have to go through the non-tagged scans I uncovered during this process, tag them, and integrate them. I then have to replicate the early parts of my Photo collection in OneDrive (the parts up through 2012) to other cloud services and the NAS. And then I have to start working on those newer years, 2013 to today.
Well, actually, I’ve already started that. I have 2013, 2014, 2015, 2016, and 2017 folders on that laptop’s Desktop now, and I’ve already organized all their contained photos and videos into date-based sub-folders, and have small GIFs and PNGs folders to go through in each. But as soon as the work noted above it done, I’ll run AllDup against each and their sister folder in Photo collection, in turn, and compare the remains side-by-side as noted above. This thing isn’t going to consolidate itself.
But it is going to be consolidated. And this is how I’m doing it.

Gain unlimited access to Premium articles.
With technology shaping our everyday lives, how could we not dig deeper?
Thurrott Premium delivers an honest and thorough perspective about the technologies we use and rely on everyday. Discover deeper content as a Premium member.