Modernizing .NETpad Step-By-Step, Part 4: More Settings (Premium)
- Paul Thurrott
- Sep 08, 2024
-
0
I probably should have realized that there was no way to document the new settings interface in just a single article. But let’s wrap that up now.
In the previous article, I discussed how to implement a Notepad-like settings pane that takes over the entire app window and correctly handles the transition between that and the main app UI in both direction. We also implemented the Back button that gets the user out of there and the first three settings on that pane–App theme (which doesn’t currently do anything), Font (which includes Font family, style, and size settings), and Word wrap–plus associated labels and formatting.
There are two major settings left to implement–Auto save, which is unique to .NETpad, and Spell check–plus a few hidden settings from Notepad that don’t currently work (which I did make, but will skip here)–all their associated labels and formatting, an “About this app” section, and a “Reset settings” button at the bottom of settings that’s especially useful when working on the app (and could be expanded to offer various choices).

That’s the goal. Let’s get started: There’s a ton of XAML code in there, but most of it is straightforward.
Implement files-related settings UIs
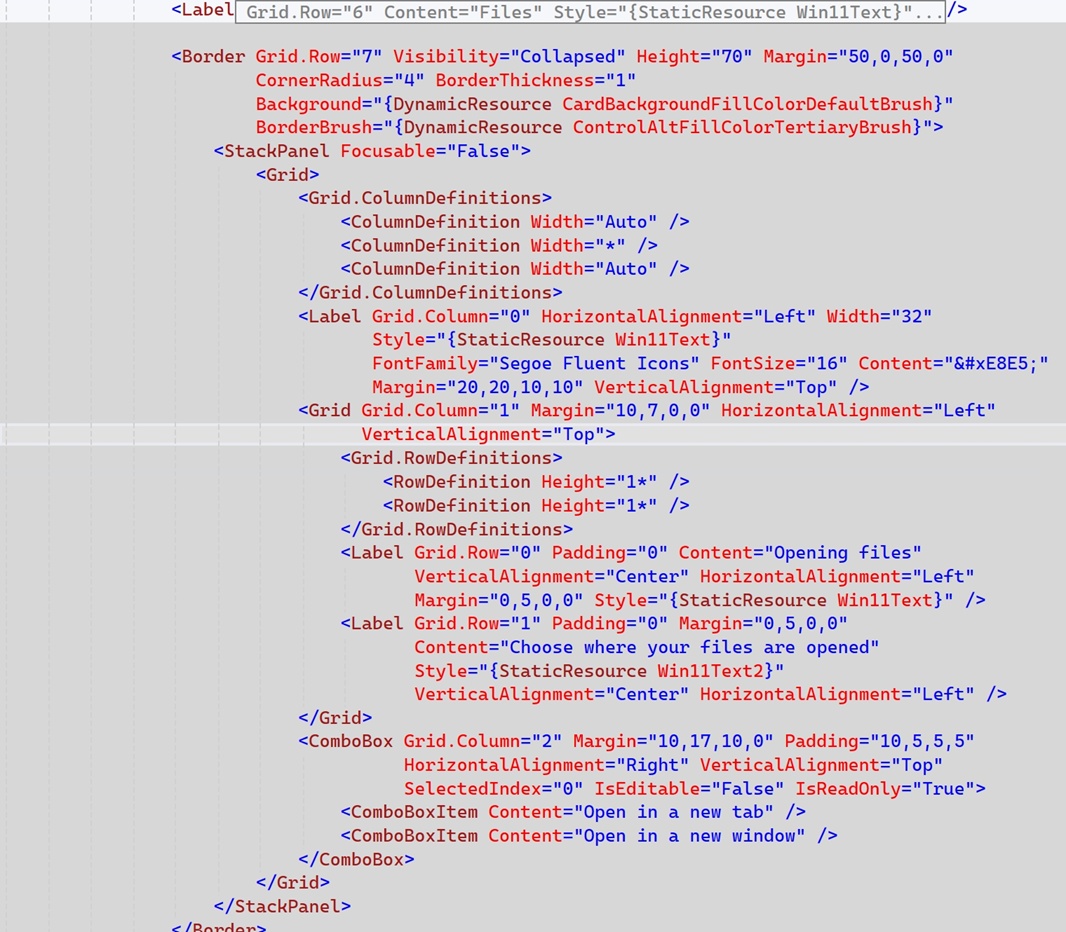
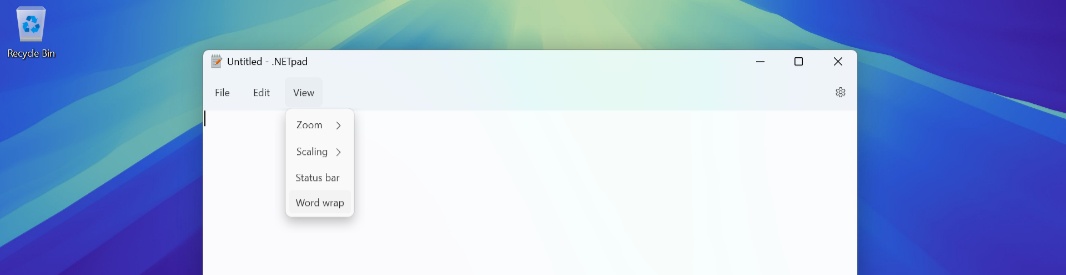
The third section in settings is called Files. (This is called Opening Notepad in the original app, but because the two settings it contains–Opening files and When Notepad starts–are something we may try to implement later (or not), we’re going to skip those, and rename the section). And there’s just a single setting in there, for Auto save.
The Files header should be familiar by now, as it’s nearly identical to the previous headers, Appearance and Text formatting.
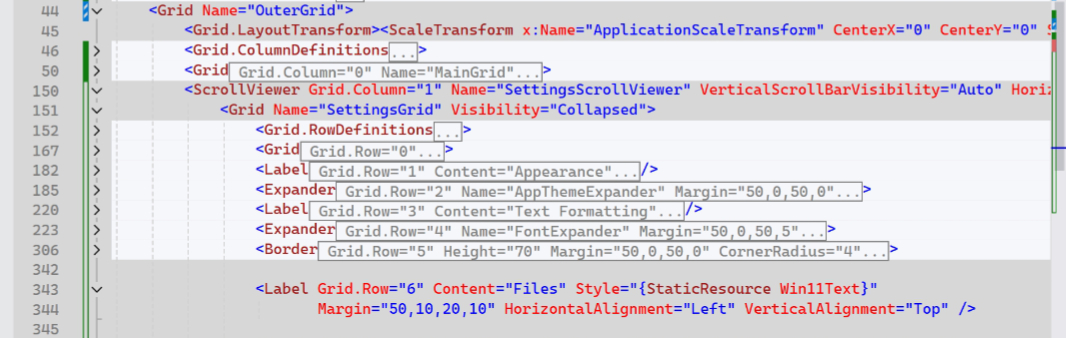
The next section is for the Auto save feature. This is a toggle–it’s either on or it’s off–so mirroring the UI from Word wrap makes sense. That is, it’s another “fake” Expander created with a Stackpanel wrapped in a Border. But the trick here will be making sure we hit all three of the places where this feature communicates its current status: In the File menu, in the status bar, and now in settings.
We’ll add the code needed to correctly present this feature as on or off (and to handle the user changing it here in settings) below.
Implement spelling-related settings UIs
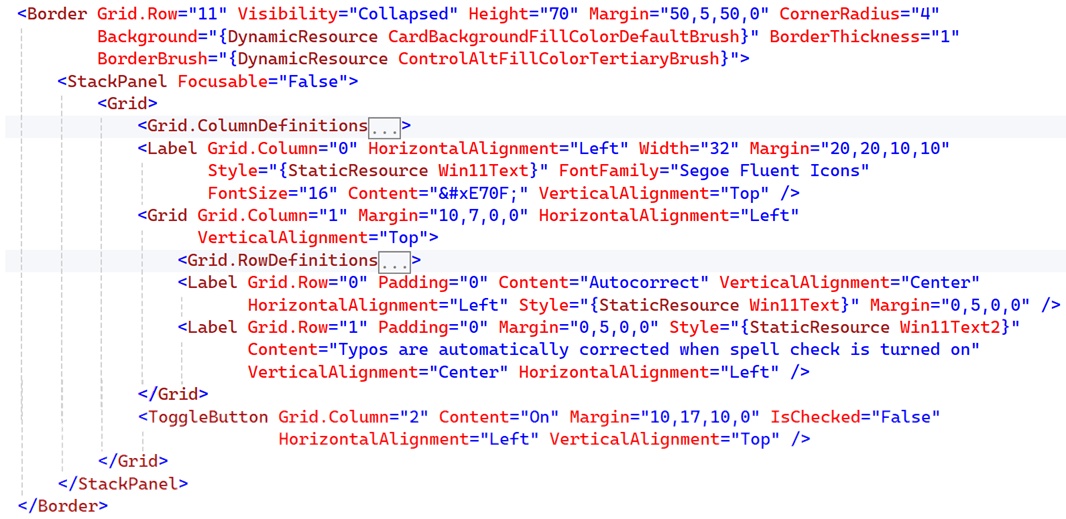
Notepad recently added a spell check feature, along with autocorrect and some associated sub-features. Autocorrect isn’t natively available in WPF, so we’ll skip that for now. But spell check is. So we’ll need a Spelling header and then a Spell check expander.
As with the previous headers, the Spelling header is familiar.

And, so too is the code for the Spell check expander, which is another Stack panel wrapped in a Border. Same as ever.
As with Auto save, we’ll add the C# code for this setting after we’re doing laying out the XAML user interface.
Implement About this app
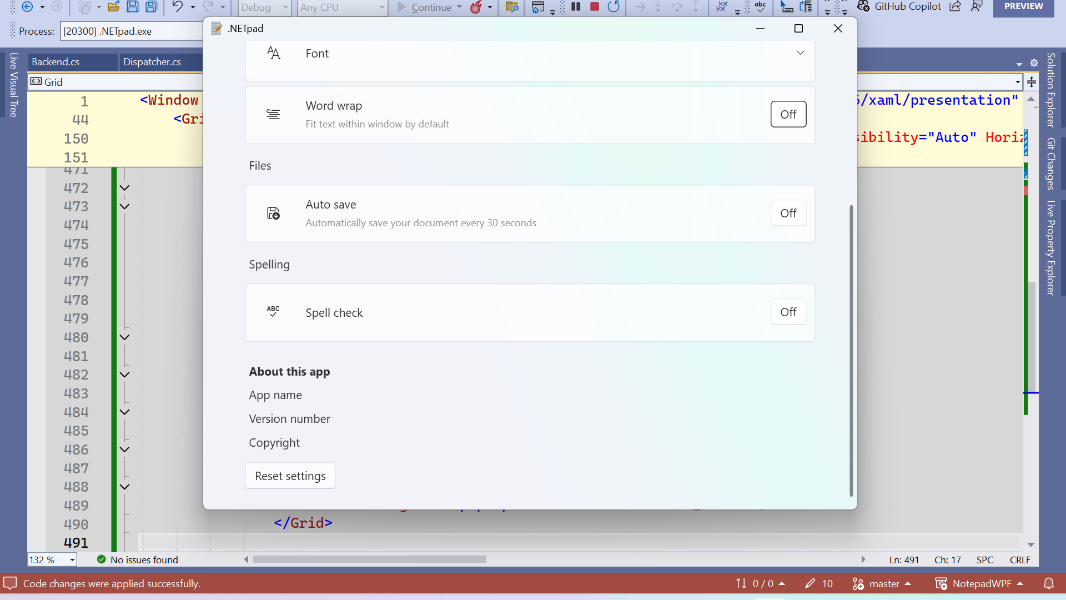
And that’s it for the settings, amazingly. (Not counting the two or three we’re not implementing, at least for now.) That leaves us with some “About this app” information at the bottom of the pane, plus a “Reset settings” button I always find useful.
This couldn’t be simpler. Again, we’ll add the code that makes this come together soon.
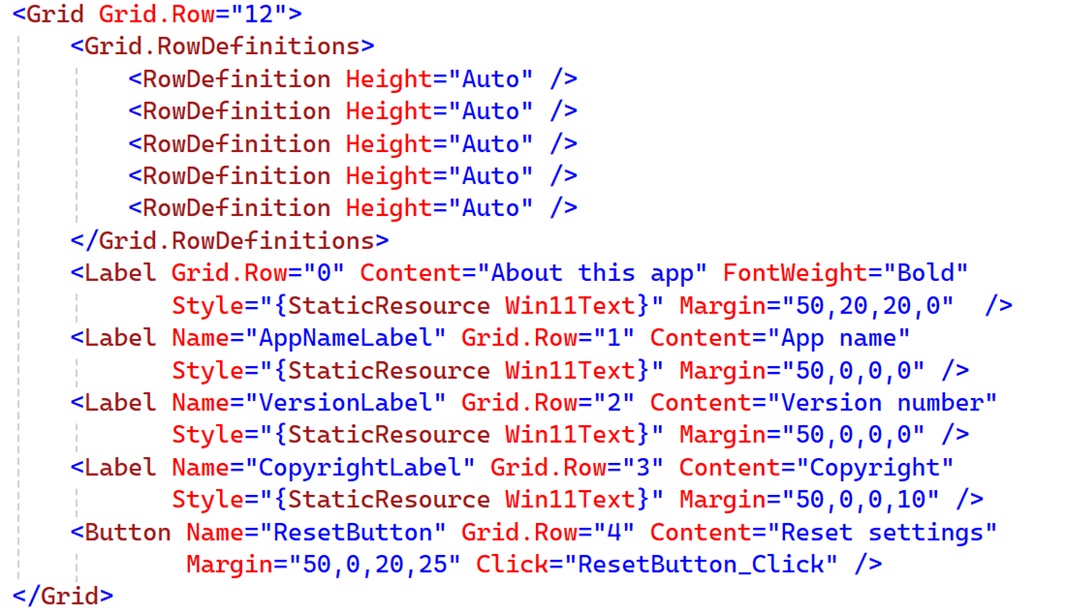
For now, here’s what the bottom half of settings looks like.
Code the remaining settings
OK. We have three settings–Word wrap, Auto save, and Spell check–that are on/off toggles that need C# code. Two of those features–Word wrap and Auto save–can be toggled elsewhere in the app (in their respective menu items) while the third, Spell check, is new and only available via a toggle switch in settings. All three are–or will be–user settings that are saved so the user gets a customized experience each time they run the app.
Word wrap
Word wrap comes up a few times in code. The underlying user setting (Settings.Default.MyWordWrap) is read when the app launches (in AppWindows_Initialized()), and we use that information to configure the text box’s TextWrapping property accordingly at that time. And the WordWrapMenu_Click() event handler fires when the user clicks what is now View > Word wrap, toggling menu item’s checkmark and the text box’s TextWrapping property as expected.
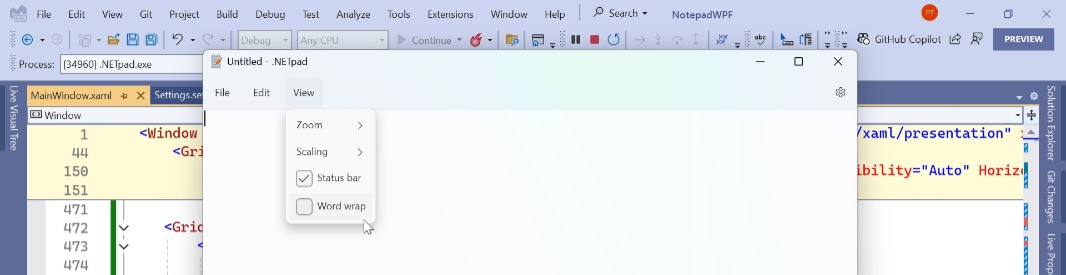
This is straightforward. Well, except for one thing: If you look at the Word wrap menu item, you’ll see that there’s no check mark. This is because of the Windows 11 style change, but it’s easily fixed.
We need to edit AppWindows_Initialized() and WordWrapMenu_Click() so that each also configures WordWrapToggleButton (in settings) correctly. (WordWrapToggleButton already uses the WordWrapMenu_Click() event handler, so we don’t need to duplicate that change.) And we have to fix the check mark. Not just on the Word wrap menu items, but on the Auto save and Status bar menu items too.
That latter bit is easily, so let’s do that first. Just add the following code in the XAML code block for each in MainWindow.xaml:
IsCheckable=”True”
We have many updates coming to Auto save, but Status bar and Word wrap should work correctly now.
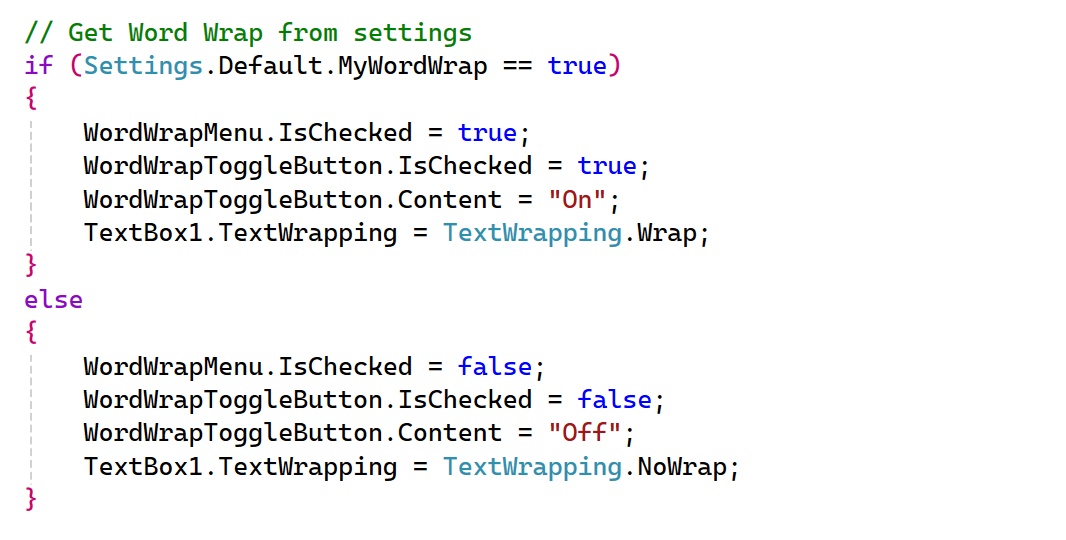
OK, let’s take a look at AppWindows_Initialized() in MainWindow.xaml.cs. The code that handles Word wrap looks like so:
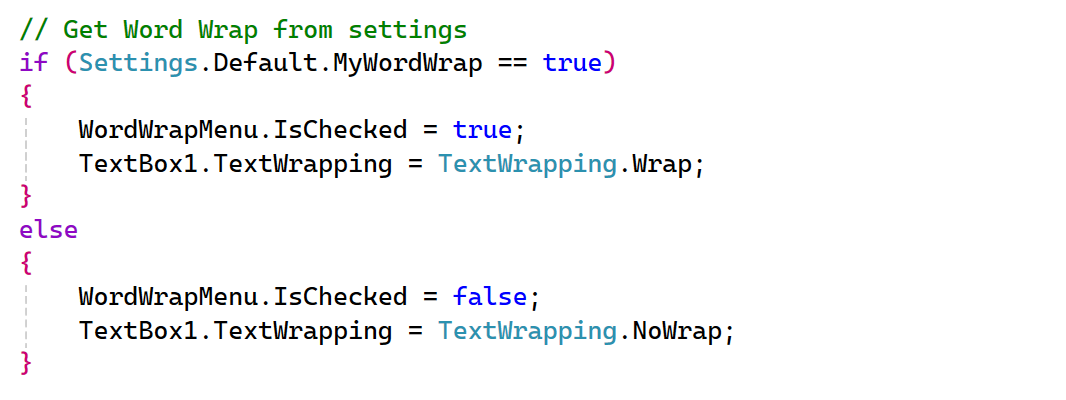
The edit here is pretty obvious: We need to configure WordWrapToggleButton too. But WordWrapToggleButton has two properties to set: IsChecked (a boolean that is either true or false) and Content, which represents the text on the Toggle button and will be set to either “On” or “Off”. So this code will now look like so:
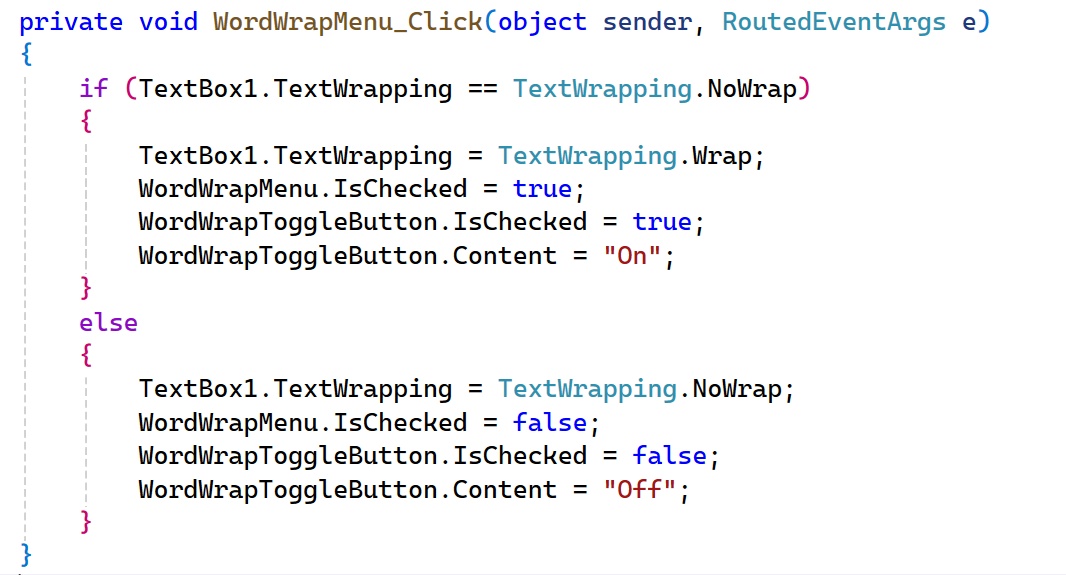
WordWrapMenu_Click() requires a similar change. When it’s done, it will look like so.
You can of course check that everything works by testing both methods of changing the setting, quitting and restarting the app, and so on. You probably should.
Auto save
I rewrote the Auto save code this past summer as part of my code refactoring work. So we’ll need to add that code here because the Auto save toggle in settings relies on it. We already moved the AutoSave “global” variable into App.xaml.cs, but several other changes are required:
- AppWindow_Initialized() in MainWindow.xaml.cs, when the Auto save user setting is read from Settings.settings and the Timer is created.
- AutoSaveMenu_Click(), also in MainWindow.xaml.cs, the event handler that fires when the user selects File > Auto save.
- SettingsButton_Click() MainWindow.xaml.cs, when the Timer is stopped so that an Auto save dialog doesn’t when the user is in settings
- BackButton_Click() in MainWindow.xaml.cs, when the Timer is restarted so that an Auto save dialog can appear normally when required.
- ResetButton_Click() in MainWindow.xaml.cs, where Auto save and other features will be reset to their default configuration
- A new event handler tied to the Timer, in MainWindow.xaml.cs.
- SaveSettings() in Backend.cs, so that the user’s Auto save configuration is saved to Settings.settings.
- Two new methods in Backend.cs–AutoSaveEnable() and AutoSaveDisable()–whose names are self-explanatory.
- The Click() event handler declaration for AutoSaveToggleButton (in MainWindow.xaml) has to change to AutoSaveMenu_Click().
Yep. It’s a lot to keep track of. I’ll try to do this in a logical order.
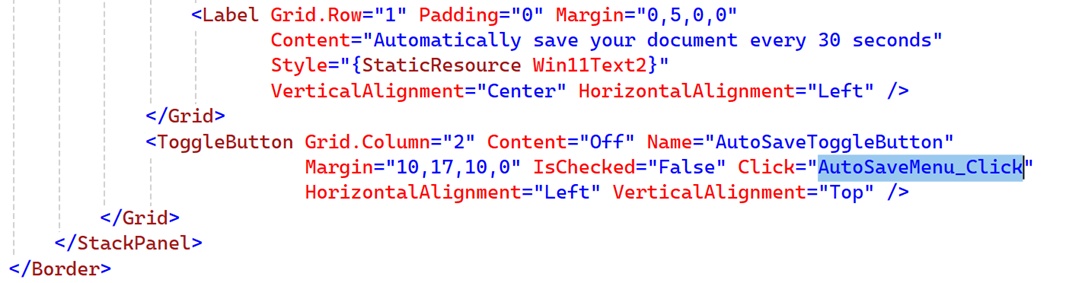
First, open MainWindow.xaml and locate the XAML code for AutoSaveToggleButton. Its Click() event handler probably points to AutoSaveMenu_Click. Change that to AutoSaveMenu_Click like so:
Save and close MainWindow.xaml and then open Backend.cs. Locate the SaveSettings() method and then find the code that saves Auto save to (user) settings and kills the timer. Delete that code and replace it like so:

Now you can close Backend.cs. The rest of the updates will happen in MainWindow.xaml.cs.
First, we’ll update all the timer code. At the top of the MainWindow (partial) class declaration, there’s a list of user setting variables, including one like so:
readonly DispatcherTimer Timer1 = new DispatcherTimer();
Delete that, and replace it with:
private static System.Timers.Timer MyTimer = new();
OnTimerElapsed; has an error squiggly under it. That’s because it doesn’t exist yet. And since it’s an event handler–or, will be–it should be created in MainWindow.xaml.cs. Here’s the code.
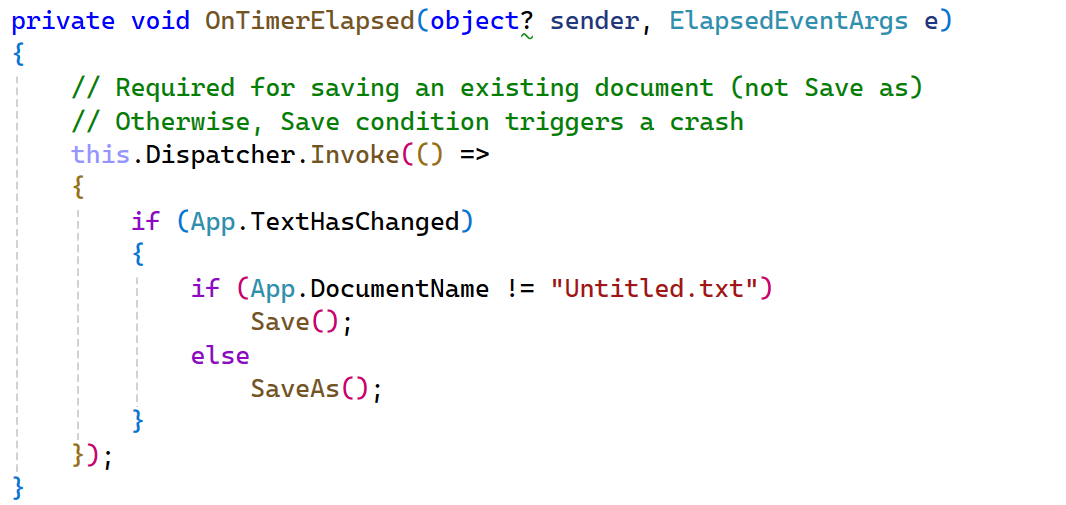
This is a fairly simplistic check to determine whether to call Save() or SaveAs(), but as it turns out, I rewrote the save logic, too. So this will be updated in the future to be a bit more elegant and (hopefully) bullet-proof. It will do for now.
Next, find the “Auto save with timer” code in AppWindow_Initialized(). Replace the code there with the following:

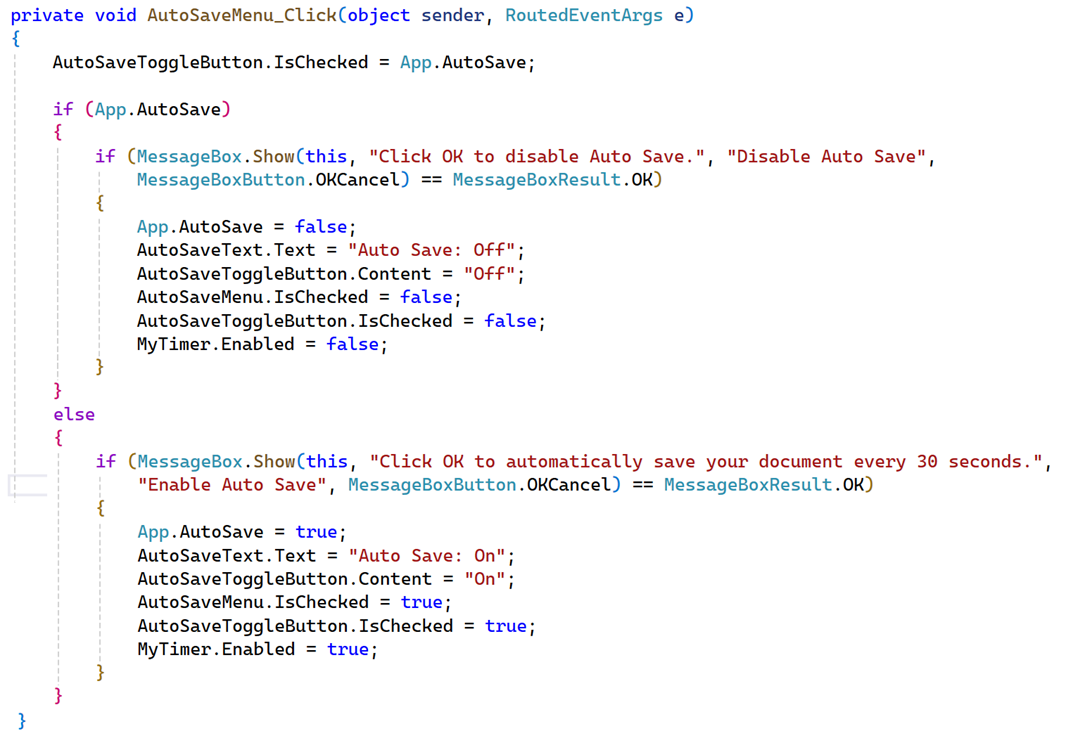
Next, AutoSaveMenu_Click() needs numerous updates, and not just for the new timer. We have to accommodate our App.AutoSave global variable and the new Auto save toggle button in settings. It should look something like this when the additions are made.
Moving ahead to ResetButton_Click(), we can change the Auto save code to:
// Auto save
Settings.Default.MyAutoSave = false;
AutoSaveToggleButton.IsEnabled = App.AutoSave;
MyTimer.Enabled = false;
Next, we need to update the code for the settings interface so that the Auto save feature doesn’t fire when the user is there. (You don’t want a Save confirmation dialog popping up while you’re in settings.)
Add the following code to the beginning of the SettingsButton_Click() event handler:
// Disable timer so a Save as window won’t appear
MyTimer.Enabled = false;
Then, add the following code to the beginning of BackButton_Click():
// Re-enable the timer – that way, a Save as dialog will appear again if needed
MyTimer.Enabled = true;
Does it work? Sort of. There are other instances in which we’ll want to temporarily disable the the timer. But we can address that in a coming code refactoring phase.
Spell check
Spell check is new: I added it because Notepad now offers this feature, and I was surprise how simple it was to do so. It’s also unique in that the toggle for this feature in settings is the only place to configure it. (Auto save and Word wrap are also menu items.)
Because this is a user setting–something the user will expect to be configured correctly each time they use the app–we will need a new setting in Settings.settings. Then, we’ll need to read that setting when the app starts up, and we’ll need to save the setting when the user configures it or closes the app.
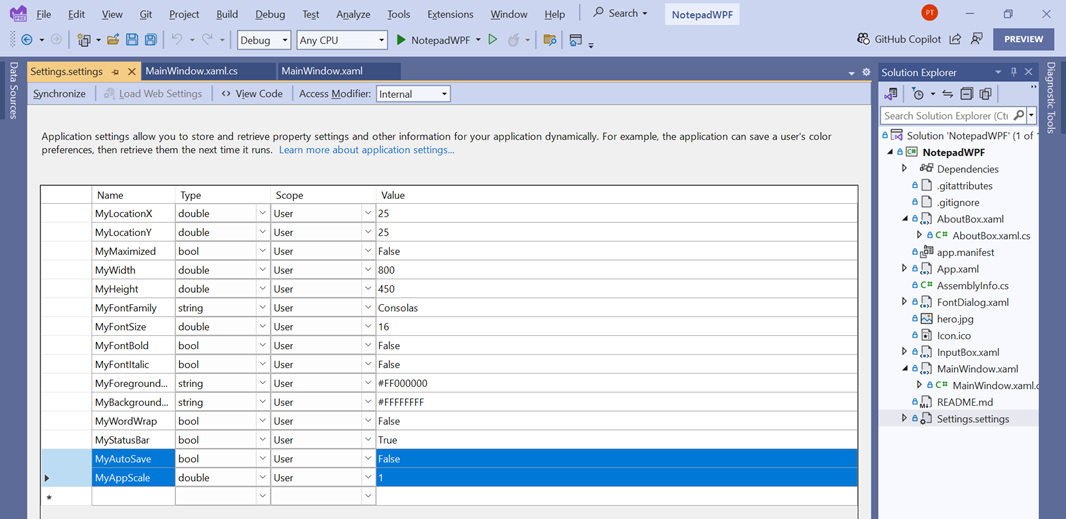
The first step is to open Settings.settings and add the new setting. It’s named MySpellCheck, is type boolean, and is set to “False” by default. And since we’re here, add a new setting for the app scaling feature. This one is named MyAppScale (of course); it’s type double and the default value is 1.
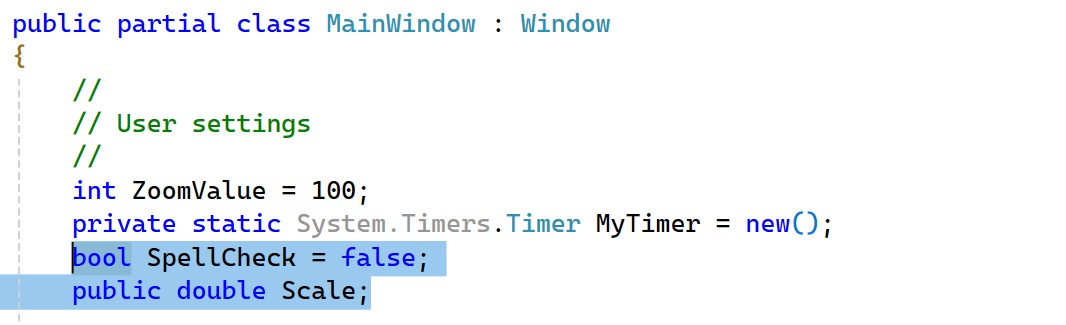
After that’s saved and closed, open MainWindow.xaml.cs and locate the area at the top of the class definition where we create a few variables related to user settings. Add the following code:
Next, locate the AppWindow_Initialized() event handler. Near the bottom, add the following code:
Now, open Backend.cs and locate SaveSettings(). Add the following code near the bottom of this event handler.

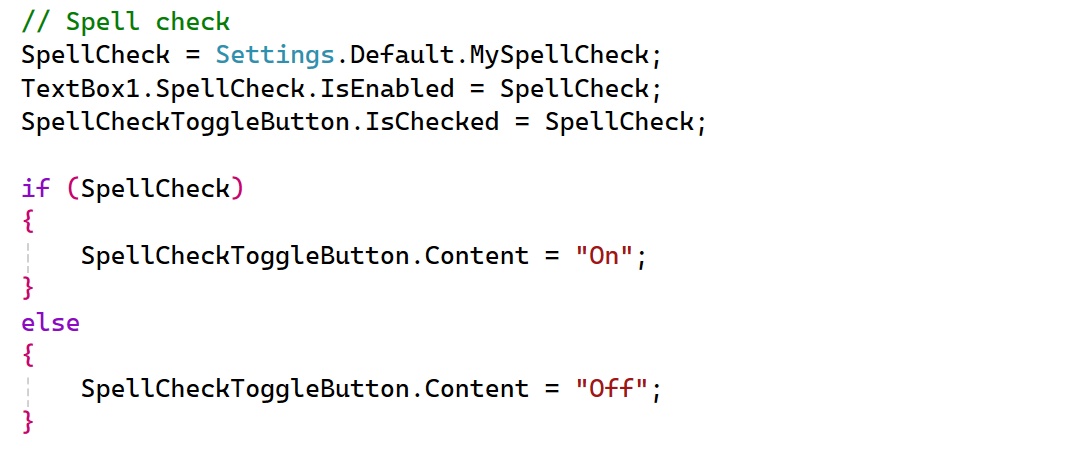
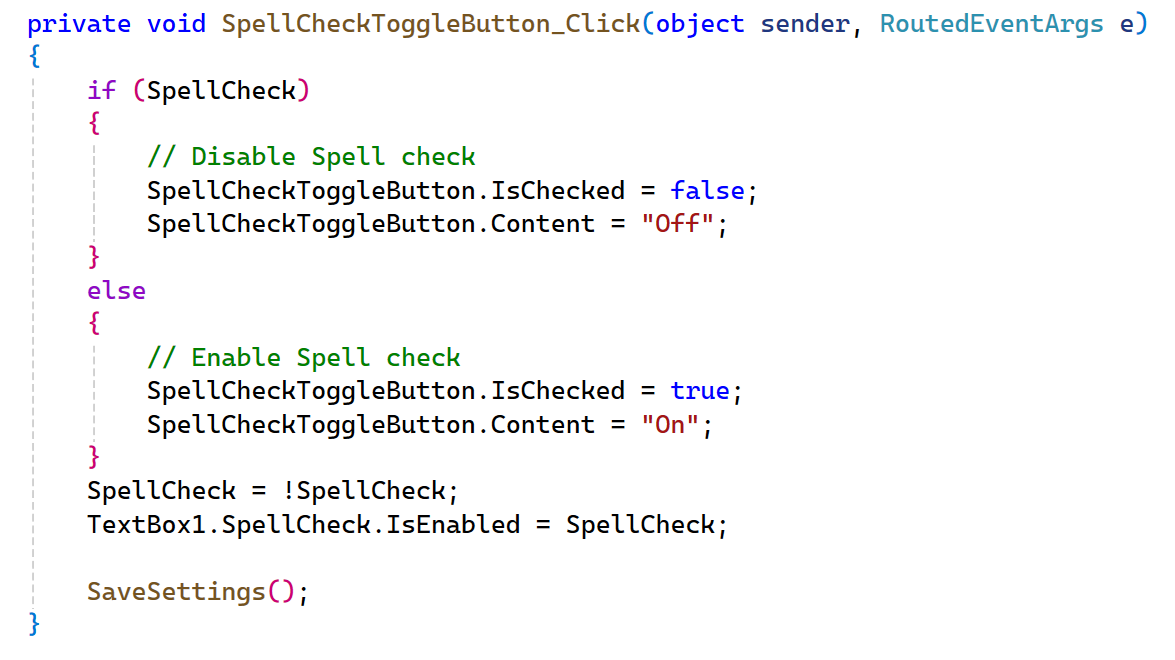
Back to MainWindow.xaml.cs, where we need to find the blank SpellCheckToggleButton_Click() event handler. This is much like the code we added previously in AppWindow_Initialized():
You can test the app now, and Spell check should “work” in that it will flag misspelled words and respect the configuration of the setting. But when you right-click a misspelled word, the menu that appears displays in the font used by the text box, not the system font. The style is all off.
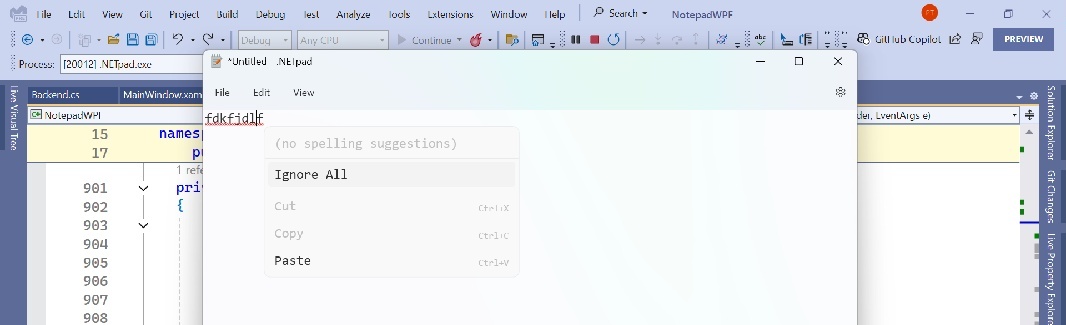
This needs to be fixed. But it’s something I’ve not spent too much time on or figured out yet. So it’s on the to-do list for later. (Notepad also supports an Auto correct feature that may be difficult/impossible to implement, too. That’s on more of a wish list at this point.)
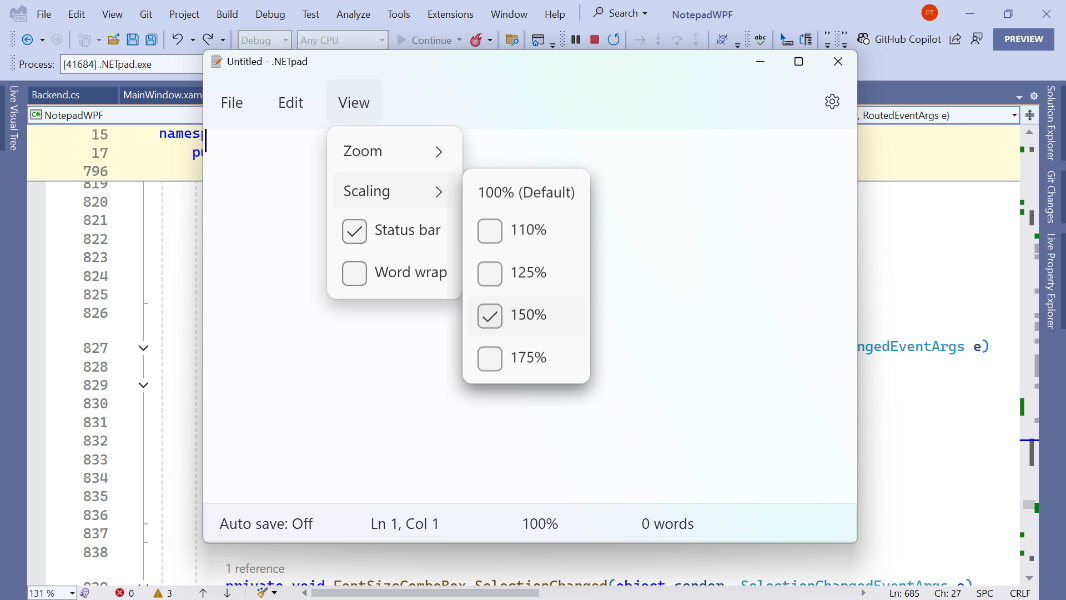
App scale
At some point while updating this app, it occurred to me that any user who took the time to configure app scaling would probably want to retain that setting. So I added that feature, and in the code changes above, we partially added that work. So let’s finish that up.
Previously, we added the new MyAppScale setting to Settings.settings. We added the global variable Scale to the top of the MainWindow partial class definition in MainWindow.xaml.cs. We also added code to save the app scaling value to user settings (in SaveSettings() in Backend.cs).
As noted, there’s more to do. First, we need to add IsCheckable=”True” to each of the app scaling menu items in MainWindow.xaml, as we did previously for a few other menu items. Otherwise, the check mark noting the user’s selection won’t appear.

Next, add the following code to AppWindow_Initialized() (in MainWindow.xaml.cs) so that the value of the MyAppScale setting is applied to Scale at runtime and the correct menu item under View > Scale is checked.
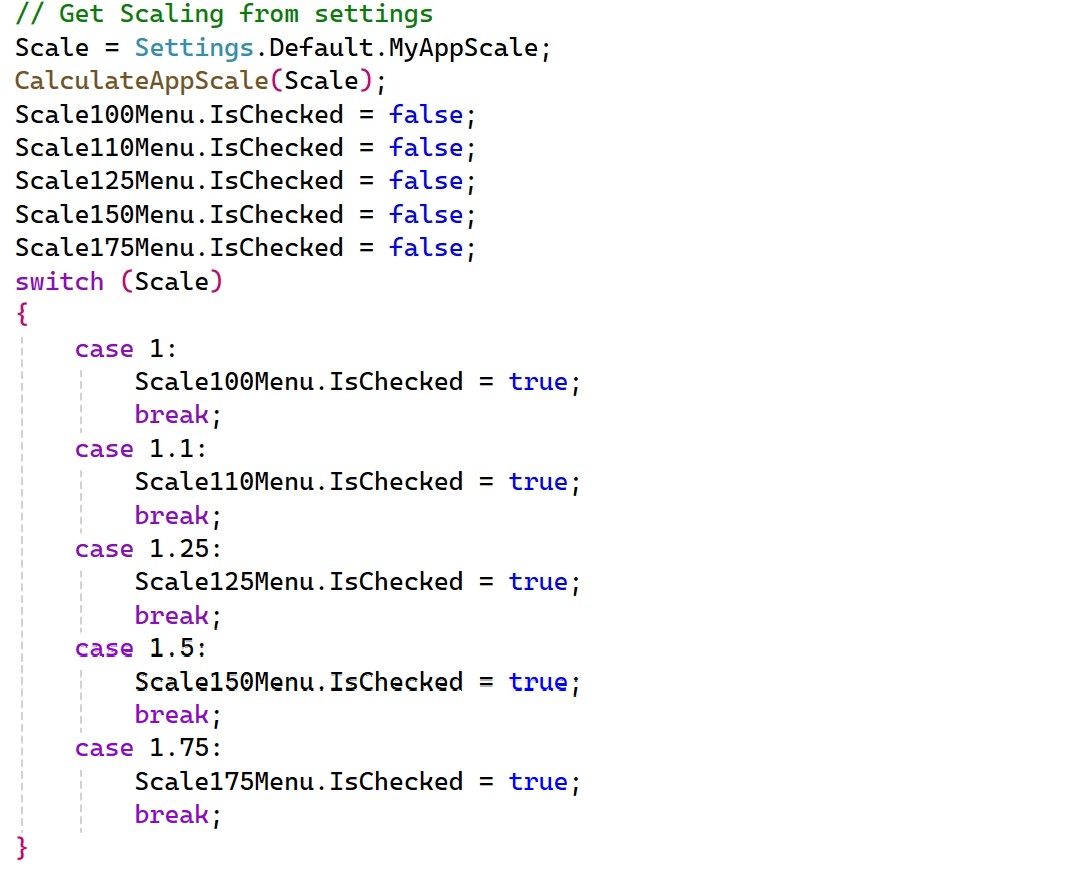
That should do it. Test the app by changing the scale value and restarting it. It should retain that configuration.
About this app and Reset settings
The bottom of settings is straightforward. We just need to display the correct app name, version number, and copyright text in the “About” area and then implement the code behind the “Reset settings” button.
For the “About” area, I just used the code from the original About box, though I’d like to clean that up at some point. I placed the following code in the SettingsButton_Click() event handler:

“Reset settings” could turn into something fun, but for now, I just hard-reset several key user settings to their default values. No promises, but this is a potential task to revisit at a later point. For now, just add the following quick and dirty code to the ResetButton_Click() event handler.
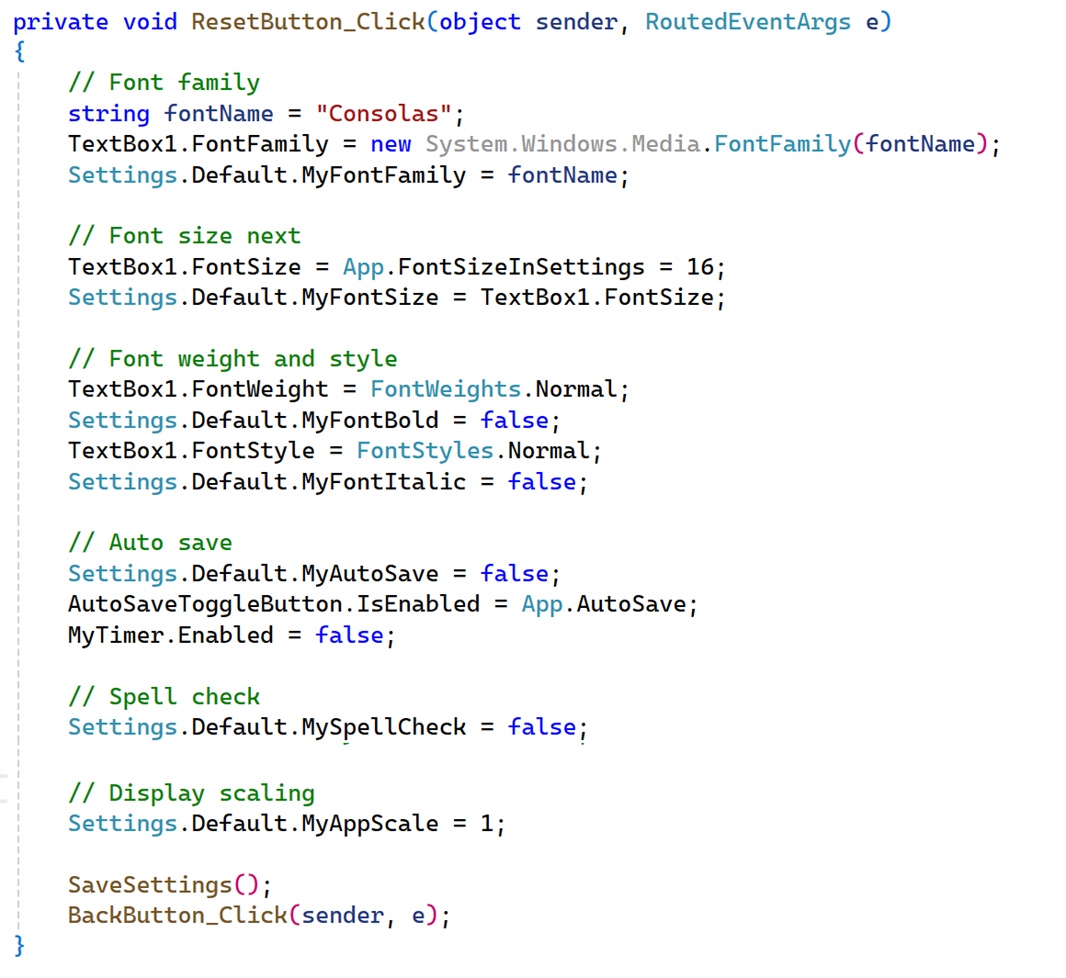
That last bit triggers the BackButton_Click() event handler so you exit settings when you reset the settings.
OK, that’s enough for now. We should add zoom to the settings we save and restore for the user too, but that can wait for later. This is long and complex enough.
Next up, dialogs.

Gain unlimited access to Premium articles.
With technology shaping our everyday lives, how could we not dig deeper?
Thurrott Premium delivers an honest and thorough perspective about the technologies we use and rely on everyday. Discover deeper content as a Premium member.