The WinForms Notepad Project: New Window, Printing Basics (Premium)
- Paul Thurrott
- Dec 08, 2019
-
6
With our Notepad clone getting more mature, the remaining commands are, by nature, the most difficult to implement. So it’s natural that things are slowing down: Some of these features are proving so difficult, they hurt my head. Again, I’m not a professional developer, so some of these topics are straining my abilities.
But that’s fine, and it’s expected. So let’s add a few more features.
(Note: I keep promising to work on some fit and finish issues, including some bugs that readers have noticed. I will definitely get to those. But like Microsoft, I just can’t resist the alure of adding new things before fixing code I’ve already written. Ironic, right?)
File > New Window
I had forgotten about the File > New Window command, which opens a new instance of the application. Indeed, I was considering adding this as a feature that Notepad doesn’t offer. But it does. Ahem.
Anyway, doing this requires just a single line of code, but I had to use Google to figure it out. We need two pieces of information here: The code used to start an EXE file and a way to find the full file name (including path) of our running application.
The first is simple enough: The command Process.Start() can be used to start an EXE file; you just need to pass it the full file name of the EXE (including the path). But I would never have guessed how to get that file name: The code is System.Reflection.Assembly.GetEntryAssembly().Location, which returns a string.
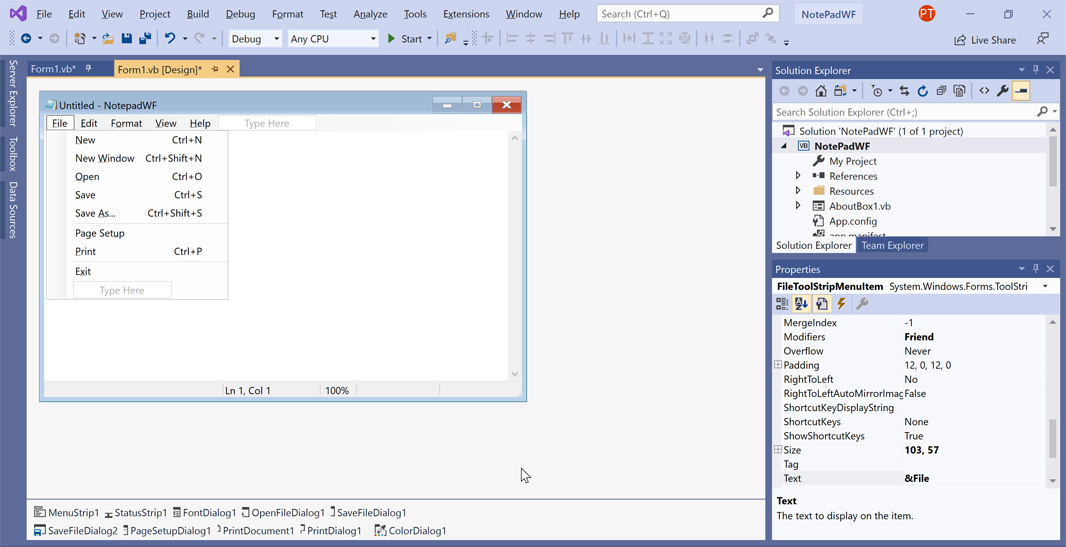
To add this code to the project, create a new menu item below File > New called New &Window and change its ShortcutKeys property to CTRL + SHIFT + N.

Then, double-click that new menu item to open its Click event handler. Add the following line of code:
Process.Start(System.Reflection.Assembly.GetEntryAssembly().Location)
This works, but the new instance of the application window appears directly over the previous instance. I assumed that the real Notepad would cascade new application windows at some kind of an offset, but as it turns out, it behaves the same way as our application. So I will leave that alone for now, but will look into offsetting each new application window a bit from the one underneath it. (This should be doable, as you can pass command line parameters to the EXE run by Process.Start and we could pass the offset and then look for it when the application starts.)
Basic printing
Notepad offers two printing-related commands in the File menu: Page Setup and Print. And I gotta tell you: I’ve struggled with these commands. A lot.
This should be straightforward. Printing, after all, was actually pretty easy in classic Visual Basic, and you’d think that it would get even better with the move to Windows Forms and Visual Basic.NET. But it didn’t. In fact, as I researched this topic, I discovered a 15+-year-old litany of complaints from developers better than me who tried and failed to get printing to work properly in VB.NET.
In a weird coincidence, I was working in my home office the other day and I happened to glance up at a row of used books I had purchased for the Programming Windows series I wrote this past year. Among them is a 1200-page book by Charles Petzold called Programming Windows with C#; this was his .NET-based follow-up to his classic Programming Windows series of books, all of which had, to that point, been based on C and the Win32 API. But this book is about C# and Windows Forms.
Hmm, I thought. I wonder if Petzold explained how printing works.
Imagine my surprise when I discovered that Petzold actually creates a Notepad clone of his own over the course of three chapters in this book. Imagine my further surprise when I discovered that my own Notepad clone is much more full-featured, and much closer to the original, than is his. Now, imagine my happiness upon discovering that not only does Petzold explain printing, but he does so in the context of his own Notepad clone. Hooray!
Unfortunately, Petzold also confirmed my understanding of how terrible printing is with Windows Forms.
“Part of the difficulty in learning about printing in Windows Forms is the existence of several interlocking classes, all of which seem to refer to each other,” he writes in that book. “After a while, the System.Drawing.Printing namespace starts to look like a hall of mirrors.”
Ha! That’s exactly right.
Programming Windows with C#, like all of Petzold’s other books is code-heavy, in sharp contrast to the approach I’ve taken here, which is to leverage the RAD (rapid application development) capabilities of Visual Basic, Windows Forms, and Visual Studio to their utmost in order to write the least amount of code as possible. It’s also written for the C# programmer, of course, and while that language is more sophisticated than VB, especially today, it’s not as simple to read as is VB. I choose the tools I chose for a reason.
Thanks to Petzold and a healthy dose of Google, I now have what I will call the most basic printing functionality that I consider worth sharing. This is something I’ve been working on for a while now, and I will continue to try and improve it. But I’ll point out those areas where I’ve come up blank. Who knows? Maybe a real developer will help out.
To get started, you need to add three objects to the project from the Toolbox: A PageSetupDialog, a PrintDialog, and a PrintDocument.
As you can probably tell, the PageSetupDialog is used to display the Page Setup dialog that appears when you choose File > Page Setup. Likewise, the PrintDialog is used to the display the Print dialog that appears when you choose File > Print. But what’s PrintDocument? Petzold describes it as the class that represents a print job, which consists of one or more pages printed out on a particular printer. That’s a lot clearer than Microsoft’s more convoluted explanation.
With those objects added to the project, it’s time to add the Page Setup and Print commands (plus a divider) to the File menu. Again, I will assume that you understand how that works. Just remember to write their Text properties as Page Set&up and &Print, respectively. And to add the CTRL + P keyboard shortcut to Print.
Before coding the event handlers for these two new commands, we need to add two lines of code to Form1_Load, which (as you’ll recall) runs when the application first starts. You can add these lines anywhere in there, but I put them at the bottom:
PageSetupDialog1.PageSettings = New Printing.PageSettings
PageSetupDialog1.PrinterSettings = New Printing.PrinterSettings
We need to do this because the Print command will fail if we run it without first displaying the Page Setup dialog. Which is a pretty frequent occurrence. (I had implemented Page Setup first, so didn’t notice this problem at first. But in the real world, most people will probably just print without worrying about Page Setup.)
OK, with that out of the way, let’s at least display the Page Setup dialog. Open Form1.vb [Design] and double-click the File > Page Setup menu item to display the PageSetupToolStripMenuItem_Click event handler. Add the following skeleton code:
If PageSetupDialog1.ShowDialog = vbOK Then
    '
End If
If you run the app and choose File > Page Setup, you’ll see the Page Setup dialog.
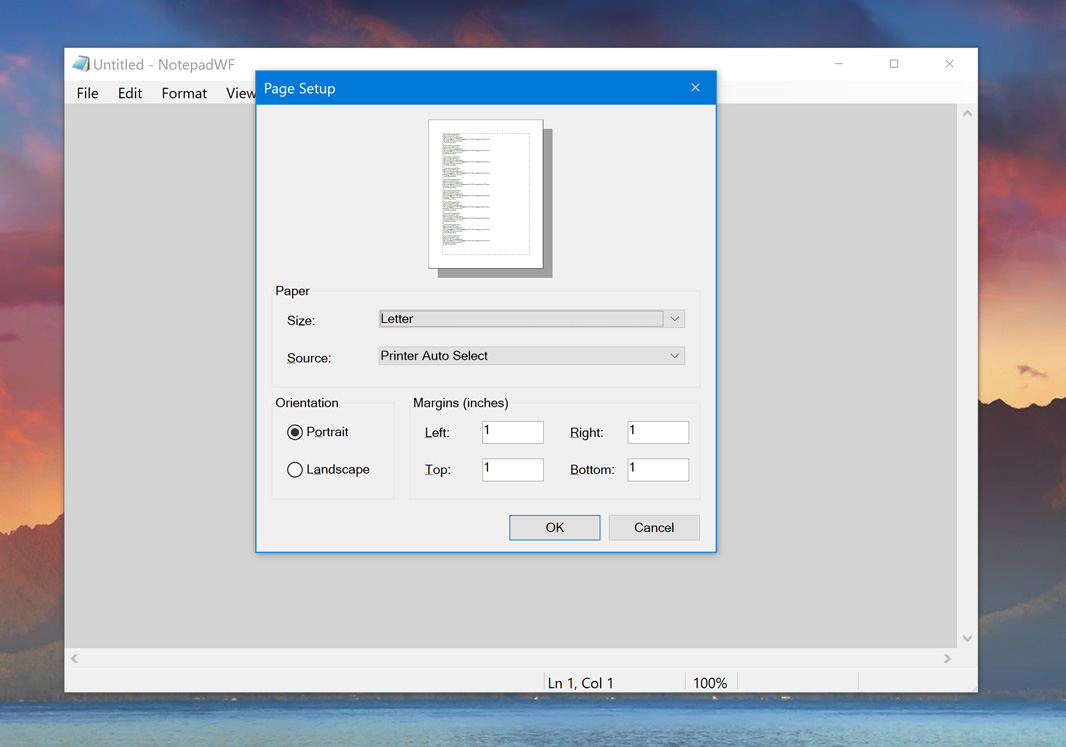
This dialog lets the user configure the paper size, orientation, and margins used when the document is printed. If the user selects OK here, we’ll set the appropriate properties of our PrintDocument object. If they select Cancel, we’ll do nothing. Add the following code inside of that If-Then loop:
PrintDocument1.DefaultPageSettings.PaperSize = PageSetupDialog1.PageSettings.PaperSize
PrintDocument1.DefaultPageSettings.Landscape = PageSetupDialog1.PageSettings.Landscape
PrintDocument1.DefaultPageSettings.Margins = PageSetupDialog1.PageSettings.Margins
Next up, we need to code the File > Print event handler. So open Form1.vb [Design] and double-click the File > Print menu item to display the PrintToolStripMenuItem_Click event handler. Similar to before, add the following skeleton code:
If PrintDialog1.ShowDialog() = vbOK Then
    '
End If
If you run the app and choose File > Print, you’ll see the Print dialog.
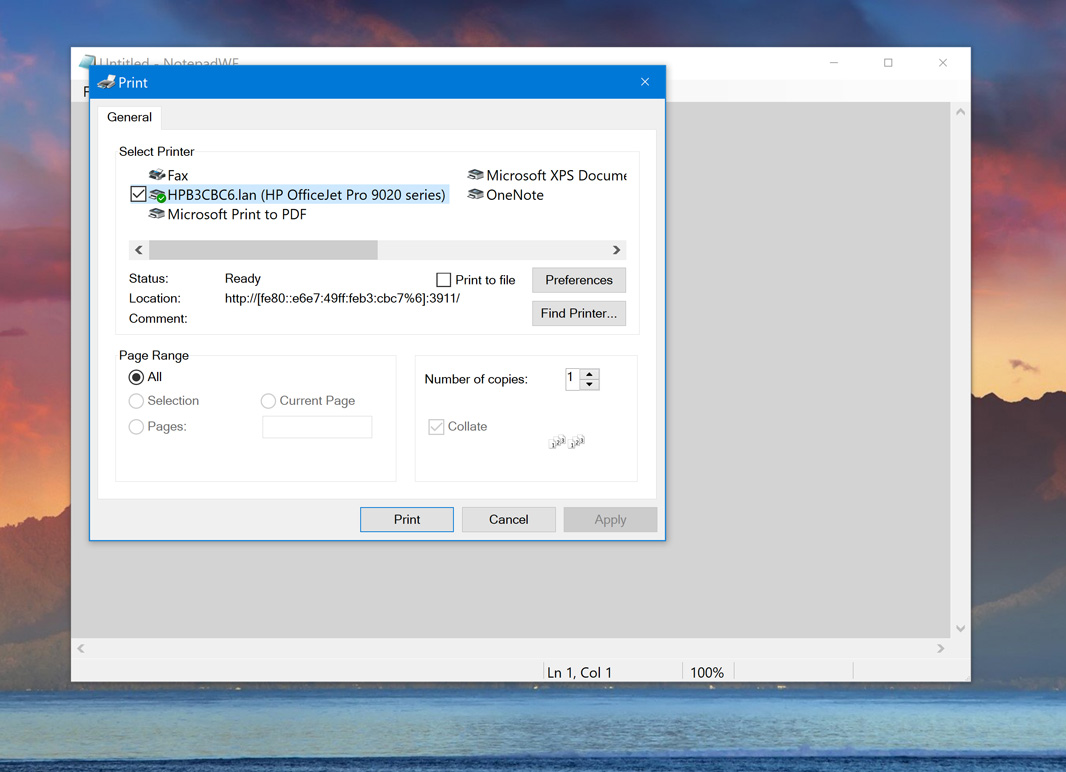
Here, the user can make various changes, including selecting a printer and view and configuring that printer’s preferences. Less obvious, perhaps, the Print dialog should bring over any page settings the user may have configured in that Page Setup dialog. That happens via the PrintDocument object they both share. (Which is why we added those three lines of code above.)
As you would expect, if the user selects OK, the current document will print to the selected printer using whatever customizations they’ve made. If they select Cancel, nothing happens.
So, add the following code inside the If-Then loop:
PrintDialog1.Document = PrintDocument1
PrintDocument1.DocumentName = TextBox1.Text
PrintDocument1.Print()
Simple, right? I mean, that should work. It looks like really basic, um, Visual Basic code.
But it doesn’t work: If you run the app, load in some text, and try to print it (I recommend doing this to the Microsoft Print to PDF virtual printer) nothing happens. And that’s because we’re missing the real meat of this sequence, which is the PrintDocument’s PrintPage event, which occurs “when the output to print for the current page is needed.” Seriously. That’s how Microsoft describes this.
Curiously, I couldn’t figure out a way to just add this event handler and make it work. Instead, using some advice and code I found via Google (and, apologies here, I meant to link to the original and somehow lost it), I discovered that you need to create your own event handler in code. You know, like a C# developer might.
So, below the PrintToolStripMenuItem_Click event handler, add the following event handler in its entirety:
Private Sub PrintPageHandler(ByVal sender As Object, ByVal args As Printing.PrintPageEventArgs)
    Dim MyPoint As New Point(PrintDocument1.DefaultPageSettings.Margins.Top, PrintDocument1.DefaultPageSettings.Margins.Left)
    args.Graphics.DrawString(TextBox1.Text, TextBox1.Font, Brushes.Black, MyPoint)
End Sub
The name of the event handler is arbitrary; I just chose a logical name.
And in case it’s not obvious, this will draw the contents of the TextBox using the TextBox’s font, in black, starting at the point specified by the PrintDocument’s top and left margins. What it doesn’t do, in case it’s not obvious, is respect the bottom and right margins. That will require a bit of math, but we’ll get that later.
First, we need to add one more line of code. We have to call the PrintPageHandler event handler from within the PrintToolStripMenuItem_Click event handler. And that needs to happen right above the line that reads as PrintDocument1.Print(). So add the following line:
AddHandler PrintDocument1.PrintPage, AddressOf Me.PrintPageHandler
Yes, that is some unfamiliar if not tortured syntax right there. (And, yes, this looks more elegant in C#, what doesn’t?)
Anyway. If you run this now, it should print. It should respect the orientation (portrait or landscape), the paper size, and the top and left margins if you configure them.
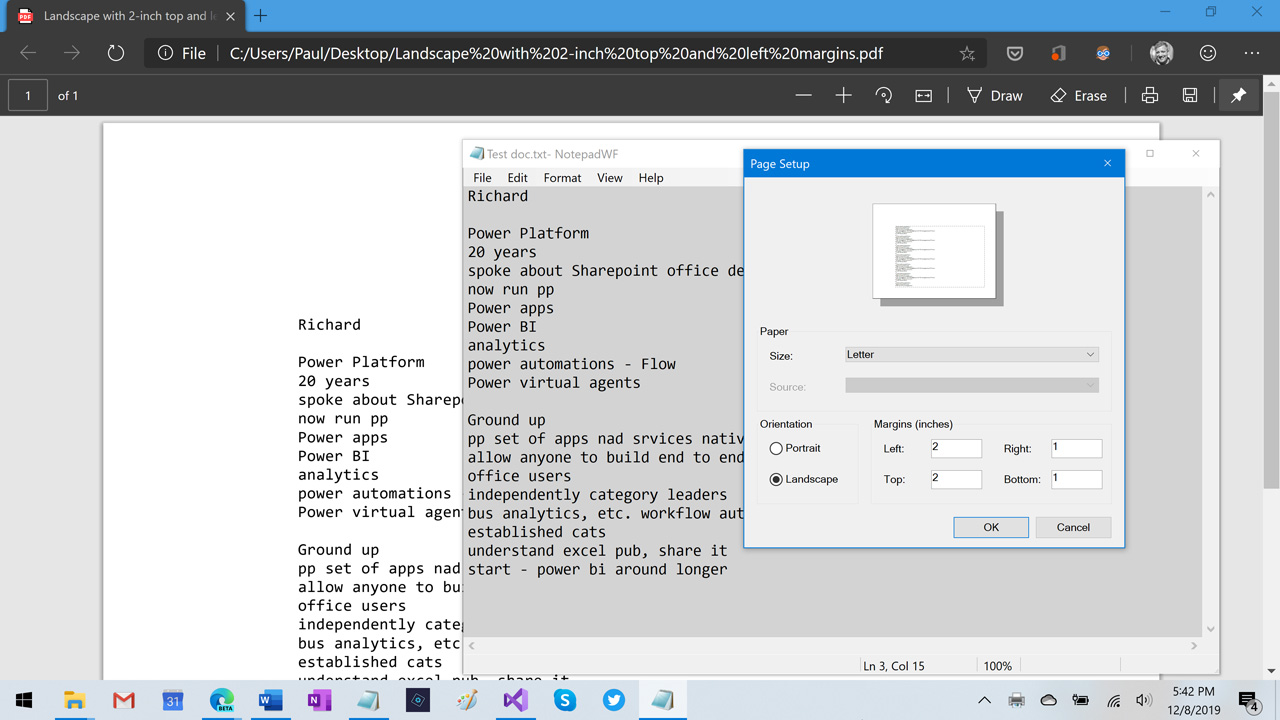
What it won’t do is respect the bottom and right margins, as noted. And it seems like very large documents are not printing correctly. I will fix the former issue, I think. And I will try to figure out the latter. But seriously, after all the testing and failures I’ve had, this is much, much closer than I thought I was going to get when it comes to printing. There’s more to be done, for sure.
Next up: Some long-overdue clean-up and bug fixing.

Gain unlimited access to Premium articles.
With technology shaping our everyday lives, how could we not dig deeper?
Thurrott Premium delivers an honest and thorough perspective about the technologies we use and rely on everyday. Discover deeper content as a Premium member.