The WinForms Notepad Project: Replace, Go To, Fit and Finish, New Name (Premium)
- Paul Thurrott
- Jan 12, 2020
-
4
Today, we implement the Replace, Replace All, and Go To commands, improve the fit and finish, and change the application name.
First, the fit and finish.
A bit of fit and finish
In The WinForms Notepad Project: Find, Find Next, and Find Previous (Premium), I used an Input Box to implement the Find command, and I’m going to use it again to implement Replace, Replace All, and Go To. But before doing that, I want to build out the existing Find Input Box a bit and then use that as a model for the Input Boxes to come.
If you open Form1.vb and locate the FindToolStripMenuItem_Click event hander, you’ll find the line of code that displays the Find Input Box when the user selects this command (Edit > Find, or by typing CTRL + F). It currently looks like so:
FindTextString = InputBox("Find what:")
That’s pretty basic. It is, in fact, the simplest form of InputBox that we can use, and it’s missing some functionality. First, we’re not customizing the title bar text of the dialog, which we should. And because we’re not providing any positioning information, Visual Basic/Windows Forms is just displaying this dialog right in the middle of the screen.
But if you look at the documentation for InputBox, you’ll see that we can pass it several optional parameters in addition to the prompt string, which is required. You can pass it a title, and default response, an XPos (the horizontal position of the dialog on-screen), and a YPos (the vertical position of the dialog on-screen). Those are all useful for Find, and they will all be useful for the other InputBoxes that we’re about to create.
The title is obvious enough: It should read as “Find” (no quotes), as it does in Notepad. The default response can be set to the selected text in the main form’s text box; if nothing is selected, it will just be blank. And then for the XPos and YPos, we can programmatically ensure that the InboxBox is displayed over the application and not just in the middle of the display. Find an exact position that makes sense every single time is not possible, so I’ll just position it near the upper left of the main application window, and over the textbox.
To see what this looks like, replace the line of code noted above with the following:
FindTextString = InputBox("Find what:", "Find", TextBox1.SelectedText, Location.X + 200, Location.Y + 300)
Here, I had selected the first instance of the word Power before typing CTRL + F:

So that’s better.
OK, let’s move on to the other new commands.
Replace
In Form1.vb [Design], open the Edit menu in the main form and double-click the Replace menu item to open the ReplaceToolStripMenuItem_Click event handler in Form1.vb. Then add the following code:
CheckTimerInterval()

Dim FindWhat As String = InputBox("Find what:", "Replace", TextBox1.SelectedText, Location.X + 200, Location.Y + 300)
Dim ReplaceWith As String = InputBox("Replace with:", "Replace", "", Location.X + 200, Location.Y + 300)

FindTextString = FindWhat
'Find text from current cursor position
FindTextIndex(TextBox1.SelectionStart, False)

If FindLastIndexFound > -1 Then
    TextBox1.Text = TextBox1.Text.Substring(0, FindLastIndexFound) + ReplaceWith + TextBox1.Text.Substring(FindLastIndexFound + Len(FindTextString))
Else
    MessageBox.Show(Me, "Cannot find " + Chr(34) + FindTextString + Chr(34), "Notepad", vbOKOnly, vbInformation)
End If

ResetTimerInterval()
This code uses the CheckTimerInterval() and ResetTimerInterval() methods because we want to temporarily short-circuit any possible Auto Save dialogs while we have Input Boxes displayed. And it does display two Input Boxes, one for the initial Find prompt (which we auto-fill if there’s a selection) and one for the Replace prompt (which we leave blank). After that, it will look for the next instance of the FindWith text and then, if found, replace it with the ReplaceWith text. If it can’t find the text, it will display a Message Box explaining that. (Where possible, I mimic the language the real Notepad uses in every case.)
Again, thanks to Michael Lerch for his help with this.
Replace All
In the real Notepad, Replace All is an option in the Replace dialog and I hope to get there someday. But for now, we’ll treat it as a separate command so that we can use a simpler Input Box. So locate the Replace All menu item in Form1.vb [Design] and double-click it to open a blank ReplaceAllToolStripMenuItem_Click event handler in Form1.vb. Then, add the following code:
CheckTimerInterval()

Dim FindWhat As String = InputBox("Find what:", "Replace all", TextBox1.SelectedText, Location.X + 200, Location.Y + 300)
Dim ReplaceWith As String = InputBox("Replace with:", "Replace all", "", Location.X + 200, Location.Y + 300)

FindTextString = FindWhat
FindTextIndex(0, False)

If FindLastIndexFound > -1 Then
    Dim NewText As String = Strings.Replace(TextBox1.Text, FindTextString, ReplaceWith, 1)
    TextBox1.Text = NewText
Else
    MessageBox.Show(Me, "Cannot find " + Chr(34) + FindTextString + Chr(34), "Notepad", vbOKOnly, vbInformation)
End If

ResetTimerInterval()
This works almost exactly like the code in Replace except that this version replaces every instance of FindWith with the ReplaceWith text chosen by the user, and it does so in one whack by not worry about the caret position and by using Strings.Replace. (In other words, it’s “replace every instance,” not “replace every instance from the caret position to the end of the document.”) Nice!
Again, thanks to Michael Lerch for his help with this.
Go To
I’ve mentioned a few times that I had worked up code for the Go To command. My initial pass at this actually included a custom (i.e. handmade) Go To dialog box, which was tedious to make and would likely require further refinement. But since we’re using an Input Box for Find, Replace, and Replace All, I decided to re-do it with an Input Box for consistency’s sake. And it seems to work well enough, and even provides basic error-checking (such as when the user enters a letter instead of a number), courtesy of Visual Basic’s exception handling capabilities.
As before, locate the Go To menu item in Form1.vb [Design], double-click it to the GoToToolStripMenuItem_Click event handler in Form1.vb, and then add the following code:
CheckTimerInterval()

Try
    Dim LineNum As Integer = Convert.ToInt32(InputBox("Line number:", "Go to line", "", Location.X + 200, Location.Y + 300))
    If LineNum <= TextBox1.Lines.Count Then
        TextBox1.SelectionStart = TextBox1.GetFirstCharIndexFromLine(LineNum - 1)
        TextBox1.SelectionLength = 0
        TextBox1.ScrollToCaret()
    Else
        MessageBox.Show("The line number is beyond the total number of lines", "Go to line")
        GoToToolStripMenuItem_Click(Me, e)
    End If
Catch ex As Exception
    MessageBox.Show(ex.Message)
End Try

ResetTimerInterval()
Here, the InputBox text is converted to an integer, and there’s a bit of error checking to make sure that the entered value is less than or equal to the number of lines in the document; if it is, we scroll to that line number. If it isn’t, we prompt the user. And if the user enters a non-integer value (really, a value that cannot be converted to an integer, so a “non-number value,” I guess), the exception handling kicks in.
It’s not perfect: Just hitting ESC will trigger an error message. But it’s a good starting point, and I’ll try to fine tune it to handle little issues better. (Plus, if life goes accordingly, I’ll turn this into a real dialog, which would solve that problem.)
There’s a lot more work to do, still, of course: Find, Find Previous, Find Next, Replace/Replace All, and Go To could all stand more sophisticated implementations, with real dialog boxes where necessary, and I’m sure we’ll find bugs. Our Print functionality is broken (and will likely be the next major thing I try to figure out). And we’re still not explicitly supporting the text formatting and encoding options that Notepad supports.
But this marks the completion of all of the commands in the Edit menu, at least in rough form, so it’s still a big milestone. And maybe the app now deserves a better name than NotepadWF.
A new name
In The WinForms Notepad Project: Application Name Ideas (Premium), I offered up some potential final names for this application and asked readers if they had any ideas of their own. But I feel like the best name overall is .NETpad. It sounds and looks enough like Notepad to trigger that familiarity, for one thing. And the name is apt since the application was built using .NET, and it was also shaped by .NET: Windows Forms, as a part of .NET, lacks certain features that are used by the real Notepad, and we had to change our version accordingly. It just seems right.
We already did (most of) the work to ensure that our eventual name change would be easy to make. But I missed one place where we need to remove a hard-coded reference to the app’s original name: Help > About. It still reads as “About NotepadWF.” So let’s fix that first.
There’s no need to change the name in the designer, though you could always just change the Text of AboutNotepadWFToolStripMenuItem from “&About NotepadWF” to just “&About” if this bothers you. You could also change the name of AboutNotepadWFToolStripMenuItem to AboutToolStripMenuItem.
But the only important thing to do here is to change its Text property to “About .NETpad” when the application loads. So open the Form1_Load event handler in Form1.vb. And below the first line of code, which reads as Me.Text = Application.ProductName, add the following:
AboutNotepadWFToolStripMenuItem.Text = "About " + Application.ProductName
With that out of the way, we can make the application name change.
To do so, right-click on the project name in Solution Explorer and choose Properties. Then, open the Application tab if it’s not visible.
Change the Assembly name setting from NotepadWF to .NETpad. Then, click the Assembly Information button to display the Assembly Information window. In that window, change the Title and Product names to .NETpad as well.
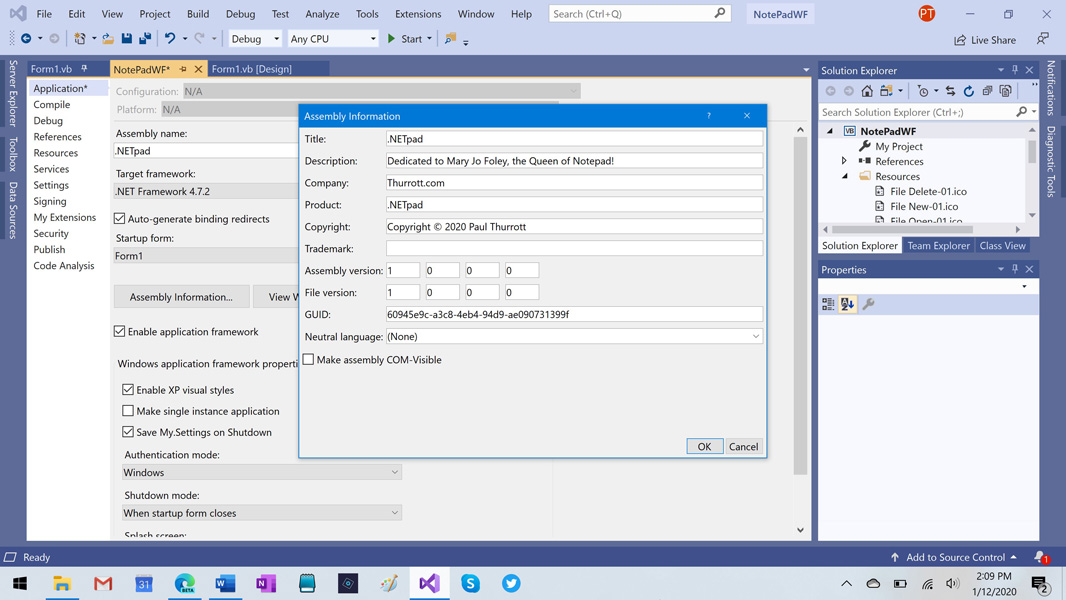
Now, when you run the application, it will identify itself as .NETpad.

And if you want to deploy the application to other PCs, it will also use the name .NETpad, and not NotepadWF.
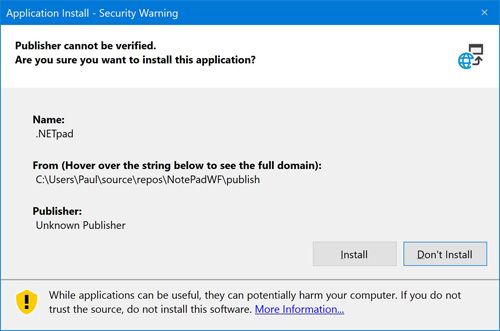
You may want to delete the contents of the Publish folder (C:\Users\Paul\source\repos\NotePadWF\publish on my PC) first, just so there isn’t a spurious NotepadWF.exe file in there, but it won’t cause any problems.
More soon. Or whenever I can figure out printing.

Gain unlimited access to Premium articles.
With technology shaping our everyday lives, how could we not dig deeper?
Thurrott Premium delivers an honest and thorough perspective about the technologies we use and rely on everyday. Discover deeper content as a Premium member.