The WPF Notepad Project: Select All, Time/Date, Go To, and Input Box (Premium)
- Paul Thurrott
- Mar 24, 2020
-
0
In this installment, we’ll implement several more Edit menu items in the WPF version of .NETpad and create a custom Input Box.
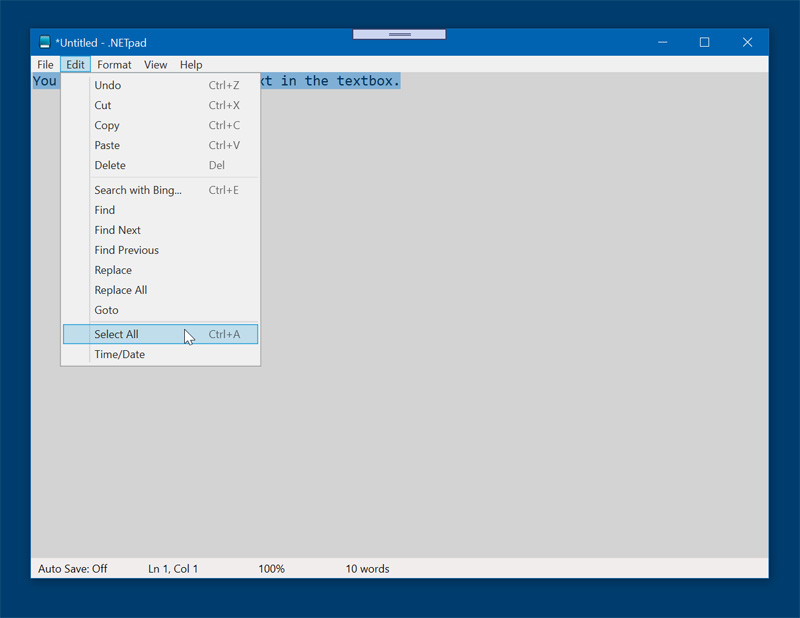
Edit > Select All
Implementing Edit > Select All is as easy as was implementing Cut, Copy, and Paste. All we need to do is associate the SelectAllMenu menu item with the SelectAll command in MainWindow.xaml. So open up that file and add a Command property to it so that it looks like so:
<MenuItem Command="SelectAll" Name="SelectAllMenu" Header="Select _All" />
That’s it. The menu and associated keyboard shortcut (CTRL + A) now work and the menu will be disabled automatically unless there is something to select. As good, the keyboard shortcut hint appears in the menu, too.
Edit > Time/Date
As you may recall, implementing Time/Date was easy in Windows Forms. All we had to figure out was how to display the time and date in the right formats.
In WPF, this is a bit more complicated because we’re using a custom command. So we need those three increasingly familiar pieces, too: A custom routed command, an Executed command event handler, and a command binding to associate the command with its event handler.
We create the custom routed command in the Window.Resources section of the MainWindow.xaml file. Add the following line of XAML there:
<RoutedUICommand x:Key="TimeDateCommand" Text="TimeDate"><RoutedUICommand.InputGestures><KeyGesture>F5</KeyGesture></RoutedUICommand.InputGestures></RoutedUICommand>
Then, we need to add a Command property to the TimeDateMenu tag so that it resembles this:
<MenuItem Command="{StaticResource TimeDateCommand}" Name="TimeDateMenu" Header="Time/_Date" />
Now, we need to add the associated command binding in Window.CommandBindings. So find Window.CommandBindings and add the following tag:
<CommandBinding Command="{StaticResource TimeDateCommand}" Executed="TimeDateCommand_Executed"/>
Finally, we have to actually create the event handler in C#. So switch over to MainWindow.xaml.cs and add the following empty Executed command event handler at the bottom of the MainWindow class declaration.
private void TimeDateCommand_Executed(object sender, ExecutedRoutedEventArgs e)
{

}
Add the following code to the event handler:
System.DateTime now = System.DateTime.Now;
TextBox1.SelectedText = now.ToShortTimeString() + " " + now.ToShortDateString();
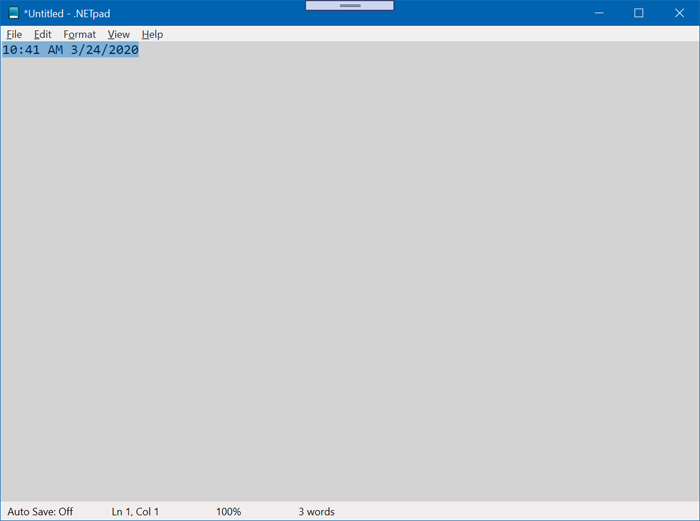
Now, run the application and test Edit > Time/Date. You’ll see that the keyboard shortcut hint is added to the menu item automatically, which is good. But that when you insert the time and date, it’s selected because we’re using that SelectedText property in the second line.
What we want is for the insert text to not be selected, and for the text caret to be placed after the insertion. So add the following two lines of code to TimeDateCommand_Executed:
TextBox1.SelectionStart += (now.ToShortTimeString() + " " + now.ToShortDateString()).Length;
TextBox1.SelectionLength = 0;
Test it again. That should work fine now. (And if you know a way to more cleanly add the text at the current insertion point instead, please let me know.)

Input Box
Go To, like Find, Find Next, Find Previous, Replace, and Replace All, requires a custom dialog. In the Windows Forms versions of .NETpad, I implemented these actions using an Input Box, which is a Windows Forms-specific window type that works like a Message Box but also provides a text box for user entry.
Ideally, we will implement these things use custom dialogs in WPF, eventually. But for my quick and dirty first pass at a WPF version of .NETpad, I instead created a single custom Input Box of my own because it can be used for six different actions. If the mood strikes, I may later go back and implement modern versions of the various dialogs, but for now let’s just work with the single custom Input Box.
As with the Fonts dialog and About box, we start by adding a new WPF window the project. So right-click the project name in Solution Explorer and choose Add > Window (WPF). In the Add New Item window that appears, rename the file to InputBox.xaml and click Add.
When InpuBox.xaml opens in a split view, double-click the XAML button in the splitter to display just the XAML code. We need to make several changes.
First, replace the code Title=”InputBox” Height=”450″ Width=”800″ with:
Title="Input" SizeToContent="WidthAndHeight"
WindowStartupLocation="CenterScreen"
This is the first time we’re not hard-coding sizing values to a custom window. Instead, we’ll automatically size the window to the content it contains.
Next, add a Margin property to the opening Grid tag so that it looks like so:
<Grid Margin="15">
The Input Box has five elements of interest: A window title and descriptive label, which we’ll customized based on what triggered its display; a text box that will contain something entered by the user, and OK and Cancel buttons.
Thinking about the design, we only need a single column, but we’ll need three rows: One for the label, one for the text box, and one for the buttons. Because we want those buttons side-by-side and aligned to the right side of the window, we’ll need to encase them in some kind of panel.
The following XAML code implements all that (inside the Grid opening and closing tags):
<Grid.ColumnDefinitions>
    <ColumnDefinition Width="Auto" />
</Grid.ColumnDefinitions>
<Grid.RowDefinitions>
    <RowDefinition Height="Auto" />
    <RowDefinition Height="Auto" />
    <RowDefinition Height="Auto" />
</Grid.RowDefinitions>
<Label Name="QuestionLabel" Grid.Column="1" />
<TextBox Name="AnswerTextBox" Grid.Column="1" Grid.Row="1" Height="25" MinWidth="300" />
<WrapPanel Grid.Row="2" Grid.ColumnSpan="2" HorizontalAlignment="Right" Margin="0,15,0,0">
    <Button IsDefault="True" Name="OKButton" Height="Auto" MinWidth="60" Margin="0,0,10,0" Click="OKButton_Click">_Ok</Button>
    <Button IsCancel="True" Height="35" MinWidth="60">_Cancel</Button>
</WrapPanel>
To check out the basic design, you can switch to the Design view:

Before continuing, remove the code Text=”AnswerTextBox” from the AnswerTextBox tag. We want that to be empty.
Next, open InbutBox.xaml.cs and add the following lines of code inside the constructor and right below the line InitializeComponent(); …
AnswerTextBox.Focus();

// Set the window background color
SetResourceReference(BackgroundProperty, SystemColors.ControlBrushKey);
One more step: We need to create a Click event handler for the OK button. So reopen InputBox.xaml, locate and select the OKButton tag, switch the Properties pane to the events list, and double-click next to Click. A blank Click event handler appears in InputBox.xaml.cs:
private void OKButton_Click(object sender, RoutedEventArgs e)
{

}
Now, just add the following line of code inside this event handler:
this.DialogResult = true;
OK, now we just need to use the Input Box somewhere. We’ll start with Edit > Go To.
Edit > Go To
Go To is implemented with a custom command, so we need a custom routed command, an Executed command event handler, and a command binding to associate the command with its event handler. You know the drill.
The custom routed command is added in the Window.Resources section of the MainWindow.xaml file. So add the following line of XAML there:
<RoutedUICommand x:Key="GoToCommand" Text="GoTo"><RoutedUICommand.InputGestures><KeyGesture>Ctrl+G</KeyGesture></RoutedUICommand.InputGestures></RoutedUICommand>
Next, add a Command property to the GoToMenu tag so that it now looks like this:
<MenuItem Command="{StaticResource GoToCommand}" Name="GoToMenu" Header="_Goto" />
Next, we need to add the associated command binding in Window.CommandBindings. So, find Window.CommandBindings and add the following tag:
<CommandBinding Command="{StaticResource GoToCommand}" Executed="GoToCommand_Executed"/>
Finally, we have to implement that GoToCommand_Executed event handler. So open up MainWindow.xaml, scroll to the bottom of the MainWindow class definition and add the blank event handler:
private void GoToCommand_Executed(object sender, ExecutedRoutedEventArgs e)
{

}
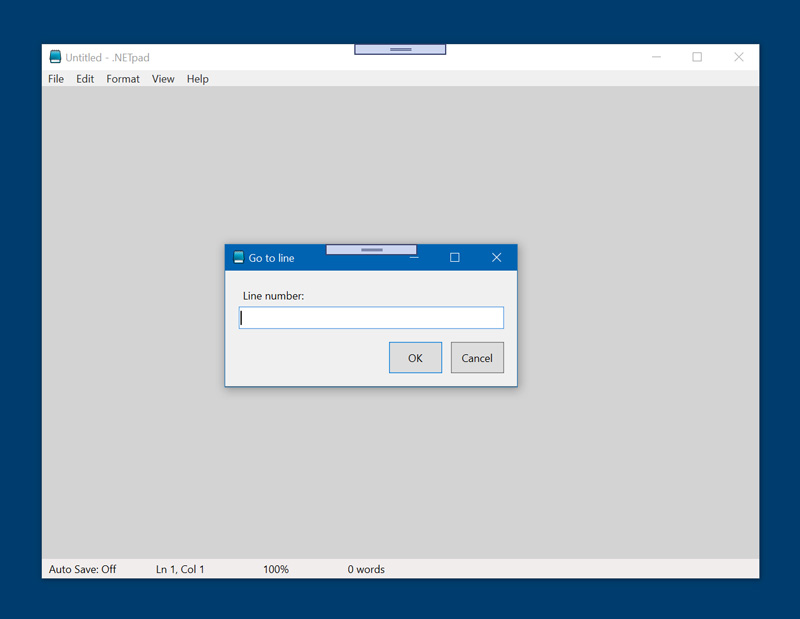
From here, we can simply access our custom-made Input Box much like we did with the built-in Input Box in WinForms. First, let’s just display the Input Box, with a customized title and label, to see what it looks like. So add the following code inside of the GoToCommand_Executed event handler:
InputBox inputBox = new InputBox
{
    Title = "Go to line"
};
inputBox.QuestionLabel.Content = "Line number:";

bool? input = inputBox.ShowDialog();
When you run the application and open the Edit menu, notice that Go To’s keyboard shortcut hint has appeared.

Then, when you select Go To (or type CTRL + G), you’ll finally get to see our custom Input Box in action:
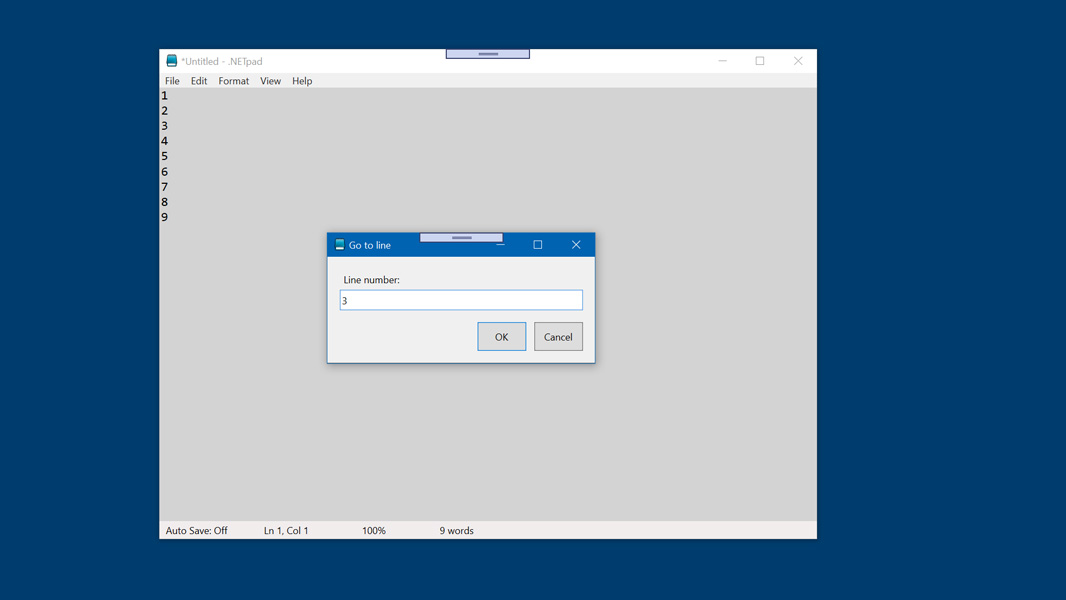
Great. But now we need to actually implement Go To. So add the following code, which is derived from what I wrote for the WinForms version of the app, inside of GoToCommand_Executed and right below the code it already contains:
try
{
    int LineNum = System.Convert.ToInt32(inputBox.AnswerTextBox.Text);
    if (LineNum <= TextBox1.LineCount)
    {
        TextBox1.SelectionStart = TextBox1.GetCharacterIndexFromLineIndex(LineNum - 1);
        TextBox1.SelectionLength = 0;
        TextBox1.ScrollToLine(LineNum - 1);
    }
    else
    {
        MessageBox.Show("The line number is beyond the total number of lines", "Go to line");
        GoToCommand_Executed(this, e);
    }
}
catch (System.Exception ex)
{
    MessageBox.Show(ex.Message);
    GoToCommand_Executed(this, e);
}
This should work pretty well, in that it will kick an exception (and a Message Box to that effect) if you enter a non-integer value, give you an error message if the line number doesn’t exist, and navigate you to the correct line if it does.
Next up, we’ll implement Find, Find Next, Find Previous, Replace, and Replace All, plus Auto Save. And I think that will do it for our initial pass at a WPF version of .NETpad. That said, this one is pretty rough, so it may be worth doing a fit and finish pass as well.
More soon.

Gain unlimited access to Premium articles.
With technology shaping our everyday lives, how could we not dig deeper?
Thurrott Premium delivers an honest and thorough perspective about the technologies we use and rely on everyday. Discover deeper content as a Premium member.