The UWP Notepad Project (Redux): Text Zoom, App Name, App Icon (Premium)
- Paul Thurrott
- Jul 09, 2020
-
0
This time, we’ll implement .NETpad’s text zooming capabilities, fix the application name, and add a new application icon.
Text zoom
Because the TextBox control in the Universal Windows Platform (UWP) doesn’t support zoom natively—the versions in Windows Forms or the Windows Presentation Foundation (WPF) didn’t either—we’ll need to employ the same workaround we used in previous versions of the app. That is, rather than mapping the font size chosen by the user to the textbox, we’ll instead map it to a global variable named MasterFontSize. Then, we can adjust the font size in the textbox according to the user’s zooming needs without impacting the font size that will be saved and reloaded during each app session.
While the way we implement zoom hasn’t changed under the covers, I am changing the way that the user interacts with the zoom commands (Zoom In, Zoom Out, and Restore Default Zoom) because the UWP version of this app has a more visual design. So instead of menu items for each, I’ve placed the zoom commands right in the lower command bar (status bar) for direct interaction.
That should be a straightforward change, as each of those buttons has a Click event handler and can have a keyboard shortcut, just as with the older menu-based designs.
To get started, though, we need to implement MasterFontSize, and that will require several small changes throughout the code in MainPage.xaml.cs.
First, declare two new global variables in the section below the comment // For the textbox. We’ll need ZoomValue later when we implement the zoom commands:
double MasterFontSize;
int ZoomValue = 100;
Next, locate ReadSettings(). Here, you will find a line of code below // Font Size that sets the value of TextBox1.FontSize to that of the user setting MyFontSize. Right below that, add this new line of code:
MasterFontSize = TextBox1.FontSize;
Then, scroll down to the bottom of ReadSettings(), where you’ll find an else clause in which we load the default font configuration and save to settings. Under the line that reads TextBox1.FontSize = 18; add the following line of code:
MasterFontSize = 18;
Now, locate SaveFontSettings(). In this method, there is a line of code that currently reads as:
settings.Values["MyFontSize"] = TextBox1.FontSize;
Change this to:
settings.Values["MyFontSize"] = MasterFontSize;
Now, locate FontSizesList_SelectionChanged(). Here, there are two lines of code. Open up a line between those and add the following new line of code:
MasterFontSize = TextBox1.FontSize;
OK, that should do it. Now, we need to implement the Click event handlers for ZoomOutButton, RestoreDefaultZoomButton, and ZoomInButton. So locate the tags for those three controls in MainPage.xaml and create the three empty Click event handlers.
The code I wrote for the previous (WPF) version of the app basically works the same here. So add the following code to ZoomOutButton_Click():
if (ZoomValue > 10)
{
    ZoomValue -= 10;
    TextBox1.FontSize = (MasterFontSize * ZoomValue) / 100;
    ZoomButton.Content = ZoomValue.ToString() + "%";
}
Then, add the following code to ZoomButton_Click(). (We’re using this middle button, which display the zoom level, as Restore Default Zoom.)
TextBox1.FontSize = MasterFontSize;
ZoomButton.Content = "100%";
ZoomValue = 100;
Then, add the following code to ZoomInButton_Click():
if (ZoomValue <= 500)
{
    ZoomValue += 10;
    TextBox1.FontSize = (MasterFontSize * ZoomValue) / 100;
    ZoomButton.Content = ZoomValue.ToString() + "%";
}
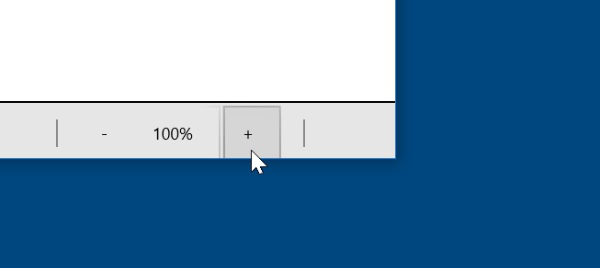
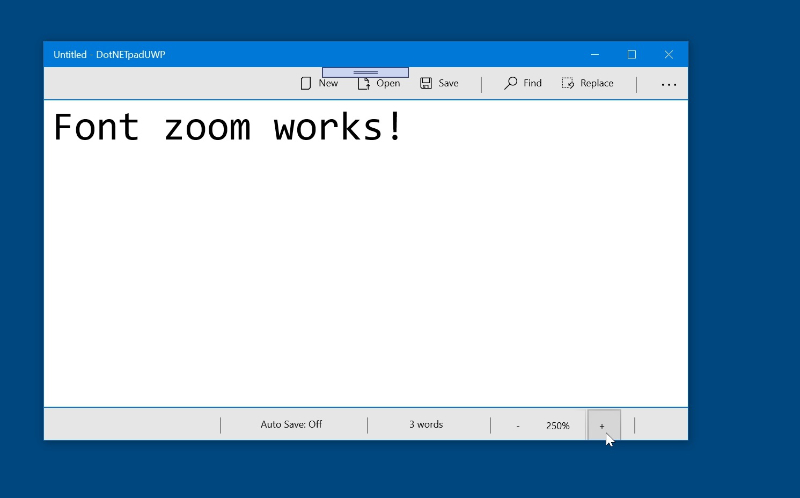
Now, if you test these three buttons, you should see that clicking ZoomOutButton (“-”) zooms the text out, clicking ZoomButton restores the zoom to 100 percent, and clicking ZoomInButton (“+”) zooms the text in.
That’s good, but we have a few more things to do. First up is the keyboard shortcuts: CTRL + Minus should zoom out, CTRL + Plus should zoom in, and CTRL + 0 should restore the default zoom. So we’ll need to update the tags for ZoomOutButton, RestoreDefaultZoomButton, and ZoomInButton to include keyboard accelerators. And we’ll add a tooltip to RestoreDefaultZoomButton so that when the user mouses over this control, they’ll get a visual hint.
When you’re done, the XAML for ZoomOutButton, RestoreDefaultZoomButton, and ZoomInButton will look like so:
<AppBarButton Name="ZoomOutButton" VerticalAlignment="Center" Content=" - " Click="ZoomOutButton_Click"><AppBarButton.KeyboardAccelerators><KeyboardAccelerator Modifiers="Control" Key="Subtract" /></AppBarButton.KeyboardAccelerators></AppBarButton>
<AppBarButton Name="ZoomButton" VerticalAlignment="Center" Content="100%" ToolTipService.ToolTip="Restore Default Zoom" Click="ZoomButton_Click"><AppBarButton.KeyboardAccelerators><KeyboardAccelerator Modifiers="Control" Key="Number0" /></AppBarButton.KeyboardAccelerators></AppBarButton>
<AppBarButton Name="ZoomInButton" VerticalAlignment="Center" Content=" + " Click="ZoomInButton_Click"><AppBarButton.KeyboardAccelerators><KeyboardAccelerator Modifiers="Control" Key="Add" /></AppBarButton.KeyboardAccelerators></AppBarButton>
And when you test this … It doesn’t work.
Well, the tooltip appears when you mouse-over ZoomButton. And CTRL + 0 works. But the keyboard shortcuts for ZoomInButton and ZoomOutButton do not work. And that’s because the Key property, which is of type Windows.System.VirtualKey, can’t map to the + or – keys. The Add key is the + key on the numeric keyboard and Subtract is the – key on the numeric keyboard. And I don’t see the equivalent of Oem_Plus or Oem_Minus in UWP.
I’m hoping someone has a solution to this. In the meantime, I’m using Ctrl + Down (Down Arrow) on ZoomInButton and Ctrl + Up (Up Arrow) as a workaround. And since that’s not obvious or normal, maybe ZoomInButton and ZoomOutButton should have tooltips too and each of the tooltips for these three buttons should include their keyboards shortcuts. Like so:
<AppBarButton Name="ZoomOutButton" VerticalAlignment="Center" Content=" - " ToolTipService.ToolTip="Zoom Out (Ctrl + Down Arrow)" Click="ZoomOutButton_Click"><AppBarButton.KeyboardAccelerators><KeyboardAccelerator Modifiers="Control" Key="Down" /></AppBarButton.KeyboardAccelerators></AppBarButton>
<AppBarButton Name="ZoomButton" VerticalAlignment="Center" Content="100%" ToolTipService.ToolTip="Restore Default Zoom (Ctrl + 0)" Click="ZoomButton_Click"><AppBarButton.KeyboardAccelerators><KeyboardAccelerator Modifiers="Control" Key="Number0" /></AppBarButton.KeyboardAccelerators></AppBarButton>
<AppBarButton Name="ZoomInButton" VerticalAlignment="Center" Content=" + " ToolTipService.ToolTip="Zoom In (Ctrl + Up Arrow)" Click="ZoomInButton_Click"><AppBarButton.KeyboardAccelerators><KeyboardAccelerator Modifiers="Control" Key="Up" /></AppBarButton.KeyboardAccelerators></AppBarButton>
There’s gotta be a better way. Let me know if you know what that is.
App name
Right now, the app name displayed in the title bar matches its project name in Visual Studio. But DotNETpadUWP isn’t just a bad name. It’s not even the name of the app. So let’s fix that.
Locate Package.appxmanifest in the Solution Explorer pane and double-click it to open it.
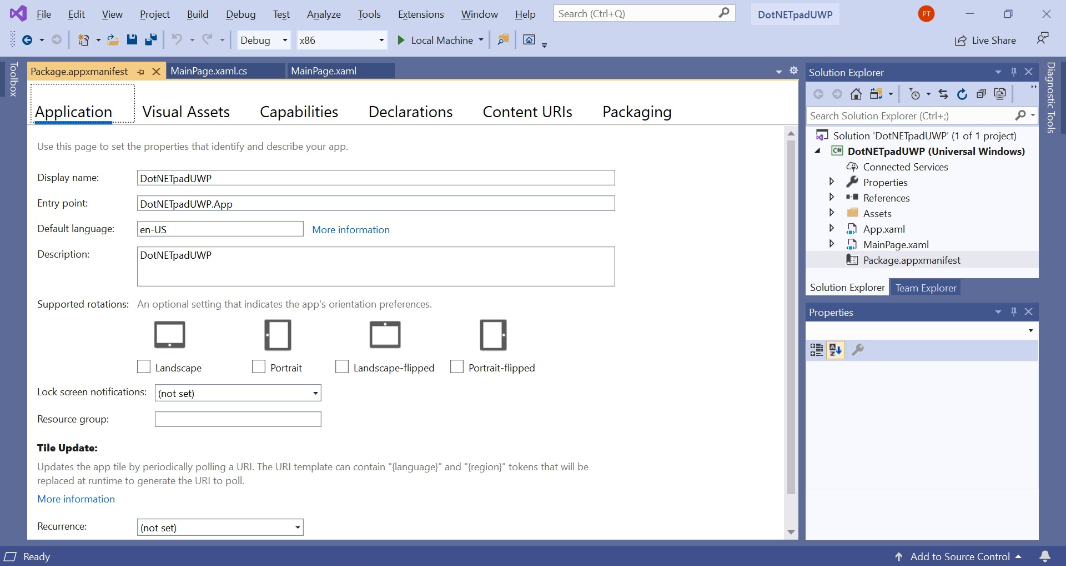
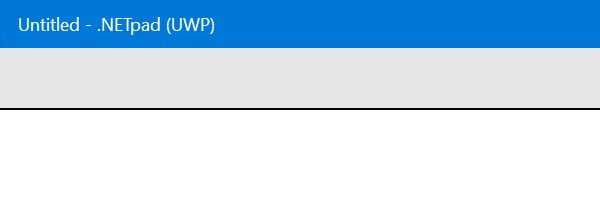
Change the text in the Display name field to “.NETpad (UWP)” (no quotes). Optionally, change the text in the Description field. (That field can’t be blank.) Then save the file. Now, when you run the app, the slightly better name will appear.
App icon
Next, let’s add an icon, which will appear in the taskbar, on the app’s tiles in the Start menu, and briefly as a splash screen image when the app first launches. (UWP can be slow.) We used the same icon for the WinForms and WPF versions of .NETpad, but I think the move to a non-desktop platform necessitates a change. And this time, I found an icon that doesn’t require any attribution. (Here’s the direct link to the actual file you need.)
Download the PNG version of this file. Then, in Visual Studio, navigate to the Visual Assets tab in Package.appxmanifest.

In the Asset Generator section at the top, click the “…” button next to Source. Then, locate and open the PNG file you just downloaded.
![]()
Now, click the Generate button. You will be warned that you’re about to overwrite some other files, but all you’re overwriting is that blue “X” icon images, so click OK. Visual Studio will need a bit of time to generate various visual assets from the icon, so give it a minute. You can scroll down in the Visual Assets tab to see how this image will be used on various tile sizes, icons, and elsewhere.
Now, when you run the app, you’ll see the new icon on the splash screen and in the taskbar.
![]()
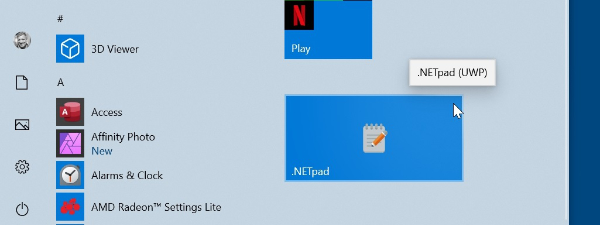
And if you look in the Start menu, you’ll see it there too.
![]()
You can also pin the app to the tiles area of the Start menu and experiment with different tile sizes. But as you can see, there’s no app name on the tile. To fix that, locate the Display Settings are in the Visual Assets tab of Package.appxmanifest and edit the Short name field; I used “.NETpad” (no quotes). Then, check the Medium Tile, Wide Tile, and Large Tile checkboxes, save the file, and re-run the app.
Now, when you pin the app to the tiles area of the Start menu (yes, you’ll have to do it again), it will have the app name text too.
A looming problem: App close
Finally, I need to address a serious issue with this app: If the user closes the app by clicking its Close window button (the “X” in the upper-right) or by typing ALT + F4, it just closes. And if you’re working with an unsaved document when you do this, you’ll lose your work.
Unfortunately, I have not yet found a viable solution to this problem.
As you know, UWP was originally created as a mobile apps platform to rival Android and iOS. And as such, it was designed for the needs of mobile apps, not desktop apps. Over time, of course, this strategy failed, and after Microsoft killed off its only volume mobile platform, Windows Mobile (previously Windows phone), it began adding desktop-like features to UWP so that developers could at least create Windows 10 PCs apps that somewhat resembled real desktop apps. The MenuBar control is a good example.
But UWP is still, at heart, not a desktop platform. And if you look at Microsoft’s Windows 10 universal Windows platform (UWP) app lifecycle documentation, you’ll see the problem: UWP supports the notion of background processing, automatic app suspending, and even automatic app termination if memory is tight, features we expect in mobile platforms. But it doesn’t natively support very basic features that I feel any app platform—mobile, desktop, whatever—should support. Including what happens when the user manually closes the app.
(On mobile, there is often a disconnect between what the user thinks they are doing and what really happens. That may explain why UWP was originally designed the way it was. But it’s still inexcusable, especially now.)
Put simply, if the user clicks the Close window button (the “X” in the upper right), the app developer should be able to prompt the user if there is unsaved data, such as there could be in our app. I’ve read that Microsoft originally didn’t want to allow this because it could allow malicious app writers a way to keep their programs from being easily closed. And that there is a process by which you can make an exception and that Microsoft, during its Store-based app approval process, will ensure that you aren’t doing anything dumb before approving your app.
I’ve researched this a lot, and most recently have used two posts Detect Application closing in UWP and App close confirmation in UWP to try and implement this functionality. But I can’t get it to work.
In the original version of this post, I described the work I had done to try and solve this problem, including the code I experimented with. But since it doesn’t work anyway, I’m not going to include it here. Hopefully, a reader knows of a way to fix this issue.
Speaking of the original post, when I first posted this series back in April, this is where I left off. But the app in its current state is incomplete, even given the features I’ve had to ignore because they’re hard or impossible to implement with UWP. And one of those features, Auto Save, could provide a nice workaround for the issues I note above where the user manually closes the app and could lose data: Maybe the UWP app should simply enable Auto Save by default and then warn the user of the consequences if they try to turn it off.
Maybe. But we can at least implement Auto Save next. And then I’ll fix the biggest visual issue with the app and offer better support for Windows 10’s Light and Dark modes.
More soon.

Gain unlimited access to Premium articles.
With technology shaping our everyday lives, how could we not dig deeper?
Thurrott Premium delivers an honest and thorough perspective about the technologies we use and rely on everyday. Discover deeper content as a Premium member.