Roll Your Own Windows Time Machine (Premium)
- Paul Thurrott
- Aug 24, 2023
-
14

Last week, a reader asked me if Microsoft or any third parties offer a full backup and restore solution like Apple’s Time Machine. Microsoft does not, not anymore, at least. And as for third parties, yeah, I’m sure such things do exist. But image-based backups like Time Machine aren’t just old school, they’re increasingly obsolete. Today, there’s a better way to achieve most of the benefits of this type of backup and restore solution that also avoids the downsides.
What are those downsides, you ask?
Most image-based backup solutions require a local storage device, typically an external drive, and that means you’re very much bound to whatever physical location in which that drive is found. If you are away from the drive, you can’t restore arbitrary data or the entire system. Likewise, when you’re detached from the device, it’s not keeping the backup data up to date. (I assume cloud-based image backup solutions exist now too, but these will be constrained by connectivity speeds.) Put simply, an image-based backup is something you basically need to manage, even though it’s technically automated.
Image-based backups are also, by nature, representative of one or more slices of time. You’re backing up as you go, in the background, and then one day you wish to restore the PC fully, perhaps to an early backup you made when everything was new and fresh, or perhaps from a newer, more up-to-date image. And … you get whatever is in that image. That is, the backup image contains everything that was on that PC at that slice in time. And that could include bad things. Malware you didn’t discover until later, whatever.
But in this modern cloud era, there is a better way. Or, I should say, a better set of ways: using tools that are (mostly) included with Windows 10 and 11, you can achieve almost everything provided by image-based backup solutions and more.
And in two of the three cases, you will be literally going back to the beginning—a clean install of the OS, for example, or clean installs of your apps—which, yes, means you may need to configure a few things to get up and running completely, whereas an image-based backup of the same system would retain whatever configuration changes you’d made to Windows and your apps before the backup image was created.
I will argue, however, that this newer approach is still better as we step through these processes. But here’s the asterisk that should mollify the doubters: you can always do both. You can still use whatever image-based backup solution you prefer and the three tools I discuss here, side-by-side. They don’t interfere with each other, and perhaps through experimentation, you may discover that you prefer this newer approach. Or not. Let’s find out.
At least two of the three tools will be familiar to most readers: Reset this PC (or Windows 11 Setup media), OneDrive, and the Windows Package Manager (winget). And while Reset this PC is core to Windows, two of these tools can be replaced with third-party alternatives. For example, you may use Dropbox or whatever instead of OneDrive. And you may prefer a third-party package manager like Chocolatey I will stick to the Microsoft tools here, of course.
OK, let’s take a look at each tool, discuss what they do, and how you can best take advantage of them.
Reset this PC/Windows 11 Setup media for a clean install of Windows
Reset this PC debuted with Windows 8 and provides an on-disk way to perform a system restore, which, when configured properly, duplicates a clean install of the operating system and returns it to its initial, factory-fresh state without you requiring to deal with the initial phase of Windows Setup. Reset this PC will also silently update itself as you upgrade to new Windows versions, ensuring that the OS you install is reasonably up-to-date and only needs the most recent month’s cumulative updates. And you can optionally choose to download a Windows install image from the cloud, which helps when there are issues with the local image or to ensure that you are as up-to-date as possible.
That said, there are two potential issues with Reset this PC, depending on how you feel about such things (and/or the specifics of your PC). First, PC makers can personalize the install image to include their own utilities and crapware, and you may not want that. And second, Microsoft of course installs some selection of crapware with Windows 10 and 11, and you may not want that either. Instead, you might want the cleanest possible install image.
Fortunately, you can overcome both issues.
To do so, skip Reset this PC and download a clean Windows 11 install image from Microsoft and make your own USB-based boot media. Use that to clean install Windows 11 instead. This will ensure that you don’t get your PC maker’s often superfluous or crapware-based utilities. (That said, you may want to download the utilities you do want first; I put them on the USB install drive.)
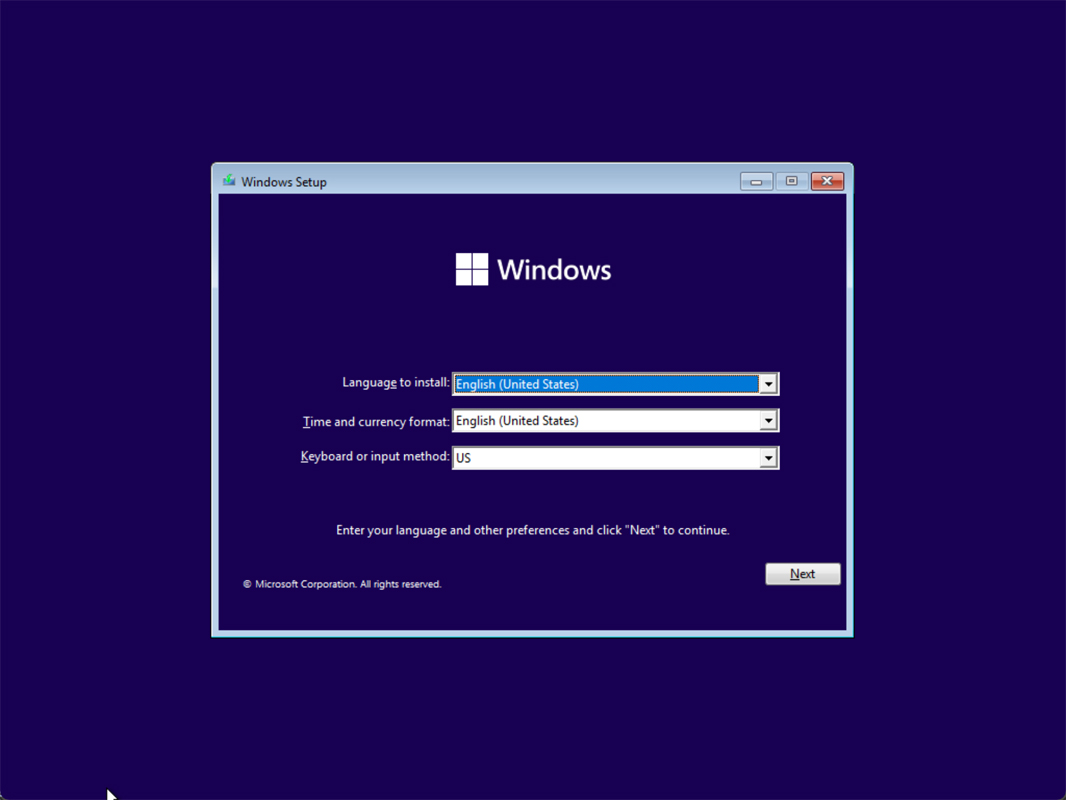
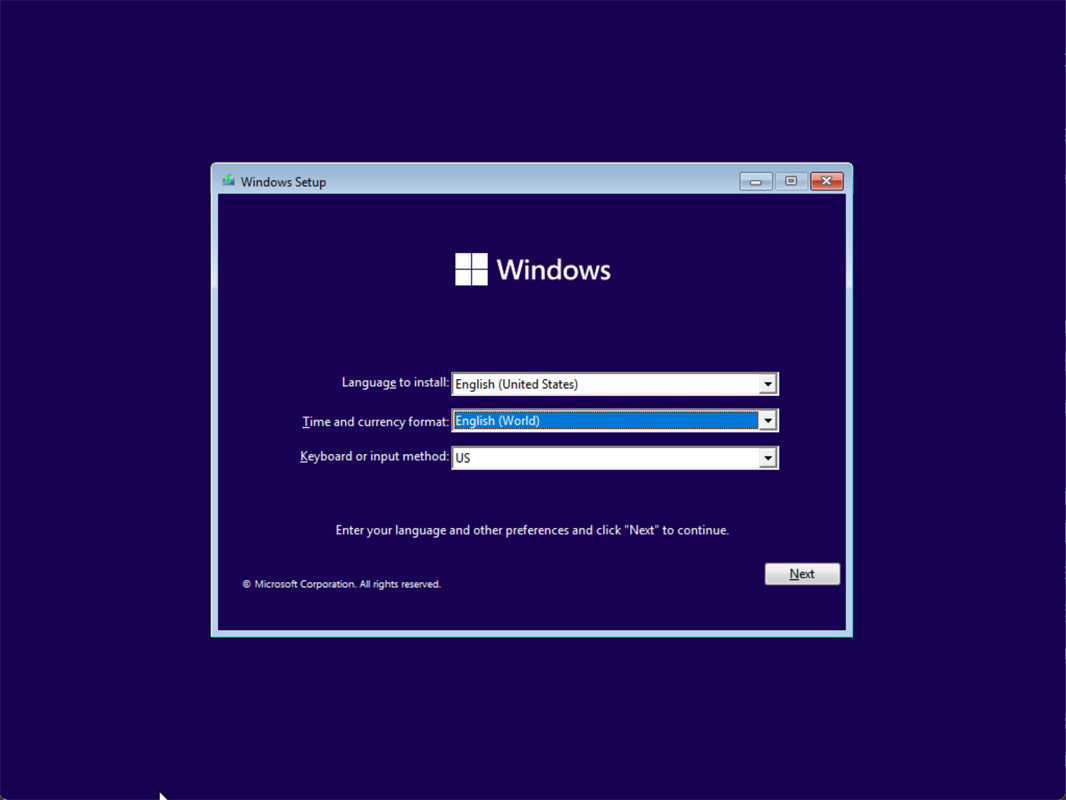
When you install Windows 11 (or 10) this way, the first screen in Windows Setup will help you address Microsoft’s crapware bundling: most people just skip right by this, but this step lets you configure your language, time and currency format, and keyboard or input method.
If you don’t want any Microsoft-supplied crapware, change the time and currency format to either “English (World)” or “(Europe).”
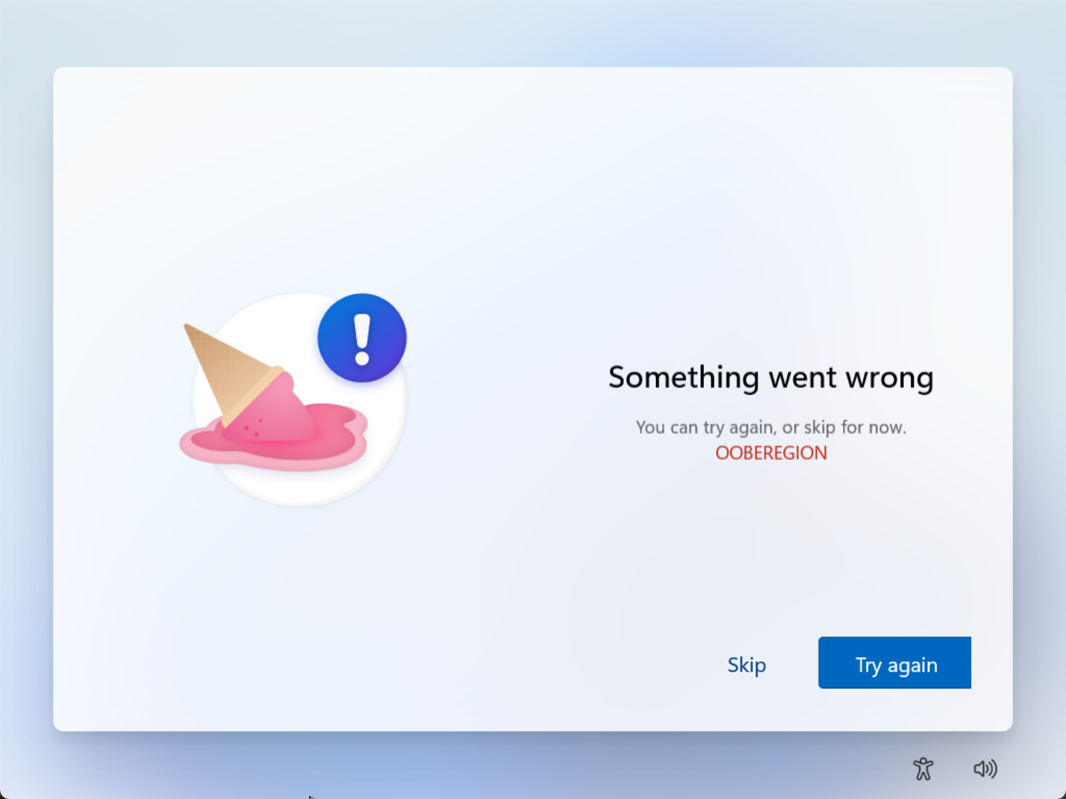
When you do, the Out-of-Box Experience (OOBE) is shorter, with fewer steps because Microsoft doesn’t know what to sell you, and you can safely click “Skip” when the “OOBEREGION” error pops up.
Then, when Setup completes, you will have none of the usual crapware that Microsoft dumps in the Start menu. (Don’t worry, Microsoft’s in-box apps are all still available via “More” in the Start menu. Only the crapware is gone.)

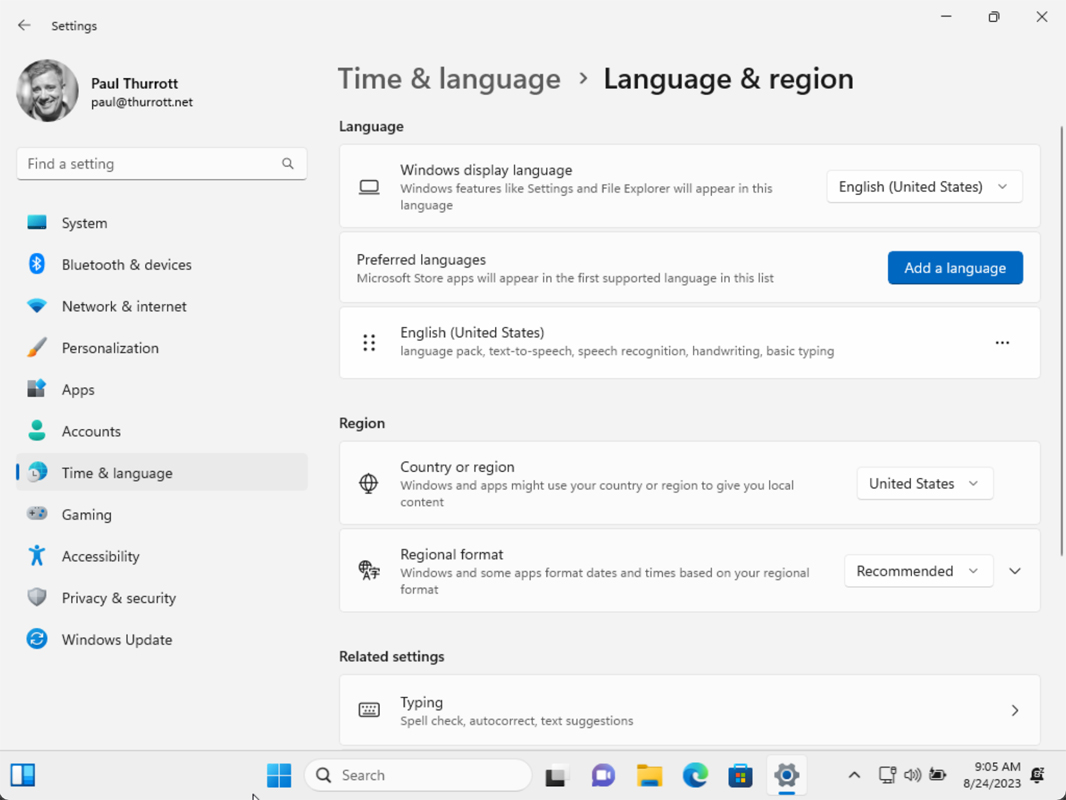
Just be sure to change to the correct region after you’re at the desktop: open Settings, navigate to Time & language > Language & region > Region > Country or region, and switch that to “United States” (or whatever).
What you lose: Windows 11 does not sync as many settings as Windows 10 (or, before that, Windows 8.x), and so you may need to manually configure some system settings after the install. If you use the Pinned area in Start a lot, you will need to pin your favorite apps there manually.
OneDrive for file sync
In Don’t Be a Statistic (Premium), I made the case that there is no excuse for data loss thanks to the availability of high-quality cloud storage services like OneDrive. Granted, you will almost certainly need to pay for the storage, either through a Microsoft 365 subscription (which is what I use), a paid OneDrive storage tier, or a third-party storage service. (Again, I’m assuming OneDrive here.)
When you sign into Windows with a Microsoft account, you are automatically signed into OneDrive and it will use Files On-Demand to display all of your cloud-based files in File Explorer. It also may automatically sync your PC’s local Desktop, Documents, and Pictures folders with OneDrive, depending on whether you installed Windows 11 Home or Pro. Also confusing, it may offer to sync your Music and Videos folder with OneDrive, though I’ve only seen this on some systems. And also confusing, OneDrive calls this feature “backup” instead of “sync.” It’s really a sync.
No matter: as long as you’re doing all of your work in folders that are synced to OneDrive, you’ll never lose anything and your data will be instantly portable to any PC. In the article linked above, I discuss my own strategies for this, but your needs will be different. Many will prefer to simply use the built-in folder “backup” feature in OneDrive. Others will have their own ways of doing things. It doesn’t matter, as long as you never store anything in a location on your PC that is not synced to the cloud. The details are up to you.
What you lose: Nothing.
Windows Package Manager (winget) for application installs
With the OS and your data out of the way, the final piece of this more modern restore puzzle is getting your applications installed and configured. In the past, I would handle this task by manually downloading each app I use from the web and/or the Microsoft Store as needed. But thanks to the arrival of the Windows Package Manager (winget) I now automated almost all of those installs. And so, too, should you.
Three tips.
First, you should use Winstall.app, from our friend Mehedi, to generate the script you will use with winget to automate your app installs. This free web app lets you search for the apps you need and add the appropriate command line for each, generate a script. After I’ve installed Windows and sync OneDrive, I just copy and paste the contents of this script into a Terminal window and let winget to its thing.
Second, you should store this script somewhere in OneDrive. That way, you will always have it, and when you restore a PC or otherwise perform a clean install of Windows 11, it will be right there with all your other data.
And third, there’s a GUI front-end for winget called WinGetUI that automates the updating of your apps. Like winget, it’s not perfect, and you may find that certain apps are better off updating themselves. But you will figure that out and can configure the app to ignore those apps.
What you lose: It’s not possible to pull your sign-ins and configuration data into any apps that you install with winget, so you will need to configure each (web-based app) accordingly. In my experience, this isn’t terrible: once the apps are installed, it takes me about 10 minutes to be up and running. Also, you may still need to install some apps manually, so you should consider taking note of which ones and store that file with your install script.
Final thoughts
There it is, a set of modern, cloud-based tools that provide most of the benefits of image-based backups but without the hassle. No, it’s not a single integrated solution. And yes, you may have a few new workflows to adopt and master. But I feel like this approach is very flexible. And I’ve transitioned to this way of doing things successfully, and I am absolutely positive, given how many laptops I review, that this is an efficient way to do these things. Whether it makes sense to you or not remains to be seen. But I think that most readers would benefit from doing things this way, and I’m curious about any success stories, concerns, or improvements you may have.
And who knows? Things may change soon: Windows 11 23H2 will introduce a new Windows Backup app that might automate some of these tasks further. I’ll be looking at that soon.

Gain unlimited access to Premium articles.
With technology shaping our everyday lives, how could we not dig deeper?
Thurrott Premium delivers an honest and thorough perspective about the technologies we use and rely on everyday. Discover deeper content as a Premium member.