Modernizing .NETpad Step-By-Step, Part 7: Find, Find Next, and Find Previous (Premium)
- Paul Thurrott
- Sep 16, 2024
-
0
In this phase of the .NETpad modernization project, we will implement a Find/Replace interface and its Find-related commands before forging ahead and tackling its Replace-related commands. As I explained recently, we will create the interface in a non-standard way, using a pane that toggles on/off as needed, and not a custom dialog. The goal here is two-fold: To create as natural a UI as possible while also improving on the rudimentary Find/Replace functionality in the original app.
If it’s not clear what any of that means, please check out the article linked above. Here, we’re just going to make it happen.
Create the Find/Replace pane
In previous phases of this project, we created a custom Content dialog and then used it to implement various custom dialogs needed by the app. The Find/Replace pane work is similar, but instead of creating a new window class, we’re going to add the code inline in MainWindow.xaml, the main app window. It will go between the app’s menu bar and text box, and it will be hidden by default and only appear when needed.
As you must know by now, the main app window is a simple grid with three rows for the menu bar (row 0), text box (row 1), and status bar (row 2), respectively. With this addition, however, there will be four rows, so we need to make space between the menu bar and the text box. Then we have to change the row numbers of the text box and status bar to 2 and 3, respectively. And add an extra row definition for the Find/Replace pane in row 1.
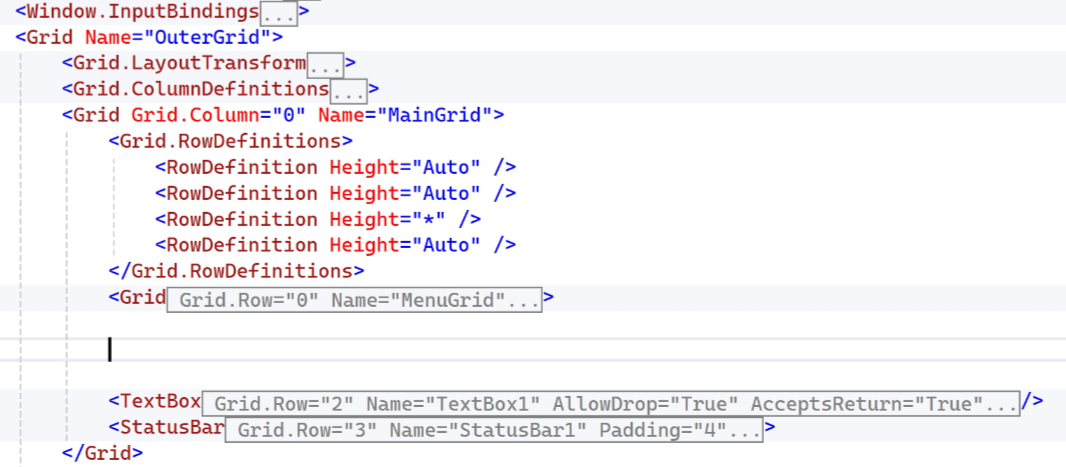
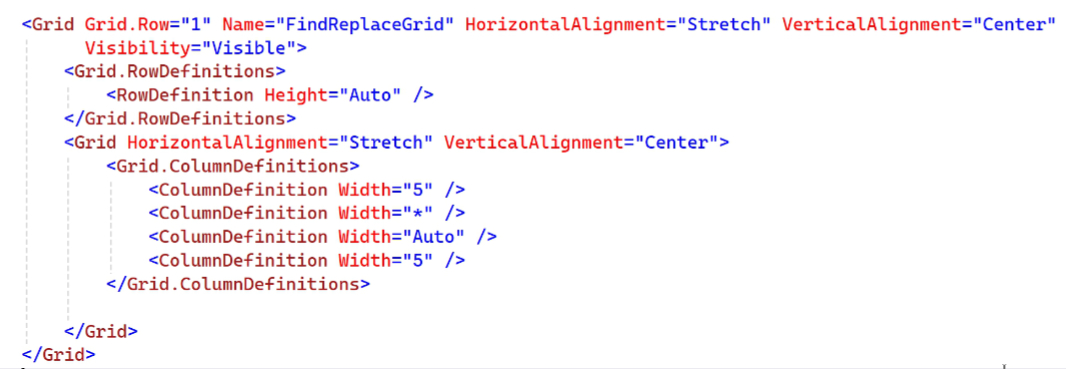
Next, we can block out the Find/Replace pane, which is implemented as a grid (of course). This will span the width of the app window. And while its visibility will be collapsed, we’ll explicitly mark it as visible as we build it out so we can see it.

As always, there are multiple way to design this thing and create it with XAML code. But I am opting for simplicity: It’s a single row. And then that row will be divided into various columns that represent some empty space on the far right and left (as we did with the custom Content dialog) and, in between those columns, space for all the necessary controls. Easy. But what controls do we need?
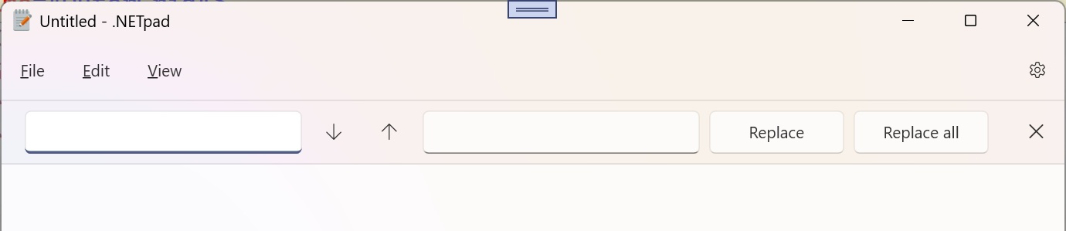
If you look at Notepad’s File/Replace dialog and translate that into a pane with a single row of the most pertinent controls (we’re going to ignore the “Match case” and “Wrap around” features under the “More options” for now, but I suspect both are simple enough to implement for a future update) it might look something like this.
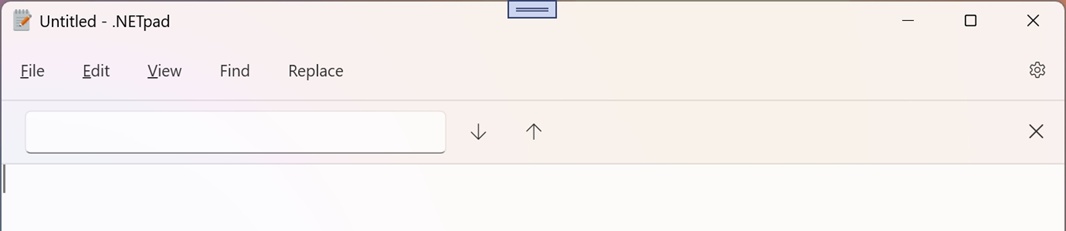
But like Notepad’s Find/Replace dialog, it may make sense to hide the controls related to Replace unless they’re needed. So it could also have a default view like so when the user explicitly choose Find (and not Replace).
This requires a bit of auto-sizing finesse. So the Find/Relace pane will have four main columns, two for the spacers on the sides, one that will auto-size according to its contents, and one for the “Close” button over on the right, that will keep its size and location no matter what else is happening. So the top-level design here is that single row and then a grid with four columns inside it, like so:
This works, but to visually separate the Find/Replace pane (which, again, is implemented as a grid), we’re also going to wrap a grid inside in a border control. So let’s just add that now.
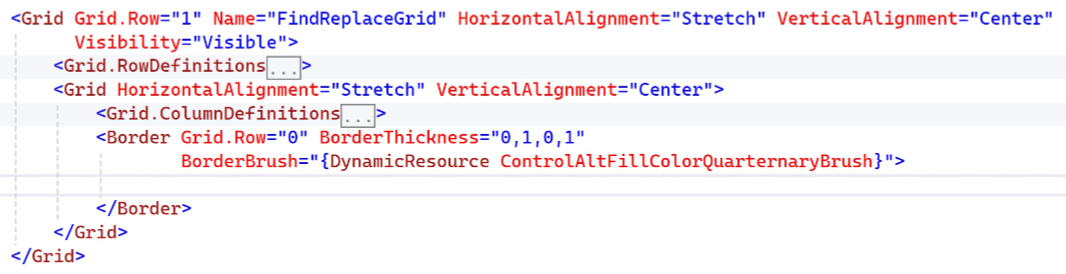
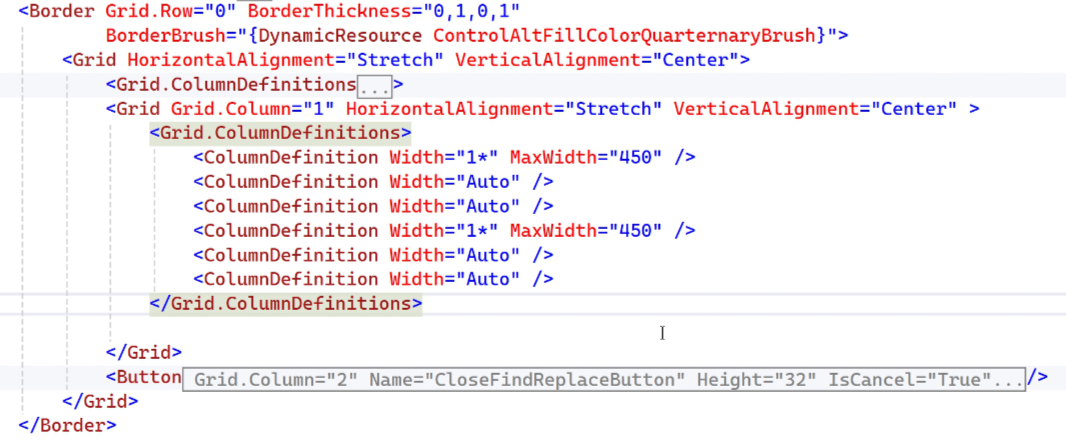
Of the four columns in that innermost grid, we only need to deal with two: Column 1 (the second column), which will contain a resizable grid for most of the pane’s controls, and column 2 (the third column), for the “Close” button, which will not resize. That looks like so:
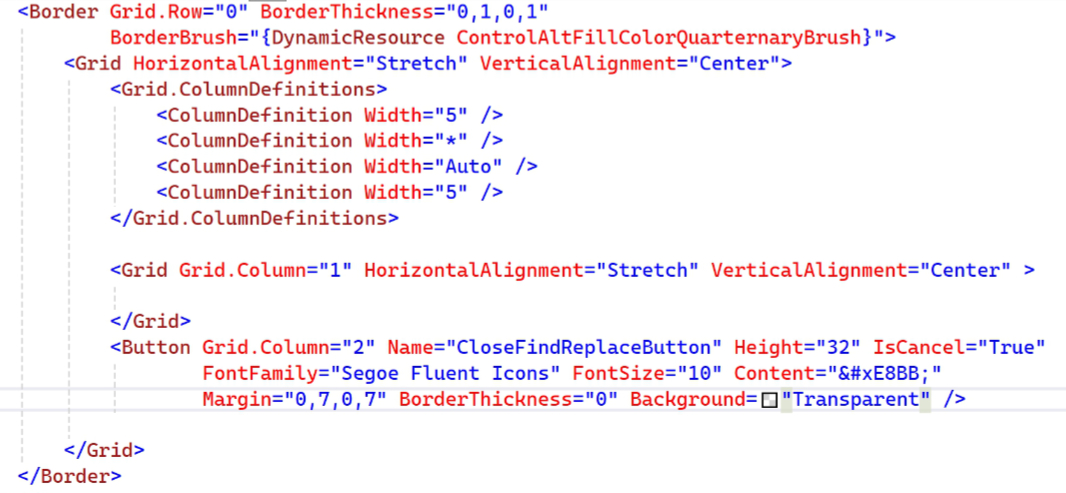
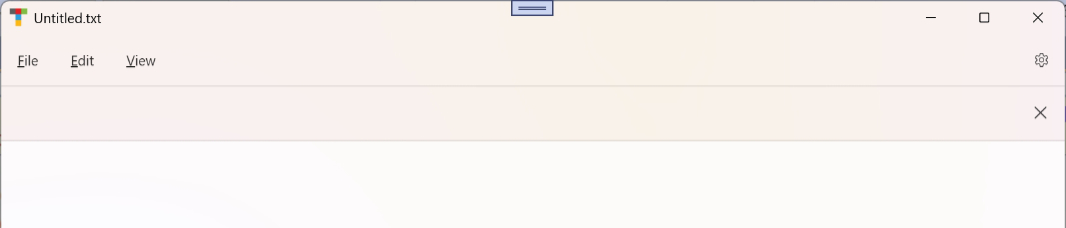
And since we finally have a control in there with a defined size and content–the “Close” button, you can run the app now and see how it looks. (Ignore the app icon in the upper-left; this is just a test version of the app.)
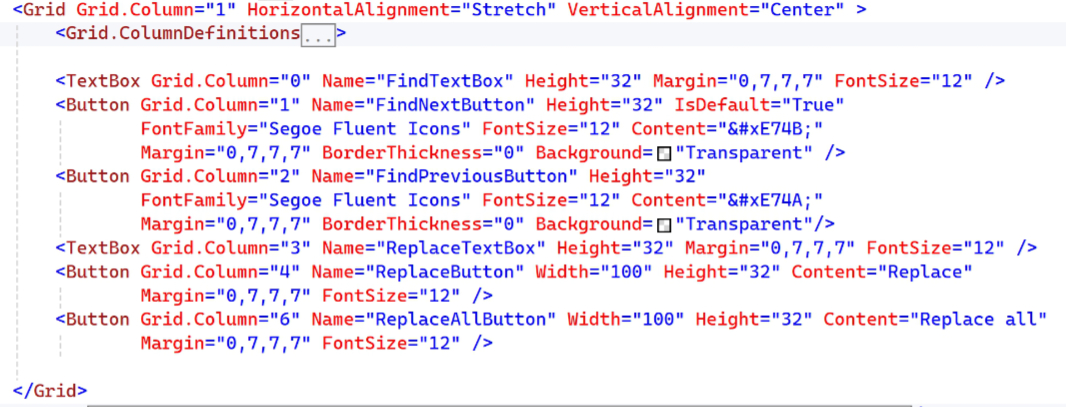
Inside that empty innermost grid, we can define columns for the text boxes and buttons that make up the Find/Replace pane. There are 6 are of them, for the Find text box, Find Next button, Find Previous button, Replace text box, Replace button, and Replace all button, respectively, from left to right.
A couple of points about that code. The Find and Replace text boxes (columns 0 and 3, respectively) will be auto-resize identically as the window is resized. They have the same max widths, ensuring that they don’t get too wide (which is important whether one or both are visible; the minimum width of the window means we don’t have to worry about min widths there). And the other four columns, for the various buttons, will all retain their respective sizes, no matter how the app window is sized.
As for the contained code for the controls that make up this pane, it’s straightforward XAML that’s mostly informed by our previous work on the custom Content dialogs and elsewhere. It looks like so:
When we run the app now, we can see all the controls in the pane. Be sure to experiment with resizing the window, too.
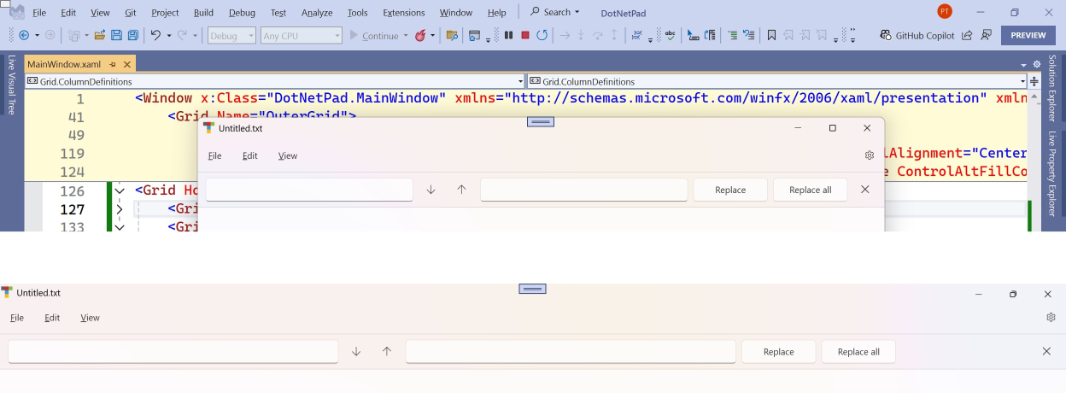
While we can see all the controls here, what the user sees, eventually, will vary according to how they summon this pane. If the user chooses “Find,” only the Find text box, Find Next, and Find Previous buttons (plus the Close button) will be shown.
OK. That should do it for the base XAML.
Write code to toggle the Find/Replace pane on/off
To get started with the C# code that controls the Find/Replace pane, we’ll create two temporary top-level menu items to test the Find and Replace commands, respectively, without touching the original code. That way, we can see how the pane appears when either command is used. Plus, we need a way to close the pane.
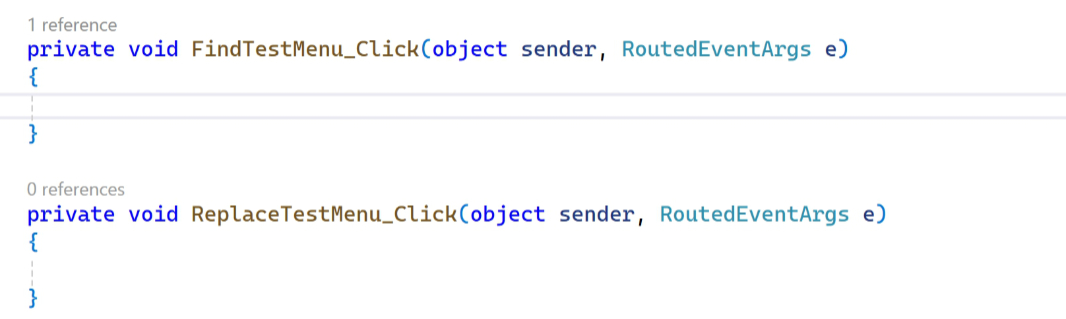
The test menu items are obvious enough and work as with similar controls that we used in the past. Add the following code to MainWindow.xaml.

This looks as expected.

Now, let’s hide the Find/Replace panel by default so it can be toggled on by those menu items (and, later, by the Find or Replace commands firing). Locate the code for the FindReplaceGrid grid in MainWindow.xaml and change its visibility to Collapsed.

If you run the app now, it will look normal, with the menu bar, text box, and status bar, but no Find/Replace pane.
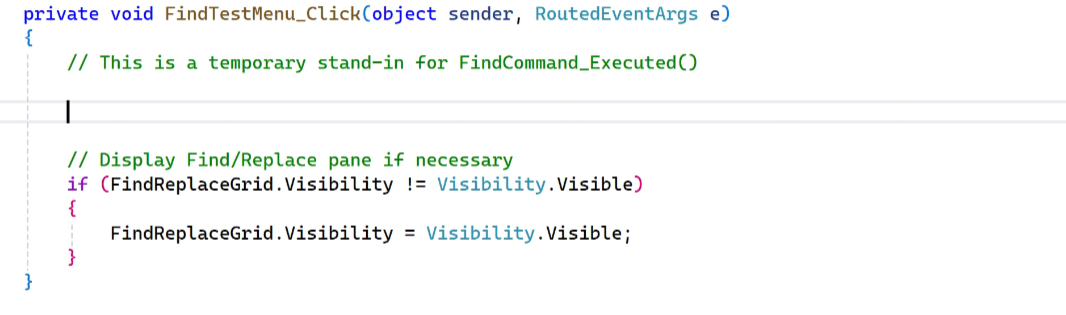
Next, open MainWindow.xaml.cs and locate the FindTestMenu_Click() event handler near the bottom.
Add the following code to display the pane if it’s not already visible. (Remember that this code block will eventually fire in response to the Find command, which can be triggered by the user typing Ctrl + F. If the Find/Replace pane is already visible, nothing happens.)

Now, when you run the app and click the “Find” menu item, the pane appears.
Next, we need to code the way(s) the user can close the pane. There are two: By clicking its “Close” button, obviously, but also by tapping the Esc key. In that latter case, the behavior emulates how a Content dialog works: Tapping Esc closes the dialog.
Both of these are handled by the same single line of code. Just add a Click() event handler to CloseFindReplaceButton in MainWindow.xaml. Then, find this new CloseFindReplaceButton_Click() event handler in MainWindow.xaml.cs and add the following code:

Now, when you run the app, open the Find/Replace pane, and then click “Close” or tap Esc, the pane closes. The reason tapping Esc works is that we already added the code IsCancel=”True” to the XAML for CloseFindReplaceButton. That’s nice two-fer.
Replace will work similarly. But let’s stick with Find for now. There’s a lot more work to do.
Implement Find
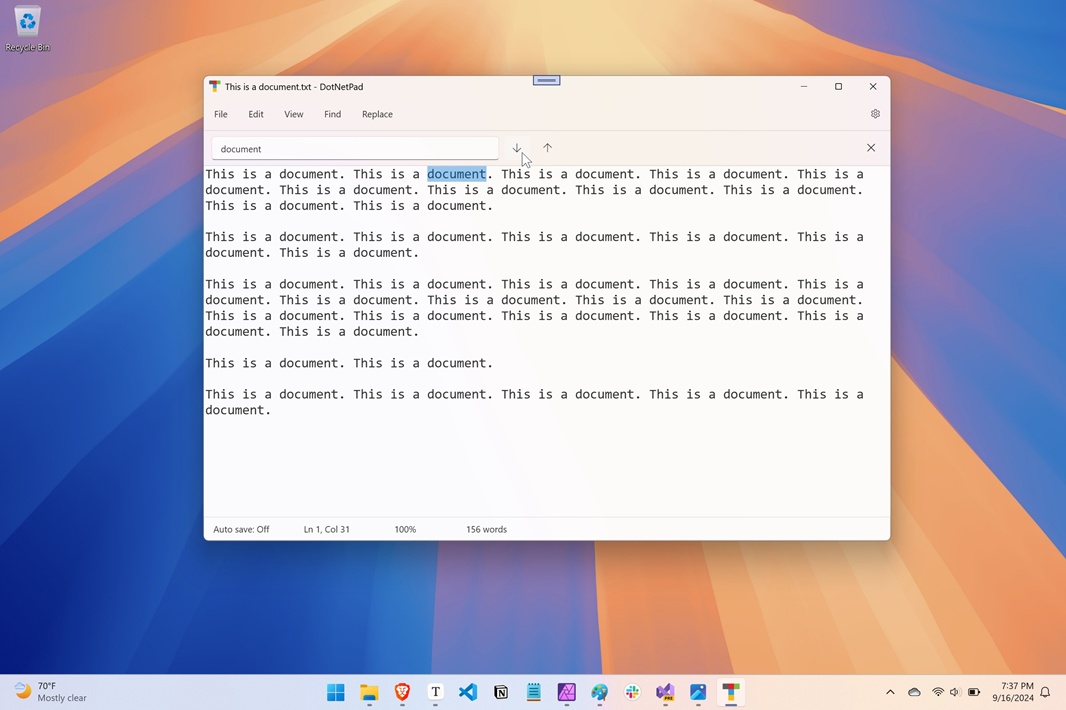
As I keep rediscovering, Notepad is a surprisingly sophisticated app despite its simple appearance. This is true of Find (and related commands like Find Next, Find Previous, and Replace) as well: There’s an interesting set of behaviors here, and it’s important to me that .NETpad mimic those behaviors as closely as possible.
No matter how the user summons Find (selecting Edit > Find in the menu or by typing Ctrl + F), the following can happen:
- If the Find/Replace dialog (the Find/Replace pane in our app) isn’t visible, display it.
- If the user has selected text in the main app window’s text box, copy that text into the Find text box (FindTextBox) in the Find/Replace pane, set the focus on that text box, and select all.
- If no text is selected, just set the focus on the that text box.
To stay focused on the task at hand, let’s first hide the three Replace-related controls in the Find/Replace pane by adding the code Visibility=”Collapsed” to each in XAML like so.

Now, we have the simpler Find-focused version of the pane that users will see when they use Find.

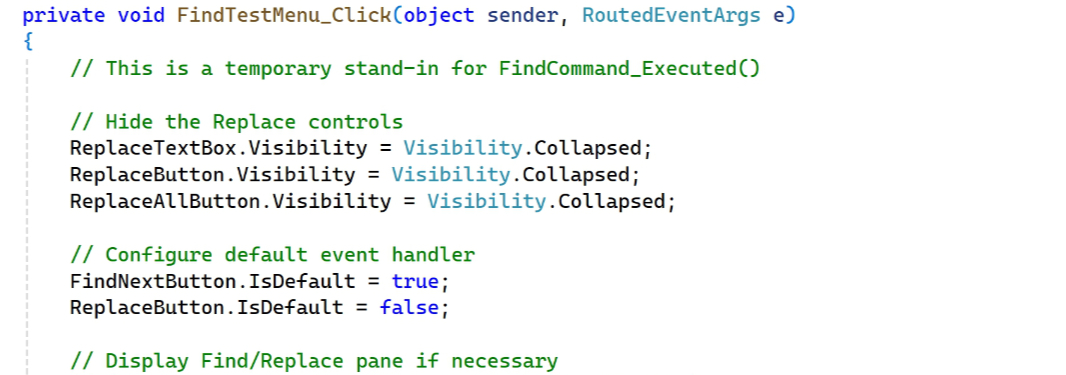
Next, we have to build out FindTestMenu_Click() a bit further. Right now, it just displays the pane if needed. But there’s more to do, and this code will all be mirrored in the similar Click() event handler later, which helps explain a few things in there that may seem redundant right now. So make some space in FindTestMenu_Click() like so.
Then, add the following code to programmatically collapse (hide) the three Replace-related controls and make sure that the Find next button (and not the Replace button) is the default, meaning the control that will handle what happens when the user taps the Enter key.
There’s more: FindTestMenu_Click() also needs to see whether there’s any selected text (in the main app’s text box) and, if so, put that text into the Find text box in the Find/Replace pane and then select it. Oh, and then it should actually find the text if possible. Obviously.
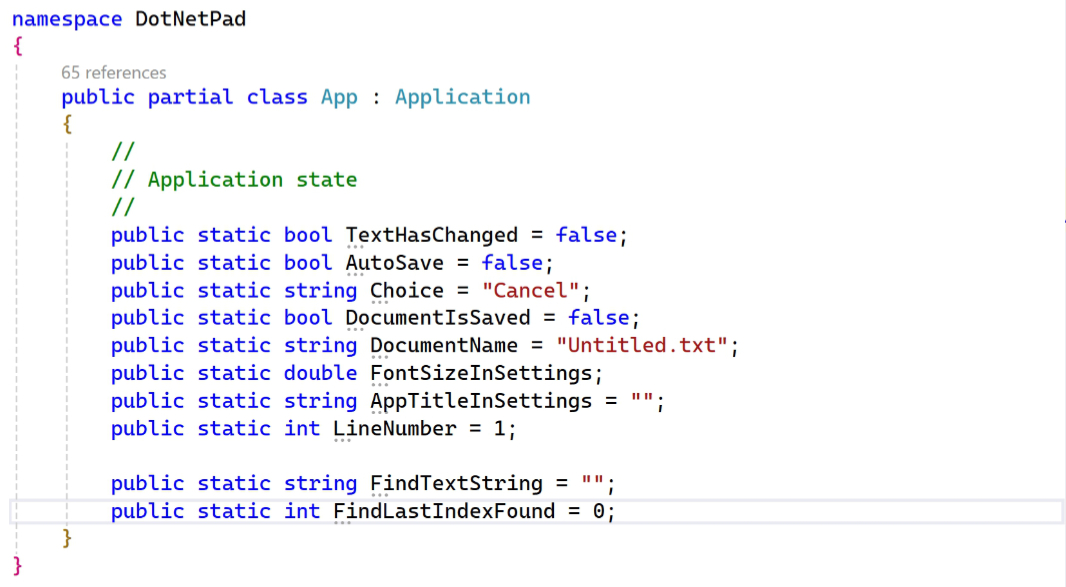
In the OG version of .NETpad, we had two “global variables” we declared in the MainWindow class. We’re going to upgrade them to app-level variables, so find them MainWindow.xaml.cs and Cut them to the Clipboard.

Then, open App.xaml.cs and paste them into the area where we define app-level application state variables. Add the public and static modifiers as with the other variables there.
Now, take a look at the FindCommand_Executed() event handler in MainWindow.xaml.cs. This is the code we’re eventually going to replace. It’s what runs when the Find command executes (via Edit > Find or Ctrl + F).
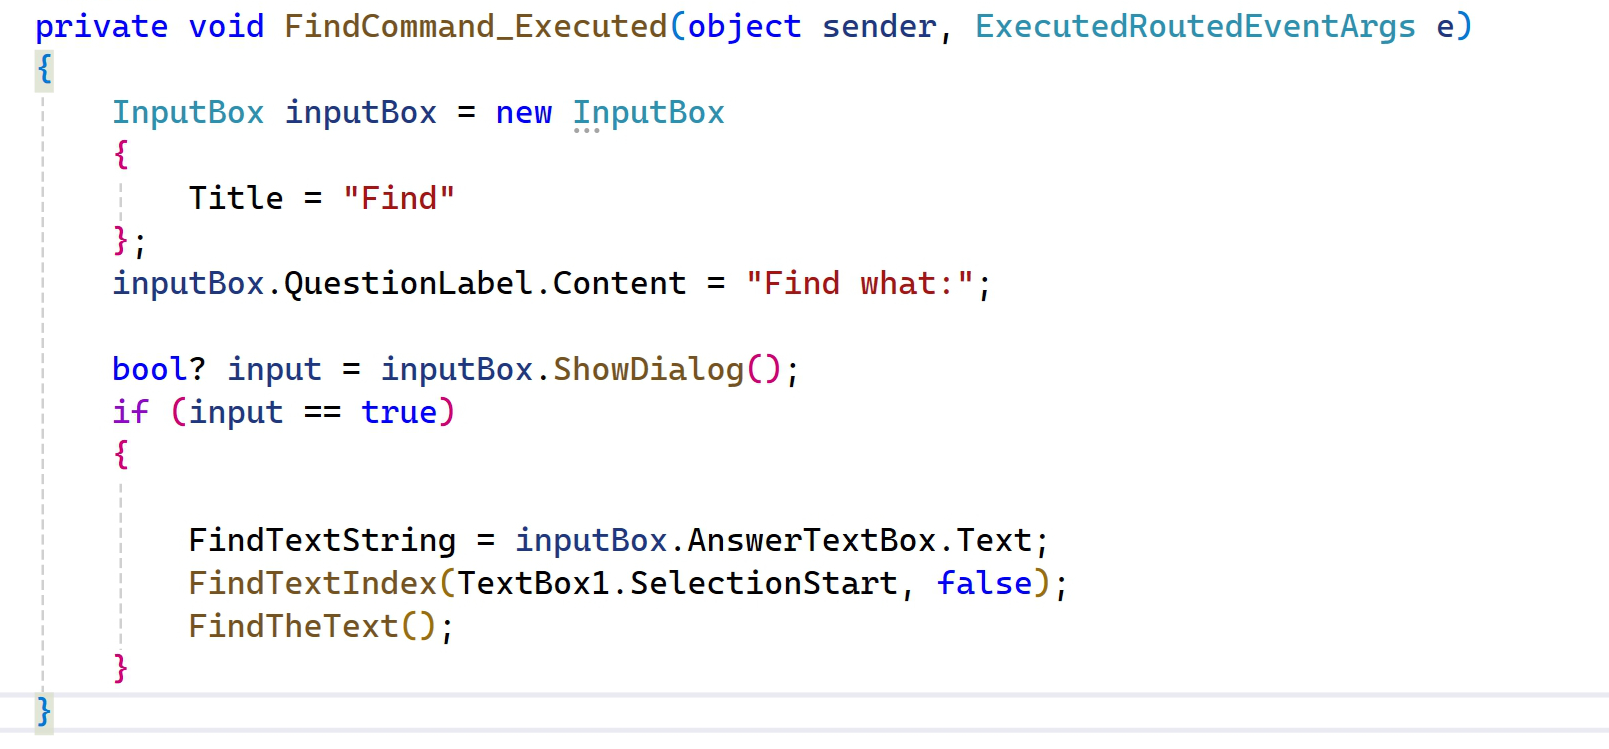
Most of that code is for the custom Input box from the OG version of the app. All we need for this new version is the three lines of code at the end, inside the if loops, so Copy that to the Clipboard. Then, return to the FindTestMenu_Click() event handler. Make some space at the end of the event handler (after the if-loop that displays the Find/Replace pane if needed) and paste it there.

The bottom two of those three lines of code can stay where they are. But the first line, the one with the two errors, needs to move to the top of this event handler. So create a new blank space near the top of FindTestMenu_Click(), above the code that hides the Replace-based controls. Then, add the following code there:

Now, Cut the line of code with the errors from below and paste it at the bottom of that new code block at the top.

Now we need to fix the code. The first of its two errors is related to FindTextString being an app-level variable, so that needs to change to App.FindTextString. And the second is that inputBox, our OG custom dialog, is no longer being used. So inputBox.AnswerTextBox.Text needs to change to FindTextBox.Text. It will look like so when done.

We’re almost done with FindTextBox_Click(). Just add the remaining two lines of code to its end so that any text it contains is selected and that control is focused.

Peek inside the black box
As I wrote in Modernizing .NETpad: Decision Time on Find/Replace (Premium), I’ve treated the FindTextIndex() and FindTheText() helper methods, and the other old Find/Replace code, all of which date back to the Windows Forms version of .NETpad, as a collective black box of sorts. That is, it was mostly provided to me by someone else, I never really understood it, and I’ve just sort of used it without worrying about it all that much.
But now we have to look at them. Most importantly because they no longer work.
They can both be found in MainWindow.xaml.cs, though we’re going to move them into Backend.cs in the next phase of this project. For now, just locate them and notice all the red error squigglies.

All those references to FindLastIndexFound and FindTextString need to be changed because those variables are app-level variables now. So, change them all to App.FindLastIndexFound and App.FindTextString, respectively. When you’re done with that, the errors will be gone and the app will at least compile and run.
But does it work?
“Work” is a strong word. It doesn’t error out. But by itself, the Find code doesn’t do anything. Instead, that happens with Find Next. Or, optionally, Find Previous. So let’s keep going.
Implement Find Next and Find Previous
Find Next and Find Previous–what Notepad now calls “Find down” and “Find up,” no doubt in deference to some locals or regions where the naming convention I’m using isn’t correct–put the action into the Find sequence. That is, we’ve only implemented the first half of Find. Find Next (and Find Previous) is the second half.
So let’s go find those event handlers. The first is called FindNextCommand_Executed(), and you can find it in MainWindow.xaml.cs, right next to FindPreviousCommand_Executed().
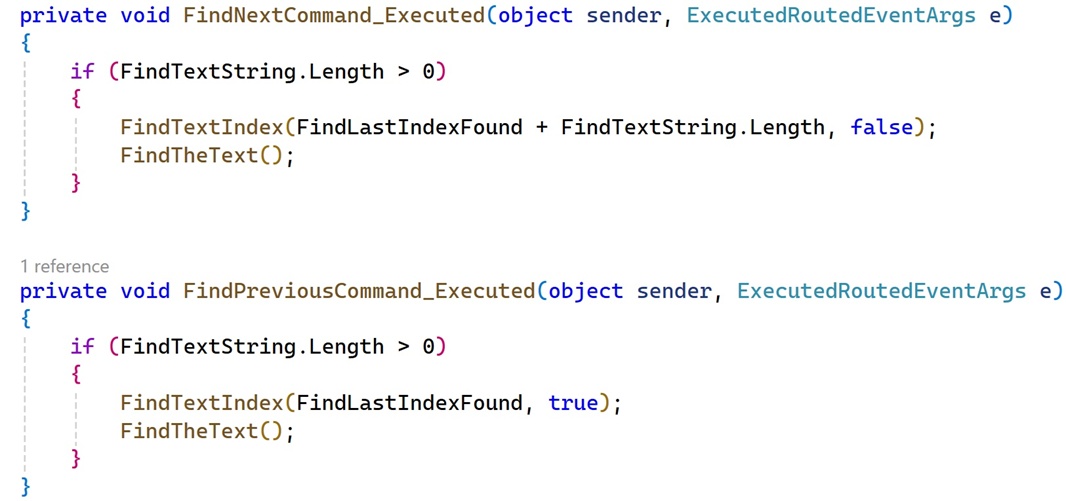
They’re both very simple. Is it possible that implementing these things using our Find Next and Find Previous button’s respective Click() event handlers will be just as simple? Is anything really every that simple?
To find out, add Click() event handlers to FindNextButton and FindPreviousButton in MainWindow.xaml, keeping the default event handler names as prompted.

You’ll find both new and empty event handlers at the bottom of MainWindow.xaml.cs. Add the code that’s currently inside the FindNextCommand_Executed() event handler to FindNextButton_Click().
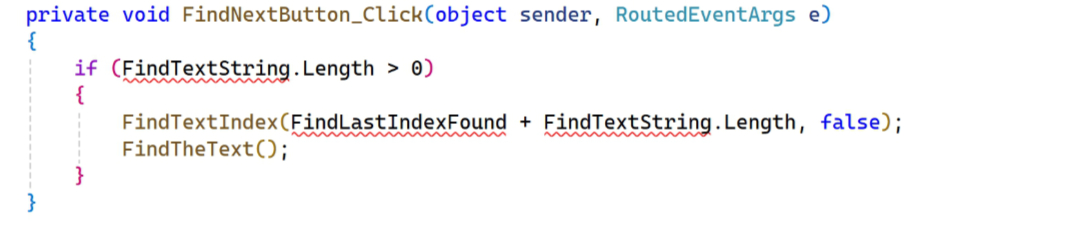
Then, correct the errors by adding the App. prefix to each, as before.
So that’s nice. But now we need to crack open that black box and edit our Find helper methods. We’ll do FindTextIndex() first, even though it’s the longer of the two by line count. This is just some basic refactoring work: This method creates a local variable named text that’s unnecessary and, to my mind, makes this thing harder to read. So delete that variable declaration and replace each instance of text. in this method with TextBox1.Text. When it’s done, it will look like so.

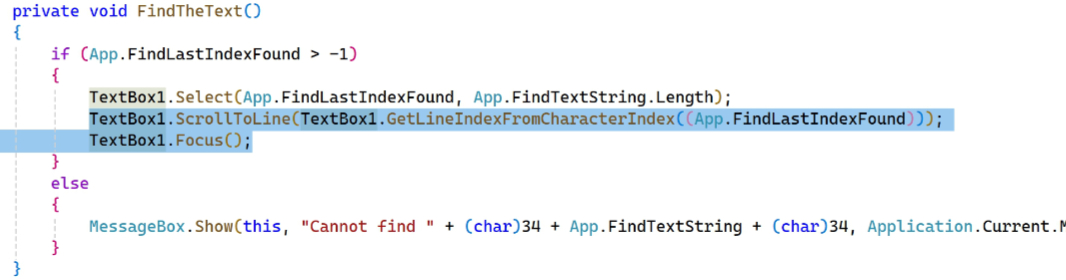
Now, let’s look at FindTheText(). This one is where the magic will happen.
The basic structure will remain the same: It’s an if-then loop that tests for whether FindLastIndexFound exists (i.e. is not a negative number, where 0 or higher means there was an index found) and then selects that text in the main app’s text box if so. In fact, it almost works as-is. It just needs a little help. For starters, we can’t see that the next found text is selected if the main app window’s text box isn’t focused. And since we’re making improvements here, I also wrote some code that will ensure that the selected text is always visible. Previously, found text that was off screen was selected, but you couldn’t see it unless you scrolled to it manually. In other words, add the following two lines of code (plus the {} brackets that should have been there from the beginning).
Now, Find and Find next both “work,” but only if you select some text before using them. Nice!
If you have a document in the app, click “Find” and then try to find some text, it doesn’t work. So we have a logic issue somewhere. A couple of them, actually.
The first issue is obvious enough: When the Find text box is selected and the user taps enter–or, when they click “Find next”–FindNextButton_Click() fires, and because there was previous no selected text, App.FindTextString isn’t set to anything, so nothing happens. So we need to add a line of code (App.FindTextString = FindTextBox.Text;) before the if statement in that event handler.
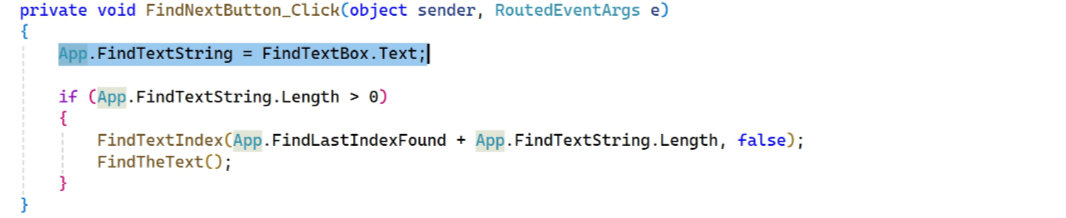
Now, we can click “Find next” repeatedly and it will keep finding instances of that text in turn (if present). So that’s one thing. But there’s nothing tying the position of the found text in the main app window’s text box (App.FindLastIndexFound) to this search text. That is, when we run Find, the following code determines the correct value for App.FindLastIndexFound.
FindTextIndex(TextBox1.SelectionStart, false); FindTheText();
But when we run Find next, it uses an old (perhaps default) value for App.FindLastIndexFound.
FindTextIndex(App.FindLastIndexFound + App.FindTextString.Length, false); FindTheText();
So we have to fix that.
The easiest way, I think, is to set App.FindLastIndexFound equal to the value of the current cursor/start selection position in the main app text box in that Find next code. And we can do that right near the start of the FindNextButton_Click() event handler, like so.

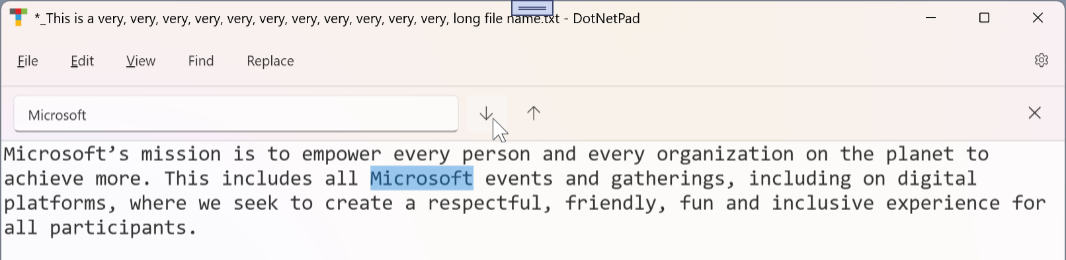
To see whether this works, we need to test several scenarios. This works best if you can load a document with some repeated text that helps you see it working (or not working). Test by selecting text and then trying to find it. Test by not selecting text and then trying to find some text. Click “Find next” repeatedly to see that it correctly finds each result in turn. (And remember that this will eventually be wired to the F3 keyboard shortcut.)
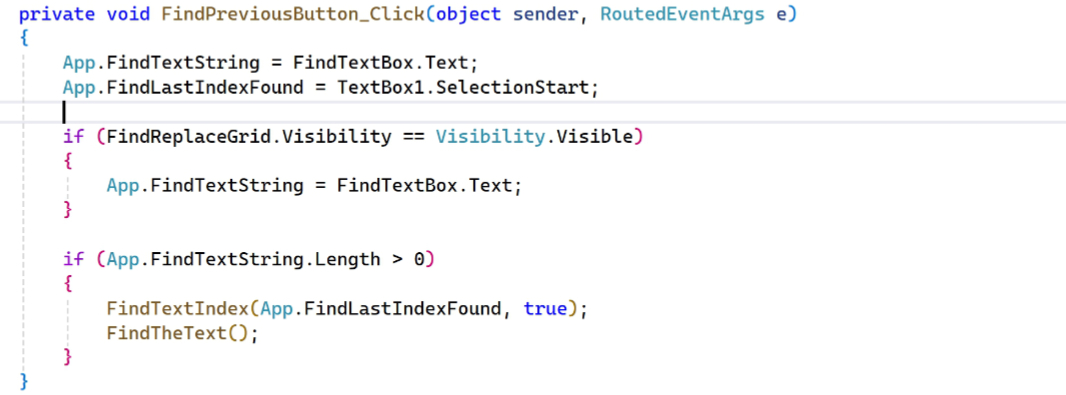
Hopefully, this is correct. For now, I will move on to Find previous. Which, not surprisingly, will work very similarly to Find next.
So there’s no reason to beat this to death. Here’s the code.
Phew. I’m still a little bit iffy on this and feel like I could be missing something. But maybe that will be easier to test once we move this code into the correct places (the Find command event handler). And we still have to implement Replace and Replace all, of course. But this was a lot. So we’ll get to that next time.
More soon.

Gain unlimited access to Premium articles.
With technology shaping our everyday lives, how could we not dig deeper?
Thurrott Premium delivers an honest and thorough perspective about the technologies we use and rely on everyday. Discover deeper content as a Premium member.