Apple UEFI isn’t your enemy: Windows in Native UEFI mode on Macintosh Part One
- jimchamplin
- Oct 05, 2017
-
2
If you thought the last one was nuts… Read all of this and understand it before you do it. DO. NOT. DO. IT. Unless you understand everything. If you follow my instructions, then you will completely eliminate the Macintosh system software and recovery partition from a Mac, leaving only internet recovery available to restore macOS.
Forward: As a long, long time Mac guy, I love how smoothly macOS works with Apple hardware like the Magic Trackpad and Magic Mouse. I’ve spent a lot of money on these things and I’m not afraid to say… I’ve wasted that money. The Magic Trackpad is a great device, but Apple intentionally hobbles it in their Windows drivers. They COULD set it up as a Precision Trackpad but why? That wouldn’t be whiney enough.
I use an iPhone and iPad, and it’s really, really hard to imagine ever leaving that. It’s just that… wow… I want the stuff I have to work well together. Not everything I own is a $1000 MacBook. I have a 2-generation-old Lenovo Flex laptop, and well, my main box is actually an Apple Mac mini.
Yeah, a Mac mini…
I admitted a couple of things in my last big post. And like I just said, one of them was that I’m among the crass jerks who dared to use ReadyBoost after the pundits back in 2007 who sank Vista said it didn’t work. Sorry. It does, even ten years later it still makes a difference on systems that spin a bunch of rust. Oops. Not my fault. I’m just the messenger. I have armor. If you try to kill me, it’ll bounce back and… okay, that’s a rather violent version of the playground anti-insult.
Alright! So Today I want to talk about UEFI. I know that there’s a lot of us who understand it and what it is and why and how it’s different. But… There’s a lot that don’t. I’m sure that there’s those among us that haven’t upgraded their box in a while who don’t maybe realize how DIFFERENT UEFI is from the old BIOS firmwares of yore.
Yore is, according to the TV show “Friends” a historical period just after “olden days.”
I really just dated myself. Almost as dated as BIOS! HA!
Oh tech humor is the best. Okay, so we all know and love (hate) BIOS because it’s so easy (inflexible) and simple (ridiculously complicated) so that we can install modern operating systems (lol Windows XP) OH WAIT I’M LYING. BIOS is history. UEFI has been present since at least 2008. Apple really pioneered EFI with the first Intel Macs in 2005 and that drove adoption through the middle part of the last decade until now when UEFI is the standard. Windows has supported native UEFI boot since at least 8.0 – No experience with 7 – hey, Karma77police won’t you please help me here, you’re clearly the local Windows 7 expert. I honestly don’t think it works with Windows 7. I wish you luck, though, my misguided frienemy.
So now we get to talk about running Windows on a Macintosh in native UEFI mode. This. Is. Awesome.
Apple has a pretty dang good utility for installing Windows side-by-side with macOS on a Mac called Boot Camp. It does have some shortcomings, – ESPECIALLY ON OLDER MACS – That is, older Macs use a hackneyed BIOS emulation layer that causes all kinds of issues. Slow boot times, corruption if you update macOS, et cetera, et cetera, et cetera.
Peter Cetera? Sorry. Old school Chicago fan here. Also a Yul Brynner fan. Whatever… COMPUTERS!!
So if you have a Macintosh and hate High Sierra because it’s a buggy bag of bones and want to set your box up with Windows 10, it’s actually pretty cool. And easy. Maybe. If you can read. You’re going to need these things…
A Windows machine. I’m pretty certain you can use a box running Windows 8 to make the Windows ISO. If you want an Insider ISO, you can use the oldest Windows version you have that runs a browser that the Insider page will run on. I don’t care. These instructions are based on Windows 8 and later.
Download Rufus first. Rufus is a Windows utility that allows you to create a bootable USB stick from a disk image, mainly from an ISO image. There’s some VERY IMPORTANT NOTES SO DO NOT JUMP INTO THIS OR YOU WILL FAIL AND DESTROY ALL YOUR DATA AND CRY WHYYYY JIIIMEY DID YEU TELL ME TA DOO DISSS!!!
So listen good. Download your preferred Windows ISO, whether using the Windows media tool, or from the Windows Insider site. It doesn’t matter which. As long as you have a Windows AMD64/x64 ISO you’re gooooooood. Download Rufus…
http://rufus.akeo.ie/
From there. Don’t go Google for it and get it from some damned spamware site, just get it from that link. That’s the official site, the original site. No, Cnet doesn’t have the real deal. They have spamware. Just get it from the link.
Next you need a legal Windows ISO. The Windows 10 Media Creation Tool will do this for you, or if you’re a Windows Insider, you can download a ISO of the most recent build MS deigns you to have. I say use the Media Creation Tool. It will at least give you a solid, stable build. This tool walks you through the process. I expect you to be intelligent enough to get to where it gives you an ISO.
For those of you wanting to install from a valid Windows 7 or 8 license, you can use El Goog to find those ISOs. This isn’t the focus of my tutorial, 10 is, but the details are similar. I won’t help you find the ISO though. I’m not interested in seeking all of that out. Once you have the ISO, though, and if you have a valid license this should work for you as well.
Once you have Rufus.exe and a Windows.iso you can go. Seek out Rufus and download the non-portable version from the Rufus site linked to above. It will save a ZIP file and Edge at least will automatically unzip it. Just run rufus-x.xxx.exe from File Explorer.
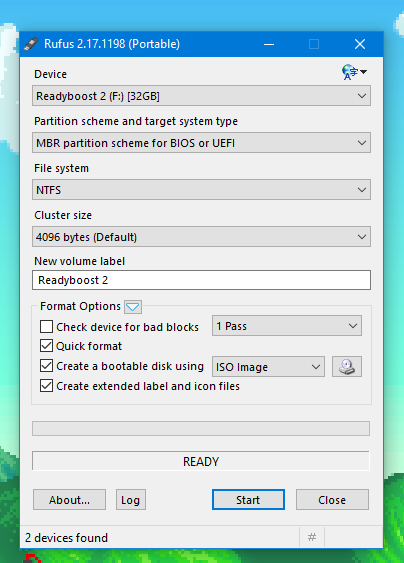
You’re presented with this window. This is Rufus, a deceptively powerful app which can make a bootable USB stick from almost anything. You can configure it for MBR (BIOS) or GPT (UEFI) boot, and have deep control over it all. What we want to do is apply a Windows ISO to a USB stick in GPT format. First off, choose your Windows ISO that you created earlier…

Once you’re done with that, you have to choose the disk format.
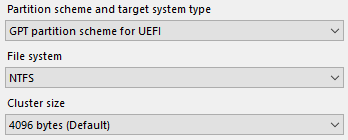
Now, hit Start in Rufus and let it go. This will make a USB stick that will boot to a Windows installer on a Mac or any other UEFI machine. That INCLUDES A SECURE BOOT BOX. You can use this USB to do a clean install on a Secure Boot box. But we’re not here to talk about Secure Boot PCs. If you need that, at this point, you can go and find out the particulars of your OEM’s firmware at this point so that you can boot a UEFI image for Windows. I’m not against this – I’m very much for users being able to install a clean version of Windows. It’s just that I’m literally using a Windows-unfriendly firmware. If I make this work… YOU CAN MAKE IT HAPPEN!!
Insert your Rufus-GPT-format-Windows-ISO format USB stick into a USB 2 or 3 jack on your Mac. Power that puppy on with the Option key held down. If you have a PC keyboard plugged in and are using that, hold down Alt. Hold Option (or Alt) down until after the bong, and you see a menu of all bootable devices. You will see “UEFI Boot” after the built-in Apple partitions. Typically “Macintosh HD” and “10.xx Recovery”
Pretty much no Macs built after 2012 support multiple drives. So… whatever. Won’t say anything about that.
Once you’re booted into Windows, you’ll come upon the installation splash screen. Before you jump into the installation at all, assuming you know what you’re doing… STOP! Now it’s time for some terminal stuff.
If you’re scared of the terminal, go away. Just go away. Leave and cry in your weak corner. Baby. Aww poor baby. It’s just a terminal window. That insulting disclaimer done with, those of you who have the metal spine to keep going will achieve nerd power by understanding how your hardware works.
PART ONE… TO BE CONTINUED