How I Configure My Phone Camera Apps for Snapshots ⭐️
- Paul Thurrott
- Mar 19, 2026
-
2
Like most of you, I take thousands of photos each year with my phones, most of which are simple snapshots. My goal is simple: Take the best possible photo as quickly as possible and then get back to whatever it is I’m doing at the time. That is, I’m not a professional photographer and though I am experimenting with RAW formats and what it’s like to edit them into finished, high-quality images, that’s time-consuming and tedious. This is just about taking snapshots.
Also, because I use iPhones and Pixel phones, this focuses on those devices and their native Camera apps. I also experiment with third-party apps, of course, but I find that the built-in Camera apps work great for my needs. Mostly, in the case of the iPhone. So if you use a Samsung Galaxy or other phone, or some other app, you will need to convert the configurations I recommend accordingly, sorry.
Finally, this is only about photos, not videos. I’m still slowly working my way into phone-based videography, and my uneducated view on that for now is that this may require more professional formats and controls for anything other than a quick social media video. But I hope to have more to say about that soon.
A few basics
Regardless of which phone and camera app you use, I strongly recommend a few basic settings and configurations.
Never enable flash. No one likes to be blinded by the light of a thousand suns in a bar, restaurant, or other dark environment. The flash on the phone is almost always unwelcome and unnecessary, except when it’s used as a flashlight.
Always enable location. You were prompted for this the first time you used the app, but I find tying the location to each photo I take to be very useful, and I always enable this.
Enable an onscreen grid and/or level line. Correctly framing a photo is super-important, and these guides will help you get there. I also use a lot of tilted angle shots, so instead of using portrait mode to photograph a tall shot (like a monument or whatever), I just tilt the phone for a fun composition.
Experiment. Nothing here is written in stone, this is just how I configure my phones. You will have different priorities and preferences in many cases.
How I configure a Pixel
Google’s Pixel phones, any of them, offer what I think is the best experience out of the box for that majority of people who just want to open the Camera app and quickly take snapshots. The experience is both consistent and consistently good, and, as any Pixel user knows, the phone’s ability to elevate almost any picture in quality is magical.
That said, we’ve all had that experience where the photo we’re taking isn’t exactly what we want. This often happens in darker environments or when the lighting casts a weird hue, distorting the camera’s ability to accurately reproduce a scene. For these moments, there are a few Pixel Camera customizations to make.
Some occur directly in the Camera app UI.
![]()
While in Photo mode, tap the Photo settings (gear) icon in the lower-right of screen (when in portrait mode). Then, I do the following.
More light. Tied to the “no flash” advice above, I make sure this is set to Night Sight (the middle option), with the understanding that I can later toggle it off on the fly from the viewfinder when needed. (When Pixel Camera is going to use Night Sight, a small crescent moon icon appears in the viewfinder; you can tap that to turn it off.)
Motion photo. Off. Always.
Ratio. This should be set to 4:3 by default, but it’s worth checking.
You can also tap the “…” option to access Camera settings. There, I do the following.
Grid type. Pixel Camera displays a subtle level line by default, but framing a shot properly is nice, and enabling a grid display really helps. I set this to Golden ratio. Now, instead of that level line, there’s a circle that appears center screen when the view isn’t level.
![]()
Quick access controls. This one is key: When enabled, you can tap anywhere in the viewfinder to enable sliders for color temperature, exposure, and shadows. This is how you fix shots that are too dark when Night mode fails you, or correct color casts like those I often get at a local restaurant/bar with red neon signs.
And yeah, that’s about it. Not that I don’t configure other options, but those are key to taking consistently good shots just about every time.
How I configure an iPhone
The iPhone needs considerably more configuration work to arrive at something that approximates the point-and-click magic you get automatically on Pixel. By default, iPhone shots are what Apple would call “realistic,” but I find them to be dull and lifeless.
The first stop is Camera settings, which you of course access from the system Settings app and not the Camera app. It’s also not with the other app settings, it’s in the second group of settings that starts with General for some reason. F’ing Apple.
Here, I make the following changes.
Camera Control. This is an entire screen of options. I configure the Camera Control button to launch the Camera app with a single click. And while I usually leave Camera Adjustments off, this is one way to access features like exposure, depth, tone, and more that sort of emulates the quick access controls on Pixel. (I find it too finicky.) I also leave Visual Intelligence press and hold enabled; this has nothing to do with photography, it’s just a super-useful feature.
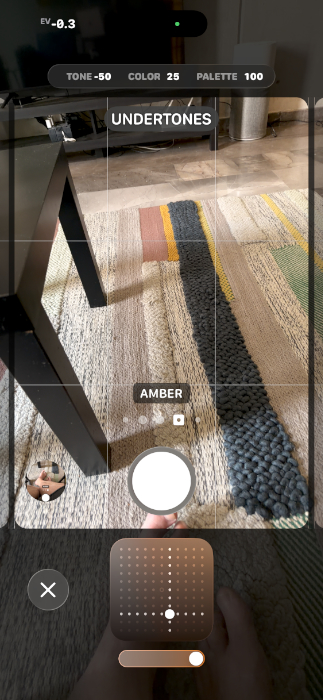
Photographic Styles. Undoubtably the worst UI that Apple ever created, this bizarre interface is nonetheless key to getting the Camera app to produce the types of shots you prefer. You will need to experiment with this, and the good news is that you can later adjust the styles of shots, so it’s not a one-way, dead-end street at least. But I configure this to the Amber style and then laboriously use the weird grid thing to configure the tone to -50 and the color to 25; I leave the normal slider for “palette” (style strength) set to 100 percent. (Key to this, too, is ensuring that the Camera app remembers this style so that you don’t have to reconfigure it if you change it later on the fly. See below.)
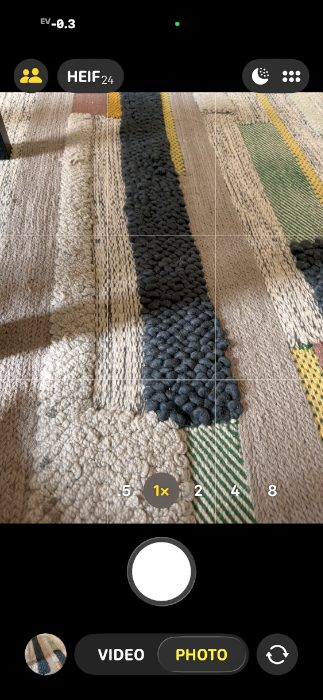
Formats. I use High Efficiency (not JPEG) for Camera Capture since the HEIF image format it uses is now broadly compatible. I configure Photo Capture to 24 MP (as opposed to 12 MP), and I do enable ProRAW & Resolution control, which just puts an extra option in the viewfinder, though I’m still experimenting with RAW. (I use JPEG-XL Lossy as the ProRAW format.)
Preserve Settings. These options are key (to me) as well. Generally speaking, I enable every option here, including Photographic Style, which may be the most important in the list.
Composition. As per the Pixel, I enable Grid and Level, and View Outside the Frame, which I find useful (for example, you can see what an ultra-wide shot would look like when using the main lens). I leave Mirror Front Camera and all Indicators off.
Fusion Camera. By default, you can tap the 1x onscreen zoom control to toggle between 24, 28, and 35 mm (equivalent) views, and while I do leave this as-is, I rarely use that on purpose. I also leave 24 mm as the default.
Portraits in Photo Mode. Leave this on, and you can edit the portrait effect later.
Prioritize Faster Shooting. I leave this on, mostly because the slowness of Night Mode can be irritating.
Lens Correction. Leave this on to minimize distortion with the ultra-wide lens (and for wide shots with the selfie camera).
Given the above–and, possibly, a Pro-level iPhone–you will then have most (but not all) of the most useful options available in the viewfinder when you use the Camera app.
You can swipe up from the bottom (or tap the icon in the upper right) to access Flash, Live Photo, Timer, Exposure, Styles, Aspect ratio, and Night Mode options. The icon has a separate Night Mode toggle, which is also useful for making that change quickly.
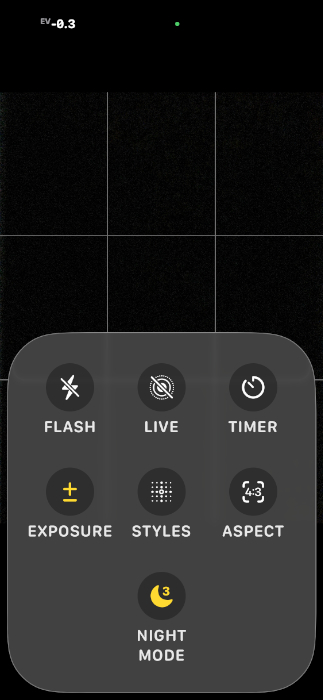
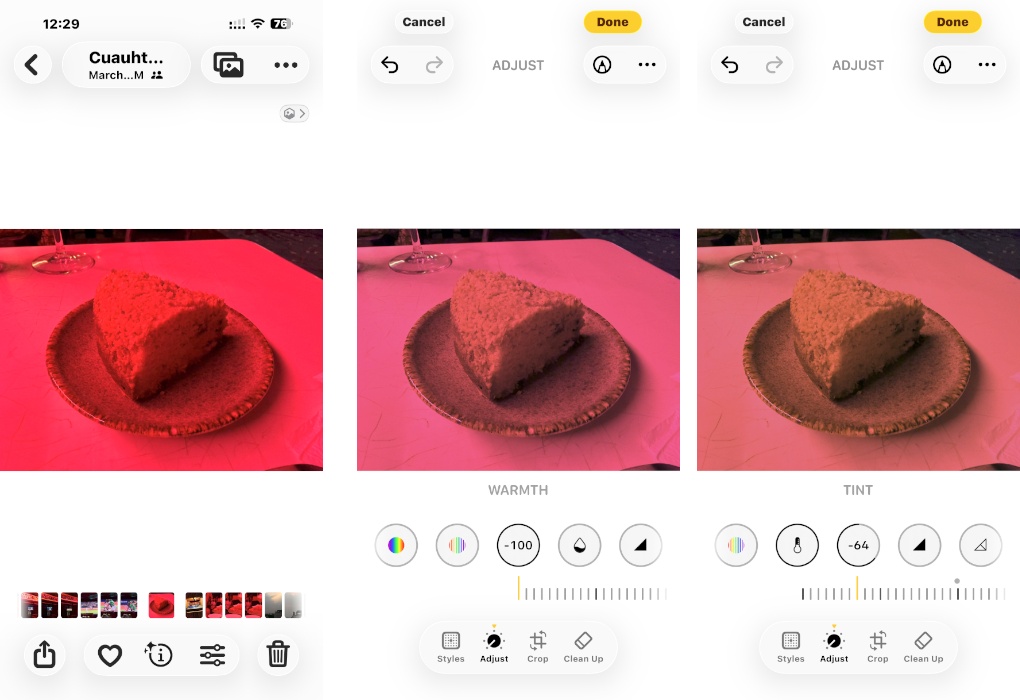
The Exposure option is useful in low light situations (as is Night Mode, obviously). But what I miss are color temperature and the other onscreen controls you can enable on Pixel. On iPhone, you pretty much have to make these changes (other than exposure, or tone, which is sort of in this ballpark) after you take a shot. To do that, find the photo you wish to correct in the camera roll, tap Edit, and then tap Adjust. From there, you can edit the exposure, brilliance, highlights, shadows, and a lot more; the warmth and tint options are the equivalent of color temperature.
Final thoughts
I’m still learning, and I will continue experimenting, but this is pretty much where I’m at right now. There will be further enhancements to the stock Camera app on each platform and perhaps a third-party alternative will emerge that’s so good I can’t ignore it. I’m open to whatever.

Gain unlimited access to Premium articles.
With technology shaping our everyday lives, how could we not dig deeper?
Thurrott Premium delivers an honest and thorough perspective about the technologies we use and rely on everyday. Discover deeper content as a Premium member.