The WPF Notepad Project: Find, Find Next/Previous, Replace/Replace All, Auto Save (Premium)
- Paul Thurrott
- Mar 25, 2020
-
0
Let’s add Find, Find Next/Previous, Replace/Replace All, and Auto Save and make the WPF version of .NETpad functionally complete.
First up, Find.
Find
You may recall that I struggled with Find, Find Next, Find Previous, Replace, and Replace All when I was working on the original, Windows Forms version of .NETpad. Fortunately, a reader, Michael Lerch, bailed me out, and I was able to complete that project using his code.
Separate from this, I later adapted that VB code to C# for a Windows Forms/C# version of the application that I never documented here. And then I adapted it again, for this WPF version, which of course uses the custom Input Box we created in the last installment.
As before, Find, Find Next, Find Previous, Replace, and Replace All also require two global variables. So open MainWindow.xaml.cs and add the following at the bottom of our list of global variables at the top of the MainWindow definition.
string FindTextString = "";
int FindLastIndexFound = 0;
We also need two additional helper methods, so let’s add those to the bottom of the MainWindow definition:
private void FindTheText()
{
    if (FindLastIndexFound > -1)
        TextBox1.Select(FindLastIndexFound, FindTextString.Length);
    else
        MessageBox.Show(this, "Cannot find " + (char)34 + FindTextString + (char)34, Application.Current.MainWindow.GetType().Assembly.GetName().Name, MessageBoxButton.OK, MessageBoxImage.Information);
}

private void FindTextIndex(int FindFromIndex, bool FindPreviousIndex)
{
    string text = TextBox1.Text;

    if (FindPreviousIndex == false)
    {
        FindLastIndexFound = text.IndexOf(FindTextString, FindFromIndex);
        if (FindLastIndexFound == -1)
        {
            // If text is not found, try searching from the beginning
            FindLastIndexFound = text.IndexOf(FindTextString, 0);
        }
    }
    else
    {
        FindLastIndexFound = text.LastIndexOf(FindTextString, FindFromIndex);
        if (FindLastIndexFound == -1)
        {
            //  If text is not found, try searching from the end
            FindLastIndexFound = text.LastIndexOf(FindTextString, text.Length - 1);
        }
    }
}
With that out of the way, we can work on Find itself. And yes, Find—like Find Next, Find Previous, Replace, and Replace All—will be implemented using a WPF command. So, we have a bit of work to do.
First, open MainWindow.xaml and locate the FindMenu tag. Then, add a Command property to it so that it looks like so:
<MenuItem Command="Find" Name="FindMenu" Header="_Find" />
Next, locate the Window.CommandBindings section and add the following command binding:
<CommandBinding Command="Find" Executed="FindCommand_Executed" />
Now, open MainWindow.xaml.cs and create an empty event handler for FindCommand_Executed:
private void FindCommand_Executed(object sender, ExecutedRoutedEventArgs e)
{

}
Like Go To, Find uses our homebuilt Input Box with a customized title and label, so some of the code will look familiar. Add the following inside of the new event handler:
InputBox inputBox = new InputBox
{
    Title = "Find"
};
inputBox.QuestionLabel.Content = "Find what:";

bool? input = inputBox.ShowDialog();
if (input == true)
{
    FindTextString = inputBox.AnswerTextBox.Text;
    FindTextIndex(TextBox1.SelectionStart, false);
    FindTheText();
}
Then, test the app. You’ll find that a keyboard shortcut hint was added to the Edit > Find menu item. And that the actual keyboard shortcut, CTRL + F, works too. As important, of course, Find works.
Find Next and Find Previous
Find Next and Find Previous let you step forward and backward, respectively, through the document, finding each instance of previously-found text in either direction. We’re implementing each with commands, but since neither is a built-in command, we’ll have to define keyboard shortcuts for each manually.
First, open MainWindow.xaml and locate the Window.CommandBindings section. Open a line under the command binding for Find and add the following:
<CommandBinding Command="{StaticResource FindNextCommand}" Executed="FindNextCommand_Executed"/>
<CommandBinding Command="{StaticResource FindPreviousCommand}" Executed="FindPreviousCommand_Executed"/>
Next, locate the Window.Resources section. Here, add the following XAML code:
<RoutedUICommand x:Key="FindNextCommand" Text="FindNext"><RoutedUICommand.InputGestures><KeyGesture>F3</KeyGesture></RoutedUICommand.InputGestures></RoutedUICommand>
<RoutedUICommand x:Key="FindPreviousCommand" Text="FindPrevious"><RoutedUICommand.InputGestures><KeyGesture>Shift+F3</KeyGesture></RoutedUICommand.InputGestures></RoutedUICommand>
Now, find the FindNextMenu and FindPreviousMenu tags. Replace those lines with:
<MenuItem Command="{StaticResource FindNextCommand}" Name="FindNextMenu" Header="Find _Next" />
<MenuItem Command="{StaticResource FindPreviousCommand}" Name="FindPreviousMenu" Header="Find Pre_vious" />
Finally, create the necessary Executed command event handlers at the bottom of the MainWindow definition in MainWindow.xaml.cs:
private void FindNextCommand_Executed(object sender, ExecutedRoutedEventArgs e)
{

}

private void FindPreviousCommand_Executed(object sender, ExecutedRoutedEventArgs e)
{

}
These two event handlers are relatively simple and didn’t require much effort to port from VB. Add the following code to FindNextCommand_Executed:
if (FindTextString.Length > 0)
{
    FindTextIndex(FindLastIndexFound + FindTextString.Length, false);
    FindTheText();
}
And then the following code to FindPreviousCommand_Executed:
if (FindTextString.Length > 0)
{
    FindTextIndex(FindLastIndexFound, true);
    FindTheText();
}
Testing the application, you’ll notice that the keyboard shortcut hints appear in the menu, which is nice, and that the keyboard shortcut both work too.

You should be able to move back and forth through the text, finding each instance of the previously-searched text. (And if there was no previously searched text, nothing happens.)

Replace and Replace All
In the real Notepad, the Replace and Replace All actions are both triggered by a Replace dialog but since we used Input Boxes in the Windows Forms version of .NETpad, I separated them out into two separate things. (If we go back and implement Replace as a custom dialog later, I’ll change it back.) But they are obviously still related. So we’ll implement both actions, together, as commands.
The first step is to open MainWindow.xaml and locate the Window.CommandBindings section. Then, open a space under the FindPrevious command binding and add the following:
<CommandBinding Command="{StaticResource ReplaceCommand}" Executed="ReplaceCommand_Executed"/>
<CommandBinding Command="{StaticResource ReplaceAllCommand}" Executed="ReplaceAllCommand_Executed"/>
Now, locate Window.Resources and add the following under the FindPreviousCommand routed UI command:
<RoutedUICommand x:Key="ReplaceCommand" Text="Replace"><RoutedUICommand.InputGestures><KeyGesture>Ctrl+H</KeyGesture></RoutedUICommand.InputGestures></RoutedUICommand>
<RoutedUICommand x:Key="ReplaceAllCommand" Text="ReplaceAll"><RoutedUICommand.InputGestures><KeyGesture>Ctrl+Shift+H</KeyGesture></RoutedUICommand.InputGestures></RoutedUICommand>
Next, locate the ReplaceMenu and ReplaceAllMenu tags and replace those lines with the following:
<MenuItem Command="{StaticResource ReplaceCommand}" Name="ReplaceMenu" Header="_Replace" />
<MenuItem Command="{StaticResource ReplaceAllCommand}" Name="ReplaceAllMenu" Header="Replace A_ll" />
As I’m sure you’re used to now, the actual Executed command handlers are next. Open MainWindow.xaml.cs, find the bottom of the MainWindow class definition, and add the following empty event handlers:
private void ReplaceCommand_Executed(object sender, ExecutedRoutedEventArgs e)
{

}

private void ReplaceAllCommand_Executed(object sender, ExecutedRoutedEventArgs e)
{

}
Each of these requires a lot of code, but I believe most of it just carries over in adapted form from the WinForms versions of these methods.
ReplaceCommand should look like this:
InputBox inputBox = new InputBox
{
    Title = "Replace"
};
inputBox.QuestionLabel.Content = "Find what:";

inputBox.ShowDialog();
FindTextString = inputBox.AnswerTextBox.Text;

InputBox inputBox2 = new InputBox
{
Title = "Replace All"
};
inputBox2.QuestionLabel.Content = "Replace With:";

inputBox2.ShowDialog();
string ReplaceWith = inputBox2.AnswerTextBox.Text;

// Find text from current cursor position
FindTextIndex(TextBox1.SelectionStart, false);

if (FindLastIndexFound > -1)
    TextBox1.Text = TextBox1.Text.Substring(0, FindLastIndexFound) + ReplaceWith + TextBox1.Text.Substring(FindLastIndexFound + FindTextString.Length);
else
    MessageBox.Show(this, "Cannot find " + (char)34 + FindTextString + (char)34, Application.Current.MainWindow.GetType().Assembly.GetName().Name, MessageBoxButton.OK, MessageBoxImage.Information);
And ReplaceAllCommand looks like so:
InputBox inputBox = new InputBox
{
    Title = "Replace All"
};
inputBox.QuestionLabel.Content = "Find what:";

bool? input = inputBox.ShowDialog();
if (input == true)
{
    FindTextString = inputBox.AnswerTextBox.Text;
    InputBox inputBox2 = new InputBox
    {
        Title = "Replace All"
    };
    inputBox2.QuestionLabel.Content = "Replace With:";

    bool? input2 = inputBox2.ShowDialog();
    if (input2 == true)
    {
        string ReplaceWith = inputBox2.AnswerTextBox.Text;

        FindTextIndex(0, false);

        if (FindLastIndexFound > -1)
        {
            string NewText = Strings.Replace(TextBox1.Text, FindTextString, ReplaceWith, 1);
            TextBox1.Text = NewText;
        }
        else
            MessageBox.Show(this, "Cannot find " + (char)34 + FindTextString + (char)34, Application.Current.MainWindow.GetType().Assembly.GetName().Name, MessageBoxButton.OK, MessageBoxImage.Information);
    }
}
Note that the Strings keyword in ReplaceAllCommand will trigger an error and be underlined with a red squiggly. Add Microsoft.VisualBasic to the using section of MainWindow.xaml.cs as prompted. (I’m guessing there must be a normal C# string replace method I could use, but I’ll look into that in the fit and finish phase.)

Anyway. Test this accordingly, especially with a longer text file if possible. But I believe it all works properly.
Auto Save
Auto Save is our final major piece of new functionality and we’re going to implement it with a simple Click event. There’s no need for a shortcut key since this is an option the user needs to think about and be prompted to accept. And it’s not something anyone would toggle incessantly.
First, though, we need to create a timer. In Windows Forms, we did this by dragging a Timer object onto the form from the Toolbox. But that isn’t possible in WPF, so we’ll do it in C# code. So open up MainWindow.xaml.cs and scroll up to the top of the MainWindow class definition, where we have created several global variables (as I call them). Add the following to the bottom of that list:
// Needed for auto save
readonly DispatcherTimer Timer1 = new DispatcherTimer();
The DispatcherTimer keyword will have a red squiggly under it, so add System.Windows.Threading to the using section as prompted.
Next, we also need to create a Tick event handler for our timer. This is the event that fires when a specific interval, which we’re going to define, elapses. So scroll down to the bottom of the MainWindow class definition and add the following event handler:
void Timer1_Tick(object sender, EventArgs e)
{
    if (TextHasChanged)
    {
        ApplicationCommands.Save.Execute("Save", this);
    }
}
Next, we need to create a new user setting for auto save so that we can test for it at app launch and save the setting accordingly at app close. So open Settings.settings and add the following setting:
MyAutoSave
Type = bool
Scope = user
Value = false
Then, save and close Settings.settings.
Next, we’ll write the code to read the value of MyAutoSave when the application starts and then configure auto save as needed. In MainWindow.xaml.cs, find AppWindow_Initialized and open up some space right at the end of that event handler. Add the following:
// Get Auto Save from settings, configure timer
Timer1.Interval = System.TimeSpan.FromSeconds(30);
Timer1.Tick += new EventHandler(Timer1_Tick);
if (Settings.Default.MyAutoSave)
{
    AutoSaveText.Text = "Auto Save: On";
    AutoSaveMenu.IsChecked = true;
    Timer1.Start();
}
else
{
    AutoSaveText.Text = "Auto Save: Off";
    AutoSaveMenu.IsChecked = false;
    Timer1.Stop();
}
This code sets the timer’s interval to 30 seconds, which is straightforward. But there is something new in there too: Because we created the timer object in code, we also have to define its Click event handler in code. And that’s what the second line of C# code there does: It adds Timer1_Tick as the timer’s Tick event handler.
Next, we have to write the corresponding code that will save the correct value to MyAutoSave when the application closes. So find SaveSettings and scroll down to the bottom of that method and add the following above the lines of code that save the settings:
// Save Auto Save to settings, kill timer
Timer1.Stop();
Settings.Default.MyAutoSave = AutoSaveMenu.IsChecked;
Finally, we need to code the Click event handler for File > Auto Save. So open MainWindow.xaml and locate and select the AutoSaveMenu tag. Then, change the Properties pane to the events list if needed and double-click next to Click to create a blank Click event handler in MainWindow.xaml.cs.
private void AutoSaveMenu_Click(object sender, RoutedEventArgs e)
{

}
Add the following code to this event handler:
if (AutoSaveMenu.IsChecked == true)
{
if (MessageBox.Show(this, "Click OK to disable Auto Save.", "Disable Auto Save", MessageBoxButton.OKCancel) == MessageBoxResult.OK)
{
AutoSaveText.Text = "Auto Save: Off";
AutoSaveMenu.IsChecked = false;
Timer1.Stop();
}
}
else
{
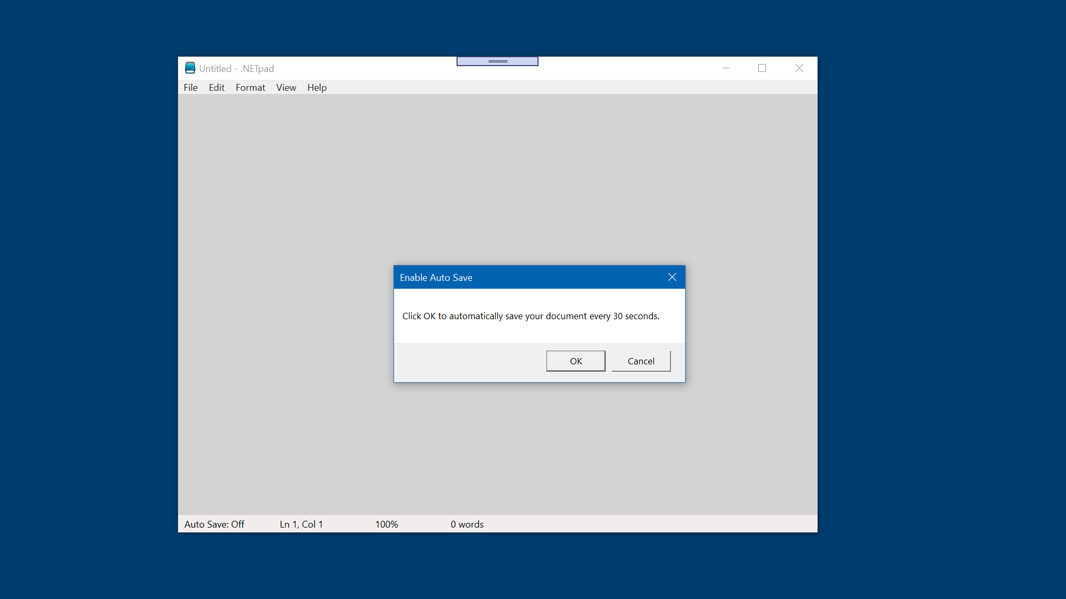
if (MessageBox.Show(this, "Click OK to automatically save your document every 30 seconds.", "Enable Auto Save", MessageBoxButton.OKCancel) == MessageBoxResult.OK)
{
AutoSaveText.Text = "Auto Save: On";
AutoSaveMenu.IsChecked = true;
Timer1.Start();
}
}
Obviously, you should test this thoroughly. (And if you are testing Auto Save, I find that setting the timer interval to 3 seconds temporarily is a big help.)
What’s missing is the tests we implemented throughout the Windows Forms version of .NETpad that would turn off the timer, if needed, whenever there was another window/dialog displayed and then turn it back on, if needed, when those windows/dialogs were dismissed. That is sort of by design, in that I did this one in a very quick and dirty way. But I’ll be doing a fit and finish pass, maybe more than one, so perhaps that is something to add down the line.
Anyway, there you go: That’s the WPF version of .NETpad that I came up with. I’ll discuss publishing the app in that coming fit and finish article.

Gain unlimited access to Premium articles.
With technology shaping our everyday lives, how could we not dig deeper?
Thurrott Premium delivers an honest and thorough perspective about the technologies we use and rely on everyday. Discover deeper content as a Premium member.