The UWP Files: Find Your Way Back (Premium)
- Paul Thurrott
- Apr 12, 2020
-
4
For the Universal Windows Platform (UWP) version of .NETpad, I’m trying to rethink the user experience in way that respects the strengths of this platform. And while I certainly have issues with UWP, I will say that I really enjoy some of the modern UIs it provides. And in trying to implement the Find/Replace functionality, I had the opportunity to experiment with some of them.
As you may recall, I implemented a basic OneNote-like Settings pane in .NETpad (UWP) where I can hide infrequently-accessed commands that the real Notepad places in menus (and sometimes in non-sensical places, in my opinion). This slide-in panel still needs some work—a shadow would be nice—but I think it looks great, and it feels like a native UWP-type interface.
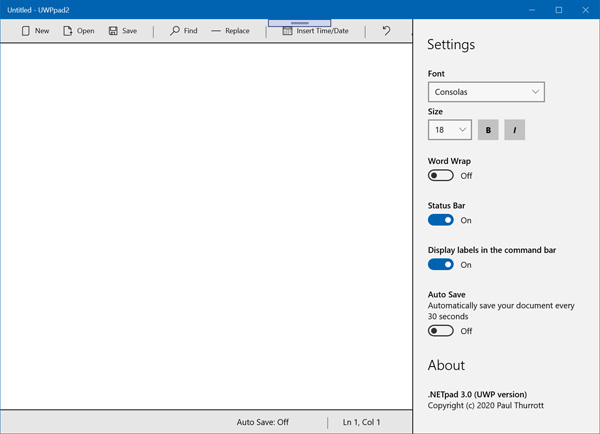
As I noted last time, I struggled a bit with the underlying user settings that this Settings pane requires, but once that was out of the way, I moved on to some of the app’s other crucial functionality, like file save operations. But eventually I had to turn my attention to what I think of as Find/Replace, which is really a slew of related commands that includes, Find, Find Previous, Find Next, Replace, and Replace All. And implementing all that will require some new UI.
In Notepad, Microsoft uses two custom dialogs, Find and Replace to implement three of those commands. Find is handled by the Find Dialog, of course. And Replace and Replace All are handled by the Replace dialog. This is what they look like (in a composite image in which you can see both together, which is not actually possible, of course):
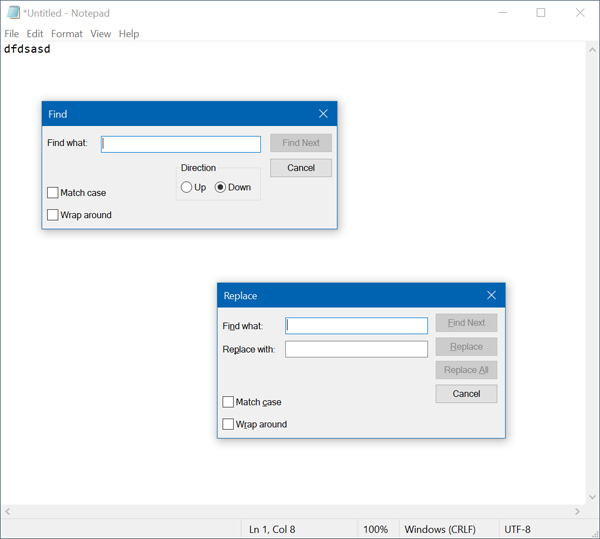
I’m not sure how Microsoft implemented those dialogs, exactly. They look like they might be the same dialog, but with extra commands (and a few missing commands) in the second version. But they’re different sizes, and I wouldn’t be surprised if Microsoft implemented them as two different things.
Maybe it doesn’t matter, but in the original Windows Forms versions of .NETpad, I had to implement Find, Replace, and Replace All using a Input Boxes because creating one or two custom dialogs was simply too difficult to bother. Input Boxes aren’t elegant, but they get the job done.
For the Windows Presentation Foundation (WPF) version of the app, I took a half-step forward by creating my own version of an Input Box using XAML. This allowed me to port .NETpad to WPF more easily, but looking back on this now, I feel like what I should have done is created custom Find and Replace dialogs instead, to make the app look and work more like the real thing.
For the UWP version, of course, I want to make something that looks and feels native to UWP. And I tried a few permutations using various UWP UIs too see if I could, ahem, find something that made sense. One idea was a panel, similar to the Settings panel, but horizontally fixed under the command bar.

And … it’s OK, I guess. I like that it can stay there so that the user can continue finding and replacing. And that it combines the two previously-separate Find and Replace dialogs into a single UI. But it didn’t really feel right, somehow.
Eventually, I decided on a Content Dialog, which I’m also using the for the Save prompt:
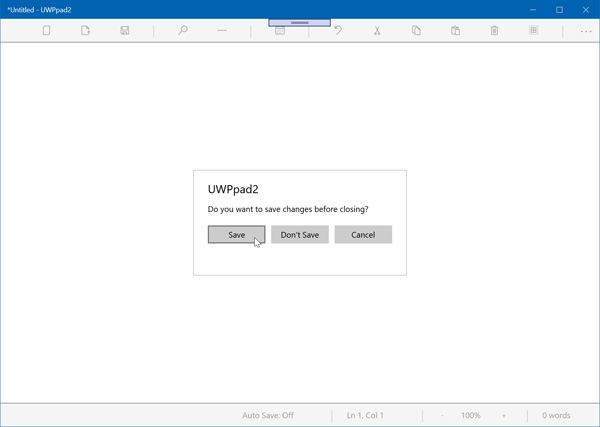
I feel like this looks native and is a modern replacement for the Save prompt used by the original Notepad. Plus, I’m not stuck with the Message Box I had to use in the WinForms and WPF versions of .NETpad, meaning that I can now customize the three buttons to have the correct text (Save, Don’t Save, and Cancel instead of the Message Box defaults of Yes, No, and Cancel).
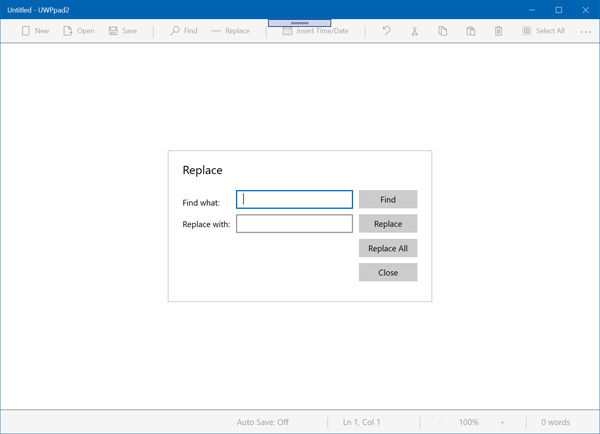
I figured Content Dialog versions of Find and Replace were doable, but I also was curious about making one Content Dialog that I could use for both. If the user selects Find, they’ll see only the UI needed for Find. But if they select Replace, I’ll show the additional UI as well. (In the future, I’ll try to add some other options, like testing for case, as well.)
And this worked surprisingly well.
The full XAML code for what I’m calling FindDialog looks like so:
<ContentDialog x:Name="FindDialog">
    <Grid Height="Auto" Width="Auto" Margin="0,10,0,0">
        <Grid.RowDefinitions>
            <RowDefinition Height="Auto"/>
            <RowDefinition x:Name="FindDialogRow1" Height="Auto"/>
            <RowDefinition x:Name="FindDialogRow2" Height="Auto"/>
            <RowDefinition Height="Auto"/>
            <RowDefinition Height="Auto"/>
        </Grid.RowDefinitions>
        <Grid.ColumnDefinitions>
            <ColumnDefinition Width="Auto" />
            <ColumnDefinition Width="Auto" />
            <ColumnDefinition Width="Auto" />
        </Grid.ColumnDefinitions>
        <TextBlock Grid.Row="0" Grid.Column="0" Text="Find what:" HorizontalAlignment="Left" VerticalAlignment="Center" Margin="0,0,10,0" />
        <TextBox Name="FindTextBox" Grid.Row="0" Grid.Column="1" Width="200" Height="32" HorizontalAlignment="Left" VerticalAlignment="Top" Margin="10,0,10,0"  />
        <Button Click="FindTextButton_Click" Grid.Row="0" Grid.Column="2" Content="Find" Width="100" HorizontalAlignment="Left" VerticalAlignment="Center" Margin="0,0,0,10" />
        <TextBlock Name="ReplaceWithTextBlock" Grid.Row="1" Grid.Column="0" Text="Replace with:" HorizontalAlignment="Left" VerticalAlignment="Center" Margin="0,0,0,10" />
        <TextBox Name="ReplaceTextBox" Grid.Row="1" Grid.Column="1" Width="200" Height="32" HorizontalAlignment="Left" VerticalAlignment="Top" Margin="10,0,0,10"  />
        <Button Click="ReplaceButton_Click" Name="ReplaceButton" Grid.Row="1" Grid.Column="2" Content="Replace" Width="100" HorizontalAlignment="Left" VerticalAlignment="Center" Margin="0,0,0,10"/>
        <Button Click="ReplaceAllButton_Click" Name="ReplaceAllButton" Grid.Row="2" Grid.Column="2" Content="Replace All" Width="100" HorizontalAlignment="Left" VerticalAlignment="Center" Margin="0,0,0,10"/>
        <Button Name="CancelButton" Grid.Row="3" Grid.Column="2" Content="Close" Width="100" HorizontalAlignment="Left" VerticalAlignment="Center" Margin="0,0,0,10" Click="CancelButton_Click"/>
    </Grid>
</ContentDialog>
If you display this Content Dialog normally—that is, with no controls hidden—you get the Replace dialog. (You have to set the title programmatically before you display it.)
And if you hide the controls in the second and third rows (and programmatically set the title accordingly), you get the Find dialog:
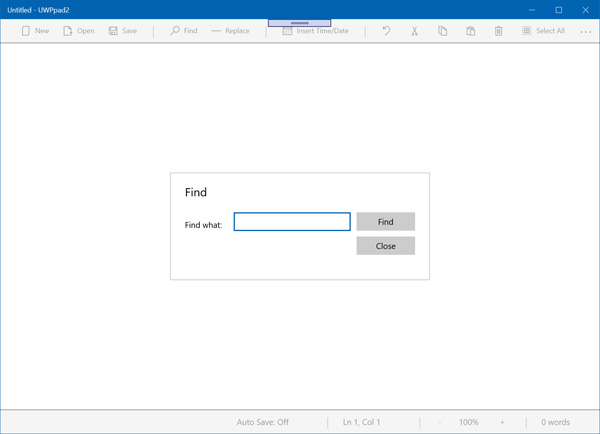
Nice!
There are other niceties to the Content Dialog, too: I had planned to repopulate the “Find” and “Replace” fields if the user had previously typed anything in either, but the Content Dialog does that automatically. Also nice!
Granted, I’m still struggling with some of the underlying implementation, in part because the UWP version of the TextBox doesn’t provide some of the string manipulation functions that previous versions had. But Find and Replace both work so far. I’ll keep plugging away.
More soon.

Gain unlimited access to Premium articles.
With technology shaping our everyday lives, how could we not dig deeper?
Thurrott Premium delivers an honest and thorough perspective about the technologies we use and rely on everyday. Discover deeper content as a Premium member.