Synology DiskStation DS224+ First Impressions
- Paul Thurrott
- May 14, 2025
-
7
The Synology DiskStation DS224+ is the first NAS I’ve purchased in 10 years, and I’m arguably doing so over three years late when you consider that its predecessor, a WD My Cloud EX2, has been out of support since April 2022.
In my defense, cloud storage has gotten a lot more sophisticated over the years, and it’s more seamlessly available from anywhere, and on any device. But with Big Tech overstepping its bounds more and more through enshittification, anticompetitive and illegal business practices, constant price hikes, and other bad behaviors, I’m ready to at least try to reset these relationships and take more a “Little Tech” approach with the technology I use, whether it’s for personal and work-related reasons. That’s what my Online Accounts (2025) series is all about, the living, breathing outcome of Big Tech finally pushing me over the edge. (And dear God, I was writing about subscription fatigue over five years ago. It’s so much worse now.)

At a high level, the goal with my new NAS was the same as that for my previous NAS, despite the decade that’s elapsed since I took that step. It’s mostly about data storage, and about ensuring that my data is backed up and replicated automatically so that it’s always accessible. That NAS was “a USB hard drive on steroids,” I wrote at the time, though it was really two hard drives in a RAID 1 configuration for redundancy, and that storage was accessed over the home network and, until supported ended, over the Internet.

What I (try to) forget all too easily now is that it was also the successor to a series of Windows-based servers that I had configured and maintained over a two decade period. Those servers, which included every version of Windows Server imaginable, plus each Windows Home Server variant, were more complex and of a different era. But the WD NAD was a device, small and relatively quiet, with web and mobile app interfaces. I typically accessed it via its shared folders using File Explorer in Windows. And like so much else in life, it’s something I didn’t think a lot about unless something stopped working. Which it did, from time to time.
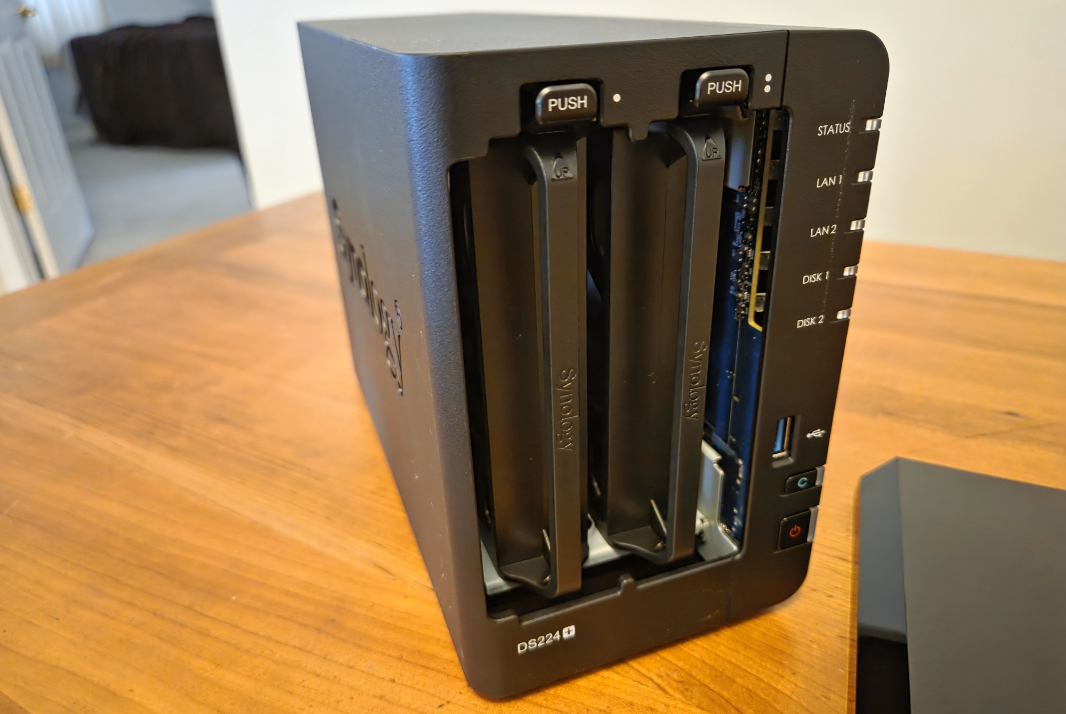
The DiskStation DS224+ I purchased is also a device. It’s bigger than the WD, but also more powerful, and smallish for a NAS. And thanks to technology advances and an impressive Synology ecosystem, it should also be more capable, with an impressive array of online services integrations, including cloud storage-based sync and backup. As I wrote previously, this NAS features a low-end (for PCs) Intel Celeron J4125 processor, 2 GB of soldered RAM (which I am upgrading to 6 GB via a 4 GB DIMM card), and two drive bays. I purchased two 12 TB SATA HDDs, double the size of the HDDs in the WD NAS, which are also configured in a RAID 1 configuration for redundancy.
?The NAS (finally) arrives
I ordered numerous items online in the days leading up to our trip back to Pennsylvania, and virtually all of it arrived early, too early, causing all kinds of problems. That ended up working out OK, but I didn’t order the NAS until after we had gotten home, and in this case, all the pieces took longer to arrive than I’d hoped. I am struggling to see the humor in this, but the RAM module arrived by its lonesome on Monday, and then the NAS and one of the two hard drives arrived on Wednesday. While I was recording Windows Weekly, of course.
The initial setup was simple enough. I took the NAS and the other components it came with–a power cable/supply, a bag of tiny screws, two Ethernet cables, a thin getting started booklet–out of the box. The NAS itself was lighter than expected, and the front panel popped off more easily than I’d like as I was handling it.

Perhaps because the RAM module had arrived earlier, I had forgotten about it, so I didn’t install that until a bit later. Instead, I pulled the first drive cage out of the NAS, detached the side rails, and placed the one hard drive I did get inside.

Then, I replaced the side rails–you don’t need to use screws to secure a 3.5-inch drive, in fact, you can’t, even though there are holes that line up–and slid the drive back into the open bay.

With that done, I attached the front panel, connected the NAS to Ethernet, plugged in the power, and turned it on. It sprung to life quickly, with a blue power light and then, several seconds later, green LAN2 (oops) and DISK 1 lights. So that went quickly.

The instruction booklet told me I could find the NAS by navigating to find.synology.com with a web browser, and it came up immediately when I did so. So I agreed to the license agreement and kicked off the Setup routine. This installed DiskStation Manager (DSM) on the NAS and then restarted it, with an on-screen message noting that the NAS would be ready in 10 minutes, along with a countdown timer.

But it finished much more quickly than that. And soon enough, I went through a familiar series of steps in which I created a device name and admin username and password, set it up to automatically install important DSM and package updates, created a Synology account, created a QuickConnect ID so I can access the NAS remotely from the Internet, enabled various services, and installed the Synology Drive Server, Synology Office, and Synology Photos packages. I also enabled 2FA via Google Authenticator (nice).

From there, I was put into the web-based desktop UI and prompted to create my first storage pool and volume. I only have a single disk right now, so that was straightforward: I stuck with SHR RAID, which will be important when I add the next HDD, let it perform a time-consuming disk check, and allocated the entire drive space to the one volume, formatting it with BTRFS, which supports all the storage features I want. I also agreed to encrypt the drive and backed up the recovery key accordingly.

Then it was time to take a look at Synology Drive. When I opened that app on the Synology desktop, I was prompted to install the client for desktop and/or mobile. So I grabbed the desktop client on the PC I was using and then found the mobile app on the Galaxy S25+ using Google Play Store. And … then I remembered the RAM.
Hilarious.
So I shut down the NAS and Googled what I needed to do. This was straightforward: Just unplug it from power and Ethernet, pop off the front panel, remove the two drive cages, and look for the RAM slot on the inside right. It’s there at the front, easily accessible. And popping in the RAM module was as easy as expected. So I replaced the two drive cages, plugged in the cables, and powered it back on.

OK, back to Synology Drive. Once the NAS was back up, I installed the Drive client on the PC and connected to the NAS. The first choice I had was to choose between Sync Task, which is what I want, and Backup Task. Sync Task supports on-demand sync, like OneDrive and Google Drive, and two-way sync with optional consistency checks, which I left enabled.

As with similar cloud-based solutions, this put a Synology Drive entry in the navigation pane in File Explorer, and so I used that app to start adding my top-level folders: App, Docs, Music, and Videos. I copied over the contents of Apps from OneDrive as a test, it’s only 3.6 GB of files, and that went pretty quickly. And then I got started on Docs, which has Archive and Current subfolders. In Current, I added Personal and Work folders. And then in Work, I copied over the most important first few folders: Code, in OneDrive, which has my most recent coding projects, and Book, To-do, and 2025-05 from Google Drive. As I do with OneDrive/Google Drive, I ensured that the Code, Book, and To-do folders were syncing locally.

As I write this, I’m working in the Synology version of this document. And I will keep working this way. Here, where I’m on the same network as the NAS, and when I go to Seattle, just to see how well it works over the Internet. We’ll see.
The mobile app was equally easy to setu p, but there’s less to do there, for now. At some point, I’ll enable photo backup from the phone. But first I want to get my photo collection on the NAS. I’ll get there.
There’s a lot more to do. But for tonight, I’ve started copying some bulk folders over from the old NAS.
? Looking to the future
Though I’ve barely gotten started with the Synology, I’m already thinking about the future.
The second drive will arrive eventually, and when it does, I’ll get that set up for redundancy. I’ll keep copying data from the old NAS and the cloud as needed. And I’m heading to Seattle for Build early Sunday morning, and that trip will be a good time to test remote access to this device. Fingers crossed.
Longer term, I’ve explained before how I’d like to get a second NAS–identical or not, TBD–so that I can have one here in Pennsylvania and one in Mexico City, synced to each other. Ideally, these NASes would become the center of my data storage across personal (largely photos) and work (largely documents), with online services used as secondary, offsite backups. I need an uninterruptible power supply (UPS) for it (and then for both of them), as we have on our TV/Internet, refrigerator, and washing machine in Mexico. And I would like to do local backups, at least here in Pennsylvania, most likely via an external USB hard drive.
There’s another issue I’m considering for Mexico, where the space is tight, my options for Ethernet connectivity are even tighter, and any noise this thing might make is even more problematic. (It’s been very quiet so far.) And it occurred to me that I might have a solution. I can’t wire the entire apartment for Ethernet, literally, it’s solid concrete construction. But I could put a new Eero Pro 6e node in the apartment’s laundry room and then wire the NAS into that. It wouldn’t be as fast as it being directly connected to the main Eero rode, on the router, but this would also get it out of our living room. And it might be fast enough: This will be easy enough to test here in PA first, as I have a three-node Eero Pro 6e network here. We’ll see.
More soon.