The WinForms Notepad Project: File Efficiency and Save Prompts (Premium)
- Paul Thurrott
- Oct 24, 2019
-
18
The fourth installment of our beginning programming project loads a file more efficiently and prompts the user to save when changes are made.
As you may recall, in part 3 of this series, called The WinForms Notepad Project: Icons and Open Files (Premium), I used a StreamReader object to read the contents of a text file; the contents of that file were then loaded into the TextBox that forms the foundation of our Notepad clone. But a reader with the clever user name of CleverUsername suggested I try File.ReadAllText instead.
Well, he is clever.
StreamReader provides a number of methods related to reading lines of information from a text file. The method I used, ReadToEnd, does what it sounds like it does: It reads the entire contents of the text file (as opposed to one character or one line, or whatever).
The ReadAllText method of the File object works similarly. But it does so with less code, which is preferable. For one, it doesn’t require creating a variable every single time the event handler it’s in is called. And for another, it does automatic garbage collection. I had used a Close method to do that manually on the StreamReader object.
So let’s change it.
(The File object, like StreamReader is found in the System.IO namespace. Since we imported that namespace previously, we don’t need to make any changes there.)
Open up Form1.vb and find the Open menu item’s Click event handler. It’s called OpenToolStripMenuItem_Click, but the easiest way to go to it directly is to Form1.vb [Design] in the Visual Studio designer and then double-click the Open menu item under File (in our app window).
Currently, the body of the event handler looks like this:
Try
    Dim Contents As New StreamReader(OpenFileDialog1.FileName)
    TextBox1.Text = Contents.ReadToEnd
    Me.Text = OpenFileDialog1.SafeFileName + "- NotepadWF"
    Contents.Close()
Catch ex As Exception
    MessageBox.Show("Something happened.")
End Try
We’re going to delete three of the lines of code between Try and Catch. Leave only the line that reads:
Me.Text = OpenFileDialog1.SafeFileName + "- NotepadWF"
Now, above that line, add the following single line of code:
TextBox1.Text = File.ReadAllText(OpenFileDialog1.FileName)
To be clear, the body of the Click event handler for the Open menu item should now read as follows:
If OpenFileDialog1.ShowDialog = DialogResult.OK Then
    Try
        TextBox1.Text = File.ReadAllText(OpenFileDialog1.FileName)
        Me.Text = OpenFileDialog1.SafeFileName + "- NotepadWF"
    Catch ex As Exception
        MessageBox.Show("Something happened.")
    End Try
End If
If you run the application, you’ll see that it works as before. But the new code is shorter and more efficient. That’s a win. Thanks again, CleverUsername. (And I should have said this explicitly before, but I’m learning along with all of you. If you have any suggestions about making this application or its code better, I’m listening.)
OK, with that out of the way, let’s add some more features.
One of the things that the real Notepad does is prompt you to save the text it contains if you changed it in any way. This could happen by typing a single character. So we should make sure the app doesn’t just close if you made any changes to a new or opened text document.
Notepad also lets you save its contents to a new or existing text file. That works with a system Save/Save As dialog, of course, which should be simple enough.
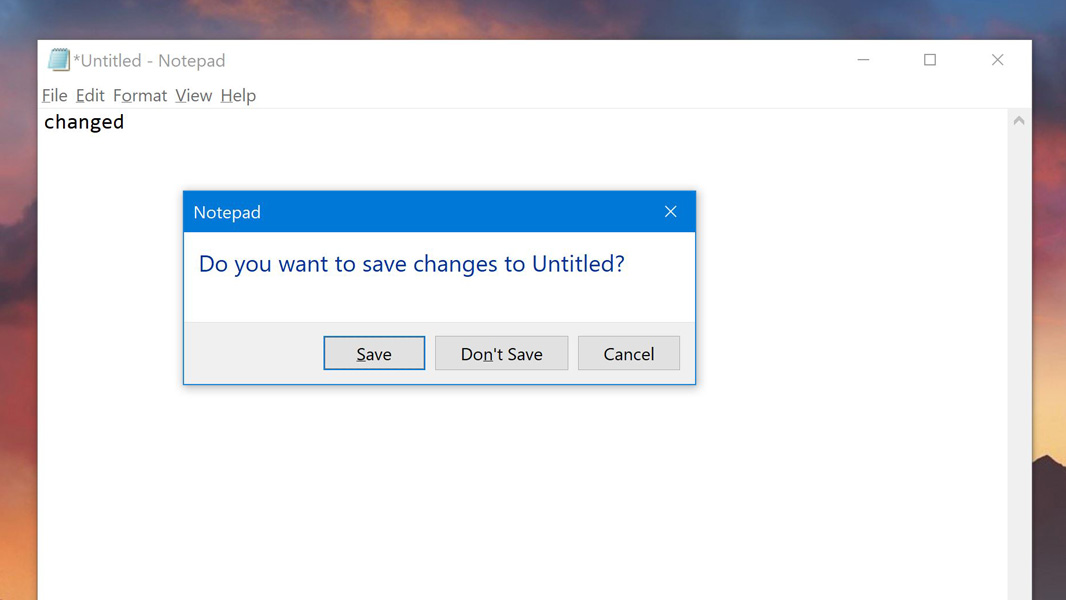
But these two functions are also inter-related. If you try to close Notepad with changes pending, the application complicates matters a bit by throwing up an interim dialog box, which I believe is of its own creation and not something provided by the system, asking if you’d like to save it first. This interim window offers three choices, shown here.
So we need to check whether there are any changes before closing the application. If there are, we need to prompt the user with that three-button dialog box. And if the user selects Save, we need to offer up a Save (or Save As) dialog. These dialogs will also need to appear when the user selects File > Save or File > Save As, of course.
That’s a lot of work. So we’ll do some of it now, and some of it later.
First up, let’s check for changes.
As it turns out, the TextBox control has a handy TextChanged event handler that fires whenever the user changes its contents by adding one or more characters, deleting one or more characters, or similar. So we can use this event handler to check for changes.
In classic Visual Basic, I would have created a global Boolean variable (which can be set to Yes or No) for tracking this. If a change was made, I would have set this variable to Yes. But modern Visual Basic versions don’t support true global variables. And as I understand it, there are two ways to work around that: You could create a public class that is accessible across your project that contains this variable, and then access it from wherever using its fully-qualified name. Or you could create a public property for the form. Since the latter is less code, let’s do that.
Open Form1.vb and scroll to the top. You’ll see a line like so that forms the beginning of the class behind our application’s main (and, for now, only) form window.
Public Class Form1
Below that, and above the first event handler (likely Private Sub ExitToolStripMenuItem_Click), add the following property declaration.
Public Shared Property TextHasChanged As Boolean
We’ll use that property to track whether there are any changes to the text. (And we’ll do so pretty poorly, frankly, unless anyone has some ideas about how to do this in a more sophisticated fashion. For example, if you add a character and then delete that character and make no other changes, our app will still think there was a change.) So we need to add the TextBox’s TextChanged event handler to our code.
To do so, open Form1.vb [Design] and double-click the TextBox control. The control’s TextChanged event handler will open in Form1.vb. Add the following line:
TextHasChanged = True
OK, that’s easy enough. But if you’re familiar with Notepad, you know that it appends an “*” character to the front of the document name in its title bar whenever there’s an unsaved changed. So we should do that too.
My initial solution proved inelegant: Add the following line of code under the line you just wrote:
Me.Text = "*" + Me.Text
Here, the Me keyword refers to Form1. (I assume this syntax was a .NET-era concession to making Visual Basic and C# as identical as possible; in classic VB, that would have read as Form1.Text or whatever.)
Anyway, run the application. When you type a character, a “*” character is added to the front of the filename (or to “Untitled”), as expected. But as you make more changes, more asterisks are added. Oops.
What we clearly need to do is check whether that asterisk is already there and then only add the character when it’s not. I figured Visual Basic/.NET had some sort of a substring method, and it does. So we can use the following If statement instead of the previous addition:
If Me.Text.Substring(0, 1) <> "*" Then
    Me.Text = "*" + Me.Text
End If
The SubString method has two parameters, startIndex (the zero-based starting character position) and length (the number of characters to read). So here, I’m starting at the first character of the Form’s Text property (its title bar text) and reading a single character, and checking whether it’s “*”. Test this and you’ll see it works.
OK. Now we should actually do something with that TextHasChanged property. That is, if the user has made any changes and tries to exit the application, it should prompt them to see whether they want to save the changes.
As noted earlier, this will require us to display a dialog box with three buttons:
Save. This choice will display a system Save/Save As dialog box.
Don’t Save. This choice will exit the application without saving any changes.
Cancel. This choice will return the user to the main application window without saving any changes.
To my knowledge—and, again, I’d love to hear otherwise—this dialog is not provided by the system. And that means that we’re going to have to create one ourselves. This is further complicated by the fact that Windows Forms isn’t high-DPI aware, at least by default, so our initial attempt may not be all that pretty. (I hope to solve the high-DPI issues at some point, but we’ll get to that. For now, let’s just worry about getting the dialog to appear and then we can focus on the fit and finish later. You know, just like Microsoft!)
To add a new form for the dialog to our project, right-click the project name (“NotepadWF” in my case) in the Solution Explorer pane in Visual Studio and select Add > Windows Form from the pop-up menu that appears.
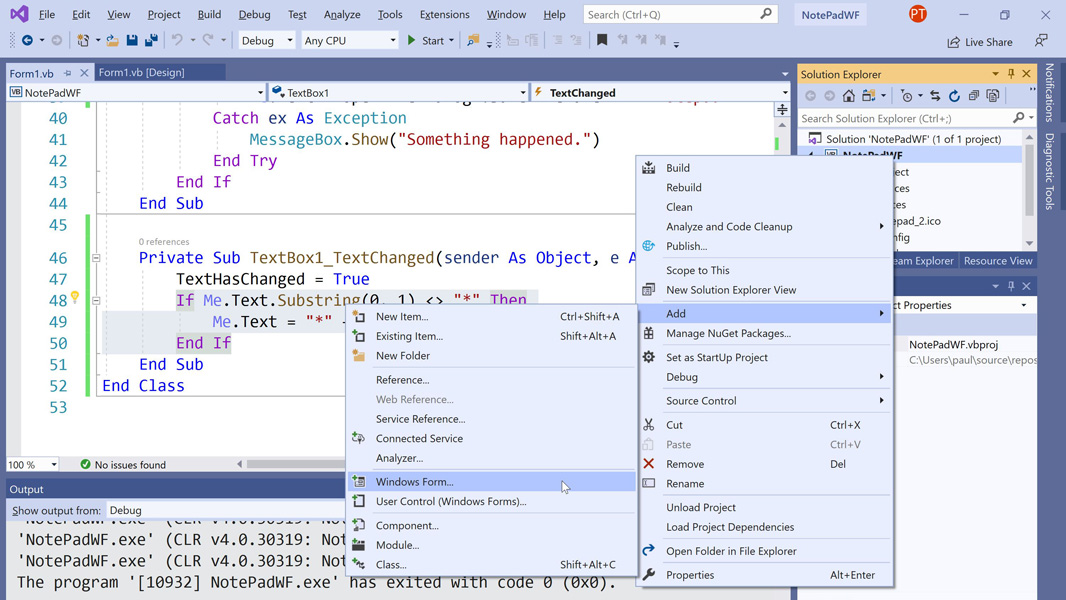
The Add New Item window appears with “Form (Windows Forms)” selected. Change the name to SavePrompt.vb and click Add. The new form opens in Visual Studio.
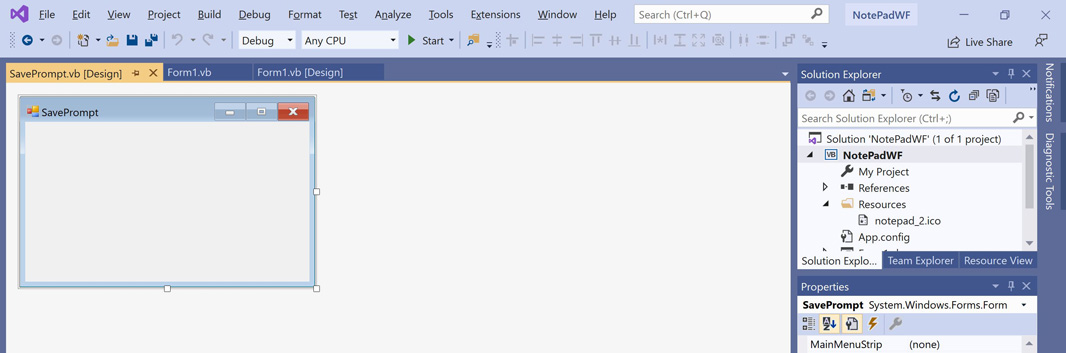
Using the window provided by the real Notepad as a guide, we’ll need to add a Label and three Button controls to the SavePrompt form. Then, we’ll need to set several properties so that this window looks and behaves like its counterpart in Notepad.
That’s simple enough: Just double-click or drag the relevant controls from the Toolbox to the form and place them in roughly the right locations. Then, change the Text property of each button to the right text—&Save, Do&n’t Save, and Cancel, respectively—and change the label, for now, to read “Do you want to save changes?” (no quotes). (I changed the font size of the label to 10 points using its Font property in the Properties pane.)
Then, after resizing the form a bit, I arrived at this.
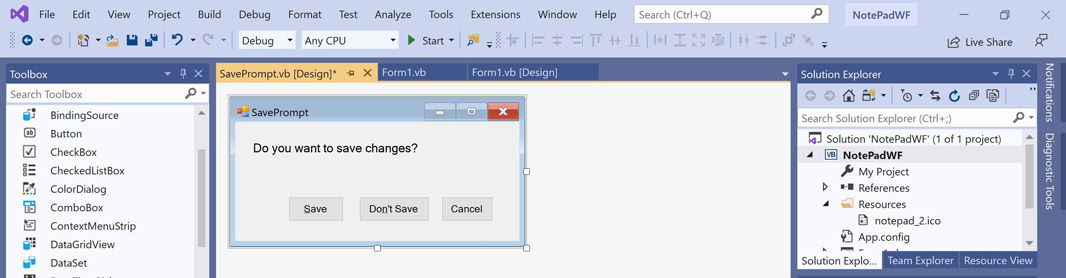
Not perfect, I know. But good enough for testing purposes.
A reader had asked me earlier about control names, correctly noting that I was just accepting whatever names that Visual Studio provided rather than renaming every control and object according to some style guide. In the old days, I used to be pretty particular about this kind of thing, and I long held to a Hungarian Notation or camel case naming style. But the reality is that the name of most of these things doesn’t matter all that much. And the default names are usually descriptive enough.
Coincidentally, that’s not the case for the three buttons we just added to SavePrompt: The default names—Button1, Button2, and Button3—are not descriptive enough and will need to be changed. Let’s call them SaveButton, DontSaveButton, and CancelButton, respectively. I assume you know how to make those changes to each button’s Name property before continuing.
Now we need to change a lot of the form’s properties to make this window work as a dialog and offer the same features as the version in Notepad. So select the SavePrompt form in the designer and then make the following property changes in the Properties pane:
Text. “NotepadWF” (no quotes)
AcceptButton. SaveButton
CancelButton. CancelButton
ControlBox. False
FormBorderStyle. FixedDialog
MaximizeBox. False
MinimizeBox. False
ShowIcon. False
ShowInTaskbar. False
TopMost. True
Most of those are probably obvious enough, but the version of this dialog only shows a Close window button (no Minimize or Maximize) and no control box in the left of the title bar. We need it to be a fixed size and modal, meaning that the user can’t select the main form window while it’s displayed.
With that done, we need to think about how we can communicate which button the user pressed and what to do at that time. Here, again, I think a Form1 property is the best approach, and that we can change that property’s value, when needed, in each of the SavePrompt buttons’ Click event handlers.
So the first step is to display Form1.vb and scroll up to the top where we added the TextHasChanged property. Below that, add the following new property:
Public Shared Property SavePromptValue As String
Now, display SavePrompt.vb again. In turn, double-click each of the buttons to create a skeleton Click event handler for each.
In SaveButton_Click, add the following code:
Form1.SavePromptValue = "Save"
Close()
In DontSaveButton_Click, add the following code:
Form1.SavePromptValue = "DontSave"
Close()
In CancelButton_Click, add the following code:
Close()
If the user clicks the Save button, we’ll set Form1’s SavePromptValue to the string “Save.” If they click Don’t Save, we’ll set it to “DontSave.” If they click Cancel, we don’t need to worry about SavePromptValue at all. In each case, however, we will close SavePromptValue because it’s job is done.
Now, back in Form1, we need to figure out what triggers the display of SavePromptValue. Basically, it will appear when there is a change detected in the text—as noted by the property TextHasChanged—and the user tries to close the application.
There are a few different ways the user could try and close the application. They could select File > Exit from the application’s menu. They could click the Close window button in the far right of the title bar. They could select the Control box in the far left of the title bar (or type ALT + SPACE) and then select Close from that menu. They could type ALT + F4. They could use Task Manager. And so on. Basically, lots of ways.
Writing duplicate code in multiple event handlers doesn’t make any sense. But Windows Forms fortunately supplies an event called Closing that we can handle. It covers all of the circumstances described above (and maybe some I’m forgetting), which is great. And what we can do is check to see whether there were any changes; if there are, we can display the SavePrompt dialog and then take things from there.
To do that, we’ll need to access Form1’s Closing event handler. So, open Form1.vb and then select “(Form1 events)” from the middle drop-down at the top of the code editor.
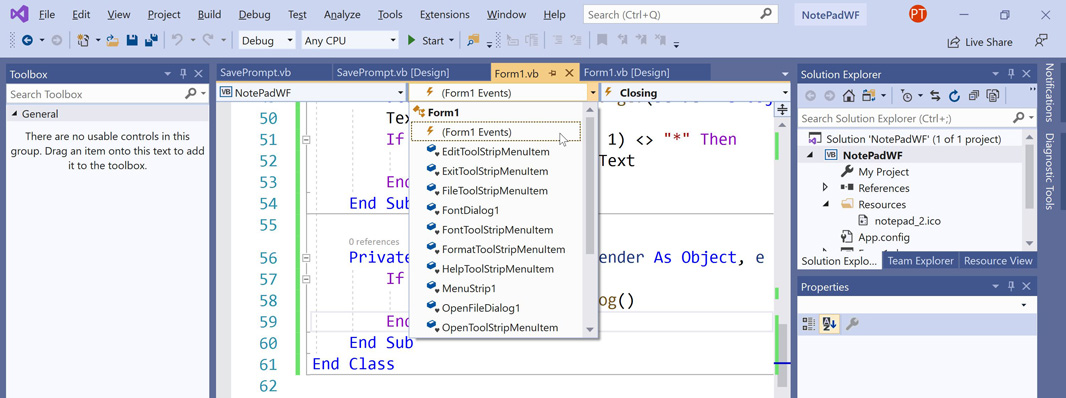
Then, in the right-most drop-down, select “Closing.”
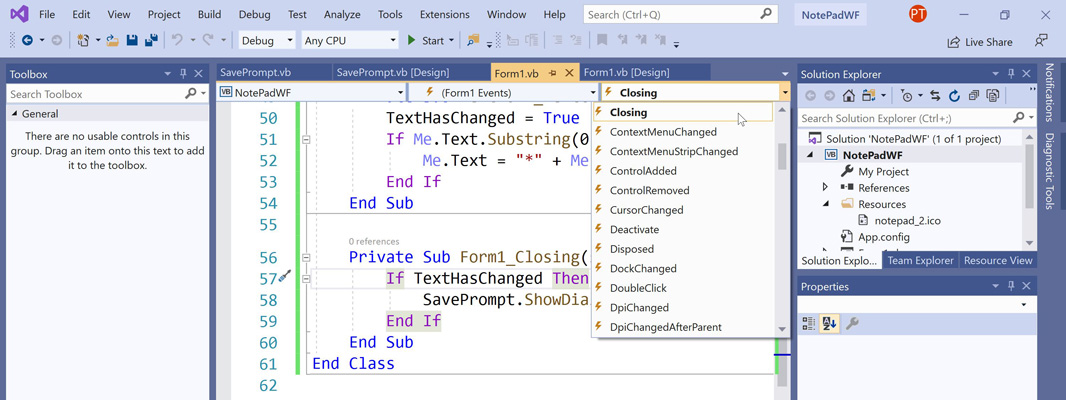
This will create the skeleton code for the Form1_Closing event handler. Inside of that, add the following code just to make sure this idea even works:
If TextHasChanged Then
    SavePrompt.ShowDialog()
End If
Now, run the application and add a character (or make whatever other change): If there’s a change to the text displayed by our application, the SavePrompt dialog should display no matter how we try to exit/close the application.

Well, it should.
But when you choose File > Exit, the application literally does just that without displaying our dialog. That’s because we used Application.Exit() in the Exit menu item’s Click event handler, and there’s no way to cancel that operation. So locate that in Form1.vb (it’s called ExitToolStripMenuItem_Click) and change the code inside the event handler to:
Me.Close()
That should work properly. (And I believe every other way of shutting down the app works too. If you see a method that doesn’t trigger the SavePrompt dialog from appearing, let me know.)
So that’s good. But when you click any of the buttons on SavePrompt, the whole application just shuts down. But that’s because we haven’t written any code to handle the various choices. Also, since this is the first time you’ve seen the SavePrompt dialog actually running, you may notice some layout issues because of that high DPI thing. Don’t worry too much about that yet. But if you want to clean it up a bit and keep testing until you like the way it looks, go for it.
Now, let’s take a look at that Form1.Closing event handler. We need to beef that up to handle whatever choice the user made. As you may recall, they can click Save, Don’t Save, or Cancel, so we need to accommodate each. And instead of using a nested If-Then-Else/Else-If statement, which I think can be hard to read, we’ll use Visual Basic’s version of the switch statement, Select Case.
Add the necessary code so that the Form1.Closing event handler now reads as so:
If TextHasChanged Then
    SavePrompt.ShowDialog()
    Select Case SavePromptValue
        Case "Save"
            ' More soon
        Case "DontSave"
            Application.Exit()
        Case Else
            e.Cancel = True
    End Select
End If
So what do we have here?
Basically, we now have a way to handle all three possibilities, and two of them, “Don’t Save” and “Cancel” are already handled. If the user chooses “Don’t Save,” the application will simply close. If they choose “Cancel,” that means they don’t want to exit the application or save the document, so we will cancel the form closing operation by setting the second argument in Form1_Closing, of type CancelEventArgs, to True.
We’ll save the actual act of saving the text file to disk for the next step, and there’s some fit and finish work to do. But that was still a lot of work for one sitting, and some good progress.
—
Note: It occurred to me later that the “Don’t Save” case may be unnecessary. For example, you change the code it runs from Application.Exit() to a comment (‘) and it does the same thing. I may reevaluate this code block before the next installment.

Gain unlimited access to Premium articles.
With technology shaping our everyday lives, how could we not dig deeper?
Thurrott Premium delivers an honest and thorough perspective about the technologies we use and rely on everyday. Discover deeper content as a Premium member.