The WinForms Notepad Project: Icons and Open Files (Premium)
- Paul Thurrott
- Oct 21, 2019
-
7
For the third installment of this starter project, we’ll add an app icon and program our Notepad clone to open text files.
First, the application icon, since the default Windows Forms icon is obviously pretty ugly. Here, we have a number of choices: We could make our own icon, which would be preferable. We could extract an icon from an existing application and use that. Or we could download an icon from the web.
For now, let’s just use Notepad’s icon, since that’s what we’re cloning. But in the future, we’ll want to replace it with a unique icon of our own.
There are lots of utilities that will help you extract an icon from an EXE, but I used Nirsoft IconsExtract. You just point it at the EXE file—in this case, C:\Windows\System32\Notepad.exe—and then dump it into a folder somewhere on your PC; I used the desktop. The file it creates is called notepad_2.ico.
In Visual Studio, you set the application icon in Project Properties: Navigate to Project > [Application Name] Properties… to see this interface.
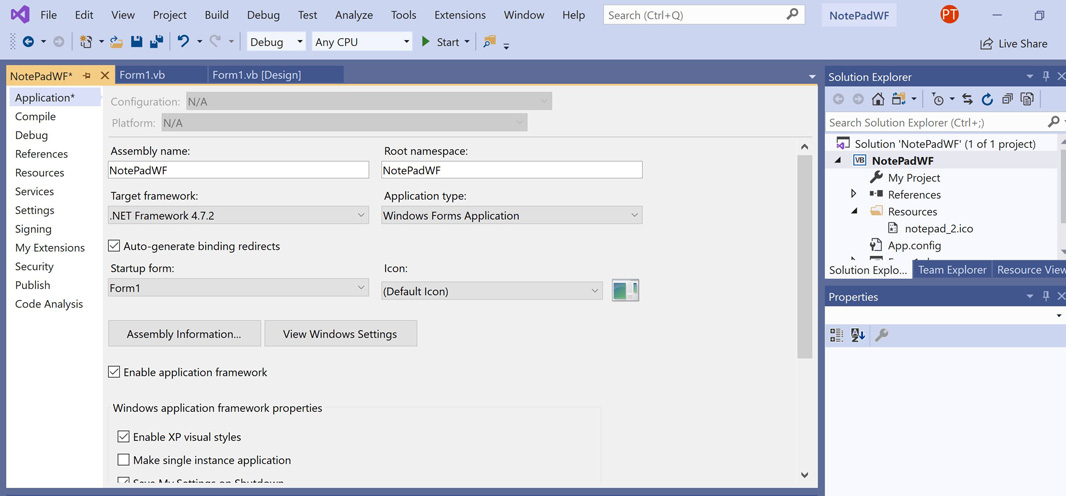
In the Application page, select the drop-down under Icon, browse to the desktop, and choose the icon file you just extracted. Then, run the application by clicking Start in the toolbar and … what the heck. That doesn’t change the icon in the application’s title bar or in the taskbar.
After a bit of research, I discovered something fairly obvious: You need to change the form’s Icon property as well. So select the form in the visual designer (by clicking its title bar). Then, find the Icon property in the Properties pane, select the “…” next to it, and select the icon file on your desktop. When you do, the icon appears on the form in the designer. And when you run it, the icon appears in the application’s taskbar button too. Nice.
![]()
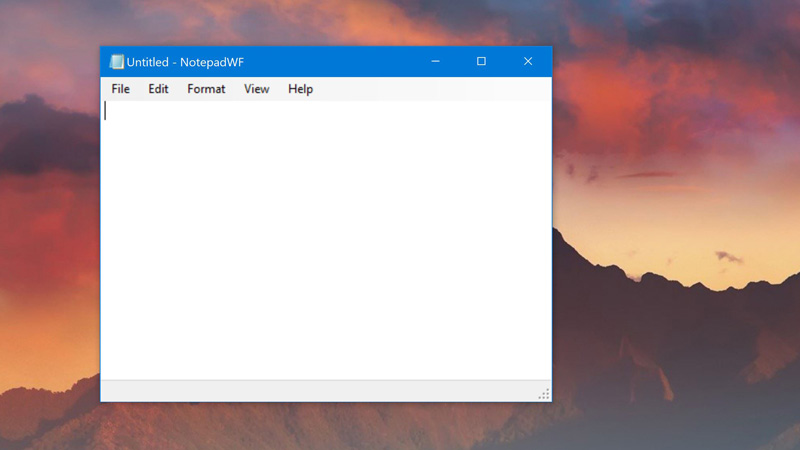
If you run the real notepad, you’ll see that it opens with a blank, unsaved document and that the title bar of the application reads “Untitled – Notepad.” For appearance’s sake, let’s change the default text in our application’s title bar to match that.
As before, select the form in the designer (after making sure the application isn’t running) and then scroll through the properties list in the Properties pane. Find the Text property and change its value to “Untitled – NotepadWF” (no quotes; you should use whatever application name you prefer). It’s a little thing, but now, when you do run the application, it more closely resembles Notepad.
OK, now for something more substantive. Let’s write the code needed for our application to actually open and display text files. This is going to introduce several new concepts.
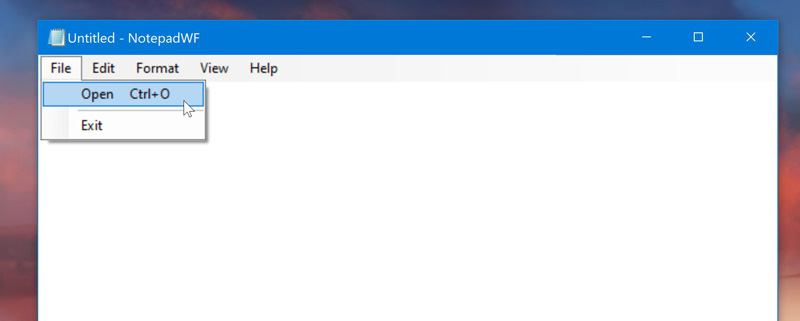
First, we’ll need an Open menu item in the File menu. And unlike the previous menu items we’ve added, this one will need a shortcut key as well. That way, the user can just type CTRL + O to open a file too.
Next, we’ll need to display a system File Open dialog in response to the Open menu item being selected (or its shortcut key being typed). As with the Font dialog we used earlier, this is supplied by Windows Forms and there are various options we can set to constrain the types of files it will display and so on.
After that, we’ll need some way to access the file the user selected and then copy its contents into the application’s TextBox control. Over time, we’ll add to this code to check and make sure that we’re not overwriting anything that’s already there. But even in this basic initial version, we’ll need to add some basic error checking, called exception handling, just in case the user selects a file that our application can’t open. If we didn’t do so, the application would crash.
Later, we’ll fine-tune all this and, of course, add a way to save any changes (or save to another file). But first things first. Right now, it’s enough to just display the contents of a text file.
OK, let’s make all that happen.
The first step, as noted, is to add a new Open menu item under File. This is a little more difficult because there’s already an Exit menu item under File. To add the Open item above Exit, open the File menu in the designer, right-click Exit, and then select Insert > MenuItem from the context menu that appears.
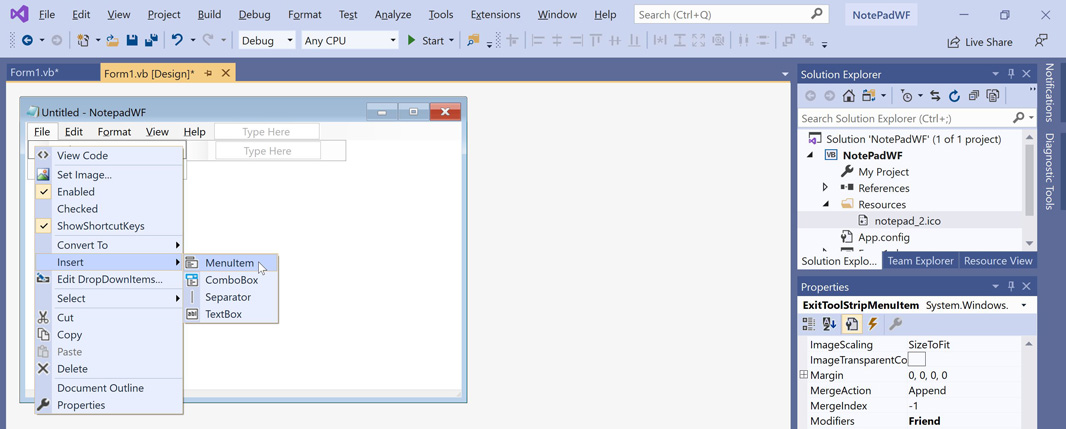
Then, change the text for the new item to “&Open…” (no quotes). (The ellipsis is a Windows standard indicating that choosing that item will open a new window of some kind.)
We should also add a separator in the File menu between Open and Exit, since there is one in Notepad above Exit as well. To do so, open the File menu in the designer, right-click Exit, and then select Insert > Separator from the context menu that appears. As you can see in the designer, a separator line now appears between Open and Exit in the File menu.
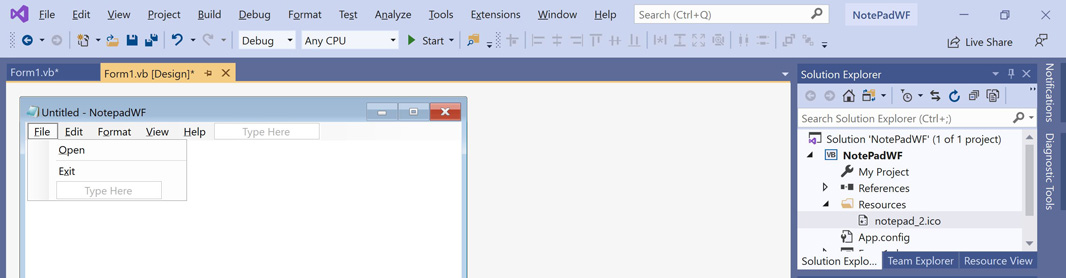
If you look at the File menu in Notepad, you’ll see that the Open menu item also displays the text “Ctrl + O” to the right of Open. That’s the keyboard shortcut for this command, and you can add it to our own Open menu item using Visual Studio. To do so, select the Open menu item in the designer to display its properties in the Properties pane.
You’ll want to change two properties.
First, change the name of the control from ToolStripMenuItem1 to OpenToolStripMenuItem to match our other menu item names.
Then, find the ShortcutKeys property, which is currently set to None. Select that, then select the carat to the right.
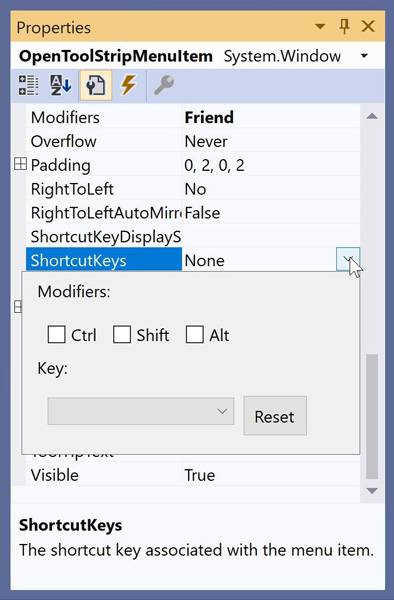
In this interface, check the box next to “Ctrl.” Then, choose “O” from the Key drop-down. As you can see in the designer and when you run the app, the Open menu item now displays its shortcut keyboard shortcut too.
Now, we need to add a File Open dialog to our project. To do so, display Form1.vb [Design] and then use Toolbox search to find the OpenFileDialog control. Drag that from the Toolbox onto the form. The resulting object will be called OpenFileDialog1. Select it below the form to display its properties in the Properties pane.
We need to change the Filter property from being empty to the value “Text Documents (*.txt)|*txt|All Files (*.*)|*.*” (no quotes). That way, the Open File dialog will only display text files (with the *.txt extension) by default. But you can use its Filter drop-down to switch to all files (*.*) if you want.
To see this in action, let’s just display the Open File dialog when the user selects File > Open. In the designer, open the File menu. Then, double-click Open to display its Click menu handler. Add the following code:
If OpenFileDialog1.ShowDialog = DialogResult.OK Then

        ' Do something

End If
This works similarly to the Font dialog code we wrote earlier: If the user cancels the dialog, they don’t want to open a file, and so we don’t need to do anything. But if they select OK—actually, Open—then we’ll eventually do something with the selected file. For now, we’ve just added a comment to remind ourselves to write that code.
Run the application, testing the Open command using both File > Open and the CTRL + O keyboard shortcut. In both cases, a File Open dialog should appear.
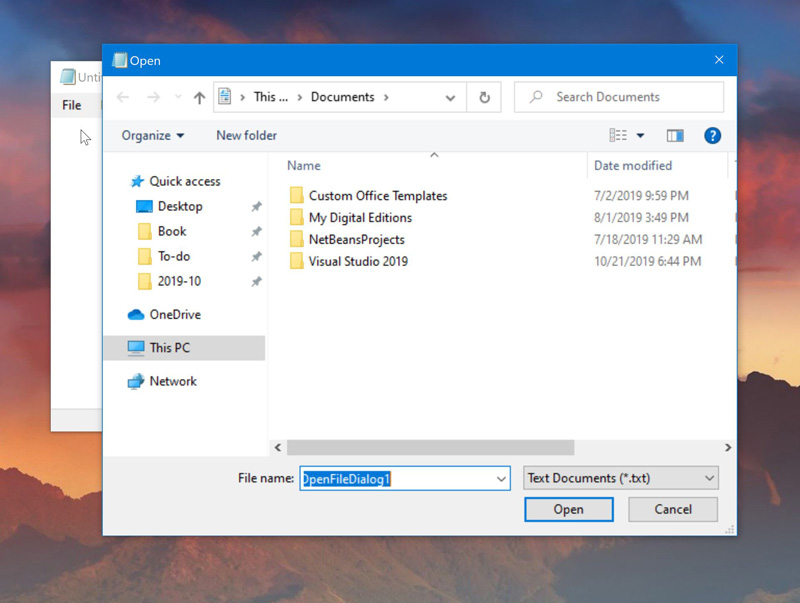
This is mostly correct. But there’s a weird “OpenFileDialog1” text in the File name text box for some reason. So let’s get rid of that. (We may want to set other OpenFileDialog properties later as well.) Scanning through the list of properties associated with OpenFileDialog1, you’ll find a property called FileName that is inexplicably preset to the name of the object. So remove that text so that it’s blank. Much better.
Now comes the most complicated part. We have to write the code that will open the text file selected by the user, read its contents, and then apply that text to the TextBox control, overwriting whatever is there. Since there is so much that could go wrong here, including allowing the user to choose a non-text file, which the TextBox control cannot read, we must use Visual Basic’s exception handling capabilities—in a very basic way—to prevent the app from crashing.
So. Delete the line that currently reads ‘ Do something in the If-Then block. In its place, type Try and then tap Enter. When you do, Visual Studio will create the skeleton of an exception handling block with Try and Catch sections. The entire block of code should look like so:
Try

Catch ex As Exception

End Try
We’ll almost certainly need to beef this up in the future, but for now, it’s just important to know that if any runtime error occurs while running the code in the Try block then the code in the Catch block will run. So add this line inside of Catch and End Try:
MessageBox.Show("Something happened.")
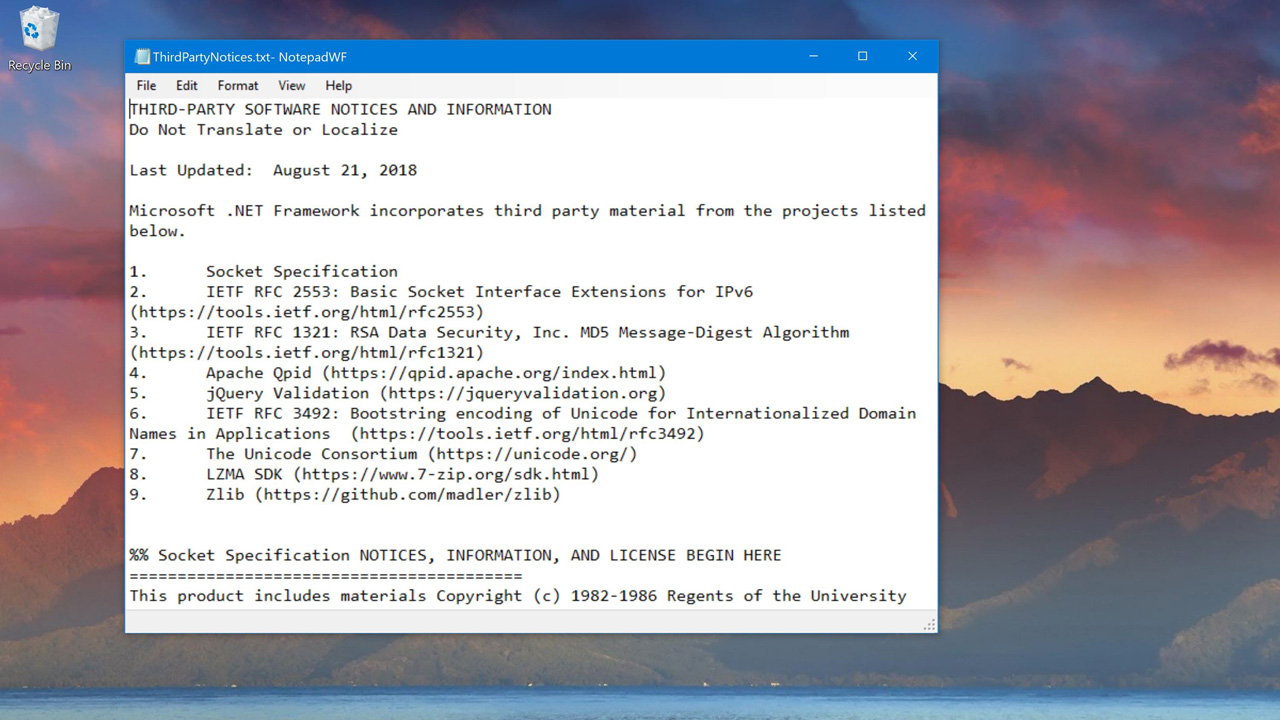
As for actually opening and reading a text file, there are a number of ways to accomplish this in Visual Basic, based on my research. But what I settled on is the method I believe to be the most efficient: You create a new StreamReader object, read the entire contents of the text file, and then copy those contents into the TextBox’s Text property (overwriting whatever was there in the process). Oh, and then don’t forget to change the form’s title bar text to display the name of the file you just opened.
This is what I came up with:
Dim Contents As New StreamReader(OpenFileDialog1.FileName)
TextBox1.Text = Contents.ReadToEnd
Me.Text = OpenFileDialog1.SafeFileName + "- NotepadWF"
Contents.Close
Don’t run this just yet: As you may have noticed, Visual Studio has placed a red squiggly line under StreamReader. That’s because it doesn’t know anything about this object. If you mouse over this error in the editor, a pop-up will offer to “Show potential fixes.” Select that and the answer is found.

You need to import the System.IO namespace into your project so that your code can use this object. So select “Import System.IO.”
That should do it. Now, when you select a valid text file with our Notepad clone, it will open that file and display it.
Woo-hoo!
There’s a lot more to do, I know. There are some additional File Open dialog options we may want to set. That exception handling actually doesn’t do much of anything at the moment. And then there’s the whole saving changes to disk bit. But this was a nice step forward, right?
We’ll do more later.
—
Oh, and here’s the entire Open menu item Click event handler just in case.
Private Sub OpenToolStripMenuItem_Click(sender As Object, e As EventArgs) Handles OpenToolStripMenuItem.Click
    If OpenFileDialog1.ShowDialog = DialogResult.OK Then
        Try
            Dim Contents As New StreamReader(OpenFileDialog1.FileName)
            TextBox1.Text = Contents.ReadToEnd
            Me.Text = OpenFileDialog1.SafeFileName + "- NotepadWF"
            Contents.Close()
        Catch ex As Exception
            MessageBox.Show("Something happened.")
        End Try
    End If
End Sub

Gain unlimited access to Premium articles.
With technology shaping our everyday lives, how could we not dig deeper?
Thurrott Premium delivers an honest and thorough perspective about the technologies we use and rely on everyday. Discover deeper content as a Premium member.