The WinForms Notepad Project: Themes (Premium)
- Paul Thurrott
- Nov 30, 2019
-
8
While we’re still missing several difficult-to-implement Notepad features, I decided to take a look at adding some features that aren’t available in the real app. I don’t want to get too crazy here, but I feel like there might be some small number of useful features we could add that retain the look, feel, and spirit of the real Notepad while making it a little bit more useful too. And the first and most obvious is basic “theme” support.
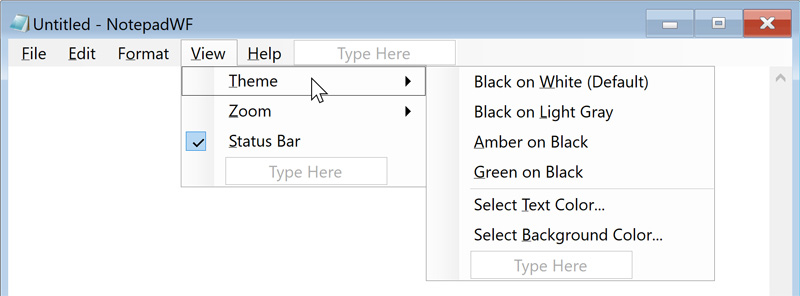
In this context, I’m referring only to the foreground (text) and background colors used by the TextBox control that’s at the heart of our application. To change these colors, we’ll add a new Theme menu item under View. Selecting it will open a new submenu with a few pre-made choices (Black on white (the default), Black on light gray, Amber on black, and so on) plus two items for changing the text and background colors. The user’s theme selection will be saved and used each time the application is loaded.
The first step, of course, is to build out the menu. I assume by now you know how to do that, so here’s what my Theme menu looks like:
Changing the TextBox’s foreground (text) and background colors couldn’t be easier: This control has ForeColor and BackColor properties for this very purpose. So the event handlers for the pre-set theme choices look like so:
Private Sub BlackOnWhitedefaultToolStripMenuItem_Click(sender As Object, e As EventArgs) Handles WhiteOnBlackdefaultToolStripMenuItem.Click
    TextBox1.ForeColor = Color.Black
    TextBox1.BackColor = Color.White
End Sub

Private Sub BlackOnLightGrayToolStripMenuItem_Click(sender As Object, e As EventArgs) Handles WhiteOnLightGrayToolStripMenuItem.Click
    TextBox1.ForeColor = Color.Black
    TextBox1.BackColor = Color.LightGray
End Sub

Private Sub AmberOnBlackToolStripMenuItem_Click(sender As Object, e As EventArgs) Handles AmberOnBlackToolStripMenuItem.Click
    TextBox1.ForeColor = Color.Orange
    TextBox1.BackColor = Color.Black
End Sub

Private Sub GreenOnBlackToolStripMenuItem_Click(sender As Object, e As EventArgs) Handles GreenOnBlackToolStripMenuItem.Click
    TextBox1.ForeColor = Color.LightGreen
    TextBox1.BackColor = Color.Black
End Sub
If you run the application now and try the pre-made theme choices, you should find that they work as expected.

Windows Forms supplies a stock Color dialog that we can display if the user chooses one of the final two options. To add this, display Form1.vb [Design], open the Toolbox, and search for color. Double-click ColorDialog to add one to the project.
ColorDialog works like other Windows Forms dialogs. So we can simply create If-Then loops that make sure the user selected the OK button in the dialog and then apply the selected color accordingly. Our final two event handlers look like so:
Private Sub SelectTextColorToolStripMenuItem_Click(sender As Object, e As EventArgs) Handles SelectTextColorToolStripMenuItem.Click
    If ColorDialog1.ShowDialog = vbOK Then
        TextBox1.ForeColor = ColorDialog1.Color
    End If
End Sub

Private Sub SelectBackgroundColorToolStripMenuItem_Click(sender As Object, e As EventArgs) Handles SelectBackgroundColorToolStripMenuItem.Click
    If ColorDialog1.ShowDialog = vbOK Then
        TextBox1.BackColor = ColorDialog1.Color
    End If
End Sub
These, too, should work as expected: A standard Color dialog appears when you select the Select Text Color or Select Background Color menu items, and the selection made is applied to the appropriate element in the text box.

Now, we’ll need to create two application settings for the foreground (text) and background colors. That way, we can save any theme changes when the application closes and then read the saved theme choices when it runs again in the future.
To do so, right-click the Project name in the Solution Explorer pane and choose Properties. Then, navigate to the Settings tab.
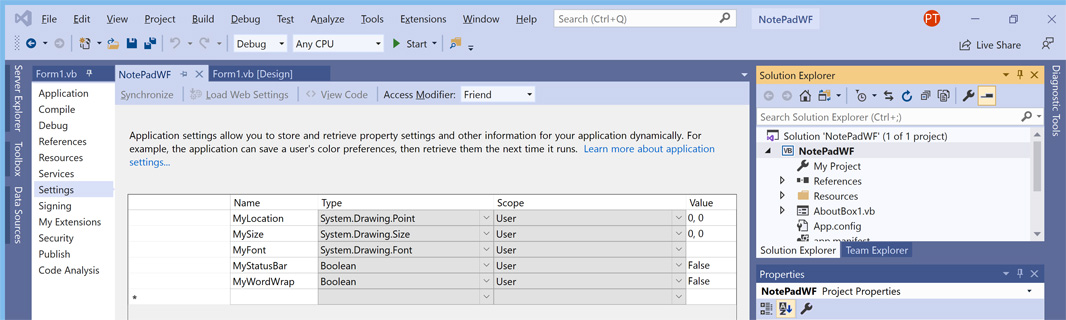
Add two settings, TextColor and BackgroundColor, both of which are type System.Drawing.Color. Then, set the value of TextColor to Black, and the value of Background Color to White. When that’s done, save and close the application settings window.
Now, we need to read in the values of these properties when the application launches and then apply them to TextBox1’s ForeColor and BackColor properties. As you may recall, this happens in Form1_Load, and we already have several related lines of code for applying settings to the appropriate control properties.
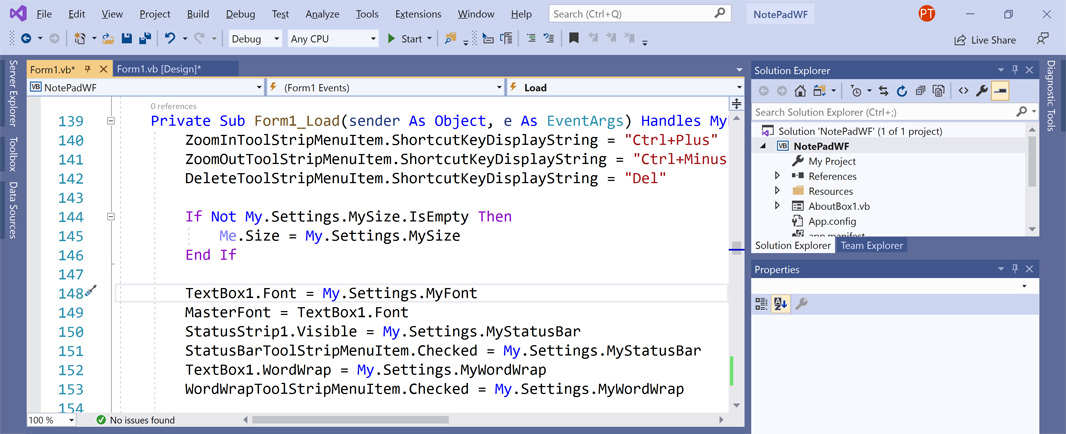
Locate the line that reads TextBox1.Font = My.Settings.MyFont. Then, add the following two lines of code directly below it:
TextBox1.ForeColor = My.Settings.TextColor
TextBox1.BackColor = My.Settings.BackgroundColor
Of course, we also need to write these settings when the application closes. And that happens in Form1_Closing. Here, again, you’ll see several lines of code that write to the application settings.
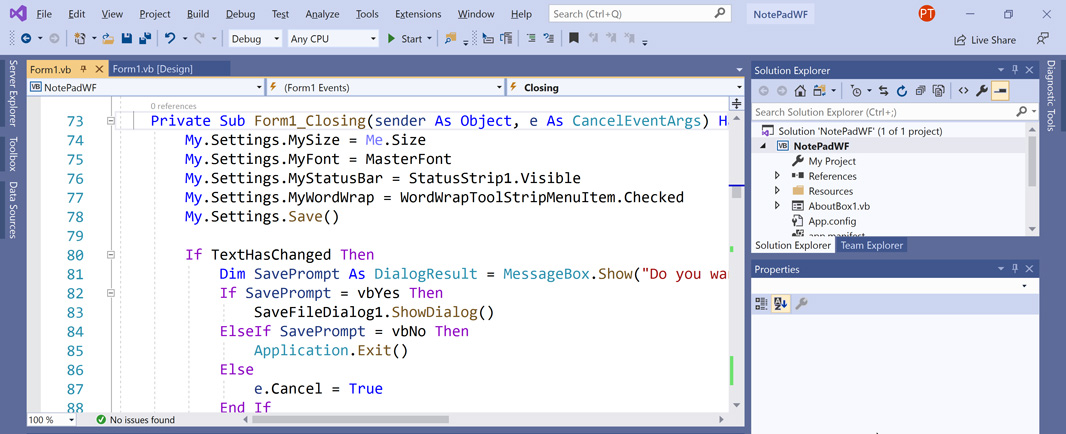
Locate the line the reads My.Settings.MyFont = MasterFont. Then, add the following two lines of code directly below it:
My.Settings.TextColor = TextBox1.ForeColor
My.Settings.BackgroundColor = TextBox1.BackColor
And that should do it. Not only can you change the “theme” but the application will retain whatever theme choices you made and reapply them each time you use the application.

More soon. And if you have any (reasonable) ideas for other features you think we should add, please let me know.

Gain unlimited access to Premium articles.
With technology shaping our everyday lives, how could we not dig deeper?
Thurrott Premium delivers an honest and thorough perspective about the technologies we use and rely on everyday. Discover deeper content as a Premium member.