The WPF Notepad Project: Exit, Print, and More (Premium)
- Paul Thurrott
- Mar 17, 2020
-
0
In part two of this project, we’ll add Exit and Print commands, implement several textbox settings, and use the real application name.
Let’s dive right in.
File menu
Let’s build out the File menu so we can start coding the first event handlers. Or, in many cases, the “command handlers,” as Microsoft calls them. We’ll get to that.
Adding sub-menu items to the File menu is simple enough: We just place more menu items (and two separators) inside of the beginning and ending File menu tags in MainWindow.xaml. Like so:
<MenuItem Header="_File">
    <MenuItem Name="NewMenu" Header="_New" />
    <MenuItem Name="NewWindowMenu" Header="New _Window" />
    <MenuItem Name="OpenMenu" Header="_Open..." />
    <MenuItem Name="SaveMenu" Header="_Save" />
    <MenuItem Name="SaveAsMenu" Header="Save _As..." />
    <MenuItem Name="AutoSaveMenu" Header="Auto Sa_ve" />
    <Separator />
    <MenuItem Name="PrintMenu" Header="_Print" />
    <Separator />
    <MenuItem Name="ExitMenu" Header="E_xit" />
</MenuItem>
File > Exit
Exit is probably the simplest command to implement first. And yes, it is possible—and easy—to add a Click event handler to it: Just make sure the Exit menu item is selected in the XAML and then find the Click event in the Properties pane. If you created such a thing—don’t, we’re going in a different direction—it would look like so:
private void ExitMenu_Click(object sender, RoutedEventArgs e)
{
    Application.Current.Shutdown();
}
Better still, it would work. In addition to actually shutting down the application as promised, it would first fire that Close event handler for the window, which would in turn fire the SaveSettings method that saves our settings. It would work fine.
But WPF offers support for a native application Close command. And we can bind that command to a particular method. It’s the WPF way.
To accomplish this, we need to do three things: Add a Command property to the object, in this case the Exit menu item, in XAML; add a command binding to a Windows.CommandBindings section inside of the Window section in XAML that associates the command with an appropriate method; and create that method in C#. For a built-in command like Close, this is as simple as it gets.
So let’s step through that.
First, the command property. Edit the Exit menu’s XAML to include the command. It should look like so when you’re done. (I always put the Command property first so that I can easily parse which objects have commands when I’m viewing MainWindow.xaml.)
<MenuItem Command="Close" Name="ExitMenu" Header="E_xit" />
(The fully qualified name for Close is ApplicationCommands.Close, but Close works fine as-is.)
Next, the command binding. Because this is the first command we’re adding, we will have to create a Windows.CommandBindings section inside of the Window section in MainWindow.xaml. I do this right above the <Grid> section so that it looks like so:

Then, we have to add the command binding for Close. This looks like so (and yes, it goes between <Window.CommandBindings> and </Window.CommandBindings>).
<CommandBinding Command="Close" Executed="CloseCommand_Executed" />
(The name of the method—or command handler—referenced in the Executed property can be of your choosing. But I try to follow a logical standard.)
Then, we have to actually create that command’s Executed event handler in the C# file so that code runs when the command is fired. So switch over to MainWindow.xaml.cs and find a spot under SaveSetings() but still inside the MainWindow class definition. Add the following code:
private void CloseCommand_Executed(object sender, RoutedEventArgs e)
{
    Application.Current.Shutdown();
}
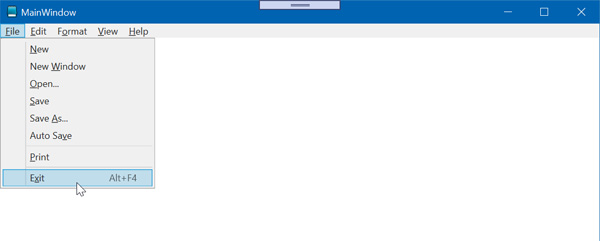
Now, it is an interesting fact that the keyboard shortcut ALT + F4 will also close the application, so it makes sense to add that keyboard shortcut hint to the Exit menu item. As you’ll see, many commands add this hint automatically (for example, Cut, Copy, and Paste). But Quit does not. In such cases, XAML supports an InputGestureText property that lets us display a keyboard shortcut hint in menu items, but it’s not tied to any code; it just displays the text. So let’s just take the easy way out for now and use that here.
Edit the ExitMenu tag to include an InputGestureText property like so.
<MenuItem Command="Close" Name="ExitMenu" Header="E_xit" InputGestureText="Alt+F4" />
When you run the app, you can see that there is now a keyboard shortcut hint next to Exit.
OK, let’s tackle some more commands.
File > Print
As crazy as this sounds, given how difficult printing was in WinForms, handling File > Print in WPF is actually pretty easy, and my original working code was just a few lines (I’ve since built it up a bit). There’s no Page Setup dialog, unfortunately, but its most important configuration options are available via sub-windows from Print, so I’m OK with that.
Before getting to Print specifically, let’s add a few global variables related to the textbox to the top of the MainWindow class definition. We’re doing this now because one of them is required for Print to work.
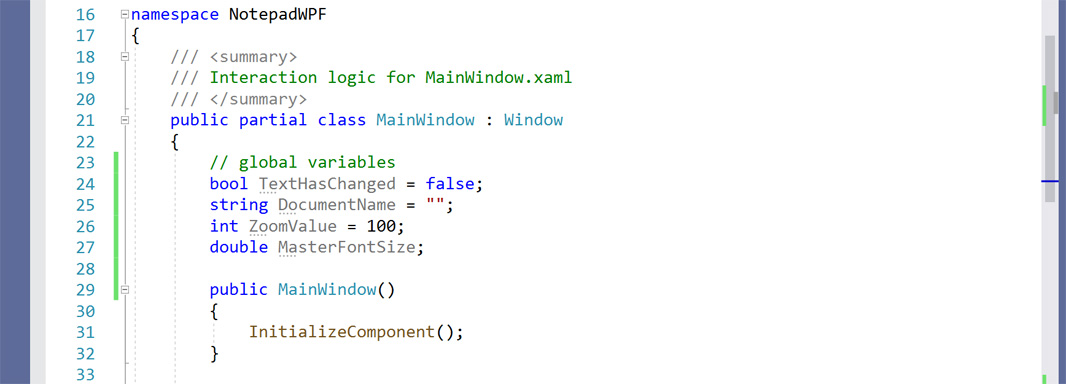
In MainWindow.xaml.cs, add some space above the class constructor (public MainWindow()) and add the following:
// global variables
bool TextHasChanged = false;
string DocumentName = "";
int ZoomValue = 100;
double MasterFontSize;
When you’re done, it should look like so:
Since Print is another native (built-in) command, we can add a command binding for it to <Window.CommandBindings> in the XAML file. Locate that section and add the following above the Close command binding. (As a style thing, I try to place the commands in the order in which they appear in the application UI so they’re easier to find.)
<CommandBinding Command="Print" Executed="PrintCommand_Executed" />
So, the entire command bindings section should now look like so:
<Window.CommandBindings>
    <CommandBinding Command="Print" Executed="PrintCommand_Executed" />
    <CommandBinding Command="Close" Executed="CloseCommand_Executed" />
</Window.CommandBindings>
Then, locate the Print menu item in the XAML file and edit it to add a Command property. It will now look like this:
<MenuItem Command="Print" Name="PrintMenu" Header="_Print" />
Now, switch over to the C# file and add a PrintCommand_Executed method below CloseCommand_Executed and inside of the MainWindow class definition. It will look like so:

Printing in WPF requires two primary objects: A PrintDialog which, as expected, represents the system Print dialog, and a FlowDocument, which is new to WPF and supports advanced document features for both onscreen display and printing. (Oddly, FlowDocument prints documents in a two-column layout by default, so we add a line of code to short circuit that.)
Add code inside of PrintCommand_Executed so that it looks like so:
private void PrintCommand_Executed(object sender, ExecutedRoutedEventArgs e)
{
    PrintDialog printDialog = new PrintDialog
    {
        PageRangeSelection = PageRangeSelection.AllPages,
        UserPageRangeEnabled = true
    };

bool? print = printDialog.ShowDialog();
if (print == true)
{
    FlowDocument flowDocument = new FlowDocument(new Paragraph(new Run(TextBox1.Text)))
    {
        ColumnWidth = printDialog.PrintableAreaWidth
    };
    IDocumentPaginatorSource iDocumentPaginatorSource = flowDocument;
    printDialog.PrintDocument(iDocumentPaginatorSource.DocumentPaginator, DocumentName);
    }
}
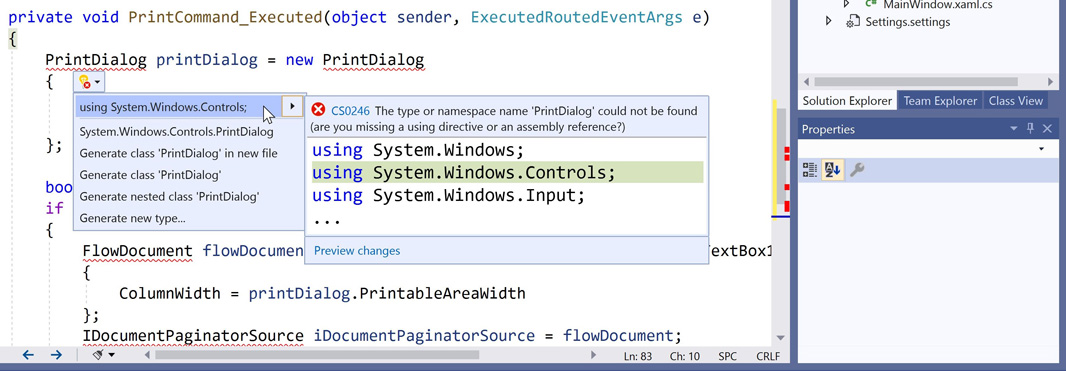
Some of the objects here will trigger Visual Studio warnings, which appear as read squiggly lines. For PrintDialog to work, you’ll need to add System.Windows.Controls to the using section at the top of the C# file, for example. (And FlowDocument requires you to add System.Windows.Documents.)
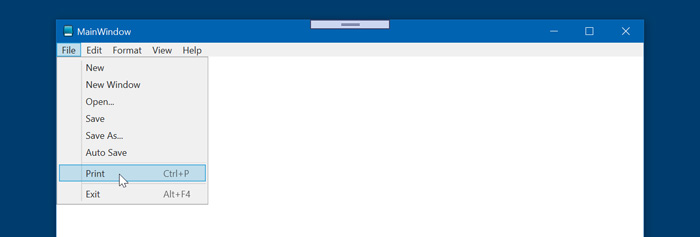
Anyway, that’s all you need: If you test this app (with some text pasted into the textbox), the Print dialog will appear when you select File > Print and it will print normally. Even better, the CTRL + P keyboard shortcut hint appears next to the menu item automatically and that shortcut works too.
Before moving on, let’s discuss one interesting bit of C# syntax in this code:
PrintDialog printDialog = new PrintDialog
{
    PageRangeSelection = PageRangeSelection.AllPages,
    UserPageRangeEnabled = true
};
This is the equivalent of the following, which is how I would normally write this code:
PrintDialog printDialog = new PrintDialog;
PrintDialog.PageRangeSelection = PageRangeSelection.AllPages;
PrintDialog.UserPageRangeEnabled = true;
Visual Studio recommends the former style when you write code like the latter because it is simpler and/or more readable. I’m not sure about that, but I’m getting used to it, and I’ll adopt it here. (You can see it again in the FlowDocument bit too.)
By the way, if you want to see the default two-column printout, comment out the line ColumnWidth = printDialog.PrintableAreaWidth.
This may also be an interesting place to discuss one of the unique features of commands: You can use a CanExecute property in XAML, and a corresponding CanExecute method in C# code, to determine whether a command can execute (as its name implies). I’m not actually doing this for the Print command, but I could see the rationale for disabling the Print command until there is something to print. That is, if the document is blank, don’t even make Print available.
To make this change—and again, I’m not doing this in my own version of the app—you need to do the following:
Add a CanExecute property to the Print menu item in XAML. That looks a lot like the Executed property and takes the following form:
CanExecute="PrintCommand_CanExecute"
Add a PrintCommand_CanExecute method to the C# file. That takes the following form:
private void PrintCommand_CanExecute(object sender, CanExecutedRoutedEventArgs e)
{

}
Write code in this method to handle the check. This is incredibly simplistic, but the following code checks to see if the textbox is empty. If it isn’t, the Print command is available (as is the CTRL + P keyboard shortcut).
if (TextBox1.Text.Length > 0)
    e.CanExecute = true;
There are probably better tests to be had. Maybe check if there is at least one word of text? (We will enable word count soon.) Whatever. I don’t see the need for it. But CanExecute is good to know about, and some built-in commands, like Cut, Copy, and Paste, handle this functionality for you automatically. This is one of the few ways in which the otherwise convoluted WPF commading system actually makes sense.
More textbox settings
Since a lot of the functionality in this app centers on the textbox, let’s implement the loading and saving of some textbox-related settings. This will require additions to both AppWindow_Initialized and SaveSettings (which you’ll recall is triggered in AppWindow_Closing), respectively.
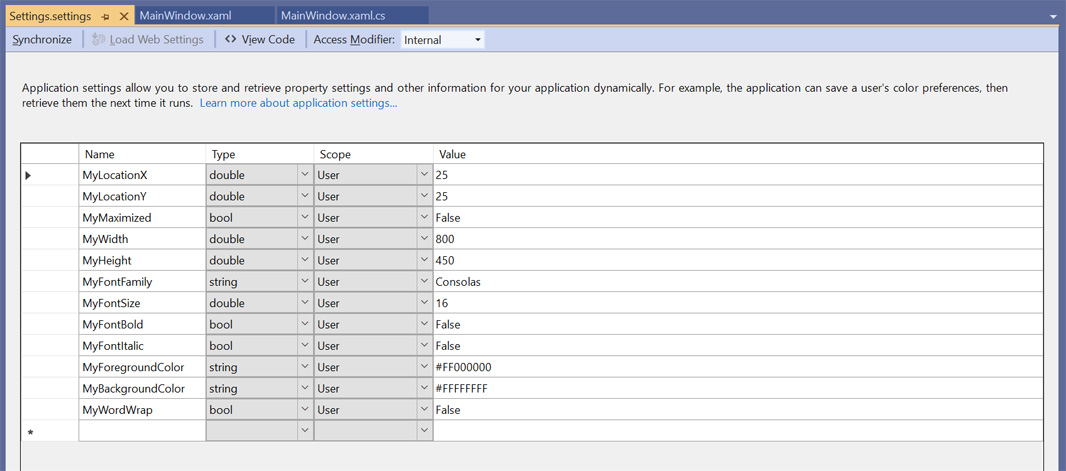
Before that, however, we need to add the corresponding settings to Settings.settings. So open that up and add the following user settings:
MyFontFamily. Type string. Value “Consolas” (no quotes).
MyFontSize. Type double. Value 16.
MyFontBold. Type bool. Value False.
MyFontItalic. Type bool. Value False.
MyForegroundColor. Type string. Value “#FF000000” (no quotes).
MyBackgroundColor. Type string. Value “#FFFFFFFF” (no quotes).
MyWordWrap. Type bool. Value False.
Save and close Settings.settings when you’re done.
Now, open MainWindow.xaml.cs and locate AppWindow_Initialized. Then, add the following comments to the bottom of this event handler:
// Get textbox fonts from settings

// Get textbox foreground and background colors from settings

// Get Word Wrap from settings
Then, do similarly for SaveSettings(), adding the following comments (above // Save settings):
// Copy textbox fonts to settings

// Copy textbox foreground and background colors to settings

// Copy Word Wrap to settings
In MainWindow.xaml.cs, change the comments you just added to the following:
// Get textbox fonts from settings
string fontName = Settings.Default.MyFontFamily;
TextBox1.FontFamily = new System.Windows.Media.FontFamily(fontName);
TextBox1.FontSize = Settings.Default.MyFontSize;
MasterFontSize = Settings.Default.MyFontSize;
    if (Settings.Default.MyFontBold)
TextBox1.FontWeight = FontWeights.Bold;
    else
TextBox1.FontWeight = FontWeights.Normal;
if (Settings.Default.MyFontItalic)

    TextBox1.FontStyle = FontStyles.Italic;
else
    TextBox1.FontStyle = FontStyles.Normal;

// Get textbox foreground and background colors
TextBox1.Foreground = new BrushConverter().ConvertFromString(Settings.Default.MyForegroundColor) as SolidColorBrush;
TextBox1.Background = new BrushConverter().ConvertFromString(Settings.Default.MyBackgroundColor) as SolidColorBrush;

// Get Word Wrap from settings
if (Settings.Default.MyWordWrap == true)
{

    // WordWrapMenu.IsChecked = true;
    TextBox1.TextWrapping = TextWrapping.Wrap;
}
else
{
    // WordWrapMenu.IsChecked = false;
    TextBox1.TextWrapping = TextWrapping.NoWrap;
}
There’s a lot there, and while the code is pretty readable and readily understandable, we need to discuss at least some of it.
First, the references to BrushConverter will have red squiggly underlines under them: You can fix this by adding System.Windows.Media to the using section as promoted.

Second, as you may have read in my The WPF Files series, Microsoft dramatically changed font support between WinForms and WPF. The former framework supported a single, elegant Font object that contained everything the programmer needed at the time. But in WPF, there are multiple objects—FontFamily, FontSize, FontWeight, FontStyle, and many others—instead. This change was necessitated by the more dynamic capabilities in the then-modern WPF framework, which was originally going to launch with Longhorn, and I don’t resent their existence. What does bother me is that Microsoft offered no clean way to map new font objects to the old Font object. As a result, I had to create my own Font dialog—which I’ll document soon—instead of using the system Font dialog, which is unavailable to WPF developers. (Unless they link to WinForms, in which case it’s just horribly difficult to use. We’ll get to that.)
Anyway, in the WinForms versions of .NETpad, I only needed to use a single Font setting. But in the WPF version, there are multiple settings. But while each is of a different type that matches up with the underlying new font objects, they mostly work as expected.
Also, in the Word Wrap section, you can see two commented-out lines related to something named WordWrapMenu. We haven’t implemented that menu item (Format > Word Wrap), but we will soon. So we’ll uncomment those when we do.
Now, do similarly with SaveSettings, replacing the three new comments there with the following:
// Copy text box fonts to settings
Settings.Default.MyFontFamily = TextBox1.FontFamily.ToString();
Settings.Default.MyFontSize = MasterFontSize;
if (TextBox1.FontWeight == FontWeights.Bold)
    Settings.Default.MyFontBold = true;
else
    Settings.Default.MyFontBold = false;
if (TextBox1.FontStyle == FontStyles.Italic)
    Settings.Default.MyFontItalic = true;
else
    Settings.Default.MyFontItalic = false;

// Copy text box foreground and background colors to settings
Settings.Default.MyForegroundColor = TextBox1.Foreground.ToString();
Settings.Default.MyBackgroundColor = TextBox1.Background.ToString();

// Copy text box Word Wrap configuration to settings
// Settings.Default.MyWordWrap = WordWrapMenu.IsChecked;
Once again, we’ve commented out the reference to WordWrapMenu, since we still need to add that menu item to the application. More broadly, the user doesn’t have any way to change any of these settings because we haven’t implemented that Font dialog yet. We will fix both of these issues soon.
Application name
Before moving on, I’d like to change the application name internally and then use that name in the application window’s title bar. Right now, it just says MainWindow.
To do so, right-click on the project name in the Solution Explorer and choose properties.

Change the Assembly name from “NotepadWPF” (no quotes) to “.NETpad” (no quotes) and save and close the properties window.
Now, open MainWindow.xaml.cs and locate AppWindow_Initialized. At the very top of this event handler, above any other code, add the following:
// Get application name from assembly
AppWindow.Title = "Untitled - " + Application.Current.MainWindow.GetType().Assembly.GetName().Name;
When you run the application, it will include that “Untitled – ” text we see in Notepad plus the real name of the app.

More soon.

Gain unlimited access to Premium articles.
With technology shaping our everyday lives, how could we not dig deeper?
Thurrott Premium delivers an honest and thorough perspective about the technologies we use and rely on everyday. Discover deeper content as a Premium member.