The WPF Notepad Project: Save, Save As, New, New Window (Premium)
- Paul Thurrott
- Mar 20, 2020
-
2
I originally intended to document Save and Save As in the previous article in this series, but I ended up improving it dramatically, which triggered a big rewrite. As I mentioned previously in The WPF Files series, my original recreation of .NETpad using WPF was done rather quickly, so I’ve been cleaning it up where necessary while documenting how I did it here. And this was one of the bigger fixes.
Anyway, like other document-based applications, .NETpad lets the user save a document (“Save”) or save a document using a different file name (“Save As”). But it’s a little more nuanced then that: If you’re working with a new, as-yet-unsaved document and you choose to save it, you’re really doing a Save As in that one instance; subsequent saves will call Save instead.
WPF provides support for Save and SaveAs commands. But because we will need to use the functionality from either in other contexts, we’ll create our own Save and SaveAs methods and then call them from SaveCommand_Executed and SaveAsCommand_Executed. (And later, from elsewhere too.)
To get started down this path, open MainWindow.xaml and locate the <Window.CommandBindings> section. Add the following two lines of XAML inside this section and between New and Print:
<CommandBinding Command="Save" Executed="SaveCommand_Executed" />
<CommandBinding Command="SaveAs" Executed="SaveAsCommand_Executed" />
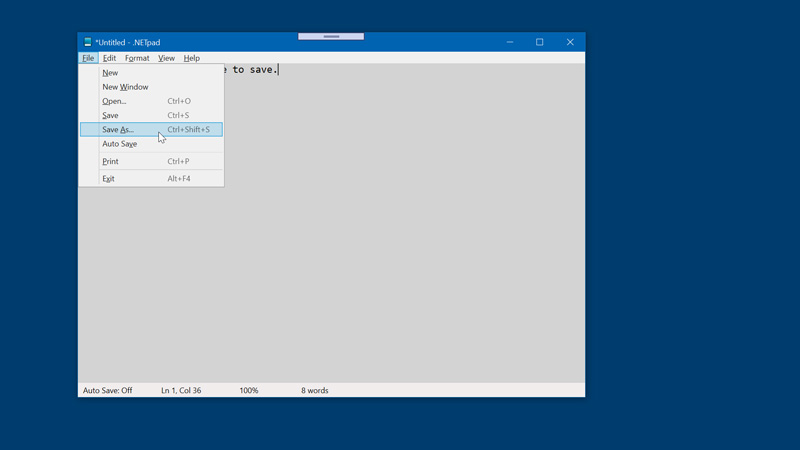
Then, locate the Save and Save As menu item tags and add the appropriate Command properties to each so that those two lines read like so:
<MenuItem Command="Save" Name="SaveMenu" Header="_Save" />
<MenuItem Command="SaveAs" Name="SaveAsMenu" Header="Save _As..." InputGestureText="Ctrl+Shift+S" />
Because the SaveAs command doesn’t automatically provide the associated keyboard shortcut (and, in the menu, the shortcut hint), we also need to add a key binding to the <Window.InputBindings> section in the XAML file too. That looks like so:
<KeyBinding Key="S" Modifiers="Ctrl + Shift" Command="SaveAs" />
Over in MainWindow.xaml.cs, we now need to create empty Save() and SaveAs() methods inside of the MainWindow class definition, like so:
private void Save()
{

}

private void SaveAs()
{

}
Then, we need to add Save and Save As command handlers that call those methods:
private void SaveCommand_Executed(object sender, ExecutedRoutedEventArgs e)
{
    Save();
}

private void SaveAsCommand_Executed(object sender, ExecutedRoutedEventArgs e)
{
    SaveAs();
}
Let’s code SaveAs first, since the Save method will need to call SaveAs if the current document has never been saved.
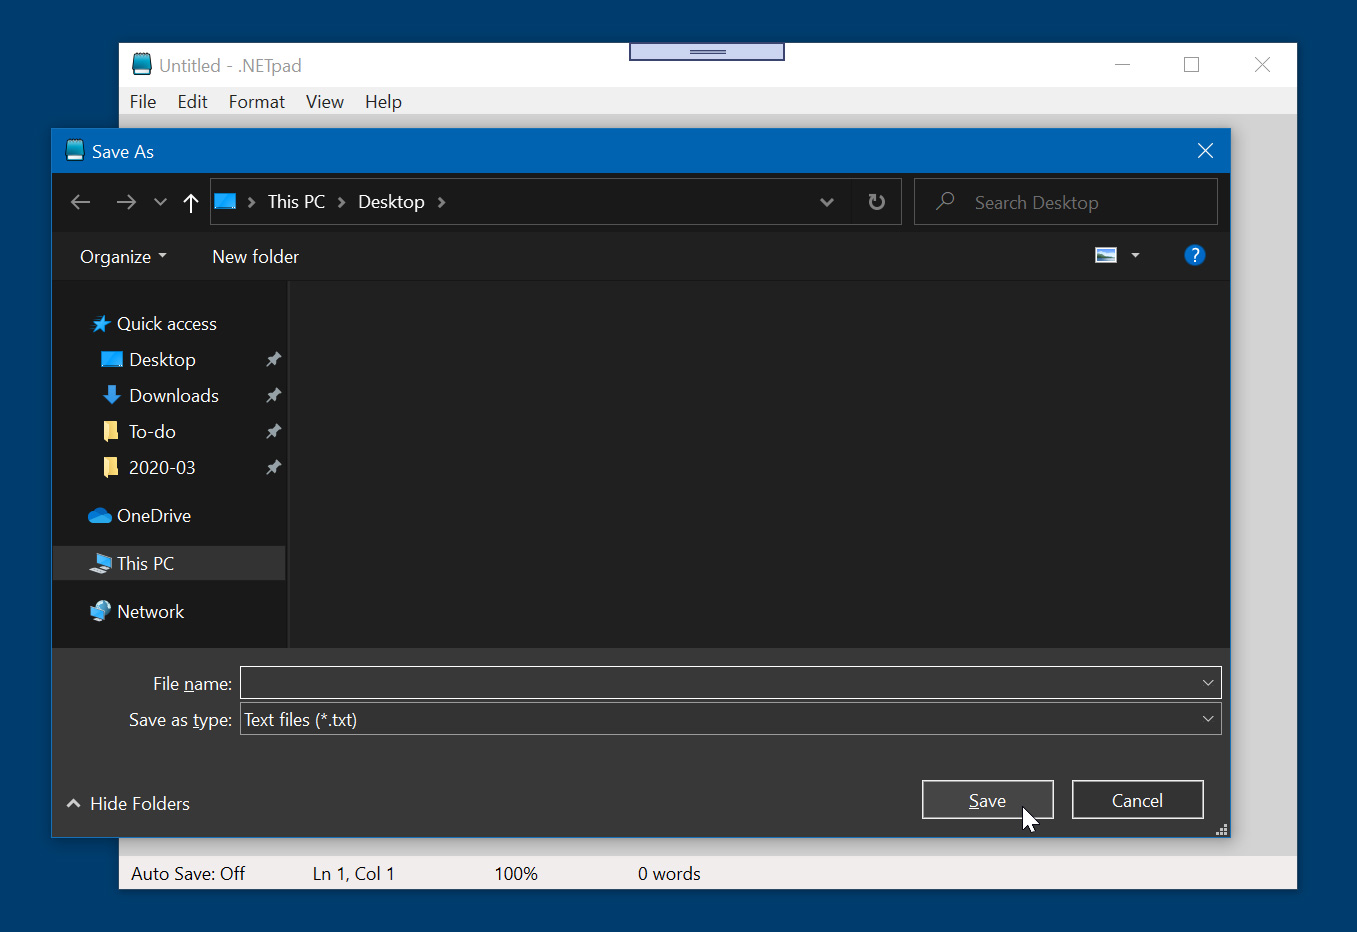
SaveAs basically needs to display a Save As dialog. If the user creates a name and chooses to save, our application will create the new text file with that name (in whatever location the user chose), change the DocumentName global variable to that filename, change the application title bar to reflect the filename, and change TextHasChanged to false.
It looks like this:
SaveFileDialog saveFileDialog = new SaveFileDialog { Filter = "Text files (*.txt)|*.txt|All files (*.*)|*.*" };
if (saveFileDialog.ShowDialog() == true)
{
    try
    {
        DocumentName = saveFileDialog.FileName;
        AppWindow.Title = Path.GetFileNameWithoutExtension(DocumentName) + "- " + Application.Current.MainWindow.GetType().Assembly.GetName().Name;
        TextHasChanged = false;
        File.WriteAllText(saveFileDialog.FileName, TextBox1.Text);
    }
    catch (Exception ex)
    {
        MessageBox.Show(ex.Message);
    }
}
The Save method, meanwhile, has to check whether DocumentName is a non-empty string. If it isn’t, then it calls Save As. But if it, Save will save over the existing file without displaying a dialog, set TextHasChanged to false, and remove the “*” from the application title bar. It looks like this:
if (DocumentName.Length > 0)
{
    try
    {
        File.WriteAllText(DocumentName, TextBox1.Text);
        TextHasChanged = false;
        AppWindow.Title = AppWindow.Title.Replace("*", "");
    }
    catch (Exception ex)
    {
        MessageBox.Show(ex.Message);
    }
}
else
{
    SaveAs();
}
Test this and you should find that everything works as expected, including the keyboard shortcuts.
We need a DisplaySavePrompt method
With Save and Save As out of the way—barring any issues discovered by readers—it’s time to turn our attention to the other times in the app in which we might need to display a Save (or Save As) dialog. There are three I can think of:
AppWindow_Closing. This event handler fires when the user chooses to close the application. It doesn’t matter how that occurs—via the Close window button, File > Exit, or the ALT + F4 keyboard shortcut. In any of these instances, this event will fire.
OpenCommand_Executed. This command handler fires when the user chooses to open a document from the file system.
NewCommand_Executed. We haven’t added support for the New command yet, but this command handler fires when the user tries to start over with a new, blank document.
The logic we’ll need in each instance is essentially identical. That is, we need to test whether our global variable TextHasChanged is true. If it is, we will display a Save prompt in the form of a message box with Yes, No, and Cancel options. In each case, if the user chooses Cancel, the underlying operation—Closing, Open, and New, respectively—needs to be canceled as well. Only if the user chooses Yes (in which case, Save or Save As will also occur) or No will the underlying operation continue.
To make this happen efficiently, we’ll create a method called DisplaySavePrompt that will display the Save prompt (obviously), process it accordingly, and then return a Boolean value. If the user chooses Yes or No, the method will return true. But if they choose Cancel, it will return false. We will also need to add some surrounding code in each of those event/command handlers to proceed accordingly, based on what value is returned.
Here it the new method:
private bool DisplaySavePrompt()
{
    if (TextHasChanged == true)
        {
        MessageBoxResult SavePrompt = MessageBox.Show("Do you want to save changes before closing?", Application.Current.MainWindow.GetType().Assembly.GetName().Name, MessageBoxButton.YesNoCancel);
        switch (SavePrompt)
        {
            case MessageBoxResult.Yes:
                Save();
                return true;
            case MessageBoxResult.No:
                return true;
            case MessageBoxResult.Cancel:
                return false;
        }
    }
    return true;
}
Add that method at the end of the MainWindow definition in MainWindow.xaml.cs, of course.
Before moving on to our three event/command handlers in turn, we need to make one more change.
Close command
In MainWindow.xaml.cs, locate CloseCommand_Executed, which currently contains only a single line of code:
Application.Current.Shutdown();
Change that to:
Application.Current.MainWindow.Close();
This change is required because the application’s Shutdown method can’t be canceled, and DisplaySavePrompt returns a value that indicates whether the underlying action should be canceled. The good news is that MainWindow.Close can be canceled, which is what we want if the user tries to close the app, gets a Save prompt, and chooses “Cancel.”
Application window closing
With this simple change, we can now prompt the user to save an unsaved document before closing the application, opening another document, or starting over with a new document. We’re going to do this in AppWindow_Closing, which currently has only a single line of code in it:
SaveSettings();
Let’s change that to:
SaveSettings();
bool result = DisplaySavePrompt();
if (result == false)
    e.Cancel = true;
The switch statement in DisplaySavePrompt handles all three of the possible results of the save prompt. If the user chooses “Cancel,” the app won’t close; that’s what the line e.Cancel = true; does. And yes, I know that we’re saving the settings before this decision happens, but I’m OK with that.
To test this, make a change to the text. Then try to close the application. You’ll get a Save prompt, and if you click Cancel, the app will not close.

File > Open
Now we need to update the Open command handler in a similar fashion. However, because OpenCommand_Executed is a command handler and not an event handler, we need to handle the return value from DisplaySavePrompt a bit differently. Here we’ll test the value that it returns and, if it’s true—meaning that user chose Yes or No—we’ll display the Open dialog. Otherwise, we’ll just skip all that. Basically, we just need to wrap the code that’s already there in an if loop, but here’s all the code just so it’s obvious:
private void OpenCommand_Executed(object sender, ExecutedRoutedEventArgs e)
{
    bool result = DisplaySavePrompt();

    if (result == true)
    {
        OpenFileDialog openFileDialog = new OpenFileDialog
        {
            Filter = "Text files (*.txt)|*.txt|All files (*.*)|*.*"
        };
        if (openFileDialog.ShowDialog() == true)
        {
            try
            {
            TextBox1.Text = File.ReadAllText(openFileDialog.FileName);
            AppWindow.Title = openFileDialog.SafeFileName + " - " + Application.Current.MainWindow.GetType().Assembly.GetName().Name;
            TextHasChanged = false;
            DocumentName = openFileDialog.FileName;
            }
            catch (Exception ex)
            {
                MessageBox.Show(ex.Message);
            }
        }
    }
}
As always, test this—and test each instance, where you have changed text and choose Yes, No, and Cancel—to make sure it works as expected.
File > New
We haven’t implemented File > New yet, but you probably won’t be surprised to discover that we can use a WPF command for that, and that the save prompt test we’ll perform is identical to that used above. But first things first: Open MainWindow.xaml and add the following line inside the <Window.CommandBindings> section:
<CommandBinding Command="New" Executed="NewCommand_Executed" />
Then, find the New menu item and add a Command property so that it looks like this:
<MenuItem Command="New" Name="NewMenu" Header="_New" />
In MainWindow.xaml.cs, scroll down to the bottom of the MainWindow class definition and add a blank command executed handler for the New menu:
private void NewCommand_Executed(object sender, ExecutedRoutedEventArgs e)
{

}
Then, add the following code inside it:
bool result = false;
if(TextHasChanged)
{
    result = DisplaySavePrompt();
}

if (result == false)
    return;

TextBox1.Text = "";
TextHasChanged = false;
DocumentName = "";
Application.Current.MainWindow.Title = "Untitled - " + Application.Current.MainWindow.GetType().Assembly.GetName().Name;
The top part of that should look familiar by now. The rest of it exits from the handler if the user chose Cancel, and otherwise resets some global variables and the title bar of the main application window to their default values.
As always, test this using every possible permutation.
And what the heck. Let’s add one more thing…
File > New Window
This is unrelated to the functionality we added above, but it’s quick. Let’s handle the File > New Window operation, which creates a new instance of the .NETpad application.
Open MainWindow.xaml, locate the New Window menu item. Since New Windows isn’t associated with a command, we’ll just use a basic Click event handler for now. (This means we won’t have a keyboard shortcut, but that may not be super-important since New Window is an infrequent command. But I will revisit this later.) So select the New Window menu item, switch the Properties pane to the Events list, and double-click the textbox next to Click. An empty NewWindowMenu_Click event handler appears in MainWindow.xaml.cs:
private void NewWindowMenu_Click(object sender, RoutedEventArgs e)
{

}
Researching how to start a new process from WPF, I came up with the following line of code:
Process.Start(System.IO.Path.GetFileName(Process.GetCurrentProcess().MainModule.FileName));
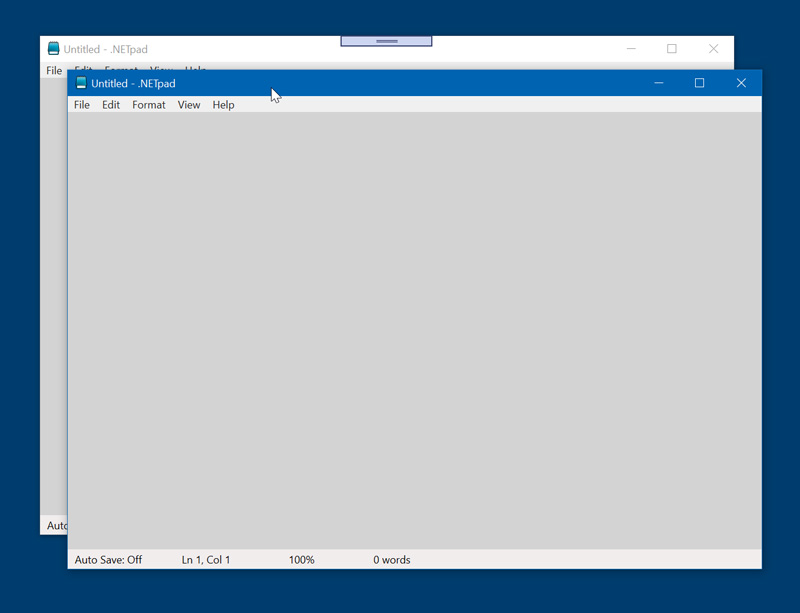
Process.Start will have a red squiggly line under it, so add System.Diagnostics to the using section as prompted by Visual Studio. That will then work, in that it will open a new application window. But the new window appears directly over the current one, which isn’t ideal: In the Windows Forms version of the app, I offset the new instance by 10 pixels (as I recall) both horizontally and vertically. Maybe we’ll fix that later if possible.
Next time, we’ll finally get to my favorite part of this version of the application: The custom Font dialog.

Gain unlimited access to Premium articles.
With technology shaping our everyday lives, how could we not dig deeper?
Thurrott Premium delivers an honest and thorough perspective about the technologies we use and rely on everyday. Discover deeper content as a Premium member.