Modernizing .NETpad Step-By-Step, Part 6 More Custom Dialogs (Premium)
- Paul Thurrott
- Sep 11, 2024
-
0
In the previous installment, we created a custom Content dialog because WPF doesn’t support the native control in Windows. And then we built out our first dialog, Save confirmation, using that as a base. This time, we’ll use it to create more dialogs. This includes the Go to line dialog and the Auto save dialog(s)–there are actually two of them–and maybe an unexpected new entry too.
Part of the difficulty for me here is that I’ve created several different new versions of .NETpad this past summer as I’ve worked to update it to support Windows 11 theming and other modern features thanks to a big update to WPF, now in preview. Each of these .NETpad versions has some unique advances, and as I write this how-to series documenting how one might modernize a legacy WPF app like this, I’ve encountered some interesting new issues. And one of those came to light last night as I was taking screenshots for this article. So we’ll see where this takes us.
For now, we have what I think is a solid base for future custom dialogs that look and feel correct in Windows 11. Well, mostly: The WPF update that enables this work isn’t fully baked, so there are still some style issues, including one that impacts this work when you mouse over the accent-colored default button in a dialog, and it doesn’t handle the temporary color change correctly. But that’s on Microsoft, and it’s not a big deal. If and when it’s fixed, the app should just look and work as expected without requiring much in the way of code changes. He writes, naively.
In addition to creating our custom Content dialog in the previous article, we also implemented the first, and arguably the most important, of the resulting custom dialogs, what I call the Save confirmation dialog. That was a lot of work, but creating the next two/three–Go to line and the two Auto save dialogs–should be relatively straightforward, as they follow the same model.
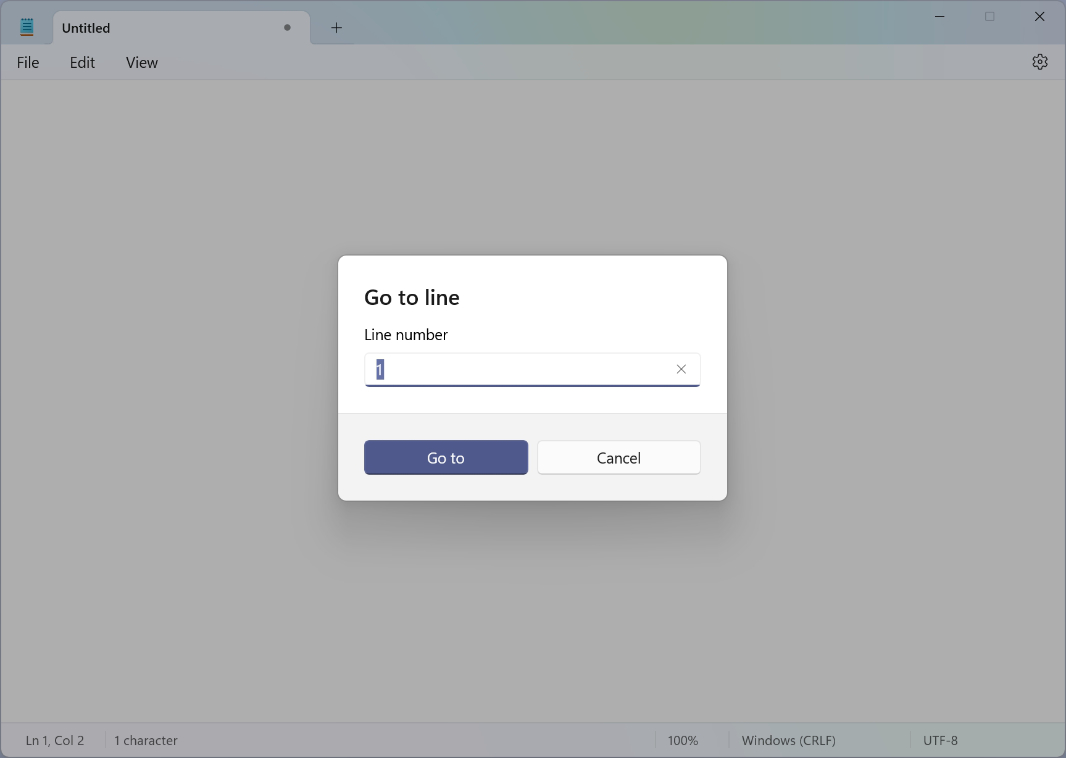
Implement the Go to line dialog
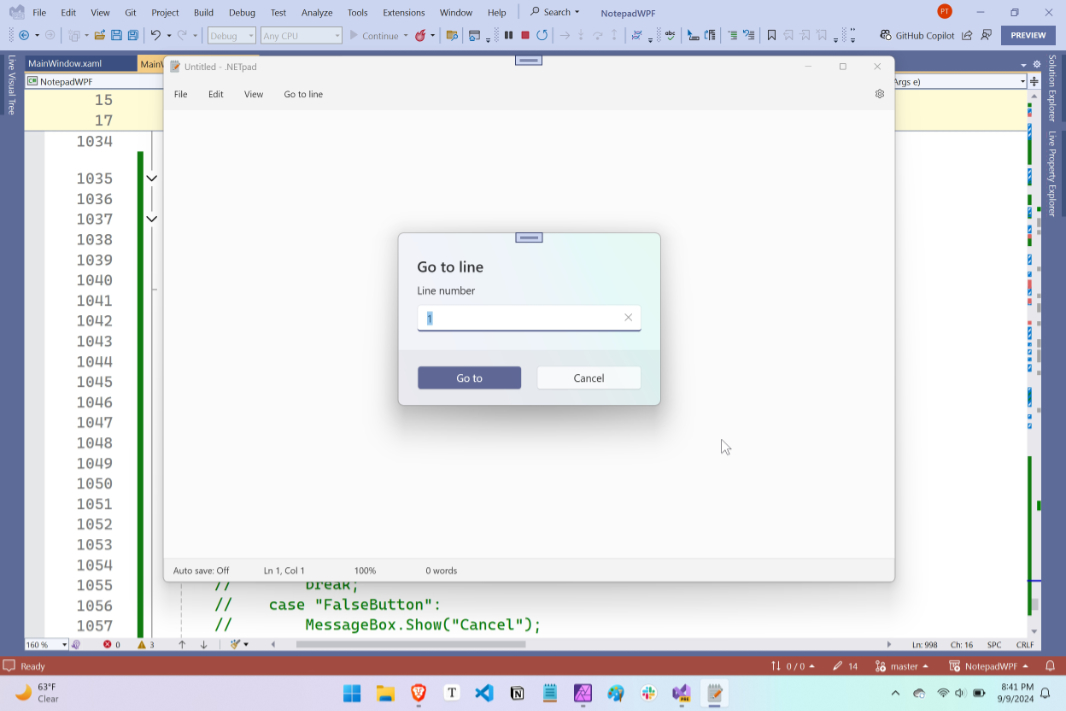
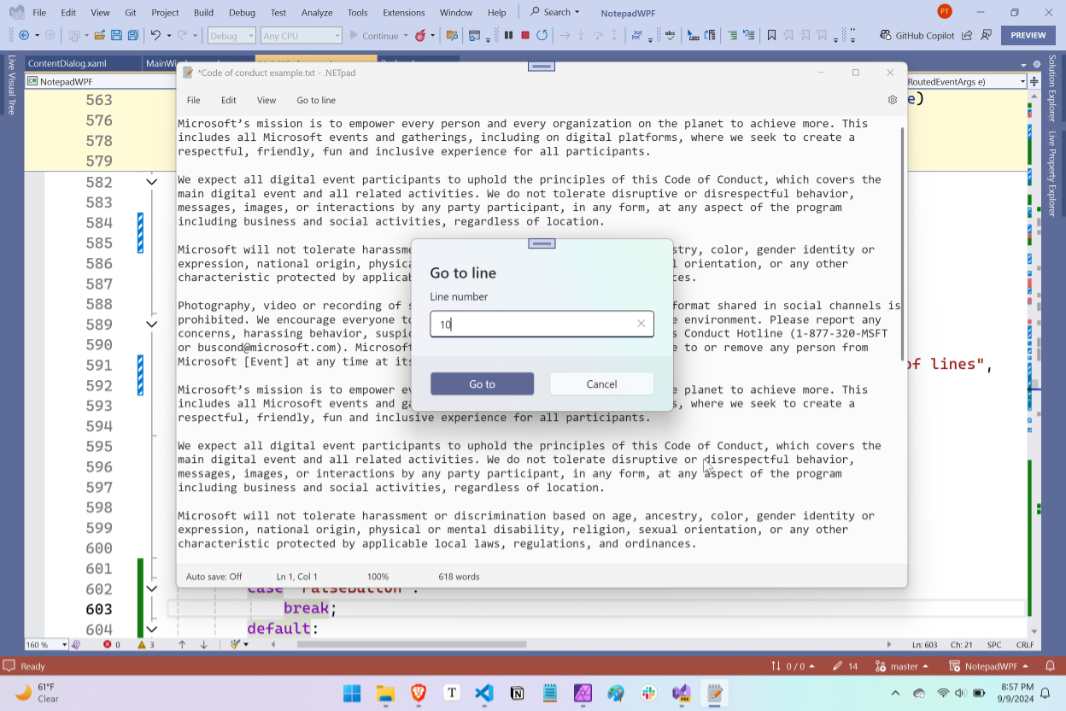
Go to line is an outlier among our custom Content dialogs in that it’s the only one to use the optional text box. As a reminder, this is what it looks like in Notepad.
To get started with our version of this, we’ll use a temporary top-level menu item to launch our new Go to line dialog while we create it, and then we’ll move it into the main code base. So locate the temporary menu items in MainWindow.xaml–their headers are ” “Template Test” and “Save confirmation,” respectively–delete the first one, and change the header of the remaining item (formerly “Save confirmation”) to “Go to line.” We could change the name of the OnClick() event handler to match, but this is temporary, so I didn’t bother myself.

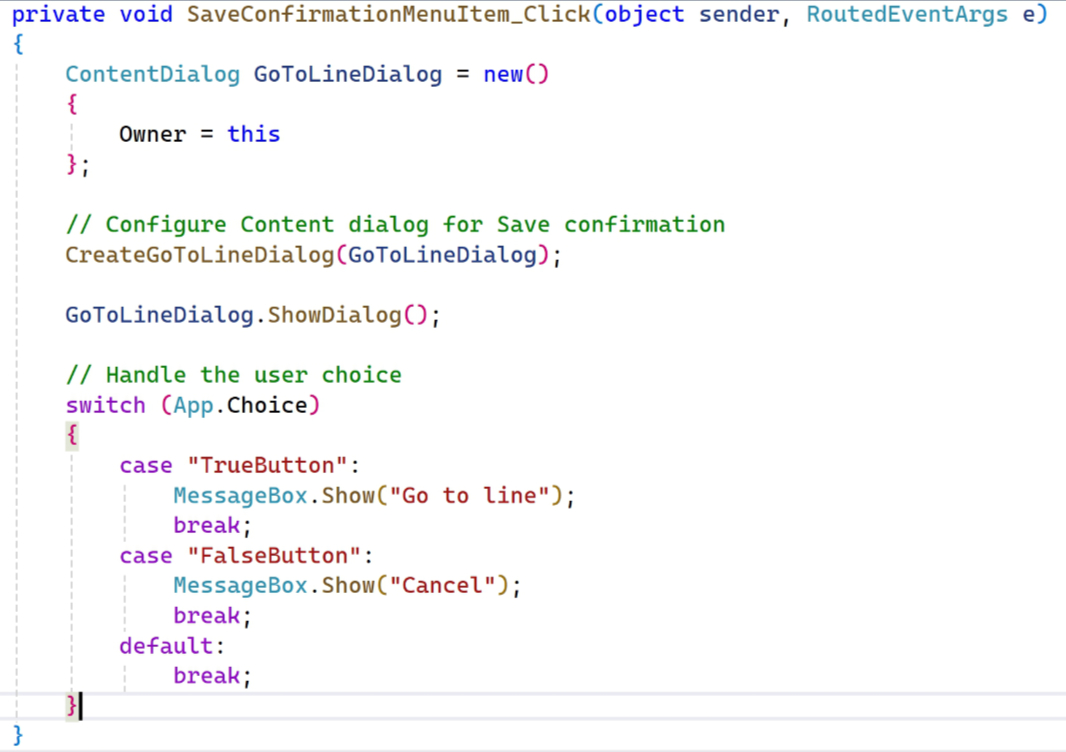
Now, we can edit the code in the (unfortunately named) SaveConfirmationMenuItem_Click() event handler in MainWindow.xaml.cs so that it makes sense for the Go to line dialog. This includes a few quick edits to the name of the ContentDialog instance we’re creating and to the “Create” method it will use.
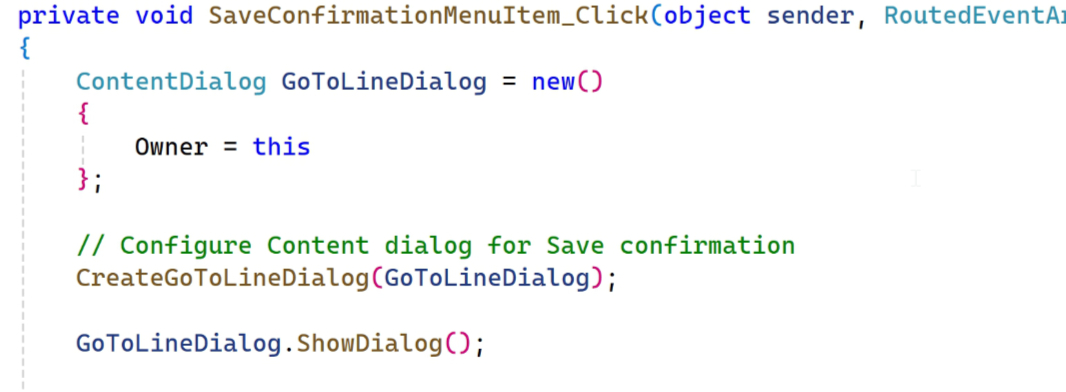
Now, open Backend.xaml and create a new, blank CreateGoToLineDialog() method.

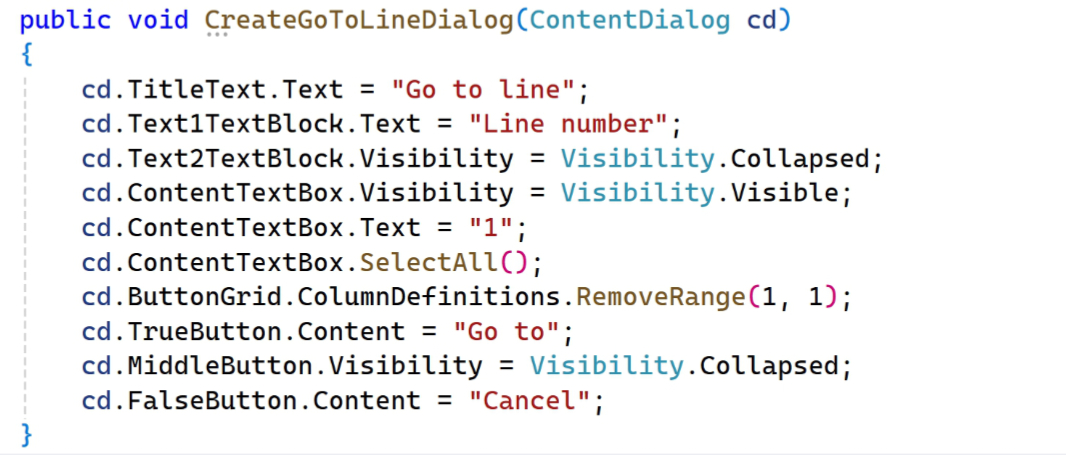
The code here needs to set the TitleText and Text1TextBlock text, as always, hide the Text2TextBlock control, make the ContentTextBox visible, set its Text property to “1”, and select its contents. Then, we need to remove the middle button in the lower half of the dialog and set the captions of the other two buttons accordingly.
With that done, you can run the app, click the new “Go to line” menu item and make sure the dialog looks right.
Return to the SaveConfirmationMenuItem_Click() event handler in MainWindow.xaml.cs so we can add the Switch statement that will handle whichever option the user chooses.
Then, test it again to see that each button press–and tapping Enter or Esc on the keyboard–generates the appropriate Message box message.
OK, that was easy. But now we have to insert this code into the actual app. To do so, locate the GoToCommand_Executed() event handler in MainWindow.xaml.cs. This code currently uses a custom InputBox I had created for the original WPF version of .NETpad, so it should be easier to convert to our new and improved custom Content dialog.
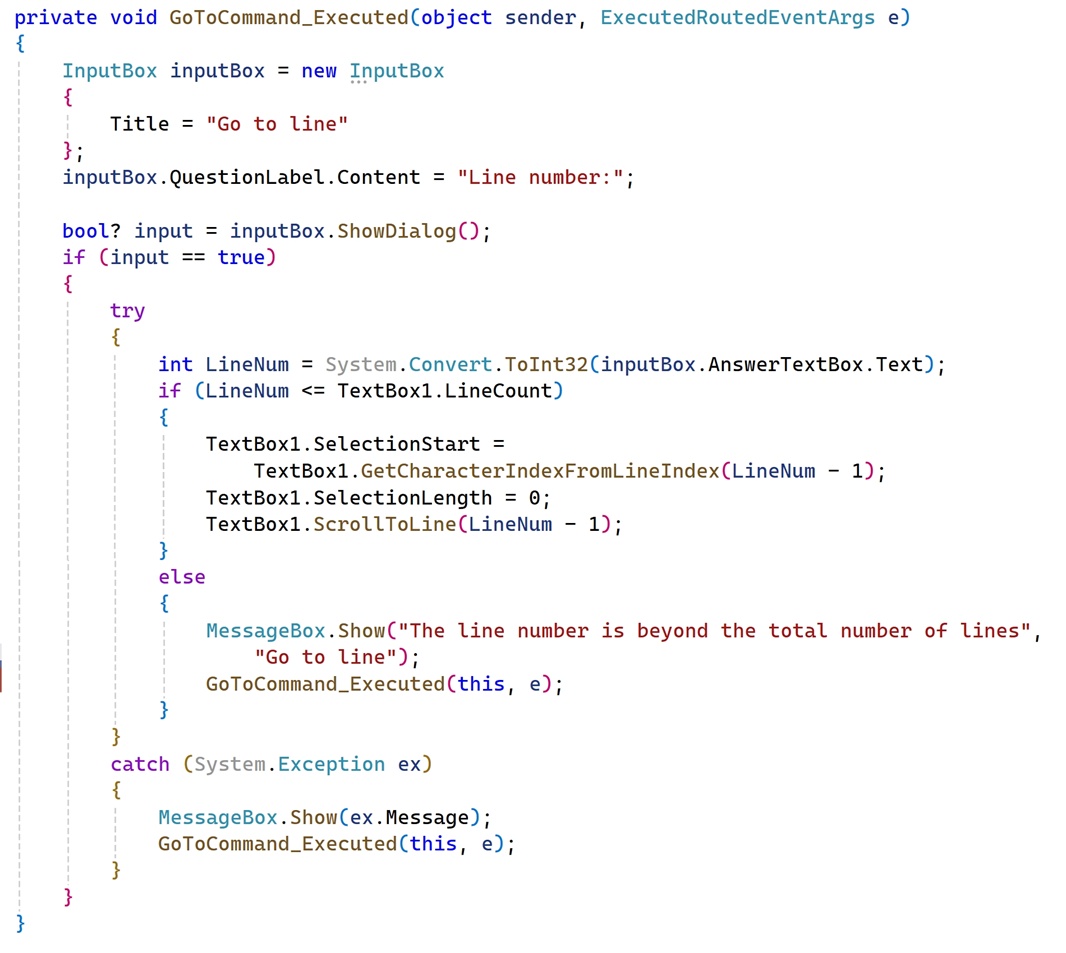
The basic structure here is to display the dialog and then respond accordingly when the user (optionally) enters a line number. It can move to the selected line if valid or display an error message (using a Message box) otherwise. (This is all in a Try/Catch block that will display an error message if there’s an exception.) Most of this will stay as-is. First, we just need to move the relevant code into the case “TrueButton”: section of our Switch statement.
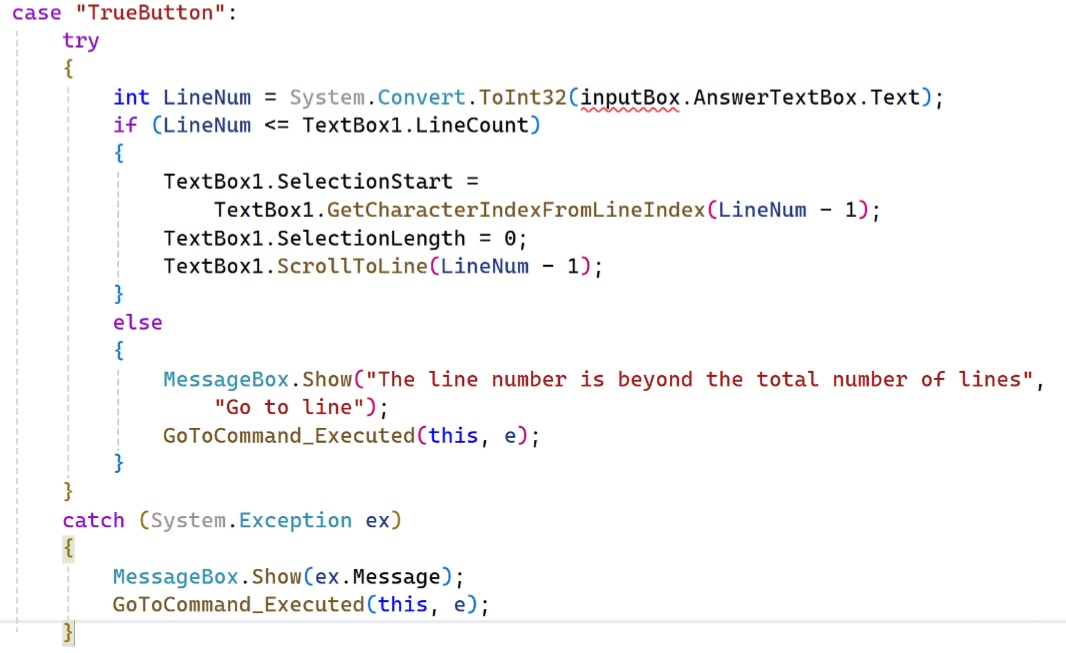
Then, we change the old inputBox.AnswerTextBox reference to GoToLineDialog.ContentTextBox.

Then, test the changes. This works best when there’s a long enough document that you can try different values.
Improve the Go to line dialog
While we’re here and this work is still fresh in our minds, we should take a moment to fix an issue with Go to line number that dates back to the original version of the app: When this dialog appears, the text box always defaults to “1”. What it should do is display the current line number. (The line in which the text insertion cursor is found.)
This is a simple change.
We already created an app-level LineNumber variable (I think), but if you don’t see it in App.xaml.cs, then add it like so.
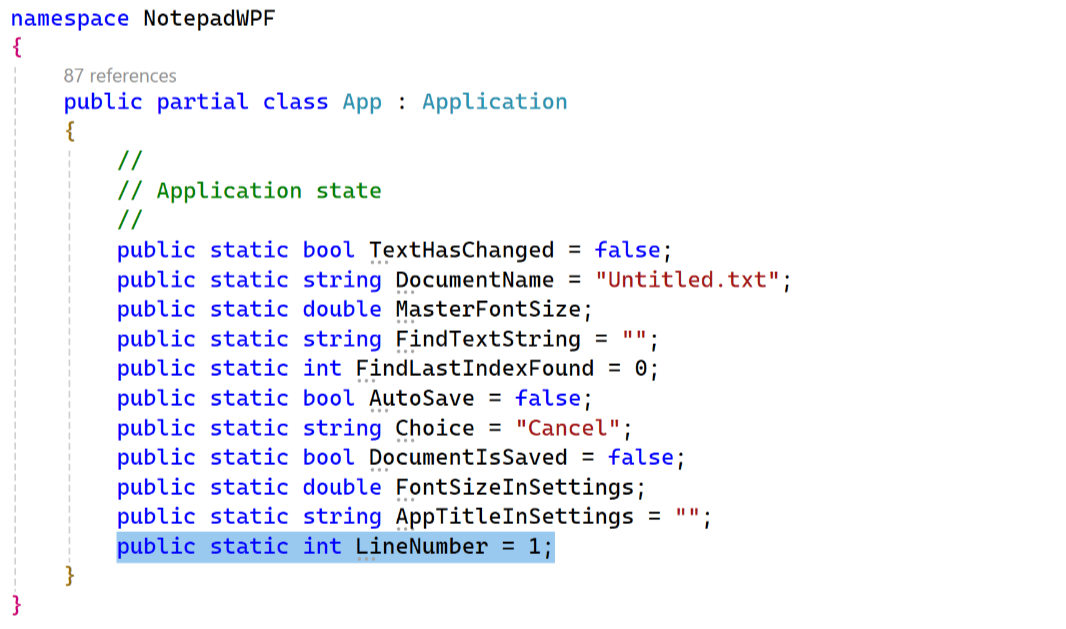
Then, open Backend.cs and locate the CreateGoToLineDialog() method. We need to make two changes. First, add the code you see at the top of the code block to set LineNumber equal to the line in which the text cursor is found.

Then, change the line that reads
cd.ContentTextBox.Text = “1”;
To:
cd.ContentTextBox.Text = App.LineNumber.ToString();
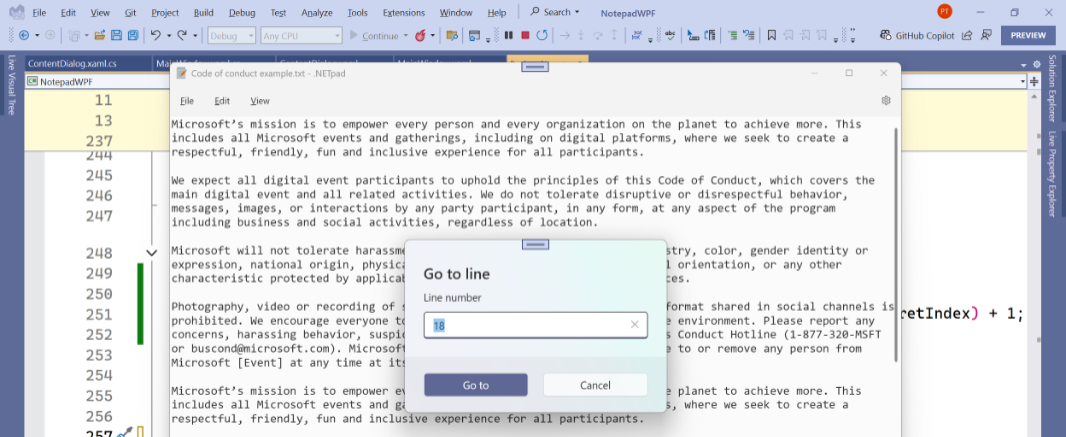
Now, give it a spin. Create or open a document with multiple lines, move the text insertion cursor to various lines, and test it. The dialog should display the current line correctly when it opens.
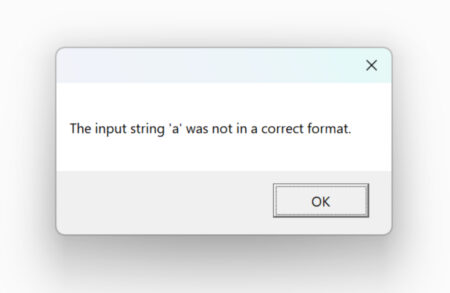
There’s another issue with the Go to line dialog I’ve always wanted to fix: Its text box should only accept numbers, but it’s just a normal text box, so it accepts letters and other characters too. There’s some logic to display an error dialog if the user enters a non-integer value, but it’s an old-school Message box that looks out of place in Windows 11.
So let’s fix that. I found a solution on StackOverflow that prevents the user from entering anything but an integer in the dialog, and it seems to work correctly.
Add the following method to ConfirmDialog.xaml.cs.

Then, open ConfirmDialog.xaml and locate the XAML code for the PreviewTextInput event handler as shown here:
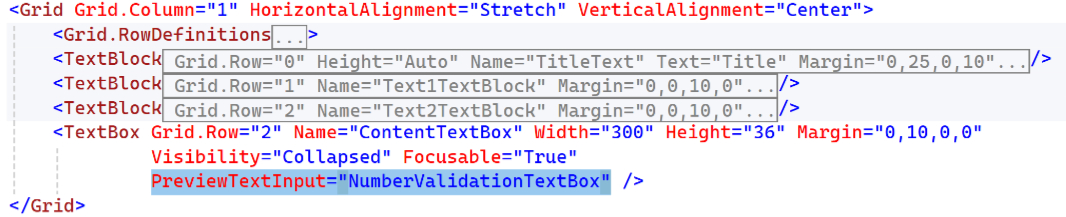
Now, when you run the add and open Go to line, it won’t accept anything but an integer. Nice.
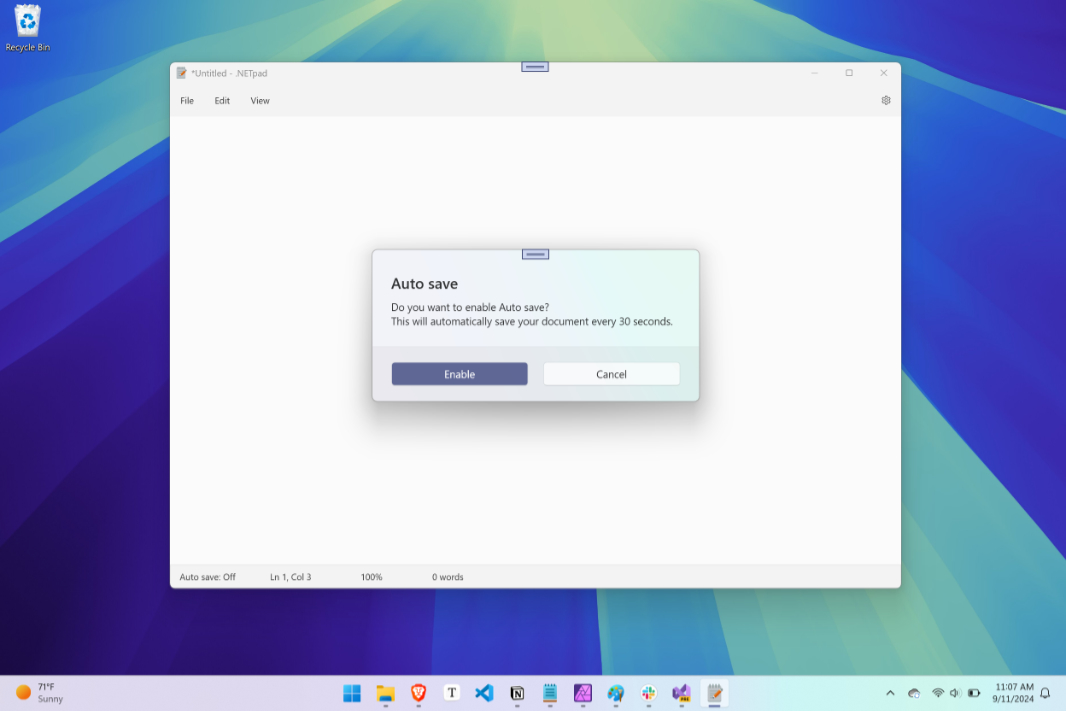
Implement the Auto save dialogs
Auto save is/was unique to .NETpad, and it’s a pretty basic feature. You can toggle it on and off, and if it’s on, it’s hard-coded to auto save at 30 second intervals when on. For now, the goal is modernizing the current app, so we’ll just focus on that. But I could see improving this feature later, perhaps by giving the user auto save interval choices.
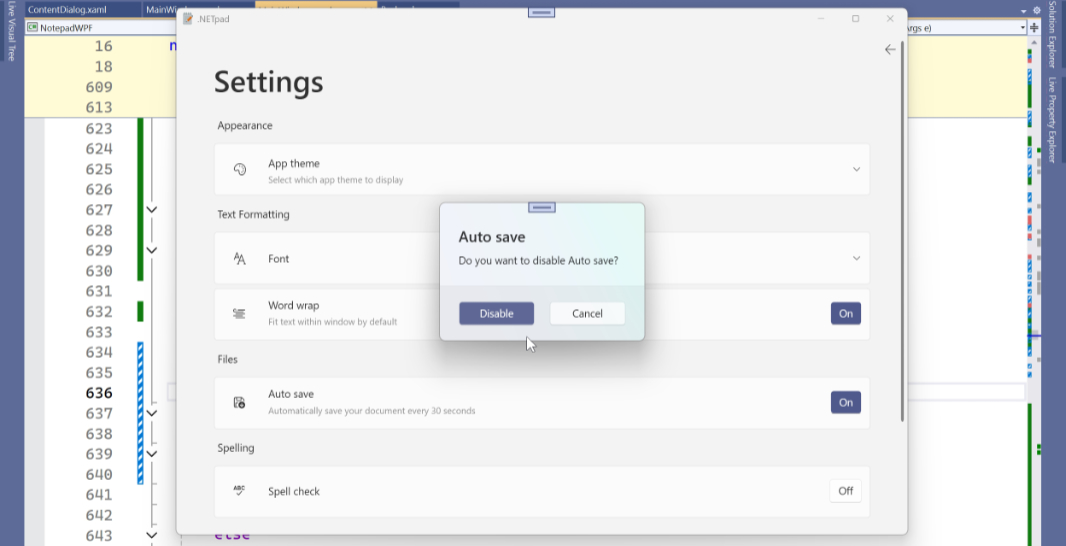
Thanks to our previous updates, there are now three ways to toggle Auto save: From the File > Auto save menu item, by double-clicking the Auto save item in the status bar, or by using the Auto save toggles in the settings pane. Each time you toggle the feature, an Auto save dialog appears. But it’s really two different dialogs, one for enabling the feature and one for disabling it. So we’ll implement each in turn.
As before, we start by editing the temporary top-level menu item in MainWindow.xaml, which is current using the header “Go to line.” Change that to read “Auto save on.” And then add a second top-level menu item with the header “Auto save off” and a new event handler like so.

Note that you’ll need to rename the event handler to match.

Now, in the poorly named SaveConfirmationMenuItem_Click() event handler in MainWindow.xaml.cs, we can edit the code to be appropriate for the Auto save enable dialog.

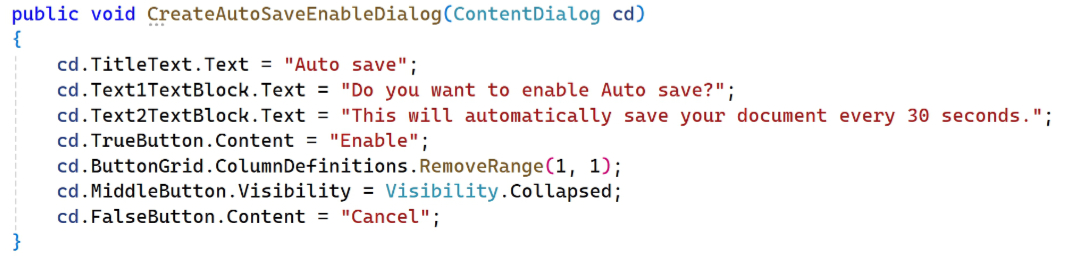
That CreateAutoSaveEnableDialog() doesn’t exist yet, so create that in Backend.cs.

Then, add the code below to correctly configure the dialog for the needs of this feature. This one is unique because it uses the second text description line (Text2TextBlock).
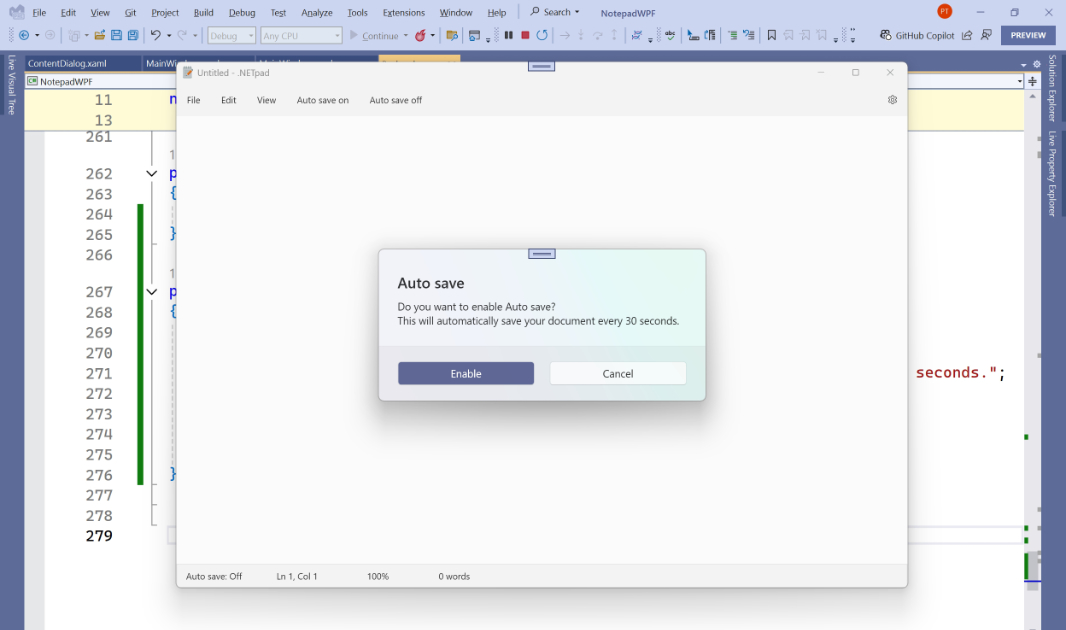
Then, run the app and select File > Auto save to see that it looks correct.
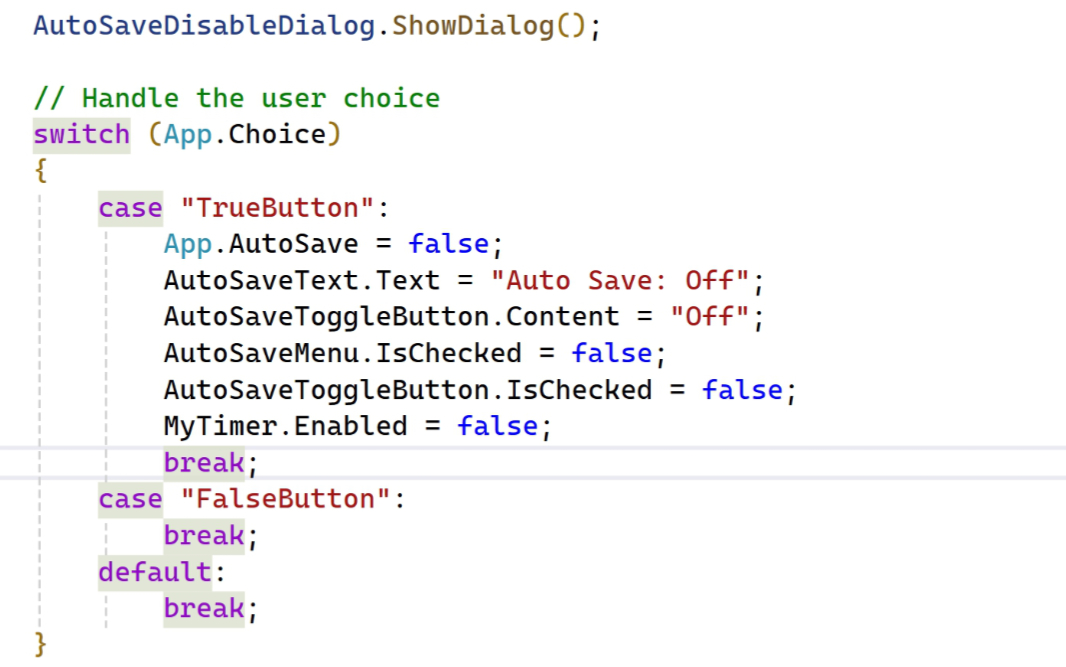
In what should now be a familiar step, we can add code to handle the user’s choice in SaveConfirmationMenuItem_Click() … but we already know it’s going to work fine, so just skip that. Instead, let’s add the code to AutoSaveOffMenuItem_Click() in MainWindow.xaml.cs to display that version of the dialog.
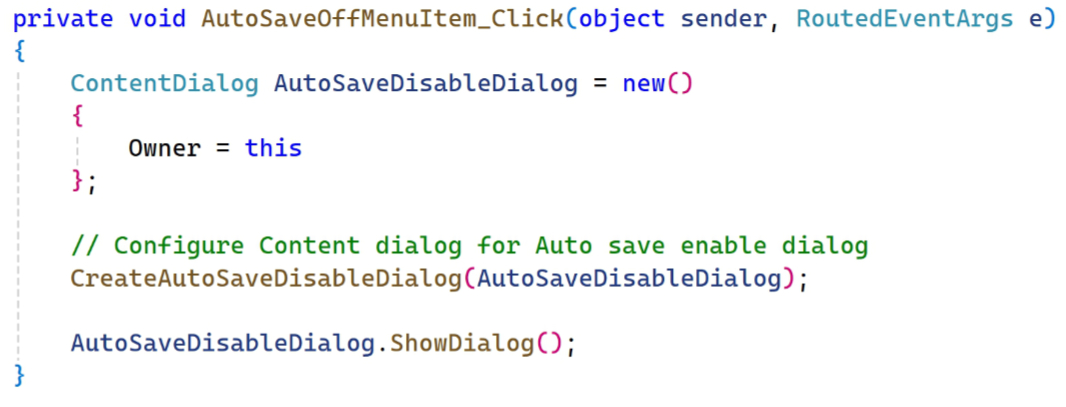
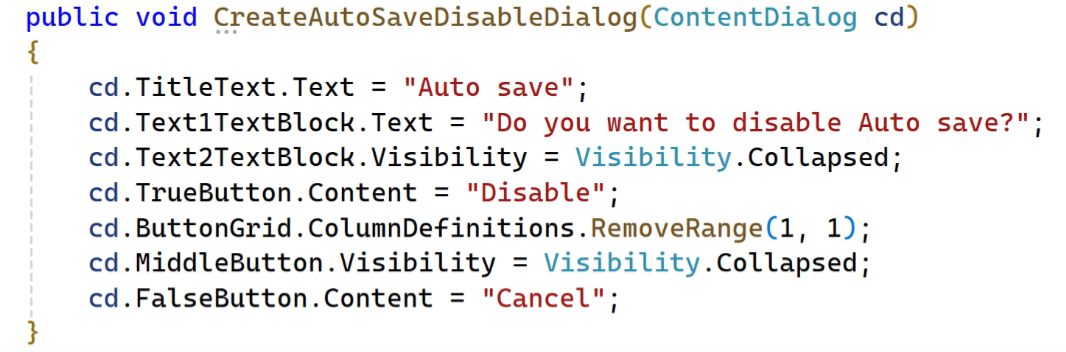
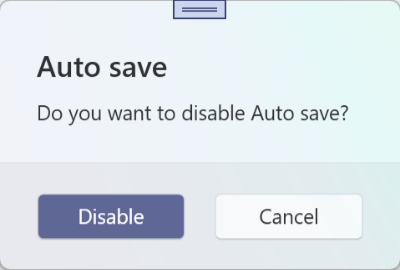
And then build out CreateAutoSaveDisableDialog() in Backend.cs. This is one simple: Just one short text description line and two buttons.
Again, test the dialog by clicking the “Auto save off” menu item in the main app window. It should look like so.
While there are three ways to toggle Auto save in the app as noted above, each runs the same event handler, AutoSaveMenu_Click(). So locate that in MainWindows.xaml.cs.
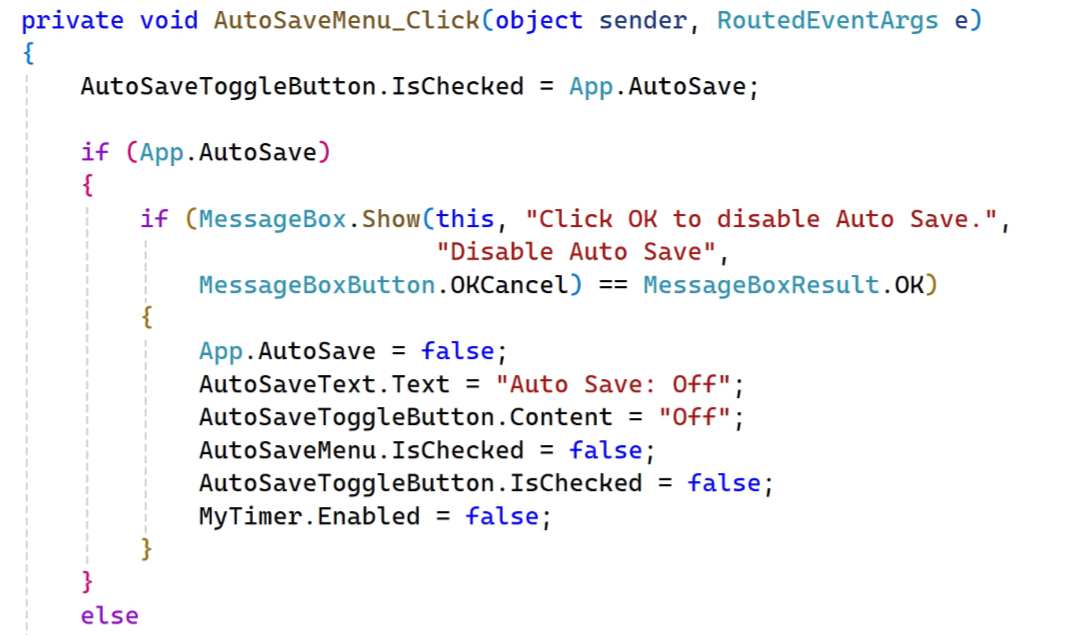
It’s basically a big if-else block. In each case, an old-school message box appears. Is Auto save is enabled and the user clicks “OK”, the “if” clause disables the feature. And if it’s disabled and the user clicks “OK” in the Message box, the “else” clause enables the feature. So we just need to change that to display the correct custom Save as dialog in each case.
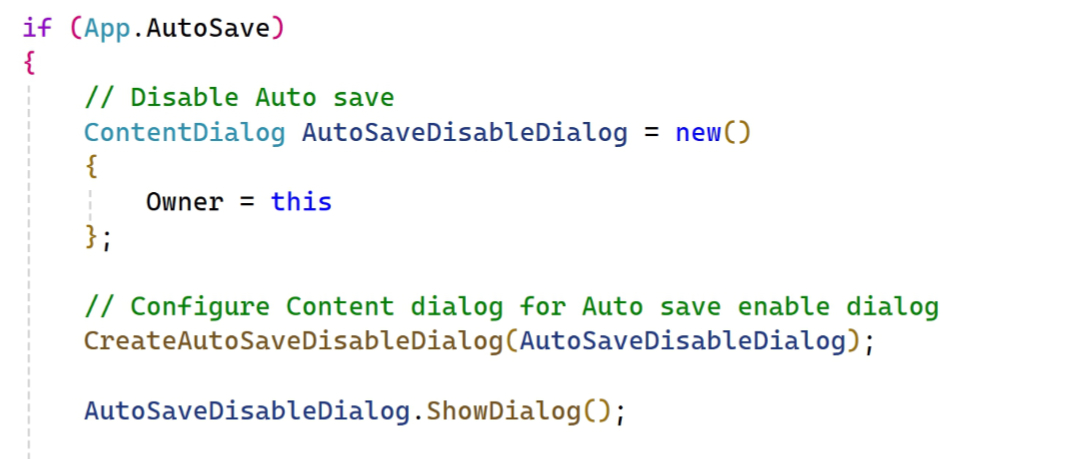
Replace the code in the “if” block with the code we used earlier to display the Save as enable dialog.
Then, start adding a switch statement to handle the user’s choice.
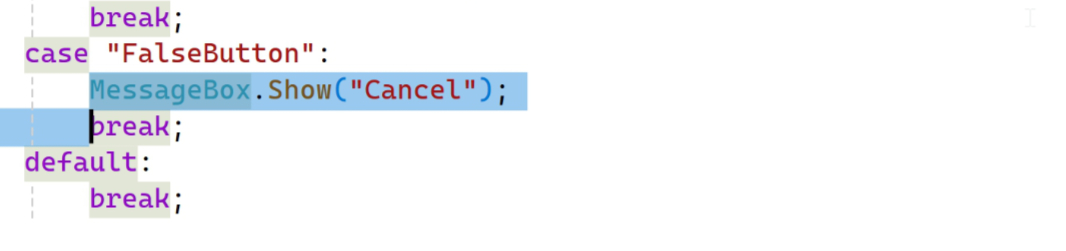
We don’t really need to do anything if the user clicks “Cancel,” so that code will look like so, with the selected text being deleted.
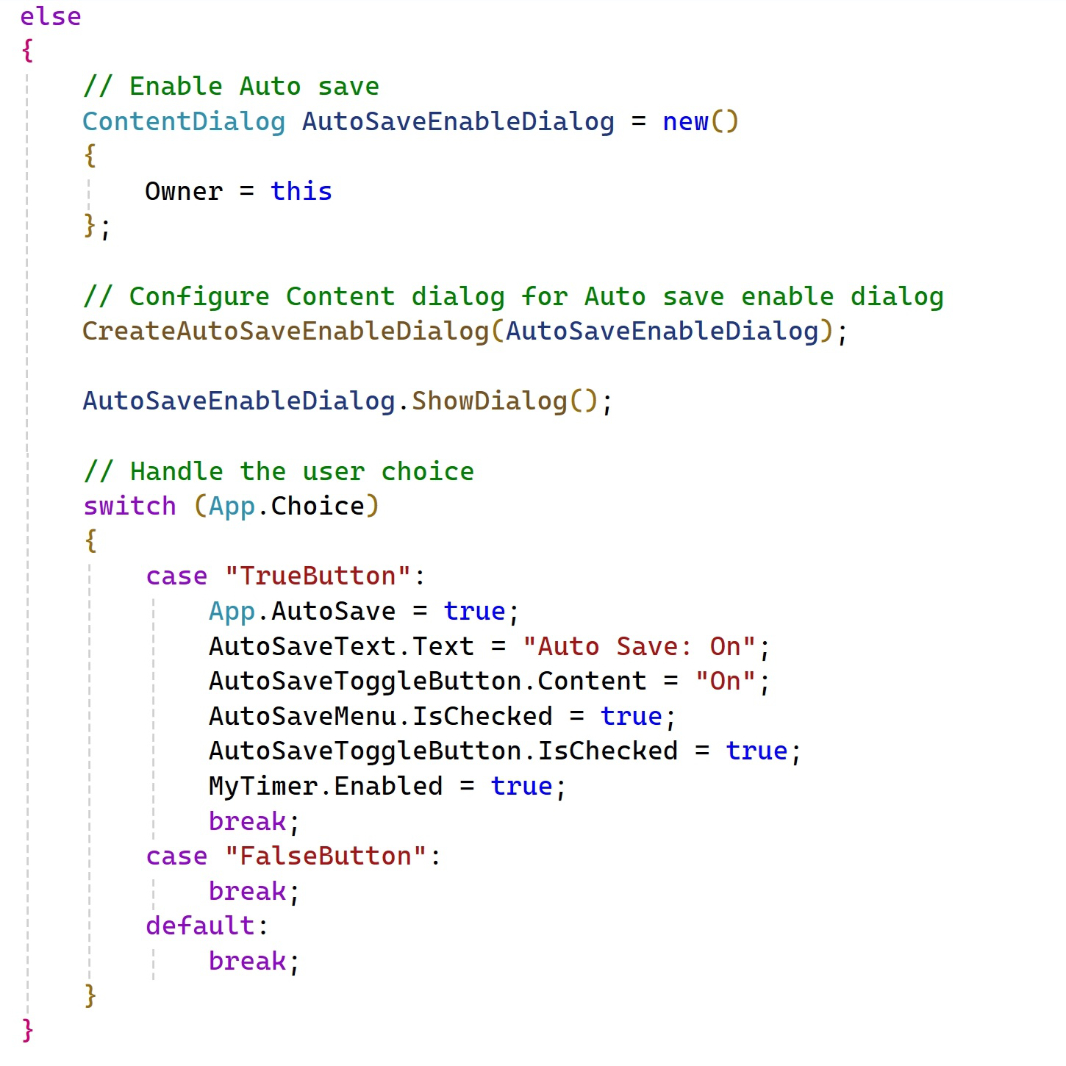
Then we can work on the “else” block. Remove the code it contains and replace it with the following.
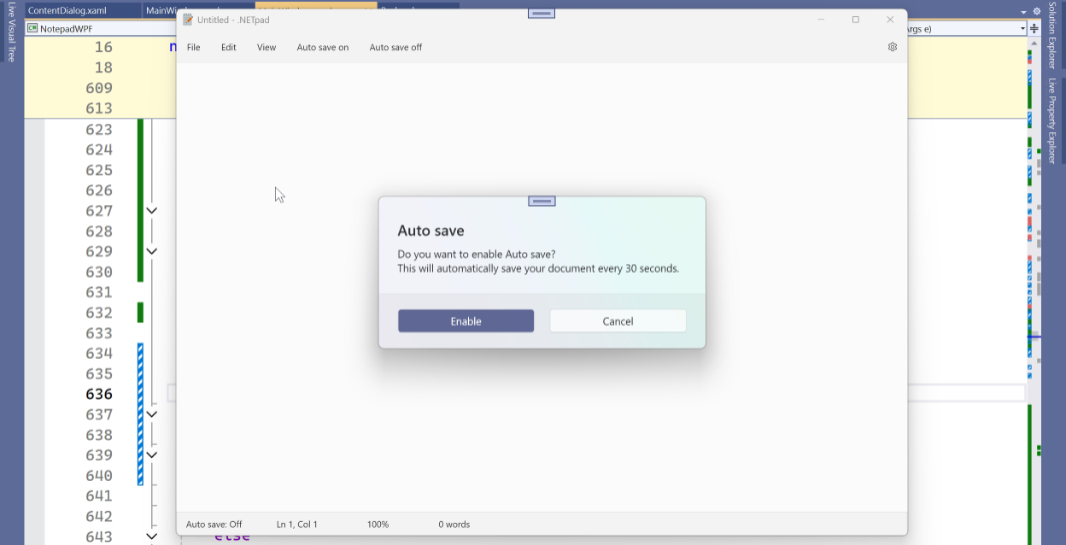
Alright. It’s go time. Run the app and test toggling Auto save on and off. It should display the custom dialogs now and work as intended, no matter which choice is made in either.
Enable:
Disable:
Now, open MainWindow.xaml and remove those temporary menu items. We’re done with them.

Indeed, we’re done with the custom dialogs. Mission accomplished!
Well, maybe.
Implement a Message box dialog?
When we updated the Go to line dialog above, we eliminated one instance in which the app displays an old-school Message box dialog. But there are some others left, and it might be worth eliminating those as well. However, doing so will require us to use the custom Content dialog we created, and it may not be worth the effort. So the first step here is to determine when and how .NETpad uses Message boxes.
It turns out there are several. We can ignore the instances that are in the “catch” block of a try/catch exception handler: I kind of like the idea of something old-school being used for errors, plus they never really come up in real-world use. Ignoring those, I see one related to drag and drop on the main app window’s text box, two related to Find/Replace, and then the one noted above that’s part of Go to line. And then there’s another instance in Backend.cs also related to Find/Replace.
We’ll be updating Find/Replace later, so we can ignore that. And I’ve not even looked at the text box drag and drop functionality this year, so I’ll put that on my to-do list. But we just updated Go to line. Does it make sense to complete that work by implementing a custom Message box dialog that’s based on our Content dialog work?
Maybe. When I built that out originally, I worked through all the use cases I thought I’d need. But I never really considered this one, and I only ran into it for the first time when I was writing this article. So I’m a bit nervous about making this change now, as it’s a unique use case with just a single button (where the others have two or three).
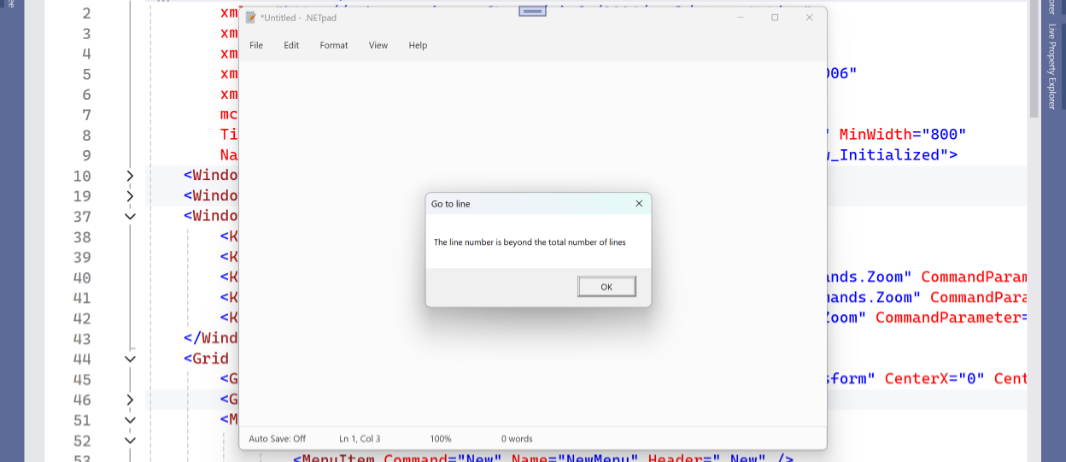
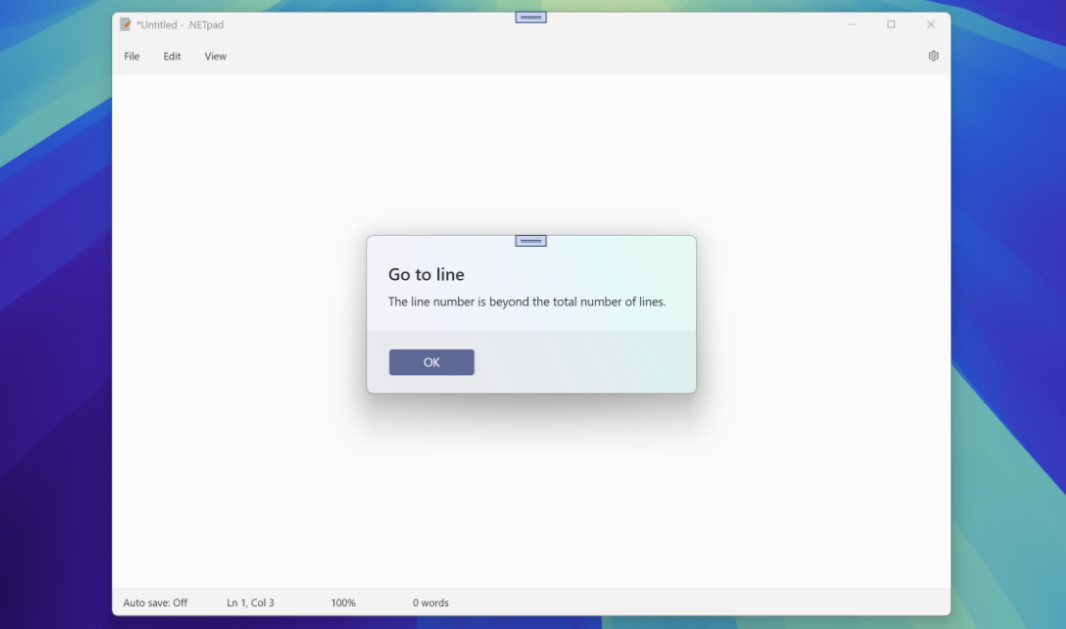
This new dialog appears when you use Go to line and try to go to a line that doesn’t exist. For example, you have a one line document and try to go to line 20. Currently, you see this:
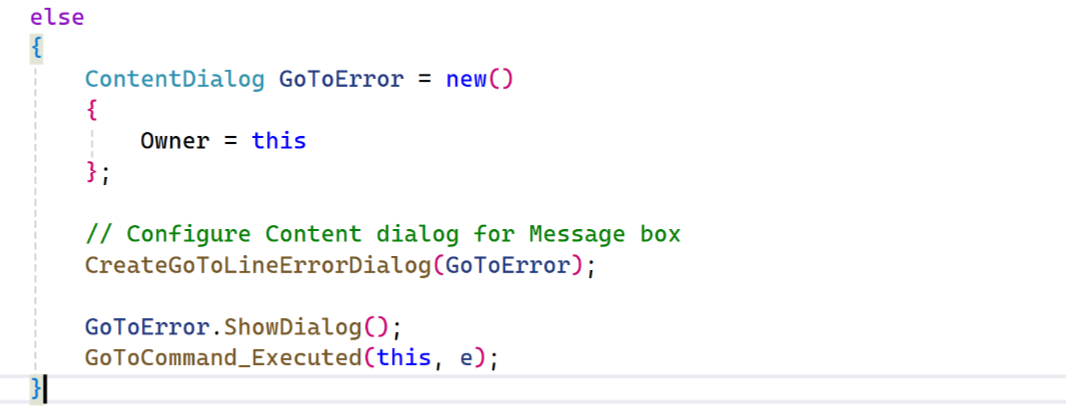
Let’s give this a shot. Open MainWindow.xaml.cs and locate the GoToCommand_Executed() event handler. In the try block, you’ll find an if/else block in which we display the system Message box.
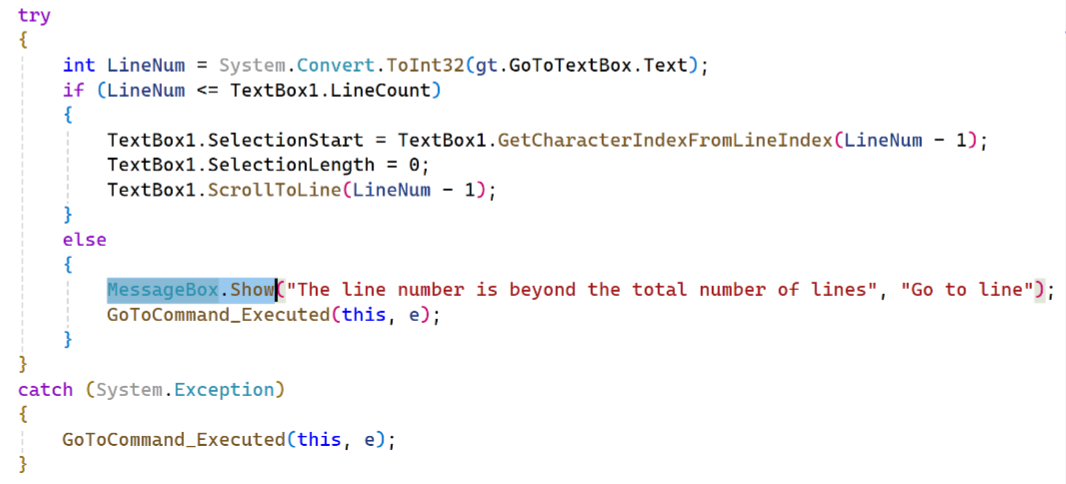
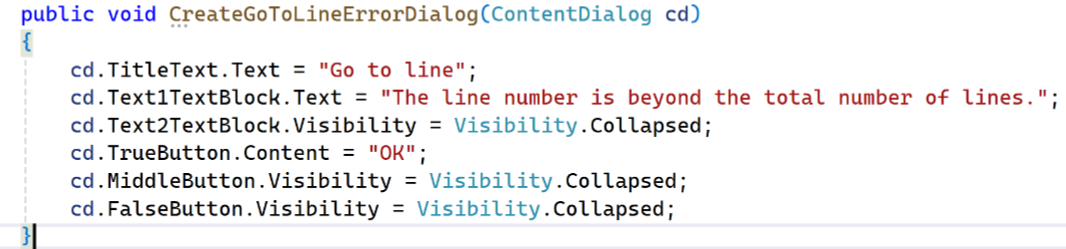
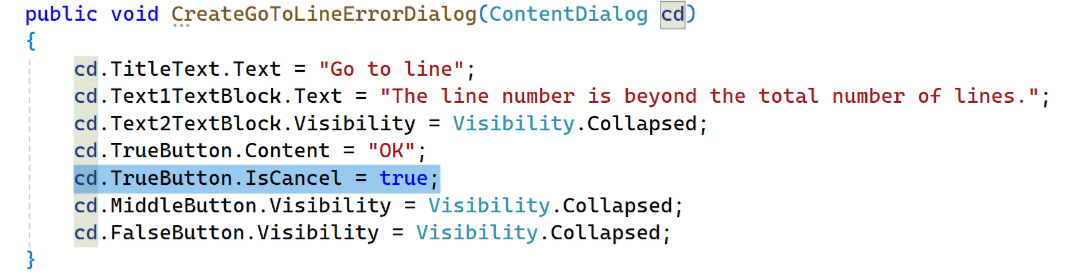
This is simple enough: There’s a title, a single line of description text, and then one button, “OK.” So we can create a CreateGoToLineErrorDialog() method in Backend.cs based on the work we’ve done before.
Then, we can replace the else block in the GoToCommand_Executed() event handler in MainWindow.xaml.cs, using now-familiar code for our custom Content dialog.
When we run the app and try to go to a line that doesn’t exist, the new error dialog appears.
That looks pretty good. But because there’s only one button, the user can only dismiss the dialog by clicking “OK” or typing Enter. If they type Esc, nothing happens. So make the following addition to CreateGoToLineErrorDialog() in Backend.cs.
Now it works like the Message box did. So I guess it’s OK. I played around with making the “OK” a bit wider–you could add a line like cd.TrueButton.Width = 180; (or similar) to CreateGoToLineErrorDialog(), for example–and maybe right to right-align that button. But I think this is fine, so I’ll leave it as-is.
But wait, there’s more
There are two more major tasks to complete. The Find/Replace functionality, which is complex and requires an entirely different type of dialog or flyout, and some overdue code refactoring in which we’ll try to clean up and optimize the C# code in the app.
More soon.

Gain unlimited access to Premium articles.
With technology shaping our everyday lives, how could we not dig deeper?
Thurrott Premium delivers an honest and thorough perspective about the technologies we use and rely on everyday. Discover deeper content as a Premium member.