Improving My Winget Bulk App Installer Script (Premium)
- Paul Thurrott
- Feb 14, 2024
-
16
I’ve been automating app installs in Windows 11 using the Windows Package Manager (winget) for the past year or so, and given how many laptops I review, and how many times I reset PCs because of my book and testing work, this process has saved me an incredible amount of time. But I keep tinkering with the script I use for automated app installs, mostly by adding and removing apps as needed. And each time I go through this process, I’m reminded of some more profound improvements I’d like to make. And this week, I finally decided to put in the work.
For those unfamiliar with this work, please check out my previous articles on this topic, most notably Tip: Use Winstall and Winget to Bulk Install Apps and Roll Your Own Windows Time Machine (Premium). But here are the basics. Windows Package Manager (winget) is a command-line package manager built into Windows 10 and 11 that can automate the installation (and updating) of Windows apps sourced from the Microsoft Store and/or the web, in the latter case using the Windows Package Manager repository. You can install one app using a single command line, or you can create a script that bulk installs multiple apps all at once. And that’s what I do.
Last year, my install script was simple enough. It looked like so:
winget install –id=Microsoft.VisualStudioCode -e ; winget install –id=Brave.Brave -e ; winget install –id=Microsoft.Teams -e ; winget install –id=Microsoft.Skype -e ; winget install –id=Discord.Discord -e ; winget install –id=Notion.Notion -e ; winget install –id=Greenshot.Greenshot -e
As noted, I’ve since added many more apps to the script. The version I was using before the changes documented here looked like so:
winget install –id=Brave.Brave -e ; winget install –id=appmakes.Typora -e ; winget install –id=Microsoft.VisualStudioCode -e ; winget install –id=Google.Chrome -e ; winget install –id=Microsoft.Teams -e ; winget install –id=Microsoft.Skype -e ; winget install –id=Discord.Discord -e ; winget install –id=Notion.Notion -e ; winget install –id=Greenshot.Greenshot -e ; winget install –id=Git.Git -e ; winget install –id=Zoom.Zoom -e ; winget install –id=SlackTechnologies.Slack -e ; winget install –id=Microsoft.DotNet.SDK.8 -e ; winget install –id=Google.GoogleDrive -e
This works well enough. But as noted, I have identified some changes I’d like to make to the script to improve it. From an efficiency standpoint, it’s not truly automated because I have to respond to a few license agreements and some of the app setup routines trigger User Account Control (UAC) prompts that will cancel the app install if not addressed, while others try to run interactive installers. The script can only be run on a new installation of Windows, but it would be nice if I could run it against any install and have it simply ignore the apps that are already installed. And I want to ensure that I’m using the Microsoft Store as the install source as often as possible (for reasons noted below), and I have some paid Microsoft Store apps that I still install manually; it would be nice if these could be automatically installed via the script too.
I was able to accomplish most of that, as it turns out, and in doing so, the script also got more complicated and thus harder to read. And so I introduced some basic formatting to make it more readable, and that should make further edits and additions easier as well. I’m sure I’ll keep tinkering with it, but I felt that the improvements I’ve made so far were good enough to warrant this write-up.
So let’s dive in, starting from the back, so to speak.
Make the script more readable
The original script isn’t particularly human-readable because of the way Windows command lines work. I call this a script, because it is, but I don’t run it as a script. Instead, I just open the file (Install core apps.ps1) in Notepad, copy the entire thing to the Clipboard, and then paste it into a Terminal window (which uses the PowerShell environment by default). So it all executes as a single huge command. But it’s really multiple winget commands, and because PowerShell doesn’t support line breaks, each is separated by a semicolon (;).
Ideally, it would be easier to read, and easier to edit, but the original format makes adding or removing individual apps a bit painful. Consider just two commands:
winget install –id=Google.GoogleDrive -e ; winget install –id=Brave.Brave -e ;
It would be nice if these were formatted like so:
winget install –id=Google.GoogleDrive -e ;
winget install –id=Brave.Brave -e ;
There are probably a few solutions to this issue, but PowerShell supports using the backtick character (`) to spread a single command across multiple lines. So I edited the script like so, with a backtick after each app install command:
winget install –id=Google.GoogleDrive -e ; ` winget install –id=Brave.Brave -e ; `
As noted, I’ve also added more apps to the script since my articles last year, and to aid in readability, I felt that it made sense to visually separate them into logical groups. So the two apps above might be separated like so:
winget install –id=Google.GoogleDrive -e ; `
`
winget install –id=Brave.Brave -e ; `
I also figured from my experience with various programming languages that PowerShell must support comments, which would allow me to label these sections (“Web browsers”, “Writing apps,” and so on). And sure enough, it does. There are different styles of comments, but because of the one-line nature of this script—and because of a separate change noted below—I use comment blocks, with the characters <# and #> encasing comments. Here’s a snippet:
<# Google Drive first #> `
winget install –id=Google.GoogleDrive -e ; `
`
<# Web browsers #> ; `
winget install –id=Brave.Brave -e ; `
winget install –id=Google.Chrome -e ; `
`
<# Writing apps #> `
winget install –id=appmakes.Typora -e ; `
…
It’s not perfect. But readability achieved.
Silence the license agreement prompts
The first time you use winget to install an app from the Microsoft Store or the Windows Package Manager repository, you’re asked to agree to a “source agreement” by typing “Y” at the command line. This sometimes trips me up when I’m bringing up a new or recently reset PC because I’m almost always working actively on something else and sometimes don’t notice this happening. So I will later notice the apps haven’t started installing because it’s waiting on me to agree.
Looking up the winget install command, I discovered there were two options, –accept-package-agreements and –accept-source-agreements, that accept these agreements for you without triggering a prompt. I could just add them to the first Store and winget app install in the script, respectively, but since I may edit the script later in a way that changes the app install order, I figured it was safer to just add these options to every install.
In other words, this line:
winget install –id=Google.GoogleDrive -e ; `
changes to:
winget install –id=Google.GoogleDrive -e –accept-package-agreements –accept-source-agreements ; `
(As does every app install line.)
Remove the UAC prompts
Ideally, this automated app install script is, well, automated. But various things require a bit of babysitting, meaning I have to sit in front of the PC, or at least come back to it from time to time, and respond to things. The most disruptive of these is the UAC prompt that some application installs trigger: If you ignore it for too long, the install will fail and winget will move on to the next app. And then you have a PC with one app that isn’t installed. No bueno.
Fortunately, this one is easy: Now, I just run Terminal as an administrator to run this script. Doing so passes through the authentication needed by those app installers, so there are no UAC prompts.
Install apps silently with no UI
In the same vein as above, some app setup routines are interactive or pop up some form of user interface so you can configure them or whatever. I prefer to do all that after winget is done, and so I researched how I might silence these installers. What I came up with isn’t perfect—apps like Discord and Grammarly just can’t help themselves and throw up a UI regardless—but winget install supports a –silent option that gets me most of the way there. (And those apps like Discord that still appear during this process don’t pause future installs, so it’s all good.)
As with the agreement prompt additions above, I figured it was safest to just add this option to every app install line. In other words, a line like this:
winget install –id=Google.GoogleDrive -e –accept-package-agreements –accept-source-agreements ; `
changes to:
winget install –id=Google.GoogleDrive -e –accept-package-agreements –accept-source-agreements –silent ; `
(As does every line.)
Use the Microsoft Store when possible
I’m going out on a limb here, but I suspect that many of you ignore the Microsoft Store. If so, that’s a mistake: Yes, this app store was terrible when it first debuted in Windows 8, but it’s improved immeasurably over the years as it’s expanded its support for more types of apps. Today, the Microsoft Store is the first place I turn to for apps in Windows 11, for two reasons: Paid apps like Adobe Photoshop Elements offer much more liberal installation rules when purchased via the Store, and most apps, paid or not, benefit from the Store’s automated background updating capabilities. All in all, if I can get it from the Store, I do.
Except, of course, that I don’t: As originally constructed, my auto-install script doesn’t specify where to get each app, and I omitted three Store apps I paid for because I didn’t want it to mistakenly install the web-based versions I didn’t pay for. This one is complicated enough that I split it into two parts. So let’s look at installing as many (free/non-paid) apps from the Store as possible first.
The Windows Package Manager supports two sources by default, the Microsoft Store and the Windows Package Manager repository, which gets apps from the web. Ideally, I could configure winget to define the Store as its default source, and it could look there for each app first and only install from the web when a Store version was unavailable. Unfortunately, this isn’t possible because the Store and winget repositories use different identifiers for each app. For example, the Store identifies the Brave web browser as XP8C9QZMS2PC1T, while the winget web repository identifies it as Brave.Brave.
You can see this by using winget search like so:
winget search brave
You will get the following results:
Name Id Version Source
——————————————————-
Brave Browser XP8C9QZMS2PC1T Unknown msstore
Brave Ukraine 9NXMJPRRNLKP Unknown msstore
Aramark Menu 9PNR7VH2P8R3 Unknown msstore
Brave Brave.Brave 121.1.62.162 winget
Brave Nightly Brave.Brave.Nightly 121.1.64.2 winget
Brave Dev Brave.Brave.Dev 119.1.61.87 winget
Brave Beta Brave.Brave.Beta 121.1.63.153 winget
When you install an app using a Microsoft Store identifier, it downloads from the Microsoft Store (cdn.*.microsoft.com). But when you install an app from the winget repository, it downloads from the web (brave.com in this case). You can’t fail over from one repository to the other, at least not that I could figure out. And that means I needed to examine each app in my script to identify which are available in the Store.
There are a few ways to do that. Google Search works (as in, Brave Microsoft Store site:apps.microsoft.com or similar), as the Store identifier will be seen in the URL. You can also literally search from the Store app and then use the Share button to copy the URL, which contains the Store identifier, to the Clipboard. And you can use winget search from the command line, as above.
So I did that and found that about half of the apps I routinely install are in the Store. This probably wasn’t necessary, but I used the winget install command’s source option (-s or –source) to specify that the Store was the source in each case. (When you do so, you don’t need to use the -e, or –exact, option because each Store identifier is literally an exact app.) When I was done, the first few lines of the script changed to resemble this:
<# Google Drive first #> `
winget install –id=Google.GoogleDrive -e –accept-package-agreements –accept-source-agreements ; `
`
<# Web browsers #> `
winget install XP8C9QZMS2PC1T -s msstore –accept-package-agreements –accept-source-agreements ; <# Brave #> `
winget install –id=Google.Chrome -e –accept-package-agreements –accept-source-agreements ; `
Note the “<# Brave #>” comment at the end of that Brave install line: I added something like that to the end of every app install line that uses the Store because those Store identifiers don’t tell me which app it is. Tedious.
Install paid Microsoft Store apps
I currently install three paid Microsoft Store apps—ImageGlass 9, Affinity Photo (the original version), and Adobe Photoshop Elements 2020—on every PC I use, and I do so manually by opening the Store app, navigating to Library, and finding them in my apps library. Obviously, it would be better if I could automate those installs with winget too. But could I?
Yes and no.
As it turns out, you can install paid Microsoft Store apps with winget, but with two qualifications: You must be signed in with the same Microsoft account you used to purchase the app. And the app you’re installing must be the most recent version of the app. I understand the first restriction. But I do not understand the second: There are newer versions of Affinity Photo and Photoshop Elements in the Store, and each has a different, unique Store identifier than the versions I own. For example, my version of Affinity Photo is 9NBLGGH35LXN, while Affinity Photo 2, the latest version, is 9P8DVF1XW02V. I get that you can’t buy the old version, but why can’t I install it? I have no trouble installing it manually from the Store app.
I don’t know why. I just know that it doesn’t work.
So for now, I have just added ImageGlass 9 to the script. (And I guess that will stop working when ImageGlass 10 arrives.) The line looks like so:
winget install 9N33VZK3C7TH -s msstore –accept-package-agreements –accept-source-agreements –silent ; <# ImageGlass 9 #> `
I will keep trying to solve the mystery of the non-installing older paid Microsoft Store apps.
Handle upgrade scenarios
I created my bulk install script for newly installed (or reset) PCs, but it would be nice if I could run it against a PC that I’ve been using for a while and have it only install those apps that aren’t already on the PC. An upgrade scenario, if you will, as opposed to a clean install.
And as it turns out, I can: The winget install command supports a –no upgrade option that skips the installer if the app is already installed on the PC. Perfect. So I just added that it every install line in the script. Like so:
winget install 9N33VZK3C7TH -s msstore –accept-package-agreements –accept-source-agreements –silent –no-upgrade ; <# ImageGlass 9 #> `
The updated install script
And with that, I had an updated version of my install script. It looks like so:
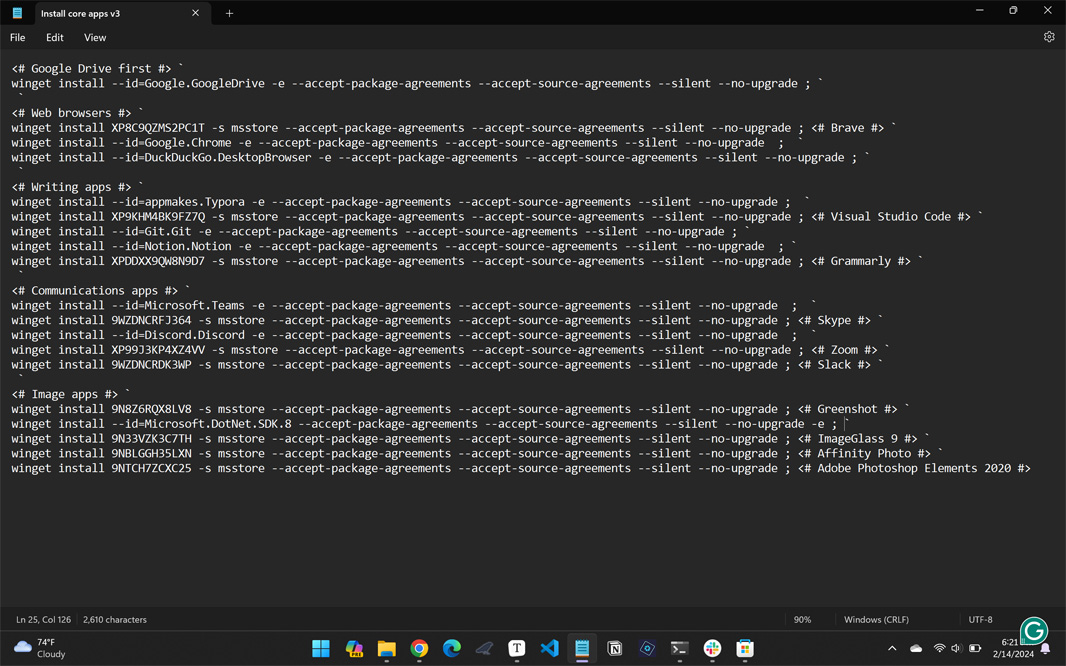
It’s not perfect, but it’s a nice improvement over the original, with no prompts or interruptions. And maybe there are further refinements to be found. Surely, there’s a way to install any paid Microsoft Store app, for starters. We’ll see. For now, I’ll move forward with this version and see what new ideas I come up with as I use it more and more in the future.

Gain unlimited access to Premium articles.
With technology shaping our everyday lives, how could we not dig deeper?
Thurrott Premium delivers an honest and thorough perspective about the technologies we use and rely on everyday. Discover deeper content as a Premium member.