De-Enshittify Windows 11: Start Fresh with a New Install of Windows 11 ⭐
- Paul Thurrott
- Feb 13, 2026
-
6
De-Enshittify Windows 11. This book will be available for purchase soon, hopefully by the end of February.
—
When you buy a new PC or reset an existing PC, Windows 11 initially boots into Windows Setup and displays its Out of Box Experience (OOBE), a multi-step process through which you configure the system for use.
This process is called a clean install, which is ironic as there’s nothing particularly clean about it: Microsoft uses the Windows Setup OOBE to force and coerce customers to configure Windows 11 in ways that benefit the company more than its users. And a “clean” install of Windows 11 will be enshittified with Microsoft’s forced telemetry, preinstalled crapware, forced Microsoft account sign-in, and forced Microsoft Edge usage whether you use the browser or not.
Fortunately, there is a better way to clean install Windows 11. Or, I should say, there are a few other ways in which to install Windows 11 in a cleaner configuration than Microsoft would prefer. Which you choose will depend on your needs and wants. Your choices include:
- Clean install Windows 11 using a Microsoft software image that was lightly modified by a third-party utility. You can use a tool called Rufus to modify the stock Microsoft software image to bypass the Windows 11 hardware requirements and the forced Microsoft account sign-in. Afterward, you can clean the Windows 11 installation manually or, using a third-party tool, semi-automatically.
- Clean install Windows 11 using a heavily modified software image that eliminates all the problematic behavior. In addition to Rufus, you can use a tool called Tiny11 Builder to create a clean, de-enshittified installation of Windows 11 with none of the problematic behaviors we see in the stock installation. This install is so clean that you may need to install some Windows 11 in-box apps from the Microsoft Store afterward. But I think it’s worth it.
This chapter describes both methods for creating a cleaner or truly clean Windows 11 installation.
⚠️ Warning: Please note that a clean install is destructive, meaning that any existing Windows installation on the PC will be erased and overwritten, as will any of your installed apps and personal data. Unless you’re doing this on a new PC or a newly reset PC, you will need to back up anything important first.
➡️ Learn more: If this approach is undesirable, jump ahead to the De-enshittify an existing install of Windows 11, where you can learn how to de-enshittify Windows 11 without performing a clean install and losing everything.
? The problems with the Windows Setup OOBE
The Windows Setup OOBE is the first thing you see when you start a new PC for the first time or have just reset Windows 11 to bring it back to its initial as-new state. So it is perhaps not surprising that Microsoft has evolved this experience over the years to introduce some bad behaviors. Among them:
Enforced hardware requirements. The OOBE enforces the Windows 11 hardware requirements even though any computer that can run Windows 10 can also run Windows 11 effectively.
Microsoft account requirement. The OOBE requires you to sign in with a Microsoft account or a Microsoft Work or School account and no longer offers a way to use the local account type that many power users prefer.
Privacy theater. The OOBE provides a privacy screen that gives you a false sense of protection, but it ignores the most privacy-adverse behaviors in Windows 11. For example, you cannot disable telemetry.
Advertising. The OOBE advertises Microsoft services like Xbox Game Pass and Microsoft 365
Upsells. The OOBE tries to upsell you to Microsoft 365 Premium if you already have a Microsoft 365 Personal or Family subscription
? Clean install Windows 11 to minimize or eliminate the enshittification
Ready to get started? Great. Let’s clean install Windows 11.
Gather what you need
To follow the instructions in this chapter, you will need:
- A USB flash drive with at least 8 GB of storage.
- The current Windows 11 ISO (disk image) file from the Microsoft website. Scroll down to “Download Windows 11 Disk Image (ISO) for x64 devices,” choose “Windows 11 (multi-edition for x64 devices)” from the Select Download drop-down box, click “Confirm,” choose the product language, click “Confirm,” and then click “64-bit Download.”
- Rufus. This is a utility that can use a Windows 11 ISO to create USB-based installation media. Select the “Standard” download.
- Tiny11 Builder (Optional). This is a PowerShell script that aggressively de-enshittifies the standard Windows 11 ISO. The download is hidden under the green “Code” button. Select “Download ZIP” and then unarchive the ZIP file you download.
- An Ethernet connection or your Wi-Fi drivers. If you use Tiny11 Builder to create a heavily modified Windows 11 ISO, you will need to connect the PC or Ethernet or have your PC’s Wi-Fi drivers ready when you set up the system.
(Optionally) Use Tiny11 Builder to create a heavily-modified Windows 11 ISO
If want to aggressively de-enshittify your clean install of Windows 11, you use Tiny11 Builder to modify the Windows 11 ISO you downloaded. There’s nothing like Tiny11 Builder. This is a PowerShell script written by a technical enthusiast that builds what its author describes as “a trimmed-down Windows 11 image.” What he means is that Tiny11 Builder de-enshittifies Windows 11 Setup so that anyone can create a clean, de-enshittified installation of Windows 11 that includes none of the problematic behaviors we see in the stock installation.
As noted, Tiny11 Builder is aggressive. In addition to removing key enshittification vectors like Microsoft Copilot, Microsoft Edge, and OneDrive from the installation, it removes dozens of other apps, including Clipchamp, Media Player, Xbox, and others that might be useful to you. But no worries: You can install any apps you do need from the Microsoft Store later. What you can’t do is customize the installation to change what installs up-front. You either use Tiny11 Builder as-is or you do not.
➡️ Learn more: This tool may be too radical for you. That’s OK. You can optionally de-enshittify any existing installation of Windows 11 and achieve most of what’s possible using Tiny11 Builder. This is described in De-enshittify an existing install of Windows 11.
If you’re ready to proceed with Tiny11 Builder, here are the steps.
Mount the Windows 11 ISO as a virtual Setup disk. Double-click the Windows 11 ISO you downloaded to mount it as a virtual disk. When it’s ready, it will open in a new File Explorer window. Take note of the drive letter that Windows 11 assigned to this disk.
Open an elevated Terminal window. Use Start Search to find the Terminal app. Instead of clicking it normally, right-click it and choose “Run as Administrator” from the context menu that appears.
Bypass script execution blocking. Run the following command in the Terminal window to bypass Windows 11’s script execution blocks for this session only.
Set-ExecutionPolicy Bypass -Scope Process
Run Tiny11 Builder. Navigate to the extracted Tiny11 Builder folder in the Terminal window (cd C:\Users\paul\Downloads\tiny11builder-main or similar) and then run Tiny11 Builder using the following command line:
.\tiny11maker.ps1
Enter the drive letter of the Windows 11 virtual drive as prompted. Tiny11 Builder will ask you to enter the drive letter of the virtual Windows 11 Setup disk. You do so by typing D or whatever letter without the colon.
Select the correct Windows 11 product edition. Tiny11 Maker will make a copy of the Setup image (install.wim) and then present you with a list of Windows 11 product editions from which to choose. Enter the appropriate number (1 for Home, 6 for Pro).
✅ Tip: It’s crucial that you get this right because Windows 11 will not activate if you enter the wrong number. If you’re not sure which product edition is correct, you can use winver to find it: Open a Run dialog (by typing Windows Key + R), type winver, click “OK,” and the window that appears will indicate whether you are running Windows 11 Home or Pro.
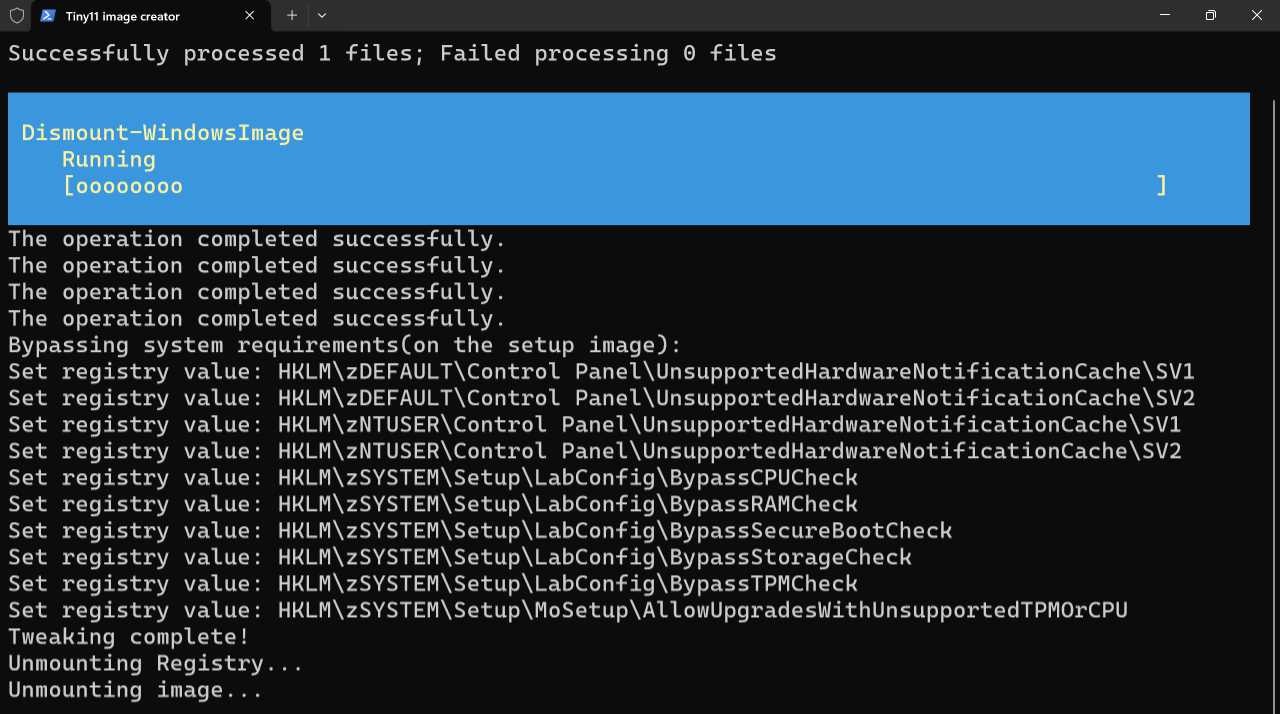
Sit back and relax. Now, Tiny11 Maker will process the Setup image, make the changes, and export a new ISO (image) file named tiny.iso. This process takes about 30 minutes. You will find tiny.iso in the extracted Tiny11 Builder folder.
Create the Windows 11 installation media
Microsoft offers a free tool that can be used to create USB-based installation media using the stock Windows 11 ISO file. But we will use Rufus instead because it can modify the installation media so that Windows Setup doesn’t force the Windows 11 hardware requirements or Microsoft account sign-in on you.
Here’s the right way to create Windows 11 installation media.
Insert your USB drive into the PC. Remember, its contents will be deleted during this process.
Run Rufus. Run the Rufus EXE directly from the Downloads folder (or wherever you download it to).
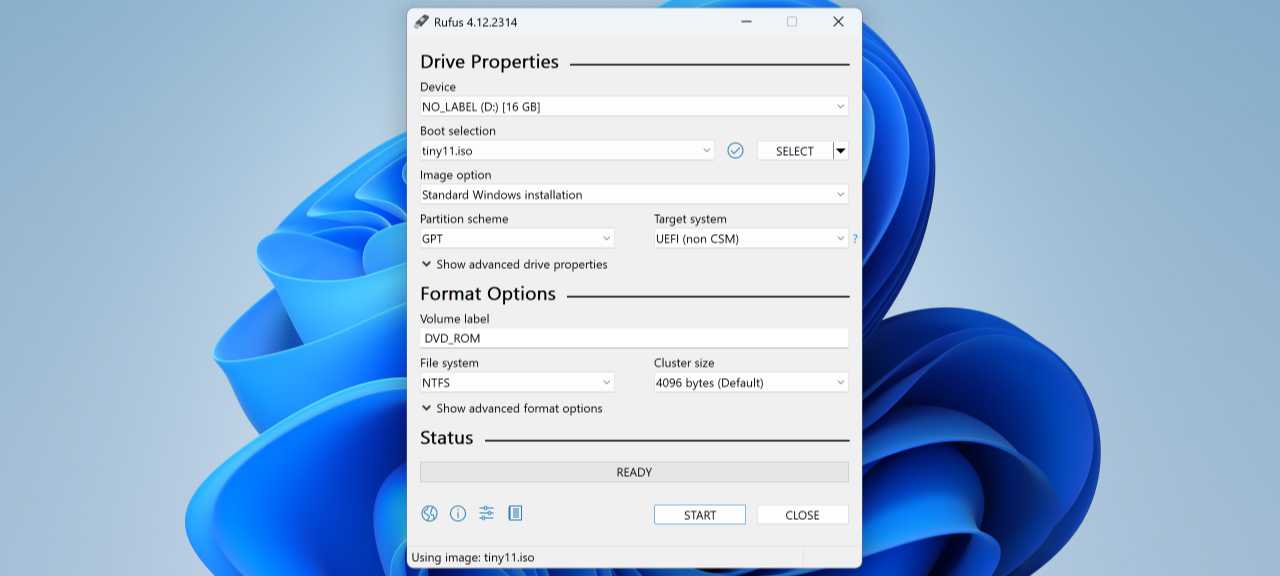
Select the Windows 11 (or Tiny11 Builder) ISO image. Click the “SELECT” button and use the Open file dialog that appears to locate and select the stock Windows 11 ISO image file or the tiny11.iso image file you just created with Tiny11 Builder.
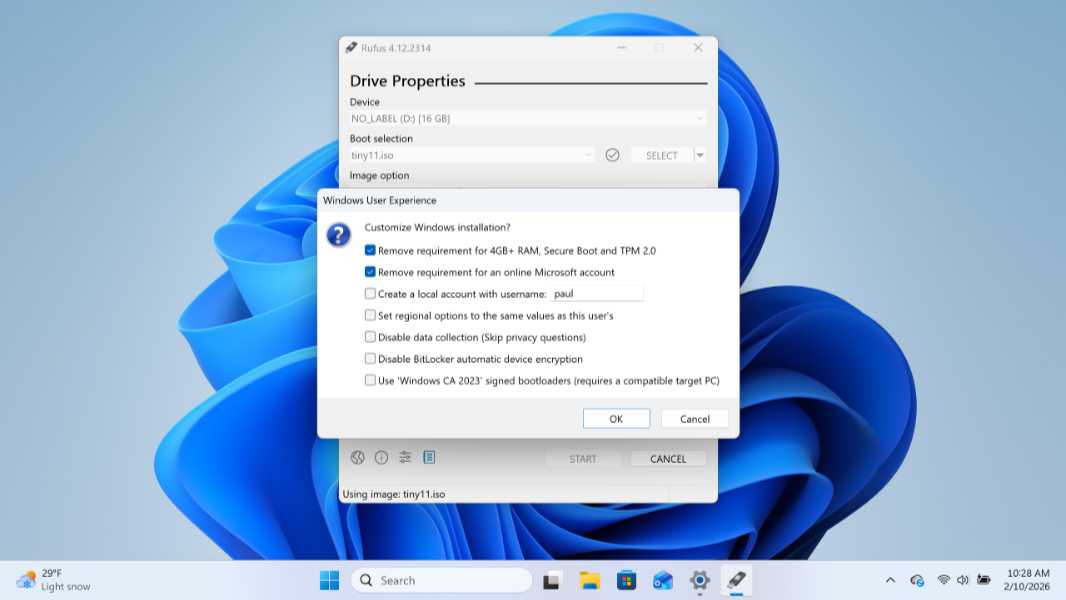
Start creating the installation media. Click “Start.” A “Windows User Experience” dialog appears.
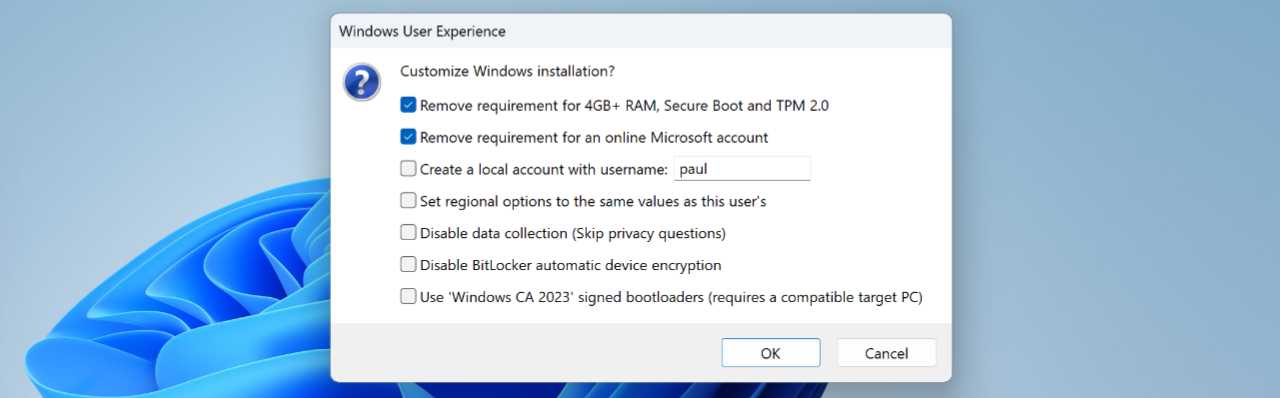
Accept the defaults. For the most part, the default options—with “Remove requirement for 4GB+ RAM, Secure Boot and TPM 2.0” and “Remove requirement for an online Microsoft account”—are fine, even if you wish to use a local account for some reason. Click “OK” to create the installation media.
ℹ️ More info: To be clear, I do not recommend signing in to Windows 11 with a local account instead of using a Microsoft account. I do understand that this is desirable for certain power users.
Boot your PC with the Windows 11 installation media
Now that you’ve created the Windows 11 installation media with Rufus, you can use it to install Windows 11. First, you have to figure out how to boot the PC with that installation media.
All PCs offer some way to boot from a USB drive instead of the normal internal system drive. This can be configured in the PC’s firmware (what we used to call the BIOS). But you can usually tap a certain key—often Esc, F1, F11, F12, or Enter—when the PC first boots up to display a boot menu so you can choose another drive instead. You will need to refer to your PC maker’s documentation to find the method that works for your PC.
But if you are already running Windows on the PC you’re about to clean up, there’s an easier way: Open the Settings app, navigate to System > Recovery, and click the “Restart now” button next to “Advanced startup.” The PC will reboot into the Windows Recovery Environment (WRE).
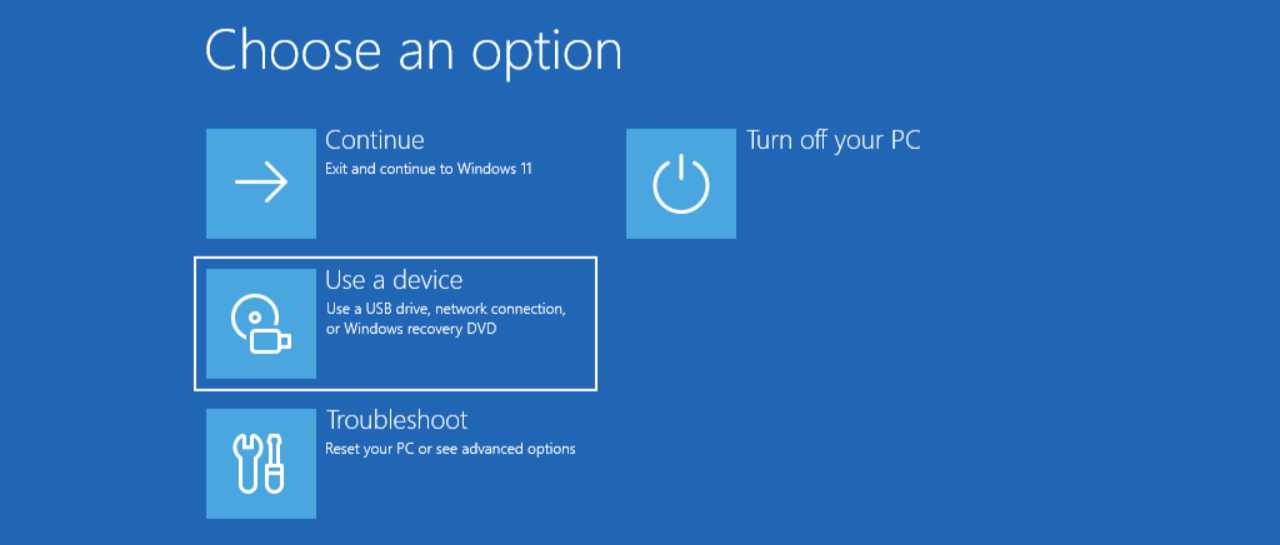
Here, select “Use a device” and then “USB” (or similar). Now, the PC will boot using your USB-based Windows 11 installation media.
Step through the Windows Setup first-run experience
Booting with the Windows 11 installation media, you will first encounter the Windows Setup first boot experience, an old-school user interface that hasn’t changed much in over 20 years and is used mostly by PC makers and system builders.
You will step through the following screens:
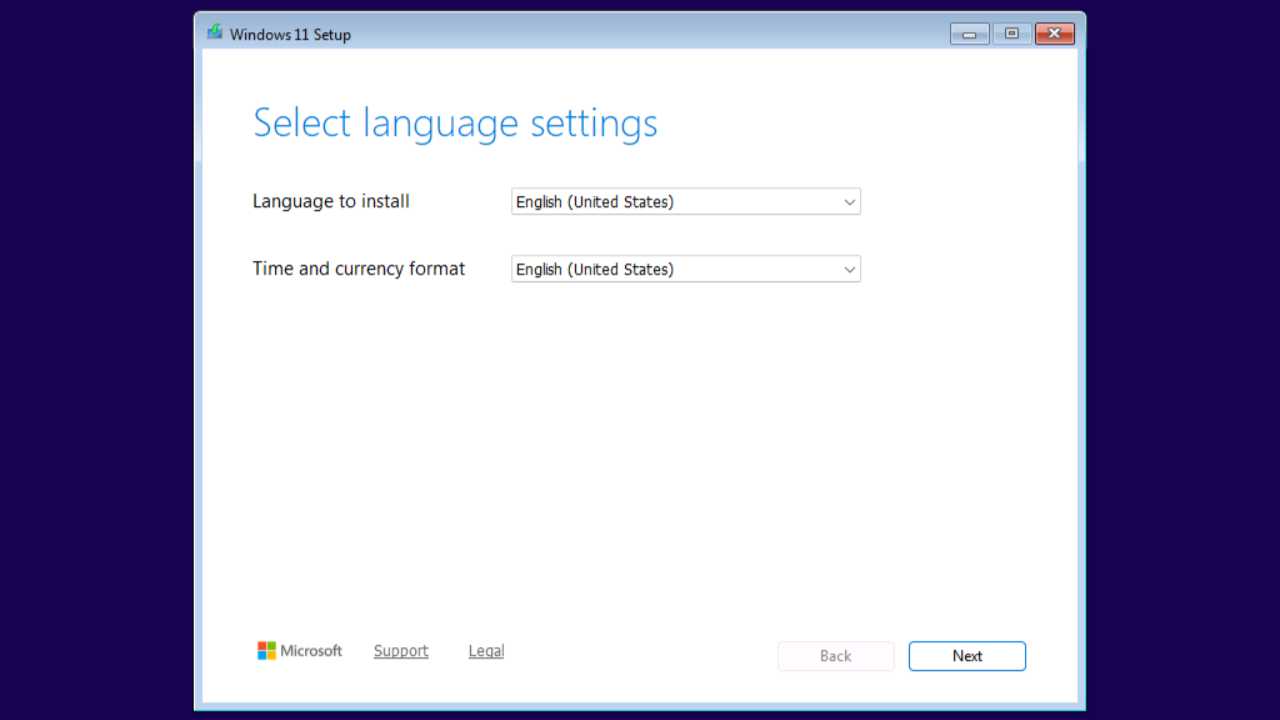
Select language settings. Click “Next.”
Select keyboard settings. Click “Next.”
Select Setup option. Make sure “Install Windows 11” is selected, check the box agreeing that you’re about to wipe out the contents of this PC, and click “Next.”
Product key. Click “I don’t have a product key” and then click “Next.” Most PCs have a Windows 11 product key built into their firmware.
Select image. Choose the correct Windows 11 product edition—usually Home or Pro—and then click “Next.”
Applicable notices and license terms. Click “Accept.”
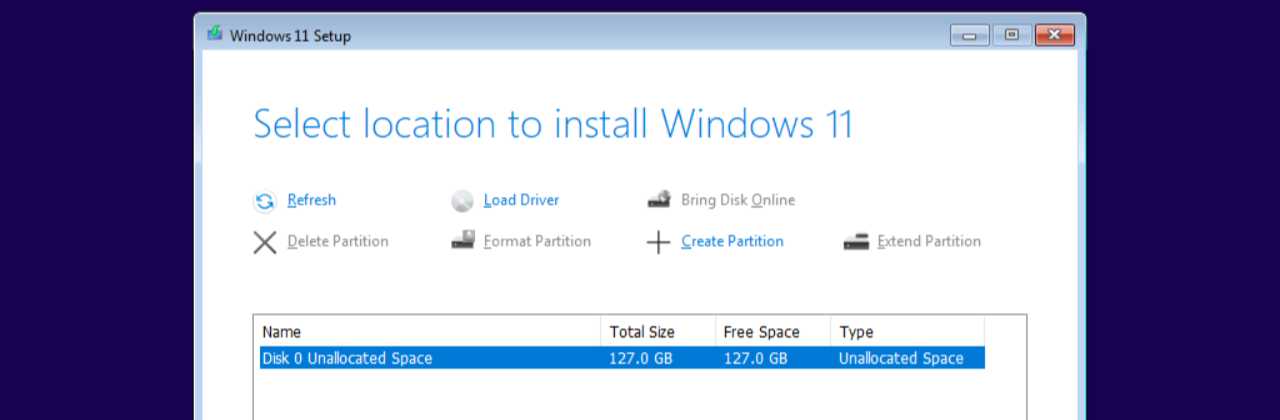
Select location to install Windows 11. Here, you will delete all the partitions on Disk 0. When that’s done, select “Disk 0 Unallocated Space” and click “Next.”
Installing Windows 11. There’s nothing to do during this full-screen medium blue experience except watch and wait. Eventually, the PC will reboot into another full-screen experience …
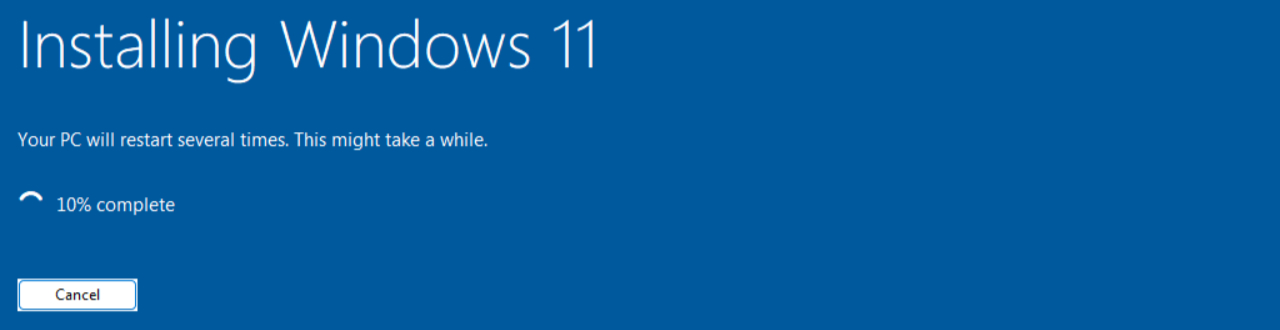
Installing. During this installation phase, the PC could reboot a few times. Here, too, there is nothing to do but wait.

Eventually, the PC will reboot again and display the Windows Setup OOBE.
Step through the Windows Setup Out of Box Experience (OOBE)
The Out of Box Experience (OOBE) is what everyone sees when they power on a new (or newly reset) PC for the first time. This is prettier and more graphical than the first-run experience. But what you see here can vary and will depend in part on which ISO you used to create the installation media.

ℹ️ More info: If your Windows 11 installation media was modified with Tiny11 Builder, remember that you will need an Ethernet cable or your PC’s Wi-Fi drivers to connect to the Internet during the OOBE. And if you are installing Windows 11 on a laptop, its touchpad may not work, in which case you won’t see or be able to use the mouse cursor to select items on-screen. To get around that, plug in a mouse if possible or just use keyboard navigation: Tab to move between selectable items and Enter or Space to select one.
Depending on the choices you make, you will step through some or all of the following screens. And because Microsoft changes the OOBE from time-to-time, there could be additional steps not noted here.
Is this the right country or region? Click “Yes.”
Is this the right keyboard layout or input method? Click “Yes.”
Want a second keyboard layout? Click “Skip.”
Let’s connect you to a network. This is where things get interesting. In this book, I assume that you will sign in to Windows 11 using a Microsoft account because that’s the right choice for most users. But power users may want to sign in with a local account instead.
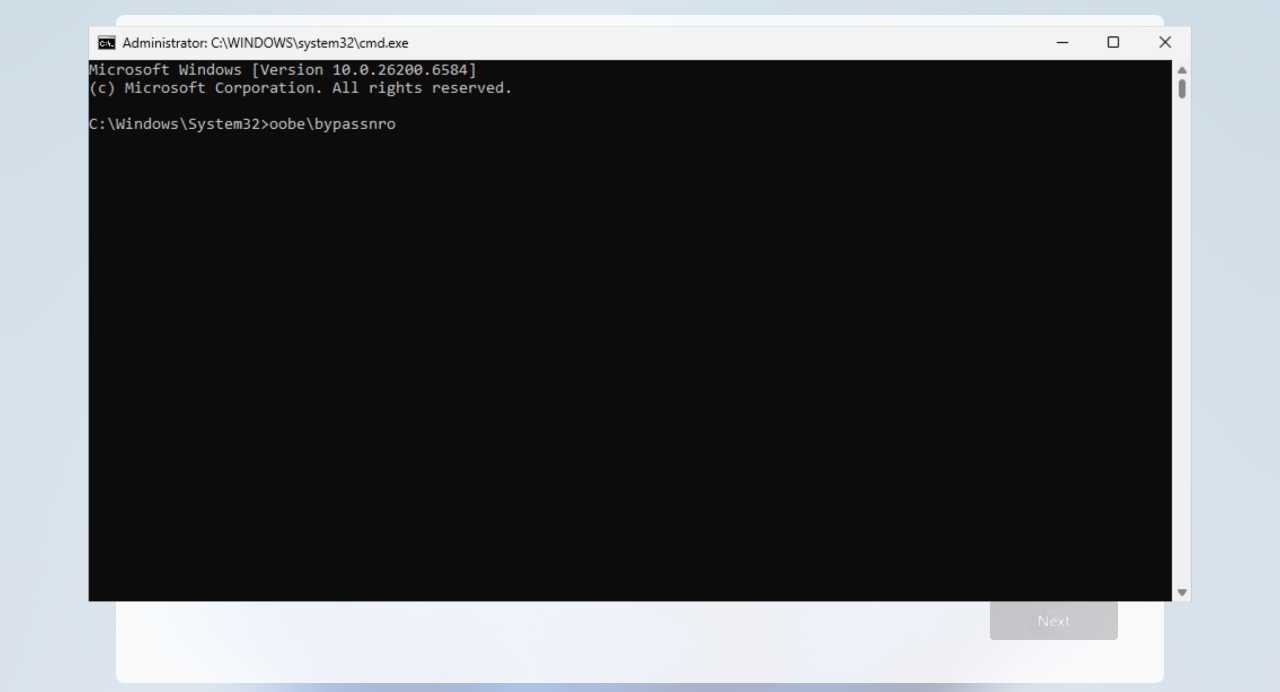
- If you used a stock Windows 11 ISO to create the installation media, you can connect to your Wi-Fi network now and continue normally. Click “Next.” Power users can optionally type Shift + F10 to open a command line window and type the command oobe\bypassnro to reboot the PC to see the “I don’t have internet” option noted below.
- If you used a modified Tiny11 Builder IOS to create the installation media, you will likely see an “Install driver” button and an “I don’t have internet” link. Here, I will assume you connect your PC to the Internet using a wired (Ethernet) connection, in which case that network will appear and you can continue normally. But power users can choose the link and create a local account, bypassing most of the OOBE. Click “Next.”

Name your device. Here, you can optionally name your PC. If you do so now, the PC will reboot before you can continue.
How would you like to set up this device? Here, you can choose to sign in to Windows 11 using your Microsoft account or Microsoft Work or School account. I assume you are doing this on a PC you own, so select “Set up for personal user” and then click “Next.”
Unlock your Microsoft experience. Click “Sign in.”
Let’s add your Microsoft account. Enter your email address, click “Next,” and then sign in and authenticate with your Microsoft account as prompted.
Want to use your face/finger to sign in faster and more securely? If your PC supports Windows Hello facial or fingerprint recognition, you can enroll your face or a finger now by clicking “Yes, set up,” following the prompts, and then clicking “Next.” Otherwise, you can click “Skip for now.”
Got it! Now set up a PIN. Windows 11 requires you to create a PIN—which can be four or more digits and/or include alphabetical characters—when you sign in using an online account like your Microsoft account. So click “Create PIN,” create and confirm the PIN you wish to use, and click “OK.”
Choose privacy settings for your device. Here, you can choose which privacy-related settings you wish to leave enabled. My advice is to leave “Location” and “Find my device” enabled and to disable all other options. Then, click “Accept.”
➡️ Learn more: You can learn more about these and other Windows 11 privacy options in the Make Windows 11 respect your privacy chapter.
Let’s customize your experience. Let’s not. Click “Skip.”
Use your phone from your PC. You can set this up later using the Phone Link app. Click “Skip.”
Always have access to your recent browsing data. This is tied to a key enshittification in Microsoft Edge. Do not allow this. Click “Not now.”
Microsoft 365 and Xbox Game Pass promotional screens. Regardless of whether you have a Microsoft 365 or Xbox Game Pass subscription, Microsoft will promote one or both of these services via series of OOBE screens. Skip past them by clicking “Next” or similar as needed.
And with that, you arrive at the Windows 11 Desktop where you can begin the initial post-setup configuration.
Perform initial Windows 11 configuration
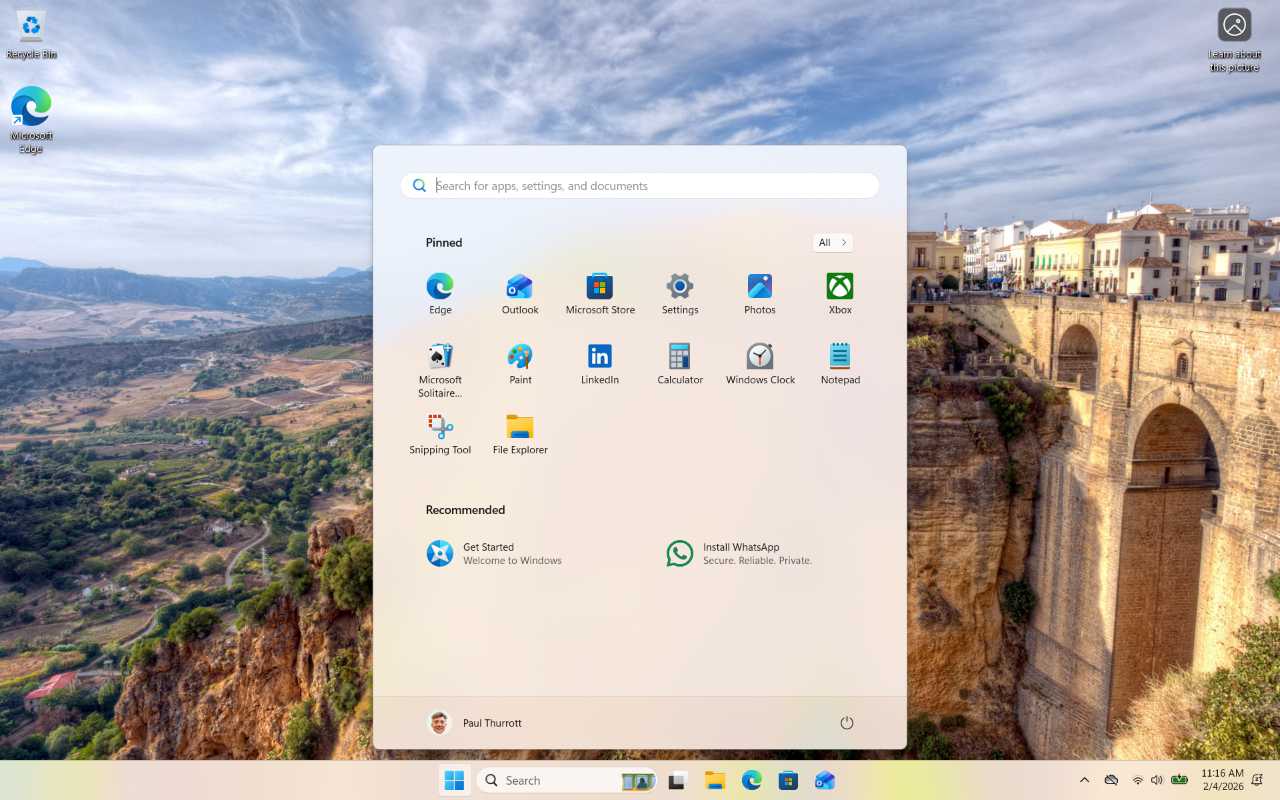
What you see when you arrive at the Desktop will depend on how you set up Windows 11. If you used the stock Windows 11 image, you will see a pretty Desktop with a Windows Spotlight background and a Start menu full of apps.
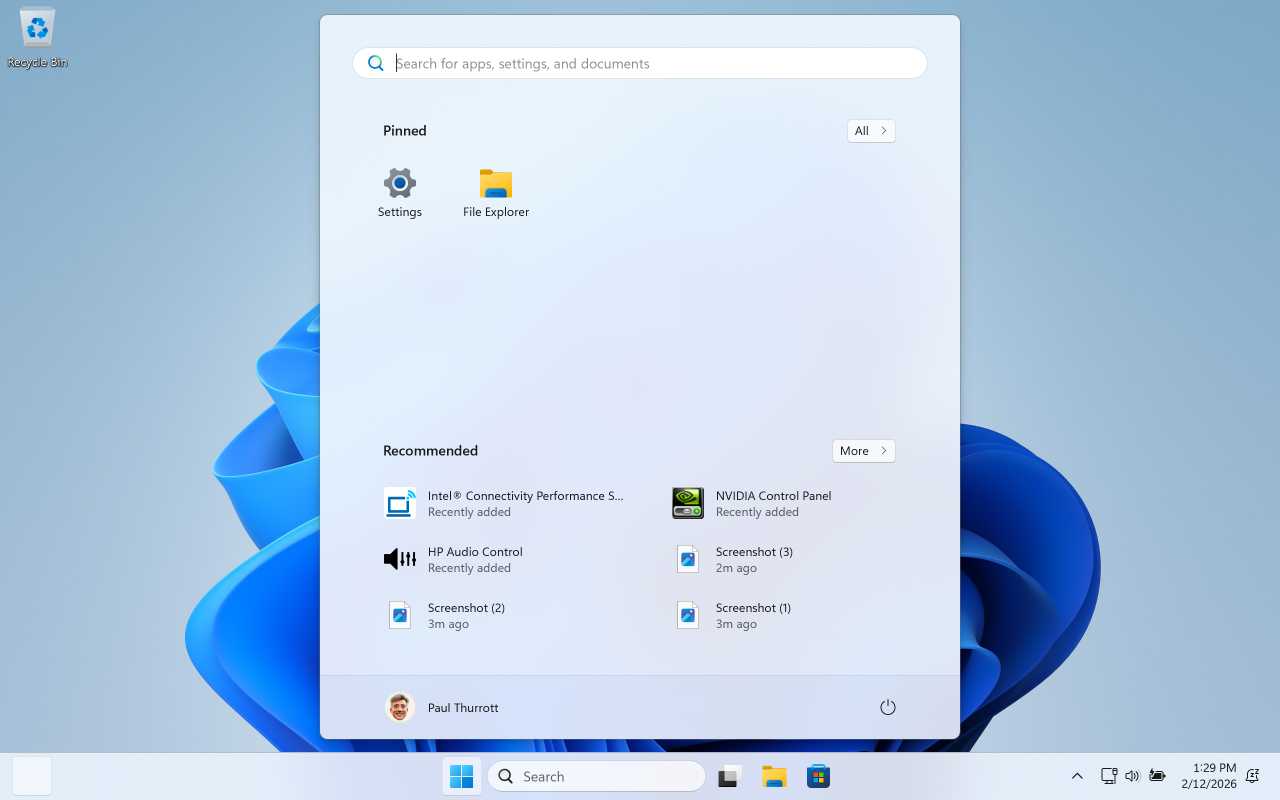
If you used Tiny11 Builder, you will see a decidedly minimalist Desktop and Start menu, the latter of which contains very few app shortcut icons.
But it doesn’t matter which way you went. Now is the time to perform some initial configuration tasks. I recommend doing the following, in this order if possible.
- Optionally prevent OneDrive Folder Backup from auto-enabling. If you did not use Tiny11 Builder and you do not want OneDrive to auto-enable Folder Backup, follow the steps in the OneDrive chapter to prevent Folder Backup from being auto-enabled.
- Get Windows 11 up-to-date. Open Settings, navigate to Windows Update, and check for updates. Install all available updates, rebooting as needed, and repeat this process until there are no more updates. This will take longer and involve far more updates if you performed a Tiny11 Builder-based clean install.
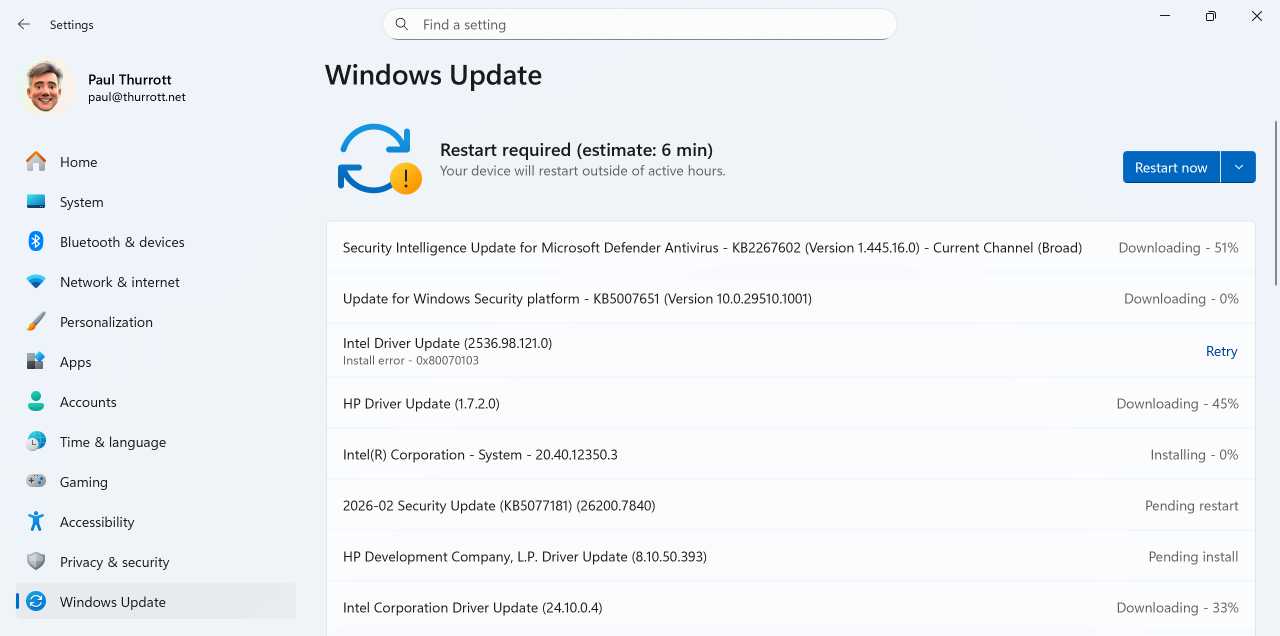
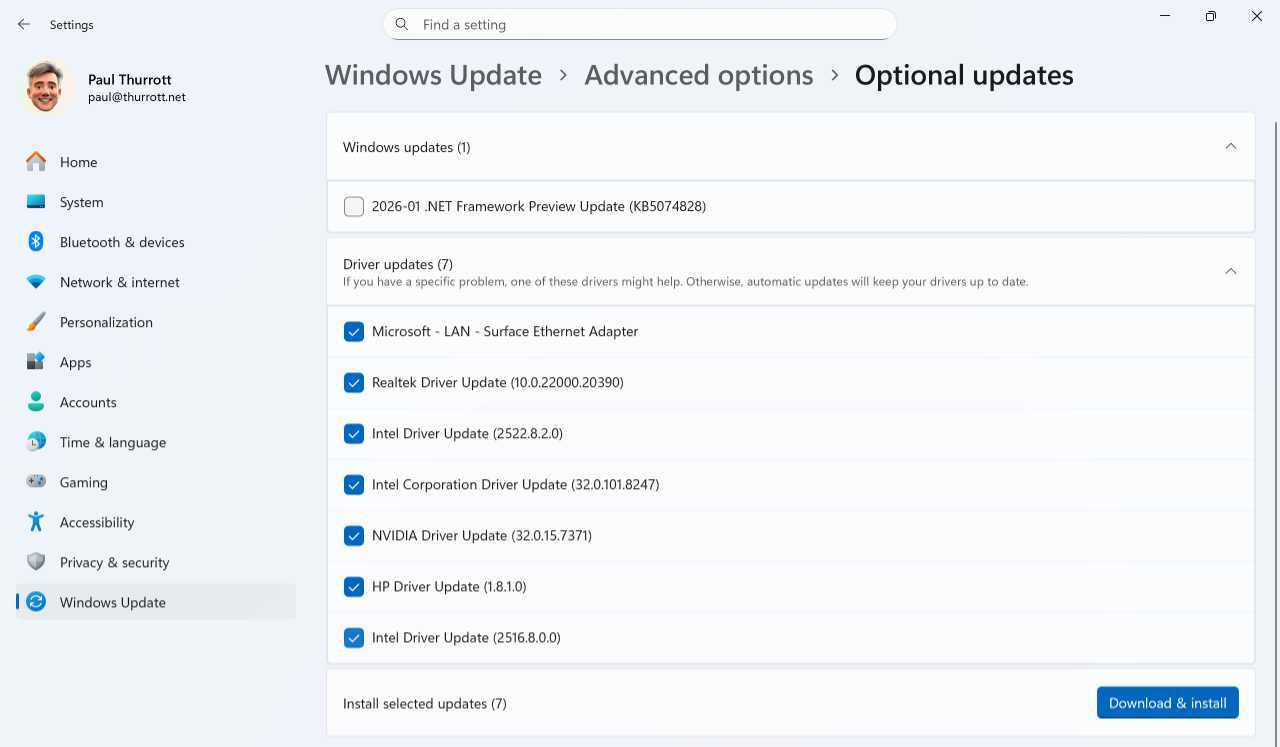
- Install optional updates. While the above is ongoing, navigate in the Settings app to Windows Update > Advanced options > Optional updates and install all available driver updates. Avoid the Preview Updates unless you want them as well.
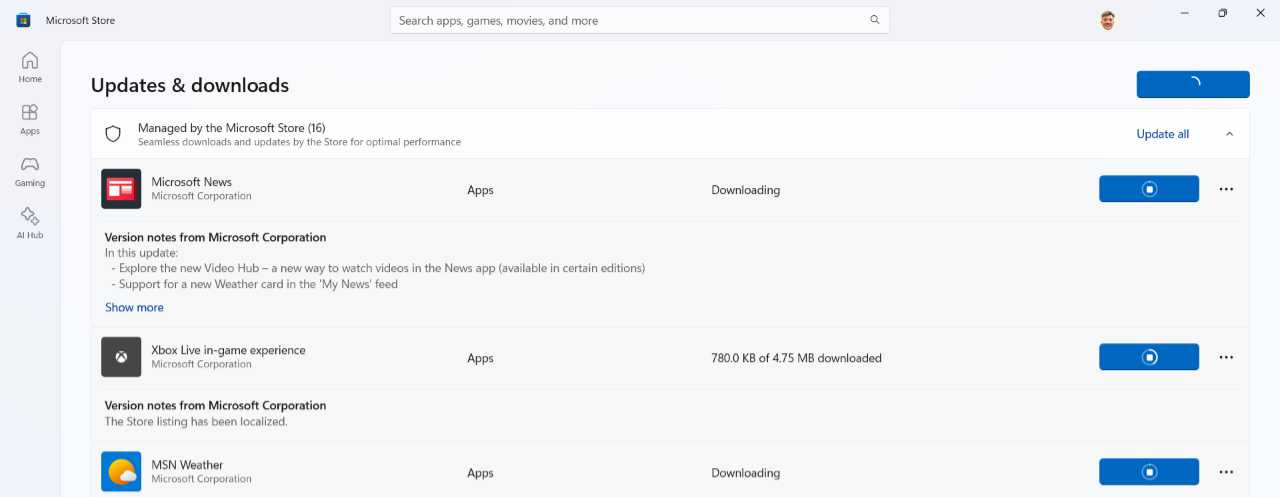
- Get the in-box apps up-to-date. While the above is ongoing, open the Microsoft Store app, navigate to Downloads, and check for updates. Install all available app updates. And consider repeating this process after the PC has rebooted after installing Windows Updates: The Store often has pending updates that do not install immediately.
- Optionally install a web browser and configure it as the default. Unless you intend to use Microsoft Edge, you should install your favorite web browser. Follow the instructions in the Microsoft Edge chapter to configure it as the default web browser, prevent Microsoft Edge from running in the background, and prevent Windows 11 from ignoring your default web browser choice. If you used Tiny11 Builder to install Windows 11, you can install a web browser using the Windows Package Manager (winget) command line utility. Open a Terminal window and use a command line like the following examples or winget search browser-name to find your favorite browser.
winget install Google.Chrome
winget install Mozilla.Firefox
winget install Brave.Brave

- Install the apps you use regularly. Use your web browser, the Microsoft Store, and/or the Windows Package Manager (winget) to install the other apps you use regularly. If you used Tiny11 Builder to install Windows 11, you can also install any in-box Windows 11 apps that Tiny11 excluded using the Store app (or winget).
- Optionally fix the issues with File Explorer. Use the instructions in the File Explorer chapter to fix issues with this crucial app if you find the performance lackluster.
- Further configure the system as needed. From here, you can perform whatever configuration changes you normally make. Those who used Tiny11 Builder may want to pin key apps to the Start menu, for example. Those who did not will likewise want to remove superfluous and crapware apps from the Start menu as described below.
? Eliminate other Windows 11 Setup annoyances
Here are a few other issues you may encounter with a clean install of Windows 11.
The Start menu is full of superfluous and crapware apps
⛔ The problem: The Start menu is full of crapware and other superfluous apps from Microsoft, its partners, and/or the PC maker.
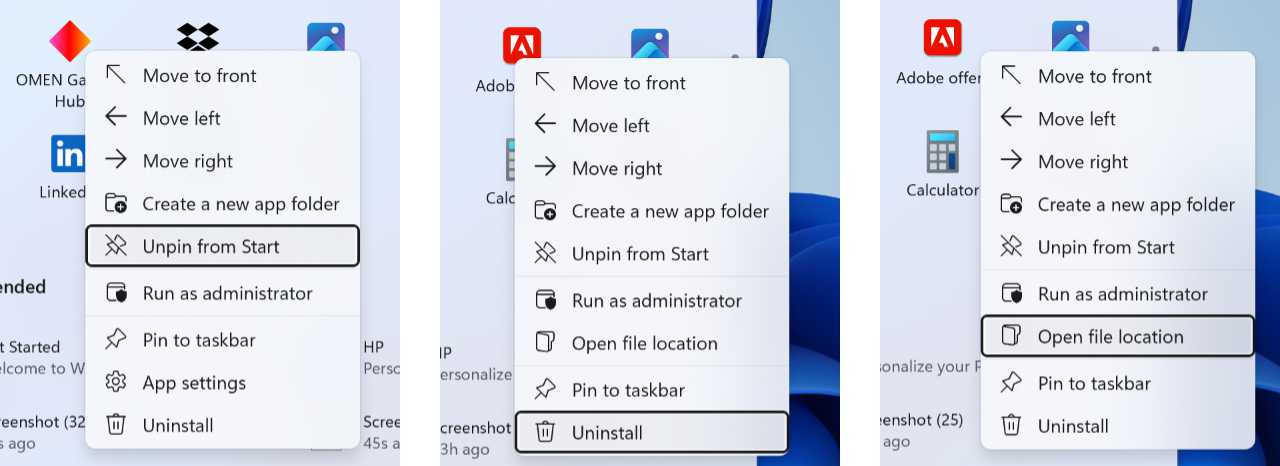
? The solution: Any of the pinned apps in the Start menu can be removed or uninstalled as needed. In most cases, all you have to do is right-click an offending app shortcut and choose “Uninstall” or “Unpin from Start” as needed. However, you may note that some of the shortcuts in Start can’t be removed using those methods. When that happens, right-click and choose “Open file location.” Then, you can delete the shortcut from a File Explorer window.
I signed in with a Microsoft account during the OOBE, but I really want to use a local account.
? The enshittification: Windows 11 Setup forces me to sign in with a Microsoft account or Microsoft work or school account, but I want to use a local account
? A workaround: If you signed in with a Microsoft account, you can simply convert it to a local account after you’ve reached the Desktop. You can do this with the Settings app by navigating to Accounts > Your info > Account settings.
I didn’t name my PC during the OOBE, but I would like to now
⛔ The problem: You skipped by the “Name your device” screen during the Windows Setup OOBE.
? The solution: You can rename your PC at any time using the Setup app: Navigate to System > About and click the “Rename this PC” button. Note that you will need to reboot the PC.

I can’t activate Windows 11 because I don’t have a valid Windows 11 product key
⛔ The problem: I’m building a PC, but Windows 11 is too expensive.
? A workaround: You can download a Windows 11 Insider Preview ISO from the Microsoft website for free and install and use that without paying for it.
? The solution: You can legally buy Windows 11 Home and Windows 11 Pro product keys inexpensively online, often for as little as $10, and then download a Windows 11 ISO from the Microsoft website, also for free. Install Windows 11 using the ISO and then activate it using the product key you purchased. I’ve successfully used Game Card Shop, Productkeys.com, Winandoffice.com, and other sites to find inexpensive Windows 11 product keys.

Gain unlimited access to Premium articles.
With technology shaping our everyday lives, how could we not dig deeper?
Thurrott Premium delivers an honest and thorough perspective about the technologies we use and rely on everyday. Discover deeper content as a Premium member.