De-Enshittify Windows 11: Make Windows 11 Respect Your Privacy ⭐
- Paul Thurrott
- Feb 17, 2026
-
4
De-Enshittify Windows 11. This book will be available for purchase soon, hopefully by the end of February. –Paul
—
Thanks to its forced telemetry and in-box tracking and advertising, Windows 11 is anything but private. Microsoft does provide you with some surface-level control over Windows 11 privacy settings, but you need to do a lot of spelunking in the Settings app to find options that are purposefully scattered throughout. And you can’t completely rein in the bad behaviors without digging even deeper and using a third-party app to fully disable the terribleness.
? The problem with privacy in Windows 11
The problem with privacy in Windows 11 is easily stated: There isn’t any. Microsoft violates your privacy by default and does everything it can, from using dark patterns to outright harassment, to convince you to lower your defenses and allow it to gain more access to your personal information. It does this so that it can track you online, build a profile, sell that information to advertisers, and use it against you in advertisements of its own.
This behavior didn’t happen suddenly. It started subtly, as is so often the case when one of the world’s biggest companies decides it’s going to start violating the privacy of its own customers: Beginning with Windows 8 in 2012, Microsoft began assigning a unique advertising ID to each PC, just as it does with its Bing search engine, so that it can collect usage data and sell it to third-party advertisers so they could provide users with more personalized search results. This advertising ID was anonymous and still is, and it can still be disabled today, though you have to know it’s happening and where to look.
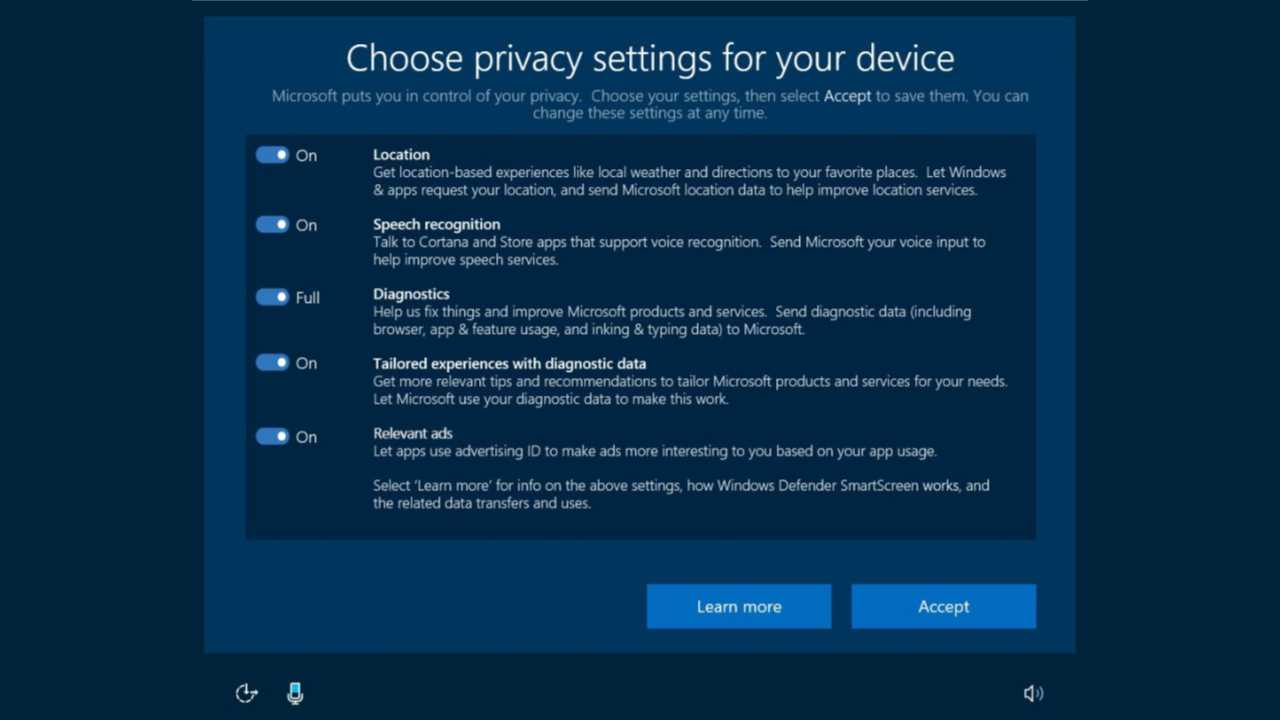
Microsoft’s privacy violations escalated dramatically with Windows 10 in 2015. Microsoft made data collection mandatory in this release, in part to help with product quality: The idea was that Microsoft could keep Windows “secure, up-to-date, and running properly” because it was collecting all this data. But there were three levels of data collection—Full, Enhanced, and Basic—and even Basic was an overreach.
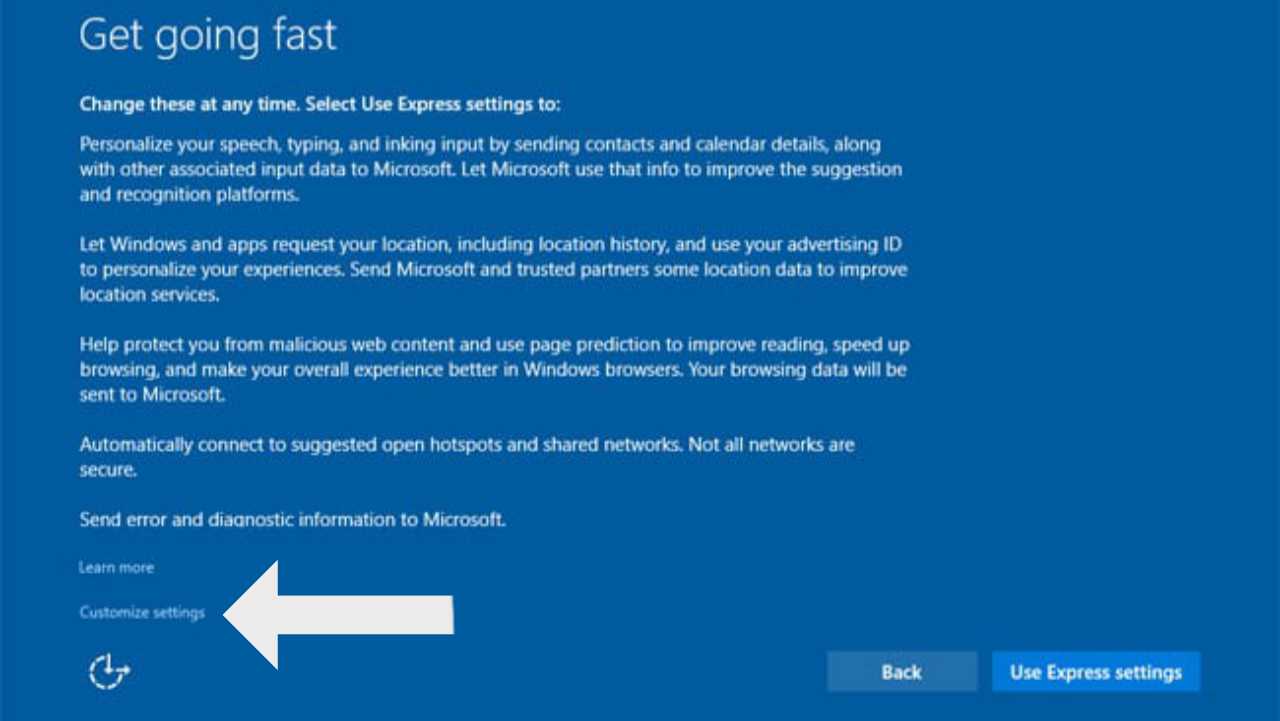
Perhaps sensing the obvious backlash, Microsoft used dark patterns to obfuscate its activities. During Windows Setup, for example, there was a “Get going fast” screen that described some of the data that Windows 10 would collect if you just agreed to let it do so. And while there was a prominent and pre-select “Use Express Settings” button, the opt-out choice, a “Customize settings” text link, was both tiny and difficult to read.
Because of this, antitrust regulators began asking questions. And so Microsoft in early 2017 revealed that it would proactively make three major changes to its data collecting behaviors.
- It would switch from three levels of data collection to two and reduce the amount of data collected when the user chose the Basic data collection level.
- It agreed to change Windows Setup and replace the “Get going fast” screen and its Express Settings option with a new privacy settings screen that would “clearly show you simple but important settings” and require you to “choose your settings before you can move forward with setup.”
- It would launch a web-based privacy dashboard so so you could “see and control your activity data from Microsoft including location, search, browsing”, and more.
When Microsoft implemented these changes, it fooled some regulators but not others. I described them as “superficial tomfoolery” and “privacy theater” because Microsoft had simply replaced unclear choices with new but still unclear choices, none of which solved the underlying problem: You can flip switches all you want, but today Microsoft still tracks your activities online with Windows 11.
You may want to prevent that and other privacy-invasive behaviors in Windows 11. In this chapter, you will learn what’s possible using the tools built into the product itself. And how you can completely prevent Windows 11 from tracking you online using a free utility.
? Try to protect your privacy using the tools that Windows 11 provides
With Windows 11, Windows Setup displays an updated version of the privacy settings screen that debuted in Windows 10 in 2017. But now as then, you can also more fully configure privacy settings at any time in the Windows 11 Settings app.
Configure Windows 11 privacy settings during Windows Setup
As noted in Start Fresh with a New Install of Windows 11, the Windows Setup Out of Box Experience (OOBE) displays a screen, like the one in Windows 10 Setup but updated, in which you can configure several high-level privacy options. It’s worth configuring each of these correctly when you set up a computer, but that’s not enough. You should also review your privacy configurations later in the Settings app and take other steps to fully protect your privacy from Windows 11 and Microsoft.
➡️ Learn more: These topics are both described later in this chapter, in Properly configure Windows 11 privacy settings at any time and Take control of your privacy with Win11Debloat, respectively.
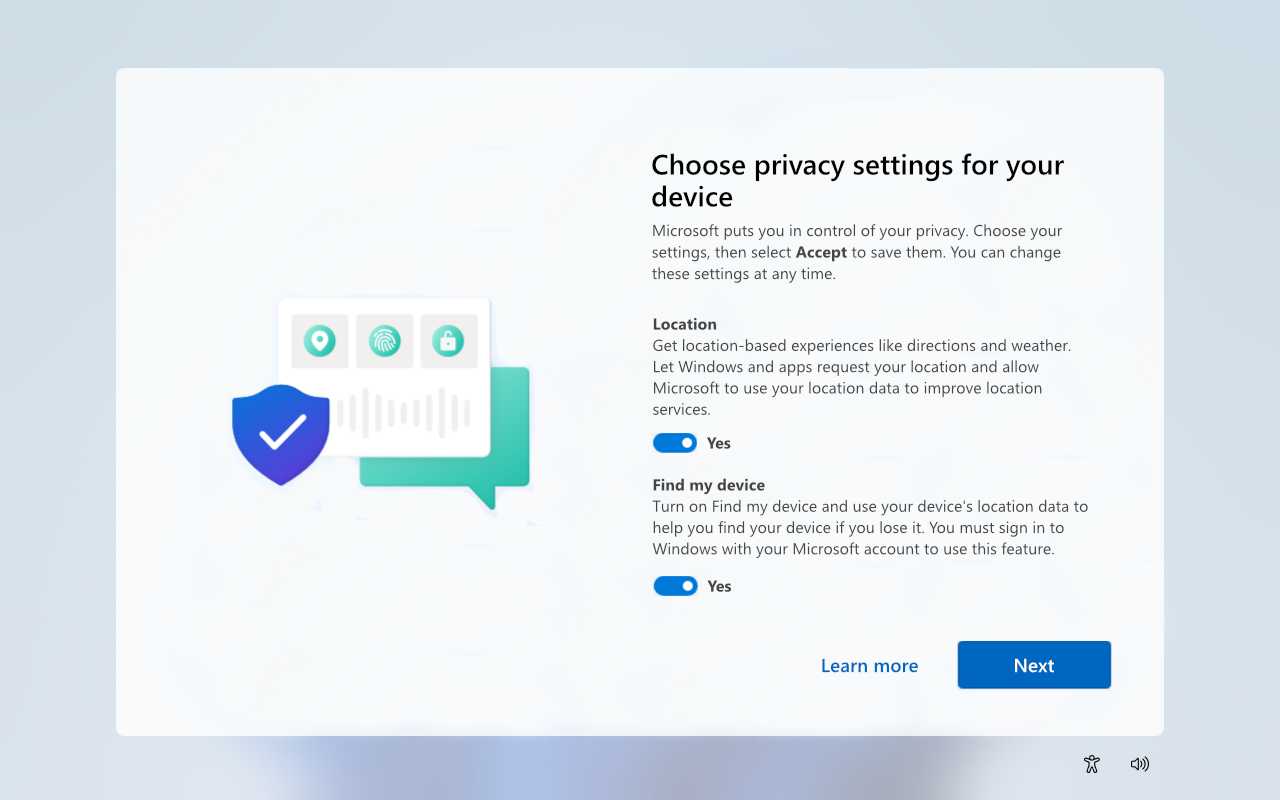
All the options you see here are enabled by default.
? Location
When left enabled, Windows 11 will permit Widgets, the Weather app, and other built-in experiences to access your location data, other apps can request access, and Microsoft will use your data to improve its location services. For most, this is a fair trade-off, even though location data is a key contributor to fingerprinting, by which online trackers can build a profile of you even when you take steps to protect your privacy: Many enjoy seeing the local weather display on the Widgets icon on the Taskbar, for example.
My advice: Leave this enabled.
➡️ Learn more: Even if you decide you wish to enable Location, take the time to review Location privacy settings as described later in this chapter. Location services isn’t a simple on/off switch, and there are numerous related options to consider.
? Find my device
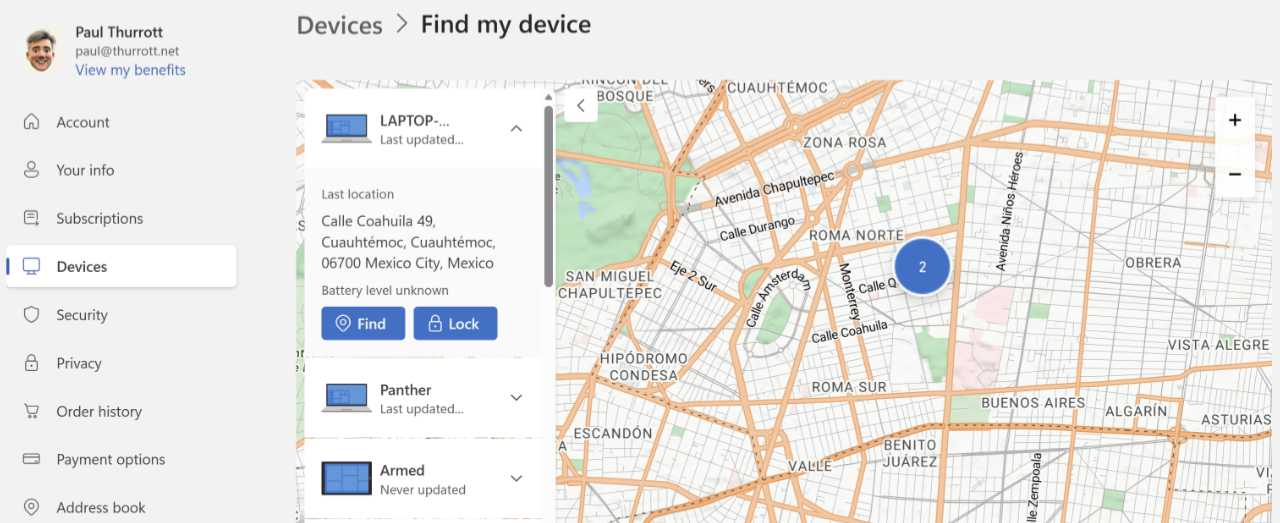
Tied to Location, Find my device remembers the most recent location of the PC you are using and associates it with your Microsoft account. This is incredibly useful as Find my device is used to help you recover a lost or stolen computer. You can see the PCs associated with your account when you sign in to the Microsoft account website and navigate to Devices. Each PC you see here displays that location, if available, and provides a “Find my device” link so you can view it on a map.
My advice: Leave this enabled.
✅ Tip: Find my device is a basic On/Off switch in Settings, unlike Location.
⛔ Diagnostic data
By default, Windows 11 sends diagnostic data, a euphemism for telemetry, which is data used for both good and bad. Basic telemetry can help detect, diagnose, and fix problems with Windows, which is fine. But Microsoft really wants you to grant it expanded access to your telemetry data, which includes your web browsing history, connectivity and configuration data, inking and speech data, typing data, and more. And that’s a mix of good and bad, as some of that data will be used by Microsoft and its advertising partners to track your activities online and target you with advertising.
You can’t turn off telemetry data entirely here. But you can toggle this option to “Off” to change the configuration from “Send optional data” to “Required only.” And I strongly urge you to do so.
My advice: Disable this option (changing it to “Off,” or “Required only”).
➡️ Learn more: Like Find my device, Diagnostic data is a simple On/Off switch in Settings, where “On” equates to “Send required and optional data” and “Off” is “Send required data only.” That said, there are additional related options in the Settings app you should consider, as described later. And while you can’t disable diagnostic data (telemetry) entirely in the Settings app, I discuss how you can use a free utility to do so in the Take control of your privacy with Win11Debloat section later in this chapter as well.
? Inking & typing
This setting is one of the more innocuous choices from a privacy perspective: If left enabled, Windows 11 will send additional and optional data associated with inking and typing to Microsoft so that it can improve its language recognition and suggestion capabilities. That said, it’s still optional and feels unnecessary.
My advice: Disable this option.
➡️ Learn more: Inking & typing is also a simple On/Off switch in Settings, though there is a related option to consider in Settings, as described later in the chapter.
⛔ Tailored experiences
This is another example of overreach by Microsoft: When Tailored experiences i left enabled, Windows 11 will send Microsoft diagnostic data, including optional diagnostic data (aside from web browsing history), so that it can offer you customized “tips, ads, and recommendations.” To be clear, this is only about Microsoft optimizing the advertising it delivers to you through Windows 11, and our goal here is to minimize if not eliminate that advertising in the first place.
My advice: Disable this option.
? Presence sensing
You will only see this option if your PC supports Windows 11-compatible presence sensing capabilities, which use your webcam and other sensors to detect when you or others approach or leave the PC. This allows the PC to automatically wake up so that you can authenticate more quickly via Windows Hello facial recognition when you approach and then go to sleep and sign you out when you leave. That’s obviously useful, but in my experience, it’s also incredibly annoying, and after spending many months trying to configure it properly and use it day-to-day, I decided to disable presence sensing and never look back. But that’s subjective: You may find value in this feature and want to leave it enabled.
My advice: Disable this option.
➡️ Learn more: If you are going to use presence sensing, at least spend the time to configure it correctly for your needs and wants. You do so in the Settings app as described later in this chapter.
To be clear, when I configure PCs for my own use, which I do dozens of times every year, I leave Location and Find my device enabled but I disable all the other options.
Properly configure Windows 11 privacy settings at any time
The privacy settings screen in Windows Setup is just “privacy theater” in that it’s designed to give you some confidence that you are, in Microsoft’s words, “in control of your privacy.” But if that’s all you configure, you’re missing out on some of the more egregious privacy violations in Windows 11, which is the point. And though Setup notes that “you can change these settings at any time,” it doesn’t explain how or where you do so. Microsoft doesn’t want you to make any changes, nor does it want you to ever think about this again.
But you’re smarter than that. Here’s a rundown of the privacy options you can and should configure in Windows 11 that actually make a difference. All these options are found in the Settings app, though they are scattered throughout by design.
Location services
As noted above, Microsoft uses location services so that Windows, in-box apps, and third-party apps can use that data and so that Microsoft can improve the service. Generally speaking, this is acceptable—you want a weather app to know your location for obvious reasons—but Location privacy and security settings in the Settings app provides more granular control over this capability so that you can determine exactly which apps can access your location. There are also several other related options options to consider.
You can find this interface in the Settings app by navigating to Privacy & security > Location.
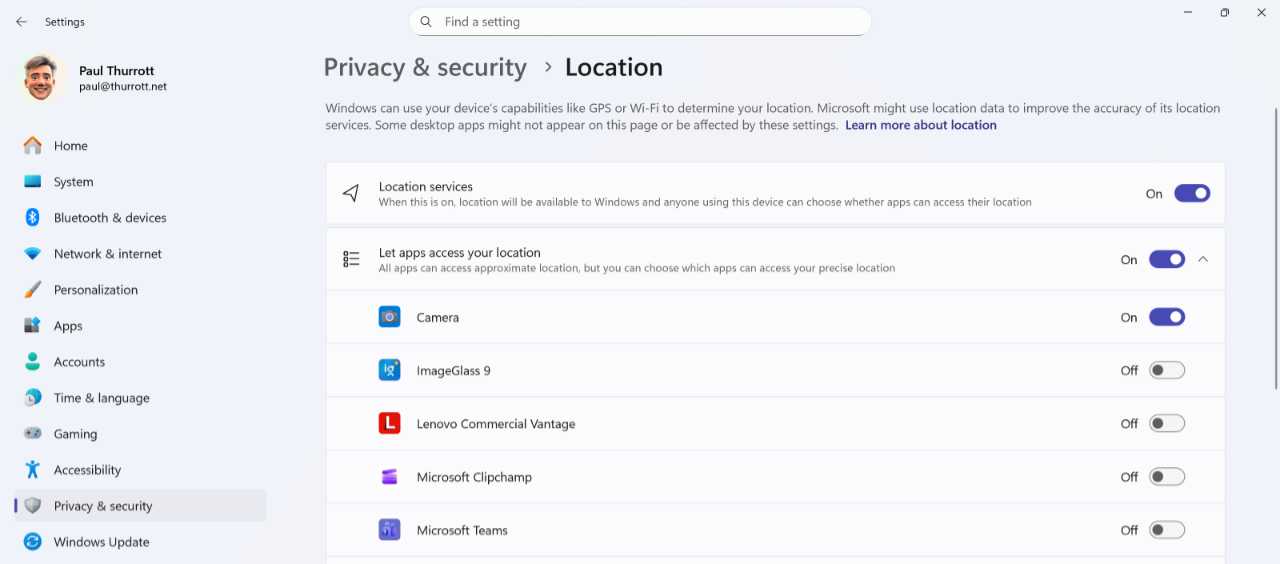
Here, you will see the following options:
Location services. This is the master toggle switch for location services, and it’s tied to the Location option you saw in the Windows Setup privacy page. If you configure this to “Off,” location services is disabled globally, but the Find my device functionality is also disabled and the “Let apps access your location” section, below, is grayed out and unavailable.
Let apps access your location. This misnamed option is really about precise location. When Location services, above, is enabled, Windows and all apps can access your approximate location. When this option is enabled, you can specify which apps can access your precise location, including, interestingly, some classic desktop apps, none of which can be configured individually. My advice is to disable precise location for almost any app you see in this list.
Default location. This option lets you use a map to configure a default location that’s used when Windows can’t determine your approximate or precise location. This is generally useful, but it is perhaps most useful for those who wish to leave location services disabled but still want some basic weather or news data from Widgets or whatever apps.
Allow location override. This setting does not impact most users and can be safely ignored. It’s designed to let a cloud-hosted or remote PC that you connect to from Windows 11 on your PC use their location instead of your PC’s location. If that doesn’t sound like something you’ll ever do, then you’re normal and can move on.
Recent activity. If you’re curious about which apps are accessing your location information, you can expand this option and find out. Well, sort of. Some of the apps you will see here, like Microsoft Edge, are expected. Some are just curious, like Windows (File) Explorer. And some are inscrutable, like “COM Surrogate.” It may be worth stepping through the list to see whether there’s anything suspicious, but I can’t say I’ve seen anything unusual beyond how often Zoom Meetings accesses my location information: It appears to do so every few seconds during online meetings.
Diagnostics & feedback (telemetry)
Telemetry—or what Microsoft calls “Diagnostic data” or “Diagnostics & feedback”—is one of the more controversial aspects of Windows 11. As noted previously, Microsoft doesn’t allow you to fully disable telemetry in Windows 11. But it does let you provide just basic telemetry (“required data”) and enhanced telemetry (“optional data”) and access a few other related options in the Settings app. You should review these options.
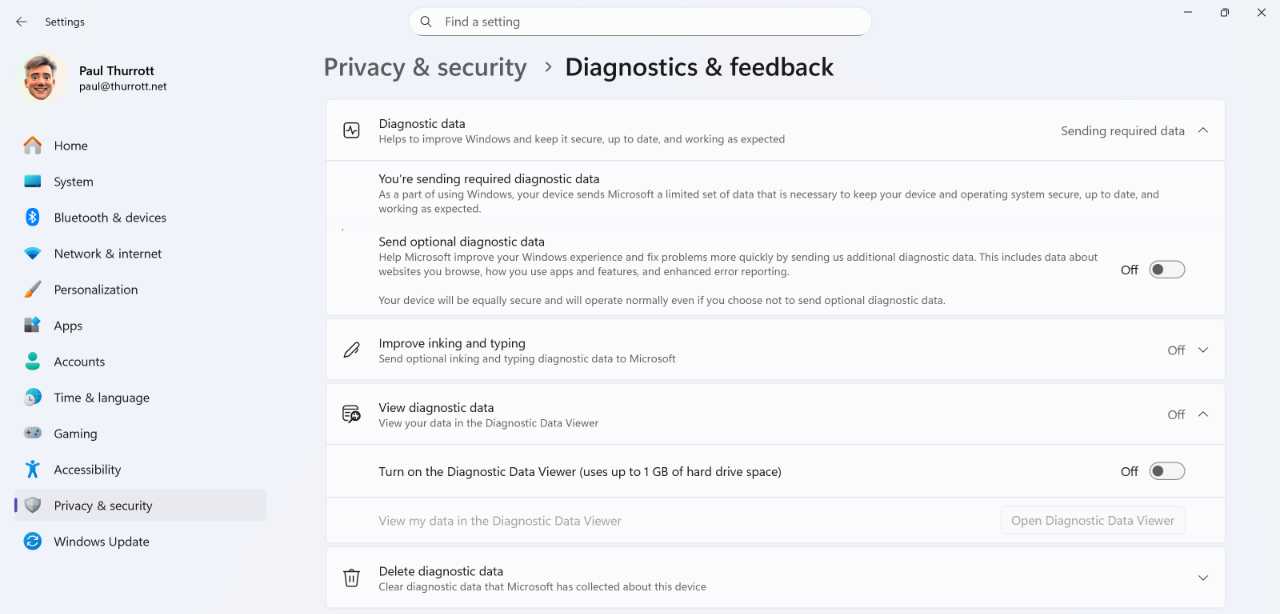
You can find this interface in the Settings app by navigating to Privacy & security > Diagnostics & feedback.
Options to examine here include:
Diagnostic data. Microsoft offers two levels of forced telemetry: You can send only the required data, which the company claims is only used to “improve Windows and keep it secure, up to date, and working as expected,” or you can send optional diagnostic to “help Microsoft improve your Windows experience and fix problems more quickly by sending additional diagnostic.” That additional data includes “data about websites you browse, how you use apps and features, and enhanced error reporting,” and there is absolutely no reason to agree to that.
➡️ Learn more: Notably absent here is the choice, “Never send Microsoft any= telemetry data.” But you can find out how to do just that in the Take control of your privacy with Win11Debloat section later in this chapter.
Improve inking and typing. Microsoft would like you to send optional inking and typing diagnostic data to. Don’t.
Tailored experiences. As discussed previously, this will “let Microsoft use your diagnostic data for personalized tips, ads, and recommendations,” or what one would succinctly call targeted advertising. Just say no.
View diagnostic data. This one would be interesting if it were useful, but it’s not. You can optionally enable a Diagnostic Data Viewer to see the data that Windows 11 sends to Microsoft. Unfortunately, you have to install the app, it takes up 1 GB of disk space, and the output is in an XML format that, while technically “human readable,” is literally indiscernible in practice. Well, except for one thing: If you leave it running, you will see that Windows 11 sends a metric ton of data to Microsoft all day, every day. Don’t bother.

Delete diagnostic data. This option lets you delete all the diagnostic data that Microsoft collected from this PC and now stores in the cloud. Do so.
Recommendations and offers
Windows 11 is awash in subtle and overt advertisements that masquerade as “personalized offers,” “recommendations,” and other nonsense. But you can go a long way towards eliminating all that in the Settings app by navigating to Privacy & security > Recommendations & offers.
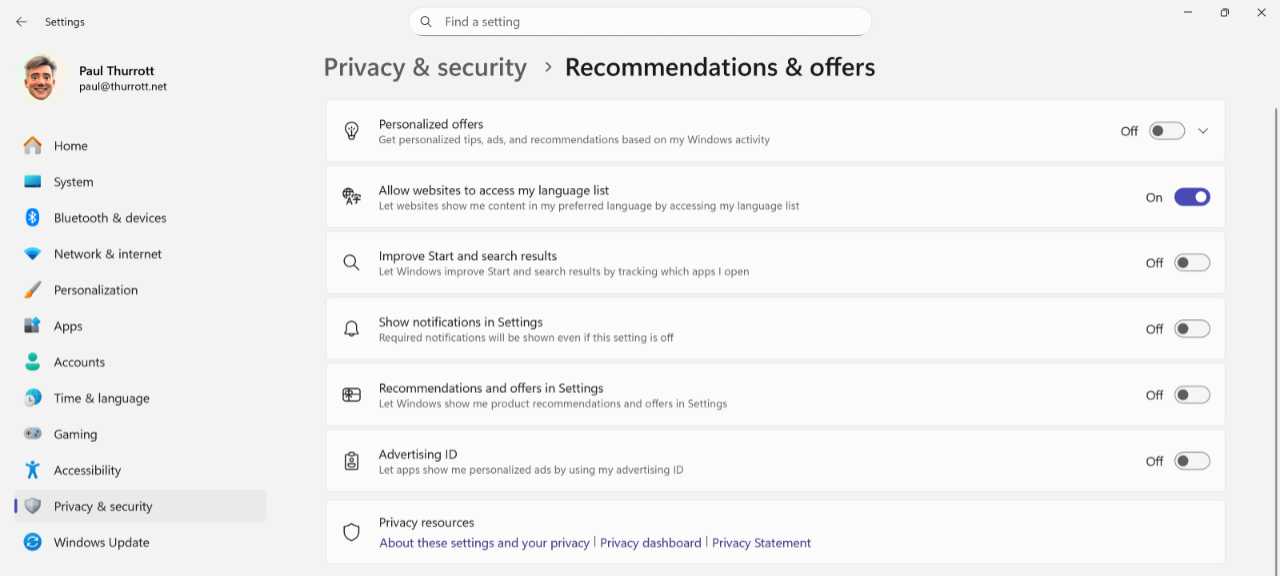
This is mostly obvious, so I will cut to the chase: Set the following options to “Off”:
- Personalized offers
- Improve Start and search results
- Recommendations and offers in Settings
- Advertising ID
Search
By default, Windows Search integrates with your Microsoft account (and/or your Microsoft Work or School account) so that it can return results using content in your OneDrive cloud storage even when that content is not synced locally to your PC. That may be useful to you, but Windows Search also displays a Search highlights experience by default that’s designed solely to put you in front of Microsoft advertising displayed on Microsoft online services like MSN and Bing.
You can configure these and a few other related Windows Search features in the Settings app by navigating to Privacy & search > Security.
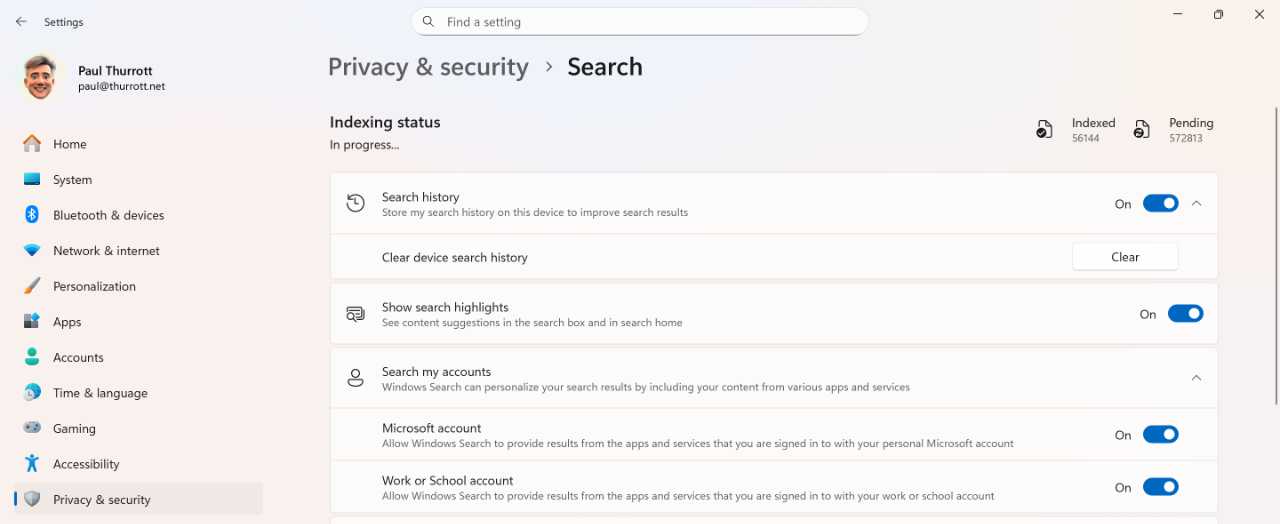
My recommendation is to configure “Show search highlights” to “Off.” And if you don’t want Windows Search to access your OneDrive-based files for whatever reason—personally, I find that useful—configure the options under “Search my accounts” and “Search the contents of online files” to “Off.”
Presence sensing
Presence sensing isn’t available on all PCs, and it’s possible or even likely that you may find it useful. As noted above, I find it irritating, and so I disable it fully when available.
There are two sets of presence sensing options in the Settings app in Windows 11, one tied to privacy and one to the functionality itself.
To configure whether presence sensing is available to apps, open Settings and navigate to Privacy & security > Presence Sensing.
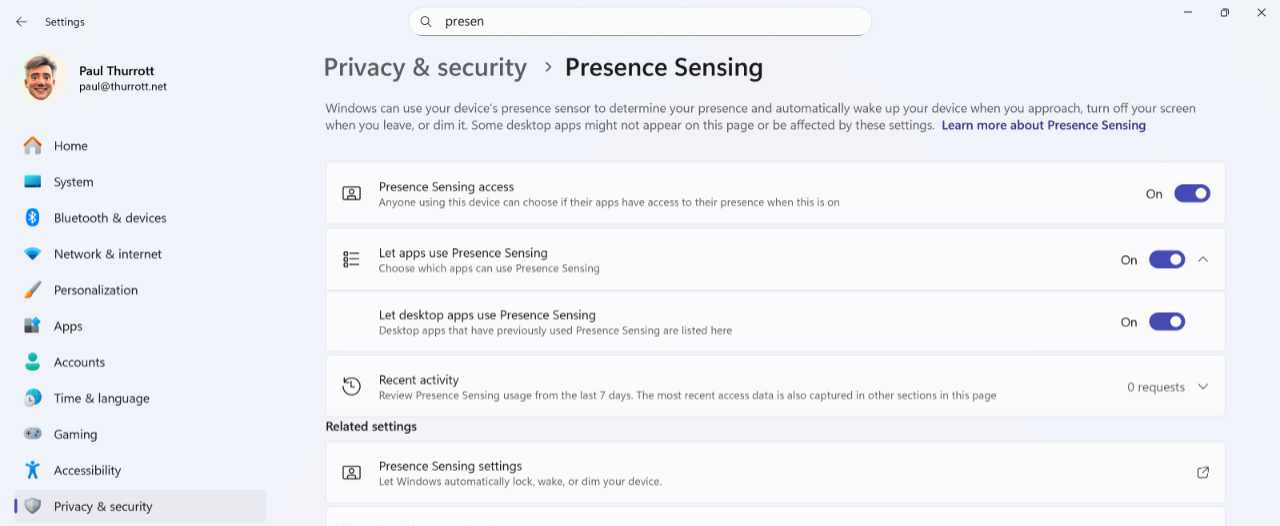
Here, just configure “Presence Sensing access” to “Off” if you don’t intend to use this feature at all.
Then, click the “Presence Sensing settings” link. The Settings page you navigate to lets you configure individual presence sensing features.
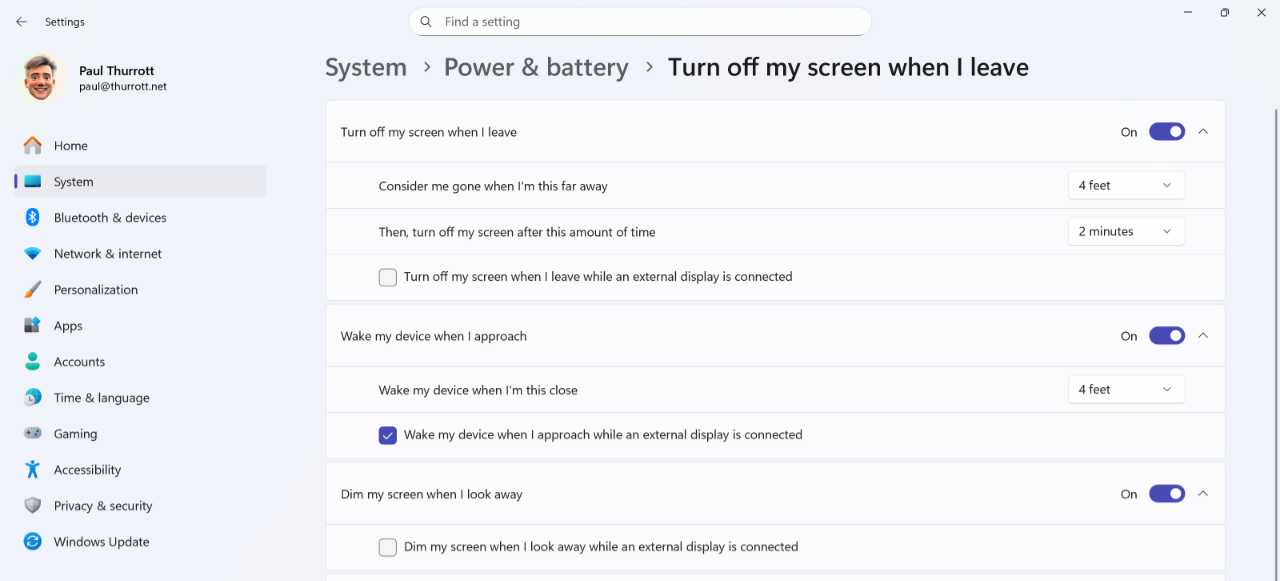
Here, you can enable or disable the following features and configure them to some degree:
- Turn off my screen when I leave
- Wake my device when I approach
- Dim my screen when I look away
➡️ Learn more: What about AI and privacy? This is such a big topic that I have an entire chapter, De-Enshittify Copilot and AI, that you can reference.
? Take control of your privacy with Win11Debloat
In De-Enshittify an Existing Install of Windows 11, you can learn how to use the free utility Win11Debloat to de-enshittify an existing Windows 11 installation. Among the changes I recommend making with this app is something you cannot accomplish in Windows 11 directly: You can completely disable all its telemetry and tracking. So let’s take a look at that in more detail.
As per that chapter, you access Win11Debloat by opening a Terminal window with administrator privileges and running the following script:
& ([scriptblock]::Create((irm “https://debloat.raphi.re/”)))
The script will download the app and, after a User Account Control (UAC) dialog, Win11Debloat appears. Click “Start” and “Next” to arrive at the System Tweaks screen. Here, you will focus only on the first section, “Privacy & Suggested Content.”
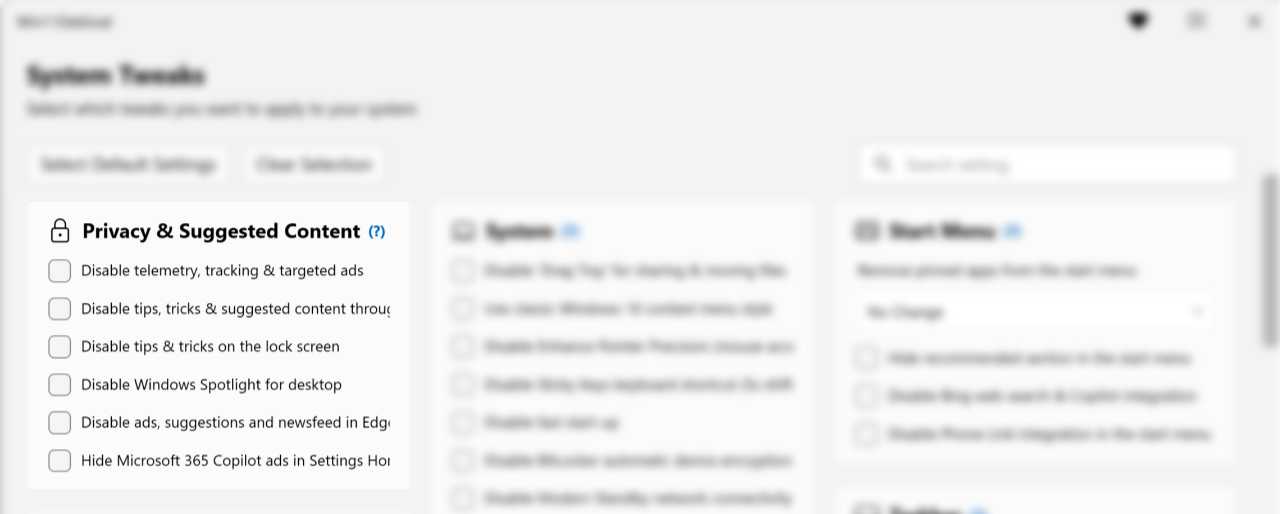
This section in Win11Debloat offers the following several options.
Disable telemetry, tracking, and targeted ads. Check this box to disable telemetry and tracking entirely. This is the magic option because it prevents your PC from sending any telemetry data to Microsoft.
Disable tips, tricks, suggestions, and ads throughout Windows. Check this box to disable these advertisements.
Disable tips and tricks on the lock screen. Check this box to disable the advertisements that Microsoft puts on the lock screen.
Disable Windows Spotlight on the desktop. This one is subjective, as you may enjoy the high-quality wallpapers provided by Windows Spotlight. But if you would like similar functionality without the superfluous Desktop icon, you could try an alternative wallpaper app like Bing Wallpaper. Though if you do choose that, be sure to uncheck the option it presents to make Bing your default search engine and disable all its widgets so there is nothing superfluous on-screen.
Disable ads, suggestions, and newsfeed in Edge. This is a no-brainer: Check this box to disable all the distractions in Microsoft Edge.
Hide Microsoft 365 Copilot ads in the Settings Home page. This likely won’t impact you unless you sign in to Windows with a Microsoft Work or School account, but it won’t hurt you to check this box to disable ads in the Settings home page.
➡️ Learn more: There are many more useful options to configure in Win11Debloat. Check out De-Enshittify an Existing Install of Windows 11 for a more complete rundown.

Gain unlimited access to Premium articles.
With technology shaping our everyday lives, how could we not dig deeper?
Thurrott Premium delivers an honest and thorough perspective about the technologies we use and rely on everyday. Discover deeper content as a Premium member.