2026 Security Checkup: Microsoft Account ⭐
- Paul Thurrott
- Jan 18, 2026
-
0
Securing a Microsoft account (MSA) is surprisingly easy. And it should only take 10 to 15 minutes to evaluate how your MSA is configured and make any necessary changes to get it in a good place.
So what does that mean?
A properly configured MSA can be accessed using passwordless methods that are both convenient and secure. It’s that simple. As is how you get there. You will configure the MSA to require two-step verification, a form of multi-step authentication (MFA), using multiple methods, two of which are the Microsoft Authenticator app on your phone and a portable passkey in your password manager.
I wrote about this process a bit over a year ago in my book, the Windows 11 Field Guide, and in a standalone article on this site, Tip: Properly Secure Your Microsoft Account. So this guide will be more concise and you can reference those two resources if you want additional information.
Here’s what to do.
Review the configuration of your MSA
Using a web browser on your computer, open the Microsoft account website, sign-in and verify your identity as required, and navigate to Security > Manage how I sign in to view the Additional security options page.
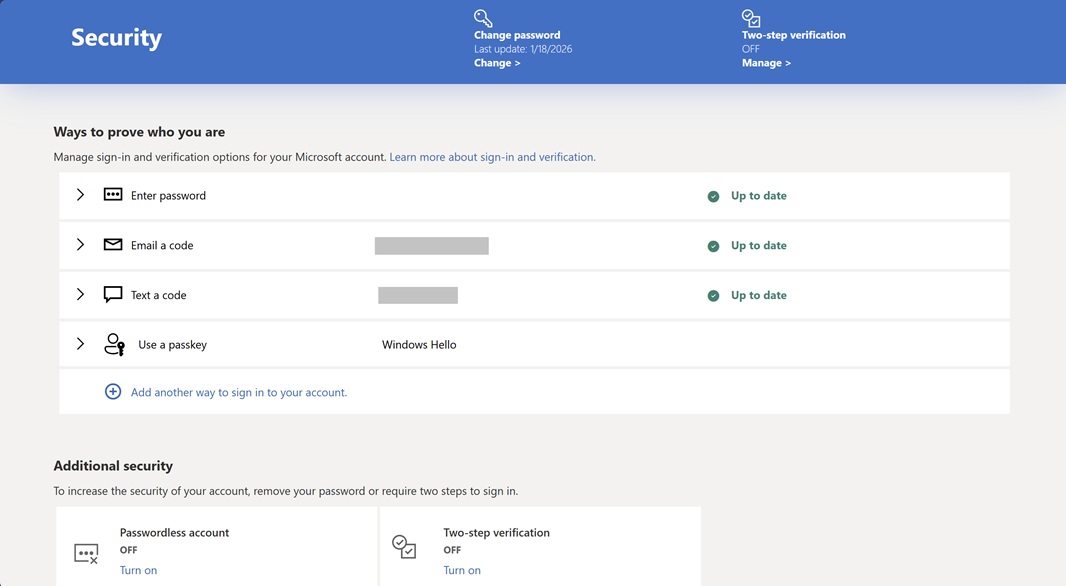
This page has two main sections, “Ways to prove who you are” and “Additional security.” Start with “Additional security,” which has two options that can increase the security of your account: Passwordless account and Two-step verification. Ensure that Two-step verification is configured to On. If it is not, click “Turn on.”
As the site explains, two-step verification adds another layer of protection to your MSA, and it does so using the Microsoft Authenticator app (or another authenticator app), which you will install on your phone.
✅ Tip: I strongly recommend using the Microsoft Authenticator app as other authenticator apps don’t provide the same seamless and passwordless sign-in experience.
Install and configure the Microsoft Authenticator app if required
If you need to enable two-step verification and haven’t already done this, get the Microsoft Authenticator app for your phone as prompted (here are direct links for Android and iPhone) and set it up for your MSA using the QR code that the MSA site will display on your computer. After you pair the app with your account, you will be prompted to enter a code that’s generated by the app.
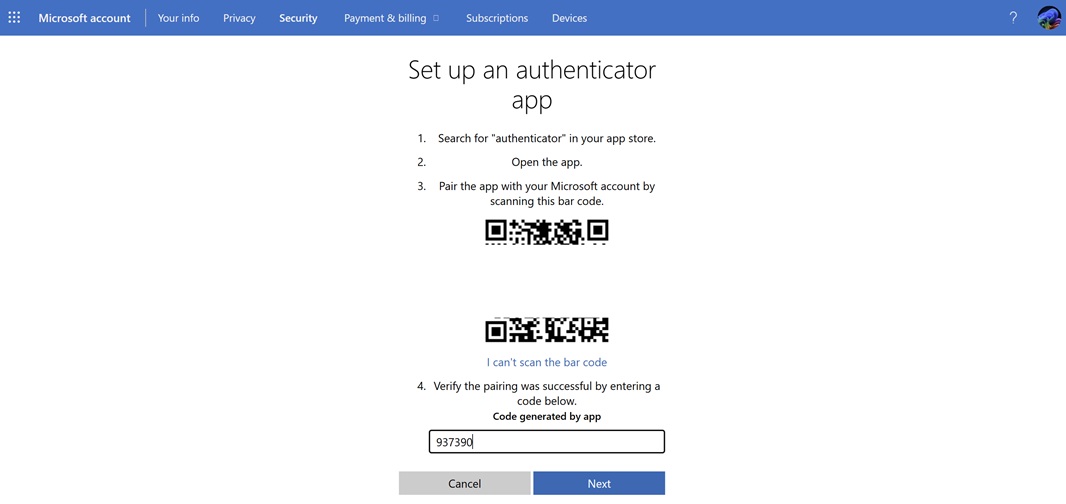
(You will then be prompted to create an app password for use with certain out-of-date devices, apps, and services. I will ignore that here.)
When this is complete, the Two-step verification option on the Additional security options page will be set to On. So now it’s time to look at your sign-in and verification methods.
Configure methods for signing in and verifying your identity
The top section of the Additional security options page, Ways to prove who you are, lists the methods you’ve configured for signing into your MSA and verifying your identity. As noted up top, the primary goal here is to configure your MSA with methods that enable a passwordless experience. But you also need multiple methods configured, some of which will be useful if you ever need to recover this account.
Available methods include:
- Enter password
- Email a code
- Text a code
- Send sign-in notification (this is the Microsoft Authenticator app option)
- Enter a code from an authenticator app (this is for another authenticator app)
- Use a passkey
My advice is to configure at least one passkey, at least one authenticator app, and at least one email address. From a passwordless perspective, a passkey is best, followed by an authenticator app (which you’ve already configured), and then an emailed code.
If you need to add another way to sign-in to your MSA or verify your identity, click “Add other way to sign in to your account.” The dialog that appears can be a bit confusing, depending on which method you need to add. But I address the most important method, Use a passkey, in the following section.
Add a passkey for your MSA to your password manager
You should manage your passkeys alongside your passwords and other identity-related information in a password manager. A few key points:
- This password manager should be available everywhere you need it, meaning your phone (via an app you will use for autofill) and your PC (typically via a web browser extension, though you can optionally install the password manager desktop app, too, if desired).
- I recommend using a third-party password manager and not the password manager provided by your web browser or OS. But if you feel otherwise, be sure that the password manager is available everywhere, as noted above.
- The best password managers by all accounts are 1Password, which is inexpensive, and Bitwarden, which is free. But I use Proton Pass, also free, and recommend it highly. Dashlane is worth looking at as well, though it isn’t free.
Before you proceed, make sure you’ve installed the web browser extension for your password manager and signed in to it. Then, you can add a passkey to your password manager.
To do so, click “Add other way to sign in to your account.” Then, choose “Face, fingerprint, PIN, or security key.” The user interface for your password manager will appear. This will vary by extension, but here’s the interface for Proton Pass.
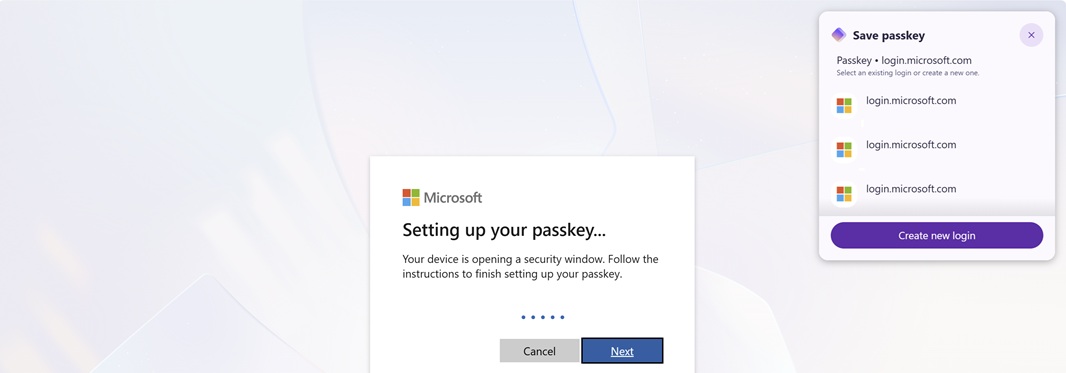
? Note: This passkey is portable, meaning it is accessible on your phone, tablet, PCs, and other devices. If you sign in to Windows 11 with an MSA, you also have a device-bound passkey on your PC. You learn more about this in the Passkeys chapter in the Windows 11 Field Guide.
That’s it. It’s that simple.
A few more MSA configuration thoughts
I typically configure each of my MSAs with one or more passkeys, two email addresses for codes (one Gmail, one Proton Mail), and the Microsoft Authenticator app (via the Send sign-in notification option).
Microsoft will prompt you to add your phone number to your MSA if you haven’t done so already. This is for the delivery of text (SMS)-based codes, which can be used to sign-in or verify your identity, though security researchers will tell you (correctly) that this method can be insecure because SMS text messages are easily intercepted. It can also be used for recovery purposes.
If your MSA is properly configured with multiple ways to prove who you are, you can optionally remove the password from the account. You do this on the Additional security options page of the Microsoft account website, in the “Additional security.” To do so, click “Turn on” in the Passwordless account block.
Should you?
As Microsoft explains, the passwordless sign-in and security methods you configured are all more secure than passwords. They’re also more convenient, especially the passkey and authenticator app options. Note that removing your password does require you to use the Microsoft Authenticator app, which is recommended regardless.
While I had not yet removed the password from my primary MSA, in writing this, I decided to finally do so.
I will look at properly securing your other online accounts next, followed by additional related topics. More soon.

Gain unlimited access to Premium articles.
With technology shaping our everyday lives, how could we not dig deeper?
Thurrott Premium delivers an honest and thorough perspective about the technologies we use and rely on everyday. Discover deeper content as a Premium member.