A Recovery Story (Premium)
- Paul Thurrott
- Apr 25, 2025
-
8

Inspired by the recent release of Ubuntu Linux 25.04 in native Arm64 form, I set out to get it working on my Snapdragon X-based Surface Laptop 7 three different ways: In the Windows Subsystem for Linux, in a Hyper-V virtual machine, and, if possible, in a dual-boot configuration. I was only partially successful. WSL installed Ubuntu 24.04, not 25.04, and I was only able to get upgraded to 24.10. The Hyper-V install went fine, though I never did figure out how to fix the screen resolution; it was stuck at a non-ideal 1024 x 768.
And then I tried the dual-boot configuration.
If you follow me on Instagram, you may have seen the result. If not, I discussed it briefly in the most recent Windows Weekly. In short, I was just curious to see whether this was even possible. So I used Rufus (which also comes in a native Arm64 version) to create a USB-based installation disk for Ubuntu Linux 25.04, and then I shut down all the apps that were running and used Settings (System > Recovery > Advanced startup > Restart now) to reboot into the Windows Recovery Environment, which would let me at least try to boot from the USB disk.
Yeah, that didn’t work. I’d never seen the blue screen depicted above, but it seemed like a problem I could bypass easily enough. Pressing the Windows key as prompted didn’t do anything, and the link to the virtual keyboard in the lower-right of the screen was likewise useless, as that keyboard doesn’t even have a Windows key. So I made a note of the error code and Googled the problem. I learned a couple of things.
First, this error was almost certainly related to me putting Surface Laptop in the Dev channel of the Windows Insider Program so I could test new features early. A Microsoft blog post for a January Dev channel build notes that “A 0xc0e90001 error will occur when booting into Windows Recovery (WinRE) on Arm64 PCs” and that “this will be fixed in the next Dev Channel flight.” Whether that ever happened or not is unclear, but my PC, which was at that moment in the Dev channel, certainly still had this problem.
Second, Microsoft claims to have fixed this problem. This post to the Microsoft Community forums has a reply from a Microsoft employee who links to a cumulative update, also from January, that “makes improvements to the Windows recovery environment in Windows 11 version 24H2.” The support article notes that “This update is available through Windows Update. It will be downloaded and installed automatically.” I didn’t see it in Windows Update’s Update history, and it wasn’t being offered. But there is a Windows Update Catalog link in there that points to a downloadable CAB file. So I tried that.
You can’t just double-click a CAB to “run” it. You can extract it. Or you can just run it from the command line. So I did that, using:
dism /online /add-package /packagepath:windows11.0-kb5053117-arm64_e4200815e4f012838695ce0f302da38a93ed1703.cab
And, yeah. That didn’t work either.
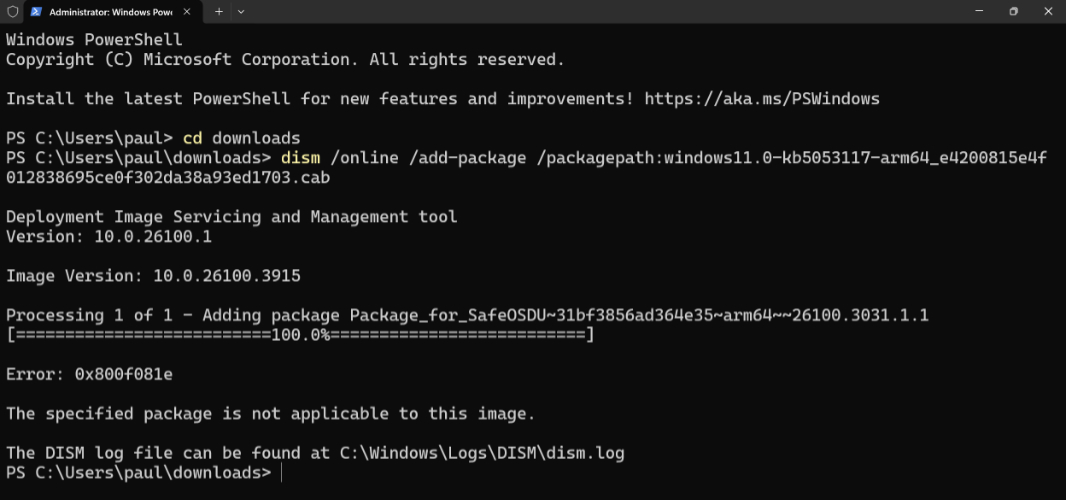
I could be wrong, but it appears the Windows Recovery Environment version I was using was newer than this, so it wouldn’t update. But whatever. From there, I went through a variety of command line machines, some suggested in that KB article, to see whether I could get the WRE updated. I also booted the system using the USB-based Surface Recovery media I mentioned in Microsoft Released the Windows 11 on Arm ISO, and I Have Some Advice. That worked, as expected. But like a loon, I also tried to boot into Ubuntu Setup from there. And that did not work. In fact, it just put the system in a boot loop.
Well, then. I was thinking about giving up, but Microsoft had other ideas for me. I removed both USB fobs from the laptop and rebooted it. It booted into that blue screen. I shut down the PC, waited a bit, and tried again. No go. It would not boot properly, and the Startup Repair tools on the Surface Recovery media failed too. So I went to lunch. Maybe it needed to rest a bit.
Nope.
Basically, I spent half of yesterday afternoon recovering the laptop. I booted with the Surface Recovery media, launched into Windows Setup, and reinstalled Windows 11 from scratch. That took a while. In addition to having to type in my BitLocker encryption key manually, always hilarious, Windows 11 version 24H2 forces you to sit through a very long install process if there’s a new version update available, and there was. But once I was at the desktop, I got started on my winget-based batch app installer. And played a bit of Call of Duty. And then wrote two stories on my MacBook Air, when I noticed that Google and Intel had released new quarterly earnings reports. It never ends.
With all that out of the way, I stepped through signing in to and configuring the apps I use and some like system customization. And by the time we were ready for dinner, I was up and running normally and everything was fine.
Or was it?
Dreading the possibility that what I had just done didn’t fix this problem at all, I closed whatever applications were running and used Settings to reboot into the WRE again. Or, I should say, tried to. As before, it simply booted into that blue screen again. Dammit.
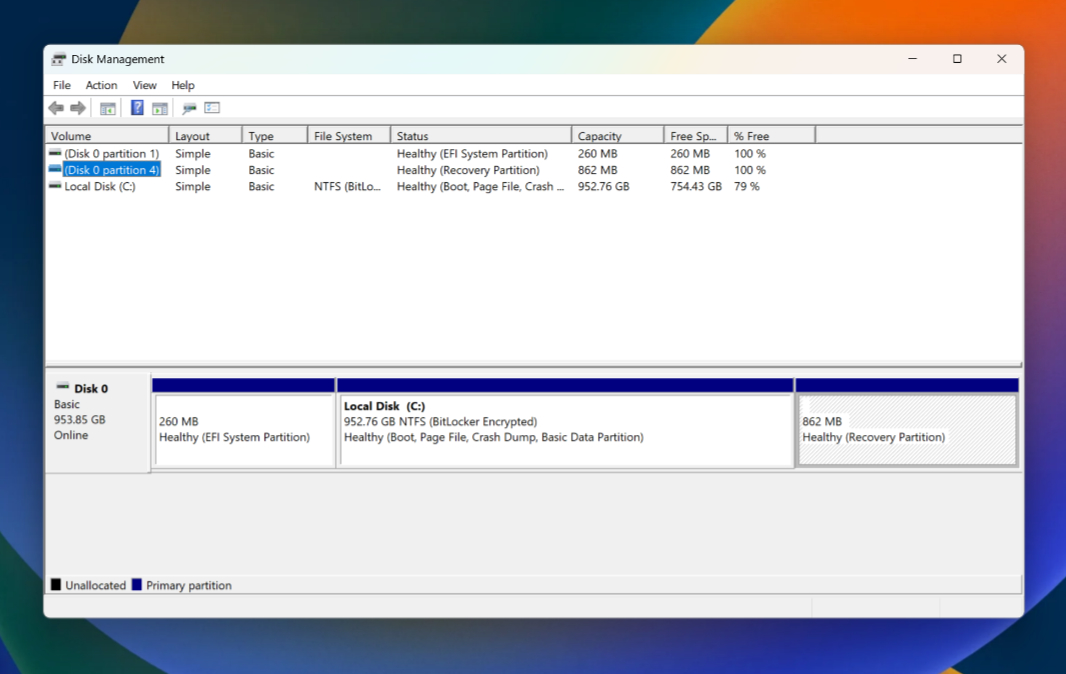
To be fair, I suspected that might happen. I had this idea that recovering the system using the Surface Recovery media didn’t overwrite the PC’s recovery partition, specifically because you don’t get the full Windows Setup experience. Which offers you a chance to repartition the drive. Instead, it must have kept the recovery partition and just wiped out the boot partition (C:) when it reinstalled Windows. I just carried the screwed up recovery partition forward.
So now it’s decision time. In some ways, this system could be a ticking time bomb, but at least I know the Surface Recovery media works, mostly. Or I could download the Windows 11 on Arm ISO and reinstall that way, and that would let me pave the full disk, not just the C: drive, and thus I would get a new recovery partition that should work. I have to admit I’m a bit curious about that.
But I will leave that for another day. For now, I want to explain what I did right. This doesn’t happen very often, so it’s triggering an unusual feeling inside.
And it goes like this. I did everything right. And because I did everything right, I didn’t lose any data.
I’ve written many times about how I do things, for example in Roll Your Own Windows Time Machine (Premium), but one of my key behaviors with Windows is that almost everything I do is synced to the cloud, meaning OneDrive or Google Drive these days. I do a bit of scratch work on the desktop, which is not synced, and so there is always the small chance I could lose something. But the book work, everything I write for the site, and my coding projects are all synced to the cloud. If I lose a PC, fine. But I will not lose my data.
This time, however, I also had the forethought to just back up whatever it was that was on the desktop. It wasn’t anything super important, but there was no reason not to do it. So before I rebooted into what I thought would be the WRE that first time, I copied all those files to a Desktop folder on two different USB keys. And then, since I ended up using the Mac to write a few articles, I copied them from one of the USB keys to the Mac desktop too.
You know, just in case.
And in doing all that, yes, I lost most of an afternoon. And yes, I didn’t actually fix the problem, that’s something I still need to figure out. But I also didn’t lose any data. Not one byte. And that, folks, is a good feeling. A happy feeling. And I feel like I need that more often.

Gain unlimited access to Premium articles.
With technology shaping our everyday lives, how could we not dig deeper?
Thurrott Premium delivers an honest and thorough perspective about the technologies we use and rely on everyday. Discover deeper content as a Premium member.