The WinForms Notepad Project: File Save and a Stub Status Bar (Premium)
- Paul Thurrott
- Oct 28, 2019
-
10
As this project has evolved, I’ve been testing out individual features I intend to add to the Notepad clone in isolation. On the Surface Pro 7, which I’ve been using most recently, for example, there are Visual Studio projects related to saving a text file, Task Dialog (which I’ve shelved for now), the status bar (not yet implemented), zoom (not yet implemented) and an About Box (also not implemented). When these features seem to work correctly, I add them to the master version of the project, which is on the Surface Book 2.
Obviously, manipulating text files is job one for any Notepad clone. I originally implemented the opening half of that equation using the StreamReader object, but changed to a more efficient method using the File object thanks to a reader suggestion. So I scrapped my original StreamReader-based approach to saving a text file and switched to the File object there as well.
If you think about how Notepad works, the Save and Save As operations come up quite a bit, and in different ways. If you start with a blank document and type CTRL + S (or choose File > Save), you’ll be prompted to provide a filename and path using a system Save As dialog box. But if you’ve previously saved the document, this will just save it again with no prompting. Likewise, you’ll be prompted to save if you have an unsaved document (or a saved document with unsaved changes) and try to close the application. Save As has its own permutations as well. And we have to try and address all of them.
Let’s start with the menu items related to saving. Our application currently has only two items in the File menu, Open and Exit, and if you look at the real Notepad’s File menu, you’ll see that it has both Save and Save As and that each has a keyboard accelerator. So let’s add those first.
Adding menu items inside of a menu is a little bit tedious, especially in this case. In Visual Studio, display Form1.vb [Design], open the File menu in our application, and then select and right-click the separator above the Exit item. Then, select Insert > MenuItem.

A new menu item named ToolStripMenuItem1 will appear below Open and above the separator.
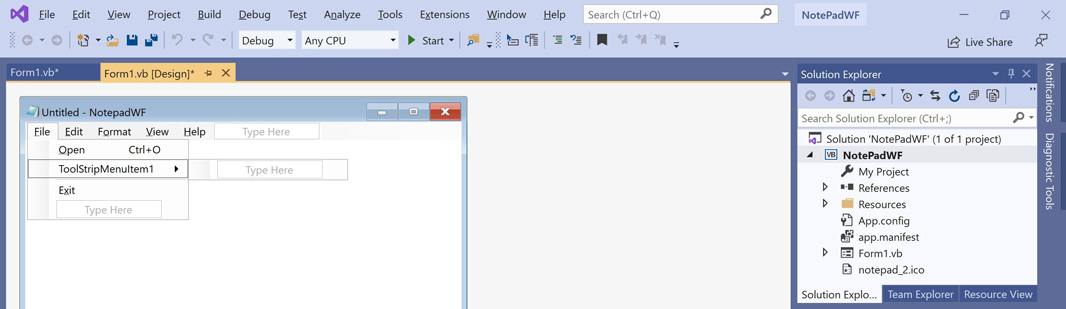
Now, repeat the same process again to add a second new menu item, which will be named ToolStripMenuItem2 and will appear under ToolStripMenuItem1.

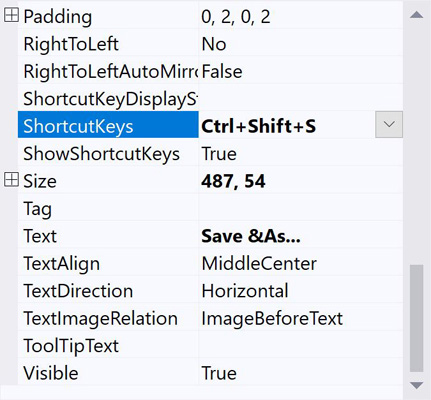
Selecting each new menu item in turn, use the Properties pane to change the name of ToolStripMenuItem1 to SaveToolStripMenuItem, and change ToolStripMenuItem2 to SaveAsToolStripMenuItem. You will need to change the Text property of each (to “&Save” and “Save &As…”, respective, with no quotes). And you will need to change the ShorcutKeys property for each: CTRL + S for SaveToolStripMenuItem and CTRL + SHIFT + S for SaveAsToolStripMenuItem.
We also need to add a SaveFileDialog object to our project. With Form1.vb [Design] displayed, find SaveFileDialog in the Toolbox and double-click it to add it.

With that bit of UI work out of the way, let’s look at the code in Form1.vb. We currently set the value of the form’s TextHasChanged property to False in the form’s Load event handler. Let’s keep the event handler, since we’ll need it later. But delete that line of code inside it.
Now, scroll up to the top of Form1.vb. There, you’ll see our property declaration:
Public Shared Property TextHasChanged As Boolean
Change this to read like so:
Public Shared Property TextHasChanged As Boolean = False
That’s a nice little efficiency where we apply a starting value at application creation time (when the application starts) rather then when the form loads. And we’ll use this style again because we need to create another property that will track the name of the document that’s currently loaded in our application. If there’s no document loaded, or the user hasn’t saved one yet, it will be an empty string. Otherwise, it will be the literal filename of the document.
So add the following line below the one you just edited:
Public Shared Property DocumentName As String = ""
We’re going to be checking the value of DocumentName at various times. But first, we need to set this property to the filename of the document when we open it using the Open File dialog. That line of code will look like so:
DocumentName = OpenFileDialog1.Filename
To add this, locate the OpenToolStripMenuItem_Click event handler. And in the Try block, below the line that reads TextHasChanged = False, add that line of code. That event handler should now look like this:
Try
    TextBox1.Text = File.ReadAllText(OpenFileDialog1.FileName)
    Me.Text = OpenFileDialog1.SafeFileName + "- NotepadWF"
    TextHasChanged = False
    DocumentName = OpenFileDialog1.FileName
Catch ex As Exception
    MessageBox.Show("Something happened.")
End Try
OK. Let’s start thinking about how the Save command works. If the user selects File > Save or types CTRL + S, they explicitly intend to save what they’re working on. If it’s a new document, we will need to display a Save As dialog and go through that process. But if it’s an existing, previously-saved document, we simply need to save it without any prompts. This is a destructive process: Whatever is saved will overwrite whatever was in that file before.
With Form1.vb [Design] displayed, double-click the Save menu item to display its Click event handler. Here, we need to check whether DocumentName is empty (meaning that there’s no document name). If it is, we will pass it off to the Save As event handler. And if it isn’t—that is, the document file already exists—we’ll just save the file, overwriting the old version.
There are a couple of different ways to handle this. But what I came up with is the following code, which should be added to the SaveToolStripMenuItem_Click event handler:
If DocumentName <> "" Then
    System.IO.File.WriteAllText(DocumentName, TextBox1.Text)
    TextHasChanged = False
    Me.Text = Me.Text.Replace("*", "")
Else
    ' Call SaveAs event handler
End If
In other words, if there is a document loaded, just save it, in this case using the File object. And then set TextHasChanged to False, and remove the “*” from the form’s title bar since we’ve saved the changes. (The Replace method replaces the text indicated by the first argument with that from the second argument; so we’re replacing the “*” with an empty string.)
If you test this now, open an existing text file, and make an edit and then save it, it should work as expected: The text document you opened will be saved correctly (with whatever changes) and the application’s title bar will lose the “*” because there are no pending changes to worry about anymore.
Now we need to figure out the Save As bit.
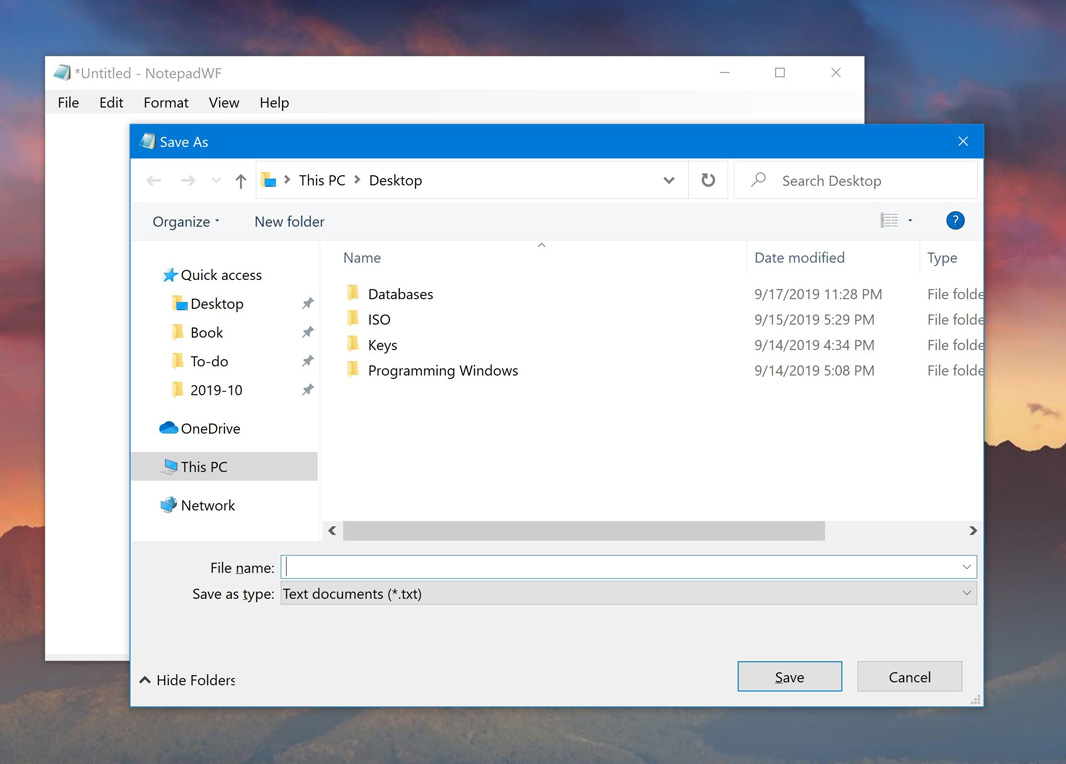
In this case, the user selects File > Save As (or types CTRL + SHIFT + S), so they explicitly intend to save what they’re working on as a new file. (Or, they’re working on a new document and select File > Save or type CTRL + S.) Whatever they do, they’re going to display a Save As dialog box. So we need to create two event handlers. One for the Save As menu item. And one for the Save As dialog’s FileOk event, which happens when the user clicks OK in that dialog. (If they click Cancel, nothing happens, so we can just ignore that.)
First, display Form1.vb [Design] and double-click the Save As menu item to display the SaveAsToolStripMenuItem_Click event handler. In this event handler, add the following line of code:
SaveFileDialog1.ShowDialog()
We should also handle the empty Else clause in our SaveToolStripMenuItem_Click event handler. Change that commented out line to the following:
SaveAsToolStripMenuItem_Click(sender, e)
All this does is call SaveAsToolStripMenuItem_Click, which will, in turn, display the Save As dialog, and we pass along the same arguments we received, not because we’re going to use them but because they’re required.
OK, open Form1.vb [Design] again and select SaveFileDialog1 in the list of objects at the bottom of the designer. Now, make the following property changes using the Properties pane so that the dialog is configured for text files:
DefaultExt. txt
Filter. Text documents (*.txt)|*.txt
Now, double-click SaveFileDialog1 in the list of objects at the bottom of the designer to display its FileOK event handler. Here, we need to save the document when the user has created a filename and, optionally, a location, and has clicked OK. (We don’t need to worry if the file already exists because SaveFileDialog1’s OverwritePrompt property is set to True by default and the dialog will do this work for us.) We also need to do some housekeeping for our app by setting TextHasChanged to False and fixing the main form’s title bar text. Here’s what I came up with for the body of this event handler:
Try
    DocumentName = SaveFileDialog1.FileName
    Me.Text = System.IO.Path.GetFileNameWithoutExtension(DocumentName) + "- NotepadWF"
    TextHasChanged = False
    System.IO.File.WriteAllText(DocumentName, TextBox1.Text)
Catch ex As Exception
    MessageBox.Show("Something happened.")
End Try
To test this properly, you’ll want to try all the different permutations of Save and Save As and make sure that files are saving correctly and that the application UI is updated accordingly (removing the “*” from the title bar text when saved, for example). Be sure to test the File > Open event handler as well, since we updated that to accommodate our new property.
I believe it correctly handles each scenario, but it’s possible I lost something in the transition from my test machine to the master project. If you find a coding error or another mistake here, I’m obviously all ears and will fix it accordingly.
Whew.
At this point, our Notepad clone is pretty much providing all of the core functionality of the real thing. But if you scan through the various menus in Notepad, you’ll see there are a lot of small features to add. And we also need to think about that status bar. It’s been bugging me.
Unfortunately, based on what I’ve worked on so far, it’s not clear that we can implement most of the status bar fields from the real Notepad in our Notepad because Microsoft doesn’t provide some of those features in the TextBox control we’re using. If we had chosen a RichTextBox instead of a TextBox (which, yes, we did originally), we could very easily display the current position of the caret (or what some probably think of as the cursor; the place where the next character will be entered when typed by the user). And we could likewise very easily implement text zoom too. But the TextBox we’re using doesn’t support either feature, so we’d need to do some serious work or otherwise improvise.
As for the other two fields, which read as “Windows (CRLF)” and “UTF-8” in my copy of Notepad, these are related to the formatting and encoding used by the text document loaded into the application. They will almost always read as these values (at least for me) and adapting our application to handle other formatting and encoding types is probably a bit much to ask. You never know.
That said, I still want to add the status bar, mostly because I think I can come up with a useful workaround for the zoom value. And for now, we can simply hard-code each field and then adjust them later. And it is always possible that we’ll go back to the RichTextBox control we originally started with and can more easily implement the status bar correctly in the future. This whole thing is a learning process, after all.
For now, let’s just make the status bar look like the one in Notepad. This is a little bit tricky because the fields are pushed over to the right for some reason: There’s a lot of empty padding on the left side of this control. There’s also what appears to be an arbitrary amount of padding to the right of the label in each of the fields.
![]()
To get started, display Form1.vb [Design] and select StatusStrip1 at the bottom of the form window. When you do, it expands a bit to display an Add Field button and dropdown. (That dropdown lets you choose non-label controls, but all we need is labels.)
Add five labels to StatusStrip1 by clicking that Add Field button five times in turn. (You may have to resize the form window to do this.)
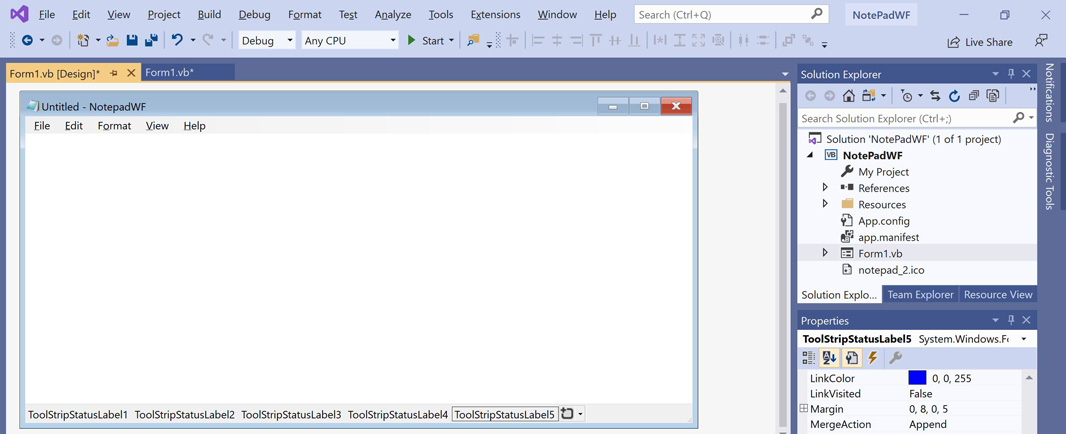
Now, multi-select the five labels (using CTRL + click). In the Properties pane, change the TextAlign property to MiddleLeft. Doing so will change this property for all five labels at once.
Next, select ToolStripStatusLabel1 and then change its Spring property to True and its Text property to [empty] by deleting the text that’s there. As you can see, that field now expands to occupy all of the available space to the left of the other fields. Nice.
Now, multiselect ToolStripStatusLabel2, ToolStripStatusLabel3, ToolStripStatusLabel4, and ToolStripStatusLabel5, and then set their BorderSides properties to Left. This will create a nice divider between each label.
I experimented with padding each field so that they behave like the corresponding fields in Notepad when you resize the window and hide the fields, but I couldn’t replicate this. Perhaps someone knows the solution to that problem. But for now, let’s just add spacing with literal spaces in each label’s Text property, as follows. As always, without the quotes.
ToolStripStatusLabel2.Text. “Ln 1, Col 1 ”
ToolStripStatusLabel3.Text. “100% ”
ToolStripStatusLabel4.Text. “Windows (CRLF) ”
ToolStripStatusLabel5.Text. “UTF-8 ”
I can hear the howls of protest already at this inelegant solution. But I used hard-coded Size properties and still couldn’t get the resize functionality I expected, so this will do for now.

The result, of course, looks like Notepad but it’s a lie: None of those status bar labels corresponds to anything. But we’ll change that later. Our status bar will eventually do something useful, even if it’s not quite the same as what Notepad provides.
More soon.

Gain unlimited access to Premium articles.
With technology shaping our everyday lives, how could we not dig deeper?
Thurrott Premium delivers an honest and thorough perspective about the technologies we use and rely on everyday. Discover deeper content as a Premium member.