The WPF Files: The End is Near (Premium)
- Paul Thurrott
- Mar 07, 2020
-
18

I’m delighted—and more than a bit surprised—to discover that I’m almost done porting .NETpad to WPF and .NET Core. Honestly, I had expected this to drag out for another month or so, but I’ve made rapid progress.
Which is nice: I spent way more time on the original Windows Forms version of .NETpad than expected, though that project was also more successful than expected, and I did create two versions, one in Visual Basic and one in C#. Also, I’m eager to move on to even more modern frameworks and technologies.
My work porting .NETpad to C# earlier no doubt helped with this transition to WPF and .NET Core: Adding a third variable would no doubt have been disastrous. But I was still a bit surprised by how quickly I was able to plow through some of the functionality that I figured would be problematic. And some early setbacks—like the fonts issue I previously complained about—were quickly put aside.
Here, I’ll provide a few code comparison examples between the C#/Windows Forms/.NET Framework and C#/WPF/.NET Core versions of .NETpad. I realize the previous article was a bit code light—where the one before that was code-heavy, but without much in the way of context—but I’ve become so taken by the power of XAML that I just wanted to especially share that part of it.
And that, really, speaks to my evolving view of how I can handle these frameworks as I move forward. I originally figured that I’d write a different standalone app in WinForms, WPF, UWP, and whatever else I end up covering. But for the short term, adapting this existing and fully-functional app to each framework is perhaps the more interesting approach. Over time, of course, that will just become tedious. But as I noted in the previous article, embracing the special something that is central to each framework is appealing. And having an app to build off of eliminates some busy work and helps me get right to that.
For WPF (and UWP, I think), that special something is primarily XAML. And where creating custom dialogs in WinForms was both time-consuming and error-prone, doing so in WPF (and, I assume UWP) is almost fun. And since writing that previous article, I have created two more dialogs in XAML for the WPF version of .NETpad.
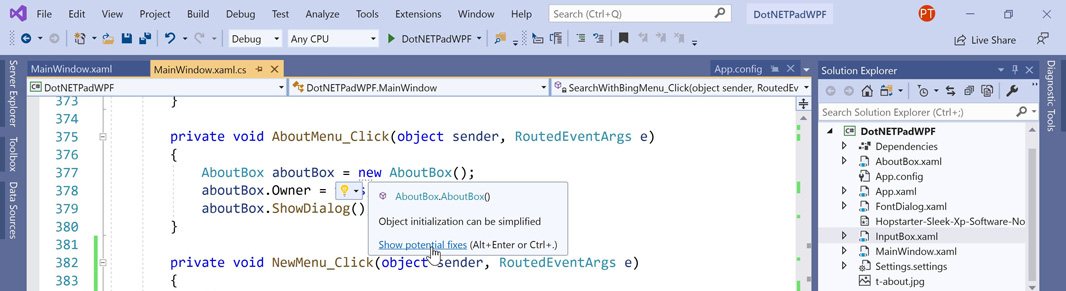
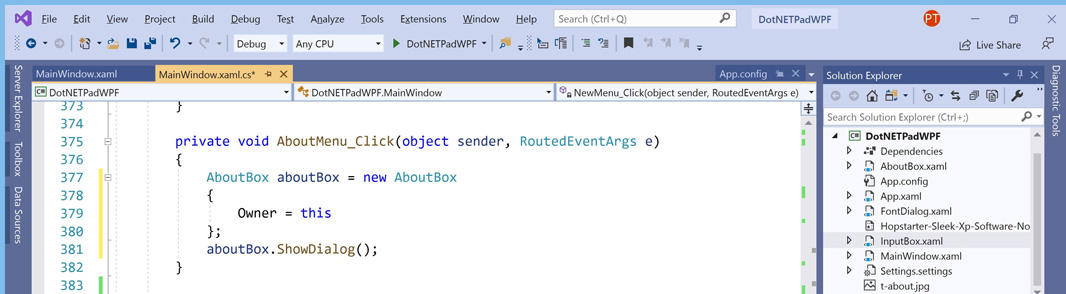
The first is the About box. Yes, you can add the WinForms About box, but as is the case with the Fonts dialog, I like the idea of creating a resolution/scaling-independent version myself. Plus, it was easy.
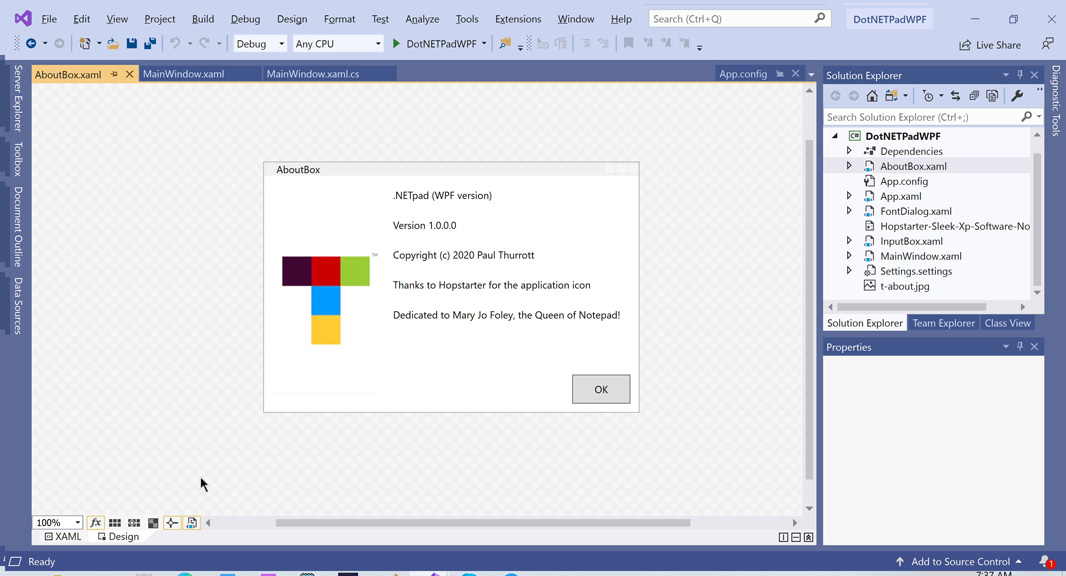
The only thing missing here is a bit of styling on the background, which should match the standard application background color (that is, not just be white); the text is programmatically updated at runtime.
The second is an Input box, which is used in several places in .NETpad—Find, Replace, and Replace All, for example—which was required because real InputBox is apparently unique to Visual Basic.
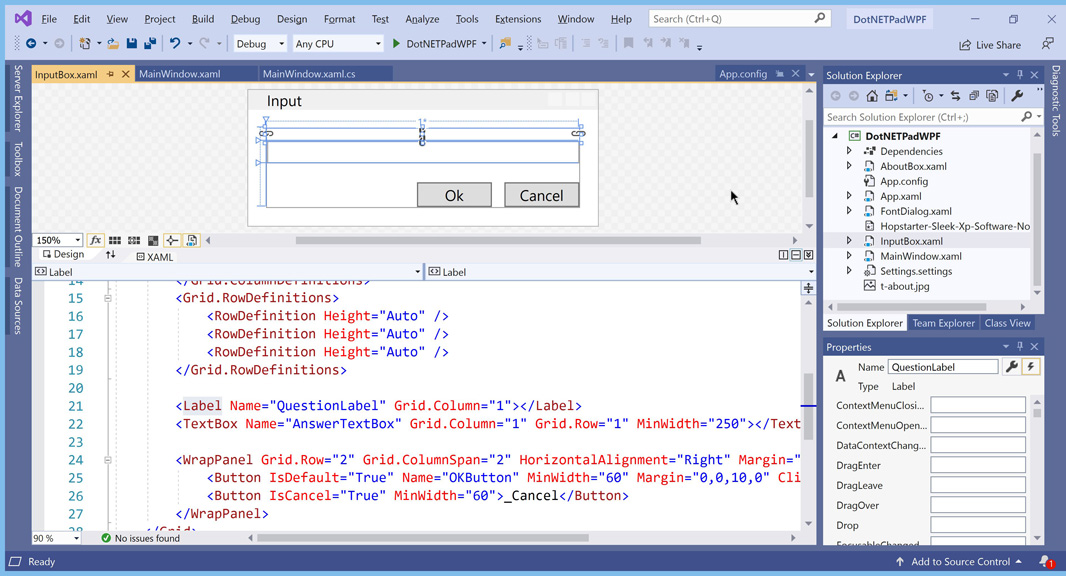
This one is cool because you can dynamically change the window title and (what I call the) QuestionLabel text each time you need it, and it can thus be easily reused just like the real InputBox.
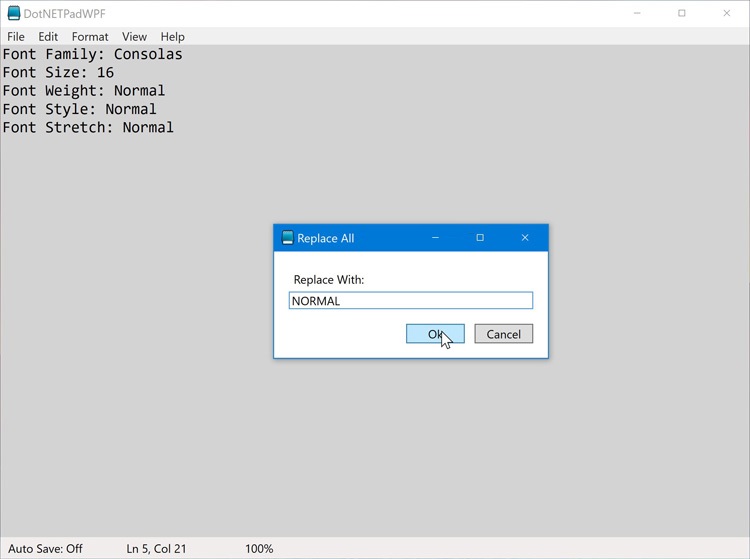
Let’s look at an example. Here’s my code for the Replace All menu item’s click event handler. This one uses two Input boxes.
private void ReplaceAllMenu_Click(object sender, RoutedEventArgs e)
{
    InputBox inputBox = new InputBox();
    inputBox.Title = "Replace All";
    inputBox.QuestionLabel.Content = "Find what:";

    inputBox.ShowDialog();
    FindTextString = inputBox.AnswerTextBox.Text;

    InputBox inputBox2 = new InputBox();
    inputBox2.Title = "Replace All";
    inputBox2.QuestionLabel.Content = "Replace With:";

    inputBox2.ShowDialog();
    string ReplaceWith = inputBox2.AnswerTextBox.Text;

    FindTextIndex(0, false);

    if (FindLastIndexFound > -1)
    {
        string NewText = Strings.Replace(TextBox1.Text, FindTextString, ReplaceWith, 1);
        TextBox1.Text = NewText;
    }
    else
        MessageBox.Show(this, "Cannot find " + (char)34 + FindTextString + (char)34,
}
When the user selects Edit > Replace All, we create a new Input box and populate the dialog’s title and QuestionLabel accordingly.

When the user selects OK, a second Input box displays, again with customized dialog title and QuestionLabel values.
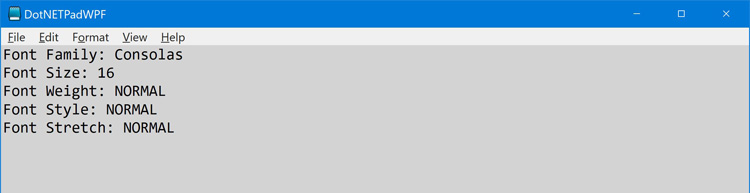
And when the user selects OK here, we call our two custom methods—which you’ll recall a reader created for me in Visual Basic; I reimplemented them in C#—and replace any instances of the text entered in the first Input box with the text entered in the second.
There are all kinds of things not happening here, including error-checking. If the user cancels out the first Input box, the second one still appears, for example. But I’m purposefully racing ahead here and trying to get a “quick and dirty” version of this up and running as completely as possible in WPF. Fit and finish work is also occurring as I go.
Much of the work in this app requires me to make changes that occurred when Microsoft transitioned to WPF—around 2006 or so, I guess—and to .NET Core, which is happening as we speak. In each case, there are new capabilities, of course. But some capabilities from the past go missing, too. Or at least change.
Consider something that was very simple in VB/WinForms: Edit > Search with Bing. In the VB/WinForms version of this Click event handler, I just checked to see if there was selected text. If there was, I searched Bing for that text. Otherwise, I just displayed the Bing website.
If TextBox1.SelectedText <> "" Then
    Process.Start("https://www.bing.com/search?q=" + TextBox1.SelectedText)
Else
    Process.Start("https://www.bing.com")
End If
You can’t do this anymore in .NET Core because of some kind of process elevation prevention. Googling it, I found a workaround on GitHub and changed my code accordingly.
private void SearchWithBingMenu_Click(object sender, RoutedEventArgs e)
{
    if (TextBox1.SelectedText.Length >= 0)
    {
        ProcessStartInfo processStartInfo = new ProcessStartInfo
        {
            FileName = "https://www.bing.com/search?q=" + TextBox1.SelectedText,
            UseShellExecute = true
        };
        Process.Start(processStartInfo);
    }
    else
    {
        ProcessStartInfo processStartInfo = new ProcessStartInfo
        {
            FileName = "https://www.bing.com",
            UseShellExecute = true
        };
        Process.Start(processStartInfo);
    }
}
There are a couple of subtle things here I find interesting, and I’ve used both throughout the app.
In the VB version, I checked to see whether any text was selected by seeing whether the selected text was an empty string (and thus is empty; that is, there is no selected text):
If TextBox1.SelectedText <> "" Then
The C# compiler really doesn’t like this kind of comparison. And it recommends checking the length of the selected text instead. The result is the same, of course, but the change looks like so:
if (TextBox1.SelectedText.Length >= 0)
The other is a nice C# code simplification recommendation. See this code?
ProcessStartInfo processStartInfo = new ProcessStartInfo
{
    FileName = "https://www.bing.com/search?q=" + TextBox1.SelectedText,
    UseShellExecute = true
};
I would normally write that like so:
ProcessStartInfo processStartInfo = new ProcessStartInfo();
processStartInfo.FileName = "https://www.bing.com/search?q=" + TextBox1.SelectedText;
processStartInfo.UseShellExecute = true;
But C#/VS recommends the former style, and I like its readability. The only time I don’t use it is when there’s only a single property involved. Here, for example, you can see how Visual Studio/C# recommends simplifying the code:
But I just don’t like the resulting change:
So I usually just ignore those suggestions unless there are two or more property changes.
Elsewhere, I just made small improvements because time has moved on and I’m noticing little things I’d like to change. Consider File > Insert Time/Date. In the VB/WinForms version of the app, the Click event handler for that command looked like so:
TextBox1.SelectedText = Now.ToShortTimeString + " " + Now.ToShortDateString
Nice and simple. But in the WPF version, I noticed that the selection caret was left at the beginning of the inserted time/date. So I added some code to move it to the end.
private void TimeDateMenu_Click(object sender, RoutedEventArgs e)
{
    // Obtain the time/date, insert it, move the selection point to the end
    System.DateTime now = System.DateTime.Now;
    TextBox1.SelectedText = now.ToShortTimeString() + " " + now.ToShortDateString();
    TextBox1.SelectionStart += (now.ToShortTimeString() + " " + now.ToShortDateString()).Length;
    TextBox1.SelectionLength = 0;
}
And yes, I’m also commenting my code finally.
Anyway, hopefully, that gives you a flavor of where it’s at. Looking at the available commands, New Window is proving to be a tough nut. I may need to remove File > Page Setup, but Print is working and just needs some code cleanup. I believe everything in the Edit menu works, which is incredible since that’s all the hard stuff. Everything in Format, View, and Help works. There’s a lot of fit and finish to do. But it’s pretty much all there. I figure I’ll be done working on this within the week. And then I can move on to UWP.

Gain unlimited access to Premium articles.
With technology shaping our everyday lives, how could we not dig deeper?
Thurrott Premium delivers an honest and thorough perspective about the technologies we use and rely on everyday. Discover deeper content as a Premium member.