Task Manager (Archived)
- Paul Thurrott
- Oct 05, 2022
-
1
Task Manager is a powerful system utility that provides task management, startup application management, and other advanced features. The version now found in Windows 11 has, of course, been simplified and so it is a bit prettier to look at but also a bit harder to use.

There are several ways to find and start Task Manager:
Taskbar context menu. If you right-click the Taskbar, you will see a “Task Manager” item in the context menu that appears.
Keyboard shortcut. Type CTRL + SHIFT + ESC.
Quick access menu. Right-click the Start button to display the Quick access menu (or, type WINKEY + X) and then select “Task Manager.”
Search. Open Start, type task, and then select “Task Manager” from the search results. If you use this app enough, you should consider pinning it to Start or the Taskbar.
CTRL + ALT + DEL. Type CTRL + ALT + DEL and choose “Task Manager” from the short list that appears. This is actually the best way to start Task Manager because it works even if the Windows user interface is corrupt or unavailable.
Where did it go?
In previous Windows versions, Task Manager was displayed in a simplified view by default and you could click a “More details” link to see the full experience. But the simplified view is no longer supported in Windows 11, and there is no workaround. Instead, you will use the full Task Manager experience as God intended.
Get to know Task Manager
Task Manager previously provided a tab-based interface in which each of its main functional areas was available in its own tab. But this application was given a more modern look and feel in Windows 11 that uses a navigation bar on the left instead of tabs on the top. And so each functional area is now available via its own view.
The problem with this design is that each item in the navigation bar is represented by an icon instead of text, and so it is sometimes hard to tell which icon does what. You can expand the navigation bar to display the name of each area, but there is no way to pin it so it stay open: the next time you run Task Manager, the navigation bar will be collapsed again.

Not all of the design changes are bad: Task Manager now includes a command bar at the top that features commonly-needed commands related to the functionality provided by each view.
One command, Run new task, appears in the command bar of every view. This command is described later in the chapter.
The following views are available in Task Manager:
Processes. This default view is used to manage running apps and services, and it provides a high-level view of how your PC’s key resources are being utilized. We discuss this view in more detail in the section Use Task Manager to manage apps and processes below.
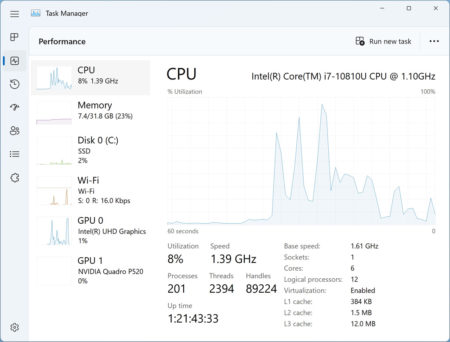
Performance. This view provides dynamic graphs displaying real-time statistics and and other information about the usage of the PC’s CPU, memory, disks, network connections, and graphics processors (GPUs). There’s no interaction to be had here. Instead, you can learn more about the hardware in your PC and how it’s being used.
App history. This curious view displays how much each of the apps installed on your PC has consumed certain resources over time.

By default, App history only displays Store apps. But you can include desktop apps and other processes in this view if you’d like: open Task Manager settings (the gear icon in the lower left of the app window) and then enable the option “Show history for all processes” (under “Other options”).

Startup apps. This view displays which apps have been configured to run automatically when the PC starts up and what impact each has on the startup speed. We discuss this view in more detail in the section Use Task Manager to determine which apps run at startup below.
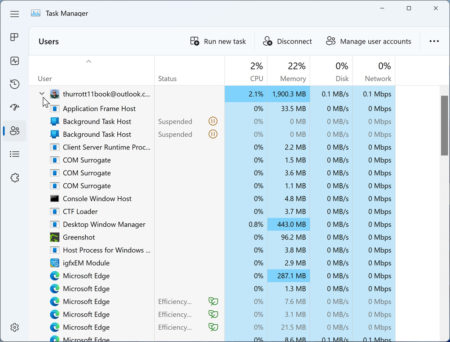
Users. This view is most useful when there are two or more people signed into Windows 11 simultaneously as it provides a peek at the processes running under each account. If this PC is used by a single person only, however, you can ignore the Users view.
Details. This view provides a detailed rundown of each process that is running on your system. But it’s interactive, too: Right-click any process to see a variety of actions you can take on that process.
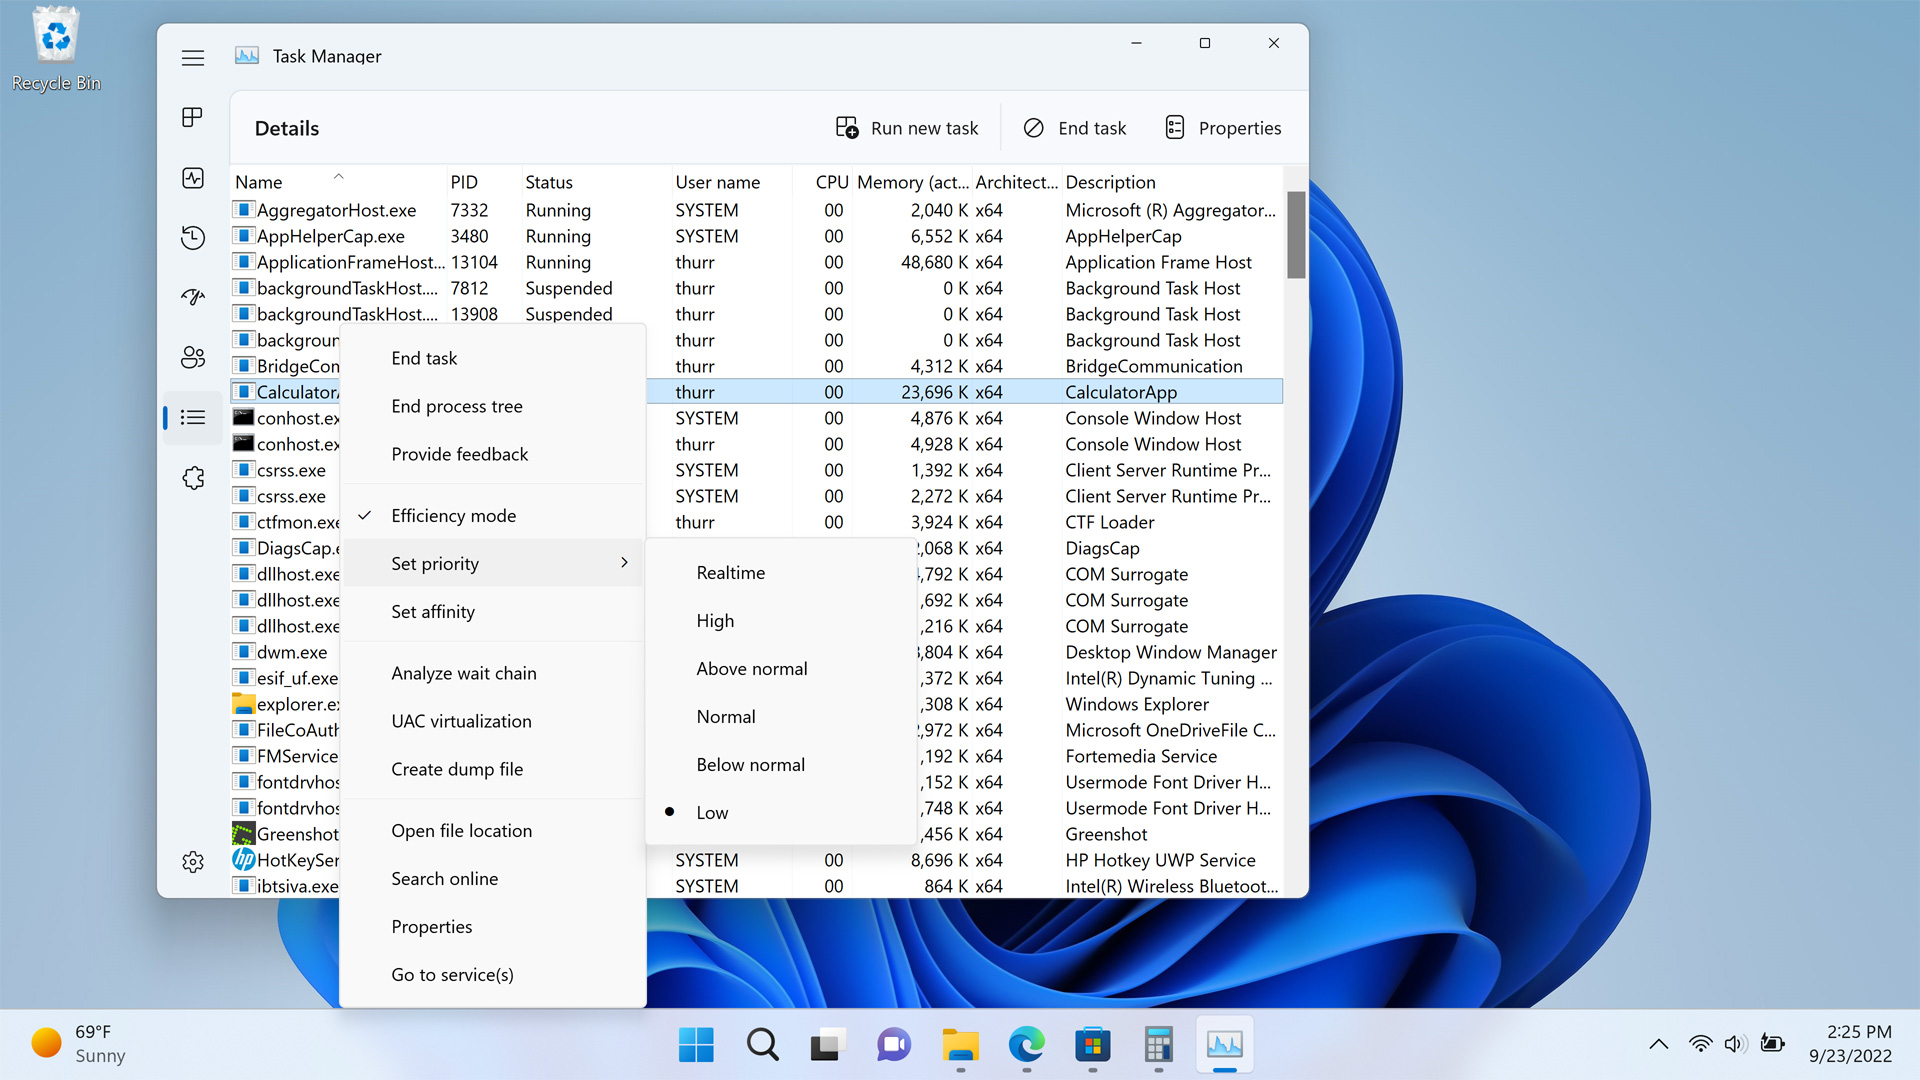
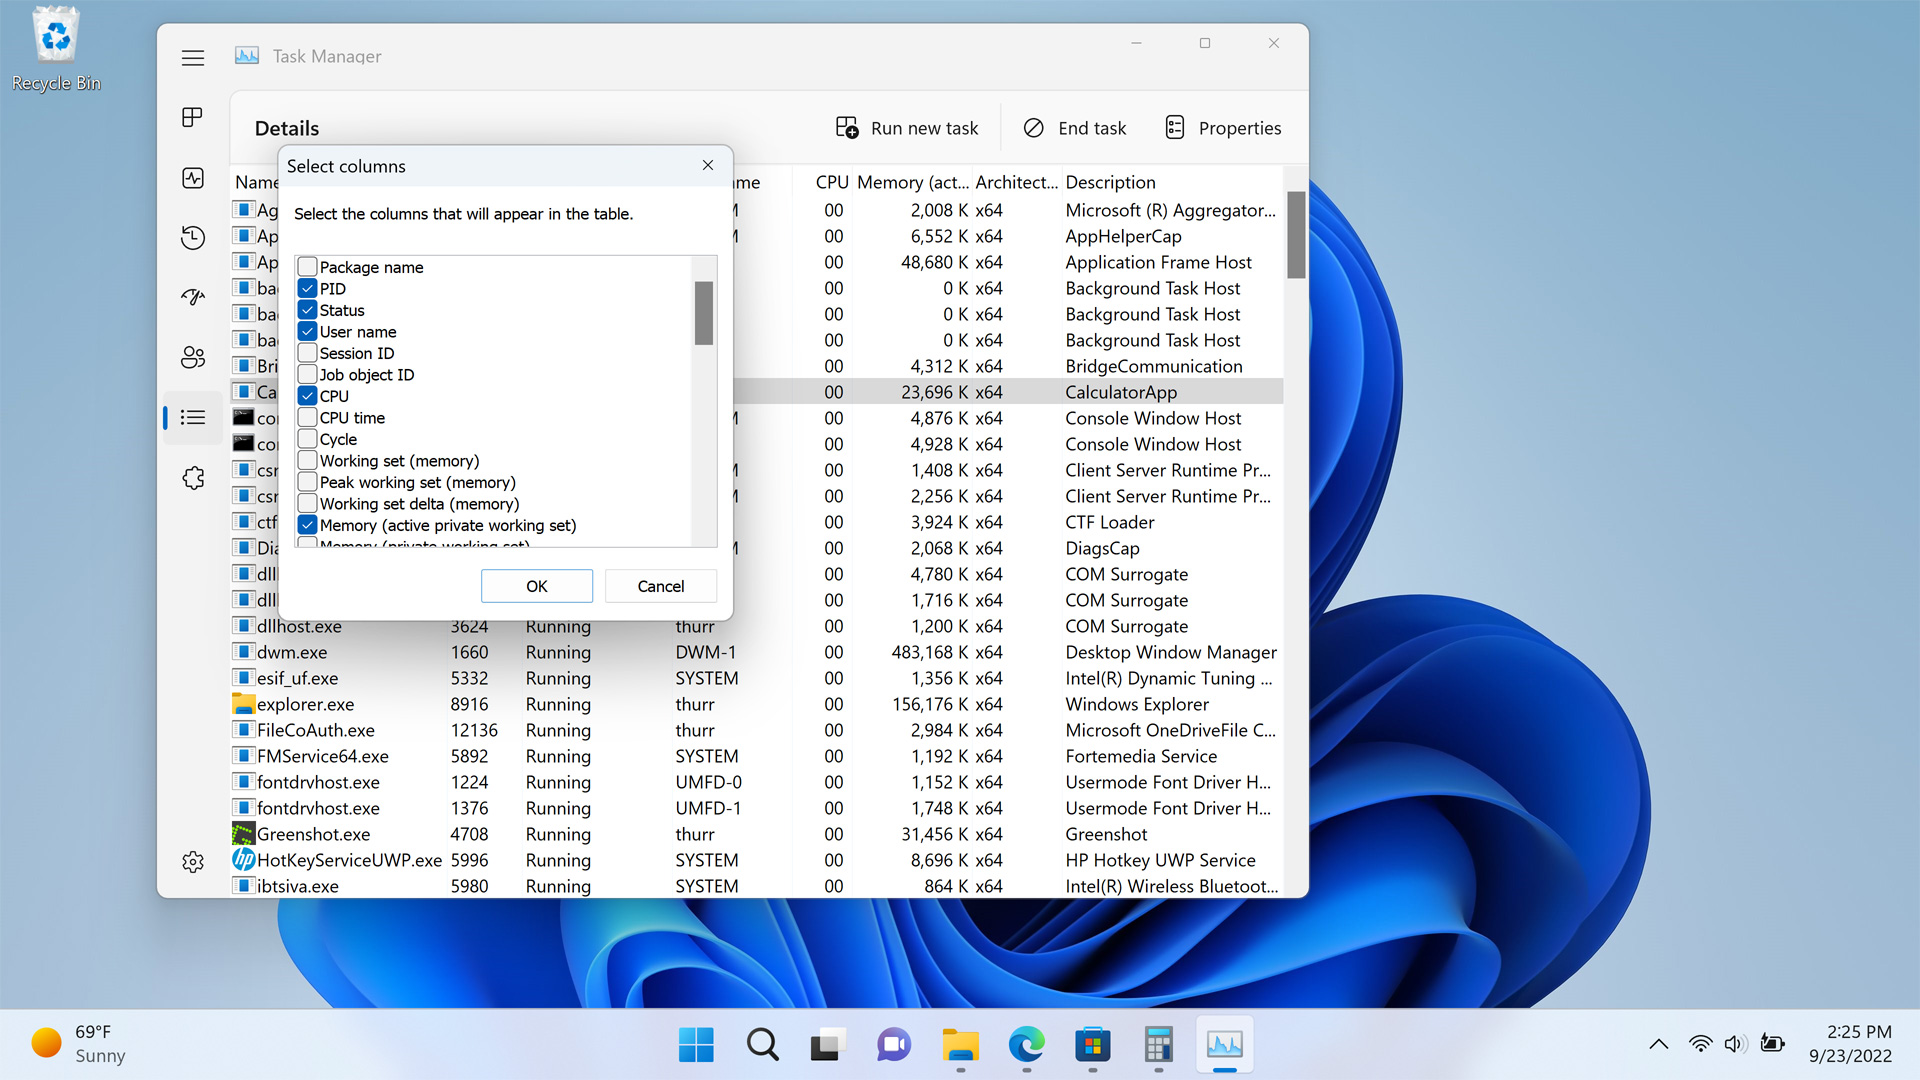
This view can get even more detailed: Right-click one of the column headers and select “Select columns” to enable a host of other information you can display about each process.
Services. This view allows you to see and configure the services that are available on your PC, that is, processes, provided by Windows and applications, that run in the background and do not require a user to be signed in. To see which actions are available, right-click a service in the list. The most common reasons to use this view are to start, restart, or stop a process.
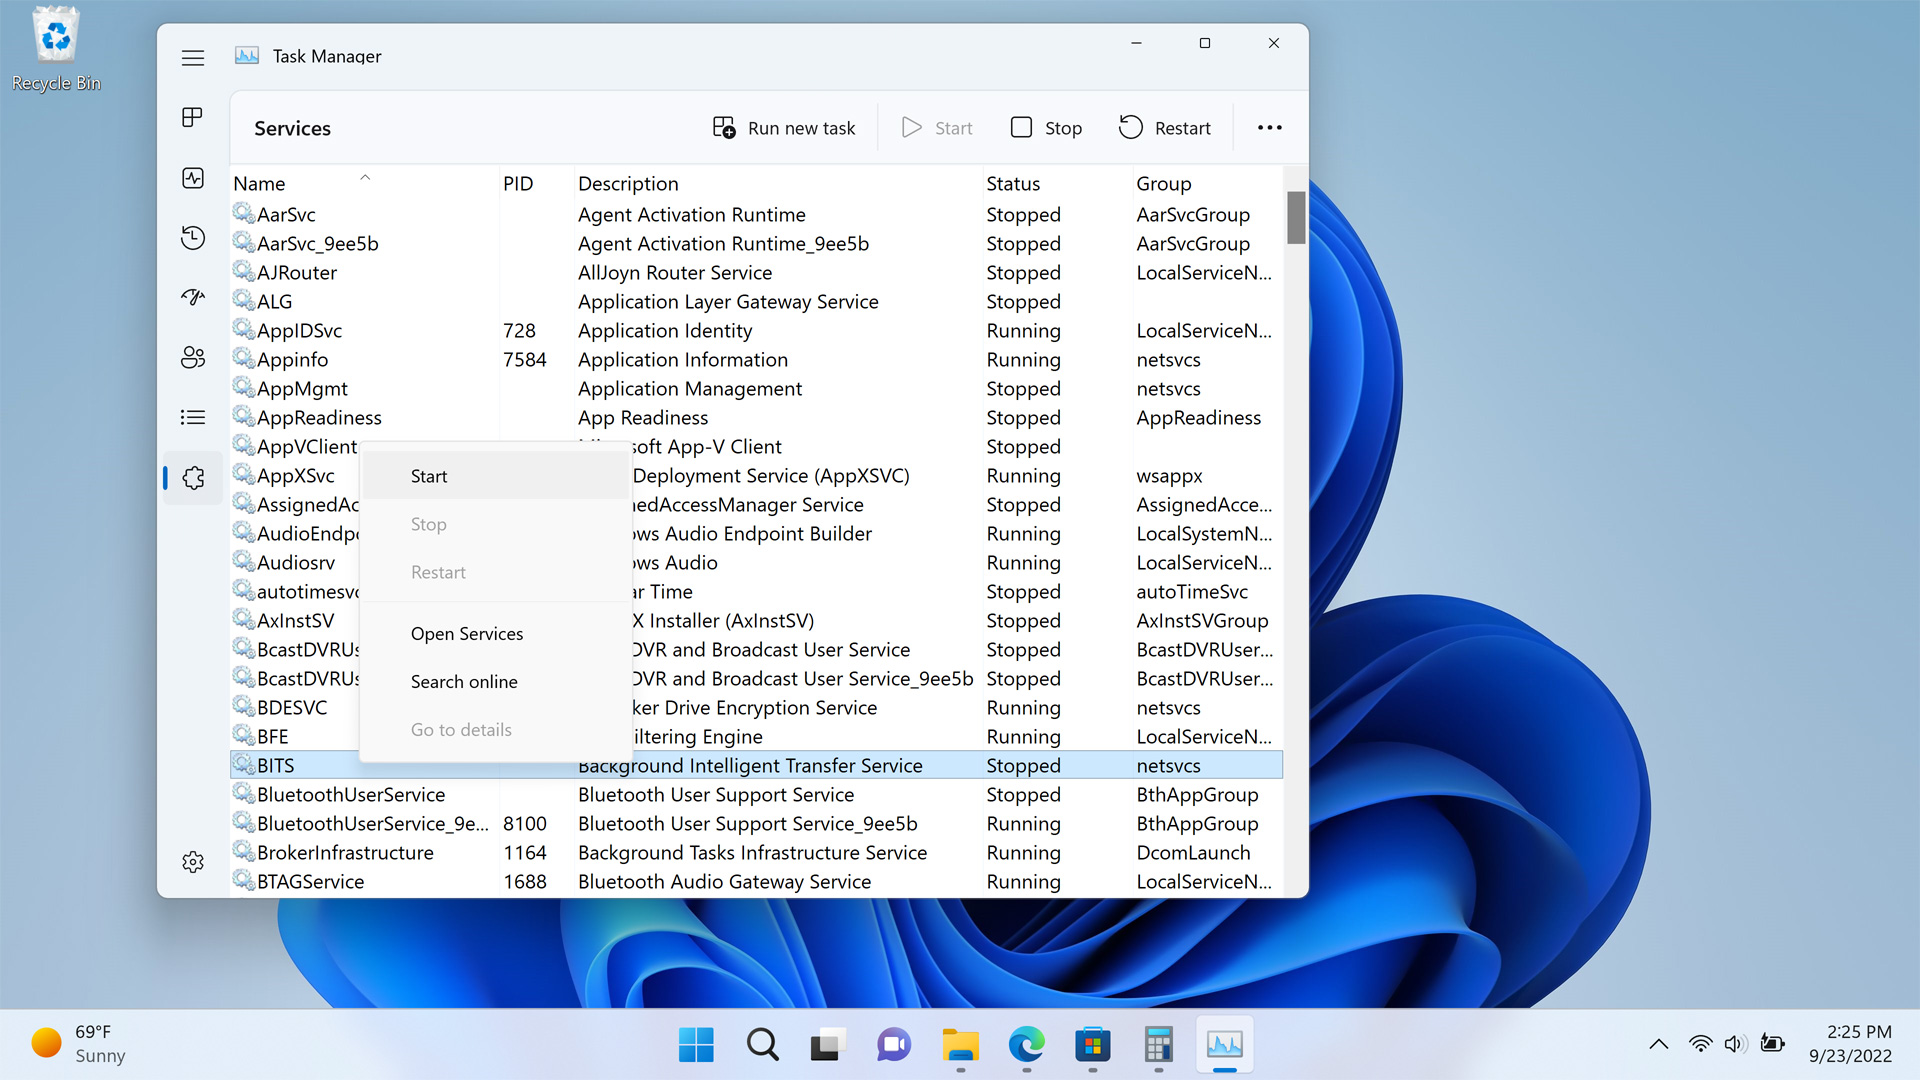
This view is nearly identical to a classic Windows Management tool that is also called Services. The classic version of Services is still available—you can find it with Search—but if you’re already viewing Services in Task Manager, just right-click a service and choose “Open Services.”
Use Task Manager to manage apps and processes
Task Manager is most often used because an app is behaving badly or the PC is performing slowly, and so it makes sense that Processes—which is used to manage running apps and processes—is the default view. Chance are, this is why you’re here in the first place.
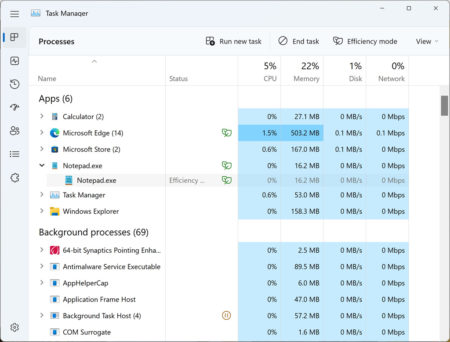
Processes provides a list of running processes—divided into Apps, Background processes, and Windows processes sections—and a columnar display that shows more information about each app and process, including a visualization of how many resources each is consuming.
By default, Processes shows a single informational column called Status and four resource columns: CPU, Memory, Disk, and Network.
Informational columns display—wait for it—information about each app or process. Here, you can see that the Media Player app has a pause icon in the Status column, indicating that it is a Store app that is going to sleep because it is not being used; the Microsoft Edge app, meanwhile, is displaying a leaf icon to indicate that it is using Efficiency mode to limit its processor utilization.
![]()
Resource columns are displayed using a simplified heat map to help isolate those apps and processes that are consuming a lot of a particular resource: the darker areas indicated higher than usual resource utilization. You can sort the display by selecting a column heading. For example, to display the apps and processes by memory utilization, select the Memory heading.

You can add many other columns to the Processes view, including informational choices like Type and Process name, and resource items like GPU and Power usage. (You can also remove any existing columns.) To do so, right-click anywhere in the column heading area and make your choices.
You can also change the resource utilization units that relevant resource item displays from raw values (the default) to percentage values. To do so, right-click anywhere in the heat map and choose Resource values > Memory/Disk/Network > Percents. (CPU utilization is only displayed in percents, so it’s not a choice here.)
Fix a badly behaving app or process
If you find an app or process that is over-utilizing one or more system resources, you can try to fix it using Task Manager. There are two general approaches, one of which only addresses CPU usage and one of which will fix any problem assuming you don’t mind its destructiveness.
Fix an app or process that is abusing the CPU
If you examine the Processes view and discover that an app or process is over-utilizing the CPU, you can try to run it (or, in the case of an app, one of its processes) in Efficiency mode, a new Windows 11 feature that throttles a process’s priority in the CPU and improves its energy efficiency.
To place a process in Efficiency mode, select it in the Processes view (if it’s an app, expand the app in the Name column and select one of its processes) and then click the Efficiency mode command bar button. (Or, right-click the process and choose “Efficiency mode” from the context menu that appears.)
A process running in Efficiency mode will display a green leaf icon in the Status column, as will its parent app if the process is part of an app.
The Efficiency mode options will sometimes by grayed out, indicating that throttling the process would negatively impact the system. Also, core Windows processes cannot be put into Efficiency mode.
You can disable Efficiency mode the same way you enabled it, and if you stop and rerun the app, it will no longer be in Efficiency mode.
Kill an app or process
Efficiency mode usually works well, but it can’t help if an app is over-utilizing non-CPU resources like RAM or disk access. Likewise, apps sometimes crash or hang and can’t be restored. In these cases, your only choice will be to take the drastic and potentially (data) destructive step of killing an app or process.
To do so, select the app or process and then click the End task button in the command bar. (Alternatively, right-click the app or process and chose “End task” from the context menu that appears.)
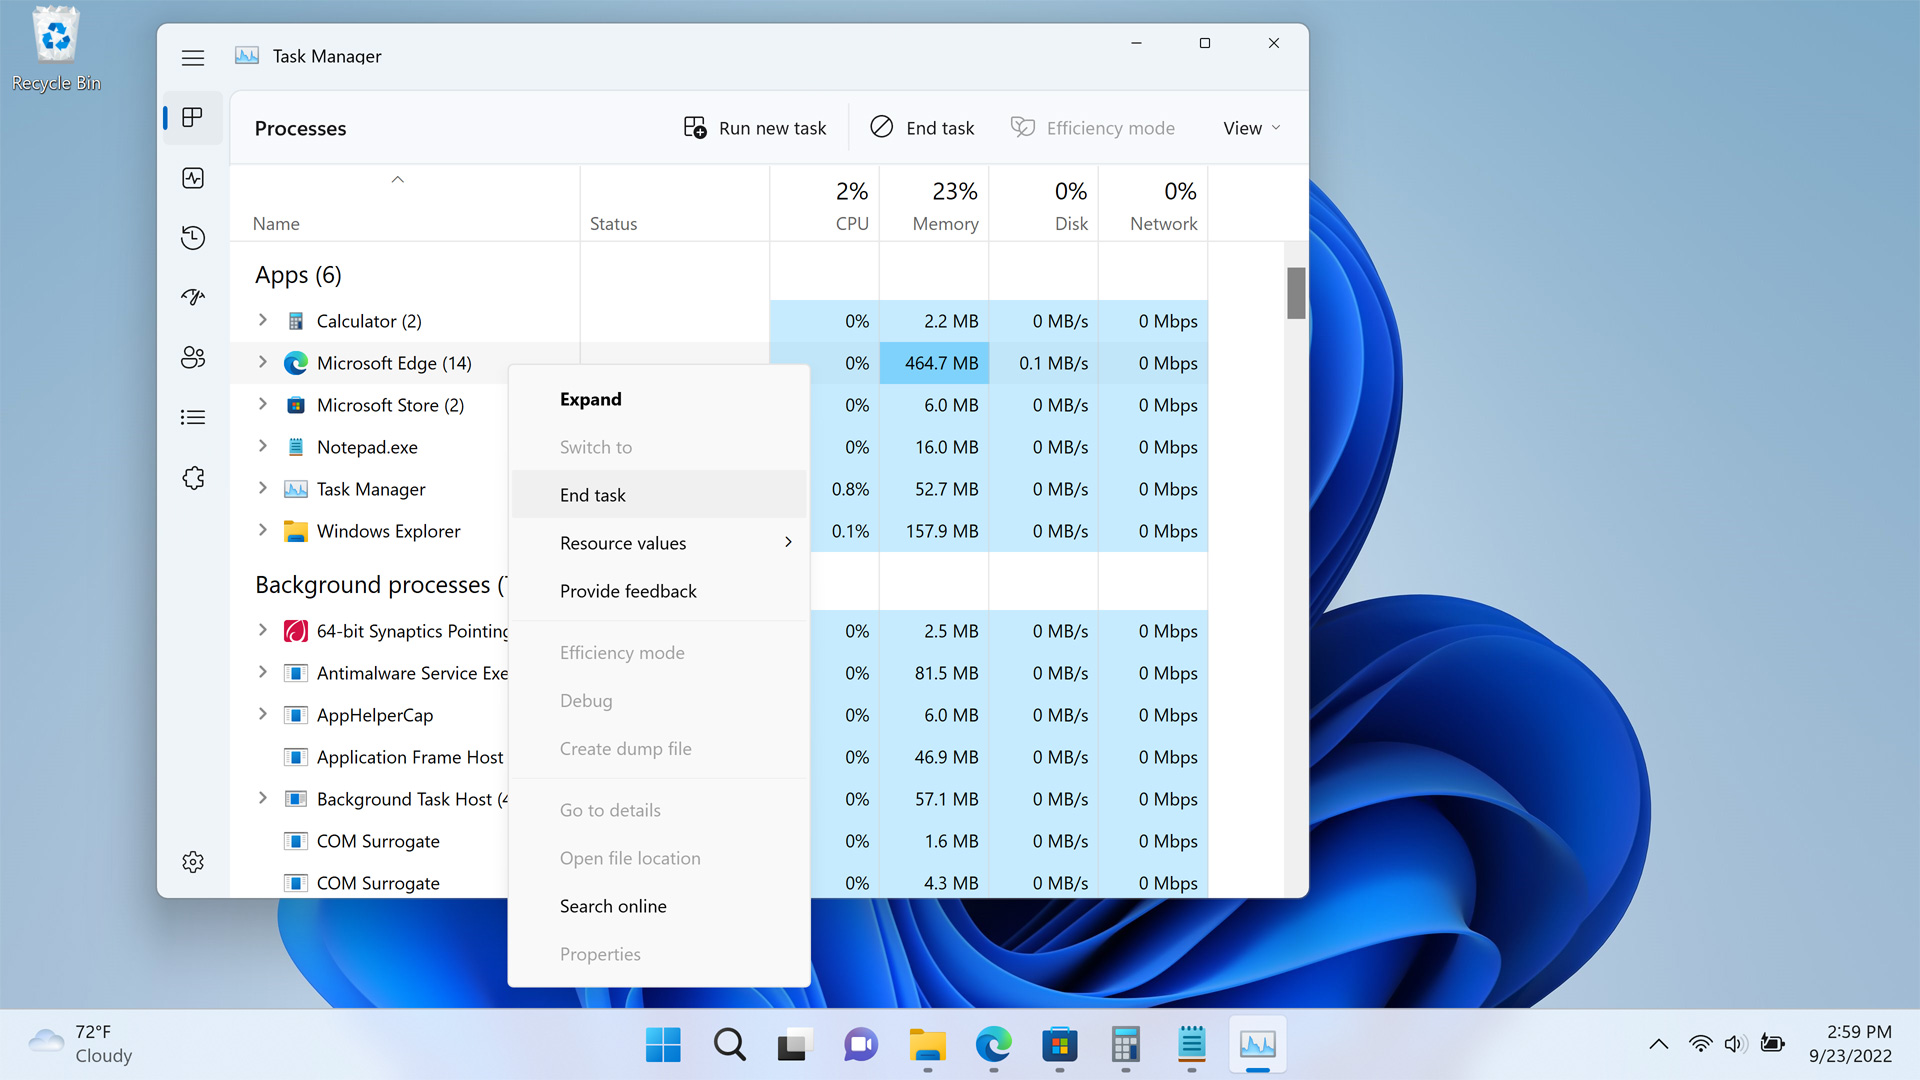
The app or process will be killed immediately, freeing up whatever system resources it was using.
Use Task Manager to determine which apps run at startup
Many of the apps on your PC—whether they’re included with Windows, installed by your PC maker, or installed later by you—will try to start automatically every time you startup. This slows the boot time, of course, but these apps also consume valuable system resources. So you should examine which apps are auto-starting each time your PC boots and prevent unnecessary apps from doing so. You do so using the Startup apps view in Task Manager.

What constitutes an unnecessary app will vary by person, and it’s not always obvious what some of the apps you see here even do. We recommend consulting with Google if you’re unsure of some of the items you will see here.
By default, Startup apps displays the list of apps that are configured to run automatically at startup alphabetically. But this list is easier to manage if you sort by Status; this places all of the apps that are enabled to run automatically together, while segregating all of the apps that have been disabled. When you make this change, you’ll have a better view of what’s really running each time your PC starts up.
To sort by Status, click the Status heading.
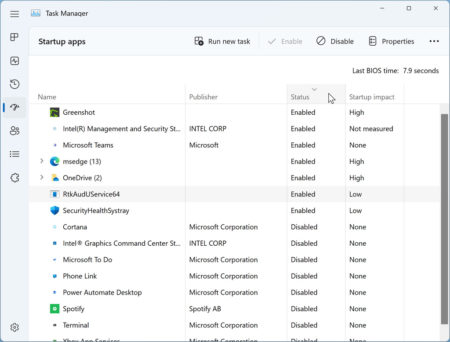
Now, consider each app that is in the Enabled group. If you find an app to disable—thus, preventing it from running when the PC starts up—select it and then click the Disable button in the command bar. (Or, right-click it and choose “Disable.”) When you make this change, the underlying app will move into the Disabled part of the list.
After making changes here, consider rebooting the PC as soon as possible.
Use Task Manager to run a new task
For the most part, it makes sense to use Start search to find and run apps that aren’t pinned to Start or the Taskbar. But Windows has always offered other ways to do this, including some that predate Start search.
For example, you can use the Run app—easily found via Start search or by typing WINKEY + R—to open an app, assuming you know its file name.
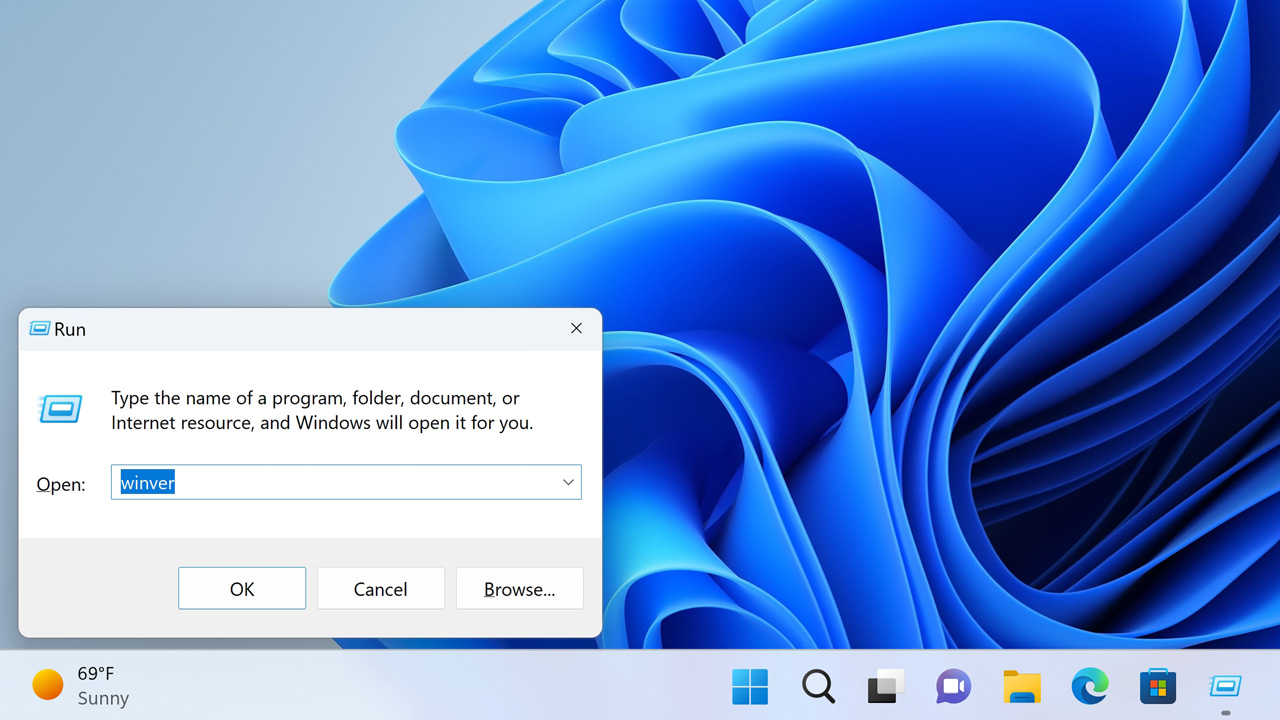
This requirement is what makes Run so outdated, of course: with Search, you can more easily find apps by their names.
Another method is to use Task Manager, which features a prominent “Run new task” button in its command bar, no matter which view it’s displaying. And Run new task has two advantages over the Run app: because Task Manager is available even if the Windows user interface is corrupted or hung, you can use it to restart that interface; and it allows you to easily run an app with administrative privileges.

Run new task also has the same limitation as the Run app: you need to know the file name of the app you wish to run.
If the Windows user interface isn’t working properly, type CTRL + SHIFT + ESC to open Task Manager, click the “Run new task” button, type “explorer.exe” (no quotes) into the Open field in the dialog, and then click OK. Voila! You’re back up and running again.
When you’re using Task Manager, you can also type ALT + N to launch the Run new task dialog.
Configure Task Manager
Task Manager provides a handful of settings you can configure. To view Task Manager settings, select the Settings icon in the lower-left of the application window (it resembles a gear).
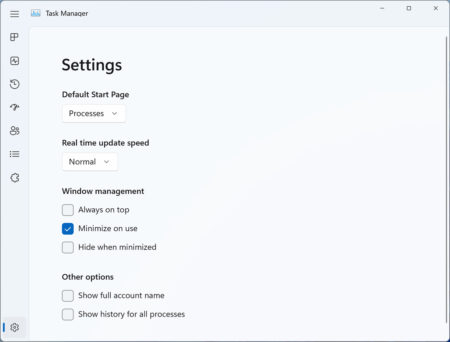
Here, you can configure which view appears by default when you launch Task Manager, its real-time update speed, some window management options, and a few other items.

Gain unlimited access to Premium articles.
With technology shaping our everyday lives, how could we not dig deeper?
Thurrott Premium delivers an honest and thorough perspective about the technologies we use and rely on everyday. Discover deeper content as a Premium member.