Multiple Displays
- Paul Thurrott
- Jun 26, 2026
-
0
While laptops and other PCs are typically used with a single display, Windows 11 supports multiple displays. In these configurations, the built-in laptop display or first external display connected to a desktop PC is referred to as the primary display, while any other displays, including wireless displays, are known as secondary displays, and each can be configured in unique ways. Whatever the setup, each PC has a single primary display, while the number of secondary displays is limited only by its expansion capabilities.
Learn more: You can learn about changing the display resolution, scaling, and text size, enabling and configuring Night Light, and other display configuration basics in the Initial Configuration and Personalization chapter.
Understand multi-display setups
Depending on the hardware, you can connect one or more secondary displays to a PC, configure each in Windows 11, and use them all together in different ways. Most people with multiple display setups use two displays, but the system works similarly with three or more displays as well.
How you connect a secondary display to your PC will vary from PC to PC.
The simplest multiple display configuration, perhaps, is to connect a portable display to a laptop via USB-C. But many laptop users will also create a desktop setup with a USB-C or Thunderbolt dock or hub, one or more secondary displays, and additional peripherals like a keyboard, mouse, and webcam. In this configuration, the secondary displays can be connected directly to the laptop via USB-C, or it they can connect to the dock or hub using USB-C, HDMI, or DisplayPort connectivity.
Desktop computers typically offer more expansion capabilities than laptops, and they can include a dedicated video card that has its own display connections. USB-C is common on desktop PCs, of course, but HDMI and DisplayPort connections are more common on desktop PC configurations with one or more secondary displays.
PCs of all kinds can also connect wirelessly to compatible displays using a technology called Miracast. And you can even use one PC’s display as a wireless display for another PC; this is typically done with laptops, which have a built-in display.
And you can, of course, mix and match as needed. You can have wired secondary displays using USB-C, HDMI, or DisplayPort connections and one or more wireless displays, all connected to the same PC simultaneously if needed.
Connect to a secondary display
When you connect a secondary display to your PC–directly with a USB-C, HDMI, or DisplayPort cable, indirectly through a hub or dock, or wirelessly–Windows 11 will recognize the new device, trill a notification sound, display a pulsing on-screen pulse animation to indicate its success, and make it available for you to use.
Tip: Windows 11 uses built-in class drivers to make this initial connection, but in some cases you can obtain better drivers and related utilities via Windows Update or the display maker’s website. This is worth investigating, but if you’re using a second USB-C-based display for standard productivity work, the drivers Windows provides are usually all you need.
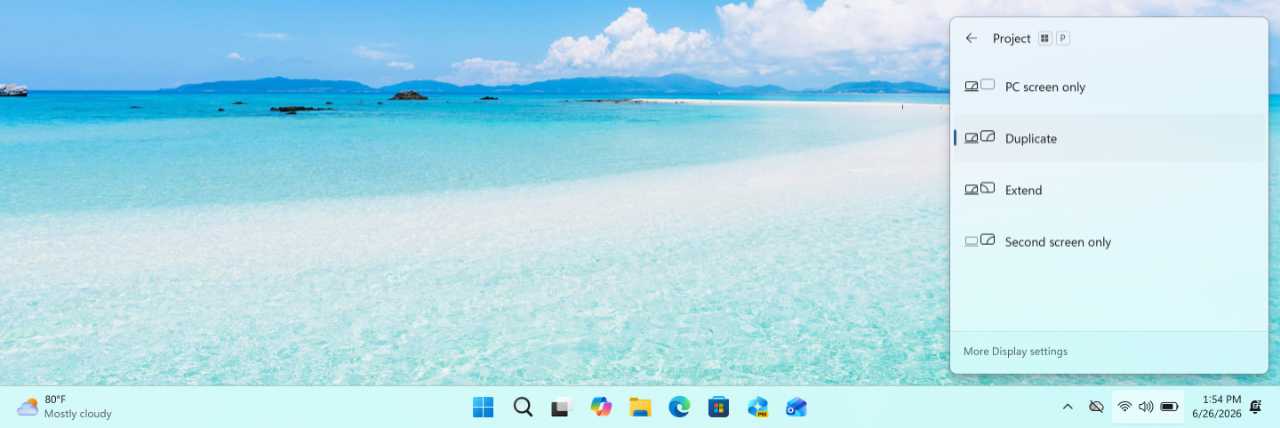
Choose a multi-display configuration
Windows 11 offers four configuration choices for using two displays (with some additional options if you have three or more displays).
They are:
- PC screen only. Here, the second display is not used and your PC uses only its primary display.
- Duplicate. This is the default configuration. When you connect a secondary display to the PC, both displays will duplicate, or mirror, each other and present the same view, with the same resolution and display scaling on each. If the two displays have different default resolutions, Windows 11 will use the lower of the two resolutions on each.
- Extend. This mode extends the Windows 11 Desktop across both displays, giving you a bigger collective area for apps and other windows and the ability to move the mouse cursor (and apps and other windows) across display edges to other Desktops. As good, each display can use its native resolution and can be configured with unique scaling, orientation, and other options.
- Second screen only. In this configuration, the primary display is disabled and only the secondary display is used.
Oddly, you’re not provided with these choices when you connect a secondary display. But there are three ways to change how Windows 11 works with multiple displays.
Ordered from quickest to most configurable, they are:
- Project pane. The quickest but least discoverable way is to launch the Project pane using the Windows key + P keyboard shortcut. The window that appears lets you switch immediately to the multi-display configuration you prefer.
- Quick settings. The Quick settings pane has a “Project” quick setting button you can use to display the Project pane and make a configuration choice.
Keyboard shortcut: You can also open Quick settings by typing Windows key + A.
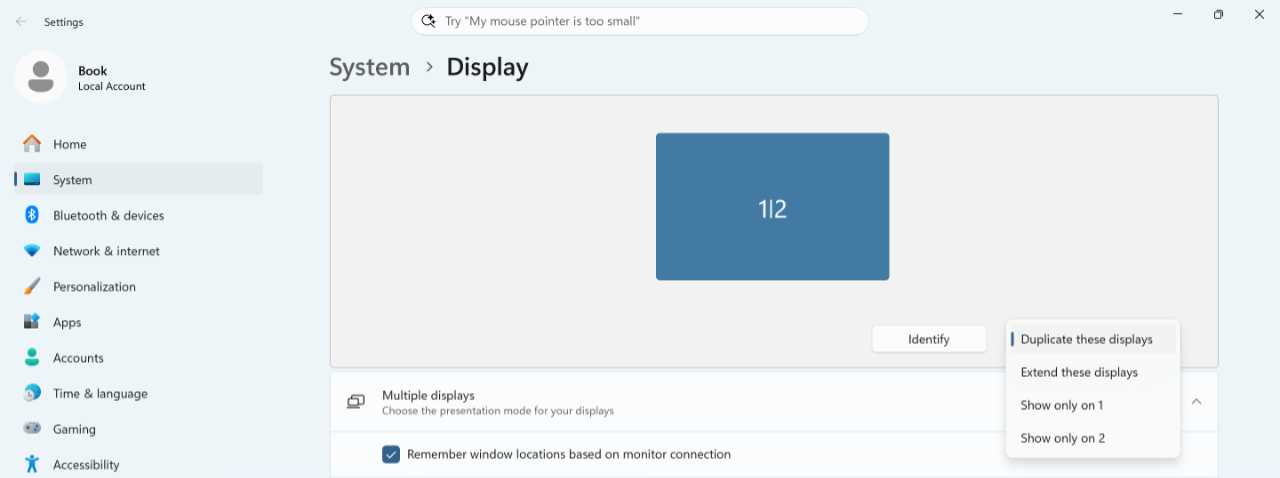
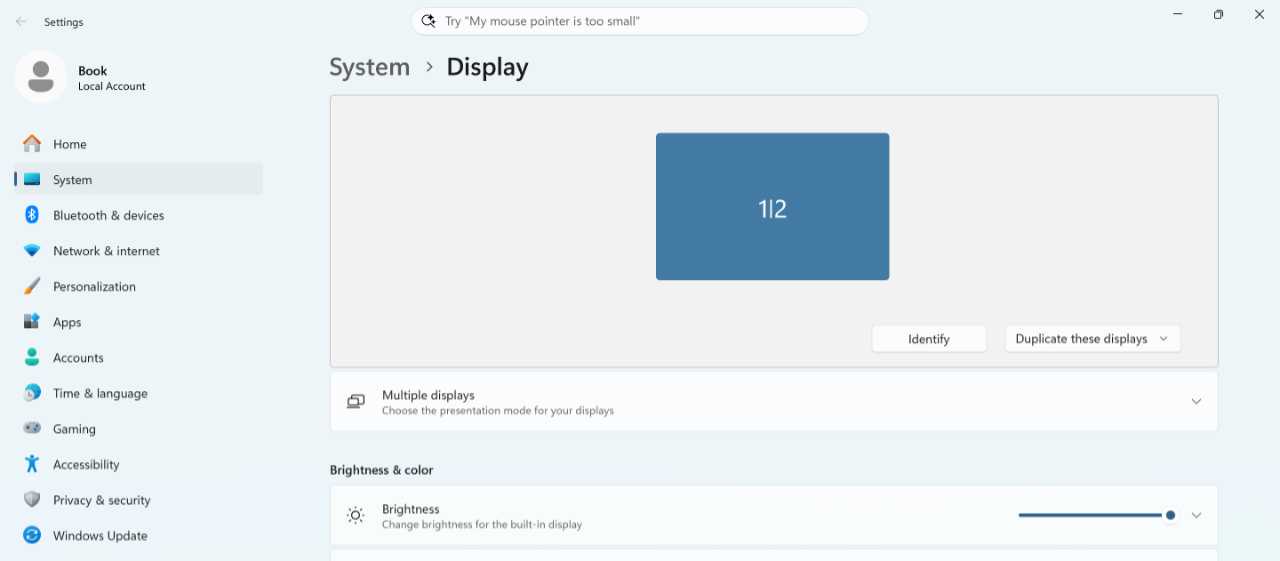
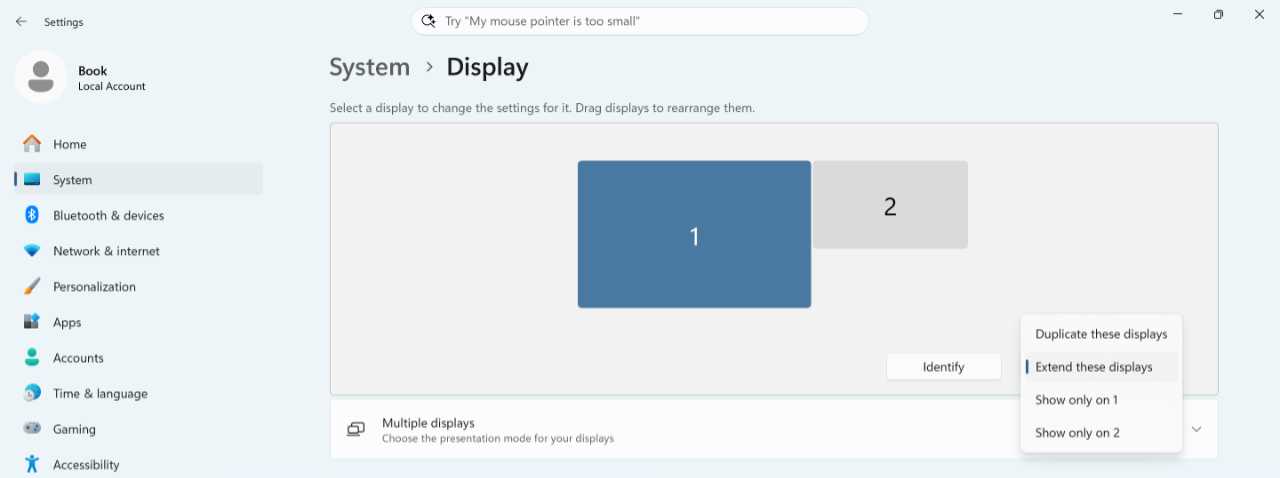
- Settings. You can open Display settings (Settings app > System > Display) to choose a multi-display configuration and, more crucially, make many other configuration changes related to both displays. (This interface uses slightly different language for each multi-display configuration choice, but they’re obvious enough. For example, “Duplicate” is identified as “Duplicate these displays” in Display settings.)
Configure a secondary display
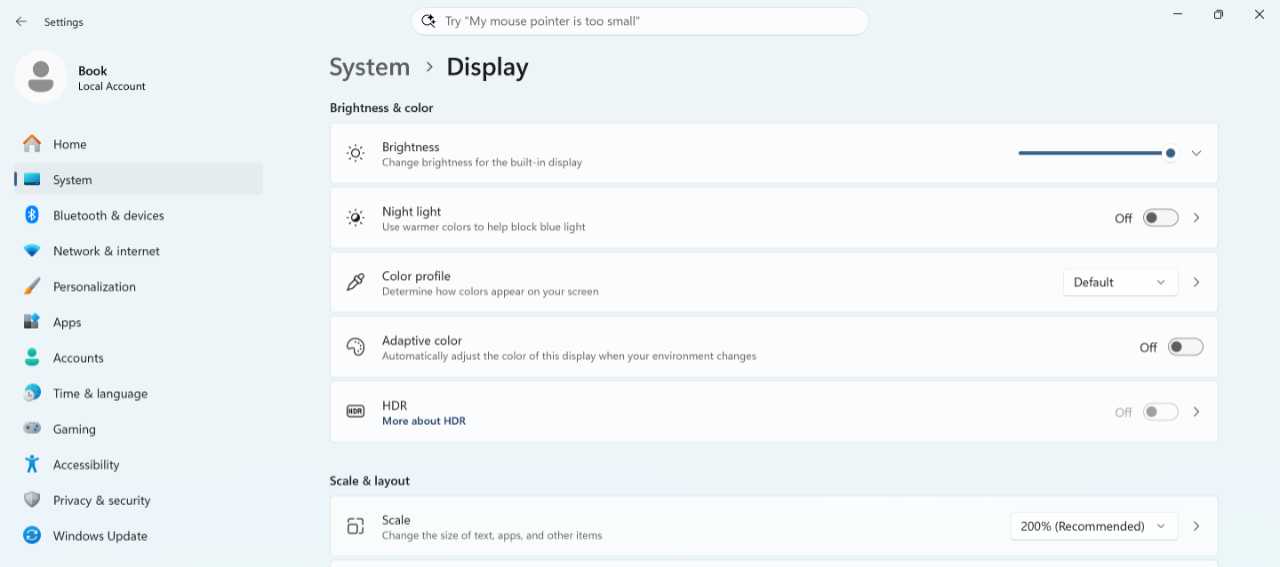
When you use Windows 11 with a single display, Display settings (Settings app > System > Display) is straightforward enough: Each of the settings you see here applies to that one display, as expected.
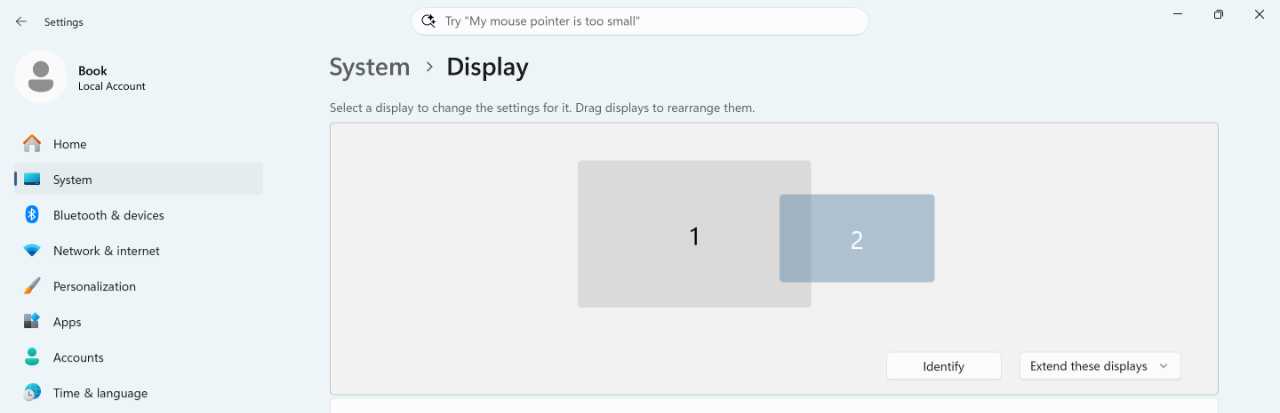
When you add a second display, Display settings changes to accommodate the new configuration. A new graphical display appears at the top of the page so that you can configure the real-world arrangement of the displays, identify which is which, and choose a multi-display configuration option. There’s also a new expandable set of “Multiple displays” options.
Here, you can do the following.
- Choose a multi-display configuration. If you haven’t already done so, you might want to change the configuration of the displays from “Duplicate” (“Duplicate these displays”) to “Extend” (“Extend these displays”).
- Rearrange the displays to match the real world. The preview pane at the top of Display settings lets you drag each display in the preview layout at the top so that their virtual positions match their relative positions in the real world. This makes moving the mouse cursor between each more seamless.
- Make a secondary display the main display. This is most useful in a docked configuration where you might have a large desktop display, but you can configure a secondary display to act as the main display. To do so, select a secondary display in the Display settings preview and then enable the option “Make this my main display” under “Multiple displays.” When you do so, your PC’s primary display behaves like a secondary display while docked and then reverts to its normal use when not docked.
- Configure other multi-display options. The “Remember window locations based on monitor connection,” “Minimize windows when a monitor is disconnected,” and “Ease cursor movement between displays” options under “Multiple displays” let you control what happens when you connect and disconnect secondary displays.
- Configure the secondary display separately from the primary display. If you’re using the “Extend” configuration, you can select the primary or secondary display in the preview and then configure individual settings–like Scale, Display resolution, and Display orientation–for each. You should at least make sure both displays are using the correct native resolution, which might be different for both.
Disconnect (and reconnect) a secondary display
If you’re using two or more displays in Extend mode, each can (and will) have its own open applications and other windows (and, as noted below, Taskbar configurations too). When you disconnect a secondary display, perhaps by undocking the PC or unplugging it from the secondary display, Windows 11 tries to handle the transition gracefully, based on the configuration choices you made (or left as-is) in “Multiple displays,” as noted above.
Tip: Note that the Snap functionality described in the Snap chapter works across multiple displays as well. For example, you can use keyboard shortcuts like Windows key + Right arrow to move a window not just across the current display but across all your displays in turn.
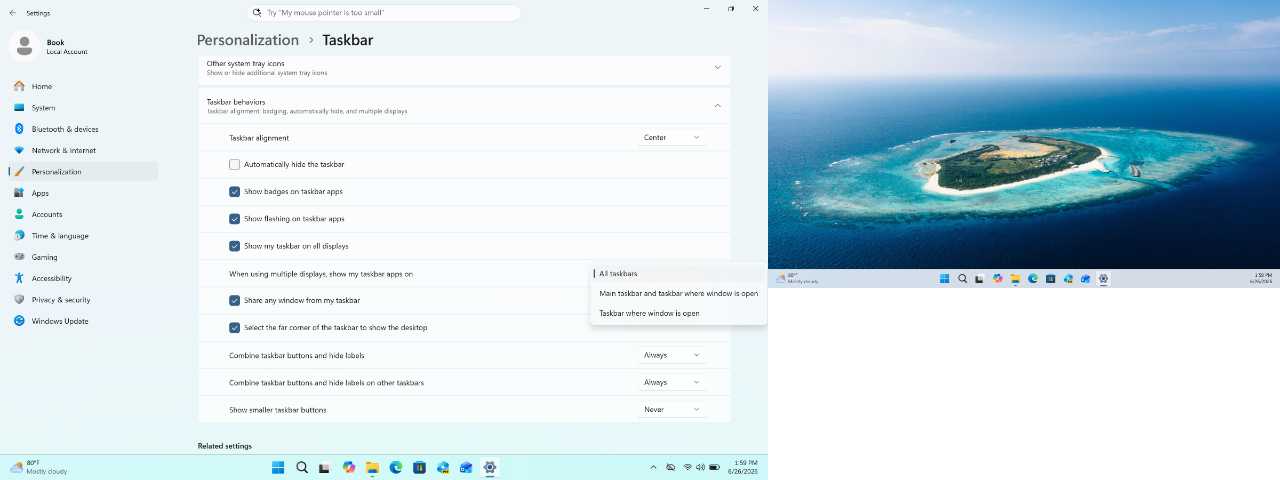
Configure the Taskbar for multiple displays
If you’re using two or more displays in Extend mode, you can configure the Windows 11 Taskbar with additional options specific to this configuration. For example, the Taskbar can be configured to show shortcut icons only for the applications and windows that are available on that display.
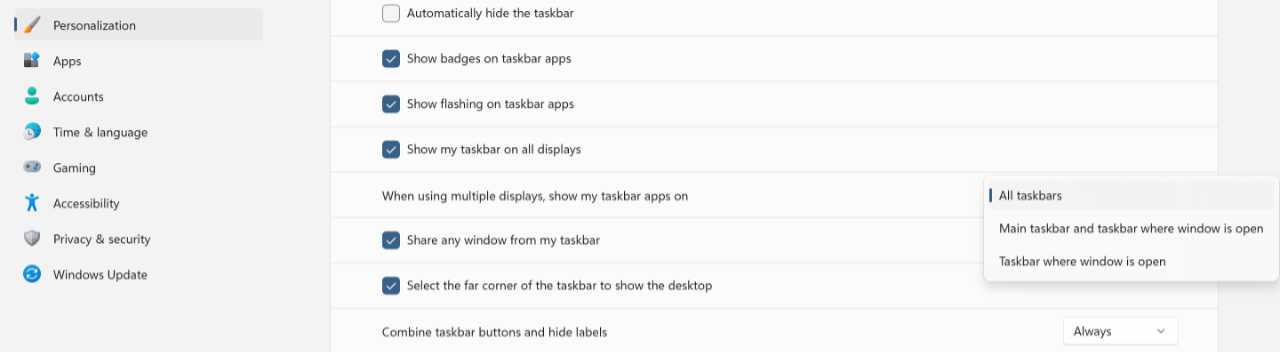
To do so, open the Settings app and navigate to Personalization > Taskbar. Then, locate the Taskbar behaviors area and expand it.
The following options are relevant to a multiple-display setup:
- Show my taskbar on all displays. When enabled, as it is by default, each display will show the Taskbar. If you disable this option, the Taskbar will only appear on the main display. (And the option noted below will be grayed out.)
- When using multiple displays, show my taskbar apps on. This option is set to “All taskbars” by default, meaning that the Taskbar on each display will be identical. But you can change this to “Main taskbar and taskbar where window is open” or “Taskbar where window is open.” I prefer that last option and feel that most with multiple displays will want to do so as well.
- Combine taskbar buttons and hide labels on other Taskbars. This option is related to “Combine taskbar buttons and hide labels” and it offers the same choices: “Always” (the default), “When taskbar is full,” and “Never.” Basically, this gives you the opportunity to configure Taskbar button combining separately on the primary and all secondary displays. (You can’t configure this on a per-secondary display basis if you have three or more secondary displays.)
Connect to a wireless display
You don’t necessarily need a cable to use an external display. Using a technology called Miracast, which uses Wi-Fi technology to establish a peer-to-peer connection between your PC (the Miracast source) and a Miracast-enabled display (the Miracast target) so that you can wirelessly cast to a compatible smart TV or other display instead.
Miracast has two requirements:
Your PC must include a Miracast-compatible Wi-Fi adapter. That means it supports either Wi-Fi Direct or Intel Wireless Display (WiDi) technology. These days, most PCs support one or the other.
Your external display must be Miracast-compatible. Many smart TVs and some displays are natively Miracast compatible. But you can also add Miracast capabilities to a smart TV or any other HDMI-capable display by purchasing an inexpensive adapter that plugs into an HDMI port on the TV/display.
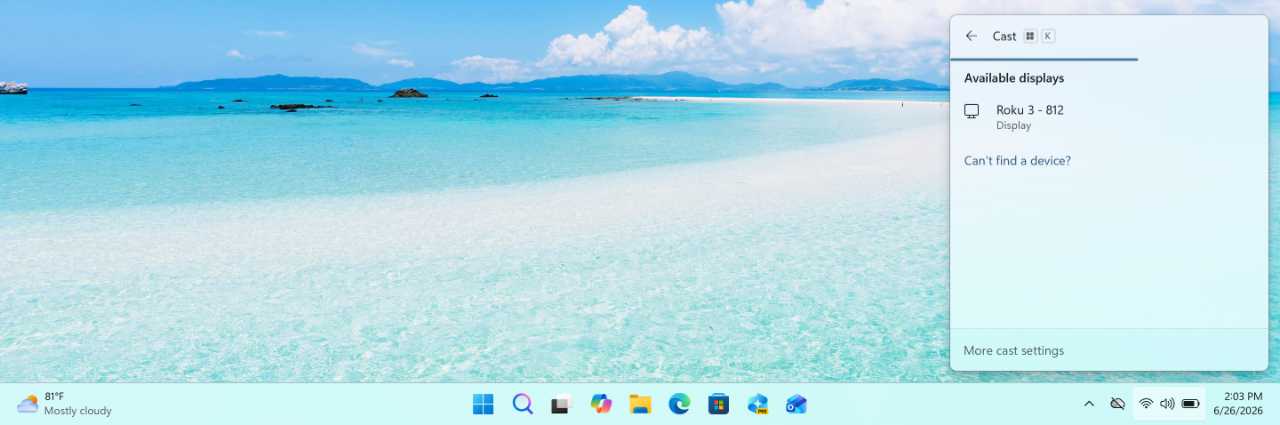
If you meet the requirements, you can connect to a nearby wireless display by opening the Cast pane.
There are a few ways to get there, with the quickest at the top:
- Cast pane. You can directly open the Cast pane by typing Windows key + K.
- Quick settings. The Quick settings pane has a “Cast” quick setting button you can click to display the Cast pane and make a configuration choice. Its label will read as “Cast” if there are no connected secondary displays, but it will confusingly display as “Wired display” or similar if there is one or more secondary displays already configured.
- Settings. Open the Settings app, navigate to System > Display, expand “Multiple displays,” and click the “Connect” button next to “Connect to a wireless display.”
- Windows Search. Open Start (or Windows Search), type cast, and then choose “Connect to a wireless display,” and Settings will open to the Display settings page, as above.
However you display it, the Cast pane displays any compatible wireless displays it can find.
You can connect to a wireless display by selecting it in the list, and Windows 11 will use and configure this display like a traditional wired display, but with one extra nicety: The Cast pane lets you pick a multi-display configuration without forcing you to separately open the Project pane or the Settings app.
From here, the wireless display will function much like any other secondary display. To disconnect the wireless display, open the Cast pane and choose “Disconnect.”
Use another PC as a wireless display
If you have another Windows 11-based laptop or other PC, you can use its display as a wireless display, too. This is an interesting use for a laptop you’re not using, perhaps, or an older PC that you just replaced.
Install the Wireless Display feature
First, you need to install an optional Windows 11 feature on the PC you intend to use as a wireless display. To do so, open the Settings app and navigate to System > Projecting to this PC.
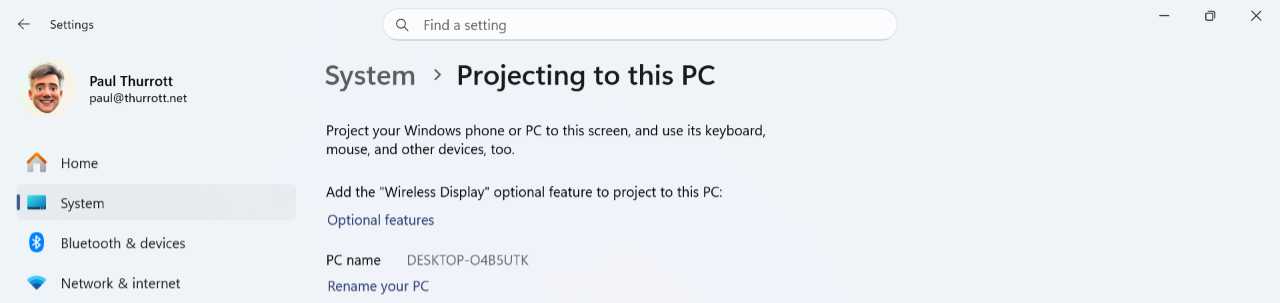
Click the “Optional features” link to open the Optional features page in Settings. (This can also be found by navigating to System > Optional features.)
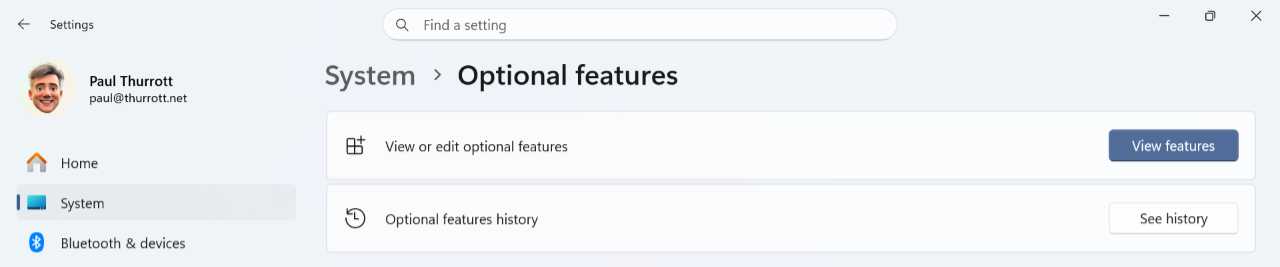
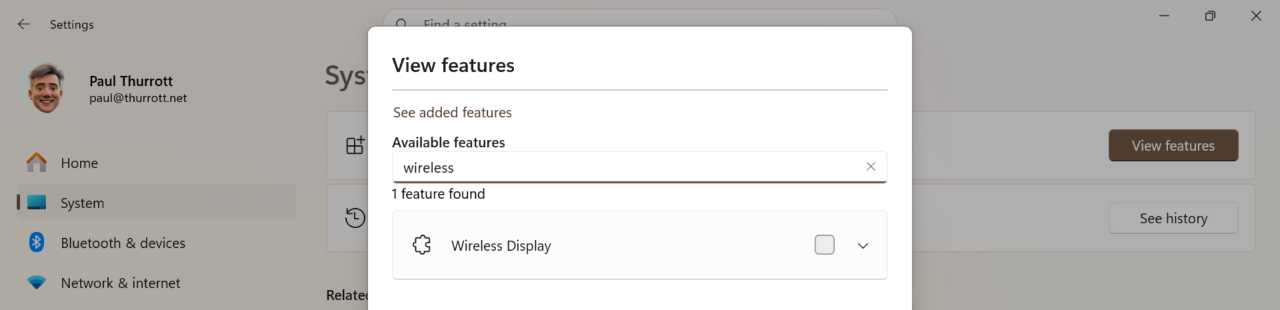
Click “View features” next to “Add an optional feature.” After dealing with a User Account Control (UAC) dialog, the “View features” window opens. Click “See available features at the top.”
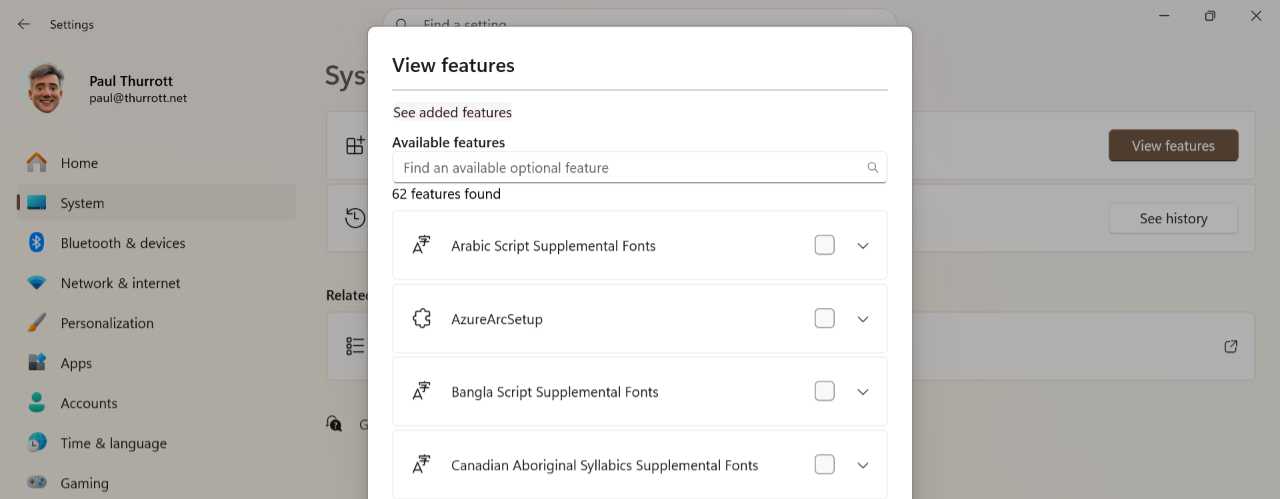
In the search box, type wireless and one additional feature, “Wireless Display,” will appear. Select that and click “Add.”
The Wireless Display feature will install and display a progress animation right in the Settings app. When it’s done–and it takes a while–Wireless Display will appear in the list of “Installed features.”
Tip: You can also install the Wireless Display feature directly by opening Start, typing optional features, and selecting “Optional features” from the search results to open Settings, which will open to the Optional features page. Then, just click “View features” and follow the instructions above.
Configure your PC for use as a wireless display
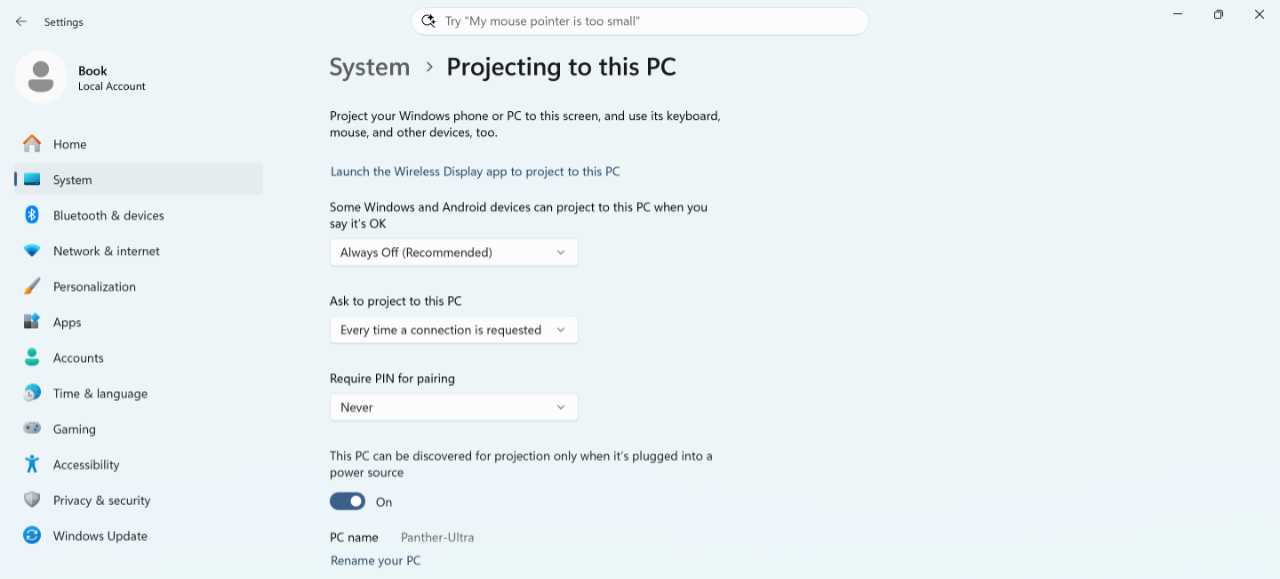
Next, you should configure the PC you intend to use as a wireless display. To do so, open Settings and navigate to System > Projecting to this PC. This page now displays various options related to this feature.
The following options are available:
Some Windows and Android devices can project to this PC when you say it’s OK. By default, the wireless projection capability is disabled (set to “Always Off”), so you will need to manually launch the Wireless Display app before you can connect to it from another PC. But you can change this option to “Available everywhere on secure networks” or “Available everywhere” if desired.
Ask to Project to this PC. This feature ostensibly controls how often you must approve connection requests from other PCs: the default is “Every time a connection is requested,” but you can also configure it to “First time only.” But it doesn’t appear to impact the connection experience at all.
Require PIN for pairing. By default, your PC will automatically accept all external connection requests, but you can use this option, which is set to “Never” by default, to require a PIN first. If you change this to “First Time” or “Always,” the person using the connecting PC will need to enter that PIN before they can connect. (This PIN appears on the Wireless Display app that’s described in the next section)
This PC can be discovered for projection only when it’s plugged into a power source. This option will only appear on a laptop or other portable PC.
Connect to a PC that’s being used as a wireless display
For the most part, using a PC as a wireless display works as you’d expect and like any other wireless display. But there are two main differences:
- Wireless Display app. You must run the Wireless Display app on the PC you wish to use as a wireless display. Your PC won’t be available as a wireless display until you do.
Tip: You can find the Wireless Display app with Windows Search. Or, open the Settings app, navigate to System > Projecting to this PC, and select the “Launch the Wireless Display app to project to this PC” link.
- Mouse, keyboard, touch, and pen support. Because this wireless display is really a PC, you can optionally enable the use of the other PC’s mouse/touchpad, keyboard, multitouch display, and smartpen. So you can control what’s happening on-screen with either PC. (You make this choice when you connect to the PC acting as a display.)
To get started, launch the Wireless Display app on the PC that’s being used as a wireless display.
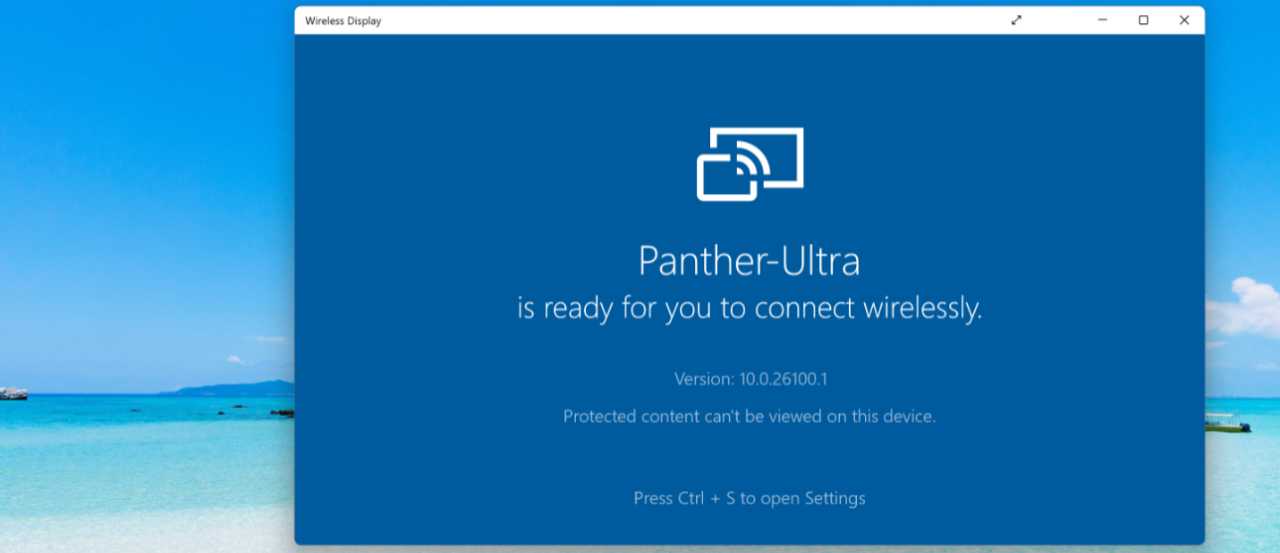
This app dates back to Windows 8, when all non-desktop applications had to run in a true full-screen mode that hid even the Taskbar. As such, it’s a bit of an outlier in today’s more modern Windows 11 environment. But the Wireless Display app’s ability to display full-screen is important: If you used it windowed (floating) or maximized (with its Taskbar showing), the PC won’t seem like a wireless display.
To use this app effectively, you need to understand that it puts key user interfaces in its title bar. And that if the app is full-screen, you can access that title bar–and the UI it contains–by mousing up to the top edge of the screen.
To toggle full-screen mode, select the Full Screen title bar button.

Also, you may be tempted to try the CTRL + S shortcut that the Wireless Display app advertises. There’s little reason to do so, as the settings interface is just a list of PCs that have already connected and a related blocked devices list. But if you open settings while the app is in full-screen mode, it’s not obvious how to exit it.
That’s why you need to know that you can display the app’s title bar if you mouse up to the top of the screen: There’s now a Back button at the far left of the title bar that will get you back into the app.
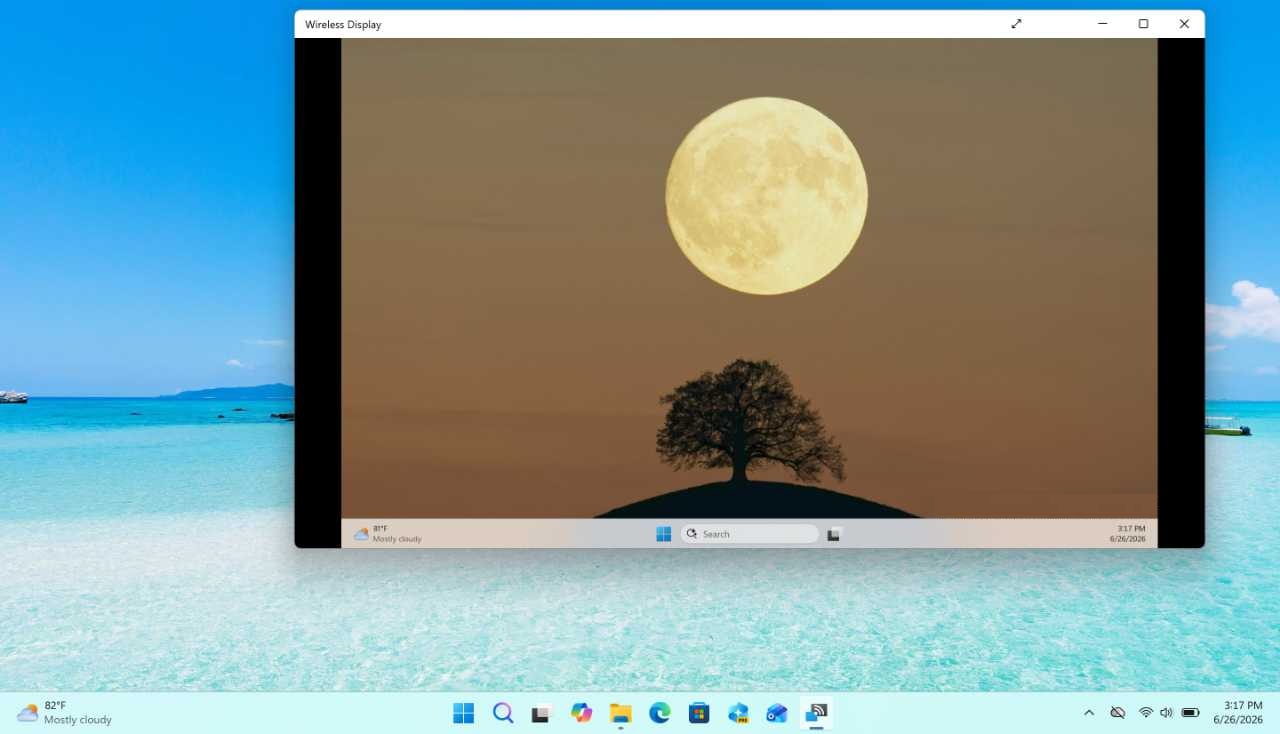
Now that you know how the Wireless Display app works, you can connect to it from another PC. And you do that the same way you connect to any compatible wireless display, with the Cast pane. But there are a few differences to consider.
If the PC to which you’re connecting requires a PIN, that PIN will be displayed in the Wireless Display app when the connection is initiated.
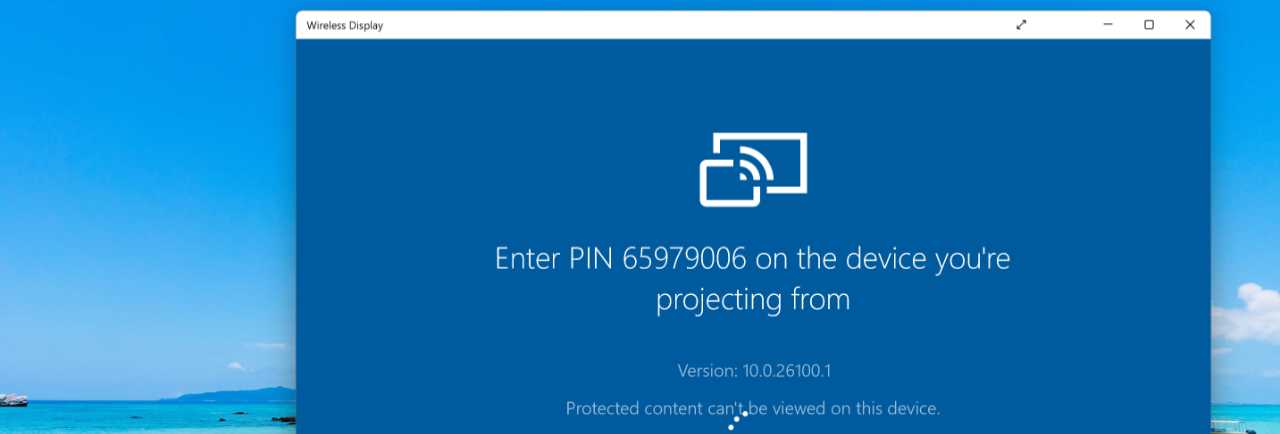
You will need to enter this PIN into the Cast pane on the PC you’re actually using.
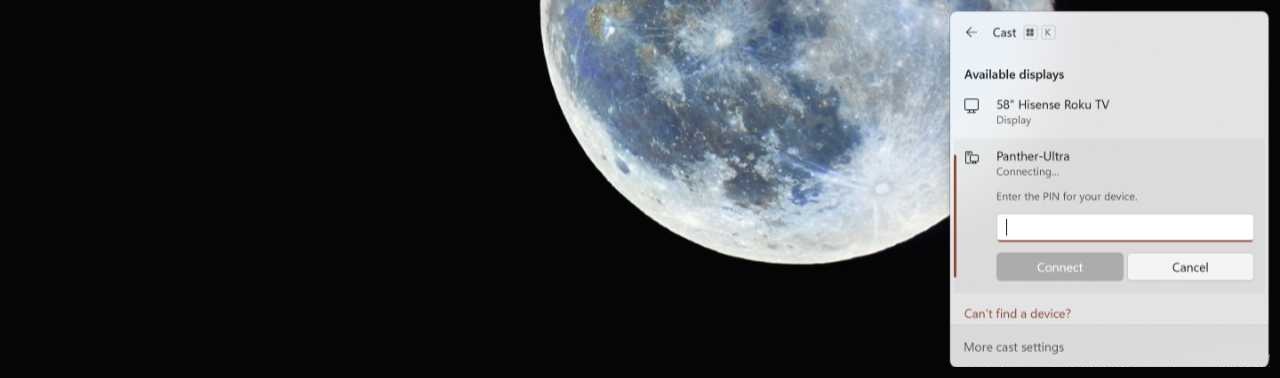
Also, because you’re connecting to a real PC, you will see an option to “Allow mouse, keyboard, touch, and pen input from this device” in the Cast pane after the connection is made. You can optionally enable this option to use any of those features on the PC you’re using as a wireless display.
You disconnect from a PC that’s being used as a wireless display the same way you do with any wireless display, via the Cast pane. When you disconnect, the Wireless Display app on the other PC closes too.

Gain unlimited access to Premium articles.
With technology shaping our everyday lives, how could we not dig deeper?
Thurrott Premium delivers an honest and thorough perspective about the technologies we use and rely on everyday. Discover deeper content as a Premium member.