Install
- Paul Thurrott
- Oct 13, 2025
-
1
You can clean install Windows 11 on a PC in various ways, each of which is covered in this chapter. How you do so will depend on your needs and your situation.
- You bought a new PC. Skip ahead to the section Windows Setup Out of Box Experience.
- You built a PC or own a PC with no operating system. You can start right at the next section in this chapter.
- You own a PC with Windows 11, but you want to reinstall it. There are several ways to accomplish what is essentially a recovery task. But the best way is to use the Reset This PC utility that’s accessible in the Settings app. You could also use the manual upgrade method described in the Upgrade chapter in which you choose “Nothing” in the Choose what to keep screen of Windows Setup.
? What you need
Before getting started, you need a way to install Windows 11. Which method you choose will depend on the state of the PC on which you’re working:
The PC works and you can boot into Windows. In this case, all you need is the latest Windows 11 disk image (ISO) file, which you can ? download for free from the Microsoft website. (That said, you can also use the second method.)
The PC doesn’t have Windows installed or can’t boot into Windows for some reason. In this case, you need to create Windows 11 installation media in the form of a bootable USB flash drive. If you have an x64 (AMD/Intel-based) PC, this can be done using a Microsoft utility called the Media Creation Tool (? also available on the Microsoft website), but I recommend using a free third-party tool called ? Rufus regardless of your PC’s system architecture. (Rufus works for Windows 11 on Arm installation media as well.) And if you are installing Windows 11 on Arm, you need to download all the drivers for that PC separately. Where you find these drivers varies by PC maker.
⏩ How to proceed
Given the above, you have a choice of two paths forward.
Install Windows 11 using the Windows 11 disk image (ISO) file. This is arguably the easiest and quickest way, and it’s described in the Upgrade chapter: Download the file from Microsoft, locate it in your Downloads folder, double-click it to mount the ISO as a virtual disk in your PC’s file system, and then run Setup.exe in the root of that virtual disk to start Windows Setup. Then, follow the instructions in Complete Windows Setup in the Upgrade chapter, being sure to choose “Nothing” when you reach the “Choose what to keep” screen in Windows Setup.
Install Windows 11 using USB-based installation media. This is the method I focus on in this chapter. It’s more versatile in that it works with Windows 11 on Arm as well as the more common x64-based versions of Windows 11. And if you use Rufus, you can customize Windows Setup to bypass some Microsoft-imposed limitations and blockers.
✅ Tip: Be sure to download the latest version of the Windows 11 disk image file and/or create new Windows 11 installation media even if you’ve done so in the past. Microsoft updates its disk images regularly and up-to-date installation media will include bug and security fixes, and even new features, that you will otherwise have to install afterwards with Windows Update.
? Clean install Windows 11
Most people who need to clean install Windows 11 will create installation media that they boot the PC with, running Windows Setup, which includes two phases, the first-boot experience and the Out of Box Experience (OOBE).
? Create Windows 11 installation media
If you are clean installing Windows 11 on an x64-based PC and aren’t concerned with customizing Windows Setup to bypass Microsoft’s hardware requirement checks and other limitations, you can use its Media Creation Tool to create Windows 11 installation media: Just navigate to the ? Download Windows 10 page on the Microsoft website and follow the instructions under the section “Create Windows 11 Installation Media.” This is straightforward, and once you’re done, you can skip to the next section.
But I very much prefer to use ? Rufus for this. And unlike the Media Creation Tool, Rufus also works with Windows 11 on Arm.
To create the Windows 11 installation media with Rufus:
- Download ? the Windows 11 disk image for x64 PCs or ? the Windows 11 disk image for Arm-based PCs from the Microsoft website, depending on your PC’s system architecture.
- If you have an Arm-based PC, download its drivers from your PC maker.
- ? Download the standard version of Rufus, being sure to get the correct version for your PC’s system architecture (x64 or ARM64).
- Run Rufus.
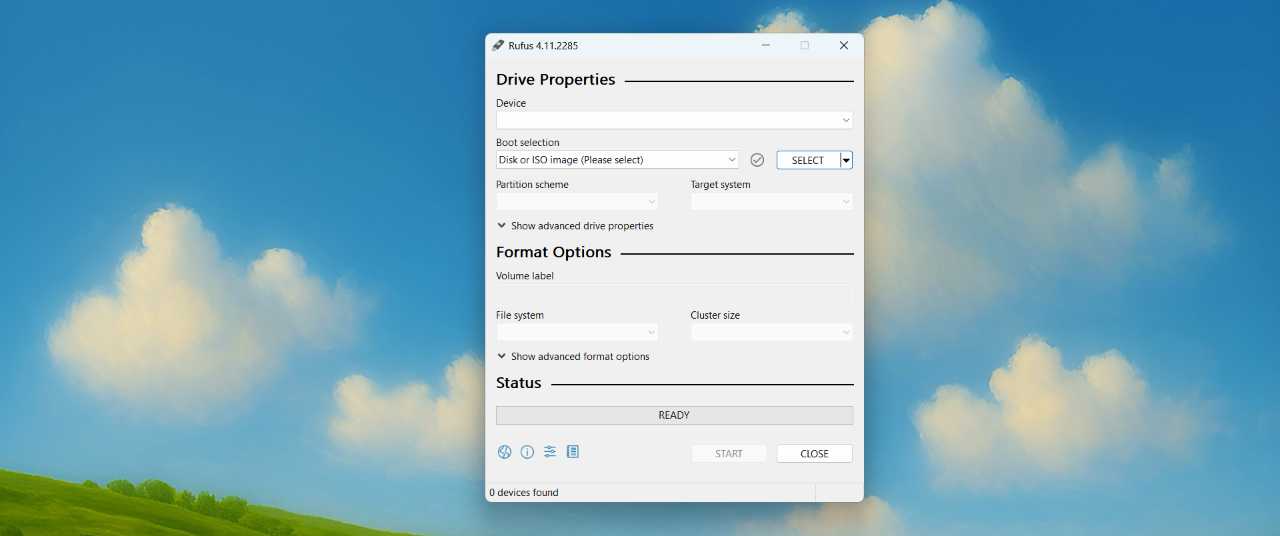
- Insert the USB flash drive you will use for the Windows 11 installation media. This must be 8 GB or bigger, and it will be erased during this process, so back up any content it contains first.
- Click “Select” and open the Windows 11 disk image you just downloaded.
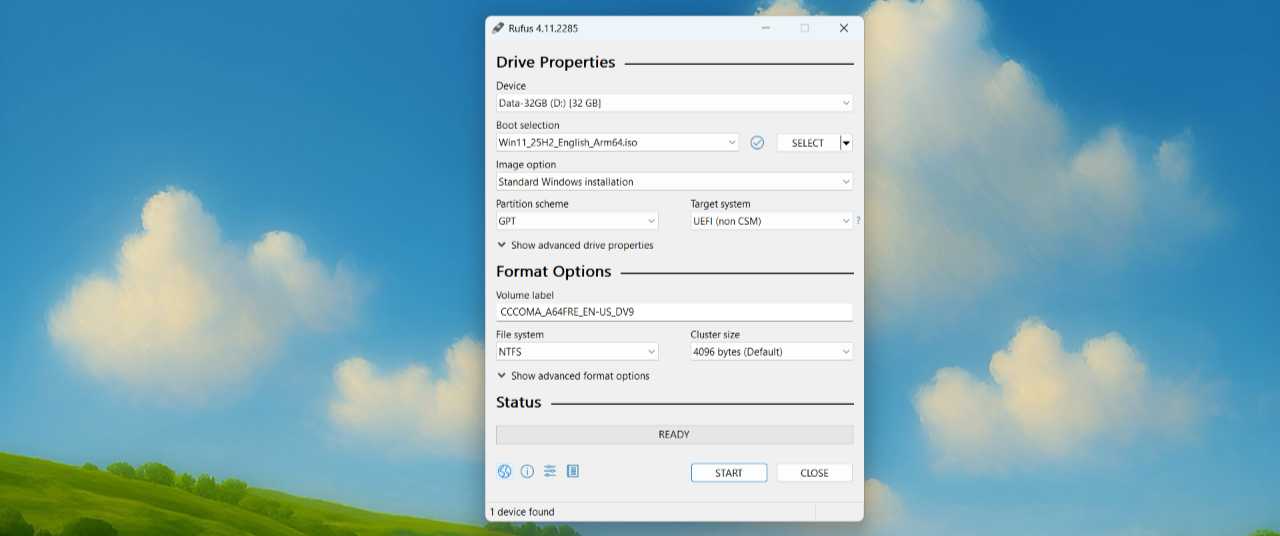
- Click “Start.” Rufus will display a “Windows User Experience” dialog with several choices to consider.
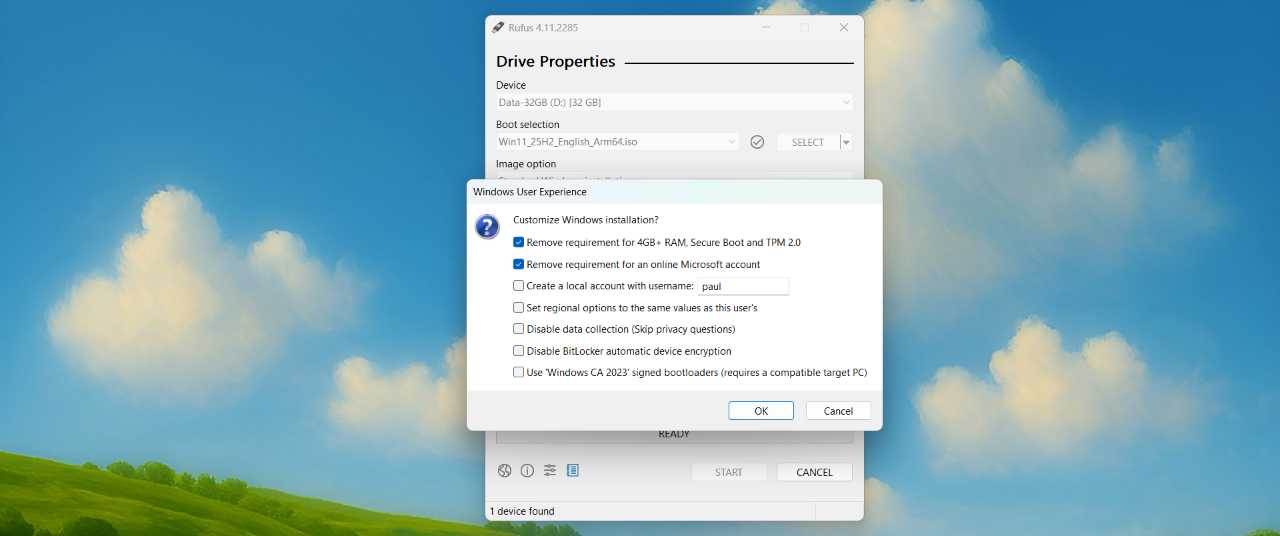
- For the most part, you can ignore these choices. But if you have particular needs, Click “OK” when you’re done making changes.
✅ Tip: The two most commonly needed options, bypassing the hardware compatibility checks and removing the online account (Microsoft account) requirement, are preselected for you, and it won’t harm the installation media if you leave these enabled.
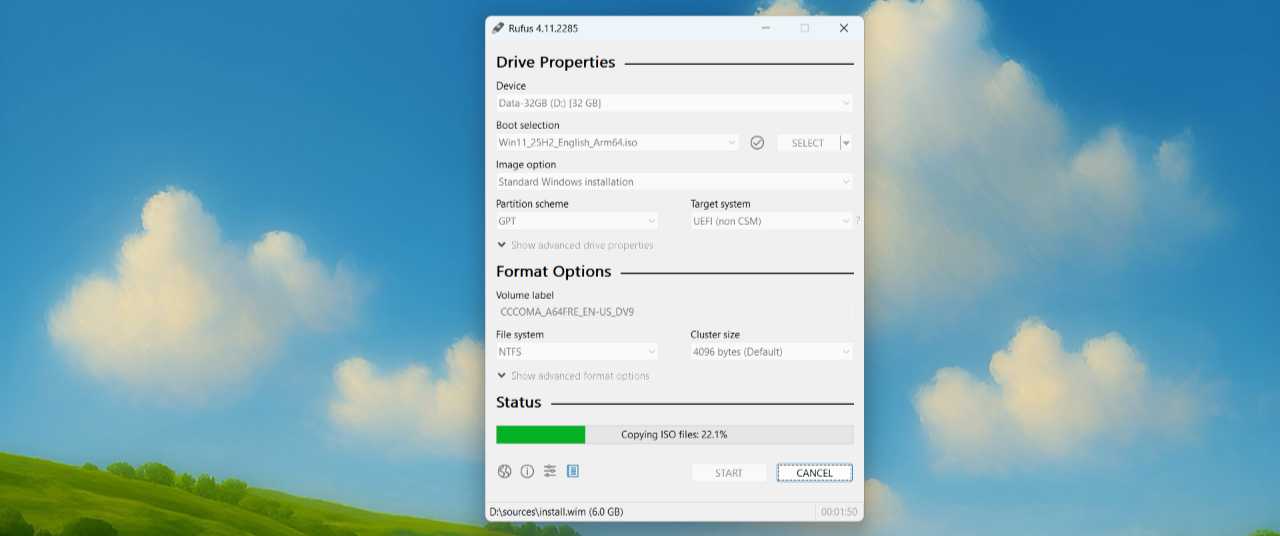
- Rufus will warn that all the data on the USB flash drive will be deleted. Click “OK.”
- Rufus will create the Windows 11 installation media. When it’s done, the progress bar will read “READY.”
? Run Windows Setup
Now that you’ve created your Windows 11 installation media, you can use it for its intended purpose: To clean install Windows 11. And to do that, you have to boot your PC with this USB flash disk. The two most common ways to do that are:
- Advanced startup. If you are using the PC that you created the installation media with or can otherwise boot into Windows on that PC, you can cause it to restart and then boot using the USB flash drive. To do so, open the Settings app, navigate to System > Recovery, and click “Restart now” next to “Advanced startup” under “Recovery options.” Click “Restart now” in the dialog that appears. When the PC reboots into the Windows Recovery Environment (WRE), click “Use a device” in the initial “Choose an option” screen. Then, select your USB flash drive in the “Use a device” screen.
- Boot the PC directly from the USB flash drive. You can also boot the PC directly from the USB flash drive. To do so, you need to know which key to press when the computer first comes on, so check with your PC maker’s document or Google.
Either way, the PC will reboot into Windows Setup, which consists of two distinct phases:
- First-boot experience. This old-school and low-level phase dates back decades and hasn’t changed much over the years. But only those who perform a clean install of Windows 11 by booting with installation media will ever experience this.
- Out of Box Experience (OOBE). This multi-step experience has been updated with the Windows 11 look and feel–and with multiple additional steps—in recent years. Everyone who installs Windows 11, including those who purchase a new PC, will encounter this interface.
Complete the Windows Setup first-boot experience
The first-boot experience is a minimalistic experience that will not vary from PC to PC. It is mostly straightforward, and only a few steps require a lot of thought.
You will complete the following steps.
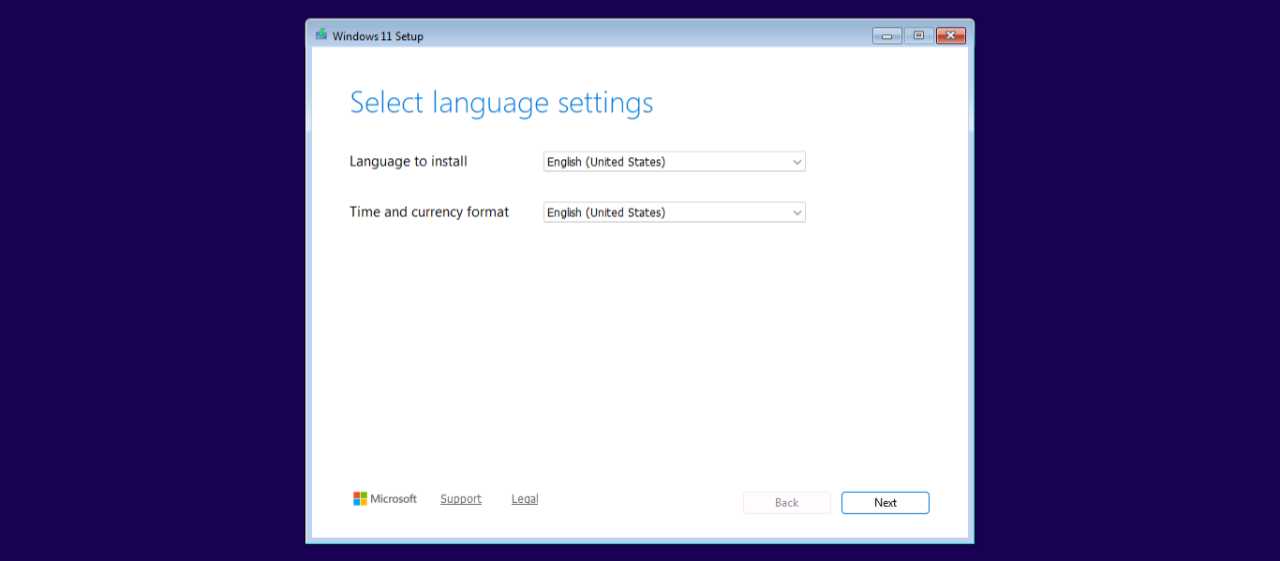
Select language settings
By default, Windows Setup will configure the Windows 11 language and time and currency format to be the same as that used by the installation media. But if this isn’t correct, you can change either or both settings here.
Select keyboard settings
This is identical to the previous step, except that it applies to the language used by your PC’s keyboard.
Select setup options
In this screen, you choose between installing Windows 11, the correct choice, and repairing an existing install of Windows 11. Note that you must check the box “I agree everything will be deleted [from your PC] including files, apps, and settings” before you can proceed.
➡️ Learn more: I discuss the various Windows 11 recovery capabilities in the Help and Recovery chapter.
Product key
Here, you can optionally enter your Windows 11 product key that you received if you purchased Windows 11 Home or Pro so you could install it on a new PC. But you will not have this product key if you are clean installing Windows 11 on a PC that previously ran Windows 11. So you can enter the product key here, if you have it, or select “I don’t have a product key.”
✅ Tip: Select “I don’t have a product key” regardless. You can always activate Windows 11 later.
Select image
If you didn’t enter a product key in the previous step, Windows Setup will display this screen so that you can choose the correct Windows 11 product edition. So choose accordingly.
⚠️ Warning: You want to get this one right. PCs ship with specific Windows 11 product editions, and when you purchase Windows 11, you are likewise purchasing a specific edition, and the product key you received will only activate that product edition. If you choose the wrong product edition and then you can’t activate Windows 11, you will need to reinstall Windows 11.
Applicable notices and license terms
You must agree to the Microsoft software license terms before proceeding.
Select location to install Windows 11
Most PCs come with a single SSD or other storage device, and most people are best served by using Windows 11 with a single disk partition on that storage device. If that’s the case, you can simply accept the default, which will configure your one SSD as what’s called the system partition, or what most think of as the C: drive.
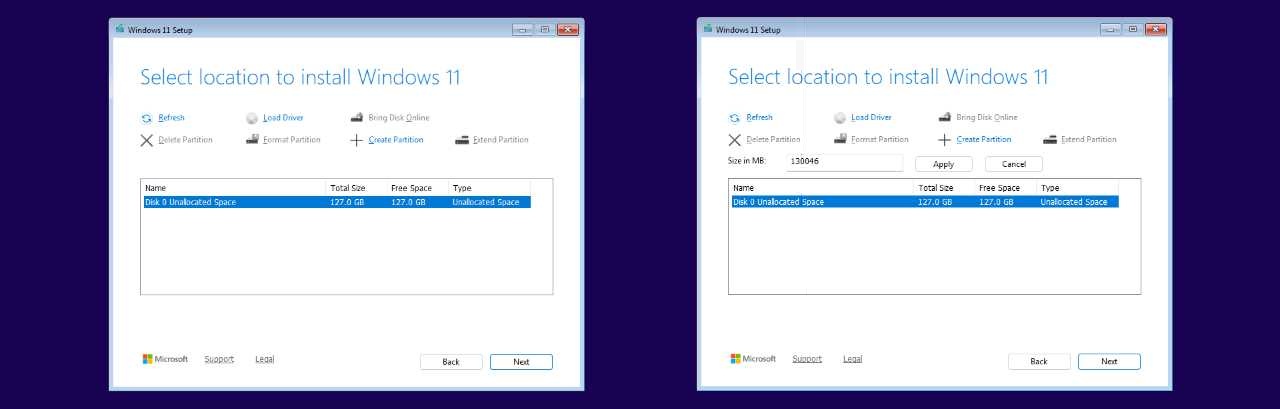
If you have a more complex configuration with multiple physical drives or plan to use multiple partitions, you can use this interface to create and manage those drives and partitions and then choose which will contain the Windows 11 install.
Ready to install
This screen simply summarizes the choices you’ve made, which, in short mean that you are about to clean install Windows 11.
Installing Windows 11
Windows Setup will then transition into a full-screen experience during which it will perform as much of the installation as it can before rebooting and completing setup while offline.

When this process completes, Windows Setup will reboot the PC again and run the Out of Box Experience (OOBE).
Complete the Windows Setup Out of Box Experience (OOBE)
Everyone who installs Windows 11 must complete the Out of Box Experience (OOBE), including those who purchase a PC and turn it on for the first time. This is a prettier, more graphical experience than the first-boot experience, but it’s also more involved and has far more tasks to complete.

The OOBE can vary a bit depending on your PC and its configuration, but you will encounter most of the steps documented here.
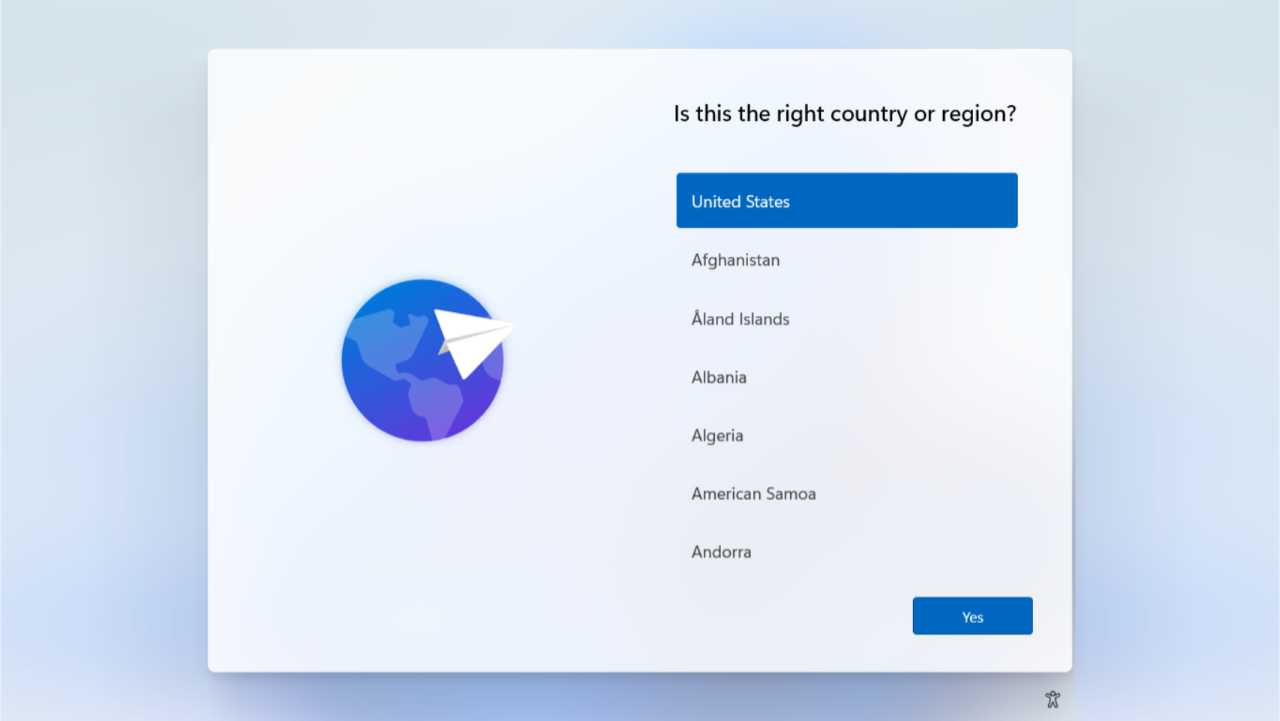
Is this the right country or region?
This should be set to the correct country, but if it isn’t, you can make that change now.
Is this the right keyboard layout or input method?
As with the previous screen, this should be configured correctly.
Want to add a second keyboard layout?
While most people won’t need this, Windows 11 supports multiple languages, and adding another keyboard layout is useful for those who are multilingual or need to work in two (or more) languages. Most can skip right past this.
Let’s connect you to a network
If the PC is not connected to the Internet with an Ethernet cable, you will be prompted to connect to a network now. This can be a Wi-Fi network–available networks will be listed here–or Ethernet. Once you’re online, you can proceed.
ℹ️ More info: As with previous Windows versions, there are workarounds in Windows Setup that allow you to continue while offline and create a local account for Windows 11 instead of an online account. Those workarounds have changed a bit in Windows 11 version 25H2, so I document one that will work for everyone later in the chapter.
Please review the License Agreement
After reading the Microsoft license agreement in its entirety, you can move on to the next step. Kidding.
Let’s name your device
Here, you can optionally provide a unique name for your PC, though Microsoft will provide a random name otherwise. If you do name the PC, the PC will reboot and the OOBE will restart at this point in the process when it comes back.
How would you like to set up this device?
In this crucial step, you will choose how you will sign into Windows 11, and so the two choices you see here both map to a Microsoft online account type. The choices are:
- Set up for personal use. This is the right choice for individuals setting up Windows 11 for themselves. When you select this choice, you will sign into Windows 11 using a Microsoft account (MSA).
- Set up for work or school. As indicated on-screen, this choice is for those who are setting up a PC for use with work, school, or some other managed organization. This type of account, called a Microsoft Work or School account, works much like an MSA but is centrally controlled by IT staff at your organization.
Put simply, you will select the “Set up for personal use” choice unless you’ve been instructed to do otherwise.
⚠️ Can you sign in with a local account instead?
Power users who prefer to sign into Windows 11 using a local account during the OOBE will notice that the most commonly used workarounds from previous versions no longer work with Windows 11 version 25H2. I don’t recommend this, but there are other workarounds that still work. Here is one that works with both Windows 11 Home and Pro.
Type Shift + F10 to open a command line window. Then, select the command line window and type the following command:
reg add HKLM\SOFTWARE\Microsoft\Windows\CurrentVersion\OOBE /v BypassNRO /t REG_DWORD /d 1 /f
After tapping Enter, type the following command to reboot the PC:
shutdown /r /t 0
When the PC restarts, the OOBE will start again. When you get to the “Let’s connect you to a network screen,” you can click a new “I don’t have Internet” link and then create a local account instead of using a Microsoft account or Microsoft Work or School account.
A local account is old-fashioned, insecure by default, and less secure than using a Microsoft account regardless. I recommend that you do not use this type of account unless you really know what you’re doing.
➡️ Learn more: I assume that most people reading this are individuals and so this book focuses largely on the experience you will have when you sign-in with an MSA. But you can learn more about sign-in accounts, Microsoft accounts, Work and School accounts, and local accounts in the Accounts chapter.
✅ Tip: By default, Windows Setup will create a folder for your user account in C:\Users that’s based on the first four characters of the Microsoft account (or Work and School account) you sign in with here. If you would like to customize that folder name during OOBE, you can. Here’s how:
Type Shift + F10 to open a command line window. Then, select the command line window and type the following command:
cd oobe
After tapping Enter, type the following command exactly (where the paul is the user folder name you prefer and the length is 16 characters or less):
SetDefaultUserFolder.cmd paul
Then, tap Enter. You’ll be told if the name you chose is valid and whether the operation was successful. When done, close the command line window to continue with the OOBE.
Unlock your Microsoft experience
After checking for updates again, the OOBE presents an unnecessary screen explaining why the choice you just made, to sign-in with a Microsoft account, is so smart.
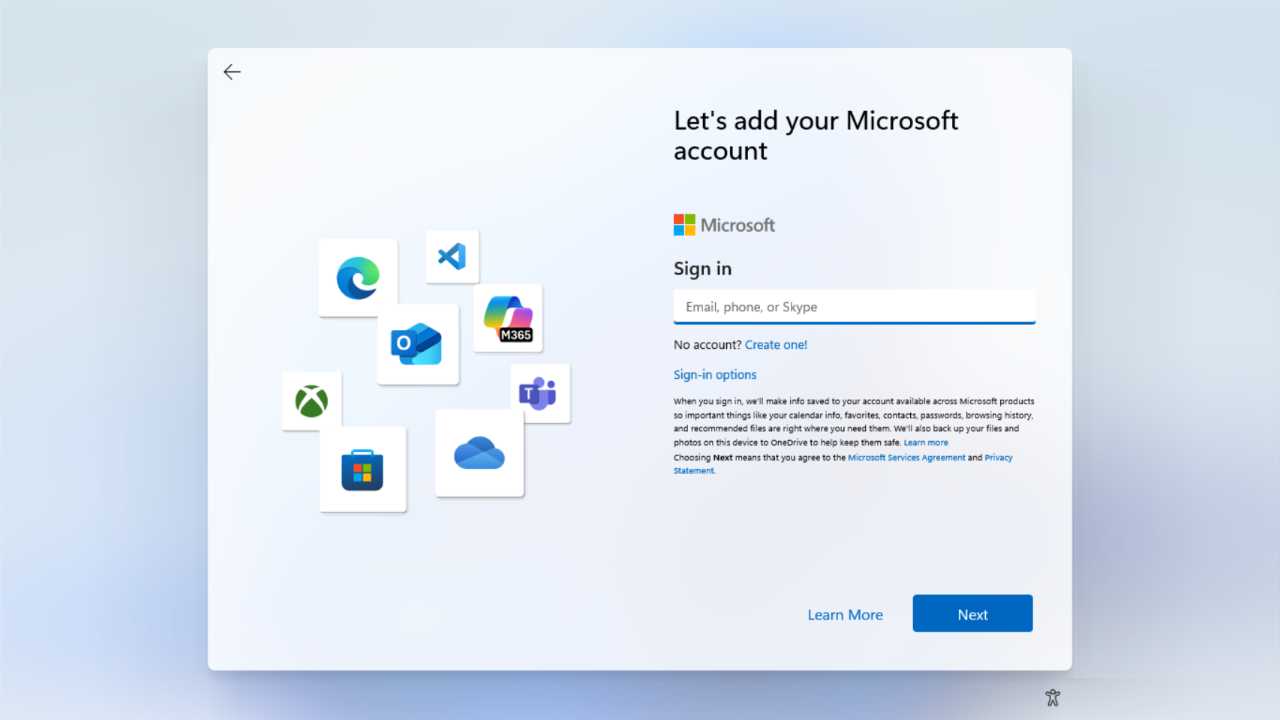
Let’s add your Microsoft account
Here, you are prompted to sign-in with your Microsoft account. Just enter your email address and then, depending on how you have configured this account, you may need to enter a password, authenticate using a passkey or some other 2FA (two-factor authentication) method, or provide other credentials.
➡️ Learn more: You can learn how to properly secure your Microsoft account in the Accounts chapter.
Want to use your face/finger to sign in faster and more securely?
If your PC supports Windows Hello facial and/or fingerprint recognition, the OOBE will prompt you to configure one of those authentication methods here. But it’s easy enough to configure this later. If you see this screen, skip this for now.
Create a PIN
When you sign in to Windows 11 with any account that has an associated password, Microsoft requires you to create a PIN (personal identification number), which is similar to the code you use to access your bank accounts with a debit card. This PIN will make it easier to sign into the PC later, though Windows Hello facial and fingerprint recognition are both easier still.
Set up a PIN
Here, you enter and then confirm a PIN. This PIN should be unique to this PC, and not reused across multiple PCs and devices. And it needs to be at least four characters in length, all of which are numbers by default.
✅ Tip: Select the checkbox next to “Include letters and symbols” if you would like to use other characters as well.
Choose privacy settings for your device
This is one of the more important steps in the OOBE and it’s one you should pay attention to. In this step, Microsoft presents several high-level privacy settings, allowing you to configure each as being enabled or disabled.
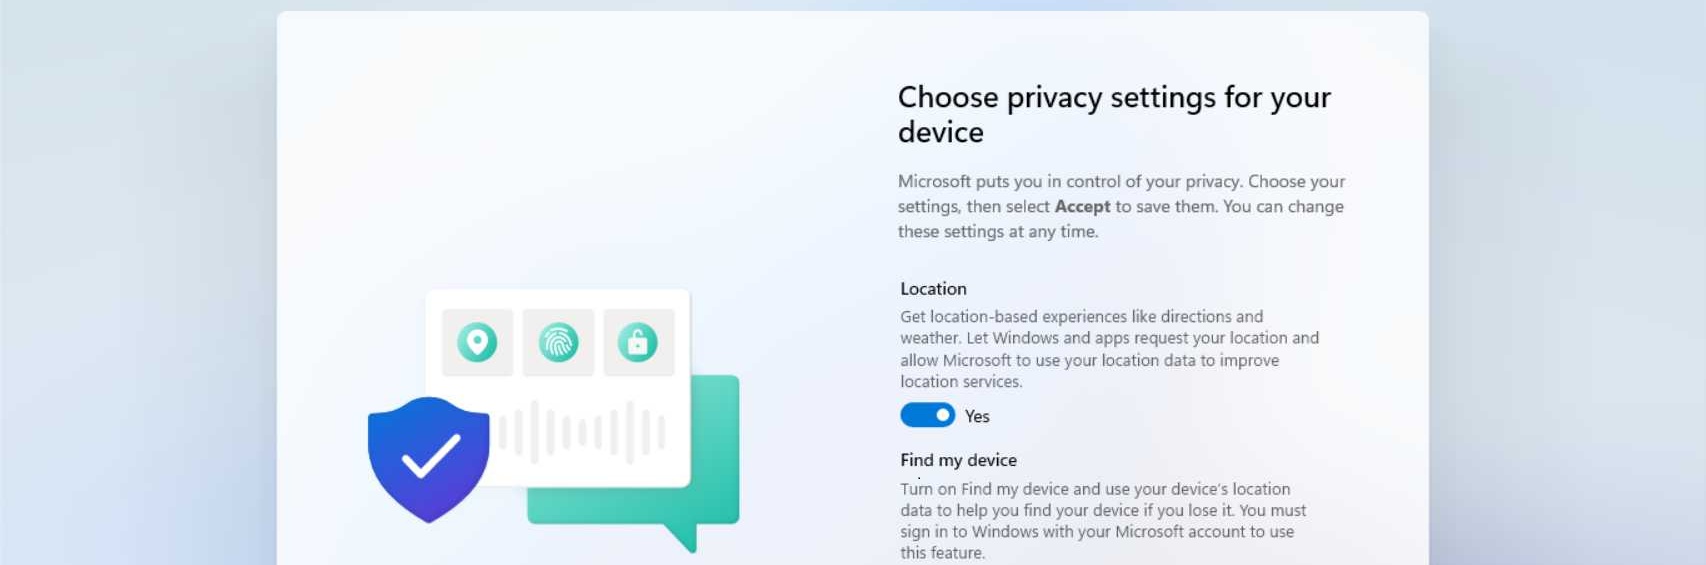
My recommendations for each are:
✅ Location. When this feature is enabled, Windows can access your location and pass it through to the Weather app and the weather display in Widgets. But other apps will need to ask your permission before they can use your location. And online services can determine your location using your IP address and other signals regardless. I recommend leaving this setting enabled, as it works with the Find my device feature below.
✅ Find my device. Microsoft’s Find My Device service stores the last known location of this PC and any others you’ve configured with a Microsoft account. ? You can view these PCs on the Microsoft account website to help you find one if it’s lost or stolen. So I recommend leaving this enabled.
❌ Diagnostic data. Windows 11 collects telemetry data so that it can detect, diagnose, and solve problems that impact all customers. That’s reasonable, but Microsoft doesn’t let you disable this behavior. And worse, it wants to collect even more data, as indicated by this toggle, which is configured to allow optional data collection by default. Don’t do it: configure this to “Required only.”
❌ Inking & typing. This setting will help Microsoft improve its language recognition and suggestion capabilities if left enabled. I recommend disabling it, though this is arguably the most innocuous of the settings I always disable here.
❌ Tailored experiences. I can’t stress this strongly enough: Do not under any circumstances enable this setting. This is not about “tailoring” experiences for you. This is about advertising. Disable it.
❌ Advertising ID. This, too, is a ridiculous thing to agree to. If you leave this enabled, Windows 11 will create a unique identifier called an advertising ID, tie it to your sign-in account, and use it to let Microsoft and third-party advertisers track your activities online, see which websites and apps you use, and then offer you customized advertisements based on that data. Do not enable this setting.
❌ Presence. This setting will only be available if your PC includes proximity sensors that work with the Presence Sensing feature in Windows 11 to detect your presence, automatically wake up the PC as you approach, and then automatically turn off the display when you leave. You may find this functionality useful, and it helps optimize Windows Hello facial recognition. But I find it annoying and I always disable this.
ℹ️ More info: You can change each of these settings later if you don’t configure them correctly during the OOBE. You can find out how in the Personalize chapter.
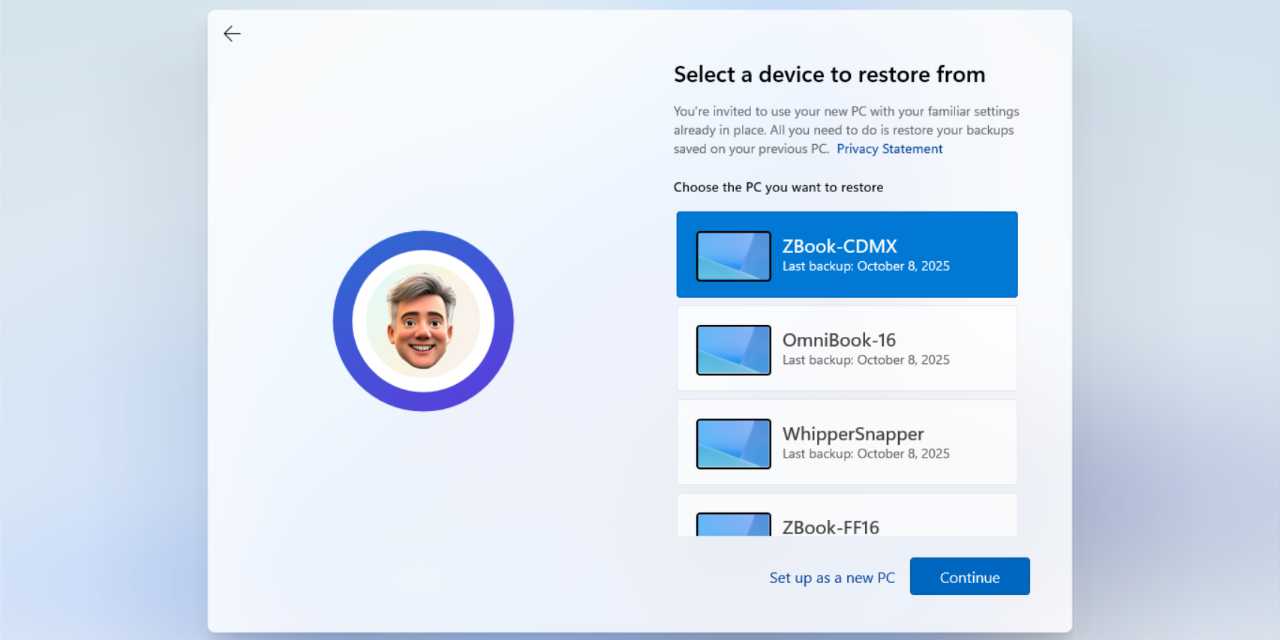
Welcome back!
Windows 10 and Windows 11 include a Windows Backup app that works as a front end for settings—OneDrive folder backup, installed and pinned app preferences, some Windows settings and preferences, and online account, Wi-Fi network, and other passwords—that are otherwise scattered throughout the system. If you used Windows Backup to back up a previous PC, you can restore the backed-up settings here.
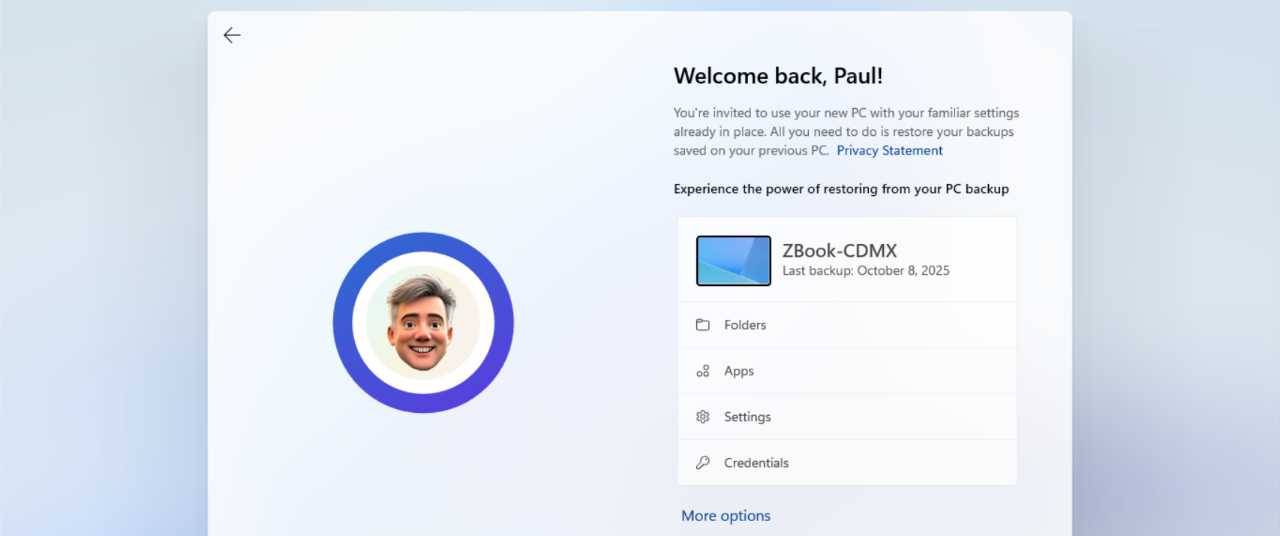
This screen initially displays the PC that was backed up most recently, but you can select “More options” to view more PCs and a “Set up as a new PC” option that is my preferred choice.
Let’s customize your experience
Let’s not. This step is tied to the privacy options you configured a few screens back, in that it’s masquerading as a benefit to you when in fact it’s really violating your privacy and pushing personalized tips, advertisements, and recommendations to you. Do not customize your experience. Choose “Skip” and move on.
Use your phone from your PC
Windows 11 includes a useful Phone Link app that integrates with your iPhone or Android smartphone and allows you to do things like send and receive text messages and phone calls through your PC. I do recommend using Phone Link, but you should set that up later. So skip this step.
➡️ Learn more: I explain how to set up and use this functionality in the Phone Link chapter.
Back up your phone’s photos to keep them safe
Here, Microsoft is recommending that you install the OneDrive mobile app on your smartphone, primarily so that you can back up any photos you take on that device to its ? OneDrive cloud storage service. If you pay for additional OneDrive storage or a Microsoft 365 subscription (which provides additional storage) and haven’t yet installed OneDrive on your phone, this is a fine idea.
Always have access to your recent browsing data
This step is tied to a malicious Microsoft Edge behavior in which Microsoft’s web browser will automatically import your browsing data from Google Chrome every time it launches. This is a terrible idea, even if you intend to switch from Chrome to Edge. Click “Not now,” only because there isn’t a “Not ever” choice.
➡️ Learn more: Microsoft Edge is a complex app with a lot of functionality and not a few malicious behaviors. Check out the Microsoft Edge chapter for more information.
Back up your files to OneDrive
This step refers to a feature of the OneDrive app in Windows 11 called Folder backup that syncs your Desktop, Documents, and Pictures folders on the PC with OneDrive in the cloud and then to any other PCs that you sign into with the same Microsoft account. This is clearly useful—OneDrive provides version history and data recovery functionality—but only if you’re paying for additional OneDrive storage or a Microsoft 365 subscription. My recommendation is to decline this offer now and then configure OneDrive as desired once you get into the Windows 11 Desktop and begin customizing the install.
➡️ Learn more: If you don’t see this step during the OOBE, Windows 11 will silently enable OneDrive Folder backup automatically. You can learn how to change that and further customize OneDrive in the OneDrive chapter.
Access granted: We’re giving you a free trial of Microsoft 365
If you signed into Windows 11 with a Microsoft account and don’t subscribe to ? Microsoft 365 Personal, Family, or Premium, you may see this screen advertising a free trial. Skip it.
Play over 100 high-quality games with PC Game Pass
As per the previous screen, you may also see a screen advertising Microsoft’s ? PC Game Pass service, one of several Xbox Game Pass subscriptions. Skip this as well.
Just a moment
And just like that, the Out of Box Experience (OOBE) and Windows Setup are complete. In moments, you will find yourself at the Windows 11 Desktop. So it’s time to begin configuring the system to your preferences and install the apps you need.
➡️ More information
Personalize Windows 11. Head to the Personalize chapter next and learn how you can customize Windows 11 so that it looks and works exactly the way you want. If you signed in with a local account, be sure to step through the tasks in the section What to do if you signed into Windows 11 with a local account.
Install apps. Windows 11 works with a wide range of apps and includes a Microsoft Store app that makes it easier than ever to discover and install apps and then keep them up-to-date.
Explore system recovery options. Windows 11 includes a suite of system recovery tools you can use if something goes wrong. It’s best to be prepared, and you can learn more about these tools in the Help and Recovery chapter.

Gain unlimited access to Premium articles.
With technology shaping our everyday lives, how could we not dig deeper?
Thurrott Premium delivers an honest and thorough perspective about the technologies we use and rely on everyday. Discover deeper content as a Premium member.