Command Line Interfaces
- Paul Thurrott
- Jul 04, 2026
-
0
Windows 11 provides a rich graphical user interface (GUI), but it also supports various command line interfaces (CLIs) through a modern Terminal app. Some of these CLIs come with Windows 11 and some are enabled by default, while others can be installed later.
Defaults
The CLI features in Windows 11 are aimed at system administrators, developers, and other power users, and so the default configuration is minimalist.
- Windows 11 includes a rich and modern Terminal app that acts as the host for any number of CLIs.
- Windows 11 still supports the legacy Windows Console Host for backward compatibility reasons, and it decides which host to use by default.
- Windows 11 includes Command Prompt and Windows PowerShell CLIs that can be accessed via Terminal or as standalone apps that use the old Windows Console Host.
- Windows PowerShell is the default CLI in Terminal.
- Windows 11 includes the Windows Subsystem for Linux (WSL), which supports multiple GNU/Linux environments with both CLI and graphical Linux apps. This feature is not enabled by default.
- Windows 11 now includes a sudo command line app, new to 2026, that is not enabled by default but works similarly to the Unix utility of the same name and lets you elevate individual CLI commands with administrator privileges.
Customize
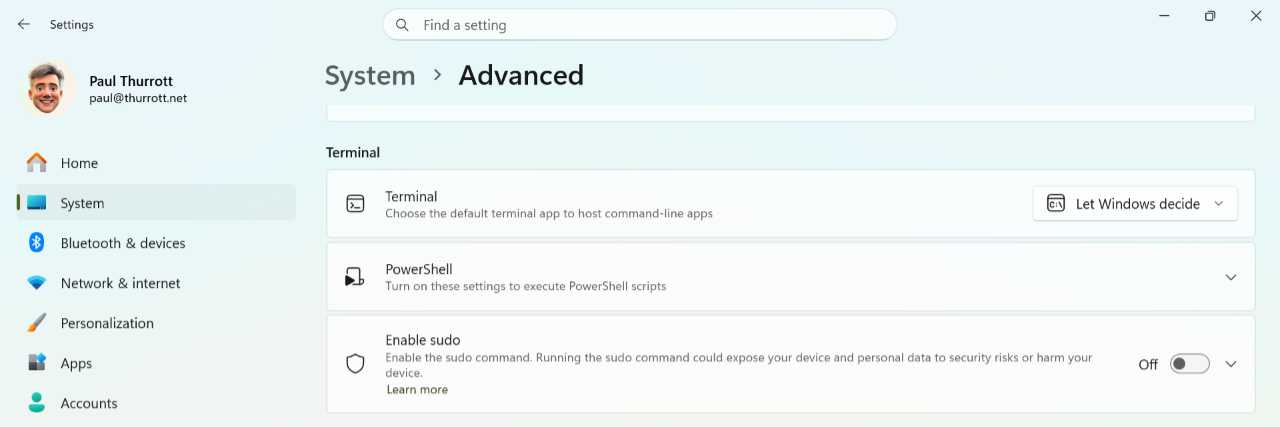
Windows 11 provides a handful of CLI settings in the Settings app, in System > Advanced, under the “Terminal” section. None are critical for casual users.
They are:
Terminal. Instead of letting Windows 11 decide which terminal host to use, as it does by default, you can configure this setting to “Windows Terminal,” which I recommend, or “Windows Console Host.”
PowerShell. This item expands to reveal a single setting, “Change execution policy to allow local PowerShell scripts to run without signing,” that’s tied to security and should not be enabled.
Enable sudo. If you’re a power user with a Unix background, you may want to enable sudo. Otherwise, leave this disabled.
In this chapter, I will focus almost exclusively on Terminal and CLIs running within it, and that app has an astonishing range of settings and customization capabilities, some of which are described later in the chapter. Additionally, you can also add external CLIs to Terminal to Windows via standalone downloads or other apps. Two notable examples include:
PowerShell. This is the modern successor to Windows PowerShell that’s built on the latest .NET stack and works in Linux and macOS in addition to Windows. It’s available as a standalone download and runs alongside Windows PowerShell rather than replacing it.
Visual Studio 2026. The lates version of Visual Studio ships with multiple CLIs that are installed along with this integrated development environment (IDE) and enabled depending on which workloads you configure.
Terminal
The Terminal app is the default command-line host in Windows 11. Command line interfaces (CLIs)–sometimes called command-line apps or console applications–provide text-based interfaces, or text user interfaces (TUIs), that harken back to the earliest days of personal computing.
Terminal is even more powerful than its predecessor in part because it can host multiple CLIs, each with its own set of commands–text-based apps and utilities that perform specific tasks and return text-based results–and syntax. You can run multiple CLIs simultaneously in Terminal, each in its own web browser-like tab. Or you can do so in multiple Terminal windows, of course.
Defaults
Though it is used to access CLIs, Terminal is a standard graphical app, so it can easily be launched via Start or Windows Search.
Tip: There’s a less obvious way to launch Terminal that’s even faster than using Start: Type Windows key + R to open the Run utility, then type wt and tap Enter.
Terminal opens with a single tab by default, and that tab hosts a Windows PowerShell CLI by default.
The Terminal window opens in a size that can accommodate a text-based display measuring 120 characters horizontally (columns) and 30 characters vertically (rows). Windows 11 determines where to place this window on-screen at launch.
Terminal maintains a separate profile–a massive collection of settings–for each CLI it hosts and it specifies specific defaults for each.
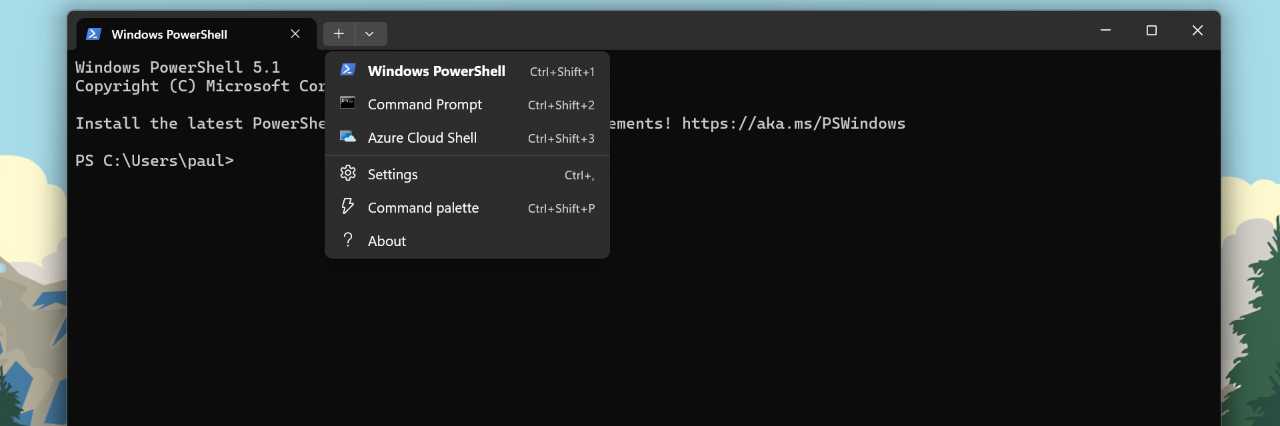
You can open a new tab with the “Open a new tab” (“+/v”) button to the right of the tabs. This is a split button. If you click the left (“+”) side, Terminal will open a new tab using the default (Windows PowerShell) profile. If you click the right (“v”) side, Terminal displays a menu of the available CLIs, plus items for Terminal settings and its Command palette feature.
Keyboard shortcut: You can also use the appropriate keyboard shortcut to open a specific CLI profile, as hinted at in the menu. For example, type Ctrl + Shift + 1 to open a new tab using the default (Windows PowerShell) profile, or Ctrl + Shift + 2 to open a new tab using the Command Prompt profile.
Tab navigation works as it does in a web browser and other tab-based apps. You select a tab to display its content and click its “Close tab” (“x”) button to close it.
Keyboard shortcut: You can type Ctrl + Tab to cycle between available tabs and type Ctrl + Shift + W to close the current tab.
To close Terminal, type exit and tap Enter. Or, click the “Close” window button as with other apps. If there are multiple tabs open, you will be prompted before Terminal closes. Otherwise, it will simply close.
Customize
Terminal can be customized almost endlessly, and if you spend a lot of time in this app, you will definitely want to spend some time examining its many settings. These are available from Terminal settings–it appears as a tab, of course–which can be accessed by selecting the right side of the “Open a new tab” split button (“v”) and then “Settings.”
Keyboard shortcut: You can also open Terminal settings quickly by typing Ctrl + , (comma).
Yes, this is a daunting set of customization capabilities. Here, I will discuss some of the more impactful changes you can make, as fully documenting Terminal would require a book in its own right.
Learn more: Customizing Terminal is almost as much art as it is technical skill, and it’s well beyond my abilities to explain well. If you are interested in best taking advantage of Terminal, I strongly recommend Kayla Cinnamon’s YouTube channel and Microsoft’s Windows Command Line blog.
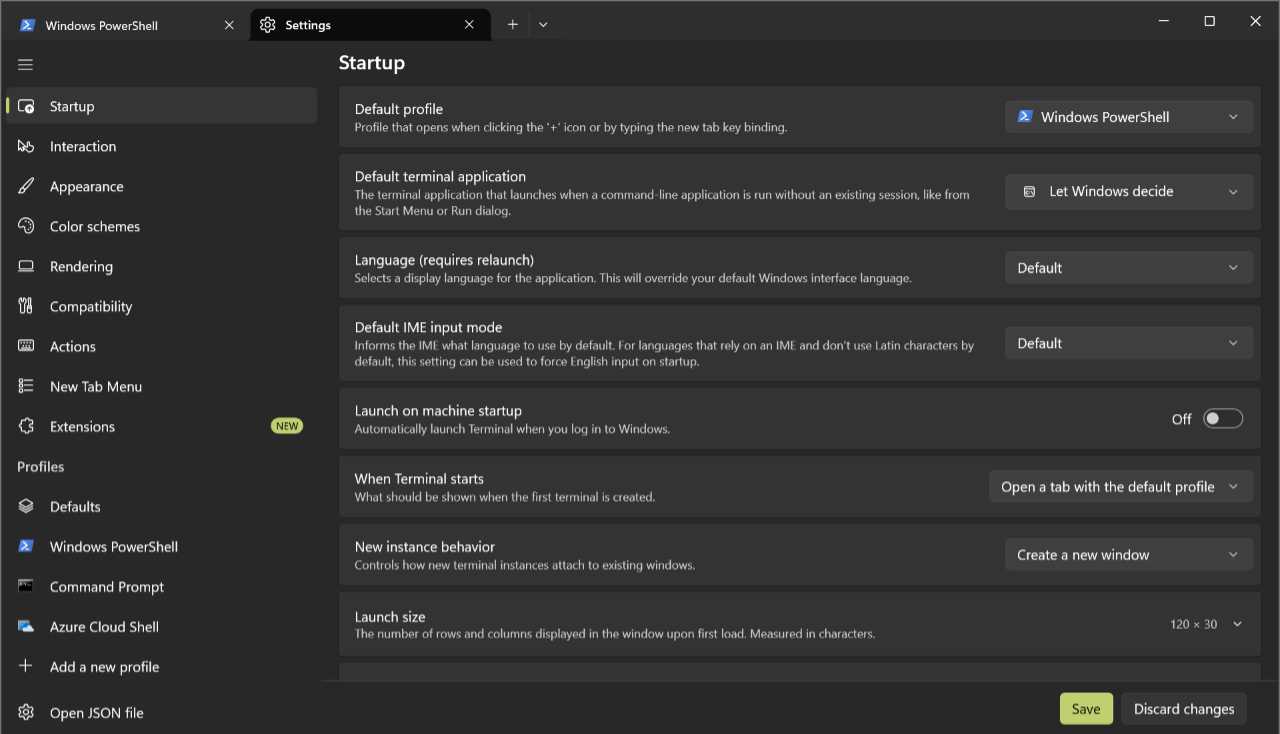
Startup settings
The Startup page appears when you first open Terminal settings and it provides several useful settings related to what happens each time you open the app.
- Default profile. This setting determines the CLI profile that Terminal uses when it opens and when you click the left side (“+”) of the “Open a new tab” button. It’s set to Windows PowerShell by default, and this is likely the best option for most.
- Default Terminal application. This setting mirrors the “Terminal” setting in Settings > System > Advanced.
- When Terminal starts. This setting determines how Terminal opens when you start it, either a new window with a single tab open to the default profile (the default) or with whatever windows or tabs you were using in your last Terminal session.
- Launch size. By default, Terminal opens with a CLI environment that is 120 characters (columns) wide and 30 characters (rows) tall. You can use this setting to arbitrarily change either of those values.
- Launch parameters. Windows determines where to place each new Terminal window you open, but you can use the options under this item to specify a location on screen in x and y coordinates, force the app window to be centered on-screen by default, or specify the type of window (Default, Maximized, Full screen, Focus, or Maximized focus).
Appearance and Color Schemes
The Appearance and Color schemes pages in Terminal settings each contain several options related to how Terminal looks. A few key settings here include:
Appearance > Application Theme. Here, you can set the application theme for Terminal to Dark (the default), Dark (Legacy), Light (Legacy), Use Windows theme (Legacy), Light, or Use Windows theme.
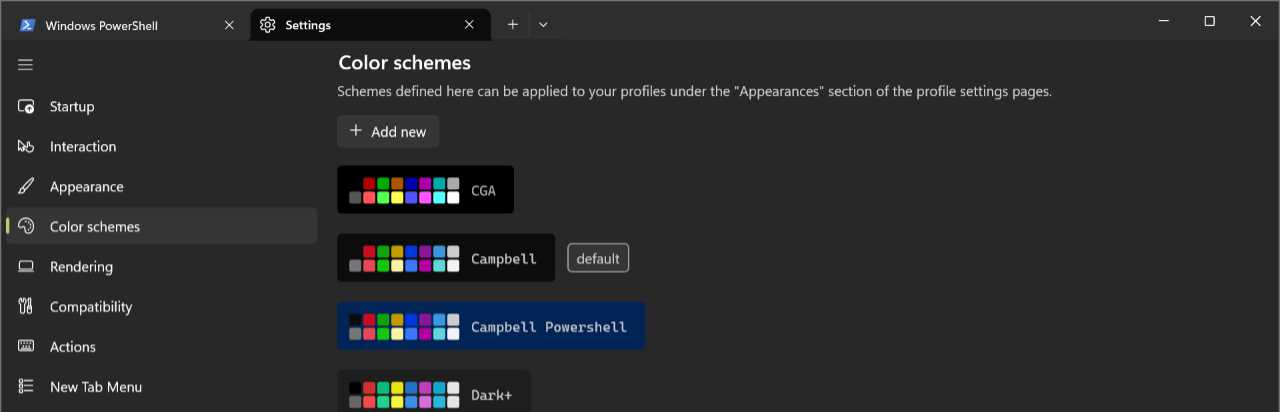
Color schemes. By default, Terminal uses a theme called Campbell that features a black background and colored text. But you can change the default theme to your liking, edit existing themes, or add new themes of your own here.
Profile settings
The settings noted above impact the Terminal app. But you can also configure individual profiles, each of which represents a CLI, and you can configure those profiles separately from the app defaults and from each other. You can see the available profiles below the “Profiles” header in the settings navigation bar on the left. And you can use the “+ Add a new profile” item to create your own. This lets you have multiple profiles, each with its own unique settings, for any CLI.
To see the available settings, select a profile.
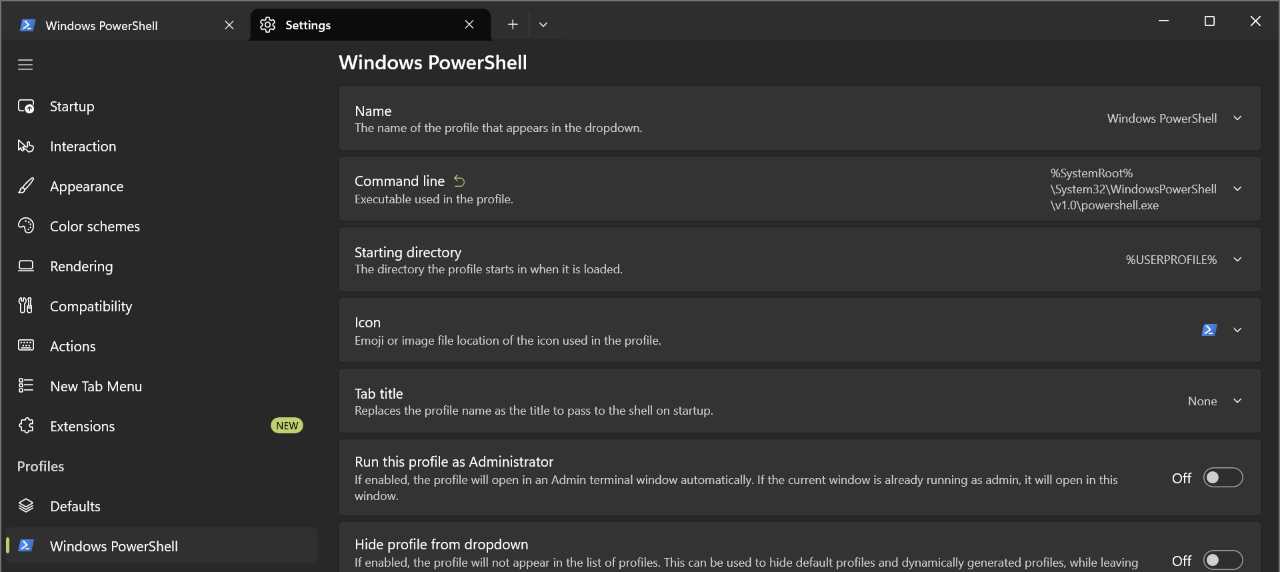
Most of the settings you see here—Name, Starting directory, Icon, Tab title, and so on—are fairly obvious. But if you dig into the Appearance and Advanced sections of each profile, you will find some useful and even fun options.
Key among them are:
- Appearance > Background image. Here, you can set the background of the profile to a specific image or just use the same image used for the Desktop wallpaper.
- Appearance > Transparency. This set of options lets you set the background opacity of the Terminal window–its level of translucency–and, optionally, enable a so-called Acrylic material effect to the translucency.
![]()
Command palette
Terminal has a Command palette feature that lets you easily invoke actions, which are commands that this app understands. To display the Command palette, click the right side (“v”) of the “Open a new tab” split button and then select “Command palette” from the menu that appears.
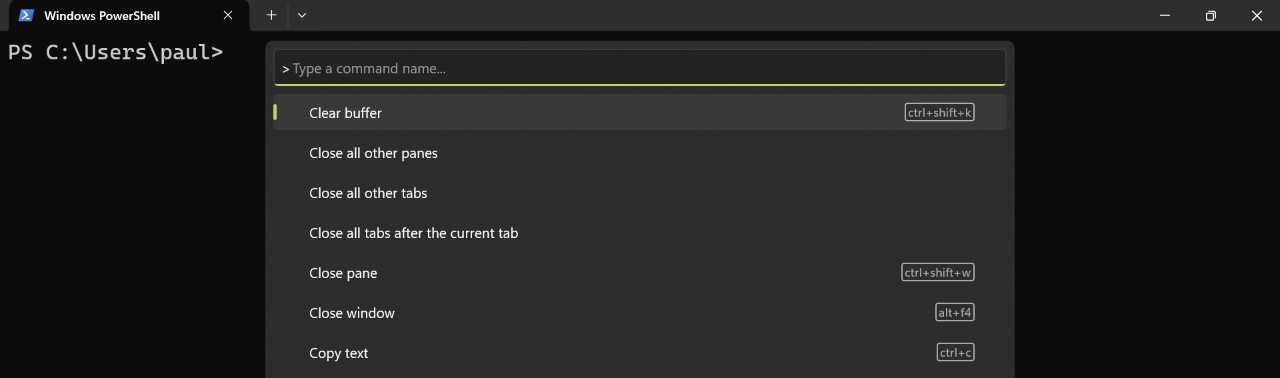
Keyboard shortcut: You can open Command palette more quickly by typing Ctrl + Shift + P.
The Command palette is handy when you don’t know how to do something specific. To find what you’re looking for, scroll through the list of actions shown in the drop-down, or you can begin typing and the Command palette will filter the list based on what you type.

The Command palette is used to find and run actions, which are commands used to control the Terminal application. Command palette lists available actions alphabetically. So you can scroll through the list to find the action you need, or you can start typing and the Command palette will filter the list based on what you’ve typed.
If you’re getting started with Terminal, the Command palette is a great way to browse available commands and the place to go when you’re stuck. For example, while you can open a second command-line environment in a new tab by using the “Open a new tab” menu, the tooltip that appears lets you know that you can alternatively open that second environment in a new pane instead by holding down the Alt key when you make your selection. This splits the window vertically.
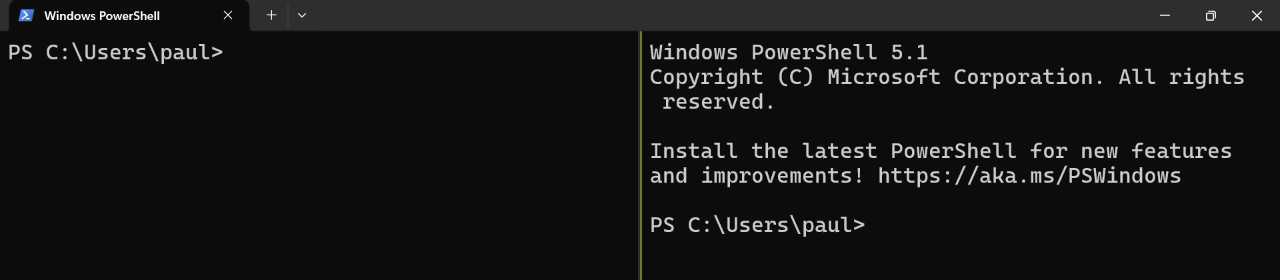
But what if you want to split it horizontally instead?
Command palette to the rescue: You can type pane to discover all the actions related to panes. And among them is “toggle pane split orientation,” which toggles the panes between vertical and horizontal orientations.
The Command palette also shows keyboard shortcuts for available actions, which can be useful for anyone using this command line tool: If you can remember a shortcut, that’s always the fastest way to get something done.
Tip: This is beyond the scope of this book, but Terminal also lets you create your own actions, each of which can be accessed through the Command Palette or with its own unique keyboard shortcut. You do so in Terminal settings, on the Actions page.
Zoom the display
Terminal supports web browser-like zoom capabilities, letting you temporarily resize the text in the current CLI environment on the fly. For example, if you zoom in a few times, the text gets quite big.
Because there’s no obvious UI to help you zoom, keyboard shortcuts make the most sense:
- Zoom in. To zoom in–make the text bigger–type CTRL + + (Plus).
- Zoom out. To zoom out–make the text smaller–type CTRL + – (Minus).
- Return to default zoom level. To return to the default zoom level, type CTRL + 0.
Tip: The default zoom level is configured in Terminal settings and can be configured on a profile-by-profile basis.
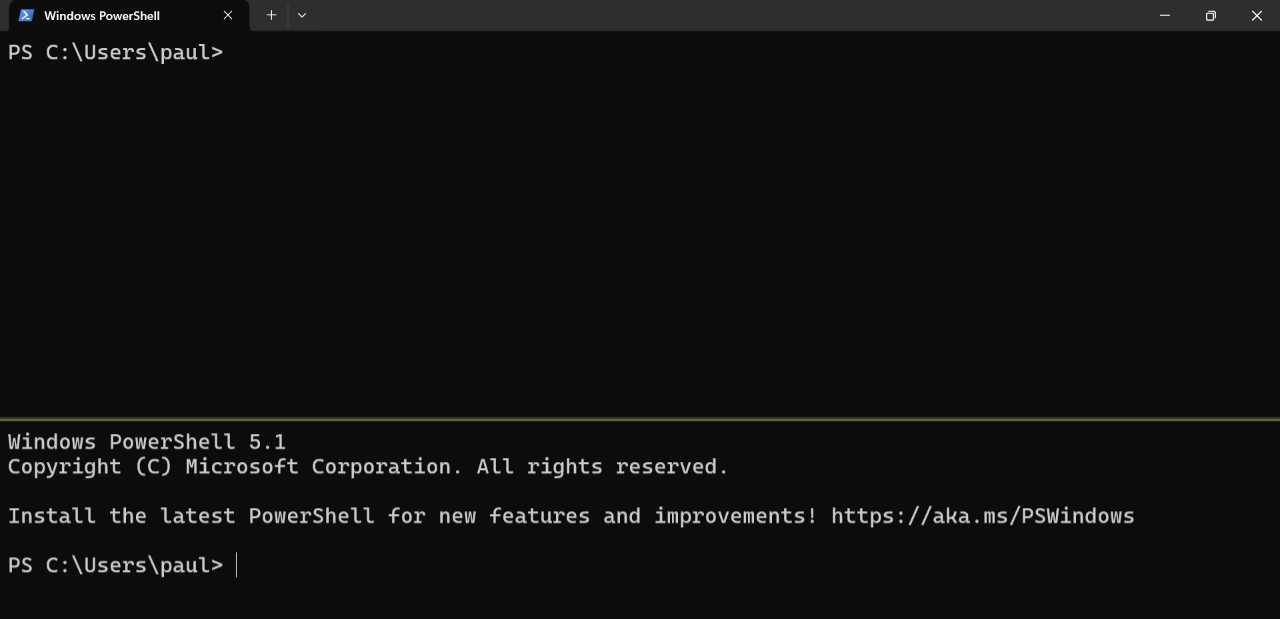
Use Terminal in Focus mode
Terminal supports a Focus mode that hides the app’s title bar and tabs so you can focus on the command line environment you’re using. It’s an especially interesting option for those with multiple display setups who wish to use Terminal full-screen on its own display.
To enable Focus mode, open the Command palette, type focus mode, and tap ENTER. Terminal takes on a svelte new look.
Keyboard shortcut: If you are going to use Terminal like this, it makes sense to enable Full-screen mode. To do so, type F11.
To exit Focus mode, just repeat the same steps: open the Command palette, type focus mode, and tap Enter.
Navigate to a specific folder more easily
While each CLI you use in Terminal supports its own set of commands and whatever specific syntax, one thing is common to all of them: It can be a bit tedious to get to a specific folder because of all the typing involved. Fortunately, Terminal does what it can to make this easier. Here are some tips.
Folder auto-completion. When you are navigating into a new folder (or folder structure), you can use auto-complete to move more quickly. This is especially true when you know the name of the folder(s) you are trying to traverse. For example, if you are in C:\Windows and wish to navigate to the Web folder, you can type cd w and then hit Tab to autocomplete the first folder name that starts with w. If the first name that comes up isn’t correct, just hit Tab until the right one does appear.

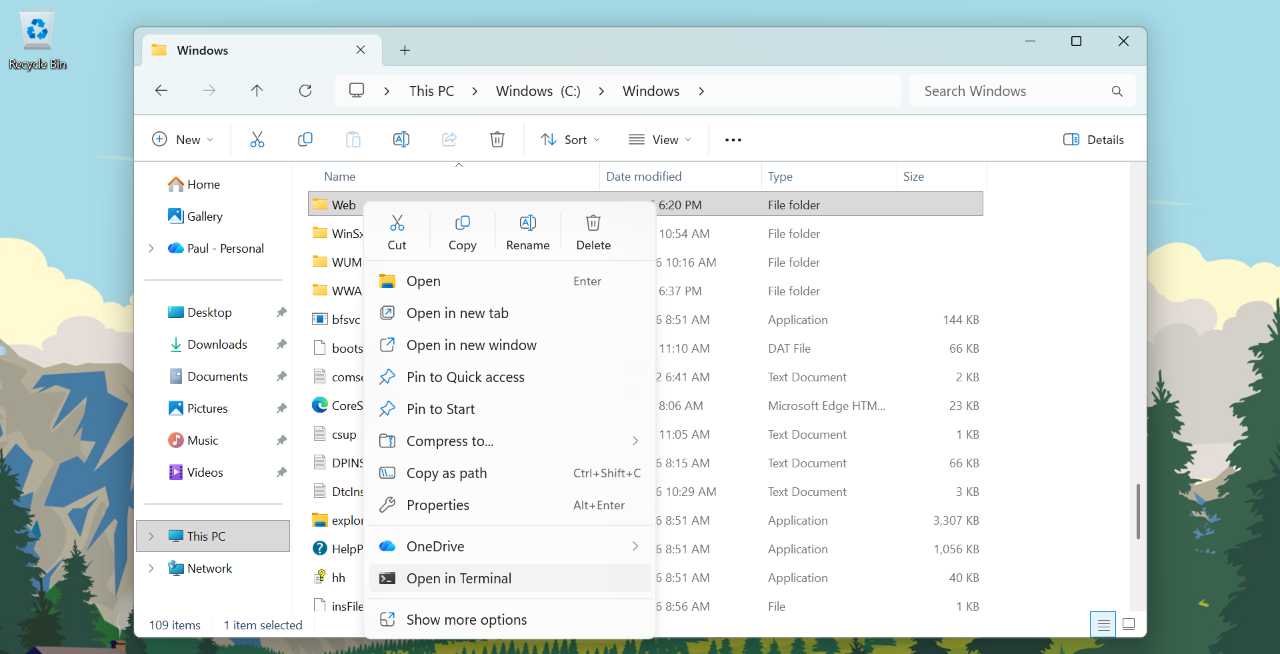
Open Terminal to a specific folder. If you have a long and complex folder location to get to and don’t mind using Terminal’s default profile (typically Windows PowerShell), you can navigate to the location of the containing folder in File Explorer and then right-click the folder you wish to be in and select “Open in Terminal” from the context menu that appears.
Use File Explorer to get the path. If you have a long and complex folder location to get to and you need to use a specific Terminal profile, you can navigate to the location of the folder in File Explorer and select the contents of the address bar (type Alt + D), which is the path to that folder. Then, open Terminal with the profile you need and type cd followed by Ctrl + V (for Paste) and then Enter.
Drag and drop a folder. If you have a long and complex folder location to get to, type cd followed by a space in Terminal. Then, navigate to the location of the containing folder in File Explorer, select the folder to which you wish to navigate, and then drag and drop it into Terminal. This will append the path to the command line, so you just need to hit Enter to go there.
Administrator Privileges and Sudo
Though you can run any app with administrator privileges as needed, this is rarely necessary because Windows 11 will display a User Account Protection (UAP) dialog so you can authenticate and grant additional privileges. But CLIs are different, and so Windows 11 provides two ways to elevate privileges with the Terminal app.
Run Terminal with administrator privileges
Sometimes, you will be instructed to open Terminal as an administrator so you can perform a troubleshooting or system-level task that requires additional privileges.
There are two primary approaches.
- With a new Terminal window. You can launch Terminal as an administrator as you would any other app: Locate it in Start, right-click, and choose “Run as administrator.” Then, click “OK” in the User Account Control (UAC) dialog that appears.
- While using Terminal. If you’re already using Terminal, you can open a new CLI with administrator privileges at any time by clicking the right side (“v”) of the “Open a new tab” button and pressing and holding the Ctrl key as you click the CLI profile you need. The CLI you selected opens in its own window instead of a tab for security reasons. And as above, you will need to address a UAC dialog.
Tip: When run with administrator privileges, Terminal displays a small shield icon and the tab name is prepended with the text “Administrator.” You should close this window as soon as you complete the task that required elevated privileges.
Use sudo to run an individual command with administrator privileges
New to 2026, Terminal users can enable a sudo (“superuser do”) command line command that works like the well-understood Linux CLI command of the same name. This lets you run Terminal normally and then elevate privileges for individual commands or scripts.
Enable and configure sudo
To get started, you have to enable sudo. You do this in the Settings app by navigating to System > Advanced and configuring “Enable sudo” (under “Terminal”) to “On.” You will be prompted to authenticate with a User Account Control (UAC) dialog.
When enabled, you can expand the “Enable sudo” item on this page to reveal a sub-setting, “Configure how sudo runs applications,” that is configured as “In a new window” by default. With this configuration, sudo works much like the experience of running a Terminal window with elevated privileges. But if you want this to work more as it does in Linux/Unix, you can change that to “Inline.”
Learn more: You can read more about sudo and this setting on the Microsoft Learn website.
Use sudo in a Terminal CLI
To run a single command with administrator privileges, you just prepend the text sudo in front of that command in the CLI. For example, to run the Windows Package Manager (winget) with admin privileges, you could use the following:
>sudo winget
You will have to authenticate with a UAC dialog.
Command Prompt
Command Prompt, sometimes called the Command shell, is a legacy environment that dates back to the original version of Windows NT. But it is modeled after the Command.com command-line interpreter that Microsoft provided with MS-DOS, the text-based predecessor to Windows. As a result, it shares many commands with that earlier system too.
Command Prompt is still provided in Windows for backward compatibility reasons, but Microsoft recommends that anyone needing automation capabilities today should focus on Windows PowerShell instead. While I agree with that advice, I can at least provide a few tips for using Command Prompt here.
Access Command Prompt
Command Prompt can be easily found in Start. Unlike in previous Windows versions, it is no longer a separate standalone app but is instead a command-line profile that runs in the Terminal app.

Tip: The quickest way to launch Command Prompt is to open Start and type cmd.
Sometimes, you will need to run Command Prompt as an administrator. To do so, open Start, type cmd, and then right-click on Command Prompt in the search results list and choose “Run as administrator.”
Tip: Curiously, when you run Command Prompt as an administrator, it appears as a standalone app and not inside of Terminal.
Learn which commands are available
Microsoft maintains a useful Command Prompt command reference that will help you get started with some old favorites like cd (change directory), dir (directory listing), format, mkdir (make directory), and ver (version). But you can also use Command Prompt to find a list of its available commands. To do so, open Terminal to a Command Prompt tab and type:
>help
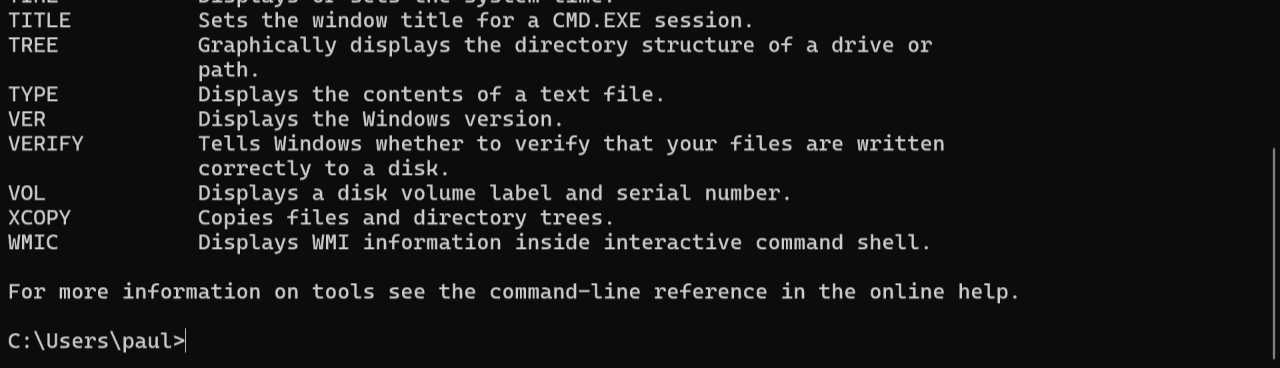
The output from this command–the list of available Command Prompt commands–will scroll past the bottom of the console window, hiding much of it. To see the rest, you can scroll back up with the keyboard or mouse. Or you can type the following to cause the output to pause each time it has filled the height of the window:
>help | more
Tap Space or Enter to continue listing available commands.
Learn how to use individual commands
In addition to the online command reference noted above, you can use the help command in Command Prompt to get help with an individual command. For example, to learn how to use the dir command, you would type:
>help dir
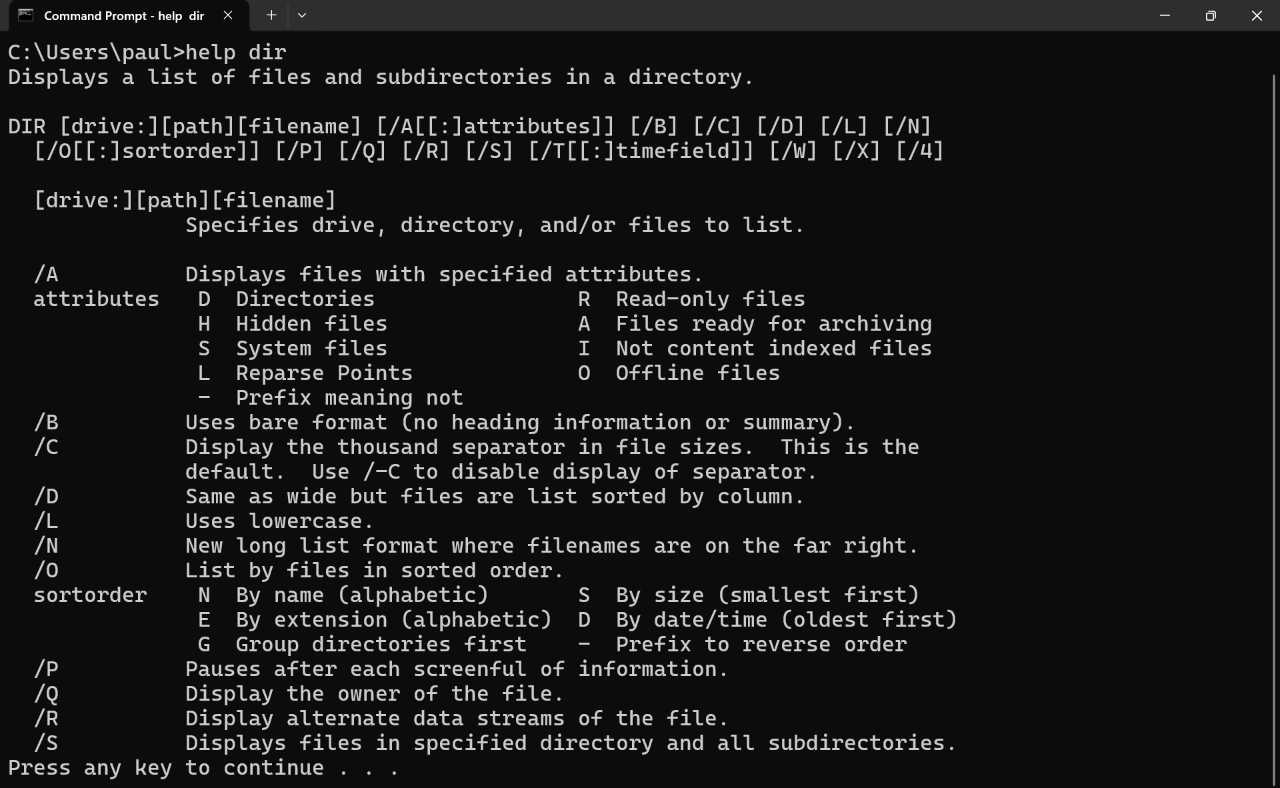
Tip: In this case, you don’t need to append | more to the end of the command, as help will automatically pause each time the text has filled the height of the window.
Learn some useful Command Prompt commands
While most Windows functionality is exposed via graphical interfaces, there are still some useful and unique Command Prompt commands that are worth knowing about.
Some of these include:
Fix corrupt system files. The System File Checker scans Windows and looks for any corrupted system files and, if needed, restores clean and working versions:
>sfc /scannow
Tip: System File Checker requires an elevated Command Prompt with administrator privileges.
Change the file extension for one or more files. To change the file extension for all files in the current directory from one extension (in this case, jfif) to another (in this case, jpg), you can use:
>ren *.jfif *.jpg
See the full Windows version number. You can see the version number of Windows, including the full build number, by typing:
>ver
Tip: Type winver instead to see the graphical version.
Get a detailed battery report. Windows will generate a report in the current directory that details the battery usage and estimates the battery life of portable PCs:
>powercfg /batteryreport
Linux
Windows Subsystem for Linux (WSL) is an optional Windows 11 feature that provides a complete GNU/Linux environment in Windows, with support for CLI and graphical Linux applications. WSL is aimed at developers who need both Windows and Linux and would like to avoid the inconveniences of using multiple PCs, virtual machines (VMs), or a dual-boot configuration. But it’s also an excellent and free way for any Windows 11 user to learn the Linux CLI.
Install Linux in Windows 11
WSL has evolved a lot since its initial implementation, and it’s now much easier to install this feature than before.
To get started, open Terminal with administrator privileges and type the following command:
>wsl --install
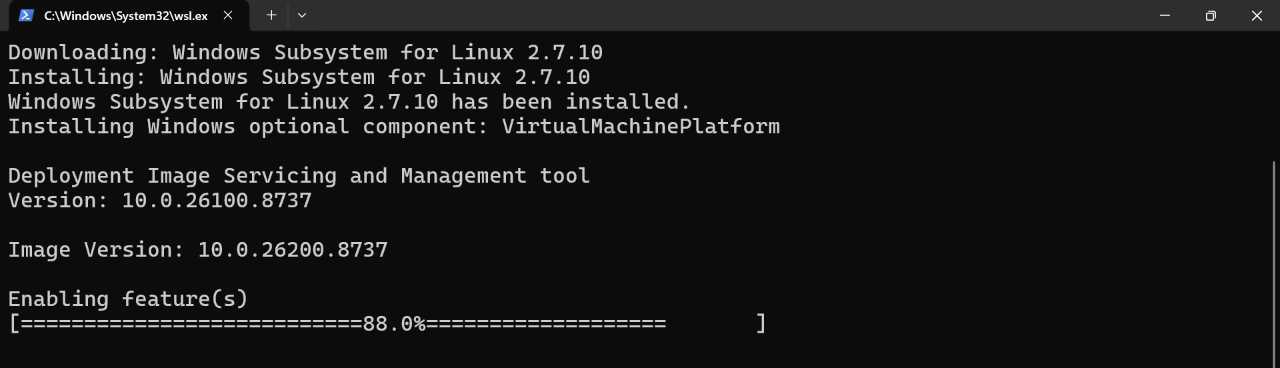
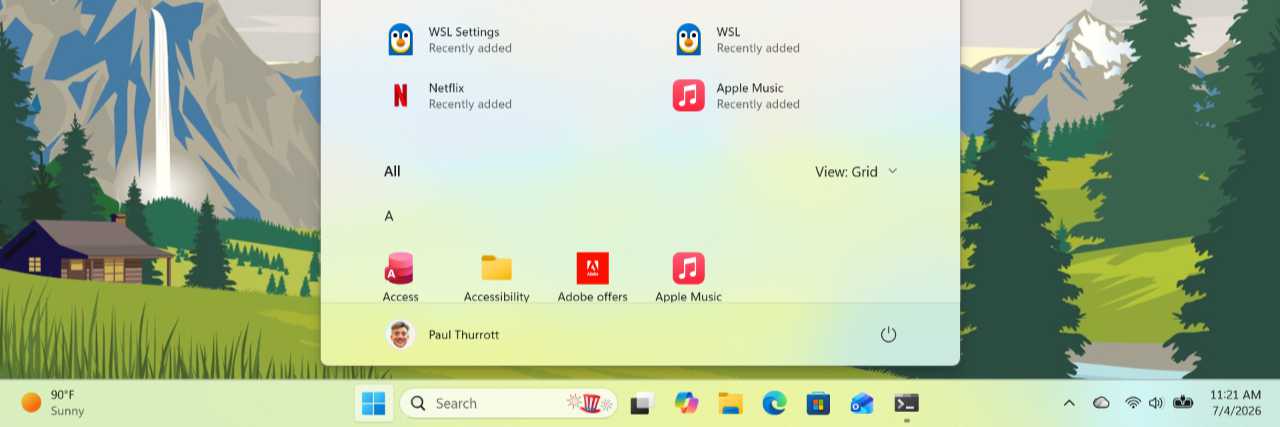
When the install completes, you’re dumped back into the CLI, and you can see two new app shortcuts in Start, for WSL and WSL Settings.
You’re not done yet. The next step is to install a Linux distribution. You can use the following command in Terminal to see which distributions are available.
>wsl --list --online
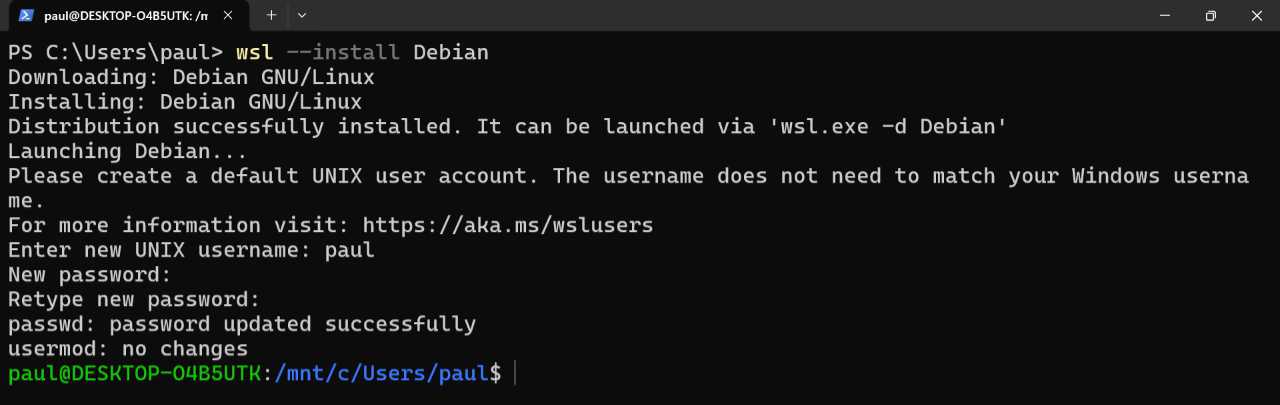
The output will list the name and friendly name of each distribution. To install one, use its name, like so (using Debian as an example):
>wsl --install Debian
Whichever method you use, WSL will prompt you to create a default UNIX user account and a password for use in that CLI. This account is unique to the Linux distribution you just installed, and it’s configured with administrator privileges, and WSL will automatically sign in to this account when you open the distribution CLI.
Once you complete this, the prompt changes to a Linux CLI prompt as the CLI is running within the current Terminal tab.
Type exit to close the new CLI. Then, open Start, where you will find a shortcut for the Linux distribution.
Going forward you can run open this distribution in a few different ways:
- Open the distribution in its own CLI window. Just find the distribution shortcut in Start and launch it like any app.
- Open the distribution within an existing Terminal window. Use the following command to open the distribution from within Terminal (again using Debian as an example):
>wsl --distribution Debian
Tip: Remember that you can install any number of distributions.
Before moving on, you should ensure that the Linux distribution is up-to-date. To do so, type the following command:
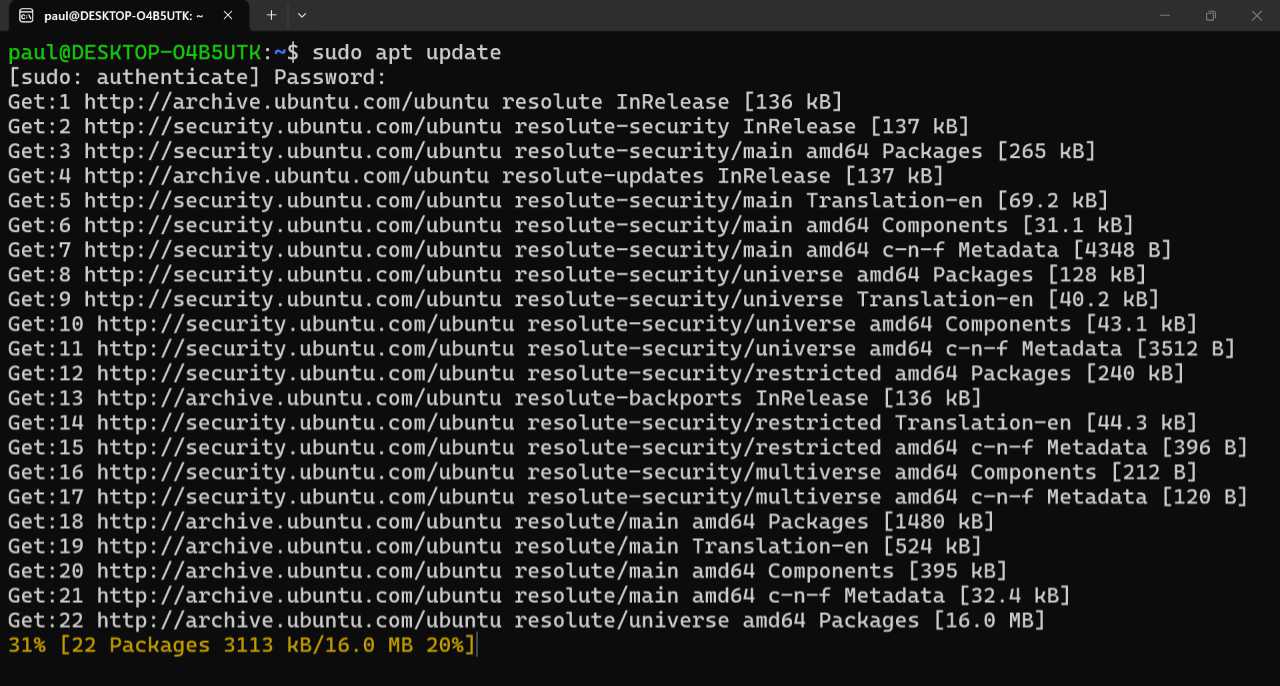
>sudo apt update
You will need to supply your password because the sudo command runs apt with elevated privileges. And as you can see, some number of packages will need to be updated.
To update all the packages at once, type the following:
>sudo apt upgrade
This process could take some time and it could be interactive, meaning that you might occasionally need to answer prompts (with a “Y” for yes or an “N” for no), depending on which packages need to be upgraded.
When that completes, you can make sure the distribution is completely up-to-date by running the following command again.
>sudo apt upgrade
It should say that “All packages are up to date.”
Configure WSL
WSL includes a Windows Subsystem for Linux Settings app for configuring various aspects of this feature.
You can ignore this app for the most part, as WSL is configured optimally for most users, especially those who are experimenting with Linux for the first time.
Of more interest are the ways in which you can configure WSL from the command line. You do this from Terminal, not a Linux CLI, using the wsl command.
To see which Linux distributions are installed, open a Terminal window (not a Linux CLI) and type one of the following:
>wsl --list
>wsl -l
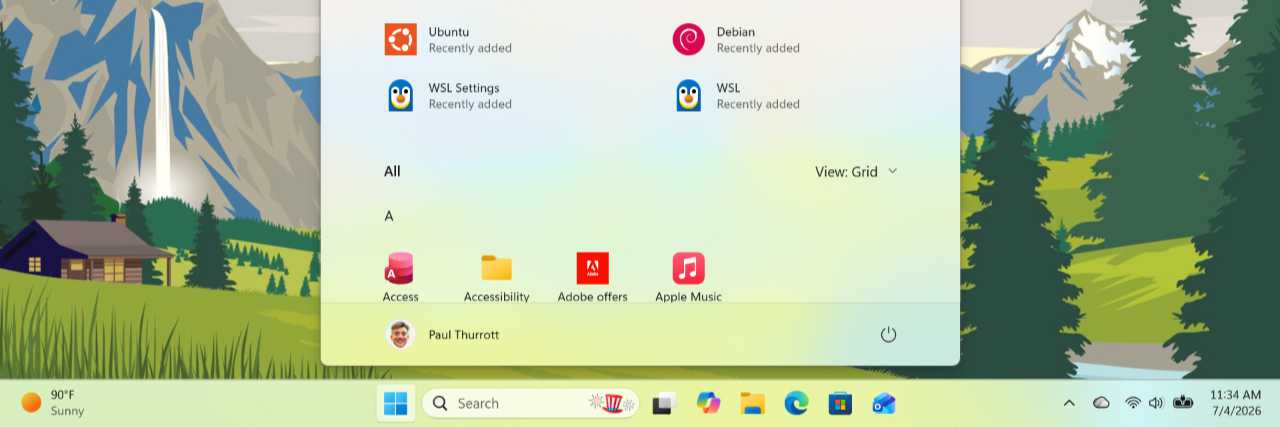
As you can see, the Debian and Ubuntu distributions are installed, and it notes that Debian is the default. That means that if you just run WSL from Start, a Debian CLI window will open.
If you have two or more distributions installed, you can change the default using either of the following commands:
>wsl --set-default Ubuntu
>wsl -s Ubuntu
You can also uninstall a Linux distribution from WSL using the following command (with the appropriate distribution name):
>wsl --unregister Debian
There is a lot more to wsl. You can learn more on the Microsoft Learn website.
Use a Linux CLI
While it’s not really possible to provide a complete overview of the Linux command-line shell, called Bash, I can at least help you get started.
More information: For a more complete overview of this environment, the official Ubuntu tutorial, The Linux command line for beginners, is quite good.
Get the full path of the current directory
You can use the pwd (path working directory) command to view the full path of the current directory. This is useful because Bash, unlike Command Prompt and Windows PowerShell, typically doesn’t display that information in the default prompt (though some distributions configure it otherwise).
>pwd

Basic navigation
As with other CLIs, you can quickly navigate around in Bash using specific commands. For example, the ls (list) command will list all the files and directories in the current directory.
>ls
Tip: The Linux ls command works like dir in Command Prompt, and you can use dir in place of ls if that’s more familiar.
The cd (change directory) command helps you navigate to a new location. For example, the following command will always navigate you directly to your user account’s home directory:
>cd ~
And the following command will move you to the root of the file system:
>cd /
As with Command Prompt and Windows PowerShell, this command will move you up one level in the directory hierarchy.
>cd ..
Learn more about commands
Linux provides a command called man (for manual) that displays pages of information about any available command. For example, to learn more about the ls command, you could use the following:
>man ls

Run a command with administrative privileges
As noted previously in this chapter, you can prepend the sudo command when running another command to do so with administrator privileges. For example, if you navigate to /mnt/c to view the Windows file system and use the ls command to get a list of the contained files and directories, you can see that ls cannot access some system files because of a permission issue.
But if you run that same command under sudo, you will have to authenticate yourself with your UNIX username and then there are no permission complaints.
Install and use Linux graphical apps
WSL isn’t just about CLIs, you can also install and use Linux graphical apps.
Before you get started, you should download the correct graphics driver for your PC, as this will let Linux apps use hardware-accelerated OpenGL rendering for better performance:
Next, run the Linux CLI and make sure it’s up-to-date per the earlier instructions. Linux GUI apps are installed similarly to CLI apps, with the apt command.
Some apps you can consider installing include:
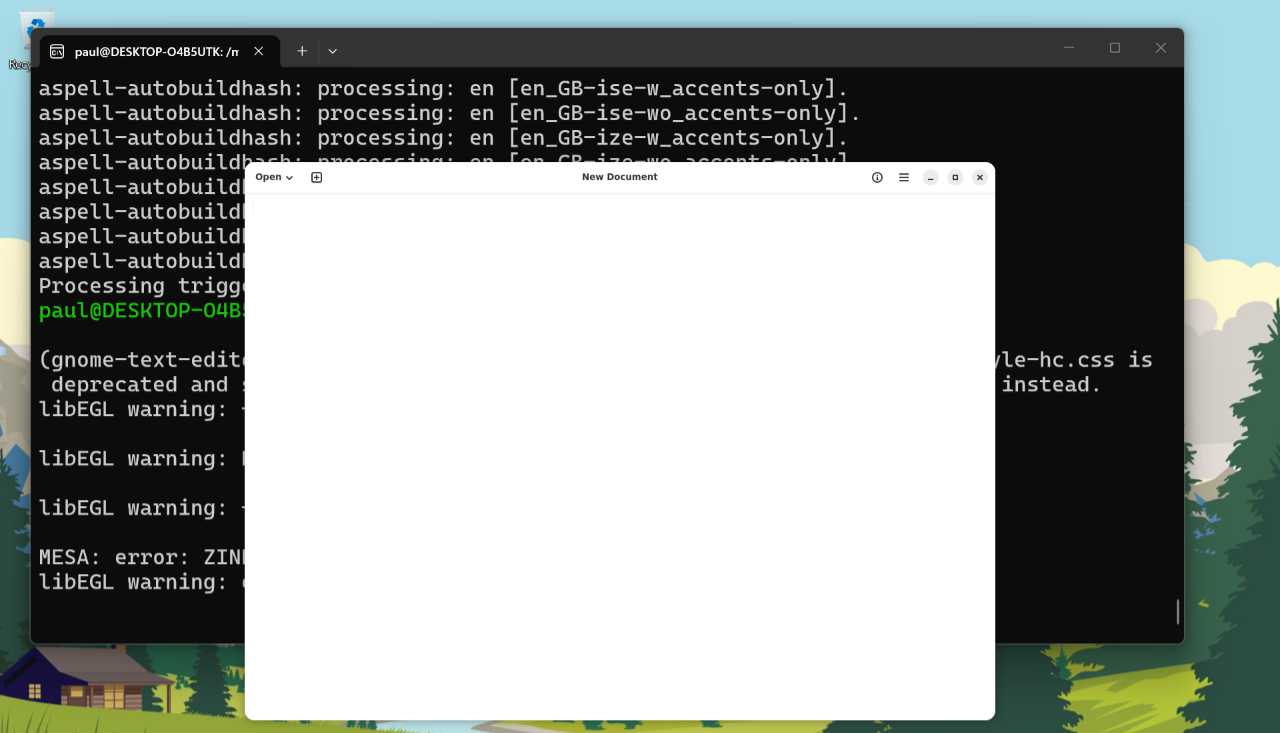
Gnome Text Editor. The default text editor in the GNOME desktop environment for Linux.
>sudo apt install gnome-text-editor -y
>gnome-text-editor
GIMP. A free and open-source image editor.
>sudo apt install gimp -y
>gimp
Nautilus. A Linux file manager application.
>sudo apt install nautilus -y
>nautilus
Learn more: You can learn more about running Linux GUI apps on the Microsoft Learn website.
File system interoperability
Though Microsoft recommends keeping your Windows- and Linux-based files separate, you may want to move files between the two environments. So WSL offer various ways to interoperate with the Windows file system.
Here are a few key methods.
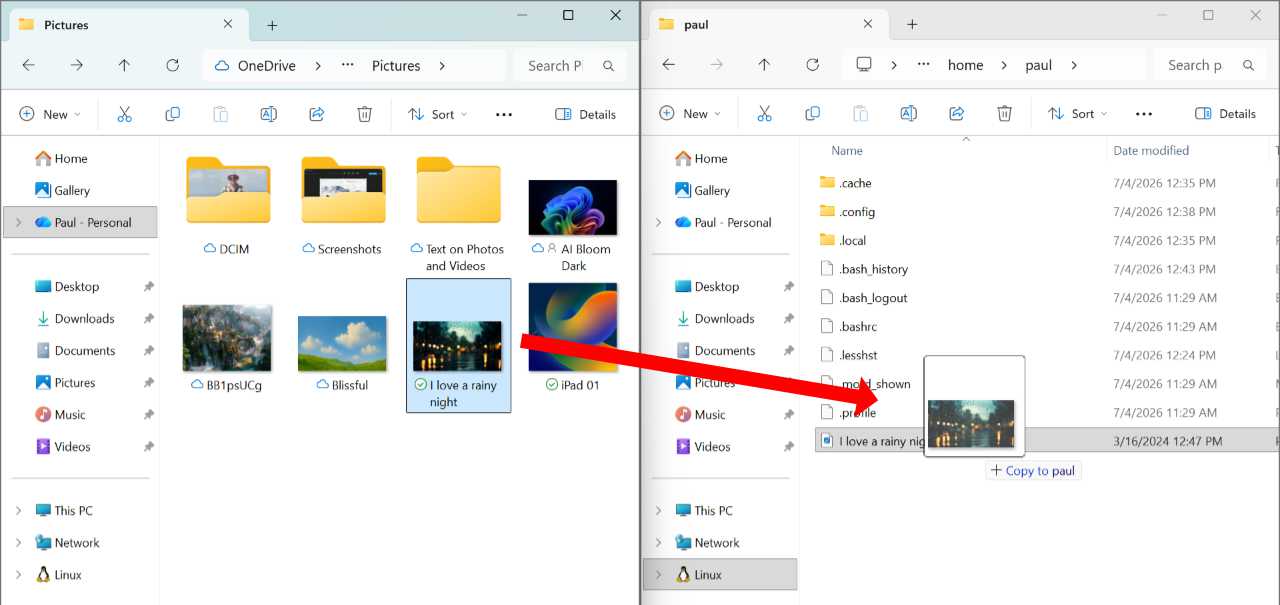
Access the Windows file system from the Linux command line
You can easily browse your Windows PC’s file system from the Linux command line environment because each drive in Windows is mounted as a drive in Linux too. The C:\ drive, for example, is mounted in /mnt/c. So you can use commands like the following to access the Windows file system.
>cd /mnt/c
>dir
>cd windows
>dir *.exe
Open the current directory in File Explorer
If you are browsing through the Linux file system in WSL and would like to open the current directory in the Windows 11 File Explorer, you can do so with the following command.
>explorer.exe .
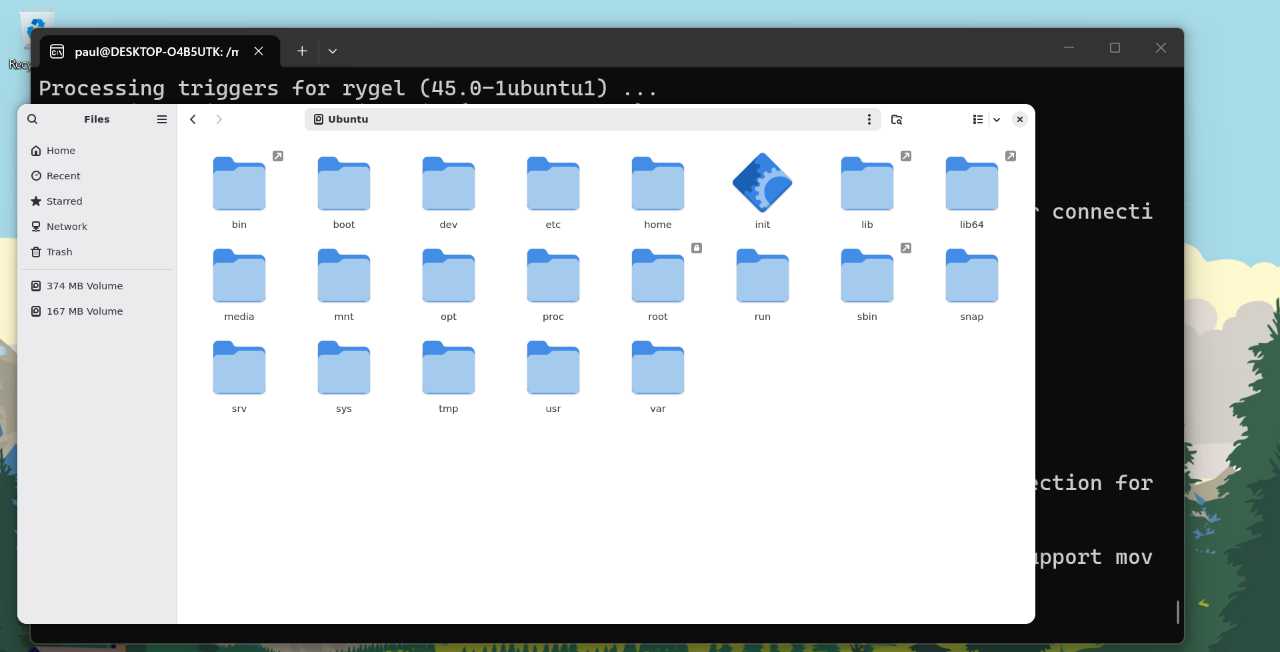
Access the Linux file system with File Explorer
When you install WSL, Windows 11 adds a Linux entry to the bottom of the File Explorer navigation bar, below This PC and Network, so you can easily access the file system for each installed distribution. Here, for example, you can see that a single distribution, Ubuntu, has been installed.
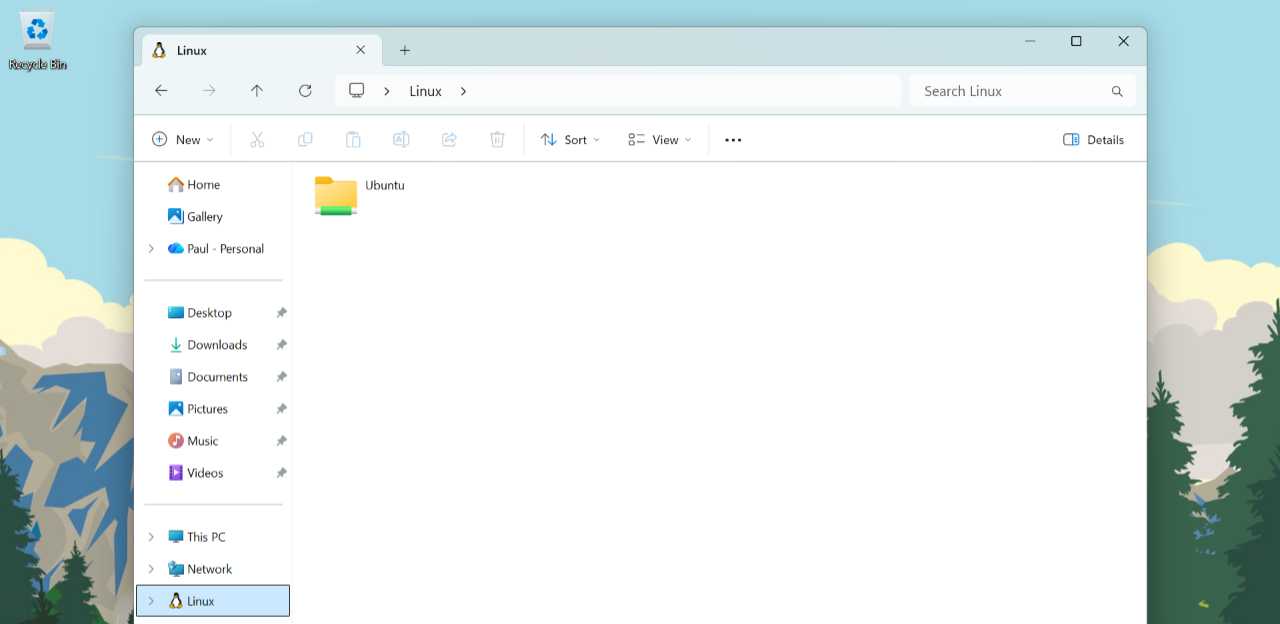
This lets you seamlessly copy files into the Linux file system so that they can be used in that environment, and vice versa.
Windows Package Manager
The Windows Package Manager is a package management system designed to help you automate the installation, upgrading, configuring, and uninstalling of apps in Windows 11. The trick is that it’s a CLI command. But don’t let that bother you: It’s easy to learn and use, and there are third-party graphical front-ends if you get stuck or want to automate app updates more seamlessly.
Get to know the Windows Package Manager
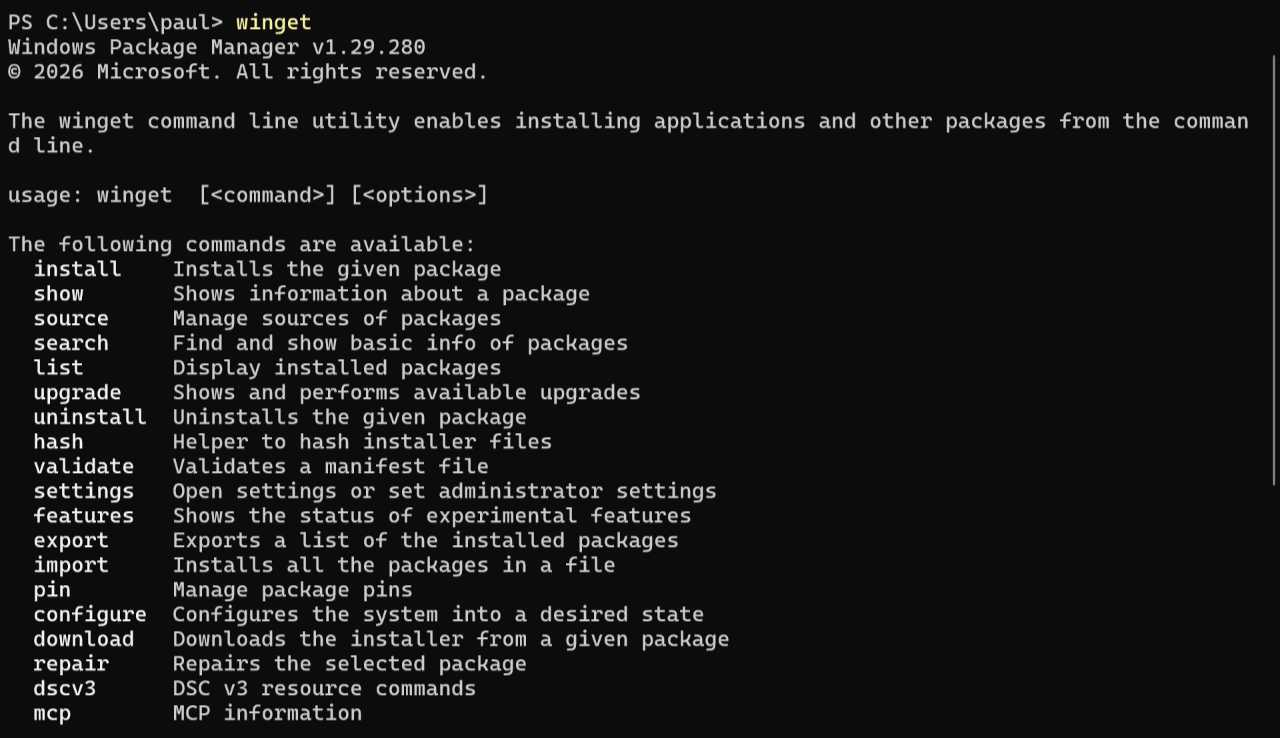
To get started, open Terminal and type the following command (followed by pressing Enter):
>winget
The output describes the app, explains which command line arguments—separated into groups of commands and options—that winget accepts, and provides a link where you can learn more.
Understand app sources
Like other package managers, winget can be used to find apps and install them on your PC. Those apps are found in repositories, and there are two configured by default, both of which are maintained by Microsoft: The Windows Package Manager app repository (winget) and the Microsoft Store (msstore). To see this, use the following command line:
>winget source list
Find an app to install with the Windows Package Manager
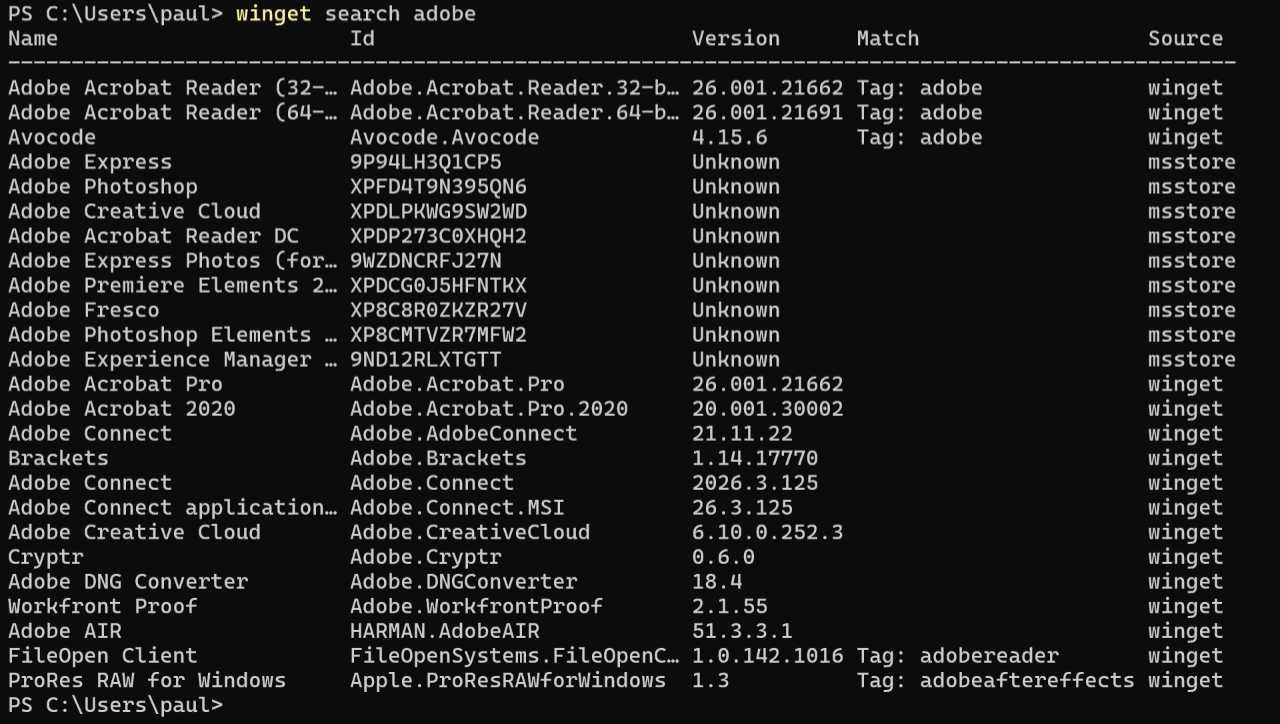
Winget has a search command that you can use to find apps to install. For example, if you want to see which Adobe apps are available in the default repositories, you can use the following:
>winget search adobe
The results list includes apps that come from the Microsoft Store (msstore) and the Windows Package Manager (winget) repositories, and you can see the source for each item in the Source column at the end.
To install an app, you will use a command like the following:
>winget install [Name or Id]
For example, to install Adobe Photoshop Elements 2026 from the Microsoft Store, you could use one of the following command lines:
>winget install "Adobe Premiere Elements 2026"
>winget install XP8CMTVZR7MFW2
Keep your apps up-to-date with the Windows Package Manager
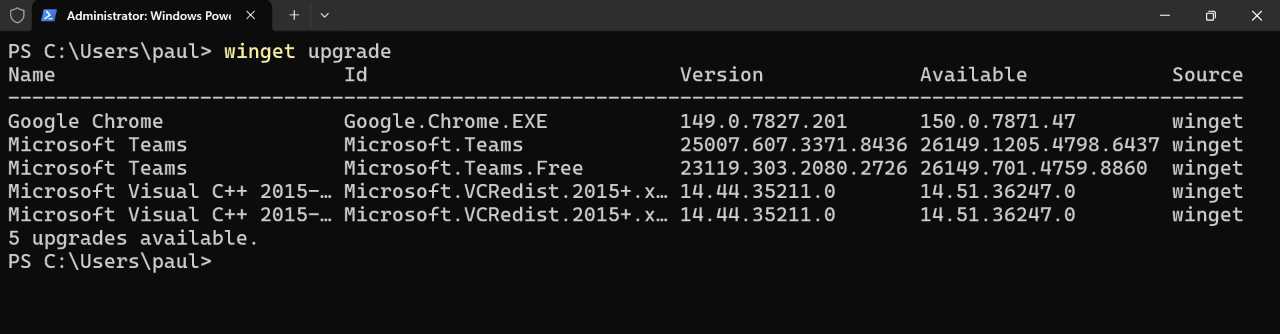
Winget has an upgrade command that can be used to discover which installed apps need to be updated, upgrade individual apps, and upgrade all the apps with pending updates.
In its most basic usage, this command will tell you which apps need to be updated:
>winget upgrade
To update an individual app, you can use a command line like the following:
>winget upgrade [Name or Id]
For example, I can upgrade the application Google Chrome like so:
>winget upgrade Google.Chrome.EXE
And if you run the winget upgrade command again, you will see that there is now one fewer app to update and that the app you updated is no longer in the list.
Of course, many times you will simply want to update every app that needs updating. To do so, use the following:
>winget upgrade --all
But it’s better to include the –include-unknown option because that will ensure that all apps, including those that do not report version information, are updated. (These versionless updates are ignored by winget upgrade because winget can’t be sure that the version in the repository is newer than the one on your PC.)
>winget upgrade --all --include-unknown
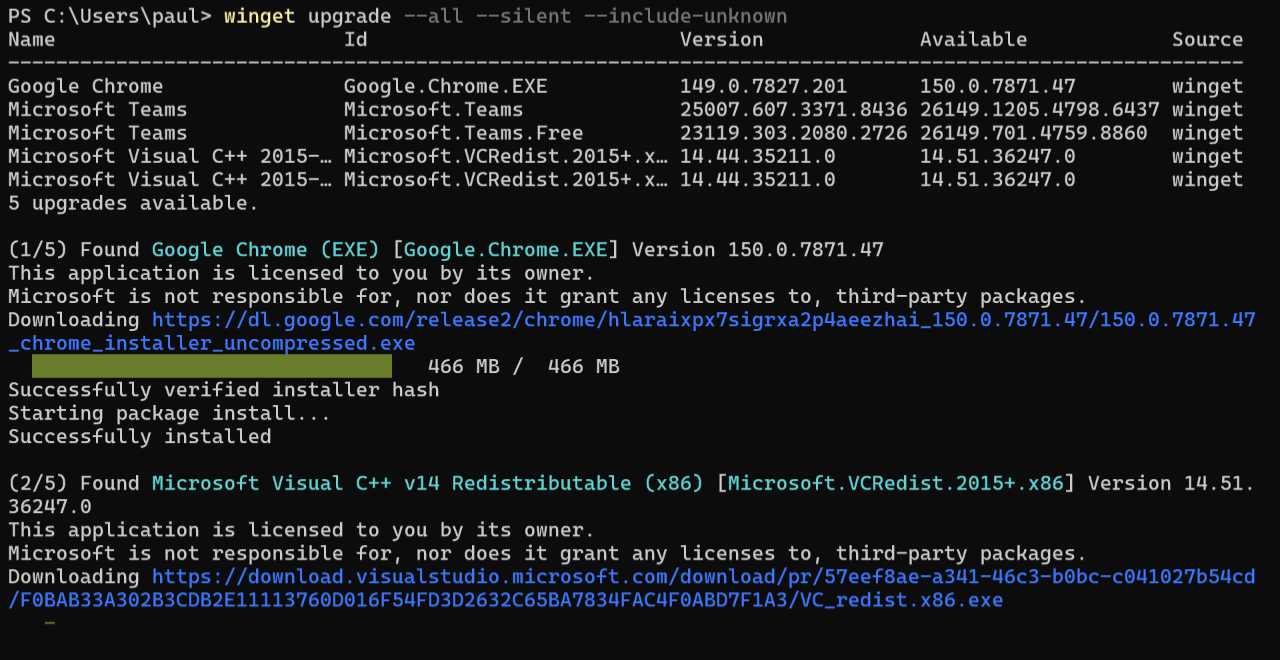
Depending on how many apps you have to update, this could take a while, and you may need to step through some interactive app setup routines. To avoid that, you can use the –silent option like so:
>winget upgrade --all --silent --include-unknown
Tip: Because so many app installs and upgrades require administrator privileges, you can further simplify this process by running Terminal with administrator privileges before using winget.
Most apps will eventually update automatically on their own or will prompt you interactively. Microsoft Store apps are managed by Microsoft, for example, and are kept up-to-date. And many web-based apps found in the Windows Package Manager repository have their own mechanisms for keeping up-to-date. Regardless, it’s not a bad idea to check in with winget upgrade from time to time so you can catch any stragglers.
Bulk-install apps with the Windows Package Manager
When you use Reset This PC or buy a new PC and sign in to Windows 11 for the first time, you have several configuration tasks to complete. Among those tasks is installing the apps you need so that you can be productive. You can do so manually, of course, by browsing the Microsoft Store or searching the web. Or, you can automate this task using the Windows Package Manager.
The key to doing so is to string multiple commands, in this case specific winget install commands, together, each separated by a semicolon. This lets you install multiple apps at once using a single CLI command.
As an example, let’s say you want to install three web browsers: Brave, Helium, and Mozilla Firefox. In each case, you can use winget search [name] to find the exact name or Id of each app. Then, you can create a new text document with Notepad and list each name/Id in turn. Like so:
Brave.Brave
ImputNet.Helium
Mozilla.Firefox
Then, you can build the individual commands around each:
winget install Brave.Brave -e --silent;
winget install ImputNet.Helium -e --silent;
winget install Mozilla.Firefox -e --silent;
Tip: The -e option ensures that winget installs the exact app noted by the Id.
I don’t find this to be as readable, but you can also string each line in the file into a single line if desired.
winget install Brave.Brave -e --silent; winget install ImputNet.Helium -e --silent; winget install Mozilla.Firefox -e --silent;
Then, copy the contents of the file into the Clipboard, open a Terminal window with administrator privileges, and paste the text into the CLI and tap Enter. After you OK a warning dialog, the Windows Package Manager will install each app in turn without requiring any intervention on your part.


Gain unlimited access to Premium articles.
With technology shaping our everyday lives, how could we not dig deeper?
Thurrott Premium delivers an honest and thorough perspective about the technologies we use and rely on everyday. Discover deeper content as a Premium member.