Desktop
- Paul Thurrott
- Aug 20, 2025
-
0
The Windows 11 Desktop works much as it did in Windows 10, but it has been updated with new iconography, simpler right-click context menus, and a new Windows spotlight background that provides a new high-quality photo every day.
⚙️ Defaults
By default, Microsoft configures the Desktop to be mostly empty, with the background set to Windows spotlight, which displays a new high-quality image every day, usually from Bing. There are also three items on the Desktop by default:
- A Recycle Bin shortcut in the upper left
- A shortcut for the Microsoft Edge web browser
- A “Learn more about this picture” icon in the upper right, shown only if Windows spotlight is configured as the background
✅ Tip: Your PC maker can customize the Desktop, so you may see a different background.
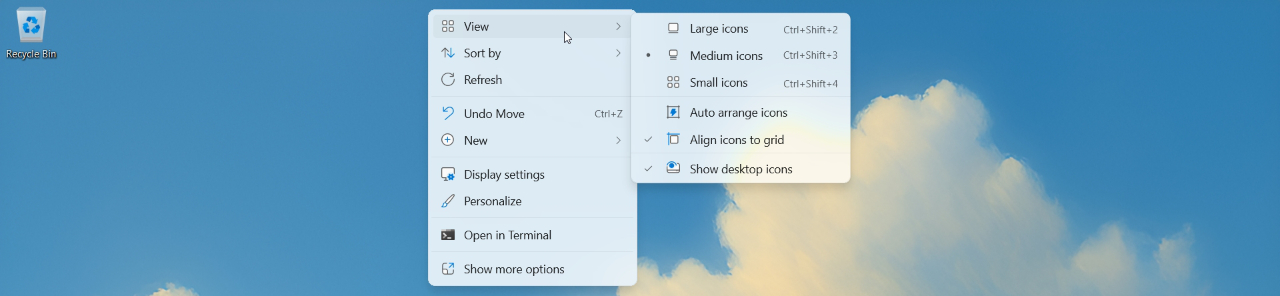
When you right-click the Desktop, a modern Windows 11-style context menu appears, as shown above. If you right-click an icon or other item on the Desktop, it will display using the same options found in File Explorer, and those options will vary depending on what you right-click.
? Customize the Desktop background
To customize the Desktop background, open the Settings app and navigate to Personalization > Background. Here, you can choose between Picture, Solid color, Slideshow, and Windows spotlight.
⌨️ Keyboard shortcut: Type Winkey + I to open Settings.
Picture
You can choose between a grid of recently used images or find a new image by clicking the “Browse photos.”
✅ Tip: The “Browse photos” option opens a standard File Open dialog that displays the contents of your Pictures folder. You can find the background images that Microsoft supplies with Windows 11 by navigating to C:\Windows\Web.
Solid color
This option lets you choose a solid color to use for the background.
Slideshow
Choose this to rotate the background between a selection of images you specify.
Windows spotlight
Windows spotlight will automatically display a different high-quality photo as your Desktop background each day.
To learn more about the current background photo, click the “Learn more about this picture” icon, and Microsoft Edge will open and display Bing search results related to the photo.
To switch to a different photo or rate the current photo, right-click the “Learn more about this picture” icon.
✅ Tip: Download a favorite Windows spotlight photo
Some Windows spotlight photos are breathtaking enough that you may wish to save a copy for yourself.These images are temporarily stored in ? a hidden location in the file system, but without filename extensions, so it can be tedious finding the one you want. You can copy these files to another location in the file system and then rename them with a .jpg extension to view them more easily.
You may find it easier to use a third-party tool to save these images. The ? Windows Spotlight Images website backs up original-quality versions of these photos and is searchable. And the ? Dynamic Theme app, which is available from the Microsoft Store, acts as a replacement for Windows spotlight that not only displays the same, high-quality images, but can also be configured to automatically download each photo locally.
➡️ Learn more: Windows spotlight is also used by the Windows 11 Lock screen.
? Customize which icons appear on the Desktop
Windows 11 only displays a single Desktop icon, Recycle Bin, by default. But you may recall that previous Windows versions offered other Desktop icons like My Computer and My Network Neighborhood. If you miss these icons, you can still display their modern equivalents on the Desktop in Windows 11.
![]()
To do so, open the Settings app and navigate to Personalization > Themes. Then, click “Desktop icon settings” (below “Related settings”) to open the Desktop Icon Settings window. Here, you can select the Desktop icons you wish to display, change the icon for each, and determine whether the current theme can customize those icons for you.
? Customize the Recycle Bin
Most Windows users know that deleted files and other items are temporarily stored in the Recycle Bin by default so that you can recover them later if they were deleted mistakenly. You can open Recycle Bin and view its contents as you do with any file system folder, empty the Recycle Bin to free up disk space, and customize how the Recycle Bin works.
View the contents of the Recycle Bin
You can view the contents of the Recycle Bin just as you would any file system location: Just double-click it, and a File Explorer window opens. Now, you can drag-and-drop items to remove them from the Recycle Bin or right-click one or more items to access a Restore command–which will put those items back in their original locations–and other options.
Empty the Recycle Bin
Right-click the Recycle Bin icon on the Desktop and choose “Empty Recycle Bin” from the context menu that appears.
Pin the Recycle Bin to Start or Quick access
If you use the Desktop Icon Settings window described above to hide the Recycle Bin icon from the Desktop, you lose an obvious way to access or empty the Recycle Bin. Before doing that, you may wish to make the Recycle Bin available elsewhere. The right-click context menu offers two options: You can pin a Recycle Bin shortcut to the Start menu or Quick access (a File Explorer feature):
Pin the Recycle Bin to Start. Here, a Recycle Bin icon appears in the “Pinned” section in the top of Start, and you can move it around as you would any other pinned shortcuts.
Pin the Recycle Bin to Quick access. In this case, a Recycle Bin shortcut appears in both places that Quick access appears in File Explorer: The Quick access section at the top of the default Home page in File Explorer and in the navigation pane on the left.
✅ Tip: You can right-click either Quick access shortcut to access an “Empty Recycle Bin” option directly. If you use the Recycle Bin from Start, you must first open Recycle Bin in a File Explorer window and then choose “Empty Recycle Bin” from that app’s toolbar to access this feature.
? Customize the Desktop (and File Explorer) context menus
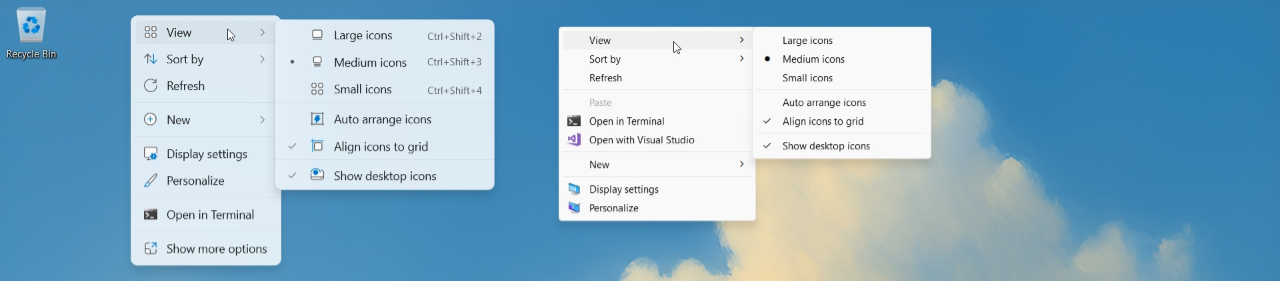
The Desktop (and File Explorer) context menus look modern and they are simpler than their predecessors in Windows 10, with fewer options. But Windows 11 lets you access the additional commands in the old Windows 10-style context menus when needed. And you can even revert to the old context menus permanently if that’s desirable
Access the commands hidden by the Desktop context menu
If you right-click the Desktop (or an item on the Desktop) and don’t see a command you need in the context menu that appears, click the item “Show more options.” This will display the older, Windows 10-style context menu with additional choices.
Display all the commands in the Desktop context menu
To display the older, Windows 10-style context menu immediately, hold down the Shift key and then right-click the Desktop (or an item on the Desktop).
Switch back to the older Desktop (and File Explorer) context menu
To permanently switch back to the older, Windows 1-style context menus, you have to edit the Registry.
⚠️ Warning: This change will impact the context menus you see in File Explorer as well.
To do so:
- Open the Registry Editor app. You can find it by typing reg in Start search
- Navigate to HKEY_CURRENT_USER\Software\Classes\CLSID
- Right-click the CLSID key (it resembles a folder) and choose New > Key
- A new key appears with its name selected. Rename it to {86ca1aa0-34aa-4e8b-a509-50c905bae2a2} and tap Enter
- Right-click that new key and choose New > Key
- Rename the new key to InprocServer32
- The contents of the InprocServer32 key appear on the right-side of the Registry Editor. Double-click the “Default” item to open an “Edit String” dialog. Then, just click “OK”: This changes the value of this item from unset to an empty value
With that done, you can close the Registry Editor and restart Explorer to see the change take effect. There are different ways to do that, including just rebooting the PC, but the quickest and simplest, perhaps, is to use Task Manager: Right-click the Taskbar, choose “Task Manager,” type explorer in the search box at the top, and then right-click “Windows Explorer” in the Processes view and choose “Restart.”
✅ Tip: To revert this change and go back to the Windows 11-style context menus, delete the {86ca1aa0-34aa-4e8b-a509-50c905bae2a2} Registry key you created using the instructions above. And then restart Explorer.
? Customize Show desktop
By default, Windows 11 provides a nearly hidden and tiny “Show desktop” button at the far right of the Taskbar, to the right of the time/date display. You can see it delineated if you mouse over this area. And you can click this small button to minimize all open apps and other windows so you can see the Desktop and access any items it contains. You can likewise click this button again to restore all open apps and windows to their previous locations.
⌨️ Keyboard shortcut: Type Winkey + D to toggle “Show desktop” at any time.
You can configure whether the “Show desktop” button appears in the Taskbar. For example, if you memorize the keyboard shortcut noted above, you may not need the button.
To do so, open the Settings app and navigate to Personalization > Taskbar. Then, expand the “Taskbar behaviors” section and locate the option “Select the far corner of the taskbar to show the desktop.” When this option is On, “Show desktop” appears in the Taskbar.
➡️ More information
Sync the Desktop with OneDrive. Windows 11 includes a OneDrive app that has a Folder backup feature you can use to sync the contents of the Desktop through that online service so that you see the same files.
Customize the theme. You can customize the theme in Windows 11–which includes the Desktop background, light/dark mode, accent color, sound scheme, and mouse cursor–in the Settings app by navigating to Personalization > Themes.

Gain unlimited access to Premium articles.
With technology shaping our everyday lives, how could we not dig deeper?
Thurrott Premium delivers an honest and thorough perspective about the technologies we use and rely on everyday. Discover deeper content as a Premium member.