Hardware Device Basics
- Paul Thurrott
- Jun 22, 2026
-
0
Your PC is compatible with a wide variety of external hardware devices, including keyboards, mice and touchpads, removable and network-based storage, printers, multiple displays, and more. Windows 11 ensures that most of these devices work with little or no intervention on your part. But some require additional configuration.
Most hardware devices and peripherals you connect to your PC are configured in Bluetooth & devices settings. To find this interface, open the Settings app and navigate to Bluetooth & devices.
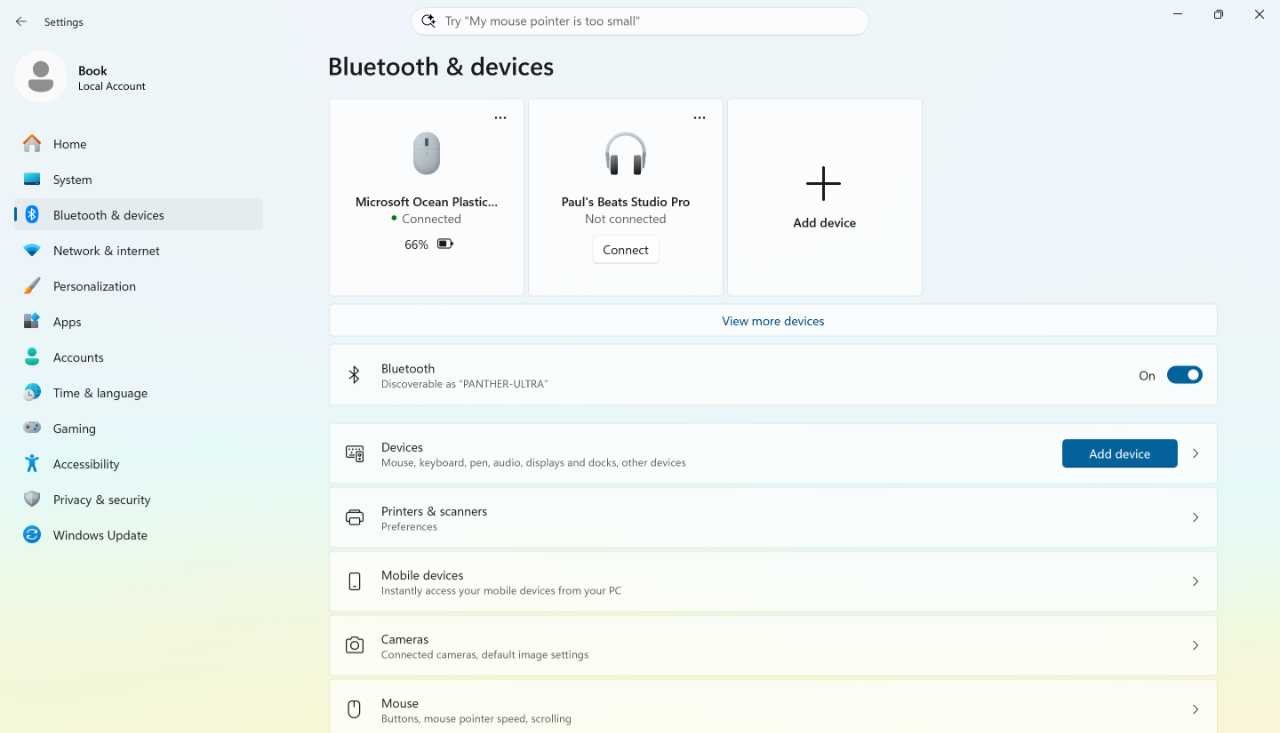
Tip: Some entries, like those for Mouse and Touchpad, only appear when those peripherals are available. Pen & Windows Ink, curiously, appears regardless of whether your PC even supports those capabilities.
Bluetooth & devices settings lets you add and configure the many types of devices that work with Windows 11. But you can also click the “View more devices” link just above “Bluetooth” to access settings for devices you’ve already connected to this PC and other areas of the Settings app related to hardware, including those for Sound and Display settings.
Connect a device to your PC
When you connect a new hardware device to your PC, Windows will try to install a basic class driver so that you can begin using it right away. Sometimes, you will see a notification banner alerting you when this happens, sometimes it will just work.
Windows 11 will also look to Windows Update for better or updated drivers and other software. So you should consider visiting Windows Update after connecting a new device to see whether updated drivers are available.
Tip: As you probably know, Windows Update can be found by opening Settings and navigating to Windows Update.
Sometimes neither Windows 11 nor Windows Update can supply a driver. The easiest way to see this isn’t all that easy, as you have to find and launch the legacy utility Device Manager. You can do so via Windows Search–just type device to find it in the search results–or right-click the Start button in the Taskbar and choose “Device Manager” from the Quick access menu that appears.
Keyboard shortcut: You can also open Quick access by typing Windows key + X.
When a hardware device isn’t correctly configured with a working driver, you will see a yellow exclamation point (or “bang”) next to it in Device Manager.
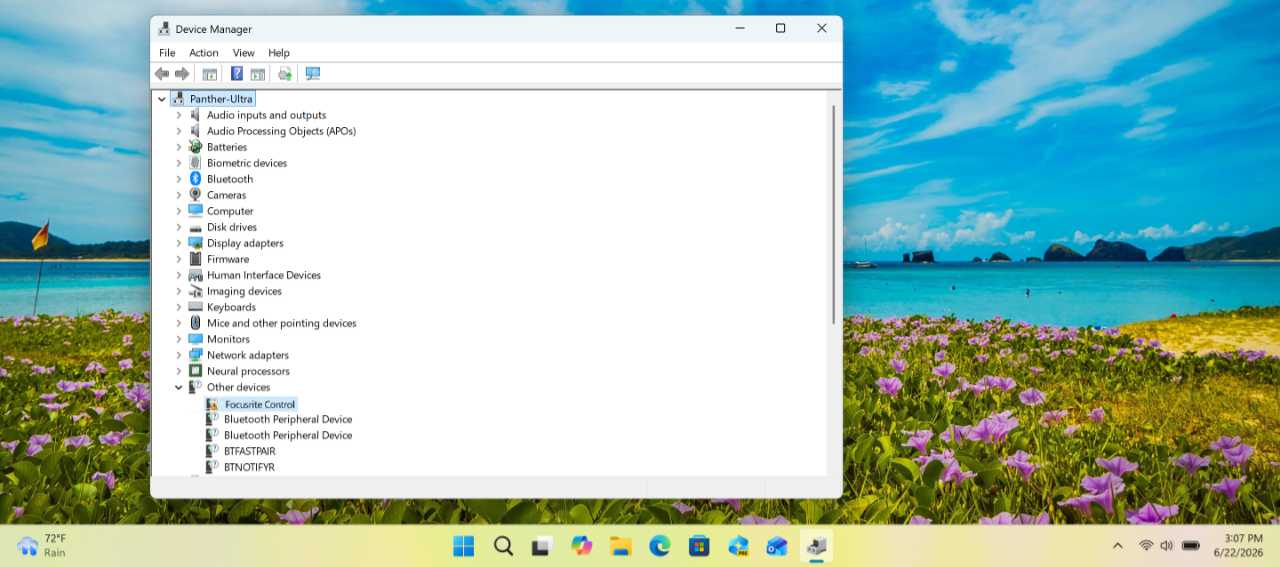
That’s your cue to find the hardware maker’s website and download the driver directly.
Indeed, even if Windows 11 or Windows Update offered a device-specific driver, you can oftentimes find a newer or better driver from the device maker’s website. And those drivers may be accompanied by software utilities that you might find useful. That varies by device, of course.
USB
USB–or, Universal Serial Bus–is the most common hardware standard for physically connecting external peripherals to your PC. These types of peripherals–storage devices like flash drives and hard drives, smartphones, printers, keyboards, and so on–are called removable devices because they can be disconnected, or unplugged, from the PC at any time. And so Windows 11 tries to handle these connection and disconnection events as gracefully as possible.
Determine what happens when you connect a removable USB storage device
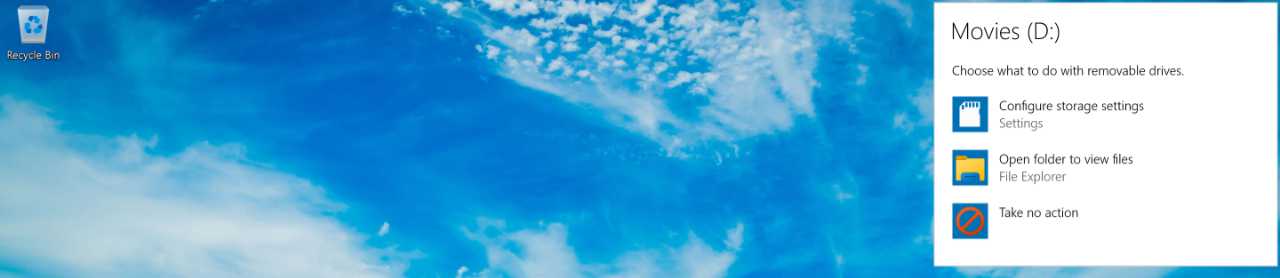
Many USB devices, like keyboards, will just silently work when you connect them to your PC, with Windows 11 quickly identifying them and installing the in-box drivers they need. But other devices, like removable storage devices, will trigger an standard AutoPlay notification in the lower-right of the screen asking if you would like to perform a certain action each time that device is connected.

If you click this notification, an old-fashioned-looking menu of available choices appears … in the upper-right of the screen. For some reason.
Tip: If you miss the notification, you can find it in the Notification center.
If you later change your mind, open the Settings app, navigate to Bluetooth & devices > AutoPlay, select the drop-down under “Removable drive” (or “Memory card”), and make a new choice.
Unplug a USB device
For the most part, you can simply unplug a USB device from your PC when you’re done using it. But because USB storage devices often contain important personal data, you should remove those drives from the PC safely. This gives Windows 11 time to make sure any file transfers are complete.
There are a few different ways to do this, but the most common are:
File Explorer. To safely remove a USB storage device using File Explorer, open File Explorer and navigate to the This PC view. Then, locate the drive you’d like to unplug, right-click it, and choose “Eject” from the context menu that appears. A banner notification will appear telling you that it’s now safe to unplug that device.
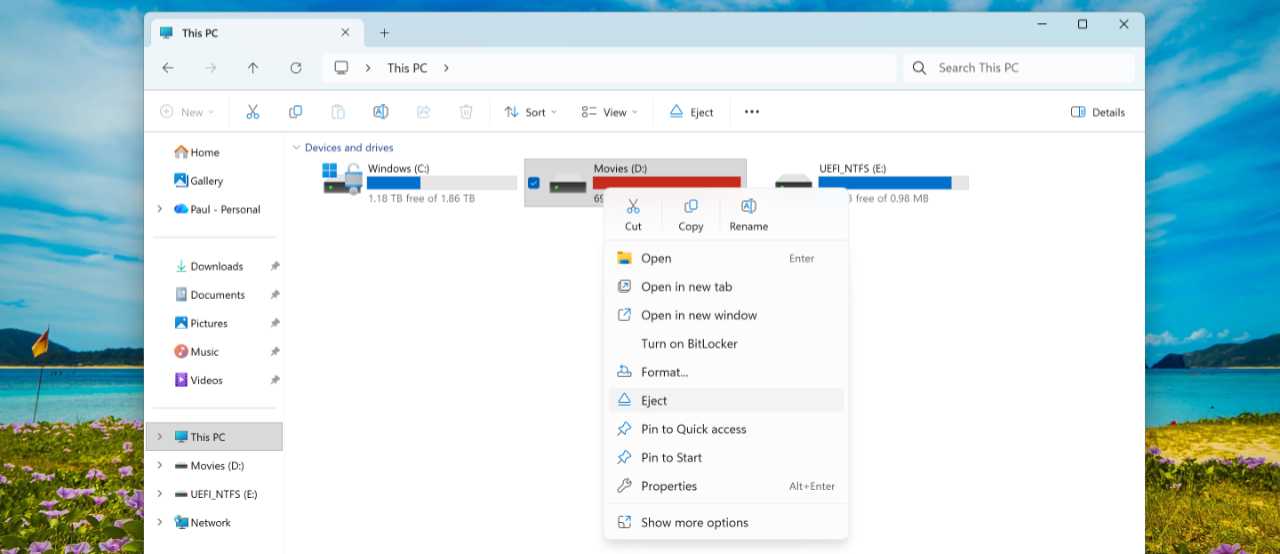
Tip: You can also do this by right-clicking the drive in the navigation pane.
Taskbar. To safely remove a USB storage device from the Taskbar, locate the “Safely Remove Hardware and Eject Media” icon in the system tray. It’s usually in the overflow area that’s accessed by clicking the “Show hidden items” icon that resembles a caret. When you click this icon, it will display a list of the available removable storage devices. Click the storage device you would like to unplug, and a banner notification will appear telling you that it’s now safe to unplug that device.

Bluetooth
Bluetooth is a wireless technology that pairs compatible devices over a short distance, creating a so-called personal area network, or PAN, that they can use to exchange data. Many PCs, including all portable PCs, include Bluetooth radios so that you can pair Bluetooth devices like keyboards, mice, headphones, and phones with your PC and manage them using Windows 11.
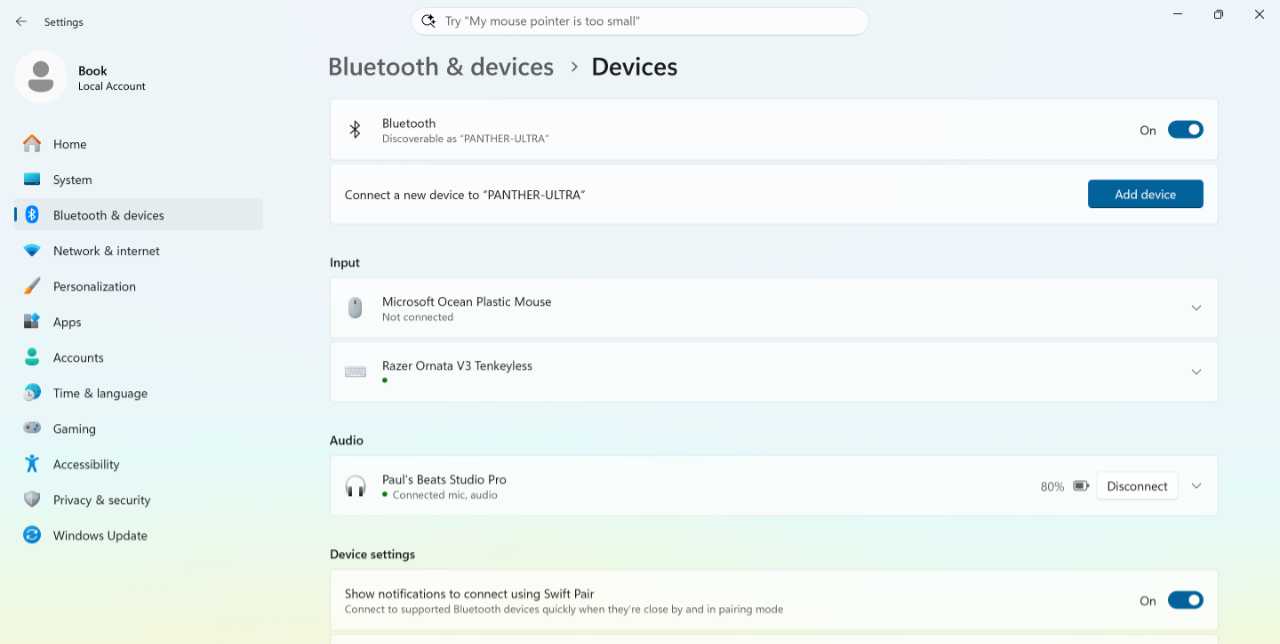
Pair a Bluetooth device to your PC
To pair a new Bluetooth device with your PC, press and hold its Bluetooth pair button on the connecting device. (Check with the manufacturer’s documentation if you can’t find this.) If the device supports a Bluetooth feature called Swift pair, Windows will notify you and offer to connect automatically. Select “Connect” when prompted.

If you aren’t prompted, open the Settings app, navigate to Bluetooth & devices and then click the large “+ Add device” tile at the top. The “Add a device” window appears.
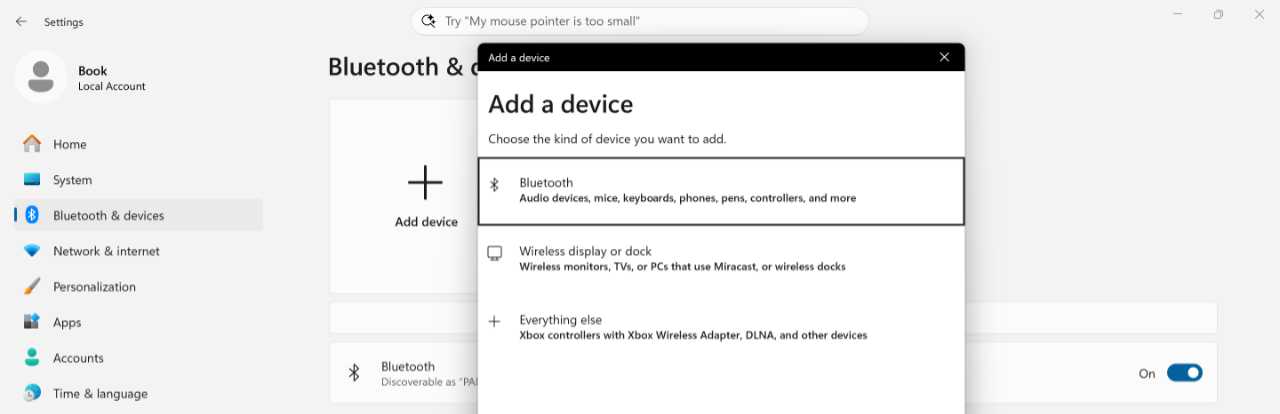
Click “Bluetooth” and the window will display a list of available Bluetooth devices.
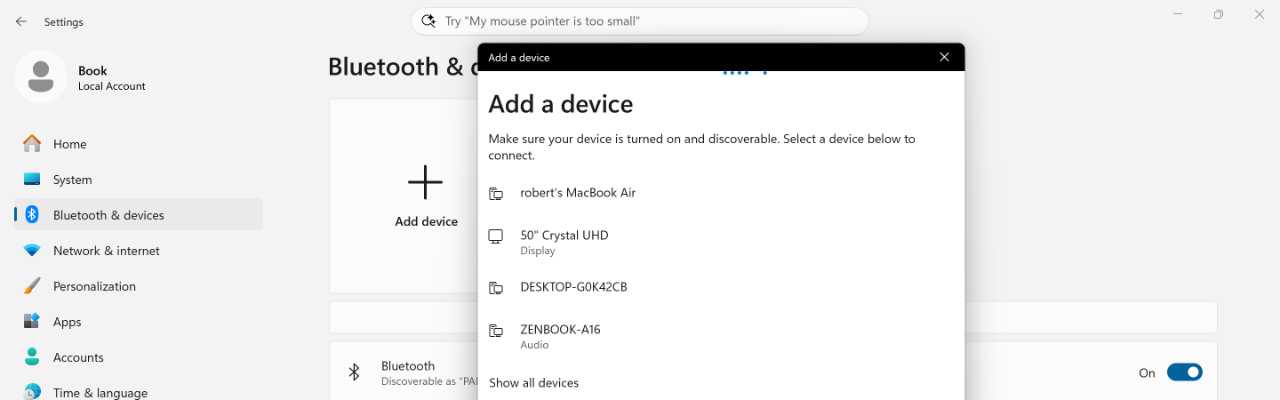
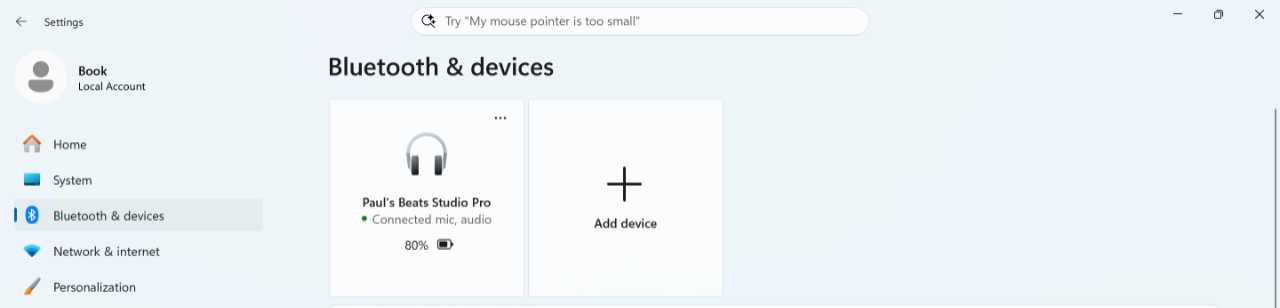
Now, select the device you wish to pair. After a short “Connecting” animation, you’ll be told that the new device is “ready to go!” Click “Done” to close the window, and Bluetooth & devices settings will display the paired device in a tile to the left of “+ Add device.”
Tip: Some Bluetooth devices may require you to enter or confirm a PIN to complete the pairing process, but the process is straightforward.
Configure and manage a Bluetooth device
You can also unpair a Bluetooth device with Bluetooth & devices settings. To do so, locate its tile at the top of Bluetooth & devices settings, click its More (“…”) link, select “Remove device” from the menu that appears, and confirm the change as prompted.

Oddly, Bluetooth device configuration occurs elsewhere. For many device types, that’s a different page in Settings. You will see an entry for Mouse in Bluetooth & devices settings, for example, that is used to configure a Bluetooth mouse.
But some devices require a separate app for further configuration. This app will be provided by the device’s manufacturer, so you should check the product’s documentation or the manufacturer’s website to see what is available.
Keyboards, mice, and touchpads
Windows 11 provides basic configuration settings for keyboards, mice, and touchpads, whether they’re removable or built into a laptop or other portable PC.
Keyboard
Virtually any hardware keyboard you connect to a Windows 11 PC via USB or Bluetooth will work automatically, as will built-in keyboards on laptops, of course. But Windows 11 offers a few keyboard-related settings you may want to examine. These are found in the Settings app by navigating to Bluetooth & devices > Keyboard.
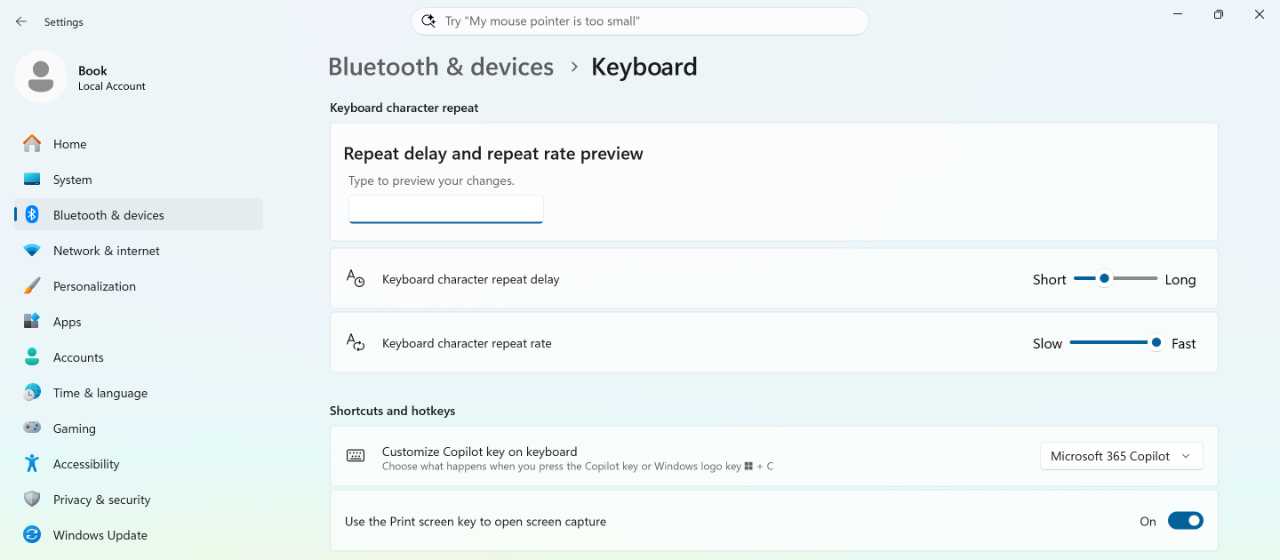
Key (ahem) keyboard settings include:
Customize Copilot key on keyboard. Most modern PC keyboards now include a controversial Copilot key between the Right Alt key and Arrow keys. It’s designed to launch the Microsoft Copilot app (on consumer PCs, and the Microsoft 365 Copilot app on business PCs), though few seem to want that. So Microsoft has made some concessions to this enshittification. Among them is this option, which lets you reconfigure the Copilot key to launch Windows Search, one of a handful of compatible apps (like ChatGPT, Microsoft Copilot, or Microsoft 365 Copilot) via a Custom option, or do nothing.
Tip: If you choose “Do nothing” and accidentally tap the Copilot key, Windows 11 will launch the Settings app and navigate it to the Keyboard settings page. If you find that as annoying as I do, you can use the Keyboard Manager utility in the free Microsoft PowerToys suite of tools to configure the Copilot key to behave like any other key press or shortcut. I configure it to work like the key directly to its right, since that’s usually what I mean to do when I hit the Copilot key mistakenly.
Use the Print screen key to open screen capture. In the good old days, the Print screen key on every PC keyboard would capture the screen and copy it to the Clipboard. But with Windows 11, Microsoft has reconfigured this key several times, and it now launches the Snipping Tool screen capture utility instead. If you would like this to work as it had for decades before the changes–or if you prefer to use a third-party screen capture utility–you can configure this option to “Off.”
Keyboard accessibility. If you click this item, Settings navigates to Accessibility > Keyboard, where you can configure Sticky keys, Filter keys, Toggle keys, the on-screen keyboard, and other related keyboard settings.
Mouse and touchpad
Windows works seamlessly with mice and other pointing devices like touchpads, as you should expect. For the most part, you can simply pair or plug in an external pointing device and it will just work.
When you do, you can manage your mouse and touchpad by opening the Settings app and navigating to Bluetooth & devices, where you will find Mouse and Touchpad links if you have those devices.
Tip: In both cases, your PC or device maker will likely provide their own utilities that you can use to further configure the mouse or touchpad.
Configure a mouse
Mice are configured in Mouse settings, which you can find by opening the Settings app and navigating to Bluetooth & devices > Mouse.
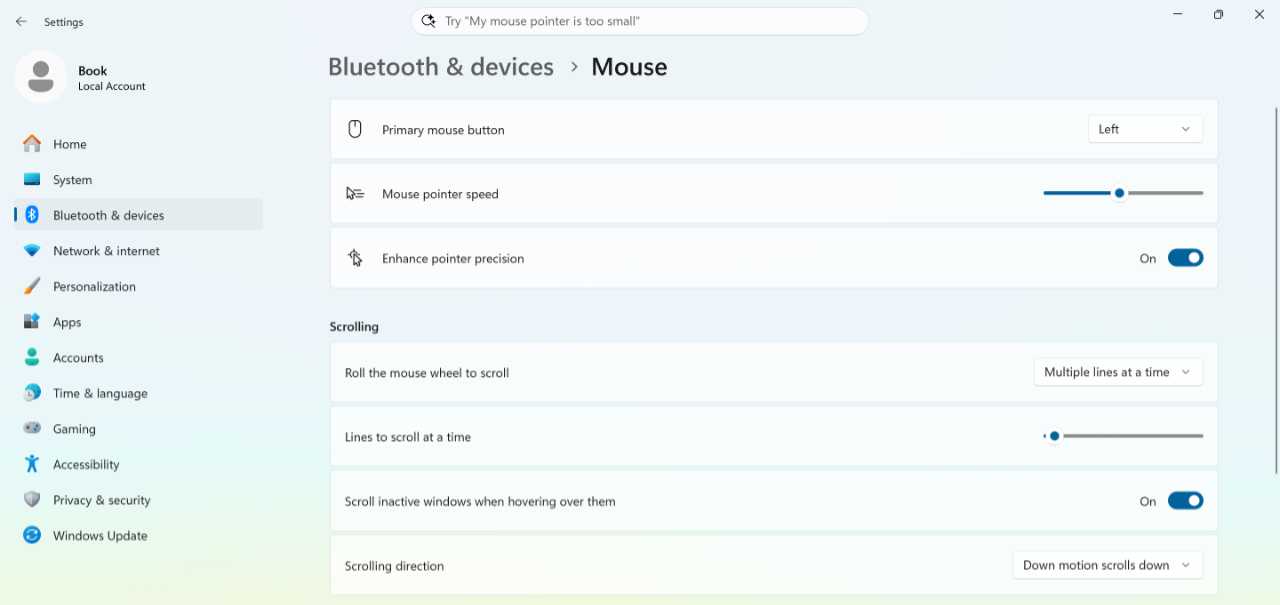
Some key options to consider include:
Mouse pointer speed. Using a slider, you can configure the speed of the mouse cursor in a range of values from 1 to 20. The default speed is 10.
Enhance pointer precision. Enabled by default, this feature accelerates and smooths mouse cursor movement. It’s a great feature unless you’re a gamer, in which case you may wish to disable it.
Scrolling direction. By default, Windows scrolls down on a page or screen when you scroll a mouse wheel down, but you can reverse that if you’re used to a Mac or another devices that scrolls in the opposite direction.
Mouse pointer and touch. This link navigates Settings to Accessibility > Mouse pointer and touch, where you can configure the mouse pointer style and speed and several other useful options.

Tip: I’m a big fan of the Inverted mouse pointer style since it makes it so much easier to see the mouse cursor than the default.
Accessibility mouse settings. Similar to the above option, this links to Accessibility > Mouse, where you can configure several other useful new features like Snap to default button, Hide pointer while typing, Click lock, Mouse keys, and more.
Additional mouse settings. This is a link to the legacy Mouse Properties control panel, which lets you configure a few features that haven’t made their way to the Settings app yet. And third party hardware makers will sometimes extend this dialog with features specific to their mice.
Configure a touchpad
Laptops and other portable PCs usually include a built-in pointing device called a touchpad, previously called a trackpad, that supports multi-touch gestures in addition to its traditional pointing duties.
These devices are configured separately from mice in Touchpad settings, which you can find by opening the Settings app and navigating to Bluetooth & devices > Touchpad.
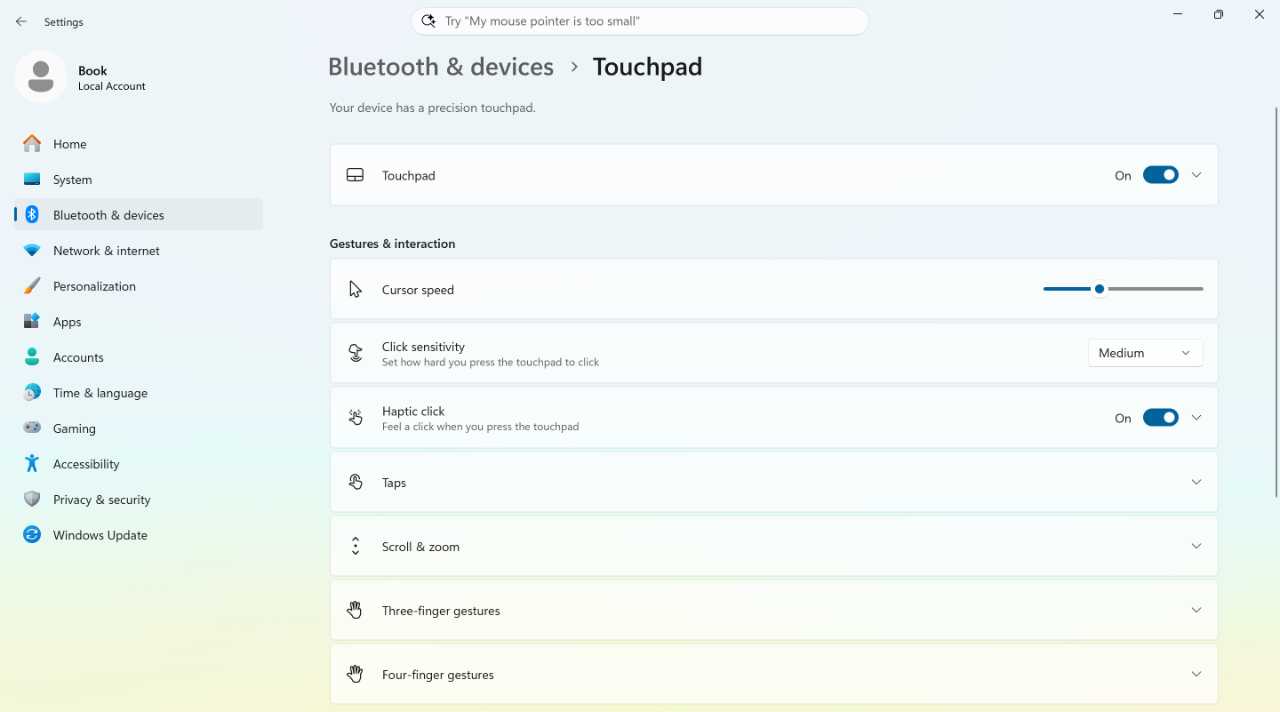
Some key options to consider include:
Cursor speed. As with Mouse cursor speed, you use a slider to configure the speed of the mouse cursor. But unlike Mouse cursor speed, the range of values goes from 1 to 10, and the default speed is 6. For some reason.
Taps. You can expand this item to configure several options related to what happens when you tap the touchpad surface, including two-finger taps and tap sensitivity.
Scroll and zoom. You can expand this item to configure gestures related to scrolling with two fingers, scroll direction, and whether you can pinch to zoom.
Three-finger gestures. By default, Windows 11 displays Task view when you use a three-finger gesture on the touchpad (“Switch apps and show desktop”) and opens Windows Search when you tap the touchpad with three fingers. You can configure both in various ways, including disabling one or both.
Tip: I find that I inadvertently trigger Task view when I mean to scroll (a two-finger gesture), so I usually end up disabling the three-finger swipe gesture.
Four-finger gestures. By default, Windows 11 displays Task view when you use a four-finger gesture on the touchpad (in this case, “Switch desktops and show desktop”) and opens Notification center when you tap the touchpad with four fingers. You can configure both in various ways, including disabling one or both.
Tip: I rarely have the dexterity or forethought to use four-finger gestures, so this is one I don’t think about all that often.
More touchpad settings. As with the similar option in Mouse settings, this is a link to the legacy Mouse Properties control panel. This one is even more likely to be customized by PC makers who use specific touchpad hardware, so it’s worth looking at.
Advanced gestures. If the three- and four-gesture settings above aren’t granular enough, this interface lets you individually configure Tap, Swipe up, Swipe down, Swipe left, and Swipe right gestures for both.
Touch, pen, and tablet
In addition to supporting traditional PC form factors with their familiar keyboard, mouse, and touchpad interactions, Windows 11 also supports modern PCs with multitouch capabilities that let you interact by tapping or using gestures right on the display. Some PCs even come in tablet, 2-in-1, and convertible PC form factors that can physically transform between different usage modes, and some support smartpens so you can write or draw directly on the display.
Multitouch
Multitouch–sometimes just called touch–is the simplest and most common of these modern PC capabilities.
Tap, tap and hold, and grab
Thanks to the ubiquity of modern smartphones, using multitouch in Windows 11 is mostly intuitive. To select an object onscreen, simply tap the screen. To perform a right-click, tap and hold on the object you wish to do more with. You can also “grab” items like icons and windows and drag them to a new location as you would with a mouse. And you can double-tap to launch apps and open other items.
Tip: Throughout this book, I mostly stick with words that describe traditional PC actions with the mouse or keyboard. Each time you see the word “click” or “select,” for example, you can substitute the word “tap” if you’re using the PC’s multitouch capabilities. Likewise, you can substitute “tap and hold” for right-click. And so on.
Gestures
Windows 11 also supports touch-based gestures, which are actions you can perform with two or more fingers, similar to Windows 11’s touchpad features, but performed directly on the screen. You can configure these gestures in Settings > Bluetooth & devices > Touch if needed.
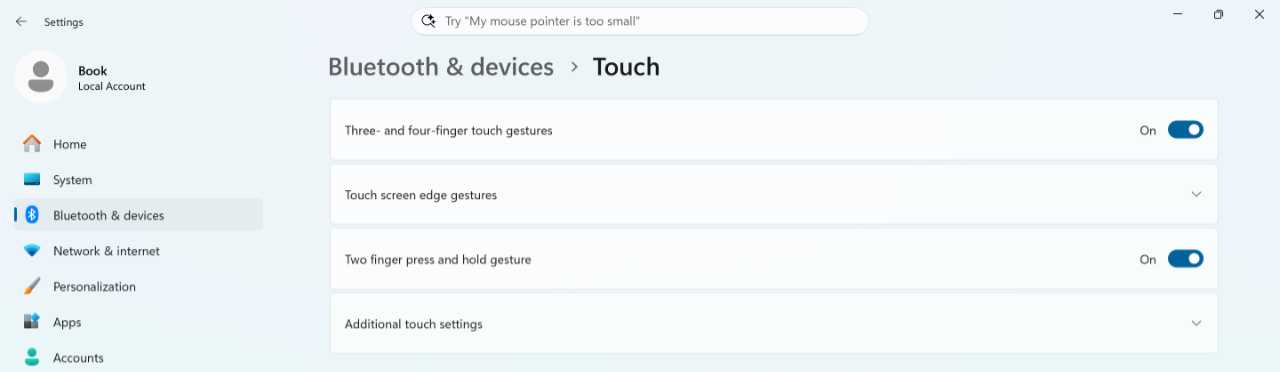
The following gestures are available:
Scroll. Using two fingers, you can slide up or down on the screen to scroll through an app, document, or web page. (And, if it supports it, you can slide left and right to scroll horizontally.)
Zoom. Using a “pinch” gesture, you slide your thumb and index finger together on-screen to zoom in on whatever you’re viewing. Or, using a “stretch out” gesture, you slide your thumb and index finger away from each other on-screen to zoom out of whatever you’re viewing.
Minimize all windows. Using three fingers, slide down on the screen to minimize all open windows and display the desktop.
Restore all windows. Using three fingers, slide up on the screen to display (“restore”) all open windows.
Snap layouts. To access Snap layouts, drag a floating window a bit to display the bottom edge of the Snap layouts pane at the top of the screen. Then, move the window towards that pane to display the available layouts and then choose one.
Edge gestures
Windows 11 also supports edge gestures, which are gestures that start at any of the four sides of the PC’s display. The following edge gestures are available:
Widgets. Swipe in from the left edge of the display to open Widgets.
Notifications. Swipe in from the right edge of the display to display the Notification center. If you have a Copilot+ PC, this will be set to Click to Do, but you can configure it for Notifications if desired.
Start. Swipe up from the middle bottom of the display to open the Start menu.
Quick settings. Swipe up from below the Network, Sound, and Power icons to open Quick settings.
Switch apps. Using three fingers, swipe left or right on-screen to switch to the previous or next app, respectively.
Tip: Check out “Additional touch settings for the Press and hold gesture and some other settings for fine-tuning touch interactions.
Use the Touch keyboard
For those instances in which you are using a PC’s multitouch functionality and need to type, just tap a text box, browser address bar, or any other area where you would normally enter text, and the Touch keyboard will appear onscreen.
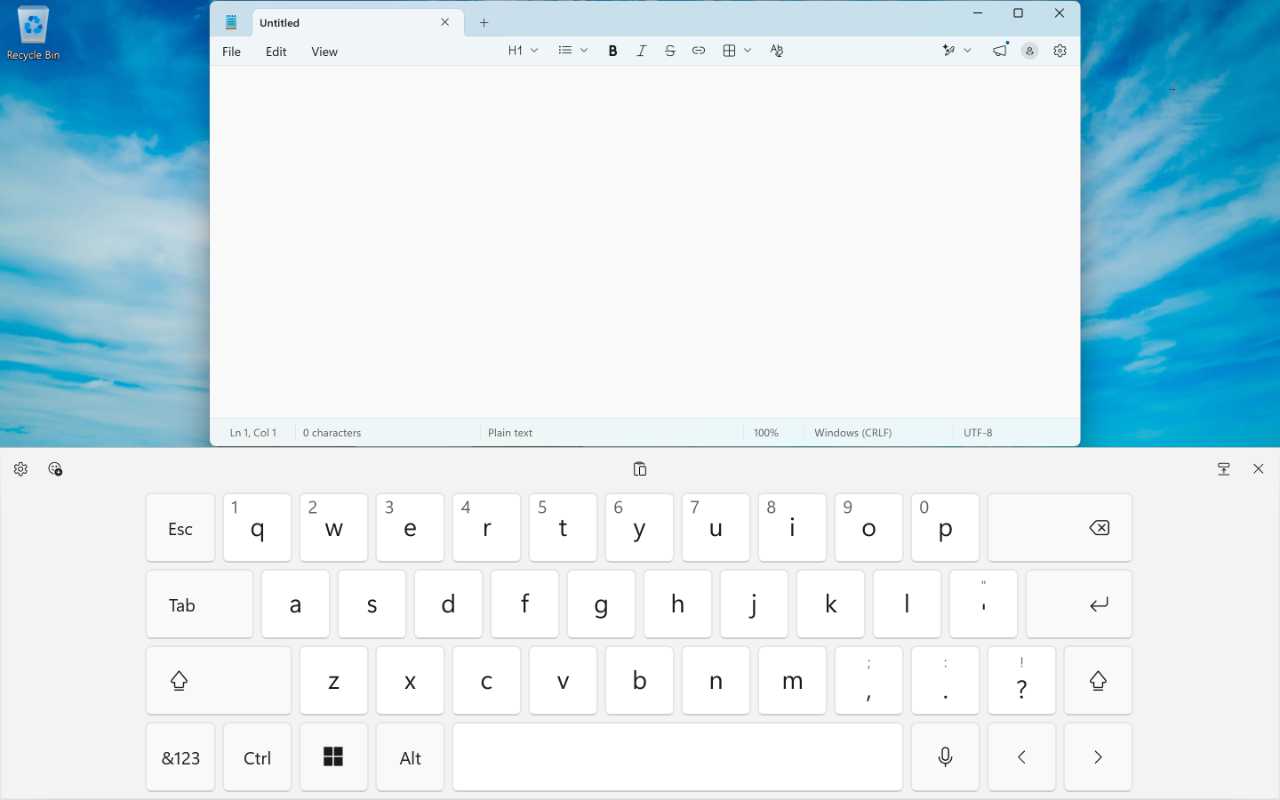
Tip: Multitouch-capable PCs typically with no hardware keyboard attached will display a Touch keyboard icon in the Taskbar’s system tray so you can trigger this utility manually. If you don’t see this icon, you can enable it: Right-click the Taskbar, choose “Taskbar settings,” and then enable “Touch keyboard” under “System tray icons” in the Settings app window that appears. This option is not available on PCs with non-touch displays.
The Touch keyboard works as expected, but it has some useful features that might not be immediately obvious. And it helps to get started with the Touch keyboard settings, which are found in the Settings app: navigate to Personalization > Text input to see what’s available.
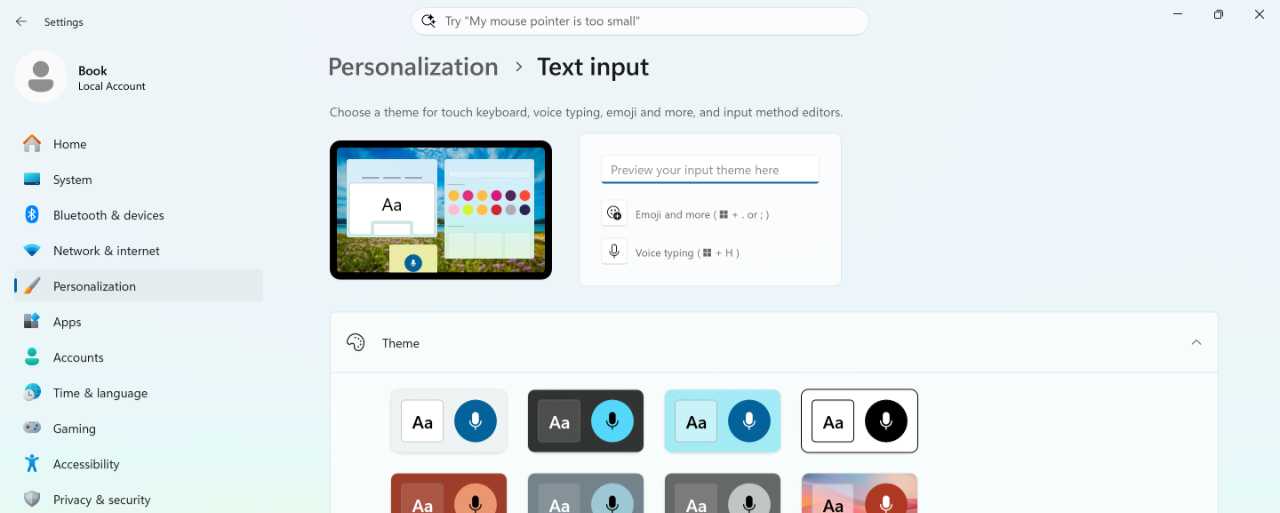
Here, there are three main areas: A preview area at the top where you can see how the changes you make will impact the real Touch keyboard, “Theme,” which lets you customize the look of the Touch keyboard with colors and background images, and “Touch keyboard,” which has options for keyboard size, whether the Touch keyboard should display button edges (“Show key background”), and key text size.
As for the Touch keyboard itself, there are a few features to be aware of:
Layouts. Touch keyboard supports Default, Compact, Split, Traditional, and Gamepad layouts, and you may want to experiment with each to see which you like best. For example, the Compact layout shown below resembles a smartphone keyboard. You choose the layout by selecting the “Settings” (gear) icon in the upper left of the Touch keyboard and then “Keyboard layout”.

A> Tip: You can quickly toggle between the current layout and the Small layout by using the dedicated button to the left of the Close (“X”) button on the Touch keyboard.
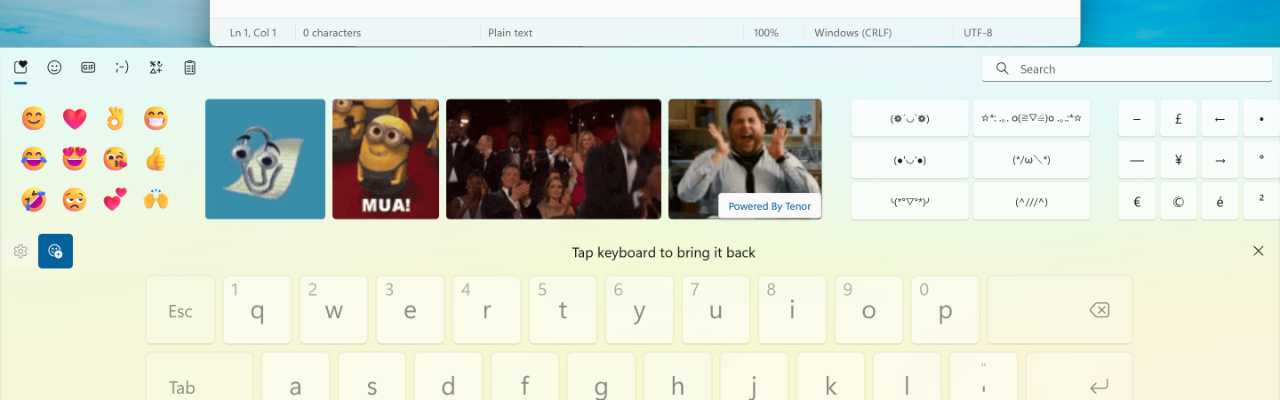
Emojis and GIFs. Welcome to the 21st century: The Touch keyboard has a dedicated button for opening the Emoji keyboard, which also provides access to GIFs, emoticons, and various symbols.
Clipboard. If there is a text-based item in the Clipboard, it will appear in the top middle of the Touch keyboard so that you can tap it to paste it into whatever app you’re using.
Smartpen
Some traditional PCs and most tablets, 2-in-1s, and convertible PCs support smartpen capabilities that let you use a powerful Windows 11 feature called Windows Ink so you can write and draw in specially-made applications and interact with on-screen user interface elements and other apps much as one would using a mouse or touchpad.
Smartpen capabilities vary by PC and by smartpen, the latter of which can look, work, and feel just like real writing implements. Many support thousands of levels of pressure so that you can press down harder to get thicker or bolder drawing and writing strokes. Most support tilt so that you can tilt the pen naturally to get broader strokes as you do. Some also include an electronic eraser that works exactly as you’d expect. And most support an extra button or two that can be programmed to perform specific actions when clicked, double-clicked, or pressed and held.
Using a smartpen is natural enough: It works much like navigating via touch, so you can do things like press and hold the pen on-screen to emulate a right mouse click. But some smartpens also provide a dedicated button on the barrel that provides right-click functionality.
Tip: Some Windows Ink features also work with touch–on compatible PCs–or even with a keyboard and mouse too. Here, I focus only on using Windows Ink with a smartpen, however.
Configure Windows Ink and your smartpen
If you’re going to use a smartpen with Windows 11, you should spend some time examining the available options for the pen and Windows Ink. These can be found in the Settings app: navigate to Bluetooth & devices > Pen & Windows Ink.
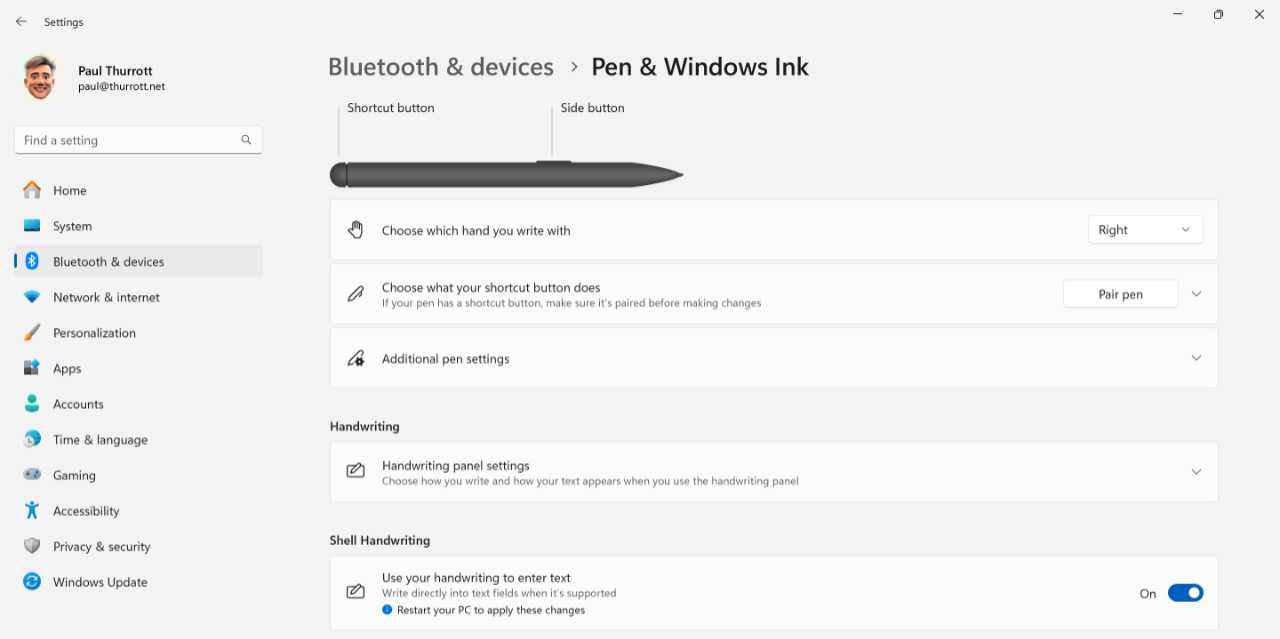
Some key options to consider include:
Choose which hand you write with. The smartpen is configured for right-handed use by default, so lefties will want to make sure to configure this for left-handed use.
Choose what your shortcut button does. The Shortcut button on the end of the pen barrel can be configured to perform different actions when clicked, double-clicked, or pressed and held. These actions include opening the Pen menu (see below), opening one of the specific, pre-selected apps, opening any program (application), or opening any (Microsoft Store) app.
Tactile signals. This set of options appears if your smartpen supports haptics, which emulates the feel of a real pen writing on paper when in use. You can toggle tactile signals on or off for inking and user interface interactions, and configure the intensity of these effects.
Handwriting panel settings. Located under the “Handwriting section,” this expandable set of options lets you configure the font and font size used in the Windows 11 handwriting panel or a supported app and how text input should work when a physical keyboard isn’t available.
Use the Pen menu
The Pen menu is a front-end or launcher for the Windows Ink capabilities in Windows 11, as it lets smartpen users quickly access the key Windows Ink-compatible apps they need as quickly as possible. In many ways, it’s like a mini-Start menu for your smartpen.
There are various ways to display the Pen menu. By default, a Pen menu icon should appear in the Taskbar when you’ve paired a smartpen with your PC. (If it doesn’t, you can enable it in the Settings app by navigating to Personalization > Taskbar > System tray icons.) Or, you can configure your pen’s Shortcut button to open the menu when you click, double-click, or press and hold it.
Tip: Oddly, you can’t open the Pen menu from the Start menu or Search. And there’s no keyboard shortcut.
Whichever method you choose, the Pen menu appears as a floating toolbar right above the system tray in the Taskbar.

By default, the Pen menu has pinned shortcuts for four apps–OneNote, Microsoft Whiteboard, Snipping Tool, and Journal–plus “See more” (gear) and “Learn more about pen” icons. The “See more” icon displays a small menu with two items, “Edit pen menu” and “Pen settings,” for configuring this and other Pen features.
Tablet experience
Windows 11 offers an integrated tablet experience that automatically optimizes the system for touch when you remove the keyboard from a tablet or transform a 2-in-1 or convertible PC into a tablet form factor. Then, and as you use the PC in this touch-only mode, the Taskbar adapts as needed.
Here, you can see the Taskbar of a tablet with a keyboard connected.

And here is the same Taskbar when the keyboard is first removed.

As you use the system this way, however, the Taskbar will change yet again, this time into a minimalist slice that gets out of the way so you have as much screen to use as possible.

If you need to access the larger Taskbar, just swipe up a bit on that slice.
Printers and scanners
Windows 11 connects to printers and scanners locally using a USB cable in a wired configuration or over your home network, in both wired and wireless configurations.
Printers
Windows supports the same traditional printing capabilities that it has had for years, and printers work much as they always have. But there are two interesting wrinkles:
- Windows protected print mode. Microsoft has brought printer driver management in-house through its Windows protected print mode program, which uses modern Windows Ready Print communication technologies to help protect against malicious software embedded in driver installations. For now, you need to enable this feature manually.
- Print to PDF. In addition to hardware printers, you can also print to easily-shared PDF files using Microsoft Print to PDF, which works like a real printer in Windows 11.
Configure printers
Printers & scanners settings–available by navigating to Settings > Devices > Printers & scanners–provides only basic printer controls: You can add new printers here, but there’s little in the way of printer configuration.
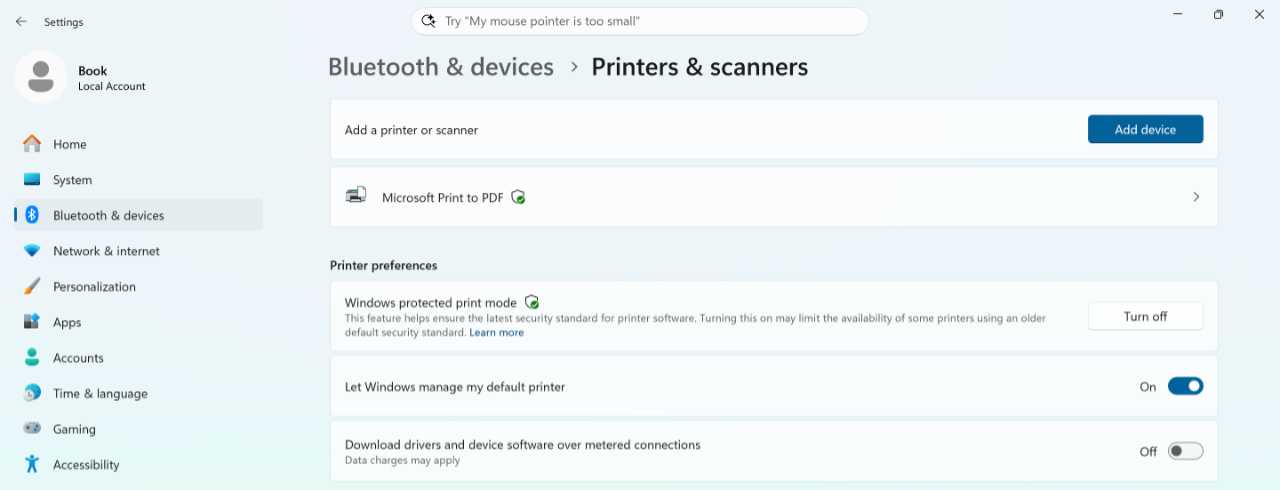
There is one important option here: “Let Windows manage my default printer.” If you leave this option set to its default setting of “On,” Windows 11 will always configure the default printer to be the most recently-used printer. If you don’t like this behavior, just configure this option to “Off.”
By default, this interface displays only a single virtual printer, Microsoft Print to PDF.
However, if Windows 11 detects a printer–either on the local network or attached directly to the PC–that will appear here as well. If you have a printer that is not displayed here, you will need to add it.
Add a printer
To add a printer, click “Add device” next to “Add a printer or scanner.” Windows 11 will look for a printer and add any that it finds to the list of available devices.
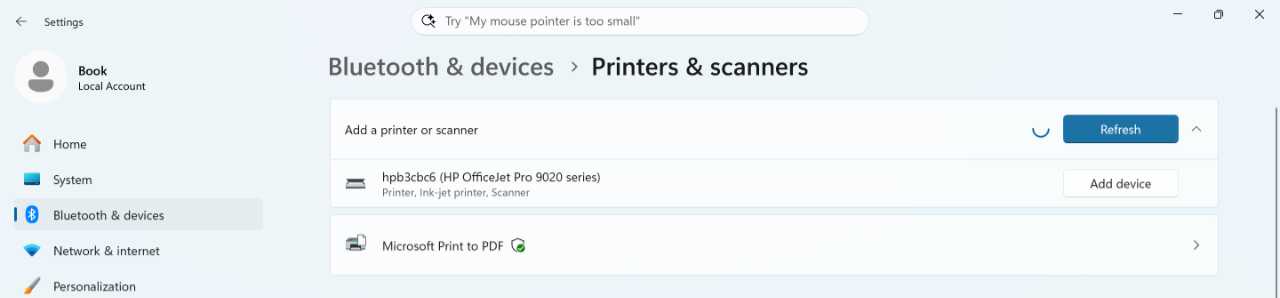
Click “Add device” next to a found printer you wish to add. Windows will download and install the necessary drivers, and then that printer will appear in the list, ready for action.
If Windows didn’t find your printer, you can click the “Show Wi-Fi Direct printers” or “Add manually” links next to “The printer that I want isn’t listed.” These options are best used for older printers, but one or the other will occasionally display a printer that doesn’t appear automatically.
Configure a printer
To configure a printer, select it in the list at the top of Printers & scanners settings.
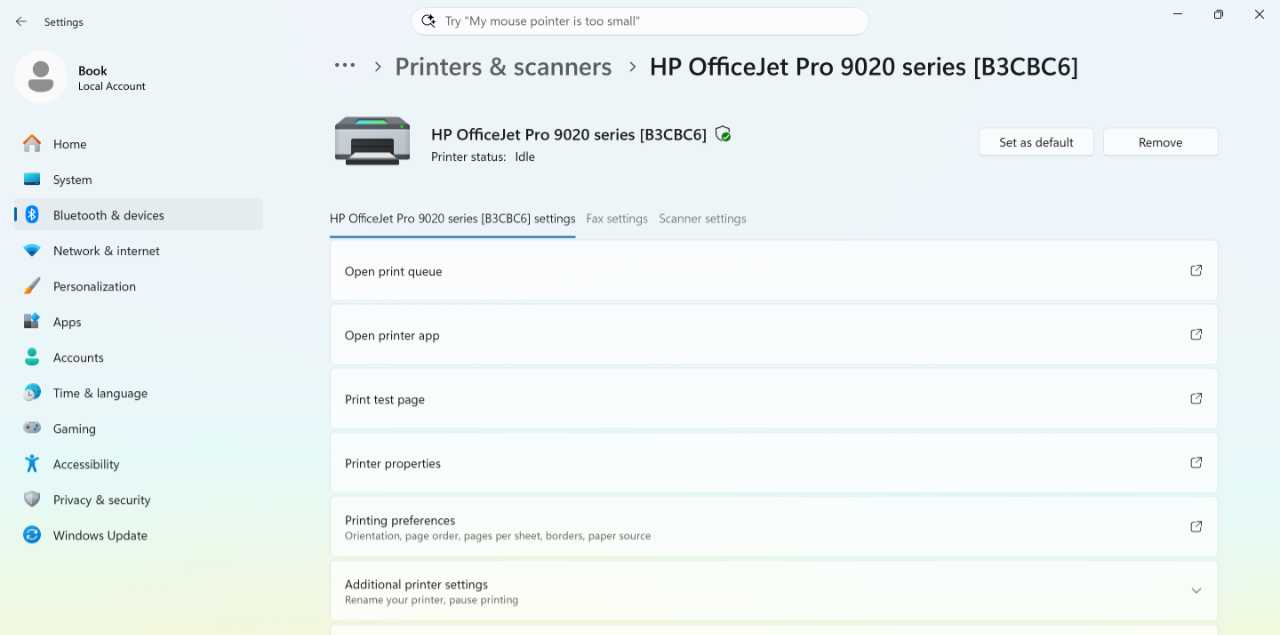
Tip: If you declined to let Windows manage your default printer, you will see a “Set as default” button at the top of this page. Click that to make this printer your default printer.
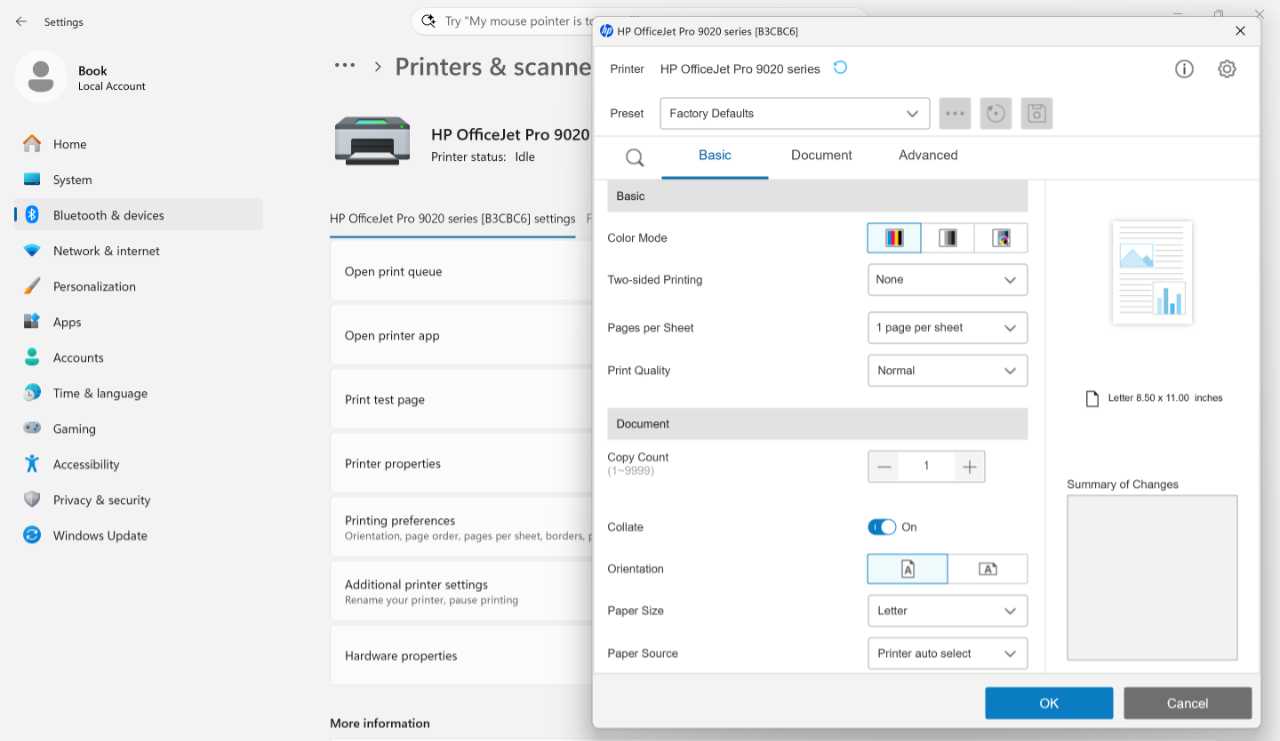
Select “Printing preferences”. The Printing preferences window for this printer appears so you can configure the printer’s various special features. This will vary wildly by device, and this window is often customized by the printer maker.
Print a document or other file
Many Windows applications support printing, and you will typically do so from within those apps. Recent apps, including most of those included with Windows 11, will use the modern Print dialog that is included with this system.
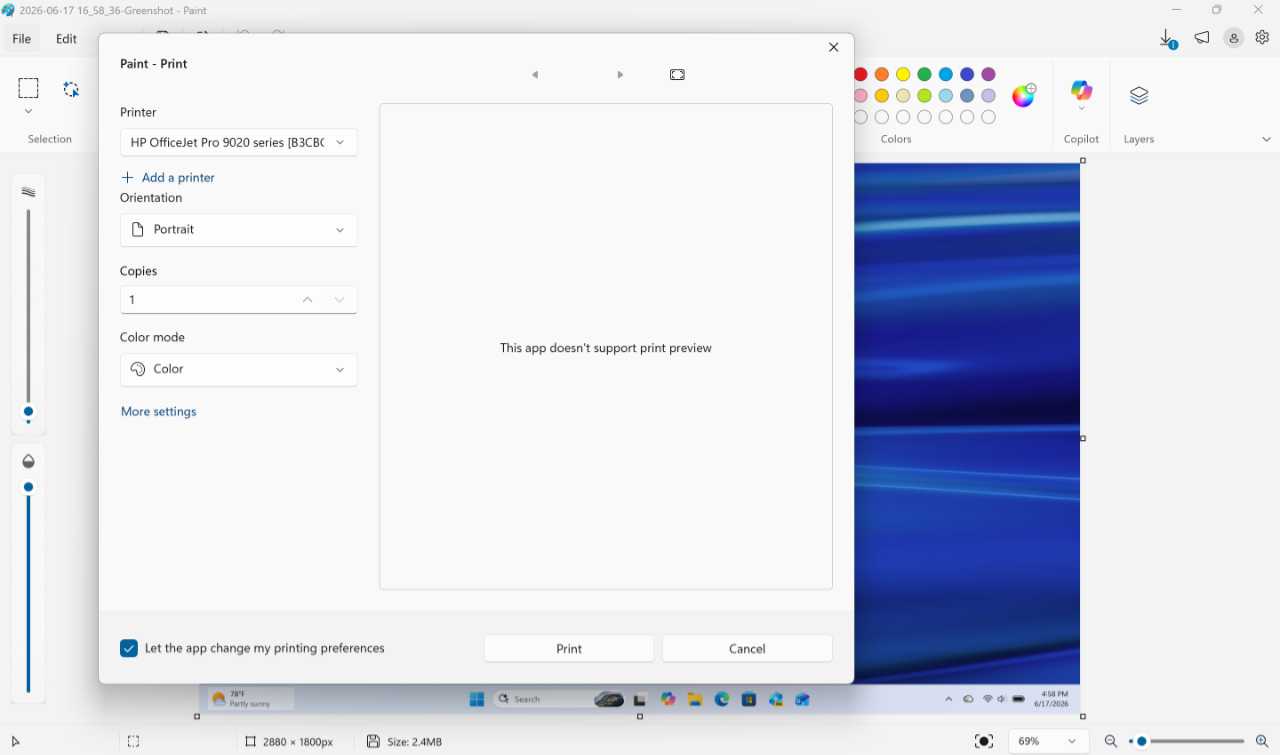
Here, you can choose which printer to use, configure the orientation, the number of copies to print, and other options, depending on the capabilities of your printer. You can also access the Printing preferences window by selecting “More settings.”
Tip: Older applications may display an old, legacy Print dialog. This is less full-featured, but it offers many of the same options.
Print to a PDF file
In addition to supporting traditional hardware printers, Windows 11 also lets you print to a virtual printer called Microsoft Print to PDF that creates a PDF file instead of a hard copy. This is useful because PDF is a de facto standard and is broadly compatible and accessible to others.
Tip: Microsoft Edge and other web browsers all support viewing and, in most cases, annotating PDF files.
You can print to PDF from any app that supports printing. To do so, simply select “Microsoft Print to PDF” from the list of available printers. When you select the Print button, you’ll be prompted to specify a file name and save location. From there, you can use the PDF file normally.
And, yes, you can set Microsoft Print to PDF as the default printer if you’d like.
Enable Windows protected print mode
Windows protected print mode is currently disabled by default but it will be enabled in a future Windows version. You can enable it now by clicking the “Turn on” button next to “Windows protected print mode” in Printers & scanners settings.
Should you?
If you’re using an older printer, perhaps not: Enabling Windows protected print mode will probably uninstall any third-party drivers, which could lead to a loss of functionality. But the good news it that you can easily toggle this feature off again–that button changes to “Turn off” to facilitate that–and when you do, the third-party drivers are reinstalled.
Scanners
Windows 11 also supports a wide variety of scanners, including all-in-one devices that provide both printing and scanning capabilities. Unlike with printers, however, Windows no longer includes built-in scanning capabilities. Instead, you will need to download an app, which can be Microsoft’s Windows Scan app, which is available in the Microsoft Store, or an app provided by the scanner maker, which might be found in the Store or on the web.
Add a scanner
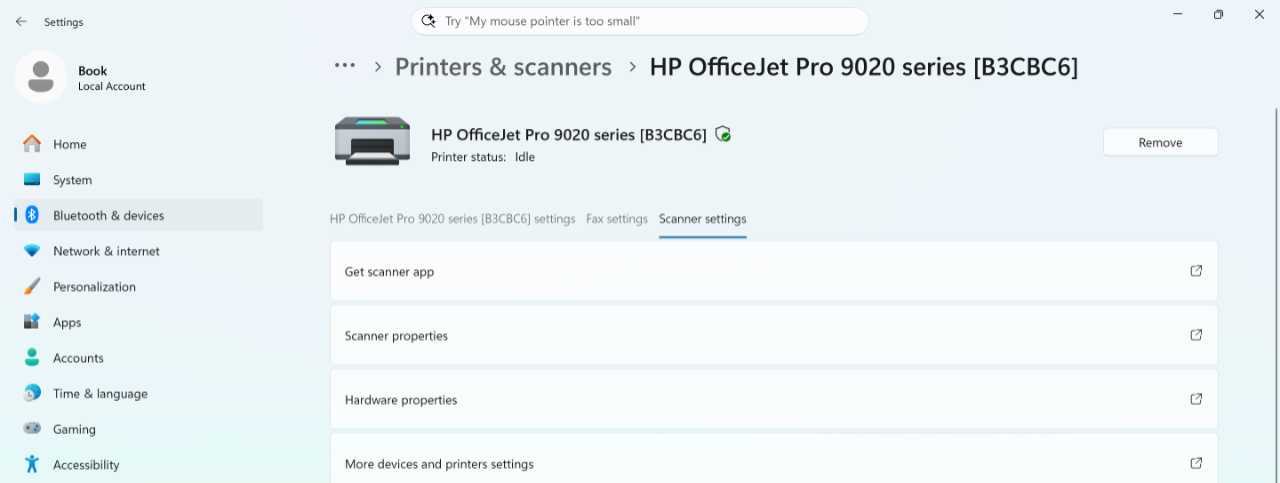
Before you can use a scanner with Windows 11, you need to make sure that it’s recognized by the system. To do so, open the Settings app and navigate to Bluetooth & devices > Printers & scanners. If Windows 11 detects a scanner (or an all-in-one printer with scanning capabilities), either on the local network or attached directly to the PC, it will appear here alongside whatever printers. If you have a scanner that is not displayed here, you will need to add it.
To do so, click “Add device” next to “Add a printer or scanner.” Windows 11 will look for a compatible scanner and add any that it finds to the list of available devices. Then, click “Add device” next to a found scanner you wish to add. Windows will download and install the necessary drivers, and then that device will appear in the list, ready to be used.
Next, select the scanner (or all-in-one printer) in the list. If it’s an all-in-one printer, select the “Scanner settings” header. Then, look for a “Get scanner app” link. If you need a scanner app, you can click this to download Windows Scanner from the Microsoft Store.
This app provides basic scanning capabilities, but you should check with your device maker and download their scanning utility instead: in most cases, this will offer a more sophisticated scanning experience that can best take advantage of the device’s unique features.
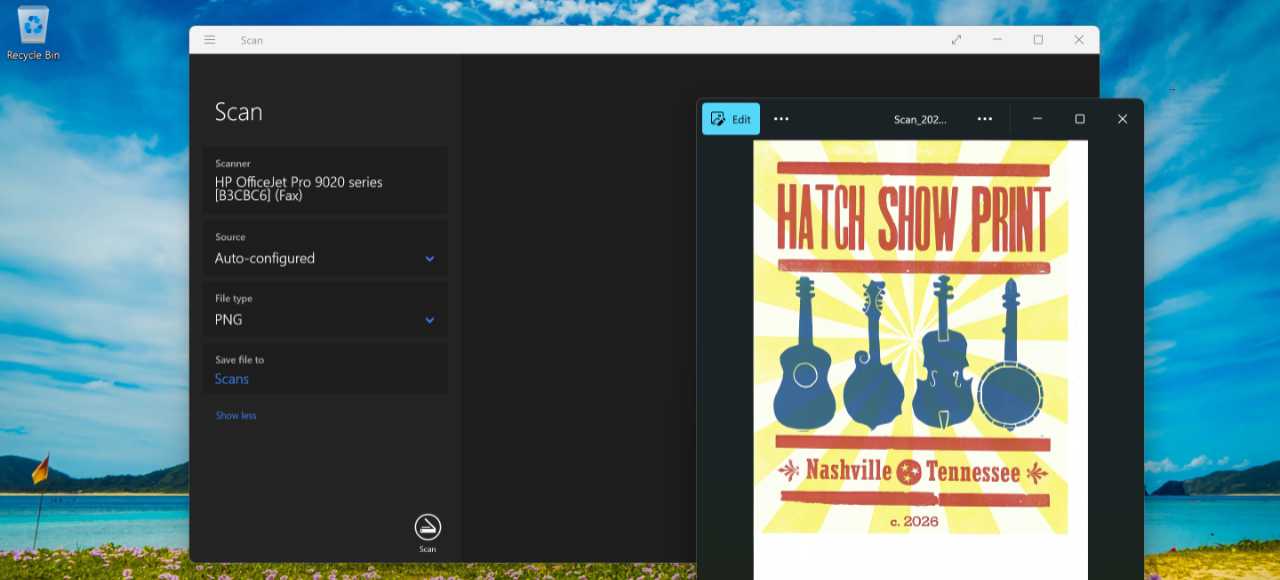
Configure a scanner and scan a photo or document
Scanner configuration occurs via the device’s maker’s software or, if you wish to use Windows Scan, that app. Windows Scan couldn’t be simpler: it has options for just selecting the correct scanner, the source (flatbed or feeder, depending on the hardware), the file type, color mode, resolution (dependent on the hardware), and the save location.
Tip: By default, Windows Scan will save scans to a Scan folder that it will create in your Pictures folder if not already present.
If you are using Windows Scan for scanning, launch that application and make sure it’s configured properly for the work at hand. When you’re ready, just click “Scan” to scan the image and save it to your PC.
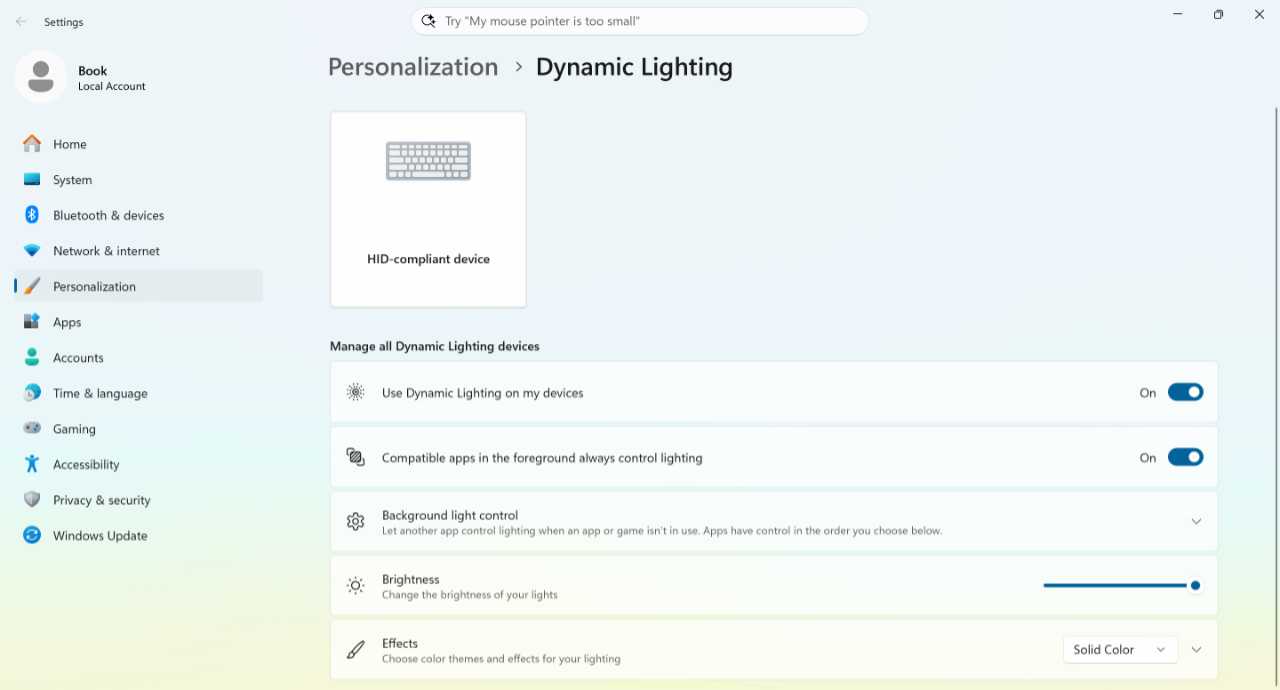
Dynamic Lighting
Hardware makers, particularly those that serve videogame fans, have long provided customizable multicolored RGB lighting capabilities in their mice, keyboards, game controllers, and other PC hardware so that customers can have a more immersive visual experience that extends past the screen. But these solutions are unique to each hardware maker, with each requiring a separate configuration app, making it difficult to mix and match peripherals from different companies.
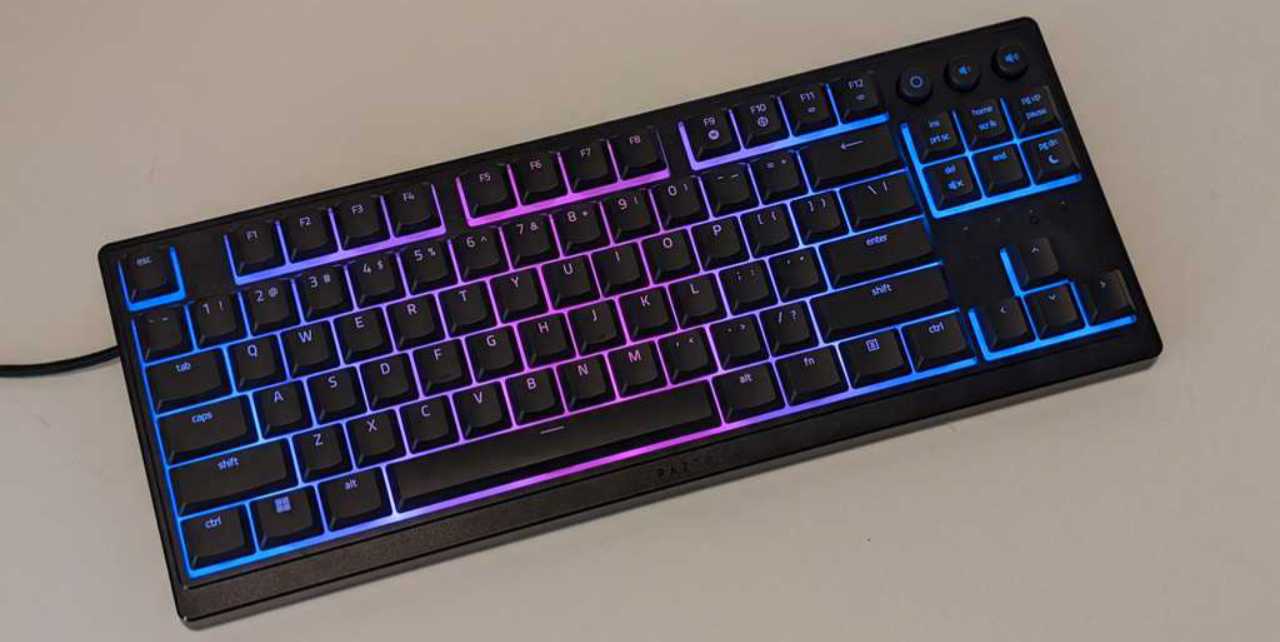
Windows 11 provides a solution to this fragmentation problem via a Dynamic Lighting feature that centralizes the management and control of the RGB lighting across all of your compatible devices. Now, you can easily apply the same RGB lighting effect to multiple devices at once, regardless of which company made each. And you can do so without installing any third-party apps. It’s all managed in the Windows 11 Settings app at Personalization > Dynamic Lighting.
Tip: Dynamic Lighting requires hardware makers to make their products compatible with this feature. Microsoft maintains a list of compatible products on its Microsoft Learn website, but it’s always out-of-date, and so you are better off consulting individual hardware makers. Leading RGB lighting companies like ASUS ROG, Razer, and others each have their own lists of compatible products.
When you connect an RGB lighting device to your PC, the Settings app will display a notification banner if it’s compatible with Dynamic Lighting.

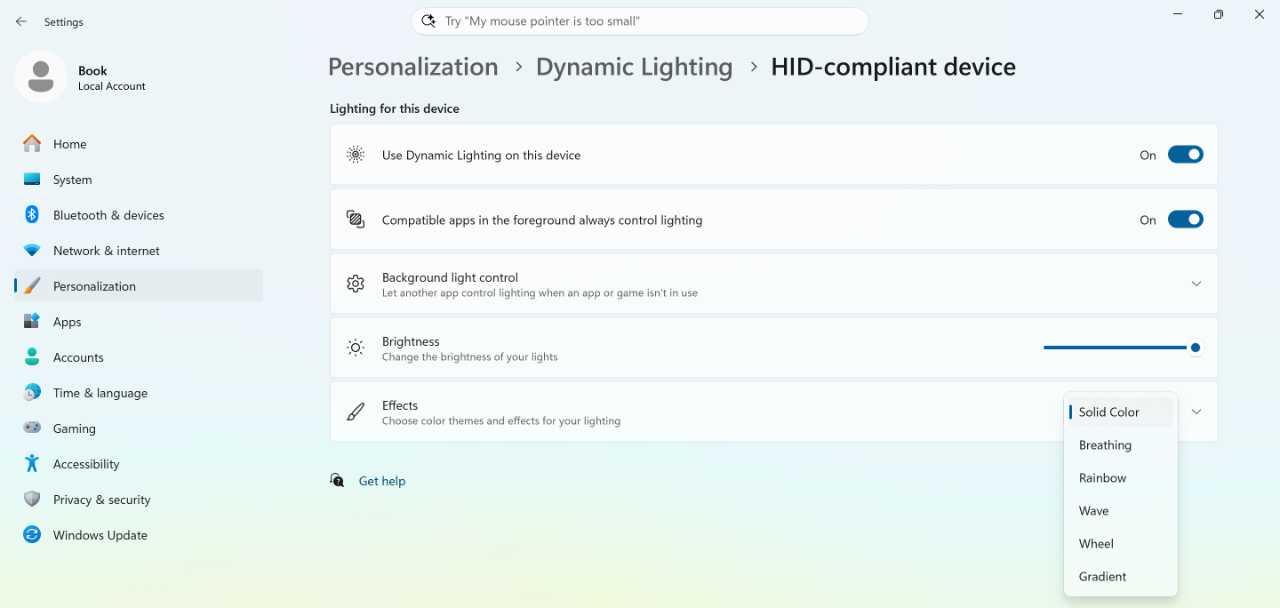
You can then click the “Setup” button on the notification to open the Settings app and view the Dynamic Lighting settings page. Each compatible device is represented by a card at the top of this page, and you can click a device card to view and configure Dynamic Lighting features for just that device. Or, you can access the same options under “Manage all Dynamic Lighting devices” to view and configure Dynamic Lighting features for all connected devices at once.
Tip: A third-party app tied to the device may auto-install at this point as well, and it could offer additional features.
A few configuration options to consider include:
Compatible apps in the foreground always control lighting. This option determines how Dynamic Lighting interoperates with the configuration app provided by your RGB lighting product maker, if installed. When set to “On,” Windows 11 will give precedence to the third-party app when it’s running alongside a game or other app, ignoring the Dynamic Lighting configuration. Otherwise, the Dynamic Lighting configuration will be used. But if it’s set to “Off” (and “Use Dynamic Lighting” is “On”), Windows 11 will ignore the third-party configuration app.
Background light control. Third-party RGB lighting apps can also run in the background so that users can control their device configurations at any time. This option, which expands to reveal a list of compatible apps when selected, can be used to determine which lighting controllers get precedence, the Dynamic Lighting Background Controller (the system), or whatever third-party app(s) you have installed. You can drag and drop them in place under “Background light control” to configure that precedence.
Tip: If you only see the “Dynamic Lighting Background Controller” item under “Background light control,” then you don’t have any compatible RGB lighting apps that can run in the background.
Brightness. This is a simple brightness slider, much like those you’ve seen elsewhere in Settings and Quick settings. Just drag the slider control until the device(s) are at the desired brightness.
Effects. This is where the magic happens: You can use this option to determine the color theme or effect used by the selected device(s), and its interface changes based on which choice you make in the drop-down.
More information
The following chapters also discuss hardware configuration in Windows 11.
Initial Configuration and Personalization 2026. Among other things, this chapter details some initial display and other hardware-related configurations you should make when you first install or reset Windows 11. Learn more.
Displays. This chapter explains how to use one or more secondary displays, including wireless displays, and how you can configure a Windows 11 PC to be used as a wireless display. Learn more.
Phone Link. This chapter looks at Phone Link, an in-box Windows 11 app you can use to integrate your iPhone or Android device with your PC. Learn more.
Windows Studio Effects. This chapter details the Windows Studio Effects, most of which require a Copilot+ PC. Learn more.

Gain unlimited access to Premium articles.
With technology shaping our everyday lives, how could we not dig deeper?
Thurrott Premium delivers an honest and thorough perspective about the technologies we use and rely on everyday. Discover deeper content as a Premium member.