Initial Configuration and Personalization
- Paul Thurrott
- Jun 15, 2026
-
0
After you upgrade to or install Windows 11, or have signed in to a new Windows 11 PC for the first time, you should ensure that everything is configured correctly for your needs and prepare your PC for the work ahead. This chapter provides a list of the post-install tasks you should perform as soon as you finish the Windows Setup Out-of-Box Experience (OOBE) and arrive at the Windows 11 Desktop for the first time, and in the order you should perform them if possible.
First, make sure you’re online
If you signed in to Windows 11 with a local account, you probably aren’t online. If so, click the Network (globe) icon in the system tray in the Taskbar to display Quick settings and then click the Wi-Fi quick setting button to find your Wi-Fi network and sign in. When you do, you may notice that more app shortcuts suddenly appear in Start. And now you can continue with the other initial configuration changes noted below.
Configure OneDrive
If you use OneDrive, you should examine how this app is configured as soon as you get online. Otherwise, it may enable its Folder backup feature automatically, which may not be what you want.
To configure OneDrive immediately, click the OneDrive icon in the tray, sign-in to the app if needed, and then navigate to “Help & Settings” (the gear-shaped button) > Settings. In the OneDrive Settings window, consider making the following two changes:
- Prevent OneDrive from automatically enabling Folder Backup. Click Sync & backup and then “Manage backup” next to “Back up important PC folders to OneDrive” to display the “Back up folders on this PC” window. If you see a a yellow info bar at the top of this window with the text “Getting things ready for backup,” you can prevent Folder Backup from auto-enabling by clicking the “Cancel” link. If you don’t see this info bar but still wish to disable Folder Backup, check back here after OneDrive is fully synced. If it does enable this feature without warning, and it can do that, you can disable it then.
- Disable the “On this day” notification that OneDrive pops up every single day. If you find the “On this day” notification annoying, navigate to Notifications and disable that option in the list of notifications that appears.
Learn more: If you’re not sure about how you wish to configure these features, you can learn more about this app in the OneDrive chapter.
Check that the system time is correct
Windows 11 is supposed to detect your location automatically and then set the time and date accordingly. This usually works, but not always. So take a quick look at the time in the time/date display in the far right of the Taskbar. If it’s incorrect, right-click the date/time display and select “Adjust date and time” in the context menu that appears to open the Settings app to its Time & date settings page. Make sure the options “Set time zone automatically” and “Set time automatically” are both configured to “On.”
Configure your user account securely
If you signed in to Windows 11 with a Microsoft account or Microsoft Work or School account, you were prompted to create a PIN and, depending on your PC, to configure Windows Hello facial or fingerprint recognition during Windows Setup. If you signed in with a local account, however, it’s possible you didn’t even configure a password. Either way, open the Settings app, navigate to Accounts > Sign-in options, and take the following steps, in this order, to better secure your sign-in account.
Keyboard shortcut: Type Winkey + I to open Settings.
Configure a password. If you signed in with a local account and didn’t create a password, do so now by clicking Password and then “Add.”
Configure a PIN. If you signed in with a local account and didn’t create a PIN, do so next by clicking “PIN” and then “Set up.”
Configure facial and/or fingerprint recognition. Depending on the capabilities of your PC, you may have Windows Hello facial recognition and/or fingerprint recognition features available to you (once you’ve configured a PIN). Enable one or both being sure with facial recognition to “improve recognition” (with and without glasses if you wear them) and enable “Enhance facial recognition protection” (which requires you to reboot the PC).
Consider disabling an annoyance. Windows 11 displays an annoying “second chance out of box experience” series of screens that resembles the Windows Setup Out of Box Experience (OOBE) after you install monthly system updates and reboot. If you find this annoying, as I do, you can prevent those screens from appearing by configuring the option “Use my sign-in info to to automatically finish setting up after an update” to “Off.”
Learn more: You can learn more about Windows Hello (PIN, facial recognition, and fingerprint recognition) in the Windows Hello, Presence Sensing, and Dynamic Lock chapter.
Ensure the PC’s disk is encrypted
If you signed in to Windows 11 with a Microsoft account or Microsoft Work or School account, then your PC’s system disk (typically solid state SSD storage these days) was automatically encrypted to prevent physical theft of your data and the encryption key you need to unlock it was stored in your OneDrive cloud storage. If you signed in with a local account, however, the disk is not encrypted, so you will need to fix that.
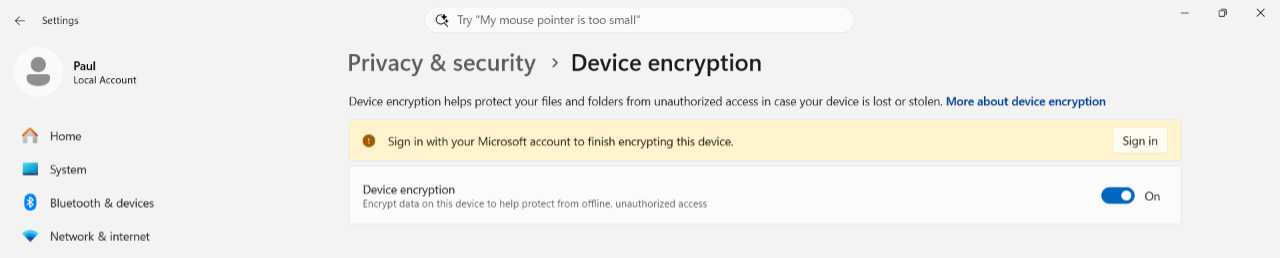
Either way, you should check the status of drive encryption now. To do so, open the Settings app and navigate to Privacy & security > Device encryption. If the disk is encrypted, the “Device encryption” option at the top is set to “On” and you have nothing more to do.

If you see a yellow info bar that reads “Sign in with your Microsoft account to finish encrypting this device” then you have some work to do.
What you do next will depend on whether you have Windows 11 Home or Windows 11 Pro. Let’s start with the latter because that’s faster and simpler.
Enable disk encryption in Windows 11 Pro
To enable disk encryption, click “BitLocker Drive Encryption” under “Related.” In the BitLocker Drive Encryption control panel that launches, just click the option “Turn on BitLocker” next to the system disk. You will be prompted to back up your recovery key, with the choices being “Save to your Microsoft account,” “Save to a file,” and “Print the recovery key.” After backing up the recovery key, Windows 11 will begin encrypting the drive.
Enable disk encryption in Windows 11 Home
If you have Windows 11 Home, you have to sign in to Windows 11 with a Microsoft account that has administrator privileges to enable drive encryption. There are two ways to do that.
- Click the “Sign in” button in the yellow info bar and sign in with a Microsoft account, a process that will convert your local account sign-in to a Microsoft account sign-in.
- Create another sign-in account that’s a Microsoft account (in Settings > Accounts > Other users), grant it administrator rights, sign in to Windows 11 with that account, navigate through a truncated version of the OOBE, and arrive at the Desktop. Then, sign out, sign in with your normal local account, and delete the Microsoft account you just created.
You could also just upgrade the PC to Windows 11 Pro. Yes, Microsoft charges $99 (in the U.S.) for that upgrade if you do this through the Microsoft Store, but you can find Windows 11 Pro product keys online–in places like the Product Keys website–for as little as $10. That will do the trick nicely, and in addition to the low price, it’s perfectly legal and safe.
Learn more: You can learn more about device encryption and BitLocker in the Device Encryption chapter.
Rename the PC if required
If you didn’t provide a name for your PC during the OOBE, Windows Setup will create a unique but nonsensical name–like DESKTOP-TAKKU2G or similar–for you. You should rename it now because you will see your PC’s name referenced by OneDrive and other Microsoft services on the web and elsewhere, and it’s helpful to know at a glance which PC they’re referring to.
To do so, open Settings and locate the “Rename” link at the top of the Home page. Click it, provide a new name–perhaps Pauls-PC, Laptop, or whatever–in the dialog that appears, and click Next. Reboot the PC as requested to complete the change.
Sorry, you can’t use spaces or most special characters in the PC name.
Check for updates
Windows 11 will keep itself up-to-date via automatic update downloads and installs, but it’s a good idea to get this process started and perform a few other related system maintenance tasks whenever you start using a PC or upgrade to the latest version of Windows 11.
You can perform the following steps and let them run while doing other tasks listed in this chapter.
Use Windows Update to install system updates. Open the Settings app, navigate to Windows Update, and click “Check for updates.” Once updates begin installing, click “Advanced options” and then “Optional updates.” On this page, select any driver-related updates that need to be installed as well and click “Download and install” to add them to the install queue. Reboot when required and repeat this process until there are no more updates.
A> Learn more: You can learn more about this functionality in the Windows Update chapter.
Microsoft Store. Open the Microsoft Store app, navigate to Downloads, and click “Check for updates” to update the in-box apps to the latest versions. You may need to repeat this process a few times before all the in-box apps are updated.
Learn more: You can learn more in the Microsoft Store chapter.
Use a PC maker support/driver update application. If your PC comes with a support or driver management app–like Dell Support Assist, HP Support Assistant, Lenovo Vantage, and others–you should use it to check for software updates as well.
Tip: If your PC uses an Intel microprocessor and your PC maker doesn’t supply its own software and driver updater, you may also want to install the Intel Driver & Support Assistant, which provides regular updates for Intel microprocessors and other chipsets.
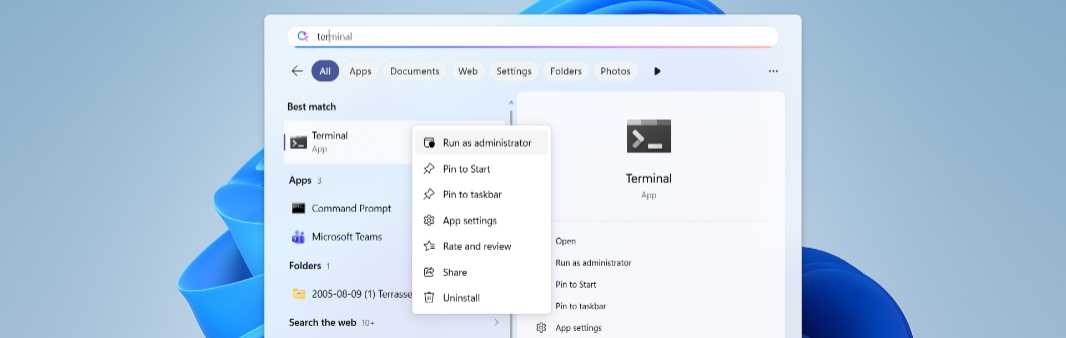
Windows Package Manager. Once all the system and app updates are all installed, search for Terminal using Search in Start, right-click it in the search results, and choose “Run as administrator.” After clearing the User Account Control (UAC) dialog that appears, you can run the following series of Windows Package Manager (winget) commands to see and then install any pending updates.
- winget install
- winget install –all –silent
Once all the updates are complete, you can close the Terminal window.
Learn more: You can learn more about the Terminal app in the Terminal chapter. And you can learn more about the Windows Package Manager (winget) in the Windows Package Manager chapter.
Configure Windows Security
Windows 11 includes a Windows Security app that provides a front-end to many of the security capabilities of your PC. And while the system is of course configured securely by default, there are sometimes additional steps you can take to improve security even further by enabling some optional features that need to share anonymous information with Microsoft to function properly.
To see this, click the Windows Security icon–it’s hidden in the system tray’s hidden icons flyout–and see whether any of the items in the default Security at a glance view have a yellow “bang” overlay. If so, correct each in turn, which usually just involves clicking an “Enable” button, running a quick virus scan, or some other obvious action. (Or, if you sign in to Windows 11 with a local account, you may have to simply dismiss a few warnings.)
Learn more: You can learn more about this app and what it does in the Windows Security chapter.
Uninstall crapware and other bundled apps you don’t want
Windows 11 comes with dozens of bundled, or in-box. apps, many of which are useful, that you can find easily enough in Start. But Start can also include a strange selection of sponsored app shortcuts–“crapware” or “bloatware” apps–supplied by Microsoft and/or your PC maker. Most of these unwanted app shortcuts can be removed from the Pinned section in Start–just right-click each in turn and select “Unpin from Start”–but you can alternatively uninstall these app shortcuts for good as well. To do so, right-click the offending shortcut and choose “Uninstall”; if that option is not available, that means only the shortcut is present, so just choose “Unpin from Start.”
Tip: Some PC makers use an age-old trick to make it harder to remove certain crapware from your PC. If you can’t uninstall as described above, try right-clicking its shortcut and choosing “Open file location.” Then, just delete the shortcut in the File Explorer window that appears.
Learn more: You can learn more about customizing Start in the Start chapter. And you can learn more about apps in the App Basics chapter.
Configure the display
Windows 11 usually does a good job of configuring your PC to use its display at its native resolution and an optimal display scaling value based on its physical size and other factors. But you should still review these settings and ensure that they and other display-related options are configured to your liking.
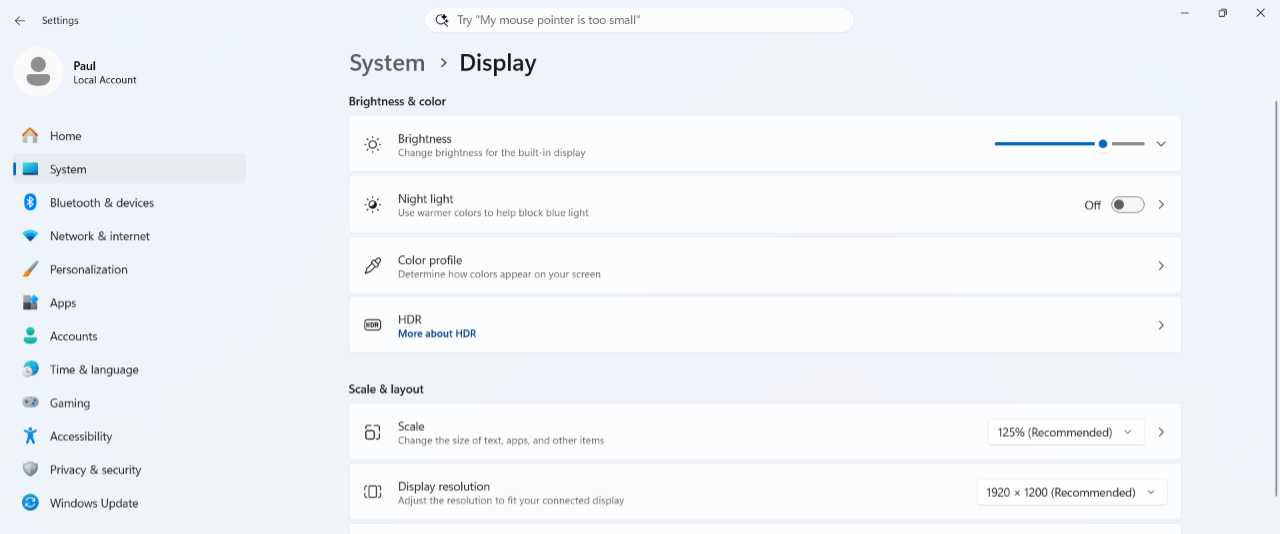
To do so, open the Settings app and navigate to System > Display. Then, examine and configure the following options as needed.
Display resolution. Windows 11 should configure your computer to use the native (maximum) resolution of its display. To make sure, click the drop-down control next to “Display resolution” under “Scale & layout.”
Scale. Windows 11 picks a default display scaling value–which impacts the size of text, controls, graphics, and other items on-screen–based on its native resolution, physical size, and other characteristics. But you can change this using the drop-down control next to “Scale” under “Scale & layout” if you find a different scale value to be more comfortable for your eyes.
Night Light. Like your smartphones and mobile devices, Windows 11 can be configured to automatically or manually enable a warmer (orange colored) display to lower the blue light output and ease your eye strain. But it’s not enabled by default. To enable this feature, click “Night Light” and then either just enable it or choose a schedule. For example, many like to enable this feature automatically between sunset and sunrise.
Adaptive color. If your display supports it, you will see an Adaptive color option that uses sensors to automatically adjust the colors displayed on-screen so that they appear correct to your eyes in different lighting conditions. I find this effect annoying–on most PCs, it makes the display take on a pinkish hue–but it’s worth experimenting with. It’s just a manual On/Off toggle, so you can just turn it off if you don’t like it either.
Refresh rate. While mainstream displays typically utilize a standard 60 Hz refresh rate, many modern displays support high refresh rates (90 Hz, 120 Hz, or higher), which can make gaming, scrolling, and other animations look smoother at the expense of some battery life. Some even support a dynamic or variable refresh rate (VRR), which lets the system switch between standard and high refresh rates on the fly, giving you the benefits of a high refresh rate without impacting battery life. To see if your PC supports either or both, navigate to Advanced display and see what’s available in “Choose a refresh rate” and “Dynamic refresh rate.” If you can choose a higher refresh rate and enable a dynamic refresh rate, I recommend doing so.
Learn more: You can learn more about display settings in the Displays chapter.
Configure power management and related settings
You will almost certainly want to configure some power management and related settings because Microsoft aggressively optimizes Windows 11 for battery life, not usability. You do so in the Settings app: Navigate to System > Power & battery and consider the following options:
Power Mode. By default, Windows 11 uses its Balanced power management mode when the PC is plugged in or on battery power. This is the right configuration for PCs powered by Qualcomm Snapdragon X and X2 processors, but AMD and Intel processors aren’t as efficient or reliable, so you may want to switch to the “Best Performance” power management mode on these PCs. Experiment first, however, as doing so will reduce battery life on battery and increase fan noise on power.
Screen, sleep, & hibernate timeouts. By default, Windows 11 is configured to turn off the display and put the PC in sleep mode in very short time frames, which can be annoying. To adjust these timeouts while the PC is plugged in and/or on battery power, expand this section. You may also see related presence sensing options like “Wake my device when I approach,” “Dim my screen when I look away,” and others that are worth considering.
Learn more: These options are discussed in more detail in the Windows Hello, Presence Sensing, and Dynamic Lock chapter.
Battery percentage. By default, Windows 11 displays the PC’s battery life as an often-inscrutable icon in the system tray. If you find this too difficult to understand, you can enable an optional battery percentage that appears in plain text form (like 68%) next to the battery icon.
Energy saver. Windows 11 puts the PC into a reduced power consumption mode called Energy saver when battery life falls to 30 percent. I find this to be overly aggressive and recommend changing this option to 10 percent (as I do) or 20 percent.
Lid & power button controls. If the power button on your laptop is built into the keyboard, you may find yourself putting it to sleep when you inadvertently tap that button/key. If so, expand the “Lid & power button controls” section and configure the “Pressing the power button will make your PC” option to “Do Nothing” for both “Plugged in” and “On battery.”
Configure multitasking and sharing features
Depending on your needs, you may want to change the configuration of specific multitasking and sharing features. The relevant options are found in the Settings app by navigating to System > Multitasking. Here, consider the following settings.
Snap windows. Generally speaking, Snap is a great set of features for managing the layout and positions of your apps and other windows on-screen. But one Snap feature, “Show snap layouts when I drag a window to the top of the screen,” can be incredibly annoying if you like to manually move windows across because the Snap layouts pane that appears at the top of the screen can get in the way. If you are also annoyed by this, expand “Snap windows” and disable that feature.
Learn more: You can learn more about Snap in the Snap chapter.
Show tabs from apps when snapping or pressing Alt + Tab. By default, Windows 11 inexplicably includes your three most recent Microsoft Edge tabs in the Alt + Tab display and when you’re snapping windows, alongside apps and active windows. If you find this annoying or if you just don’t use Edge, disable this setting.
Drop tray. Microsoft recently added a Drop tray feature that works like the Snap layouts pane noted above, but for sharing: It’s a pane that appears at the top of the screen when you drag a file with the mouse cursor, and if you drag it up to the pane, you can then access the normal Windows Share features. This is annoying for the same reason the Snap layouts pane is annoying, so you may want to disable it.
Configure Microsoft Edge even if you’re not going to use it
Microsoft Edge is problematic for so many reasons, and that’s true whether you intend to use this browser or not. So it’s important to configure this web browser correctly, even if you will simply use it once to download and install Google Chrome or whichever browser you prefer. The first steps are simple enough, though: When you first run Microsoft Edge, you step through a full-screen experience in which you configure the browser. Choose the following:
- Welcome to Microsoft Edge, the best- performing browser on Windows. You will see this screen if you sign in to Windows with a local account. Choose “Start without your data.”
- Stay current with your browsing data. Uncheck the option “Bring over your data from other browsers regularly. You can manage your preferences any time in Settings.”
- Your Google data and services, now in Edge. Choose “Continue without Google data.”
- Help us make Microsoft experiences more useful to you. Uncheck “Make your Microsoft experiences more useful to you.”
Learn more: Check out the Set Up Microsoft Edge Correctly … Whether You Use It Or Not chapter for a more detailed rundown of these steps.
Configure File Explorer
File Explorer is the Windows 11 file manager app, and while many will find it to work well in its default configuration, it suffers from performance issues you may find annoying. Plus, you might want to make a few other configuration changes depending on how you use File Manager.
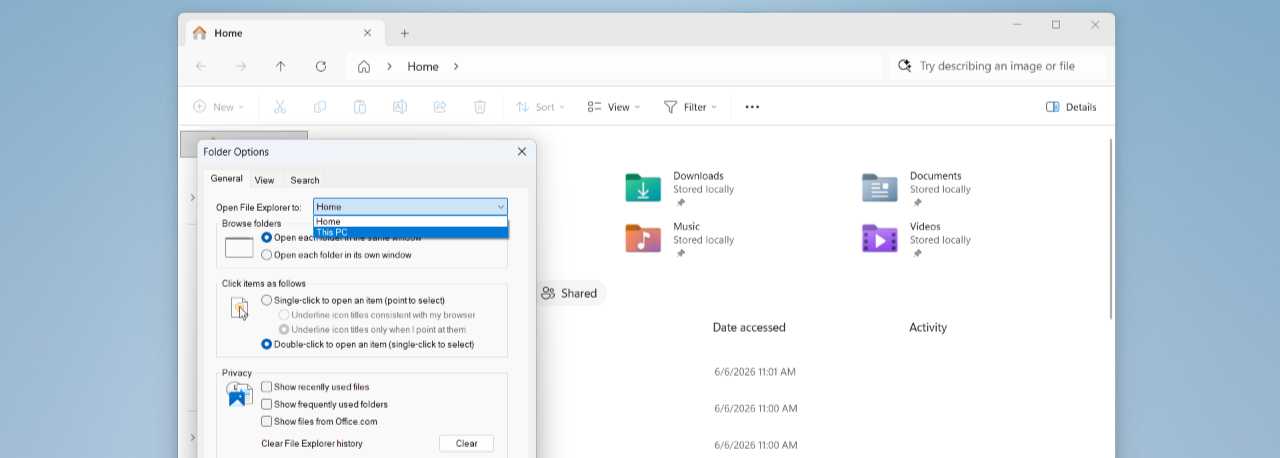
To configure File Manager, open the app, click the “See more” (“…”) button in its command bar, and choose “Options” from the menu that appears. In the Folder Options dialog that appears, consider making the following changes:
- Uncheck all the options under “Privacy”—“Show recently used files,” “Show frequently used folders,” and “Show files from Office.com”–to speed up the launch speed of the app. Note that these changes will make File Explorer’s Home view less useful as these items will no longer display.
- Change “Open File Explorer to:” at the top of the window from “Home” to “This PC” so that File Explorer no longer even displays the Home view, which will further improve app launch speeds.
Learn more: You can learn more about this app in the File Explorer chapter.
Configure the Desktop, Start, the Taskbar, Search, and Widgets
Microsoft puts a superfluous Microsoft Edge shortcut on the Desktop by default, and your PC maker may have added a few app shortcuts of their own too. This isn’t rocket science, but take a moment to delete them. It’s good for your soul and your well-being.
You should also take the time to configure other basic user interface features tied to the Desktop now.
Taskbar. You can disable and/or configure the Widgets, Search, and Task view items on the Taskbar by opening the Settings app and navigating to Personalization > Taskbar. You can also remove (unpin)–and pin and position–app shortcut icons on the Taskbar directly for fast access.
Tip: The quickest way to get there is to right-click a blank area of the Taskbar and choose “Taskbar settings.”
Learn more: You can learn more about this and other features in the Taskbar chapter.
Start. In addition to the crapware and unwanted apps you will find in Start (addressed above), this interface also displays tips, recommended apps, and other nonsense in its Recommendations section by default. To disable that, open the Settings app, navigate to Personalization > Start, and configure “Show recommendations for tips, shortcuts, and more” to “Off.”
Tip: The quickest way to get there is to right-click a blank area of Start and choose “Start settings.”
Learn more: You can learn more in the Start chapter.
Widgets. By default, Widgets launches if you mouse over its Taskbar icon (including when you do so inadvertently) and displays a terrible, low-quality news feed by default. To change this, open Widgets, click Settings (gear), disable “Open Widgets board on hover,” and both options under “Notifications.”
Learn more: You can learn more about this and other features in the Widgets chapter.
Search. By default, Search displays web results along with your file and app searches and it advertises web-based content in the search pane. To disable that, open the Settings app, navigate to Privacy & security, and configure “Show search highlights” to “Off.”
Learn more: You can learn more in the Search chapter.
Configure a theme
In addition to supporting Dark and light modes, Windows 11 also supports themes, which combine a background, an accent color, a sound scheme, and a mouse cursor into a single item you can name, enable, or change.
The default Windows 11 theme displays in Light mode and uses a dynamic background called Windows spotlight, a specific accent color, the default sound scheme, and the default mouse cursor. But your PC could be different: PC makers often configure the default theme, and if you restored from a backup during Windows 11 Setup, your configured theme should be in-place.
You can change the theme at any time, but “there’s no time like the present if you’re not happy with how it looks.
You do so in the Settings app by navigating to Personalization > Themes. This page lets you save the currently configured background, colors, sounds, and mouse cursor as a new theme, switch between any available themes, and get more themes from the Microsoft Store.
A few recommendations
- If you find the default bong sounds that Windows makes to be as annoying as I do, be sure to configure the sound scheme to “No sounds” in the Sound control panel window that appears when you click “Sounds.”
- If you have as much trouble finding the mouse cursor on-screen when your work, as I do, select “Mouse cursor” and then choose “Windows inverted” (the third option) in the “Mouse point style” section in Mouse pointer and touch accessibility settings.
- When you’re done configuring the theme, click “Save” and give it a name so you can switch back to it later if something changes.
Tip: Windows 11 doesn’t support automatically switching between Light and Dark modes based on a set schedule (for example, using Dark mode between sunset and sunrise). But you can add this feature by installing Microsoft PowerToys and then enabling and configuring the Light Switch utility.
Install and configure the apps you need
With all the above out of the way, you can finally install the apps you rely on. You can do so in any combination of the following ways (among others):
- With the Microsoft Store. The Microsoft Store is a high-quality app store with a good variety of apps, and if you install apps this way, the Store will keep most of them up-to-date automatically.
- From the web. This is the traditional, pre-Store way to install Windows apps in the 21st century.
- Using the Windows Package Manager (winget). This command line tool may be intimidating, but it’s the best way to install multiple apps all at once, in batch, when you first bring up a new Windows 11 install.
Learn more: You can learn more about apps in Apps Basics, more about the Microsoft Store in the Microsoft Store chapter, and more about the Windows Package Manager in the Windows Package Manager chapter.

Gain unlimited access to Premium articles.
With technology shaping our everyday lives, how could we not dig deeper?
Thurrott Premium delivers an honest and thorough perspective about the technologies we use and rely on everyday. Discover deeper content as a Premium member.