Start
- Paul Thurrott
- Jun 15, 2026
-
0
Start is the primary interface for launching apps and recent documents in Windows 11. You open it, as before, by clicking the Start button in the Taskbar. But as with the Taskbar, Start is simplified in Windows 11, and it’s now a centered floating window, not a menu or full-screen experience or in previous Windows versions.
Keyboard shortcut: You can also open Start by tapping WINKEY or by Ctrl + Esc.
Tip: As with previous Windows versions, you can open Start by clicking the Start button on the Taskbar or by typing WINKEY or CTRL + ESC.
Defaults
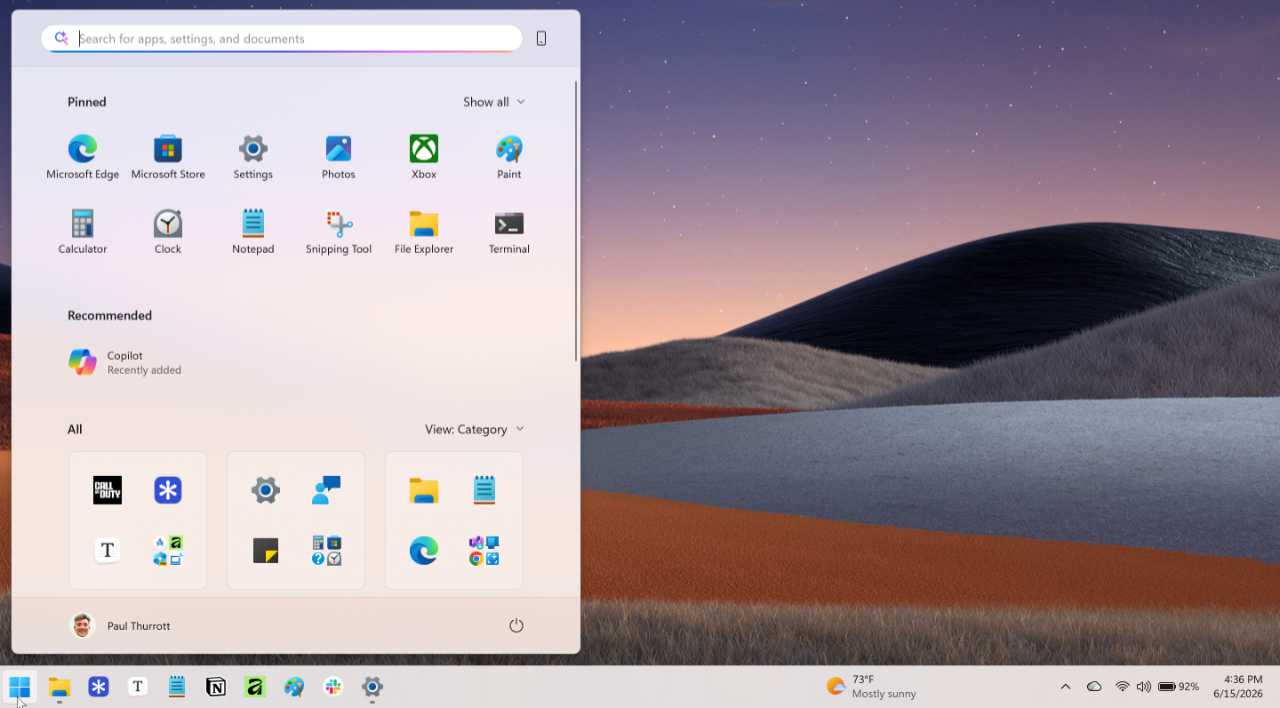
Start now offers a simplified user experience with the following interfaces.
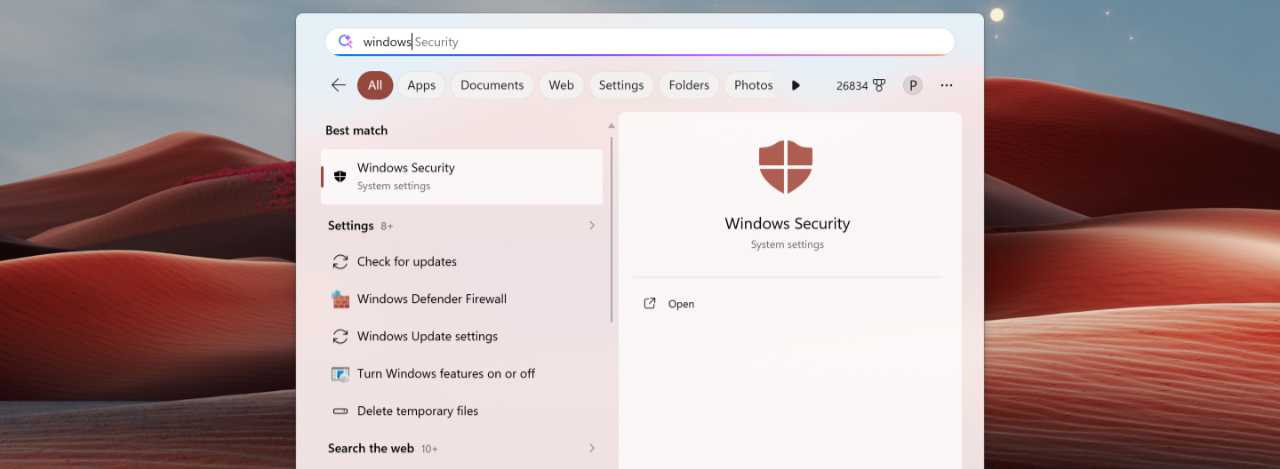
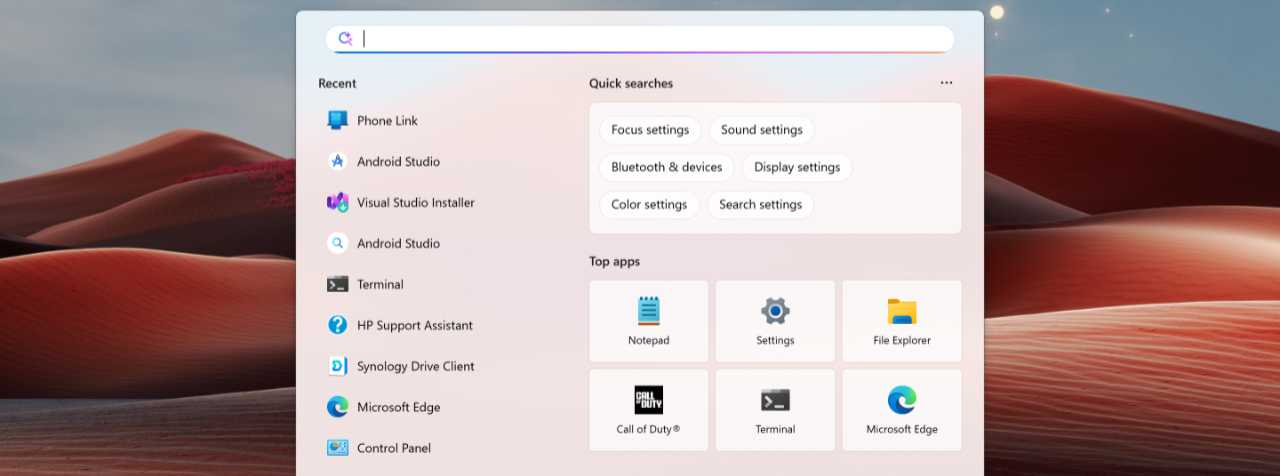
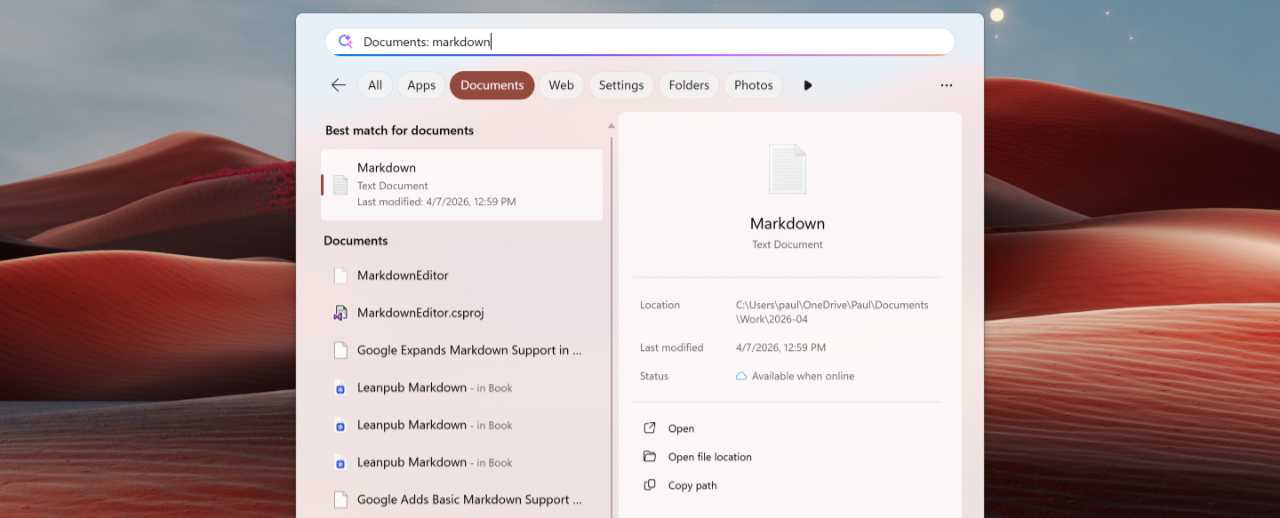
Search. A prominent Search box at the top of Start lets you search for apps, settings, documents, and more, and you don’t have to select it to get started. Just open Start and type. As you do, Start transitions into the Windows Search experience and provides filters so you can search only apps, documents, the web, settings, folders, or photos.

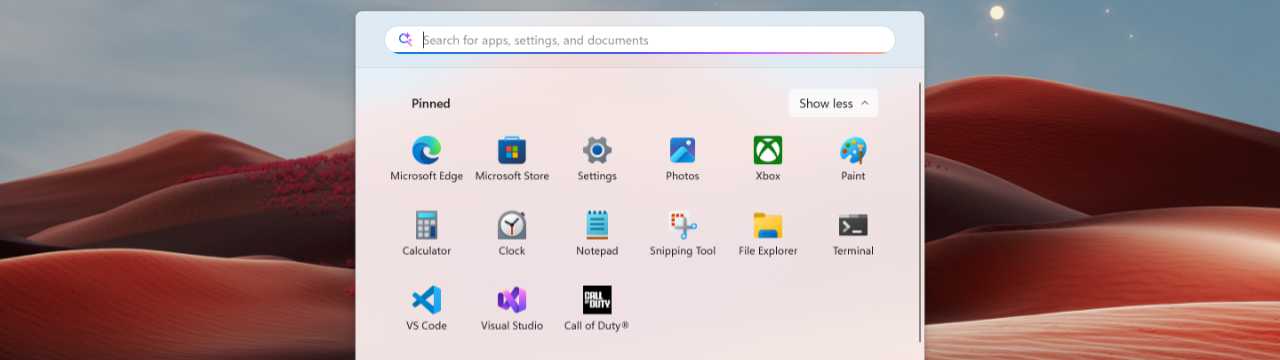
Pinned. This is a fully customizable grid of shortcuts you can access to launch your most frequently-used apps. Microsoft and your PC maker populate this section with shortcuts that you may or may not find useful. But you can delete or relocate pre-pinned shortcuts and add your own. You can also choose between an expanded or contracted view using a “Show all”/”Show less” toggle if there are enough shortcuts.
Tip: You can right-click app shortcuts in the Pinned section to access a context menu with additional choices like “Run as administrator” and “App settings.”
Recommended. This section displays recently installed apps; recently accessed documents, images, and other files, and suggested apps (which will download and install from the Microsoft Store if clicked) by default. You can configure Start to only show some of these recommendations if desired.

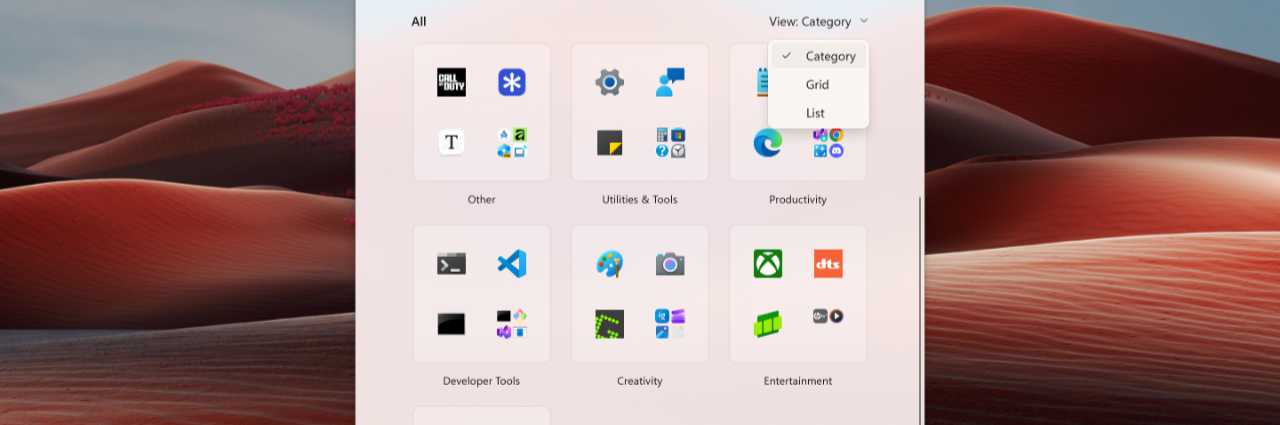
All. This section displays shortcuts for all the apps installed on your PC. It is organized using a Category view by default, but you can change it to a more useful and alphabetical Grid or List view.
Account manager. At the bottom left of Start, you will find an Account manager button with your user profile picture and name. This displays an Account manager window when clicked with account-related notifications and a “Sign out” button.

Folder buttons. None are displayed by default, but you can configure Start to display one or more system app and folder buttons–with choices that include Settings, File Explorer, Documents, Downloads, Music, and others–between the Account manager and Power buttons at the bottom of the window.
Power. This button in the lower right of Start provides quick access to Lock, Sleep, Shutdown, and Restart options.

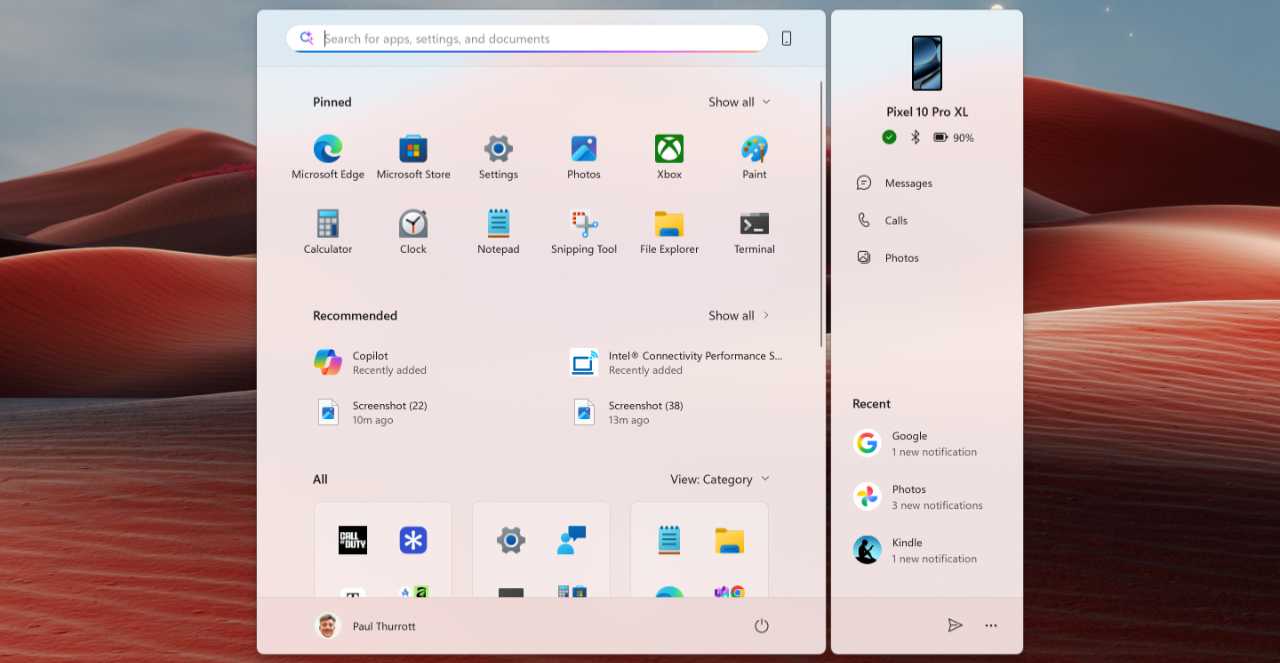
Mobile device. If you configure Windows 11 to access the content and capabilities of your smartphone or other mobile device, you can then access those features using the Phone Link app and, if enabled, a Mobile device slice on the right side of Start. There is also a “Hide mobile device/Show mobile device” button to the right of Search so you can toggle the slice on and off.
Customize Start
Some Start features are customized directly from the interface while most others require you to use the Settings app by navigating to Personalization > Start.
Tip: You can also access this interface more quickly by right-clicking an empty area of Start and selecting “Start settings” (the only option) from the context menu that appears.
There are a few exceptions, however, so let’s look at those first.
Move Start (and the Taskbar icons) to the left side of the display
Windows 11 centers Start and the Taskbar items and app shortcuts on-screen by default. But you can optionally left-align these items so that the system resembles the look and feel of previous Windows versions dating back to Windows 95.
To do so, open Settings, navigate to Personalize > Taskbar, expand “Taskbar behaviors,” and change the Taskbar alignment option from “Center” to “Left.” Note that the Widgets Taskbar item appears to the left of the system tray when you configure this layout.
Customize Search
Windows Search is available in Start, but also via the Search Taskbar item and File Explorer. You can customize how Windows Search works in the Settings app by navigating to Privacy & security > Search.
Tip: You can also get to this interface a bit more quickly by opening Start, clicking the Search box, clicking “Options” (“…”) in the Search pane that appears, and then clicking “Search settings.”
Windows Search options you should consider customizing
Some options to consider customizing include:
Show search highlights. Disable this option to hide the content suggestions that Microsoft makes in the Search box results and the Search pane. They’re just there to get you to visit Microsoft sites online so you can be tracked and put in front of advertising, and they distract you from the task at hand. Windows Search is much cleaner without Search highlights.
Search my accounts. Windows Search will search content in your Microsoft account (and/or your Microsoft Work and School account) by default. You can disable that behavior here.
Search the contents of online files. Windows Search will search content in your OneDrive and, if configured, other compatible cloud storage services by default. If you use OneDrive, this is useful. But you can disable it otherwise.
Find my files. By default, Windows Search will only index and search your Desktop, Documents, Pictures, and Music folders for local file searches. You can customize that by clicking “Customize search locations.” But if you wish it to index and search your entire drive, you can choose “Enhanced” here and, optionally, add or remove specific folders from a list of locations that are excluded by local file searches.
Tip: Search indexing improves the speed of file searches by creating a database of the files on your PC. This can be a lengthy and resource intensive task, but Windows 11 will only index the drive when you’re not actively using the computer.
Configure Windows Search to only search files on your computer
Windows Search displays app, documents (files), and other results by default, and only documents and other files when you select the Documents filter above search results. If you want these interfaces to only display local files–meaning files on the PC you’re using–disable the following in Search settings:
- Show search highlights
- Search my accounts
- Search the contents of online files
Learn more: You can learn more about Windows Search in the Search chapter.
Customize the Pinned section
The Pinned section is customized directly in Start. You can perform the following customizations:
Pin an app shortcut. To add or “pin” an app shortcut to Start, select it anywhere in the system–including the Recommended and All sections in Start–and choose “Pin to Start.”

Tip: Shortcuts pinned to Start appear at the bottom of the Pinned section, which will expand automatically if needed so you can see it immediately.
Arbitrarily move an app shortcut. You can arbitrarily change the location of any item in the Pinned section by dragging it with the mouse cursor to a new location.

Move an app shortcut to the top or to the left or right of its current location. Depending on its current location, you can right-click a pinned app shortcut and choose “Move to front,” “Move left,” or “Move right” to move it to a specific location.
Unpin an app shortcut. To remove or “unpin” any app shortcut, right-click it and choose “Unpin from Start.”
Create a folder. Start lets you create folders that you can then fill with app shortcuts. To do so, right-click the Pinned section and choose “Create a new app folder.” Or, just drag one app shortcut onto another. Then, you can drag other app shortcuts into the newly created folder as needed too.


Tip: You can move app shortcuts to new locations in a folder just as you do with the Pinned section in Start. You can also drag shortcuts out of a folder to remove them from the folder.
Rename a folder. To rename a folder in Pinned, click it to open it in place, click the folder’s name, and type the name you prefer.

Tip: To remove a folder, you have to manually delete each app shortcut it contains or drag/move them out of the folder and back to Pinned, one by one.
Customize the Recommended section and remove recommendations
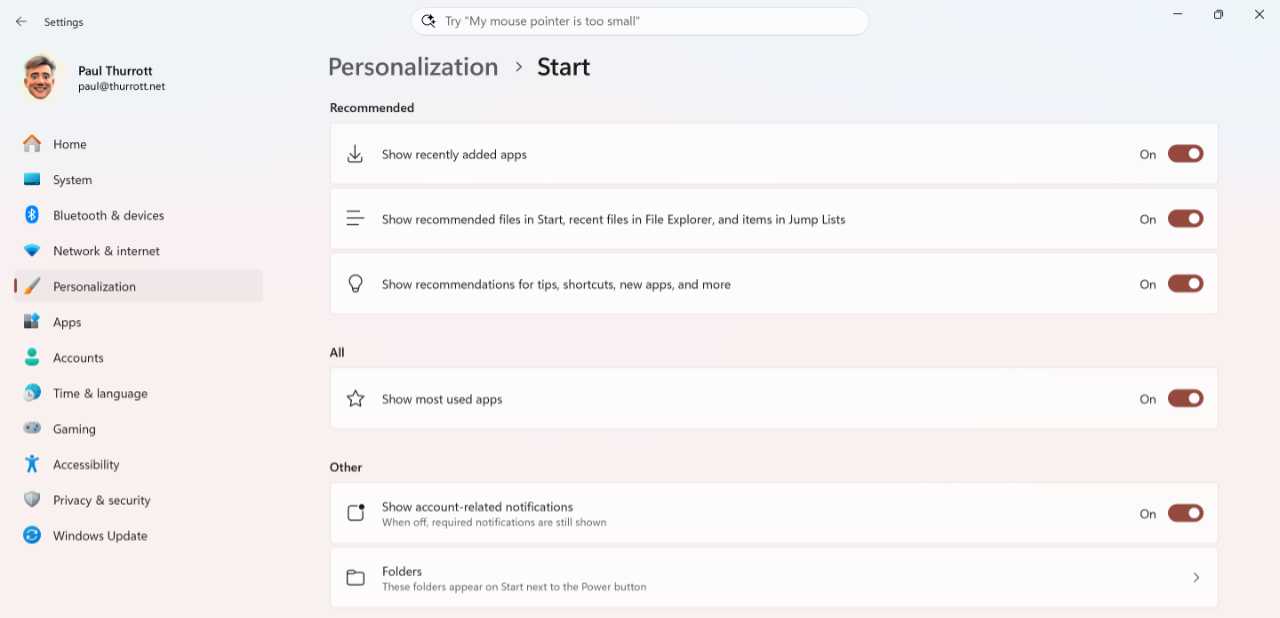
You customize the Recommended section in Start settings in the Settings app, though you can also remove individual recommendations directly in Start.
Customize Recommended
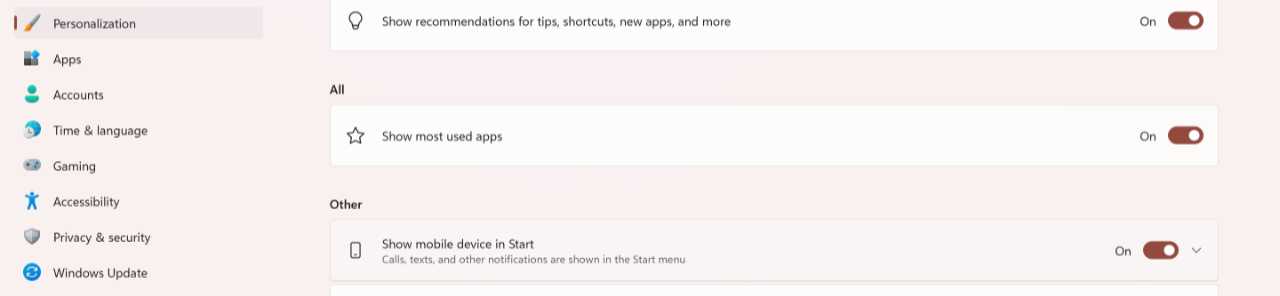
To customize what appears in Recommended, open Settings and navigate to Start settings. The following settings are available in the top section of this page.
- Show recently added apps. Most will want to leave this enabled, as it provides an obvious place to find the most recent couple of apps you installed. If you pin an app shortcut here to Start or the Taskbar–both options are available when you right-click a shortcut–it will be removed from Recommended.
- Show recommended files in Start, recent files in File Explorer, and items in Jump Lists. This option is enabled by default. It’s unfortunate you can’t individually configure this across the three locations because many might want to disable recommended files in Start but make them available in File Explorer and Jump lists.
- Show recommendations for tips, shortcuts, new apps, and more. This is an avenue for advertising and you should disable this immediately.
Remove individual recommendations
As you use Windows 11, items will appear in the Recommended section in Start. Depending on how you configured Recommended, those items can include things you do not want to see as they are taking up valuable space. Fortunately, you can remove them on a case-by-case basis: Just right-click any item in Recommended and select “Remove from list” from the context menu that appears.
Customize the All section
The All section displays all the apps installed on your PC and it provides a selection three layout choices. In Start settings, you can toggle the “Show most used apps” option to display a “Most used” group that appears only in the Grid and List views. But you can otherwise customize this section directly in Start by click the “View” drop-down to the right of the “All” header. I
Available views include:
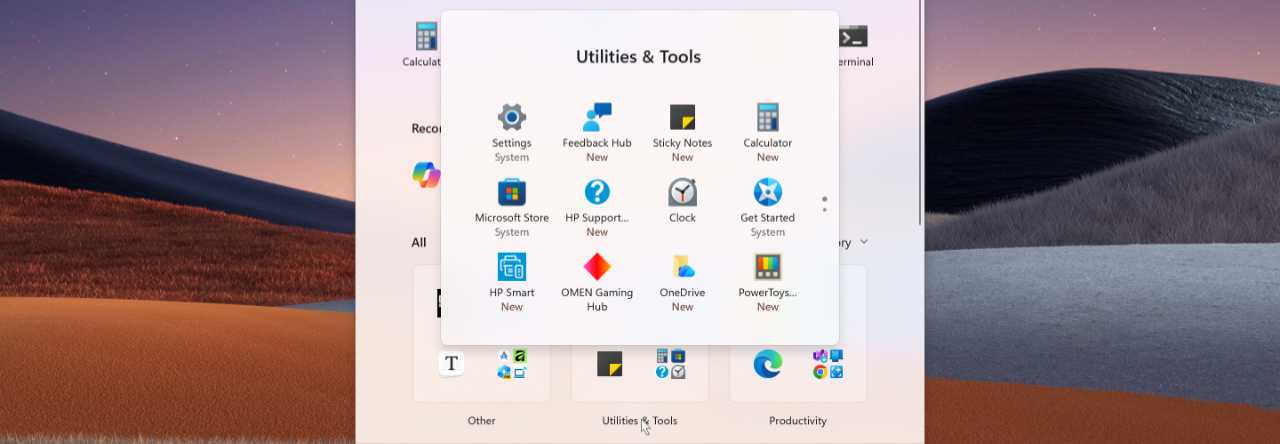
Category. The default view provides a categorized grid of app types–Utilities & Tools, Productivity, Developer Tools, Creativity, and so on–each of which opens up into a folder-like display when you click its title.
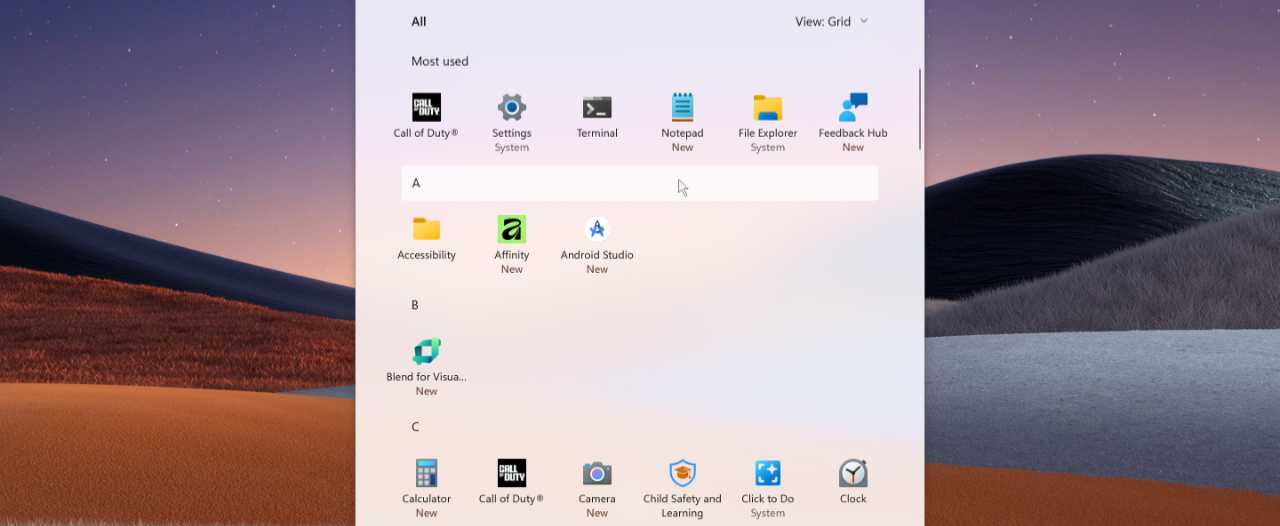
Grid. This view works like List view, below, but it displays each app that starts with the same letter in a horizontal layout to maximize screen space. You will see a “Most used” group at the top if you leave that option enabled in Start settings. And you can click the headers (“Most used,” “&,” “#,” “A,” “B,” “C,” and so on) to display a semantic zoom view of the headers for faster navigation.
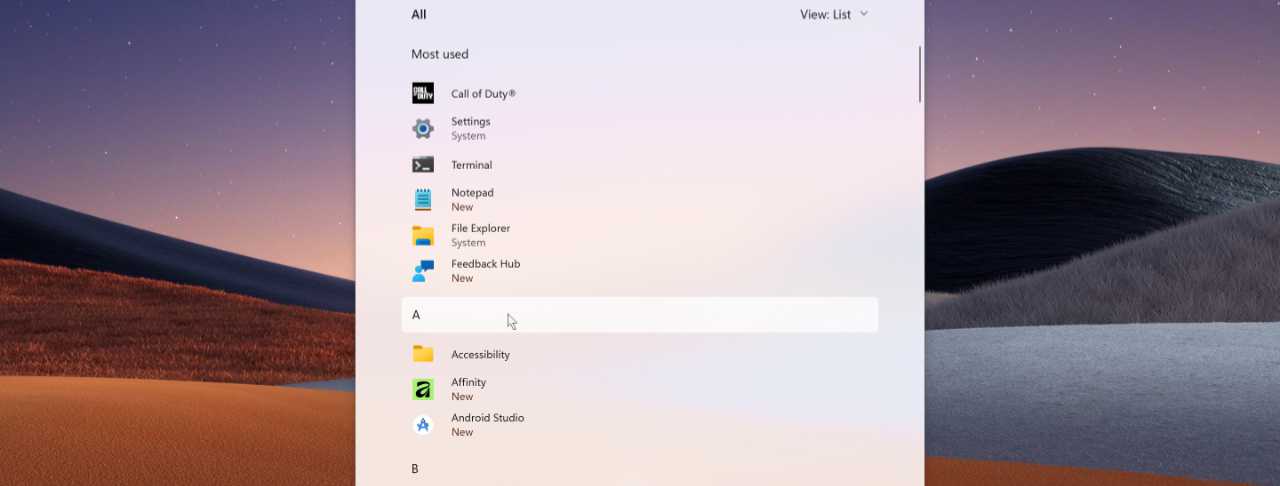
List. This view is similar to Grid view, above, but it displays each app that starts with the same letter in a vertical layout. You will see a “Most used” group at the top if you leave that option enabled in Start settings. And you can click the headers to display a semantic zoom view of the headers for faster navigation.
Customize the Account manager
There’s not much to it, but you customize Account manager in Start settings in the Settings app. There, you will find a single option, “Show account-related notifications,” in the Other group that is enabled by default. Because these notifications are usually more annoying than useful–I’ve even seen Microsoft 365 upsell ads in there–I recommend disabling it.
Add folders to Start
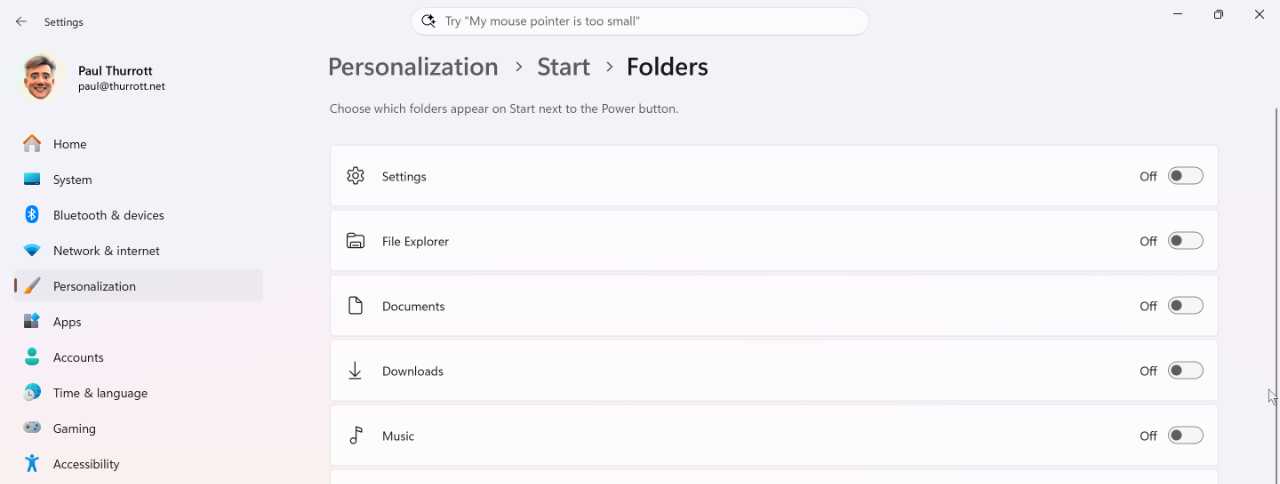
You can add a selection of folders and system apps to the bottom of Start using the Start settings interface in the Settings app. To do so, open Start settings in the Settings app and click the “Folder” item under “Other.” The Folders page that displays lists all the links to system apps and folders you can add to Start.
Here, you can see how the bottom of Start looks with the Settings and File Explorer apps and Downloads folder enabled.

Add the Mobile device slice to Start and configure how it works
To use the Mobile device slice, you have to perform the following tasks:
- Open Settings, navigate to Bluetooth & devices > Mobile devices and enable the option “Allow this PC to access content and capabilities from your mobile devices.”
- After this feature is downloaded to the PC, click “Add device” to add a smartphone or other mobile device to you Microsoft account or access a previously configured mobile device.
- If there is more than one mobile device connected to your Microsoft account, select the one you wish to use with this PC.
- Open the Phone Link app. If this is the first time you’ve done so, it will download an app update.
- Configure your mobile device, if necessary, in Phone Link.
- Open the Settings app and navigate to Personalization > Start. You will now see a new “Show mobile device in Start” option under the “Other” section. Make sure this option is enabled.
Learn more: Yes, this is complicated, and configuring it the first time can be time-consuming too. But you can learn more about this process and other related features in the Phone Link chapter.
If the stars are aligned, you will now see the Mobile devices slice when you open Start, plus the “Hide mobile device/Show mobile device” toggle to the right of Start.

Once this interface is available, you can customize it in the Phone Link app by clicking the Settings (gear) icon and navigating to Start menu personalization.

Tip: You can also get there more quickly directly from Start: Click the “More” (“…”) icon at the bottom right of the Mobile devices slice and choose “Personalization” in the pop-up menu that appears.
Here, you can customize whether the Messages, Calls, and Photos items in the Mobile devices slice display badges, which are little overlay notifications, and whether it shows recent photos, messages, phone notifications, and recent calls.
Use the Quick link menu
If you right-click the Start button on the Taskbar, the Quick link menu–which some mistakenly call the “power user menu”–appears, as was the case with previous and recent Windows versions.
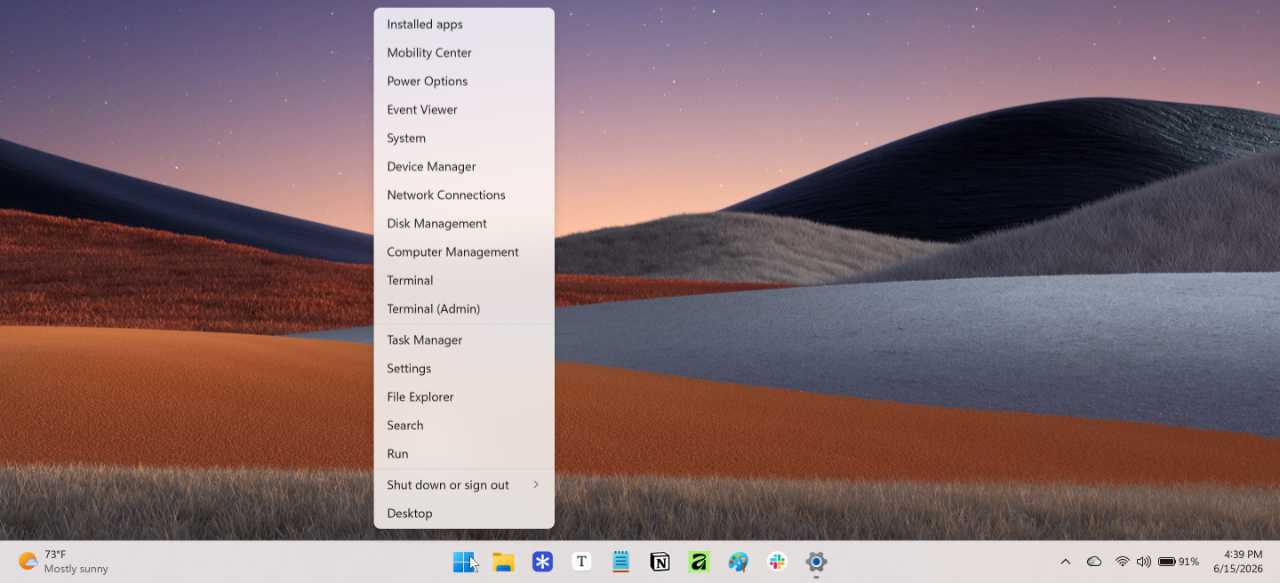
Like Start, the Quick link menu is somewhat streamlined compared to its predecessor, but it still works as before by providing quick access to legacy management interfaces like Device Manager and Computer Management as well as more updated system tools like Task Manager, Settings, File Explorer, Search, Run, and so on.
Keyboard shortcut: You can also open the Quick link menu by typing WINKEY + X.

Gain unlimited access to Premium articles.
With technology shaping our everyday lives, how could we not dig deeper?
Thurrott Premium delivers an honest and thorough perspective about the technologies we use and rely on everyday. Discover deeper content as a Premium member.