Apps
- Paul Thurrott
- Jun 27, 2026
-
1
At its heart, Windows 11 is a full-featured and mature platform for apps, or applications, standalone software programs designed for work and play. It supports multiple types of apps, includes an in-box app store, and helps apps get your attention when needed with notifications.
App basics
Windows 11 lets you run a wide array of apps. Some of these apps are included with Windows 11, but most are acquired elsewhere, typically from the web or from the Microsoft Store. For the most part, it’s not necessary to understand the low-level differences between the different types of apps that Windows 11 supports. But here is a quick and high-level overview of the most common app types you will encounter.
- Desktop apps. This app type uses technologies that dates back to the 1990s, but it is also the most powerful type of app because it can integrate with the system at a deeper level than Store or web apps. Desktop apps are typically dense with commands and include their own internal mechanisms for downloading and installing updates. Typical examples include Microsoft Word and Excel, Google Chrome, and Adobe Photoshop.
- Mobile apps. Since Windows 8 in 2012, Microsoft has given developers a variety of mobile app platforms that let them create mobile apps that run in Windows, similar to those found on smartphones and tablets. Mobile apps simpler and less powerful than Desktop apps, but also more modern and efficient. Many of the apps that come with Windows 11 use the latest version of this mobile apps platform or related technology, including Clock, Media Player, Photos, and others.
- Web apps. Many developers create web apps using modern web technologies that are installed and run on your PC like other apps. Web apps can be quite sophisticated and though they are by nature cross-platform, they can also utilize the native Windows 11 user interface and features like notifications, storage, and more. Web apps can be acquired on the web through web browsers like Microsoft Edge or through the Microsoft Store, and they are updated automatically either way. Clipchamp (a video editor included with Windows 11) and Spotify are web apps.
- Store apps. This isn’t so much a type of app as it is a description of where one acquires such apps, via the Microsoft Store, an app that is included with Windows 11 and works much like the App Store on an iPhone or iPad, or Google Play Store on Android. Many Store apps are modern mobile apps, but some are specially packaged Desktop and web apps. Regardless of how the apps were made, there are benefits common to most apps acquired from the Store, even if they’re also available on the web.
- Command line apps. Windows 11 includes a Terminal app that can run command-line apps in several different environments, including the MS-DOS-style Command Prompt and the .NET-based PowerShell.
- Linux apps. Thanks to a technology called the Windows Subsystem for Linux, or WSL, it’s possible to install one or more Linux distributions in Windows 11 and then install and run Linux command line and graphical apps. This environment targets developers specifically, but anyone can use it to learn the ins and outs of this interesting open source operating system.
App management
You manage the apps installed on your PC using Apps settings, which is found in the Settings app by navigating to Apps.
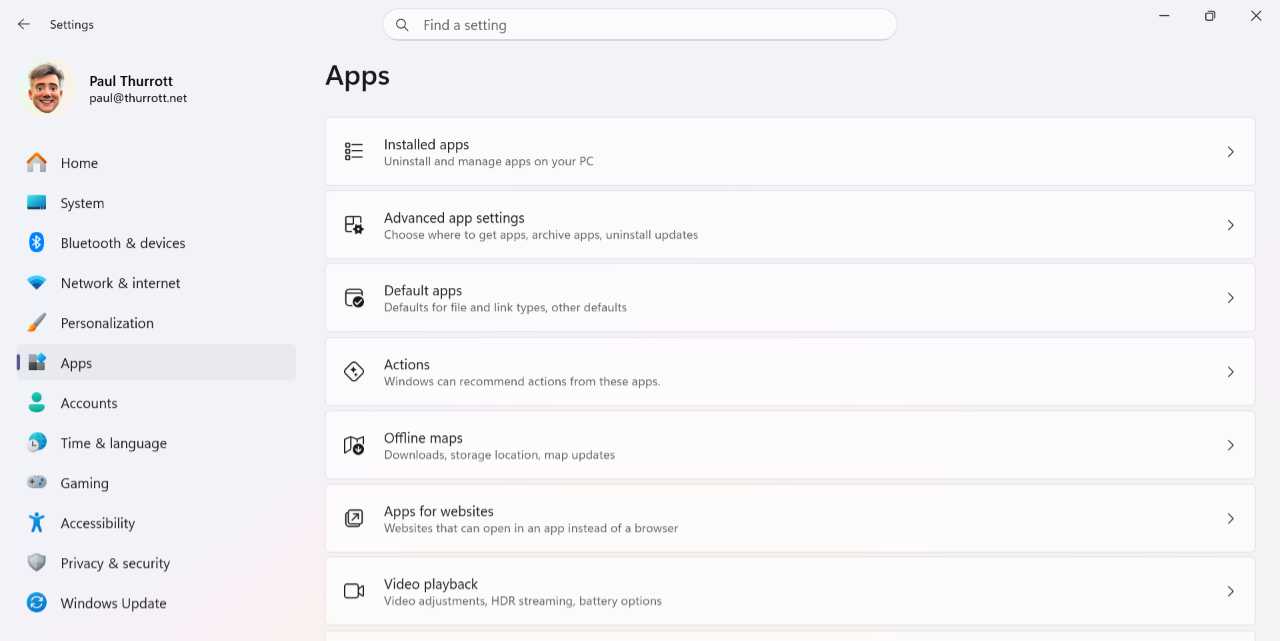
The next few sections detail the most important options here.
Configure where you can get apps
By default, Windows 11 allows you to install apps from anywhere, but you can optionally configure the system to prefer apps from the Microsoft Store or, even more aggressively, to only allow you to install apps from the Microsoft Store and not from the web.
To configure this feature, open the Settings app and navigate to Apps > Advanced app settings.
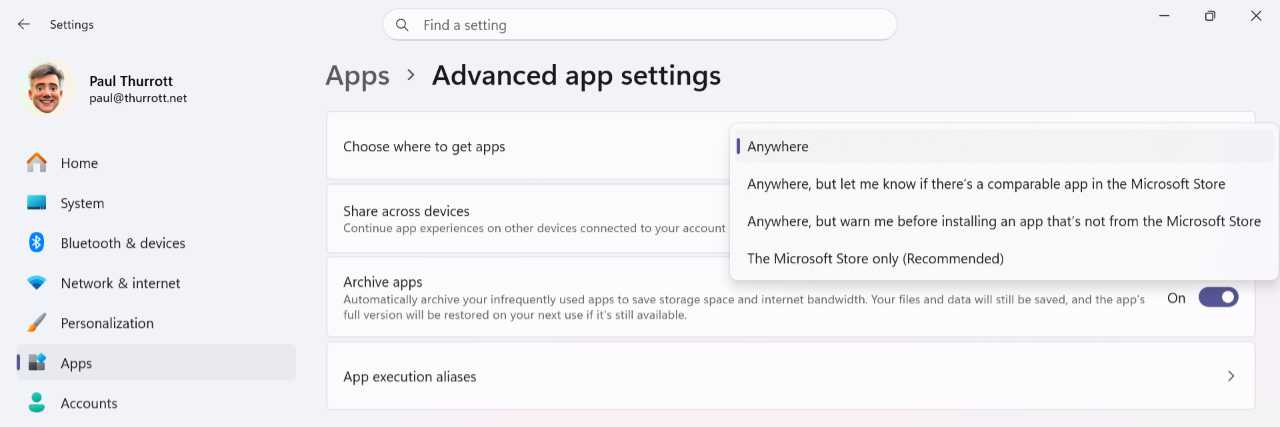
The first option here, “Choose where to get apps,” is set to “Anywhere” by default. But you can change this to “Anywhere, but let me know if there’s a compatible app in the Microsoft Store,” “Anywhere, but warn me before installing an app that’s not from the Microsoft Store,” or “The Microsoft Store only (Recommended).”
Because the selection of apps in the Microsoft Store is unlikely to meet all your needs, I don’t recommend changing this to that last option. But there’s no reason not to consider either of the middle two options if you want to have the best experience.
Tip: Because most users won’t restrict app installs to the Microsoft Store, Windows 11 also includes a feature called Smart App Control that can help protect you from malicious and untrusted apps that you download and install from the web. It’s a bit aggressive and had some undesirable requirements.
Uninstall an app
Though you can acquire apps from the web, the Microsoft Store, and other sources, Windows 11 provides a reasonably consistent experience for uninstalling apps.
You can uninstall apps via:
Start. This is typically the easiest method: Right-click an app in Start and choose “Uninstall” from the context menu that appears. If it’s a Store or web app, Windows 11 will uninstall it immediately after prompting you to be sure. If it’s a Desktop app, Windows 11 will open the Settings app as described below.

Tip: If you don’t see an “Uninstall” option in the context menu, the app may be a so-called stub, a shortcut for a promotional app that will install when you click it the first time. You can choose “Unpin from Start” in the context menu to remove it.
Settings. Installed apps settings (in the Settings app at Apps > Installed apps) lists all the apps installed on your PC. To uninstall one, locate it, click its “More options” (“…”) link, and then click “Uninstall.” After a dialog-based prompt, it will then uninstall the app or run the app maker’s uninstall routine.

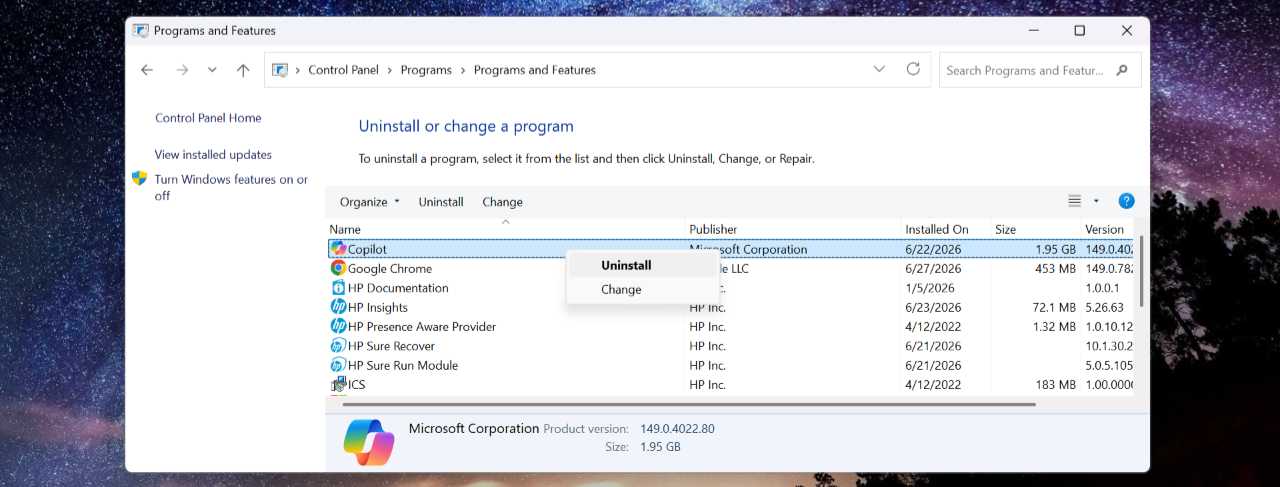
Control Panel. This legacy management utility can be found with Windows Search. It provides an “Uninstall or change a program” interface (at Programs > Programs and Features > Uninstall a program) that only lists installed Desktop apps that you can uninstall with a right-click. This shouldn’t be your first stop when you need to uninstall an app, but I’ve found that some apps, including some bundled with new PCs, appear here but not in Installed apps settings.
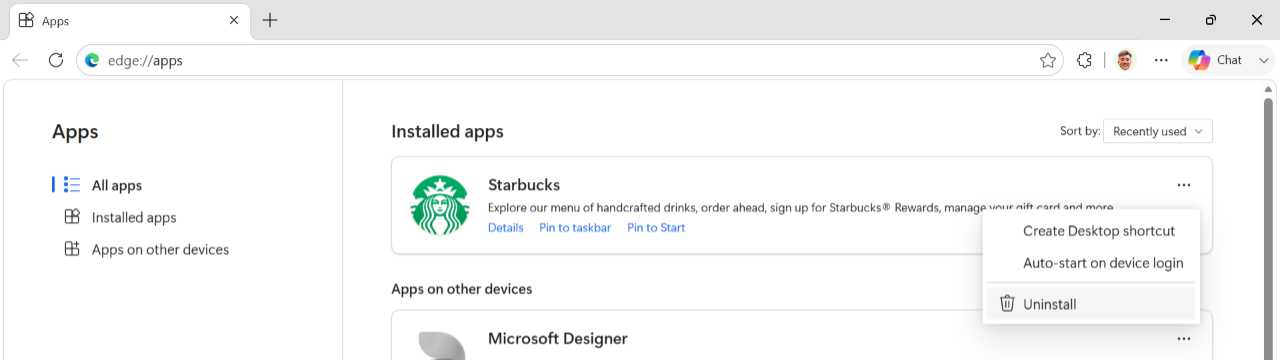
Microsoft Edge. If you installed a web app with Microsoft Edge, you can also uninstall it from that browser using its Installed apps interface. Just click “More options” (“…”) next to the web app you wish to uninstall and then click “Uninstall” in the context menu that appears.
Configure default apps
Windows 11 lets you determine which apps to use by default when opening specific file types and web browser link types. For example, you may wish to use Notepad to open text files (with a .txt file extension), or Google Chrome to open web links (via the HTTP and HTTPS protocols).
Unfortunately, the interface Microsoft provides for this is purposefully convoluted and tedious. And Windows 11 will prompt you to choose a new default app for certain file types after you install a new app that can open them.
Configure an app to open a specific file or link type
You configure the default apps for specific file and link types with Default apps settings in the Settings app (at Apps > Default apps).
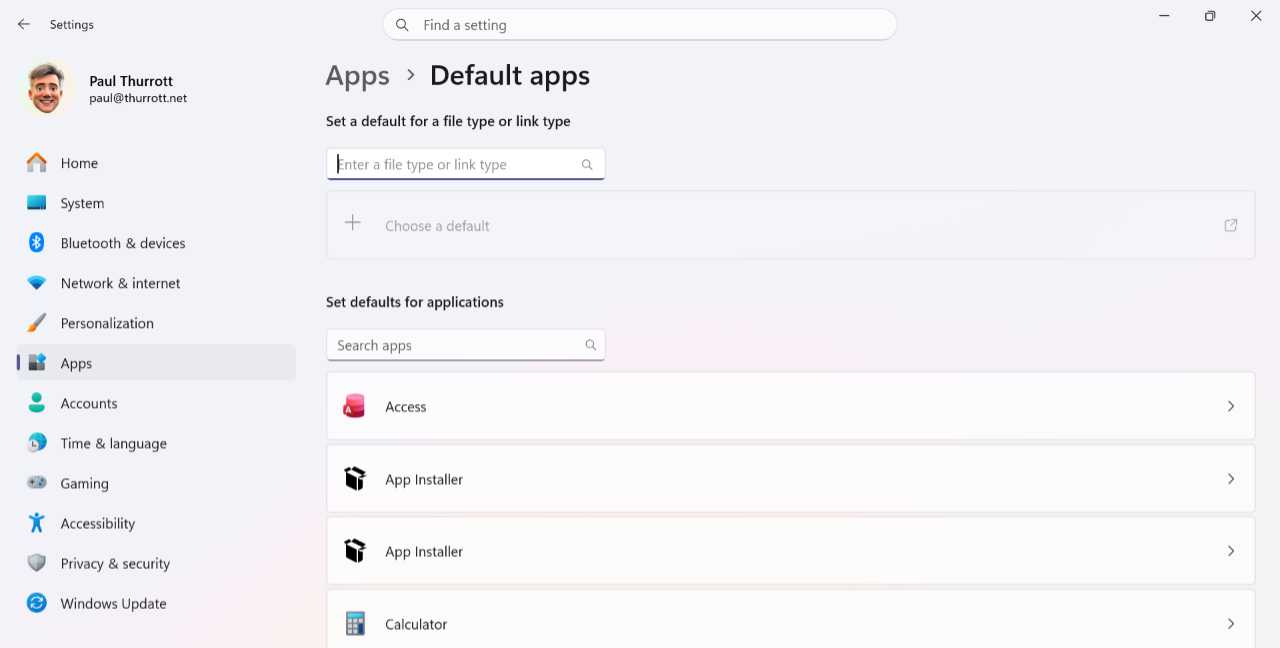
There are two ways to configure this association: You can search for a file or link type using the search box at the top, or you can select an app from the list below that to view and configure the file and link types that can be associated with that app.
To configure a file or link type with a specific app, use the search box at the top of this page. For example, if you wish to change the app that’s used to open a text file (.txt), you will search for txt and choose that term from the search results. When you do so, the configured default app will appear under the search box.
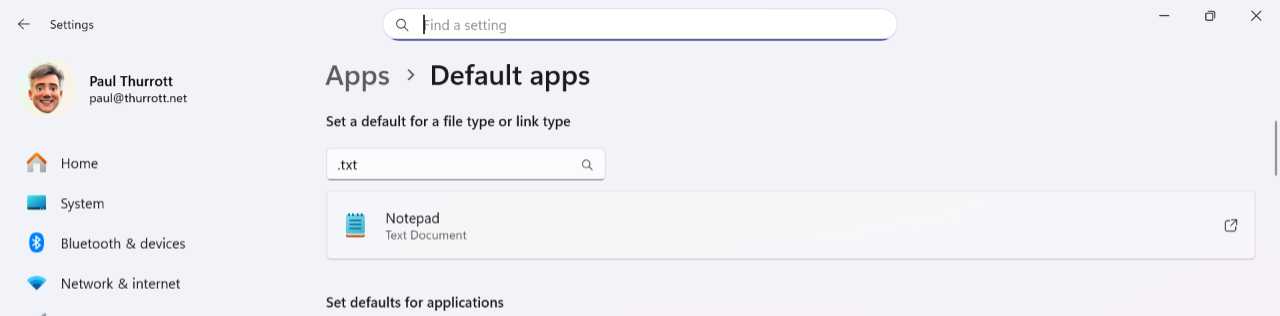
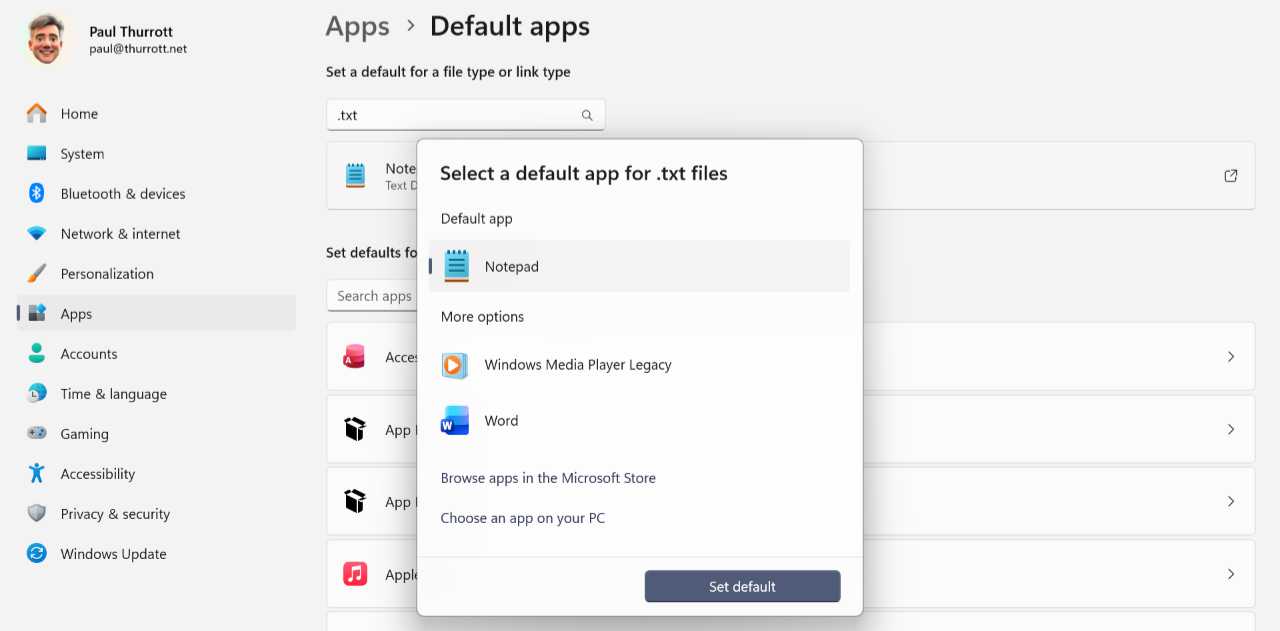
Click it to display the “Select a default app for files” window and select a different app.
To view and configure the file and link types that are associated with an app, find the app in the list and click it. The page that appears provides a list of available associations.
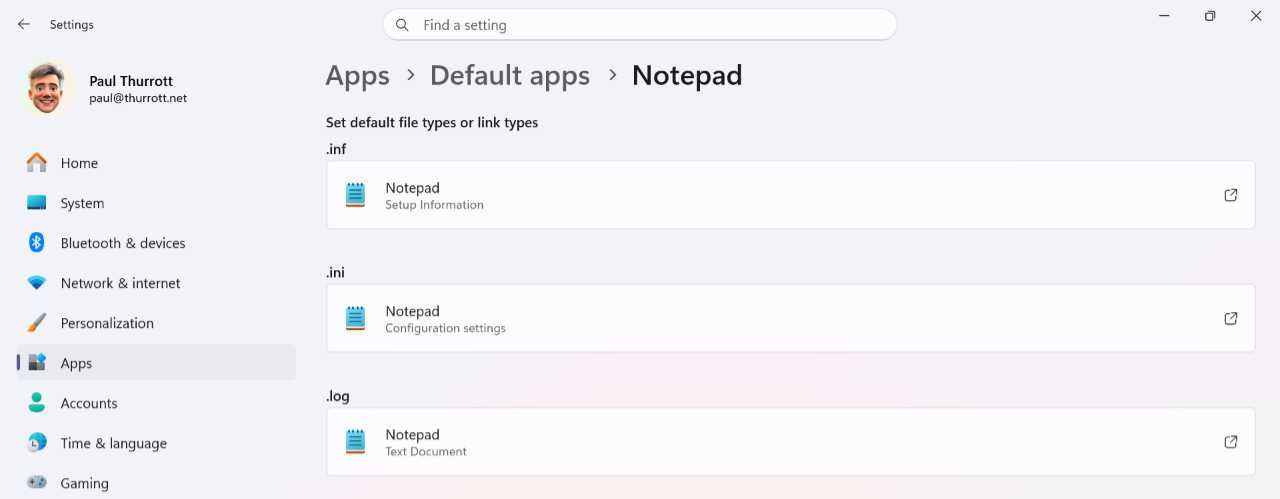
To change a specific file or link type association, click it in the list and use the “Select a default app” window to choose the app you prefer as the default.
If the app is a web browser, you can use the “Set default” button to configure several associations–the .htm and .html file types and the HTTP (URL: HyperText Transfer Protocol) and HTTPS (URL: HyperText Transfer Protocol with Privacy) link types–at once. A checkbox will appear to the left of “Set default” when you make this change.
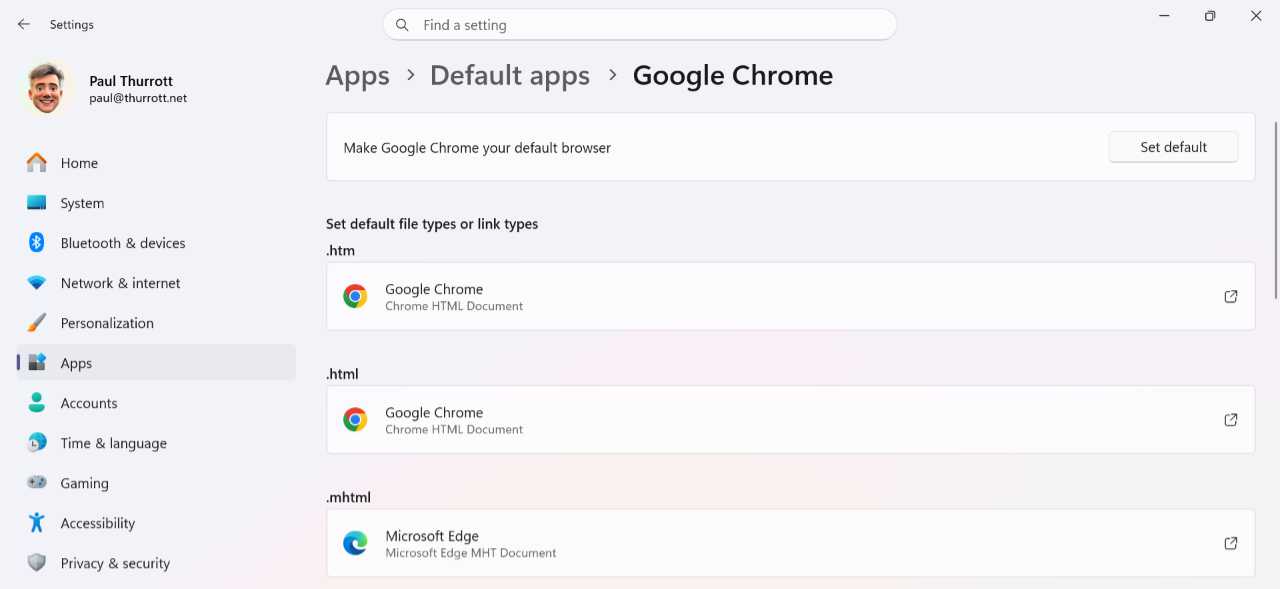
Configure a default app for a specific file type on the fly
You don’t have to use Settings to configure default apps. You can also configure file associations at any time directly in File Explorer or on the Desktop. And you can open a specific type of file with a non-default app without changing the association.
To configure a new file type association, find the file on your Desktop or with File Explorer, right-click it, and select “Open with” and then “Choose another app” from the context menu that appears. The “Select an app to open this file” window appears.
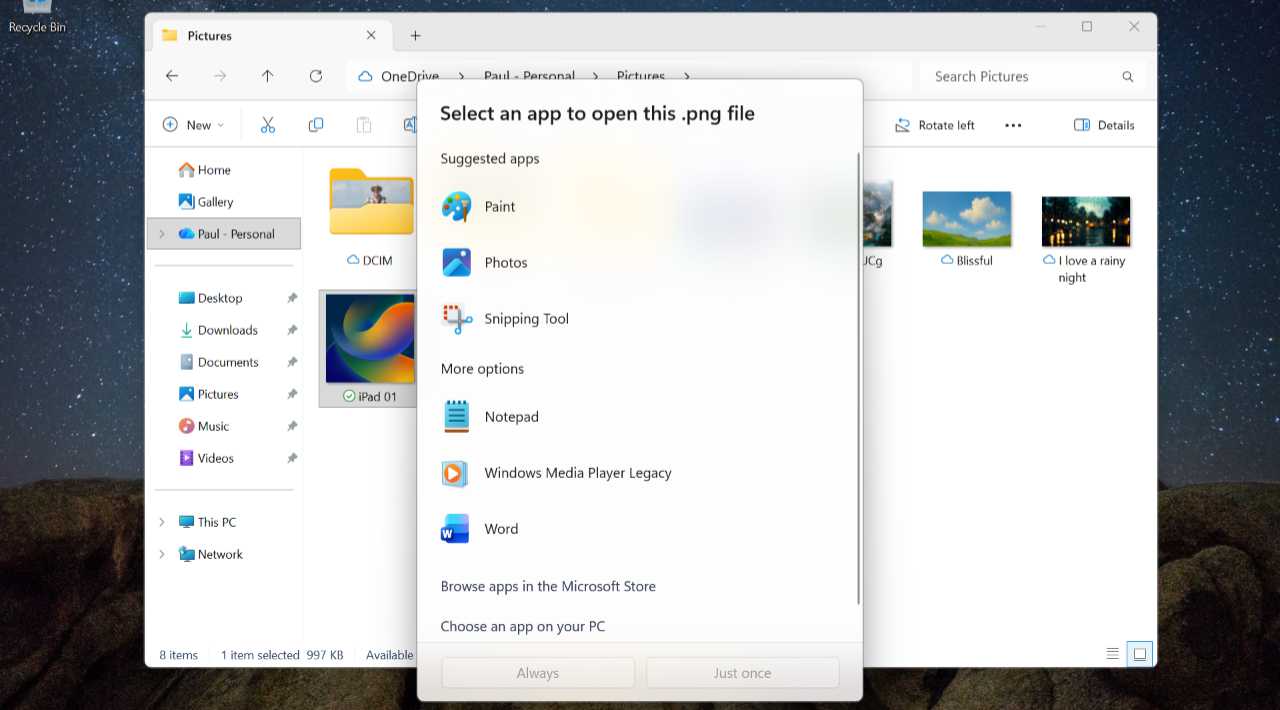
If you see the app you wish to use as the default, select it. Otherwise, you can find it with “Choose an app on your PC.” When you find the app you wish to use as the default, click “Always.”
To open a file of a specific type with a different app just this one time, perform the same actions as above but choose “Just once” in the “Select an app to open this file” window. The next time you open that file normally, it will open with the default app.
Tip: You will often see a “Select a default app for file” window after you’ve installed an app that can open that file type. This can be annoying if you already went to the trouble of configuring file associations, but you can simply choose the app you were already using.
Configure where apps are located
By default, Windows 11 installs apps on the C: drive–also called the system drive–though the location can vary, depending on the type of app. For example, most Desktop apps are installed in C:\Program Files or C:\Program Files (x86). Store apps are often installed in C:\Program Files\WindowsApps, which is hidden by default in File Explorer. And games installed from the Xbox app are typically found in C:\XboxGames, which is also hidden by default.
You can’t easily change the specific locations in a drive where Windows 11 installs new apps (and games). But you can configure which drive it uses. This can be useful if you have a C: (system) drive and a second drive (D: or whatever) with more storage. You can also move many Store apps that are already installed to a different drive.
Determine where new app installs are located
To determine where apps are installed by default, open the Settings app and navigate to System > Storage. Then, expand “Advanced storage settings” and click “Where new content is saved.” The “Where new content is saved” page appears.
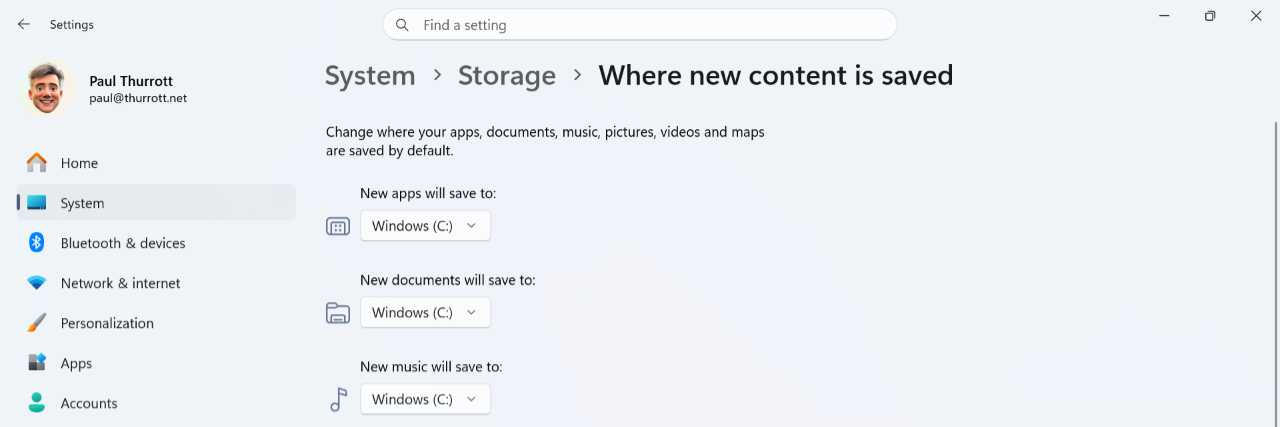
To change the location for new app installs to another drive, click the drop-down under “New apps will save to:” and select the new location.
Move an existing app to a new location
You can also move many Store apps to a different drive. This is helpful if you are running out of space on a drive, or have installed a new drive for this purpose.
To do so, open the Settings app and navigate to Apps > Installed apps. Then, select the More options (“…”) link next to the app you wish to move and choose “Move.”

Tip: If this option is not available, then it’s not possible to move that app. Most Desktop apps and some Store apps cannot be moved this way.
When you do so, you are prompted to select the drive to which you’d like to move the app install. Select accordingly and then click “Move.”
Tip: If you are running low on disk space on C: and wish to move some big apps to free up space, you can sort the list of apps displayed here by size. To do so, select the “Sort by” drop-down at the top right of the list and choose “Size (Large to small).”
Determine which apps are allowed to start when you sign in
Windows 11 offers multiple ways to configure which apps start when you turn on or wake up your PC and sign in to Windows 11. But the friendliest and most modern interface can be found in the Settings app by navigating to Apps > Startup.
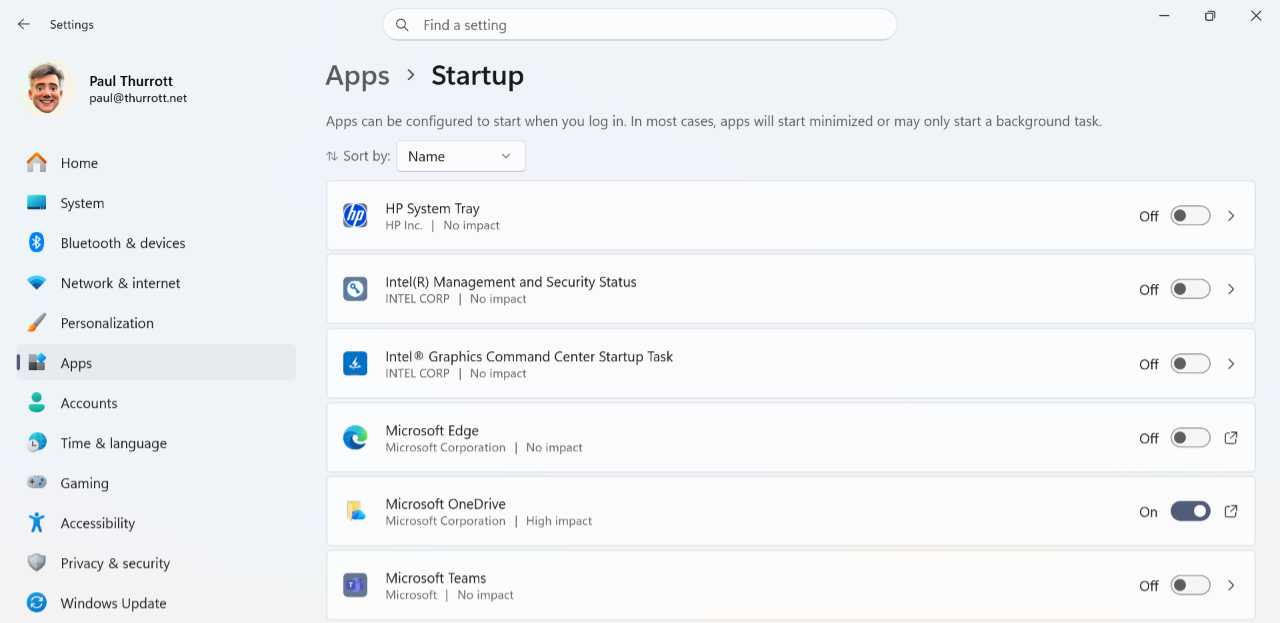
To make this interface easier to use, you can sort the list of apps by Status. When you do, all the apps that are enabled to auto-start are placed together at the top of the list, while all the apps that can be enabled to do so but are not are placed together at the bottom. To sort by Status, click the “Sort by” drop-down control and choose “Status.”
Learn more: You can manage also manage startup apps using the Startup apps view in Task Manager.
To prevent an app from running at startup, change its On/Off slider to “Off.”
Tips: Unfortunately, some apps will auto-start when you sign in and not appear in this interface. In some cases, like Spotify, you need to root around in the app’s settings interface to disable this behavior. Others, like Intel’s driver support and graphics utilities, are even more insidious, and you will need to use an antiquated Services app to find the offending startup items and disable them. Here, Google or your favorite search engine can help.
Consider which apps you might disable from auto-starting
Determining which startup apps to disable can be daunting, especially if you’re not familiar with some of them or how Windows works. Some startup apps are desirable–if you use OneDrive, for example, it makes sense for it to run when you sign in–but others are less so. The problem, of course, is that it’s not always obvious whether some startup apps are useful or even necessary. So let’s consider a few common startup apps and app types.
Microsoft Teams. If Microsoft Teams auto-starts and you never use this app, this is an easy choice: Disable it.
Microsoft Edge. Microsoft Edge is configured to run at startup, and like Teams, it does so in the background without opening a window. If you use Edge, this is useful because the app window will launch faster when you do open it. But if you use Google Chrome, Mozilla Firefox, or another app as your default browser, there’s no reason for Edge to run in the background, so you should prevent it from starting up automatically.
Apps that auto-start after you run them once. Some apps–like Spotify and the Xbox app–silently configure themselves to run at startup after you open them for the first time. If this isn’t what you want, you can easily prevent that from happening here.
Device driver apps and services. You will often see apps related to device drivers, like those for your PC’s speakers, in the Startup list. These can be difficult to resolve. In some cases, this type of app may literally be necessary for audio to work–look for the word service in its name and leave it alone if found–but some are just audio-related utilities that may or may not be useful. If you’re unsure, Google (or Bing) it.
The Startup settings page also lets you sort the list by Startup impact, so that those that task the PC’s microprocessor and disk the most at startup are listed at the top. This may seem like an ideal way to choose apps to disable at startup. But be careful: Some of the apps with the biggest impact, like Microsoft Edge and OneDrive, should be allowed to auto-start if you use them regularly.
Configure an app to run at startup
The Startup page in Settings is useful for preventing an app from auto-starting, but it doesn’t offer a way to arbitrarily configure any app to auto-start. If you want to auto-start an app that isn’t on the list, there’s no way to add it here.
But that doesn’t mean you can’t auto-start any app at sign in. Some apps offer their own interfaces for doing so–this will vary by app, of course, so you may need to do some spelunking in its menus and settings interface–but Windows 11 offers a secret way to auto-start any app. All you have to do is copy a shortcut for that app to your Startup folder.
Of course, that requires you to know how to create an app shortcut and where the Startup folder is located, and neither is obvious. So let’s step through this process using Notepad as an example.
To create an app shortcut, you need to find the app executable (typically an “EXE” file, meaning a file with a .exe extension) in your PC’s file system, and many of them are in hidden folders which makes doing so difficult. It’s possible to do this with some apps in Start—if you right-click an app and see an “Open file location” option, you’re good—but not others. Fortunately, Windows 11 provides a virtual view of all the apps on your PC, which makes this much easier.
To find it, open the Run app–search for run in Start–and type the following command:
shell:appsfolder
Keyboard shortcut: You can also type Windows key + R to open the Run app.
When you tap Enter, a File Explorer window opens displaying your apps.
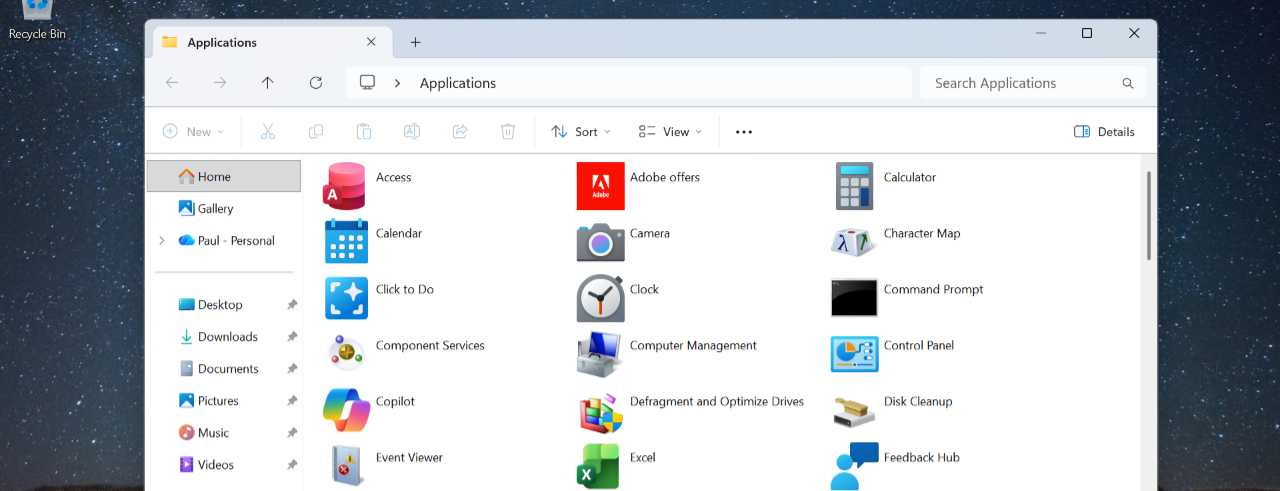
Next, browse through the list of apps or use the search box to find the app you want. Then, right-click it and choose “Create shortcut” from the context menu that appears. Windows will tell you that it can’t create a shortcut here and offers to create one on the Desktop instead. Click “Yes.” A shortcut named “Notepad – Shortcut” is placed on your Desktop. (You can close the File Explorer window.)
Now, open the Run app again and type the following command:
shell:startup
When you tap Enter, File Explorer opens and displays the hidden Startup folder.
Tip: Unlike the Applications view, Startup is a real folder: It’s located in C:\Users\your-user-name\AppData\Roaming\Microsoft\Windows\Start Menu\Programs\Startup by default.
Now, move the app shortcut you created into the Startup folder using drag-and-drop.
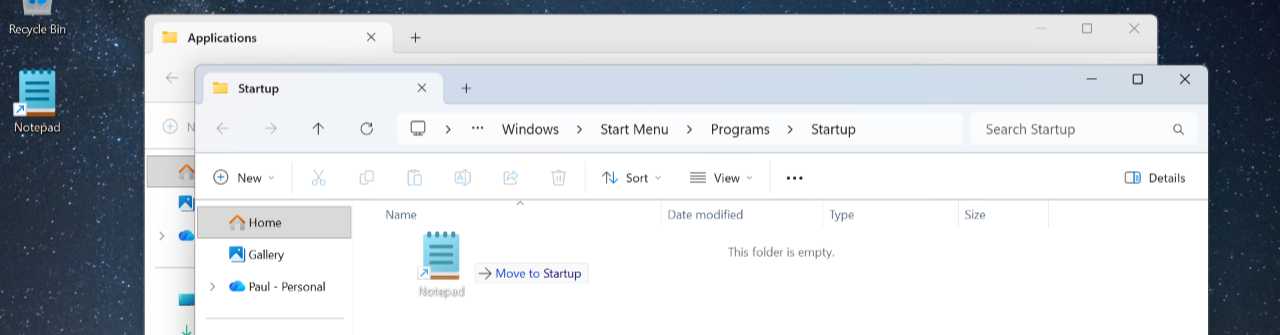
You can also configure how the app runs at startup. By default, it is configured to run normally, meaning you will see its app window open when you sign in. But you can also configure it to run using a minimized or maximized window. To do so, right-click the shortcut in the Startup folder, choose “Properties” to display its properties sheet, and then click the “Run” drop-down in the Shortcut tab to make your choice.
If you wish to prevent the app from auto-starting later, just open the Startup folder again and delete the shortcut: Apps that auto-start this way cannot be configured in Apps > Startup in Settings (or in the Startup apps view in Task Manager).
Microsoft Store
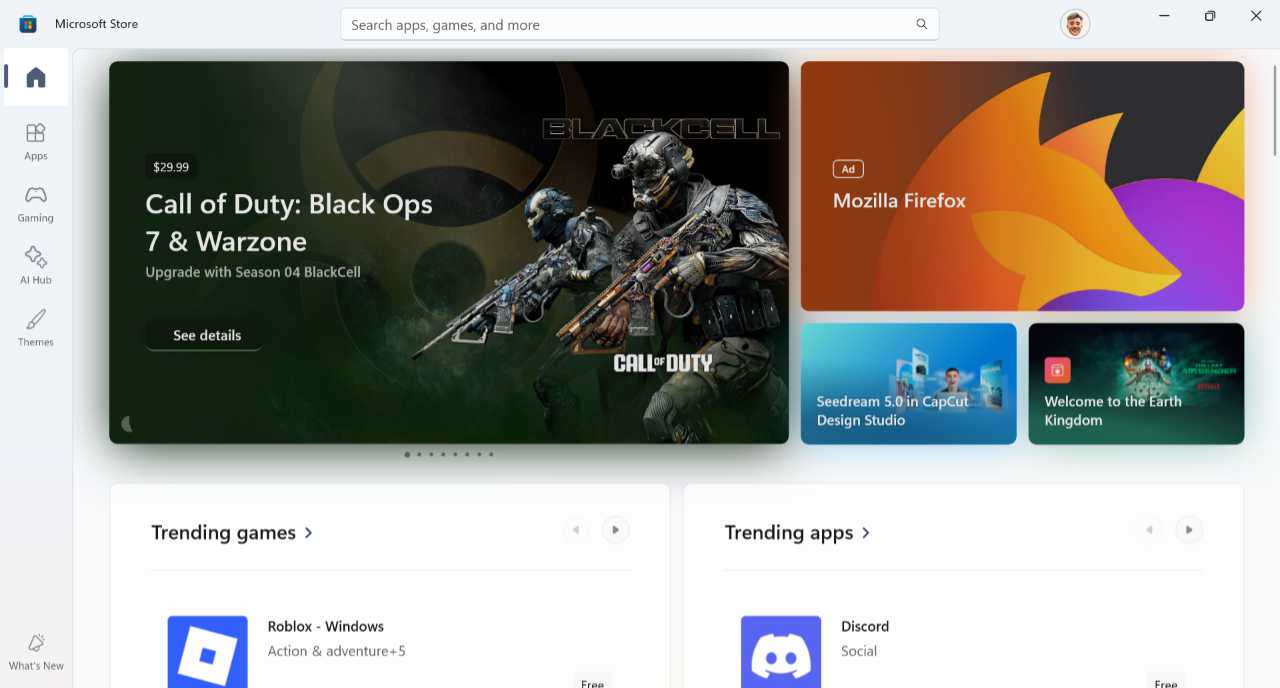
The Microsoft Store helps you find, download, and buy apps, games, and themes for Windows 11. This app, which is often simply referred to as the Store or the Store app, should be familiar since it’s so similar to the App Store on Apple’s mobile devices and Google Play Store on Android. It’s also been significantly updated with a refreshed user experience for Windows 11. A navigation bar on the left provides top-level access to various content types and your personal library of previously downloaded and purchased content.
Defaults
Microsoft Store is a simple app with a simple layout and a hierarchical navigation model.
Key Store interfaces
In addition to the vertical navigation bar on the left, key interfaces in Microsoft Store include:
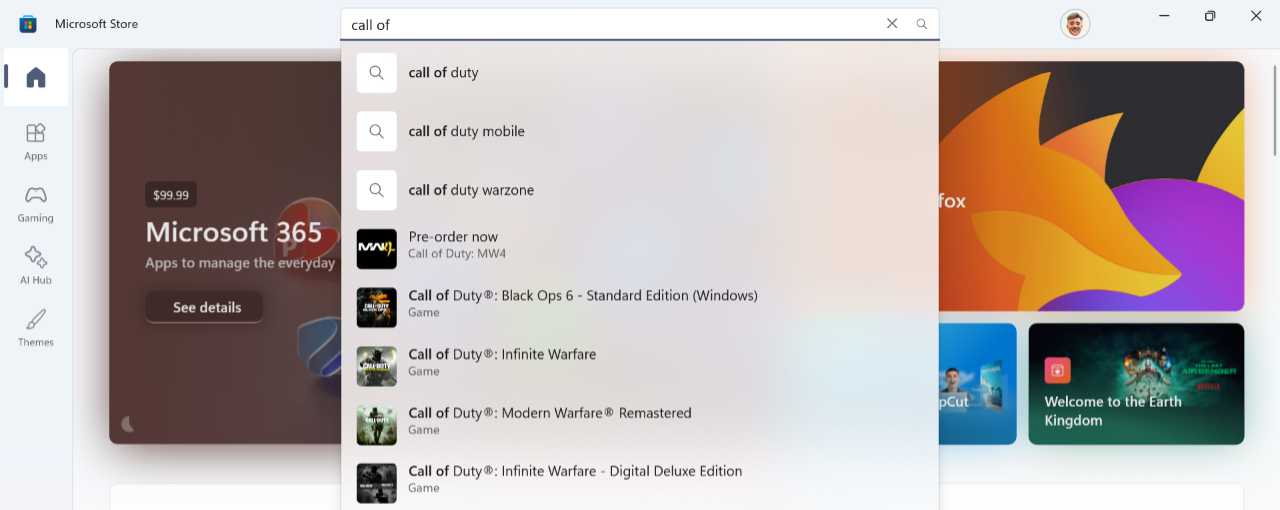
Search. You can use the Search box to find apps, games, themes, and other content. A drop-down results pane appears as you type, and you can tap Enter to view the results directly in the app.
Profile. This icon to the right of the Search box provides a menu-based list of options that include links to manage your payment methods, redeem gift cards and codes, manage your account and connected PCs, and access Store settings.
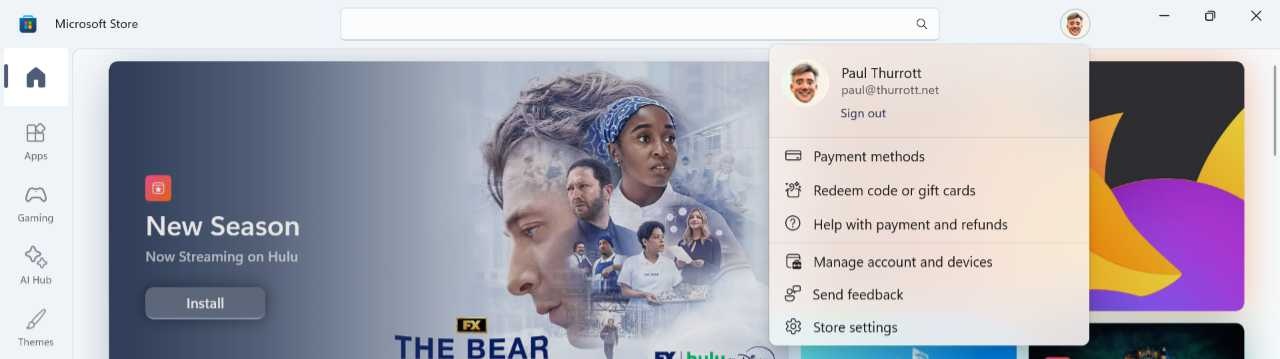
Tip: If you sign in to Windows 11 with a local account and haven’t signed into this app with a Microsoft account, the “Profile” button displays a default image and contains just two menu items, “Sign in” and “Settings.”
Home. This is the default view each time you run the app. There are no surprises here: This view promotes content in the Store dynamically, so the presentation and content selections you see will change from time-to-time. Generally speaking, you can expect an animated carousel of promotions at the top and then various sections below listing apps, games, and other content.
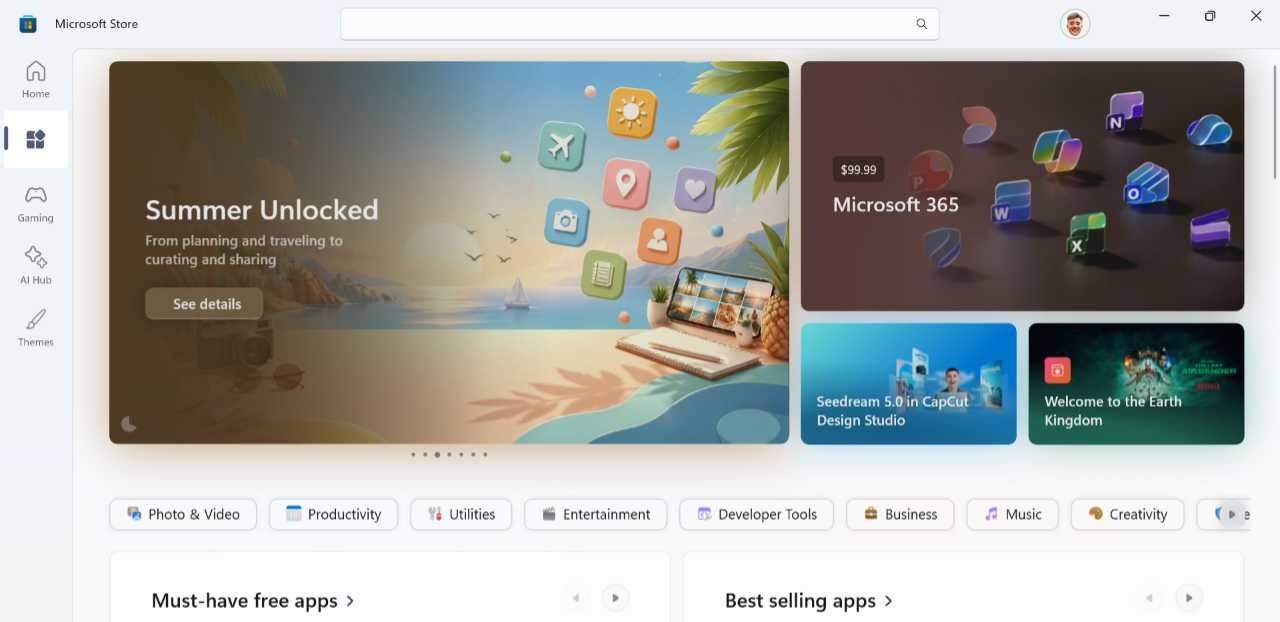
Apps. This page works like the Home view, with a dynamic presentation of content selections, but dedicated specifically to apps.
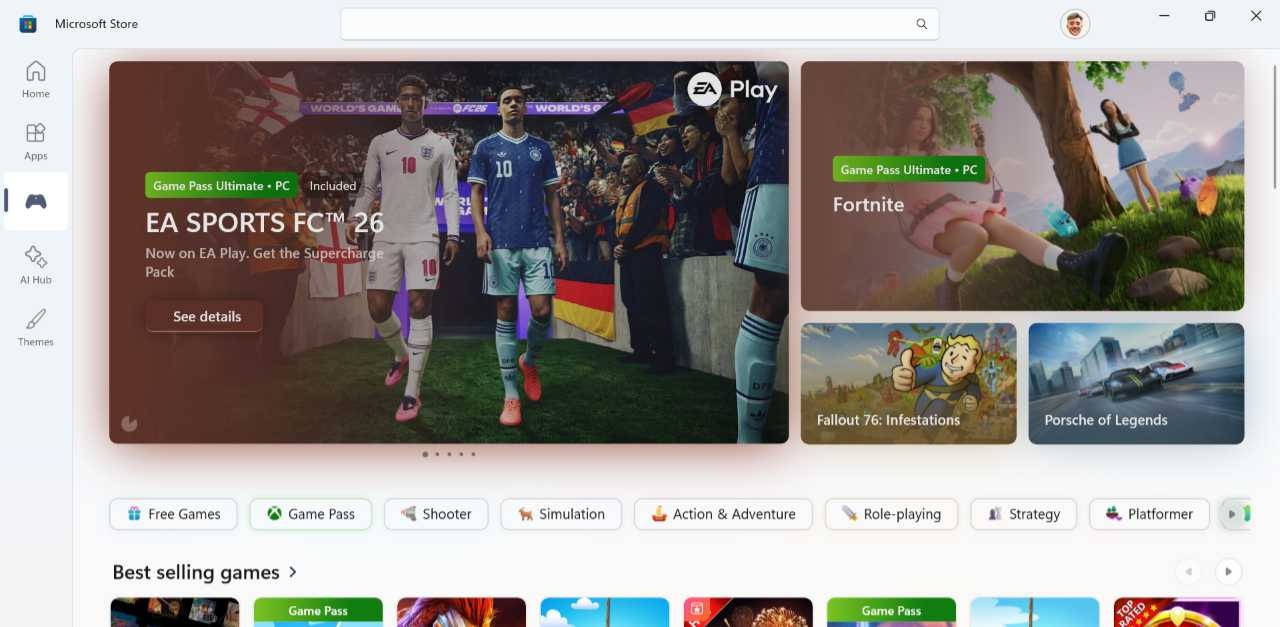
Gaming. This view is dedicated to games and is dynamic like Home and Apps. The titles you see here are standalone games–some paid, some free, and some free with in-app purchases–and Game Pass titles that are available for those with a Game Pass subscription.
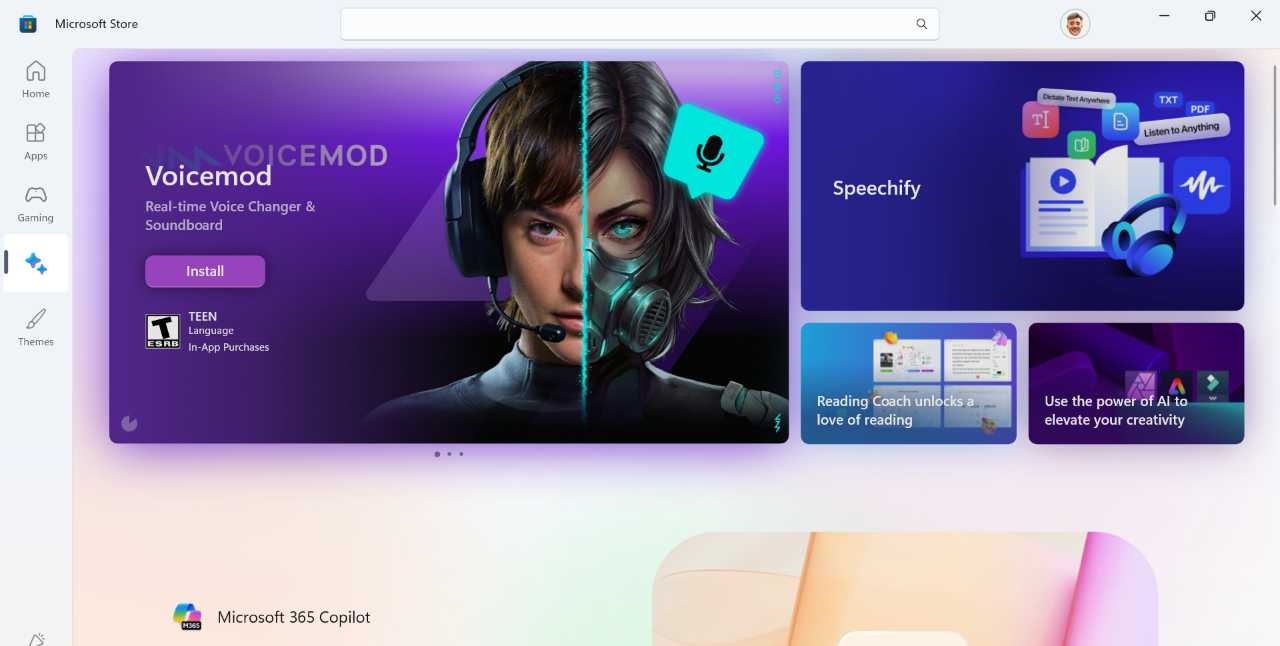
AI Hub. This view highlights a growing library of AI-powered apps, many of which are photo editors, video editors, or other creative apps. Like the other top-level Store views, AI hub is dynamic and changes regularly as new content is added or promoted.
Themes. This view provides a collection of theme packs–bundles of wallpapers, colors, mouse cursors, and sound schemes–you can install in Windows 11 and then customize as desired.
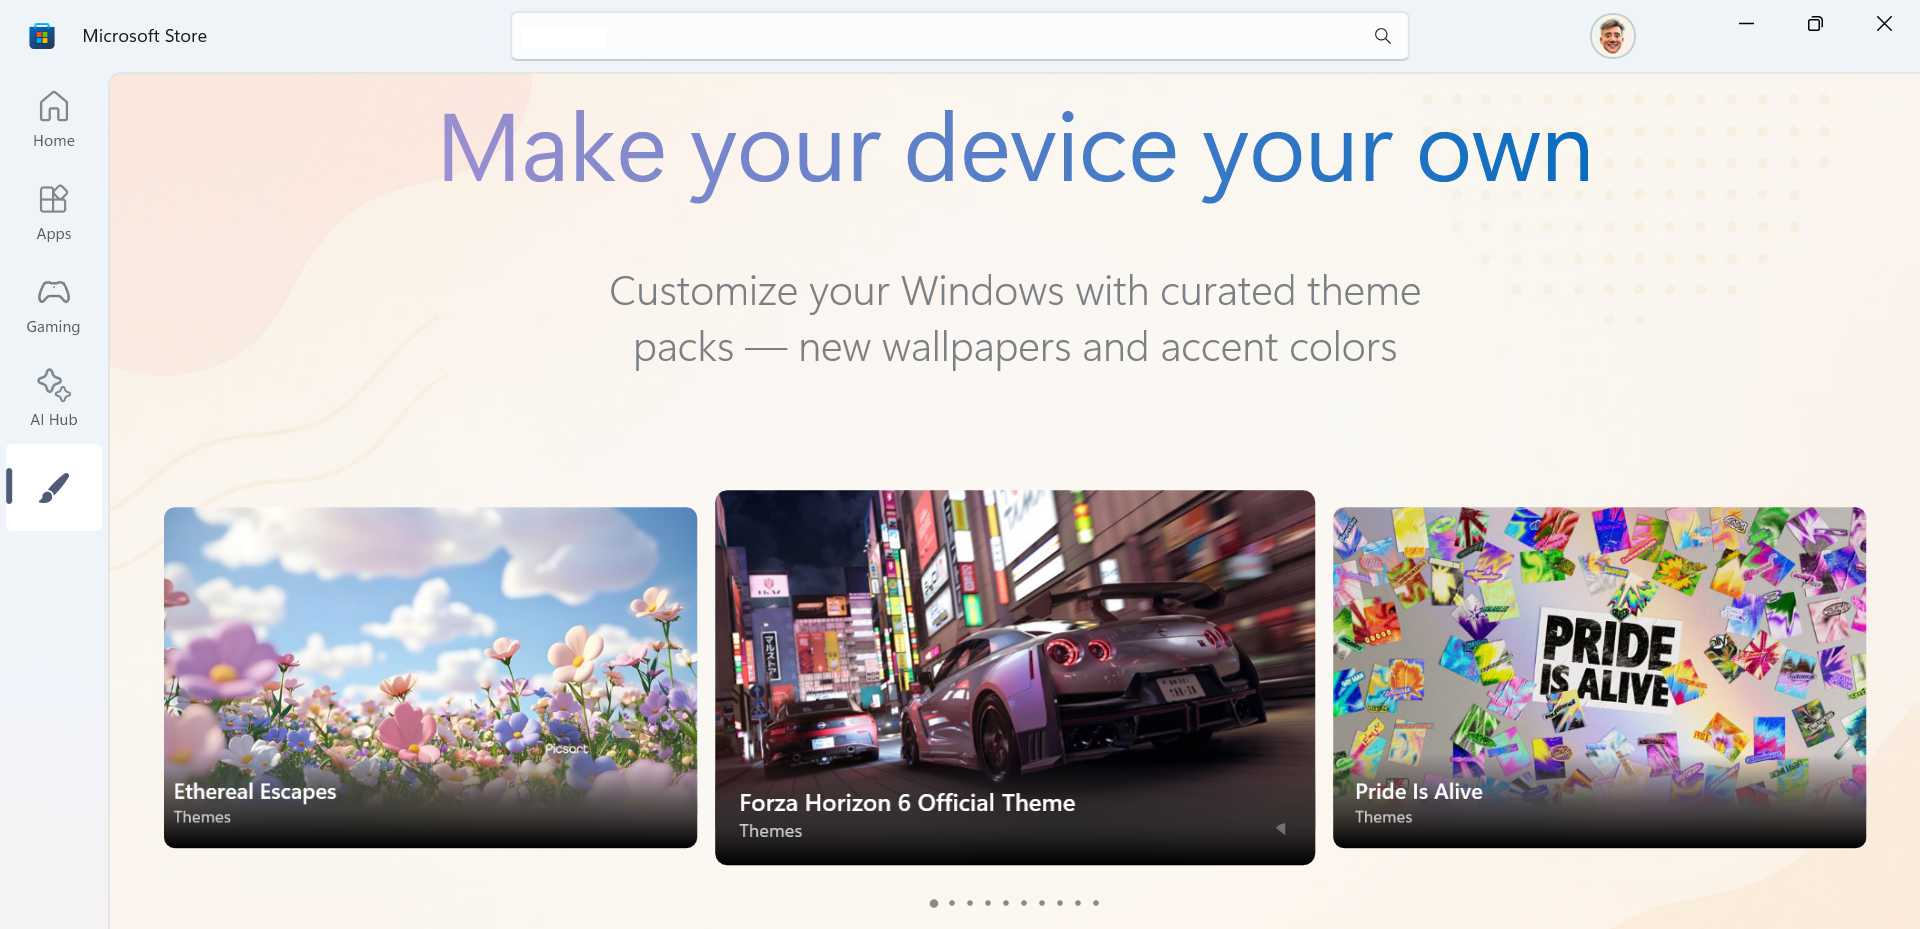
Tip: You can enable, change, and customize themes in the Settings app by navigating to Personalization > Themes.
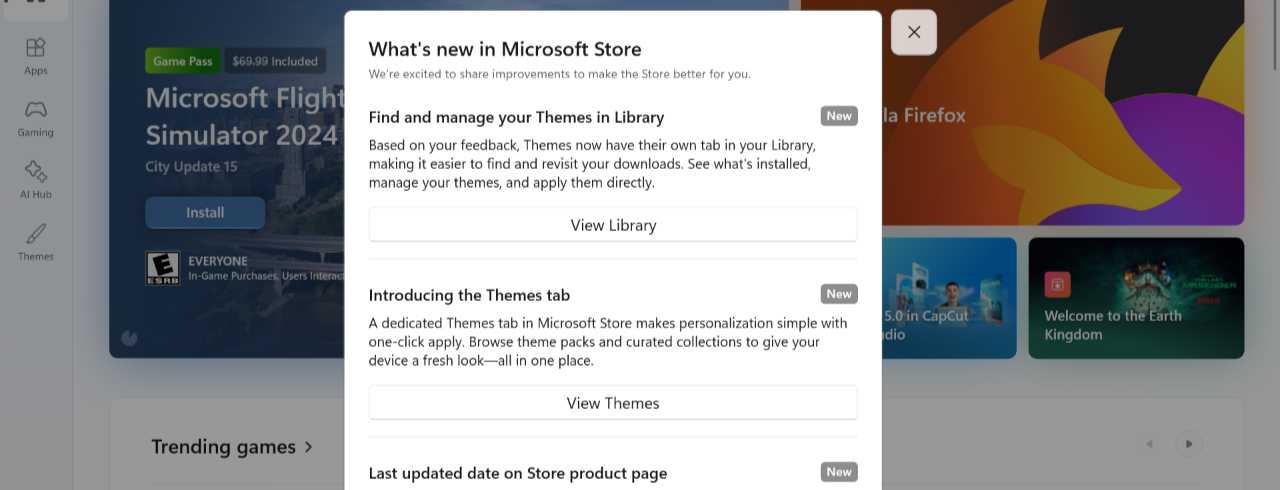
What’s new. This link displays a “What’s new in the Microsoft Store” window over the main app window so you can see a rundown of recent improvements that Microsoft made to its Store.
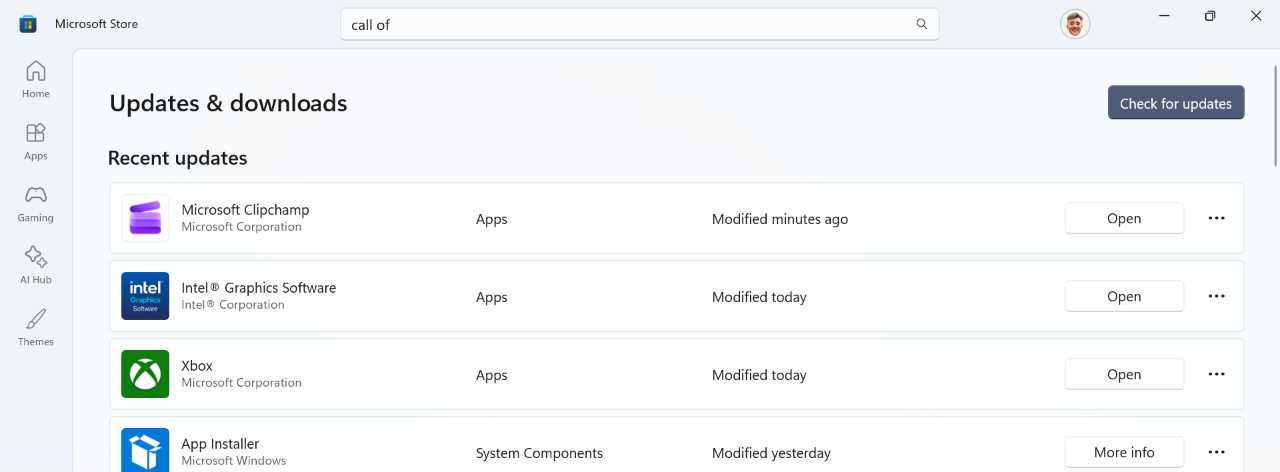
Downloads. This link brings you to the Updates & downloads view, which lists the apps, games, and themes you’ve installed on this PC and lets you check for updates, update all apps with pending updates, or update individual apps or games. Though the Store automatically manages and updates most apps and games, it’s still a good idea to visit this page from time-to-time because because some need to updated manually.
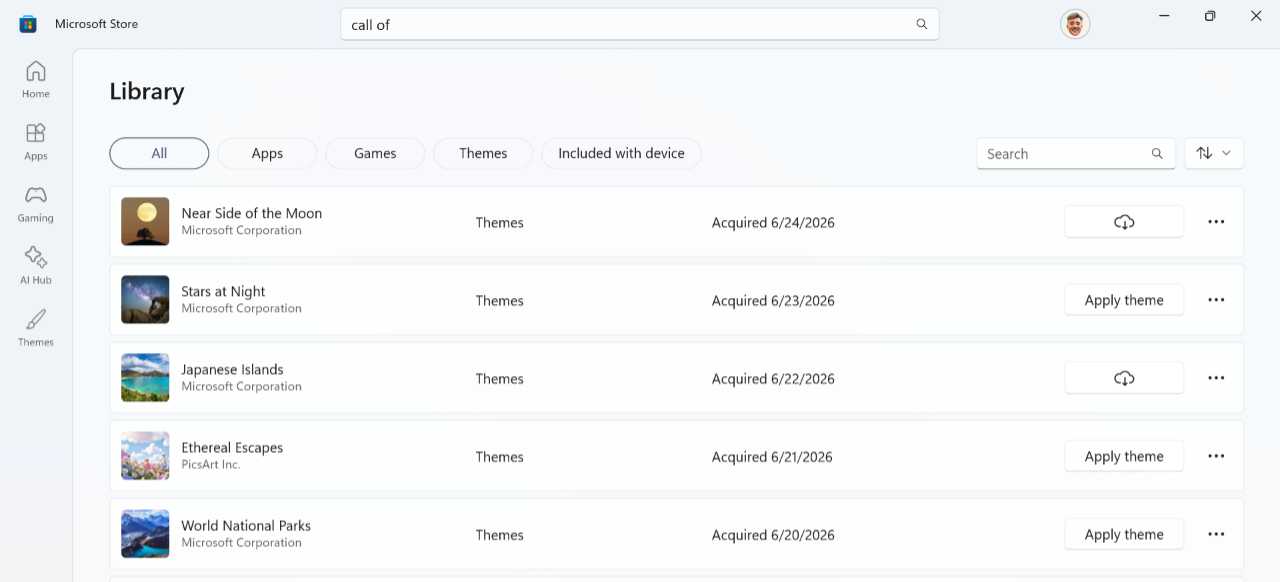
Library. The Library view lists the apps, games, and themes content in the library associated with your Microsoft account. This content could be installed on the PC or something that was previously purchased or downloaded elsewhere. You can sort the view by content type and find content using the search box. And there’s an “Included with device” filter to see whether your PC came with additional content.
App navigation
The Microsoft Store is a simple app, and navigation works much like a website. The Home view sits at the top of the Store navigation hierarchy, and the other top-level views–Apps, Gaming, AI Hub, Themes, Library, and Downloads– are logically below Home.
Each top-level view displays content blocks called collections and individual content items that are arranged in groups. When you select a collection, Store navigates into the collection, which displays individual content items in a grid.
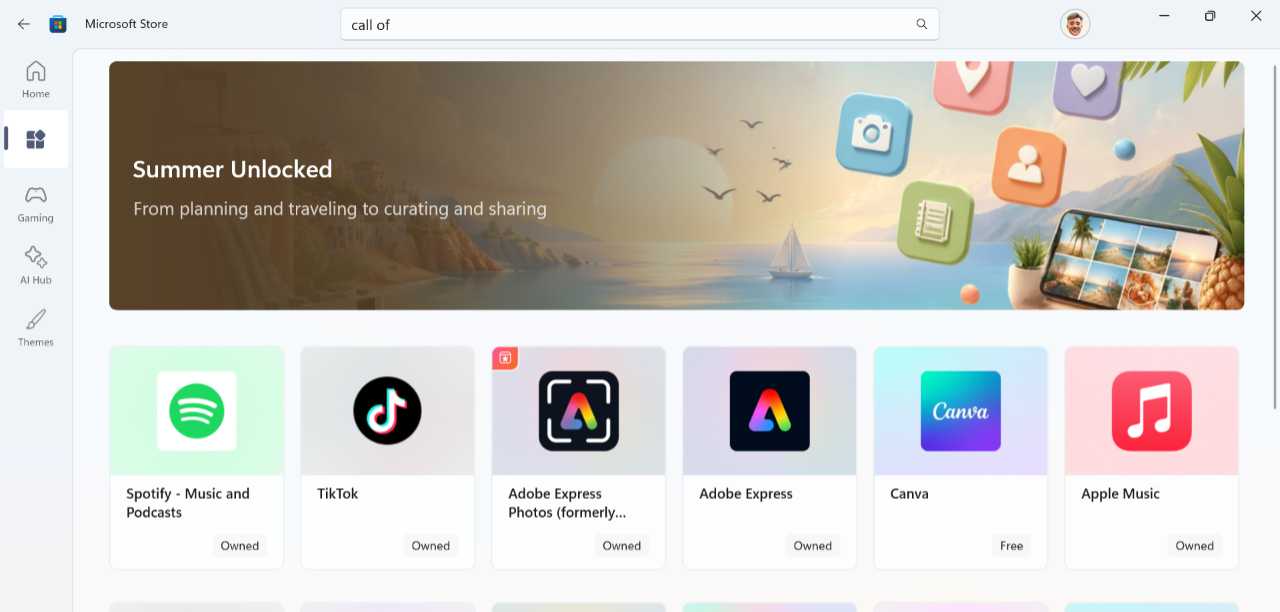
When you select a content item from any view, Store navigates to that item’s landing page.
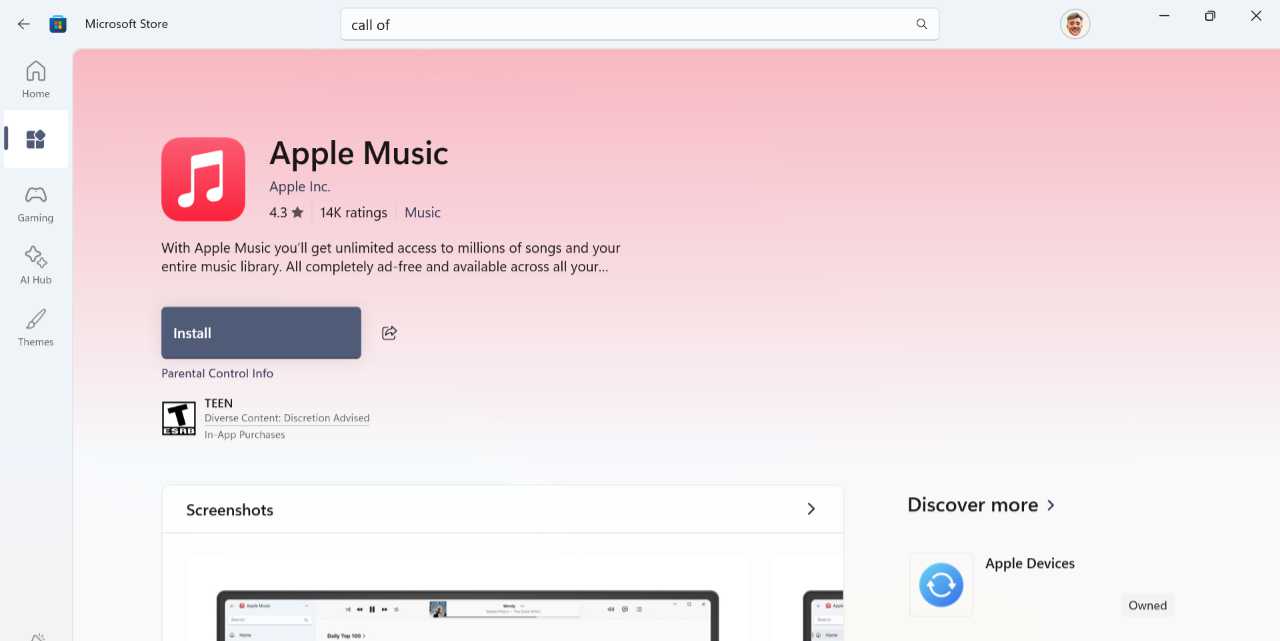
What you see on a landing page varies by the content. Apps and games will typically display an “Install” or “Get” button, screenshots, a description, ratings and reviews, what’s new, system requirements, and other information. If the app or game can be purchased, you will see a “Buy” button. And other content types can provide different options. For example, games available via a Game Pass subscription will display an “Install from Xbox app” button.
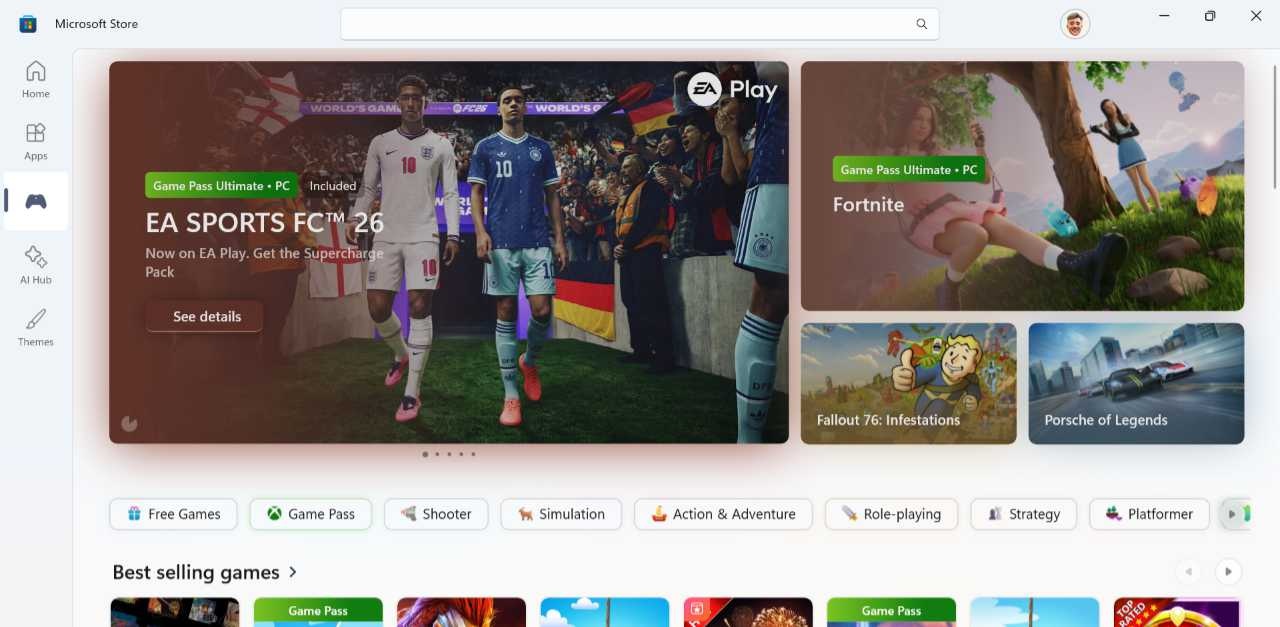
Like a web browser, you can back out of the current view at any time by pressing a “Back” button. It’s a bit subtle in the Store app, as is the case with many modern Microsoft apps, but you can find this button in the upper-left corner of the app window.

And don’t forget about the navigation bar. You can click any top-level item, including Home, to go immediately to that view.
Customize and configure
The Microsoft Store apps offers a surprisingly broad range of configurable settings. But there are also some related to your account and payment options you should configure or at least make sure are up-to-date before diving into this app.
Store settings
You access Microsoft Store settings by clicking the profile icon in the top right of the app and choosing “Store settings” from the menu that appears.
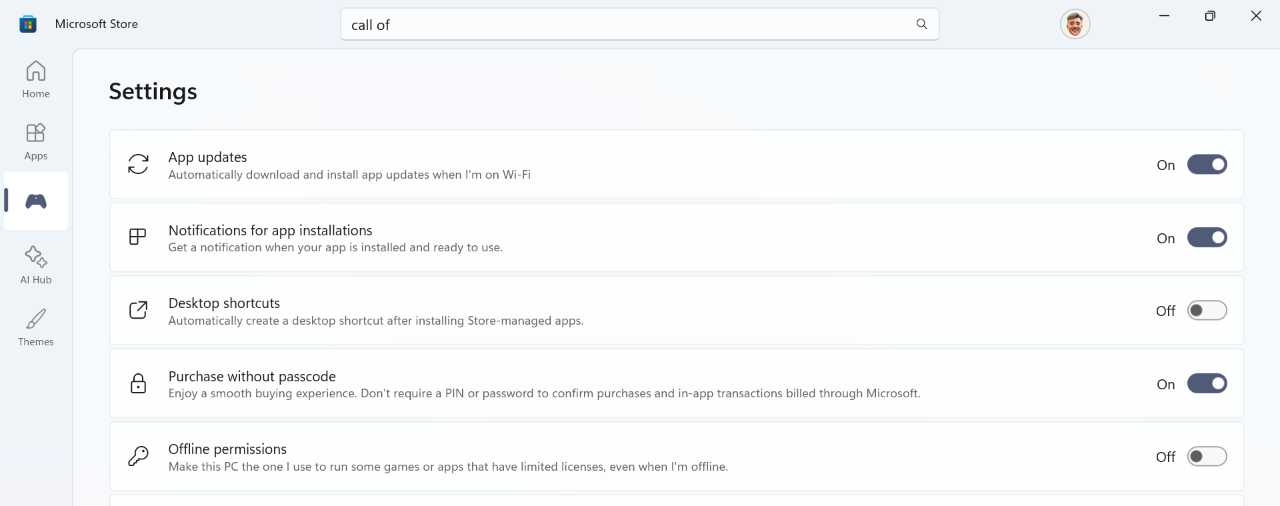
This settings page is quite busy, though most of the options here are straightforward and easily understood, and the defaults are generally fine for most people. But a few that might not be so obvious include:
Offline permissions. This option lets you designate this PC as being the one (and only) PC linked to the Microsoft Store–and to your Microsoft account/Xbox account–that’s allowed to play purchased games while the PC is offline. You can change this designation three times each year, so be sure this is the right PC.
Game installation options. This expandable set of options lets you configure the drive and folder, respectively, where Microsoft Store and Xbox games get installed.
Manage your payment options
Before diving into the Store, you should spend a few moments to ensure that your Microsoft account and whatever payment method(s) you prefer to use for paid apps and other content is configured correctly. That way, you won’t need to hunt around for a credit card or some other payment information the first (or next) time you want to buy something.
This information is configured using the Manage your payments page on the Microsoft account website, not in the Store app. But you can get there directly from the Store by clicking the “Profile” icon at the top of the app and choosing “Payment methods” from the menu that appears. Yes, it will use your default browser and not force Edge on you.
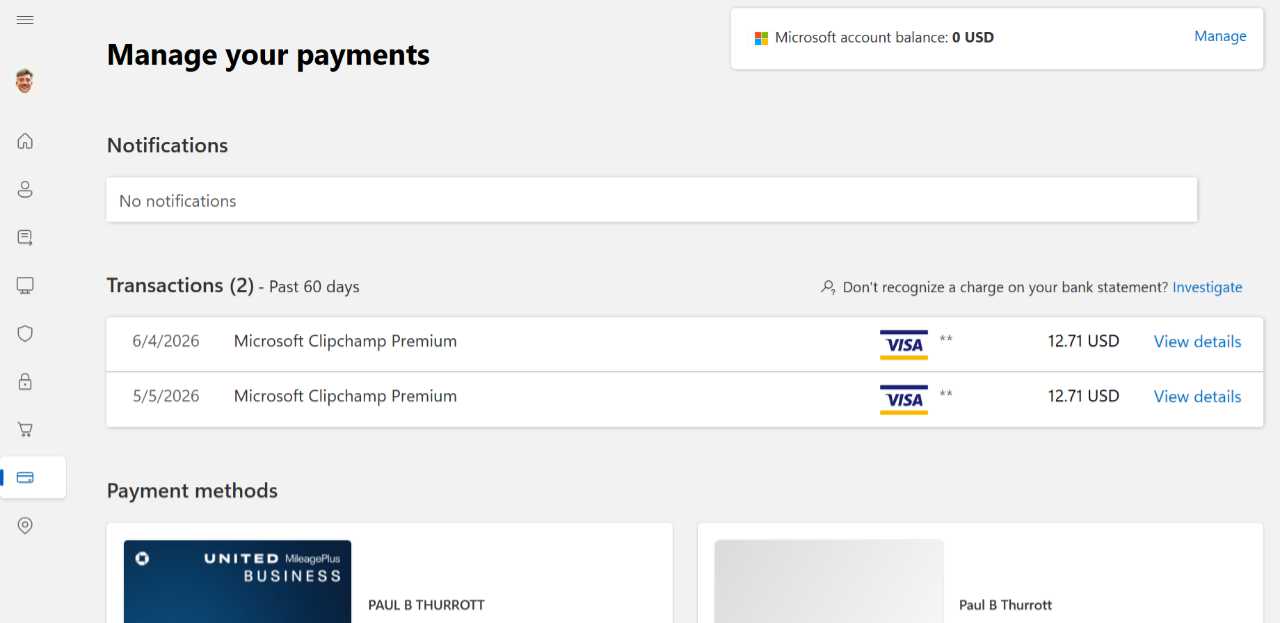
Here, you can add, delete, and manage payment options tied to your Microsoft account. These include credit and debit cards, a Microsoft gift card account balance, mobile billing through your wireless carrier, and PayPal. There are also views of notifications and recent transactions.
Manage PCs linked to your Microsoft account for purchases
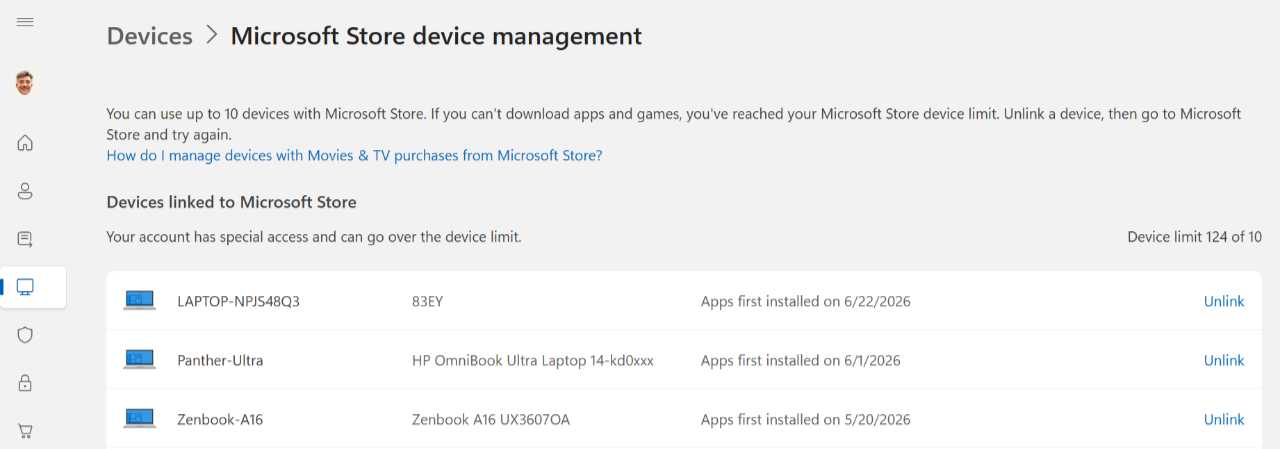
Microsoft lets you download Store apps and games to up to 10 Windows PCs at once. You can view and manage your linked PCs on the Microsoft Store device management page on the Microsoft account website. If you see any out-of-date PCs in this list, you can remove them by clicking the appropriate “Unlink” link.
Find and install apps and games
The Microsoft Store offers various ways to find and install apps and games. This process will be obvious to anyone who has used a mobile app store in the past decade. But in addition to the basic navigation and search capabilities described above, there are a few unique items of interest related to acquiring apps and games from the Microsoft Store.
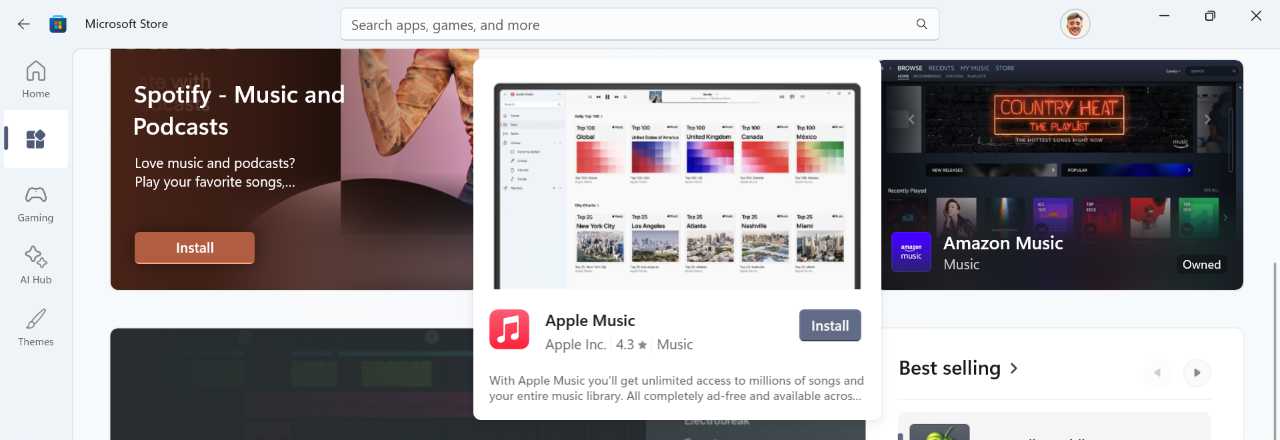
Install an app or game from a pop-up. While you can navigate in and out of app and game landing pages and click the “Install,” “Get,” or “Purchase” button you find there to download that content, the Microsoft Store lets you save a step. Instead of clicking on a content item to display the landing page, simply mouse-over it instead: Microsoft Store will display a pop-up pane with an “Install” or “Get” button so you can get started right away. (If you see a “More info” button, you’ll need to navigate into the landing page instead.)
Find an app or game after you’ve downloaded it. Windows 11 displays a notification banner when you install an app or game from the Microsoft Store. If you’re quick, you can click this notification to run it immediately. (Otherwise, you will find the notification later in the Notifications center.) Windows 11 also places recently installed apps and games at the top of the Recent section in the Start menu by default. And any app or game you’ve installed from the Microsoft Store will appear in the Start “All” area too.

Purchase an app or game. Downloading and installing a free app or game is simple enough. But purchasing a paid app or game requires a few more steps. The Store will prompt you to sign in–using Windows Hello-based authentication if you set up your PC correctly–and then ask you to confirm which payment method you prefer to use. From there, the download process proceeds normally.
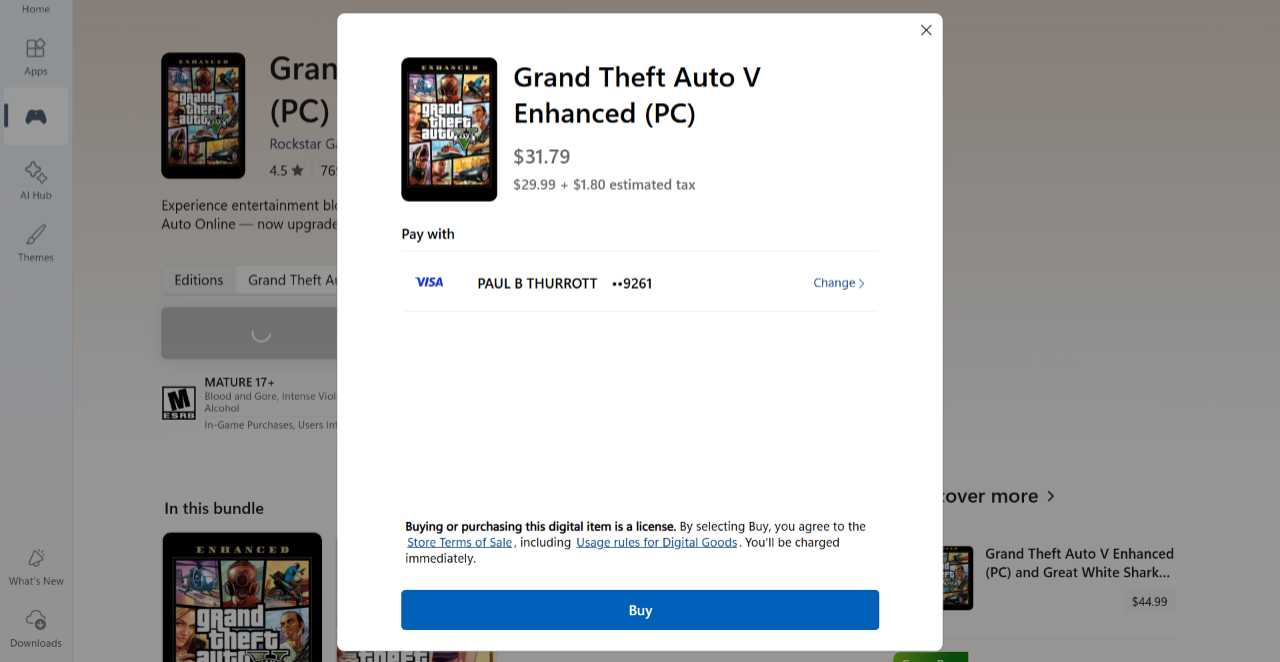
Tip: If you want to streamline the app purchase process by removing the authentication requirement, you can do so in Store settings, which is accessed by selecting Profile > “Settings” > “Purchase without passcode.” I don’t recommend making this change: It’s always a good idea to carefully consider any purchase, and this authentication prompt provides the necessary pause.
Make an in-app purchase. Some free apps–especially games–offer in-app purchases, which is a way for developers to monetize their work without requiring an upfront, one-time payment. (Another approach is to provide in-app advertising.) The types of in-app purchases you’ll see will vary from app to app, but the purchase process is the same. Like any Store purchase, you will need to authenticate and choose a payment method.
Notifications
Like your smartphone, Windows 11 supports notifications so that the system and apps can alert you about events that are unrelated to what you’re currently working on. It also provides a Notifications center so you can review notifications you’ve missed.
Defaults
When Windows 11 or an app needs to deliver a notification–perhaps because of a new email arriving, an event reminder, alarm, or similar occurrence–it does so via a pop-up banner, a small interactive window that appears in the lower right corner of the screen.

Notification banners can take many different forms, and it’s up to the app maker to decide which features to use. Most are simple, with some text and a few buttons, but they can also include images, quick reply boxes, context menus, progress bars, and other controls.
Tip: Internally, notification banners are referred to as toast notifications because the first version of this user interface popped up from the bottom of the screen, similar to toast coming out of a pop-up toaster.
Notification banners appear on-screen for a few seconds before disappearing. If you ignore or miss a notification, Windows 11 will move it into the Notifications center so that you can review it later.
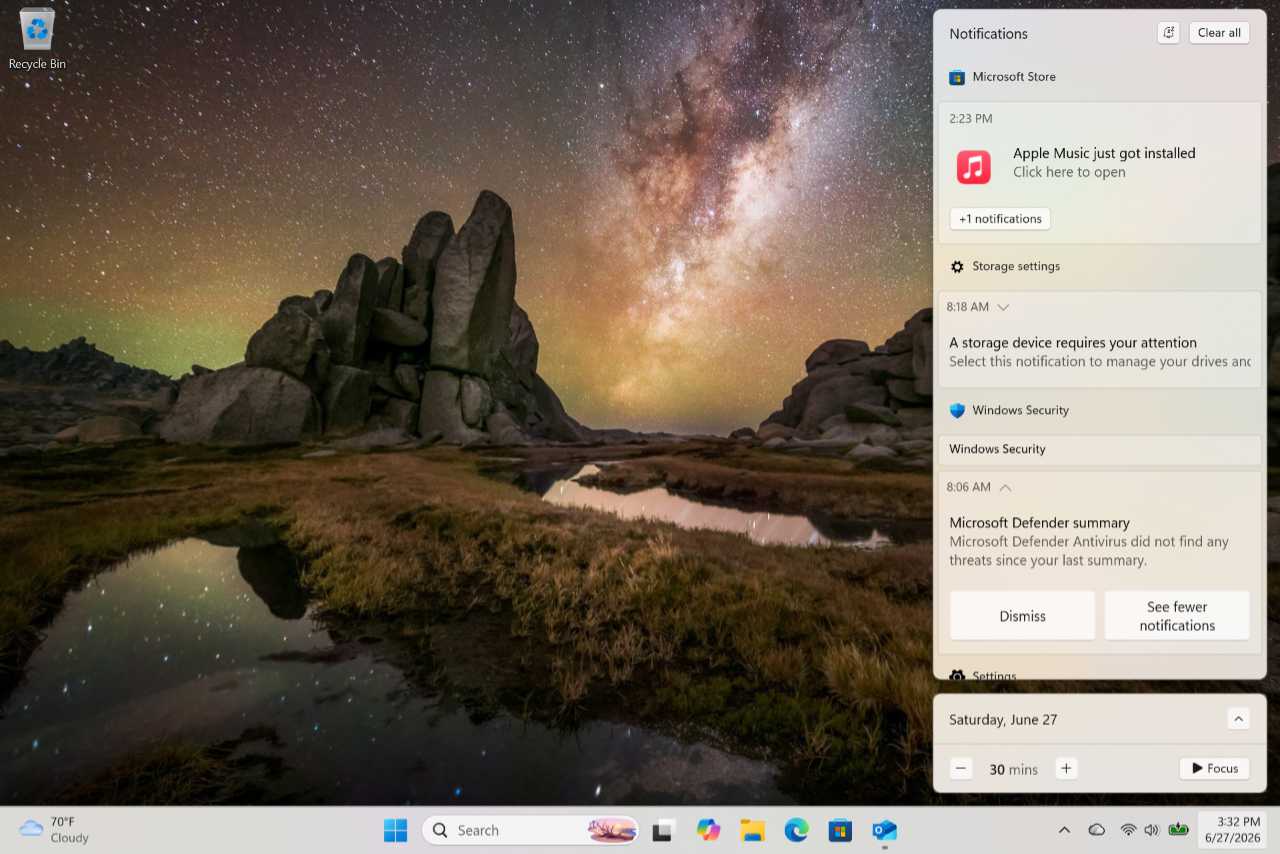
You open this interface, which consists of a Notification pane and a semi-related and collapsed Calendar pane stacked vertically, by clicking the time/date display in the system tray in the Taskbar.
Keyboard shortcut: You can open the Notifications and Calendar panes even more quickly by typing Windows key + N.
Customize
Depending on how you work and which apps you use, you could find yourself dealing with notifications frequently. So you may wish to spend some time configuring how notifications work.
You do so by opening the Settings app and navigating to System > Notifications.
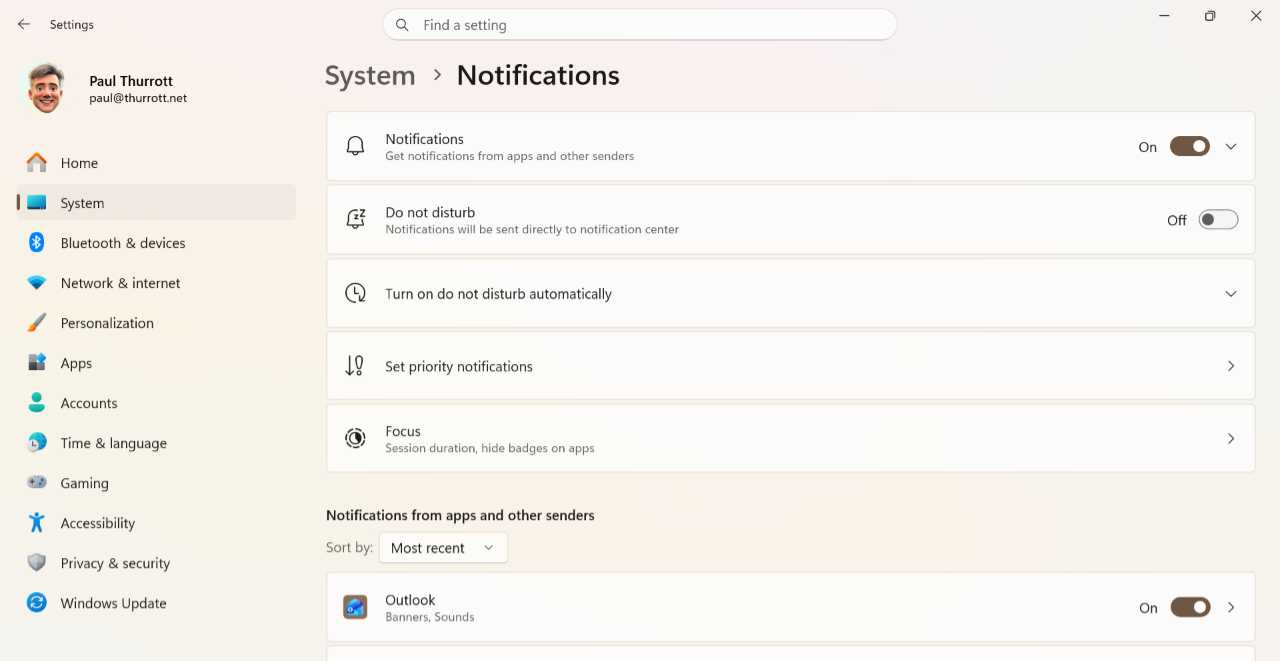
Tip: You can also get here by right-clicking the time/date display in the system tray and choosing “Notifications settings” from the pop-up menu that appears.
Be sure to expand the “Notifications” option at the top of this page.
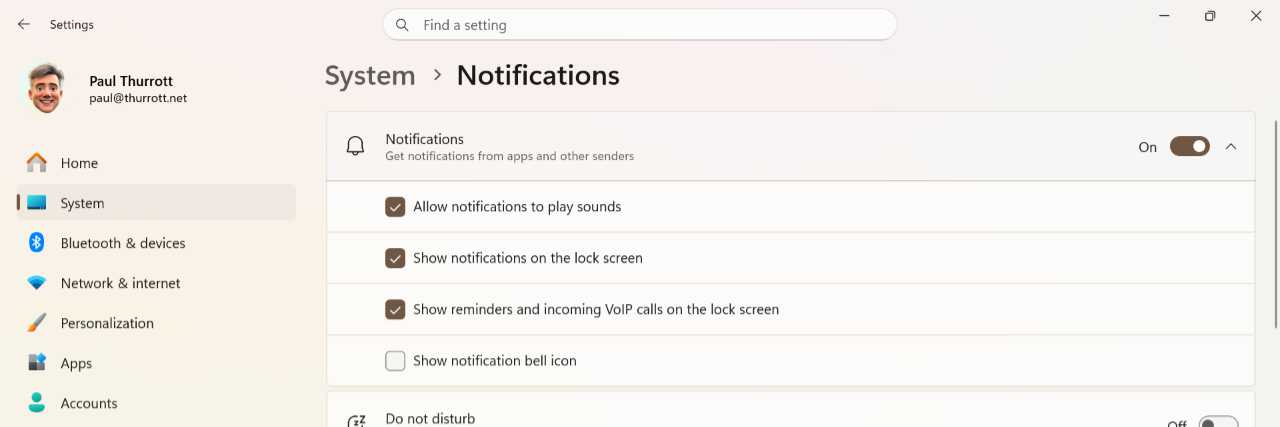
Most of these options are obvious, but a few options to consider include:
Show notification bell icon. You can use this option to enable a notification bell icon next to the time/date display in the system tray that indicates whether you have any pending, unseen notifications. This used to be visible by default, but it’s disabled now and you can (re)enable it here.
Set priority notifications. This link opens a page where you can configure which notifications will appear even when Do not disturb is enabled.
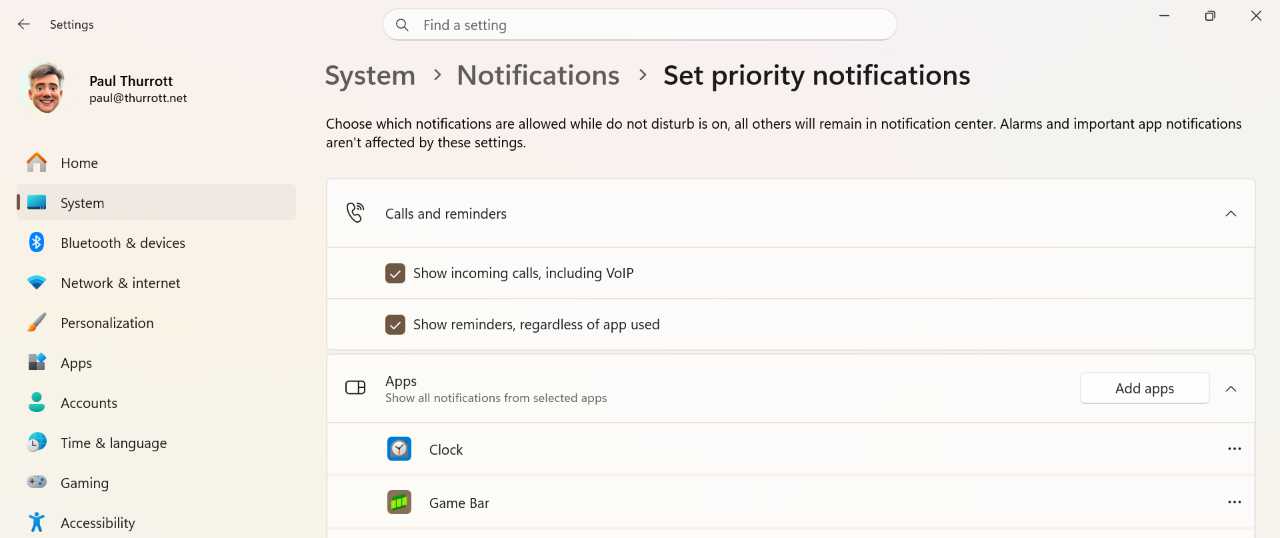
Notifications from apps and other senders. This area lets you configure notification settings on a per-app and system service basis. This capability is described in the next section. You can click into any listed app to configure how notifications appear, the priority of those notifications, and several other options.
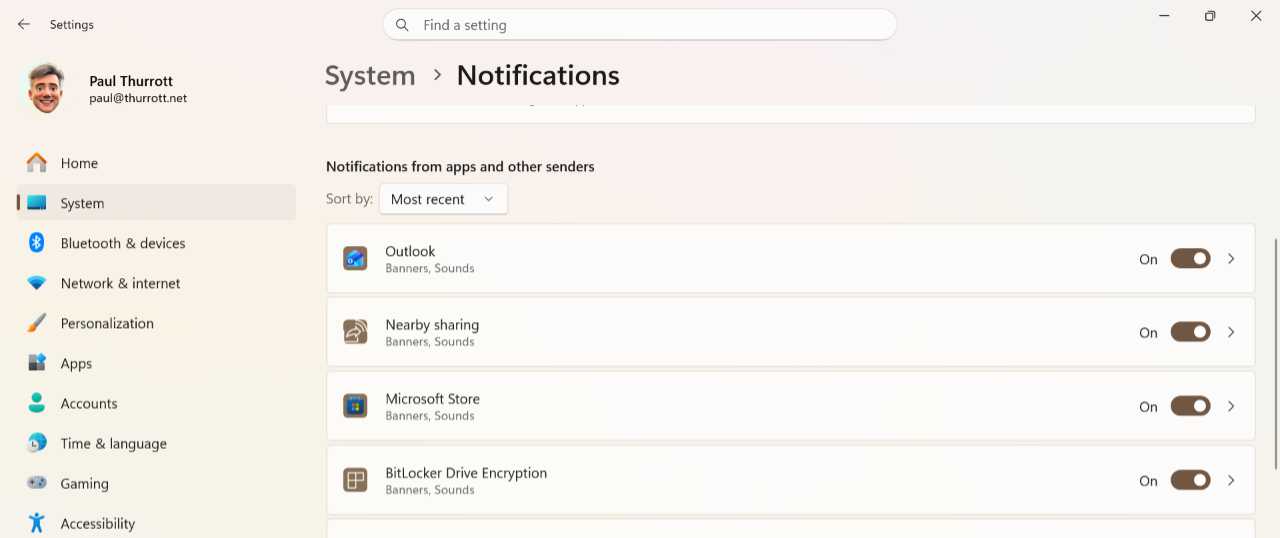
Tip: If Windows 11 notices that you aren’t interacting with notifications from a particular app, it will prompt you–yes, with a banner notification–and suggest that you turn off these notifications.
Handle an app notification as it appears
Windows 11 will trigger a notification banner–a floating window that appears in the lower-right corner of the screen–whenever it or an app fires a notification. This banner will appear regardless of what you’re doing for the most part–it can appear over the desktop, over apps, and over the Lock screen by default–though banners are disabled in some situations–during full-screen games, for example–and if Do not disturb is enabled.
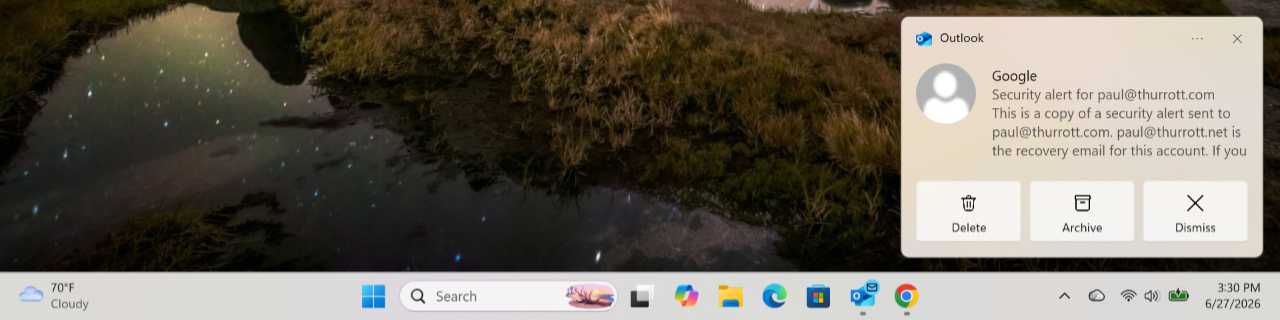
As noted previously, notification banners vary by app and some provide options right on the window for dealing with the cause of notification. In the image above, for example, you can see that Outlook notifications related to email let you delete, flag, or dismiss a new email message right from the banner, without any need to launch the app.
If you select a notification banner before it disappears–it only stays visible for a few seconds–the underlying app that triggered that notification will open. But if you ignore or miss a notification banner, you can later view it and other notifications in the Notifications pane, as described below.
Notification banners also provide other options via the small “Settings” (“…”) and “Close” (“X”) buttons, the latter of which dismisses the banner.
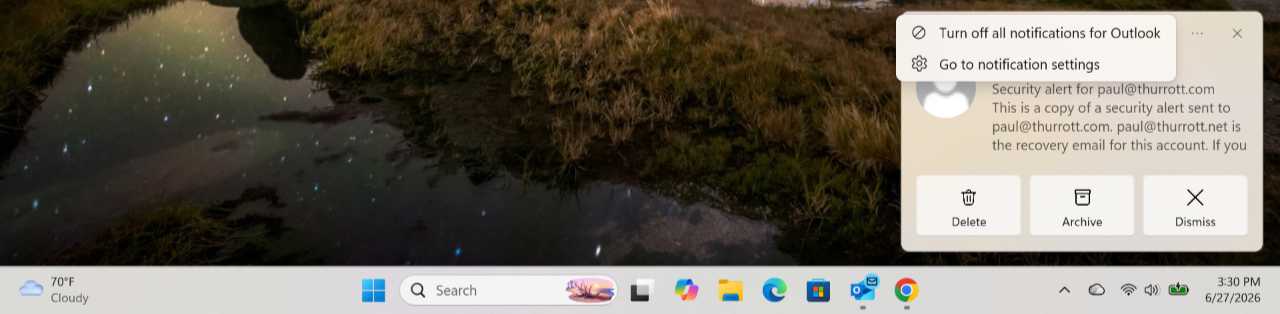
If you click “Settings,” it will display a menu with the choices “Turn off all notifications for app name” and “Go to notification settings,” which opens the Settings app and navigates to System > Notifications.
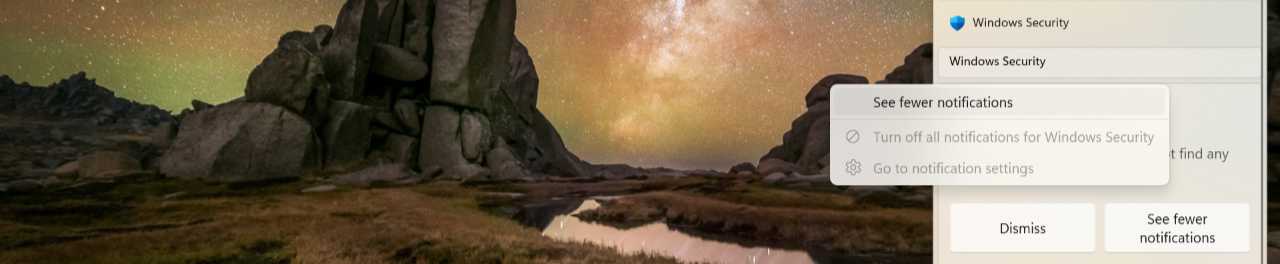
Some apps customize their notification banners. For example, Windows Security provides a weekly status update via a notification banner and it has a third item in its Settings context menu, “See fewer notifications.”
Handle previous app notifications
Notifications you miss or ignore are collected in the Notifications center so you can manage them later.
Here, you can do the following.
Remove all notifications with one click. Click the “Clear all” button to immediately remove all notifications in the Notifications center.
Open the app that triggered a notification. To open the app that triggered a notification, click the notification here. If you click the notification for a newly installed app, that app will launch. In some cases, the app will navigate to a specific interface. For example, if you click a notification for a new email message, that message will open in the appropriate app.
Tip: When you click through to an app this way, the notification is removed from the Notifications center.
Expand or collapse a notification. If the content in a notification is too big, it will display in a collapsed view. You can expand it in place by clicking the “Expand/Collapse” toggle next to the time in the upper-right of the notification.

Access other notification options. Notifications in the Notifications center behave as they do when they first appear in a banner. And you can mouse over the header above a notification to see a “Settings” (“…”) link with app-level options: “Turn off all notifications for app name,” “Go to notification settings,” and “Make app name high priority.”


Gain unlimited access to Premium articles.
With technology shaping our everyday lives, how could we not dig deeper?
Thurrott Premium delivers an honest and thorough perspective about the technologies we use and rely on everyday. Discover deeper content as a Premium member.