Virtualization
- Paul Thurrott
- Jul 05, 2026
-
1
Windows 11 includes integrated virtualization technologies that allow it to run other instances of operating systems in emulation. This is the underlying technology behind the Windows Subsystem for Linux (WSL) and the two optional Windows 11 features described in this chapter, Windows Sandbox and Hyper-V Client.
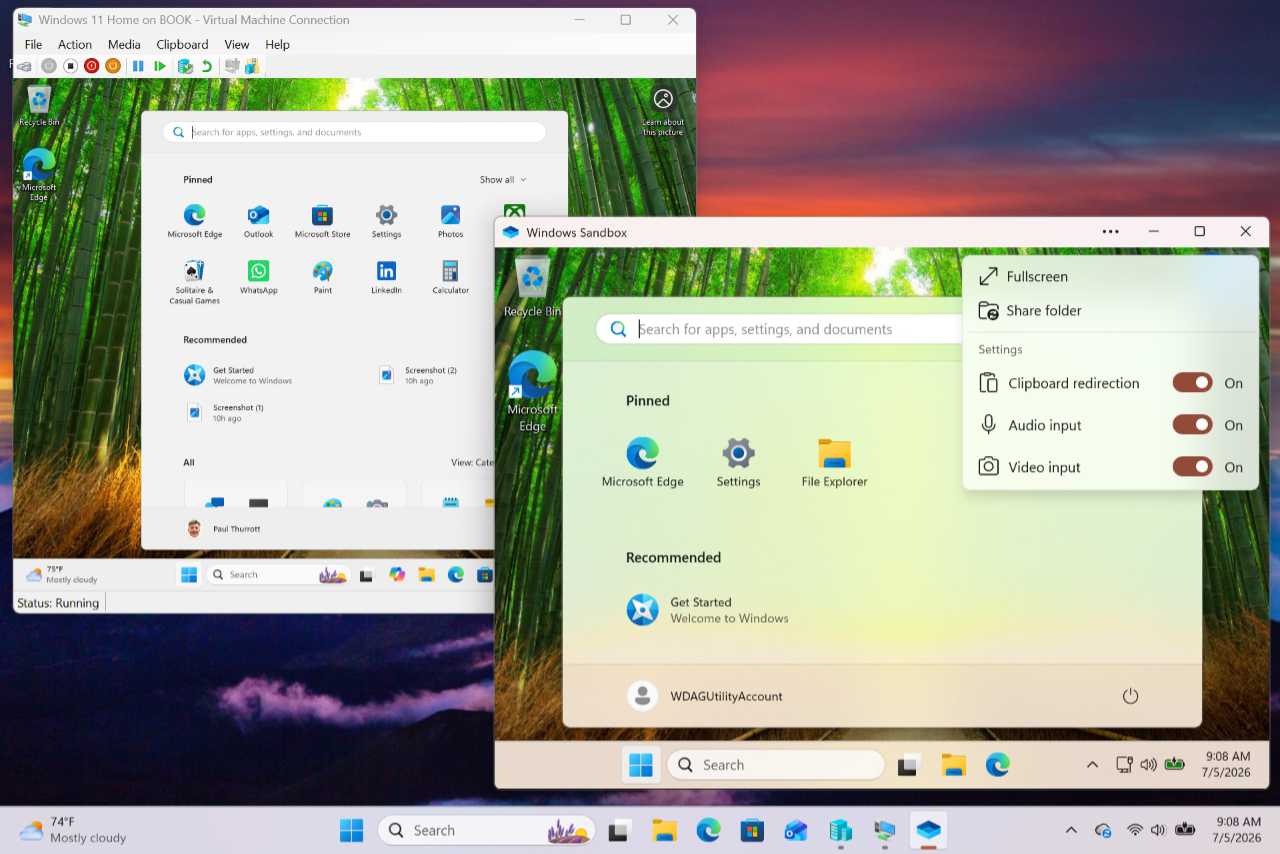
Just as many Windows 11 security features require a PC with a Trusted Platform Module (TPM) 2.0 chipset, Windows 11 virtualization capabilities require specific CPU-based hardware virtualization support. This capability is available in all modern PCs, but it has to be enabled in your PC’s UEFI firmware (formerly called the BIOS), and accessing the firmware varies from PC to PC.
A> Learn more: The Microsoft Learn website provides links to the support documentation for the top five PC makers.
With that support enabled, you can optionally install and use features like WSL, Sandbox, and Hyper-V Client. Each is built on the same core architecture, which provides chipset-level hardware acceleration to host virtual environments that run virtual machines (VMs) that act as software-based PCs.
More artificially, Windows Sandbox and Hyper-V Client both require Windows 11 Pro, while WSL also works with Windows 11 Home.
Windows Sandbox
Windows Sandbox is an optional Windows 11 Pro feature that lets you run untrusted software in an isolated, temporary Windows 11 Desktop environment without impacting the host PC. Because of this focus, it’s more lightweight than Hyper-V, can only run the same Windows 11 version as the PC on which it runs, and provides just a few of the apps found in a typical Windows 11 installation.
The important thing to understand about Windows Sandbox is that the Windows 11 environment it provides is temporary: Every time you start Windows Sandbox, you get a pristine, new Windows 11 environment. Nothing persists from session to session as on a real PC or with a Hyper-V virtual machine (VM). Windows Sandbox also doesn’t need an ISO image or a virtual hard disk (VHD). Everything it needs is already there in Windows 11.
Tip: Apps and data added to Windows Sandbox will persist if you reboot the virtual version of Windows 11 it contains. But they will all be erased when you close Windows Sandbox.
Install Windows Sandbox
To install Windows Sandbox, search for features using Windows Search and select “Turn Windows features on or off” in the results list that appears. The “Windows Features” control panel will open.
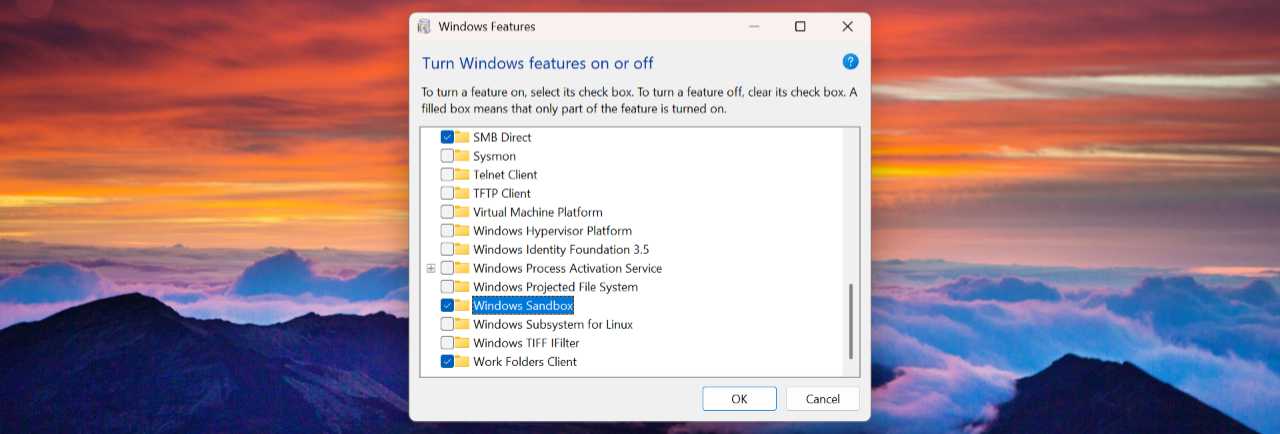
Scroll down to find the entry for Windows Sandbox. Select it and then click OK. The feature will be installed and then you will be prompted to restart the PC. Do so.
Tip: If you later choose to uninstall Windows Sandbox, you can do so via the Windows Features control panel. Just uncheck “Windows Sandbox” in the list, click OK, and restart your PC when prompted.
Defaults
Windows Sandbox isn’t automatically added to the Recent section in Start after it’s installed, but you can find it easily enough with Windows Search. When you first run the app, it may need to download and install an update, but after that it should appear quickly.
In use, Windows Sandbox couldn’t be simpler: It provides a virtualized version of your Windows 11 Pro installation, but stripped down to just a basic set of apps–Microsoft Edge, Settings, File Explorer, and a few others–and presented in a resizable, automatically-scaled Remote Desktop Connection (RDC) window.
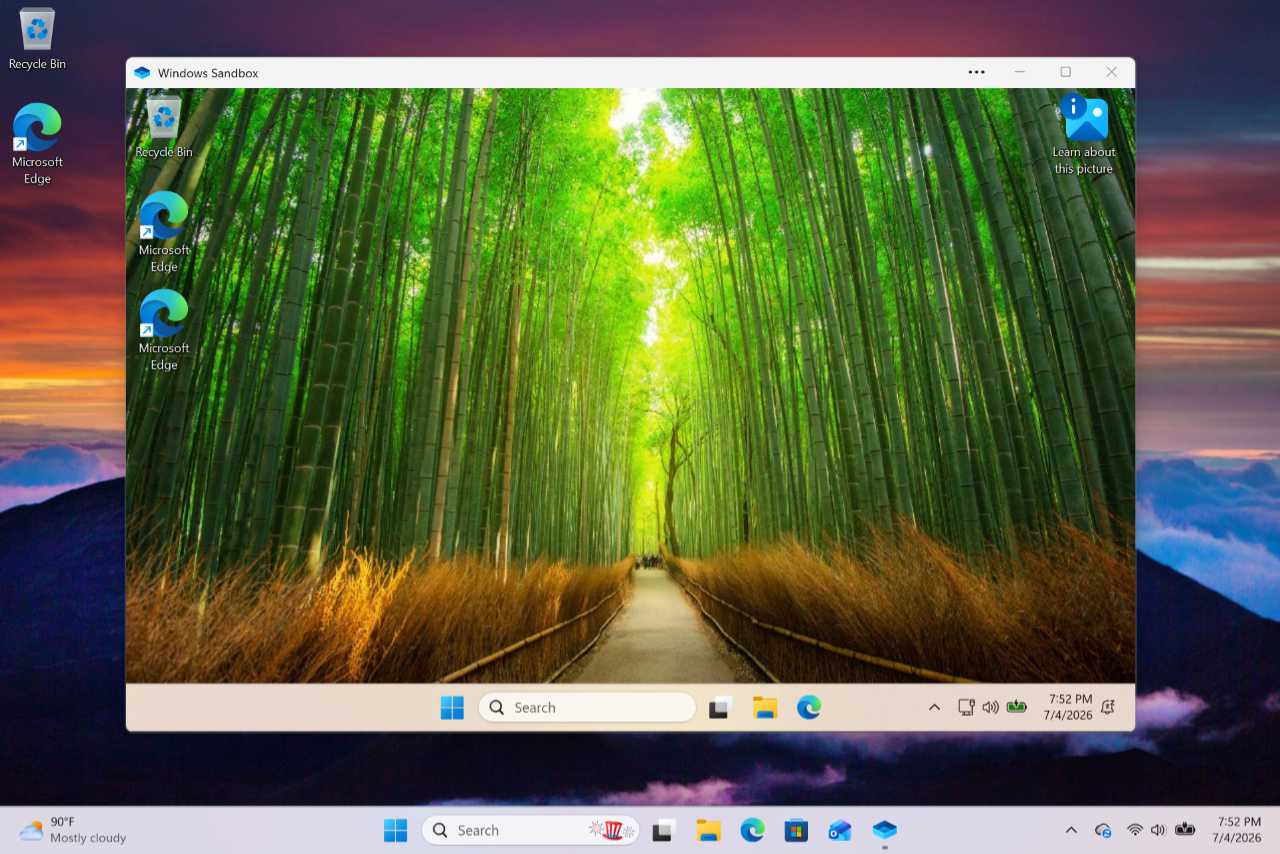
Additional options are available in the menu that appears when you click the “More” (“…”) button in the Windows Sandbox title bar, to the left of the normal window buttons.
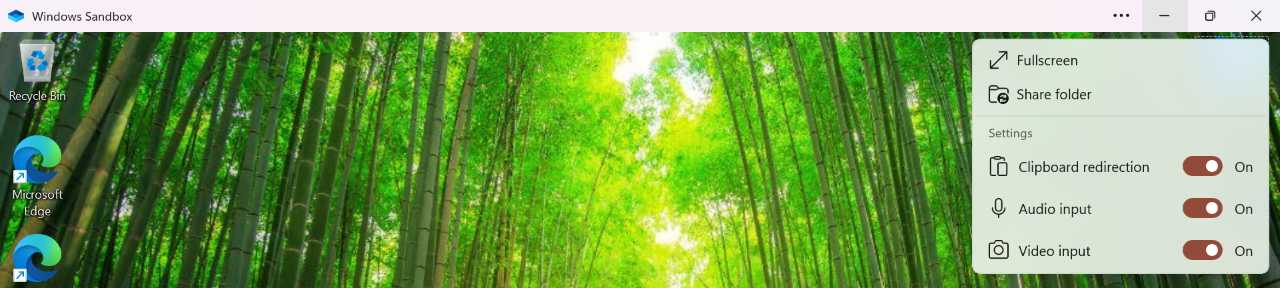
From here, you can:
Resize the window. You can arbitrarily resize the Windows Sandbox window or maximize it, and the virtual Windows 11 environment it displays will rescale accordingly.
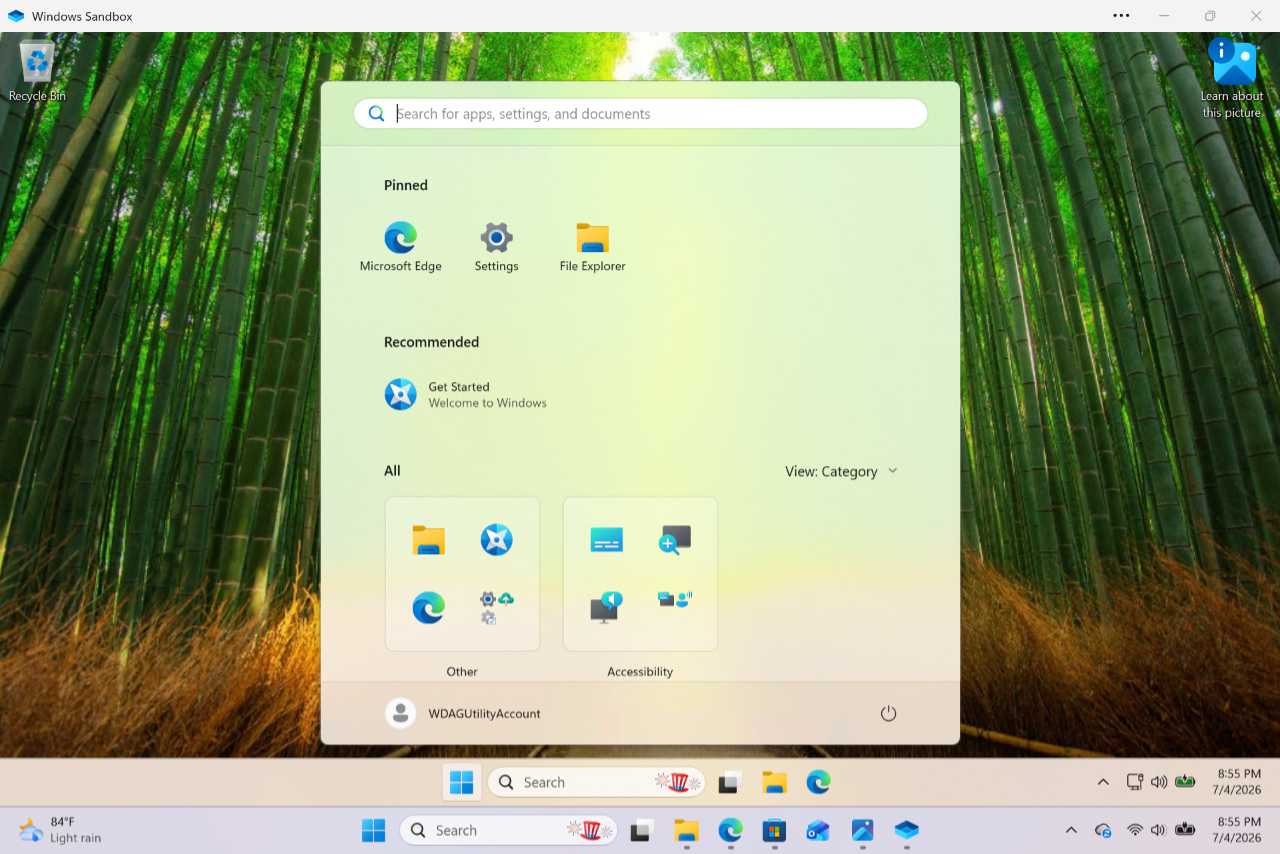
Go full screen. Using the “Fullscreen” option in the “More” menu, you can display the virtual environment using the entire display and interact with it as if it’s a real PC. A connection bar is pinned to the top of the screen by default with “Unpin”/”Pin,” “Restore,” and “Close” buttons. The “More” menu is unavailable when Windows Sandbox displays full-screen.

Configure a shared folder. Using the “Share folder” item in the “More” menu, you can use a “Select folder” window to share a folder on the host (physical) PC with the virtual environment in Windows Sandbox. When you do so, a shortcut to the folder appears on the Desktop in the virtual environment so you can copy files between it and the host PC.
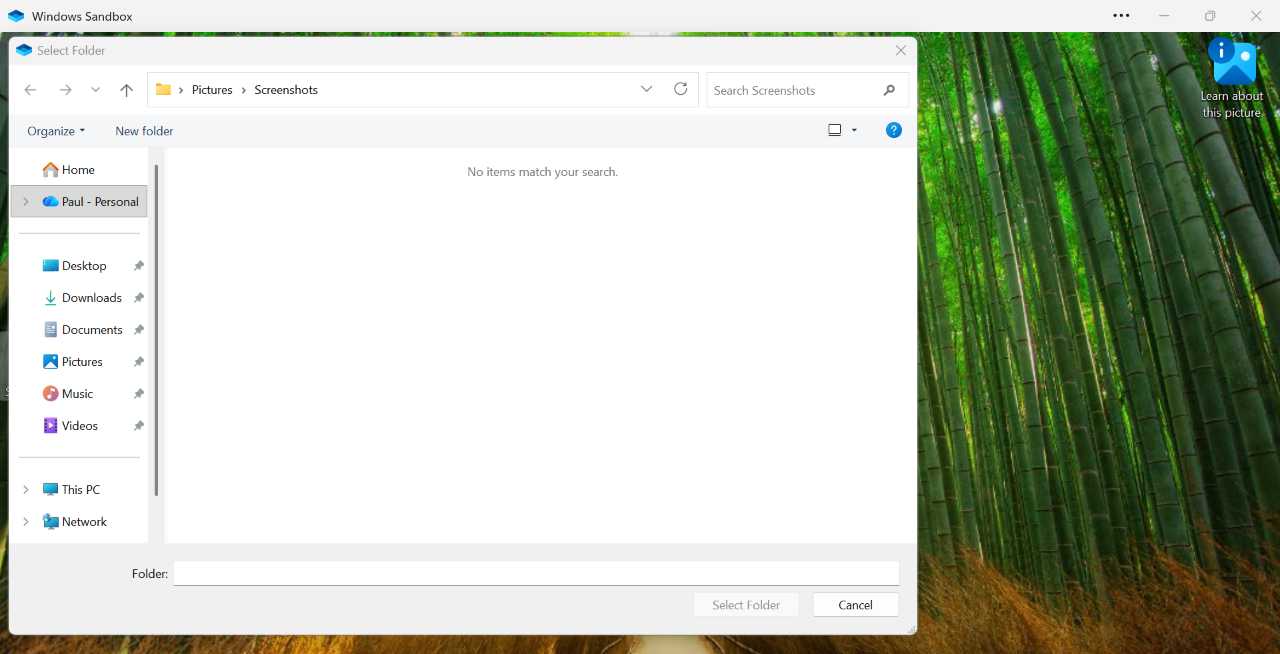
Tip: You can create multiple shared folders this way, you’re not just limited to one.
Configure settings. By default, the virtual environment in Windows Sandbox shares a Clipboard, audio input, and Video input with the host PC. But you can toggle each of these features in the “More” menu if desired.
Close Windows Sandbox. You can close Windows Sandbox by clicking the app’s “Close” window button as you do with other apps and windows. When you do so, Windows Sandbox will prompt you to remind you that everything you have changed–installed apps, created or copied files, and whatever else–will be lost permanently.

Test suspicious software in Windows Sandbox
Windows Sandbox exists solely so you can test potentially dangerous apps or files in a virtual environment without risking the security of a real PC. It provides two general ways to do so:
- Microsoft Edge. You can use the Microsoft Edge web browser in Windows Sandbox to download the software in question and then install or otherwise test it from there. This is a useful technique if Edge blocked a suspicious download on the host PC and you want to test it virtually before proceeding.

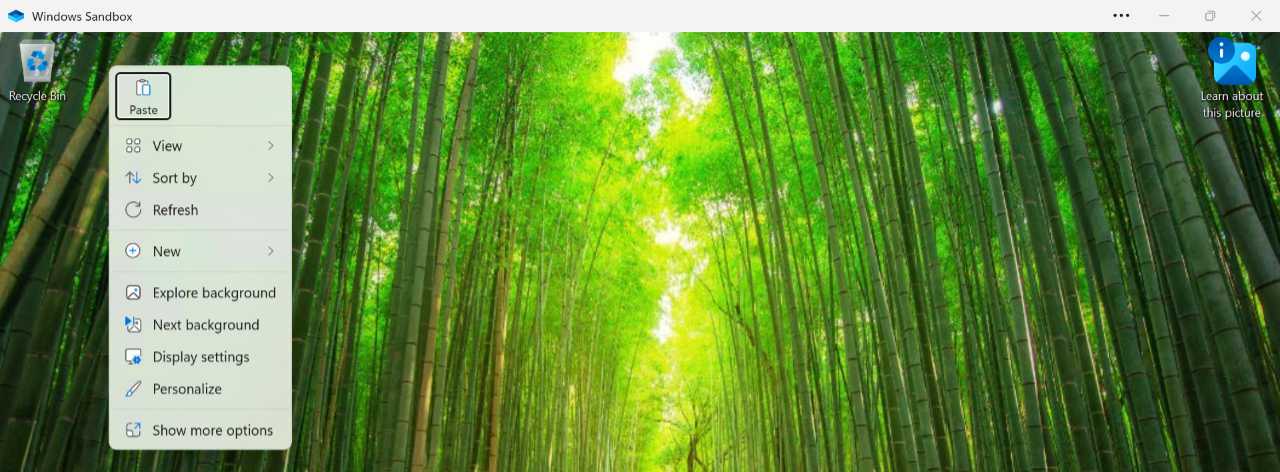
Host integration. You can use the Clipboard or shared folder capabilities noted above to copy a file or folder in the host OS to the virtual environment in Windows Sandbox. The shared Clipboard functionality is usually quicker: Just right-click the file or folder in the host OS, select “Copy” from the context menu that appears, then display the Desktop or a folder in the virtual environment in Windows Sandbox, right-click, and select “Paste.”
Hyper-V Client
Windows 11 Pro includes an optional feature called Hyper-V Client–often referred to simply as Hyper-V–that lets you run Windows 11 and other operating systems in virtual machines (VMs). This technology is useful for various reasons. For example, developers can use Hyper-V to test their applications and other software in other versions of Windows or in other operating systems.
Tip: Hyper-V can be resource-intensive. If you will be using this feature regularly, be sure that your PC is a relatively high-end model with a fast processor, fast SSD storage, and as much RAM as you can afford.
Install Hyper-V
To install Hyper-V, search for features using Windows Search and select “Turn Windows features on or off” in the results list that appears. The “Windows Features” control panel will open.
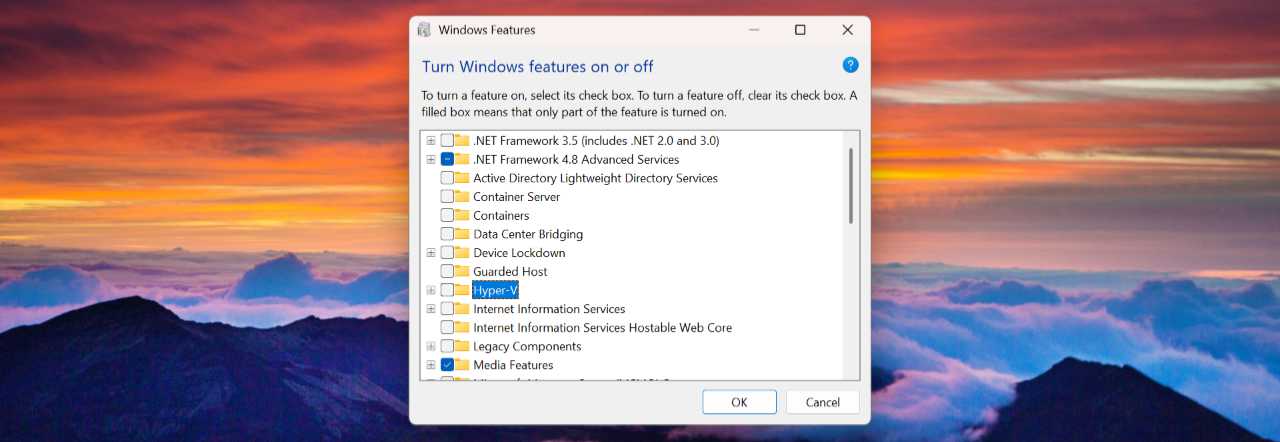
Scroll down to find the entry for Hyper-V. Select it and then click OK. The feature will be installed and then you will be prompted to restart the PC. Do so.
Tip: If you later choose to uninstall Hyper-V, you can do so via the Windows Features control panel. Just uncheck “Hyper-V” in the list, click OK, and restart your PC when prompted.
You use the Hyper-V Manager application to manage Hyper-V and its virtual machines (VMs), virtual hard disks (VHDs), and virtual floppy disks (VFDs). You can find Hyper-V Manager with Windows Search.
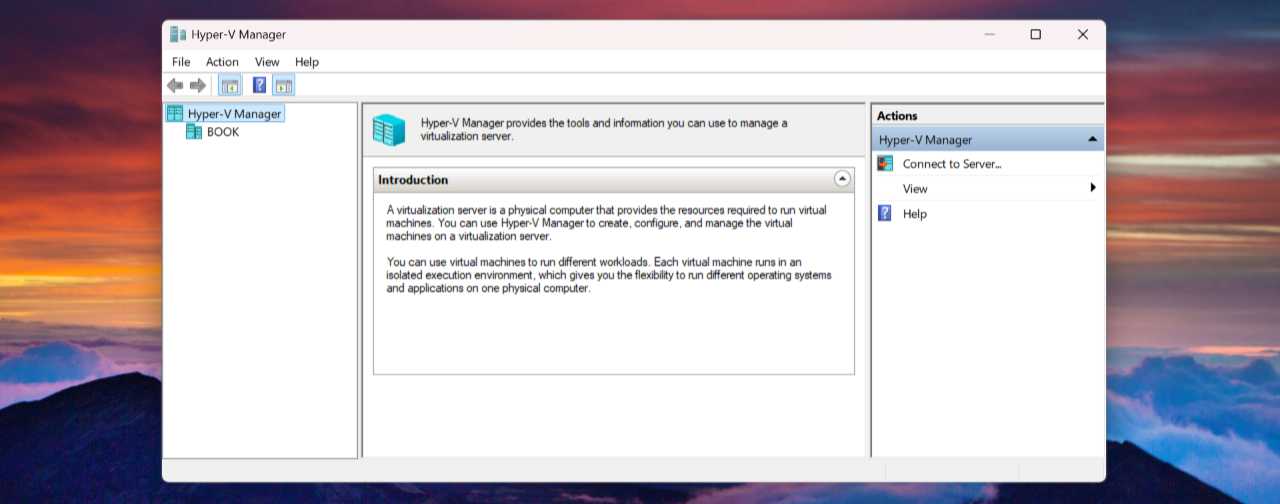
Create and use a virtual machine
Hyper-V Manager lets you create VMs using a “Quick Create” wizard that automates downloading the ISO (identical storage image of optical media) file for different versions of Windows and Ubuntu Linux installation media and then installing the system using a default configuration.
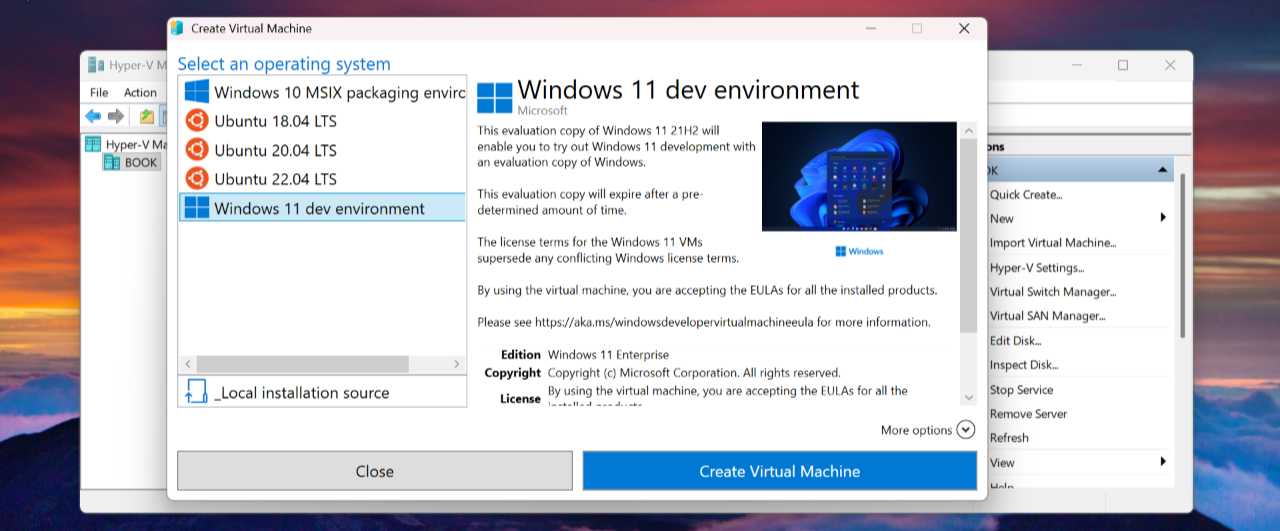
Or you can use a more manual approach in which you download the ISO(s) you need yourself and then configure the VMs to your liking. I strongly prefer the latter approach and document that here.
Create a new virtual machine manually
To install a supported OS in a Hyper-V VM, you need to first download the correct ISO file–Windows 11, Ubuntu Linux, or any other Linux distribution–to your PC.
Tip: If you are using a traditional Intel- or AMD-based PC, you can only use x86/x64 ISOs. If you are using a modern Windows 11 on Arm-based PC, you can only use an Arm64 ISO.
Then, open Hyper-V Manager and select Action > New > Virtual Machine. The “New Virtual Machine Wizard” window opens.
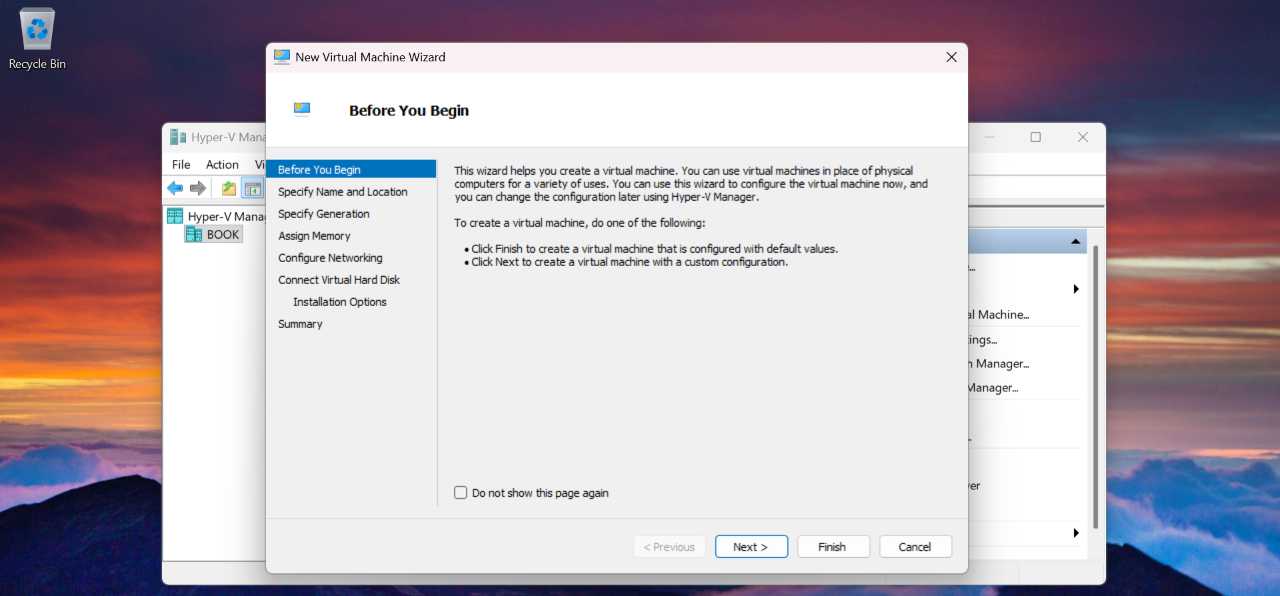
From here, you will click “Next” and work through the following steps (here, for a Windows 11 VM).
- Specify Name and Location. In this step, you name the VM (“Windows 11 Home” or similar) and, optionally, choose to store it in a different location than the default.
- Specify Generation. “Next.” In the Specify Generation step that appears, you will choose between a Generation 1 and Generation 2 VM. As the names suggest, Generation 2 is more modern and supports UEFI-based firmware instead of a legacy BIOS, so this is almost certainly the right choice.
- Assign Memory. In this step, you will configure the amount of memory that will be allocated to this VM. What you choose here will depend on various factors including how much RAM your PC has, which operating system you are installing in the VM, and how you intend to use the VM. But you can always change the memory allotment later.
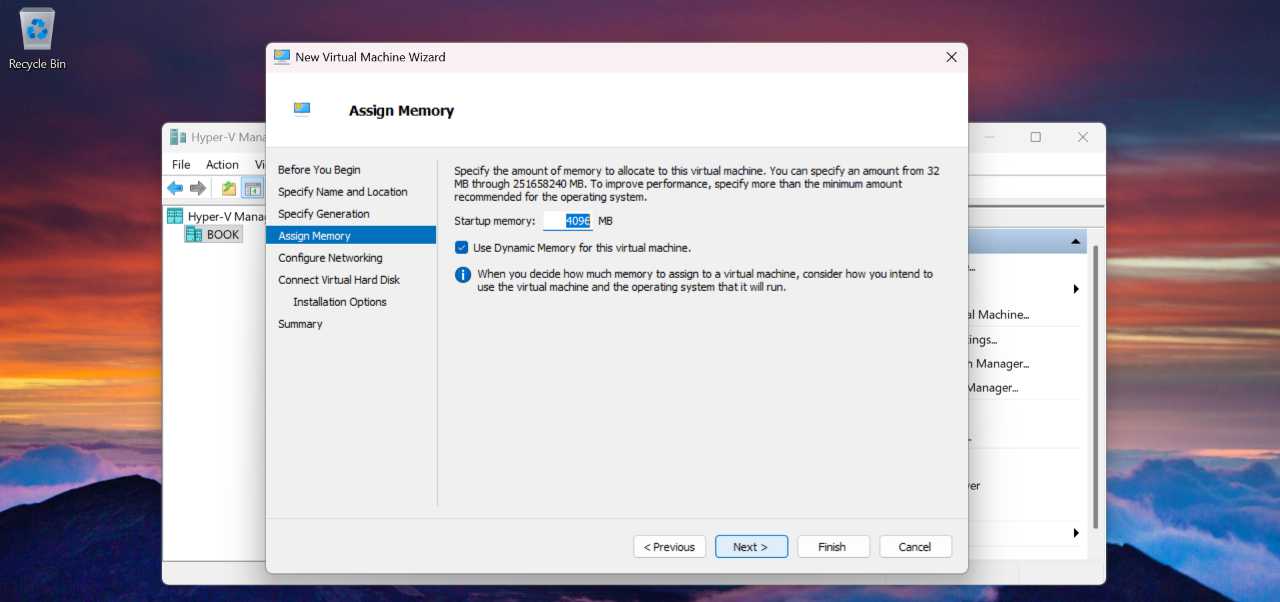
Tip: Leave the option “Use Dynamic Memory for this virtual machine” enabled.
- Configure Networking. Here, you can–and should–configure a network connection. If your PC has only one network connection, you can use “Default Switch,” which means that the VM will share the same network connection as the host Windows 11 system.
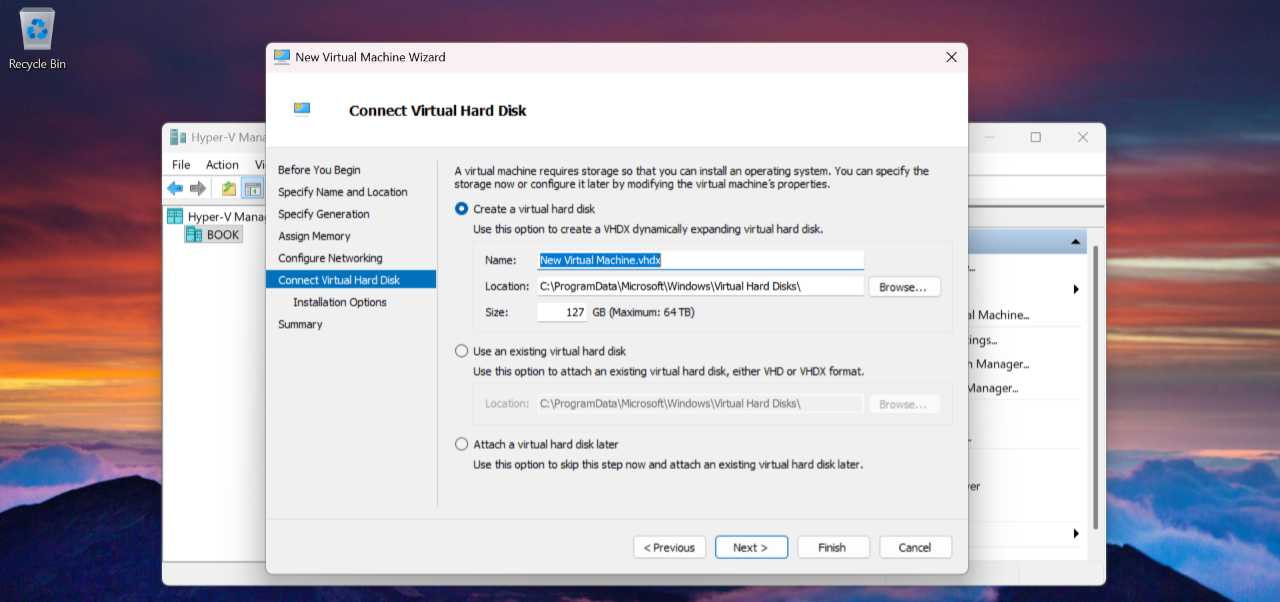
- Connect Virtual Hard Disk. In this step, you determine which VHD to use with the VM. By default, Hyper-V will create a new VHD with the same name as the VM, and that is what you want most of the time. But you can use an existing VHD or choose to attach a VHD later too.
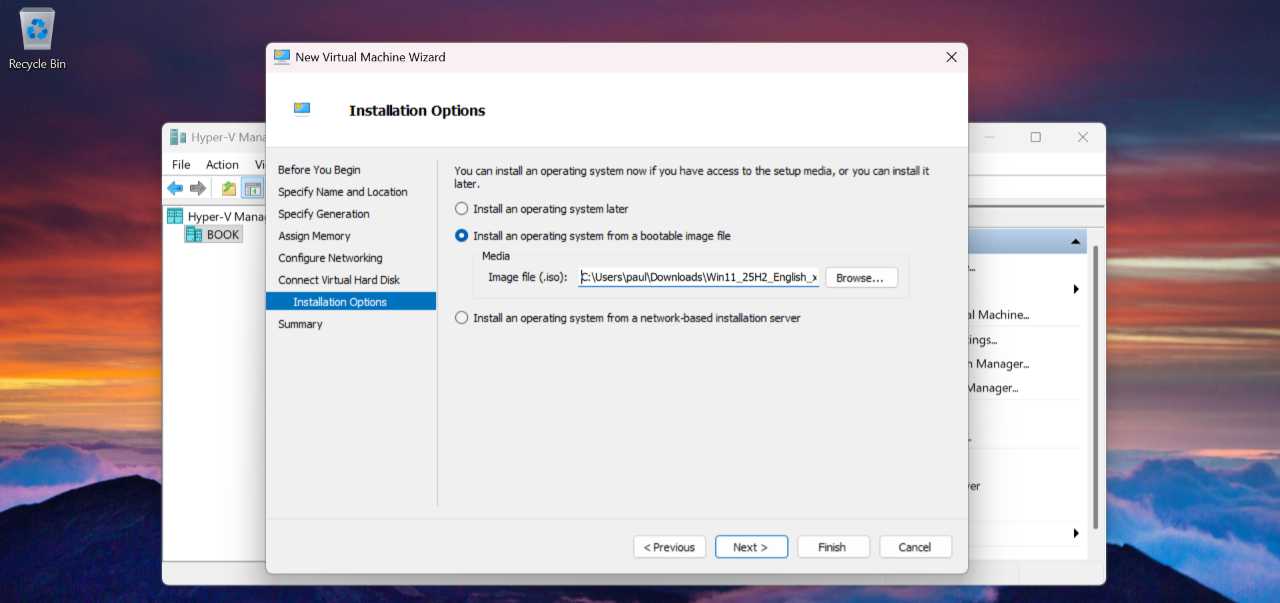
- Installation Options. Here, you choose to install an operating system now or later. Typically, you will choose “Install an operating system from a bootable image file” and then select the ISO file you downloaded.
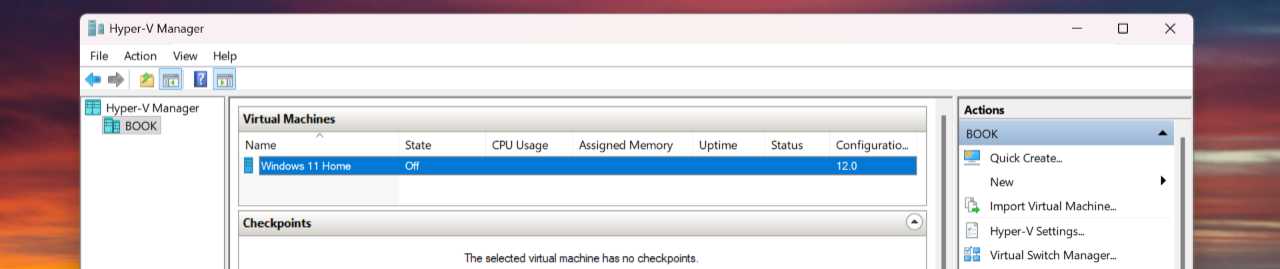
Complete the New Virtual Machine Wizard. In this final step, the “New Virtual Machine Wizard” provides a review of the settings you configured so you can check them one last time. Click “Finish” and Hyper-V will create the new virtual machine, and it will appear in the list of virtual machines in Hyper-V Manager.
Make specific configuration changes for Windows 11 or Ubuntu Linux
If you are installing Windows 11 or Ubuntu Linux in the VM, you have one more step: Right-click the VM in the list and choose “Settings” from the context menu that appears to open the VM’s settings. Then, navigate to the Security page.
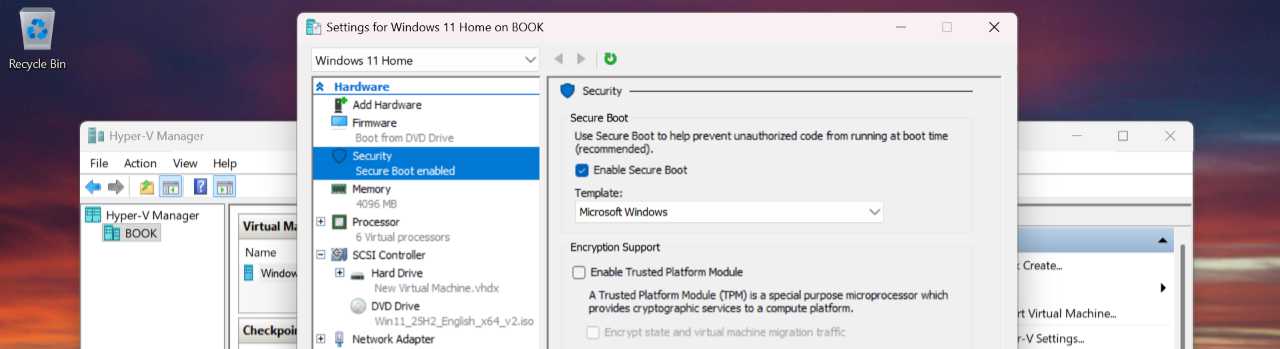
If you are installing Windows 11, check the option “Enable Trusted Platform Module.” This allows the VM to meet Windows 11’s hardware requirements. Otherwise, you will see an error when Windows Setup begins and won’t be able to continue.
If you are installing Ubuntu Linux, change the option “Template” to “Microsoft UEFI Certificate Authority.” Otherwise, the VM will not boot using the Ubuntu setup ISO.
Either way, click “OK” when you’re done.
Install and configure Windows 11 or Linux
To install Windows 11 or Linux in a newly created VM, double-click the VM in the virtual machines list in Hyper-V Manager. A “Virtual Machine Connection” window appears.
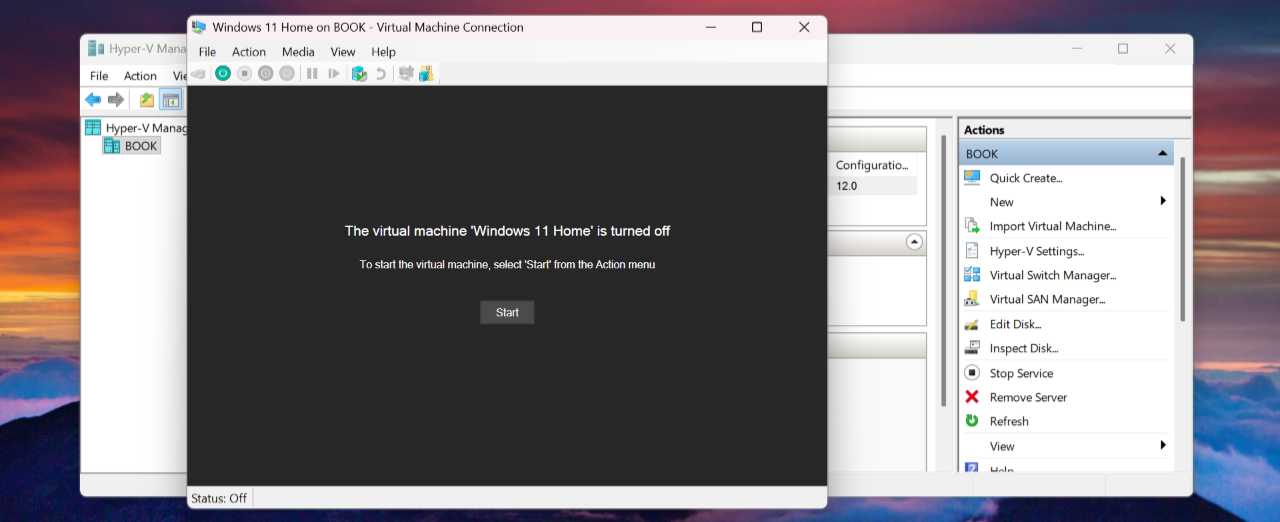
Click “Start” to power on the VM. From here, the VM mimics the behavior of a real PC, but in a window, in software. You can follow on-screen prompts to install the OS you chose.
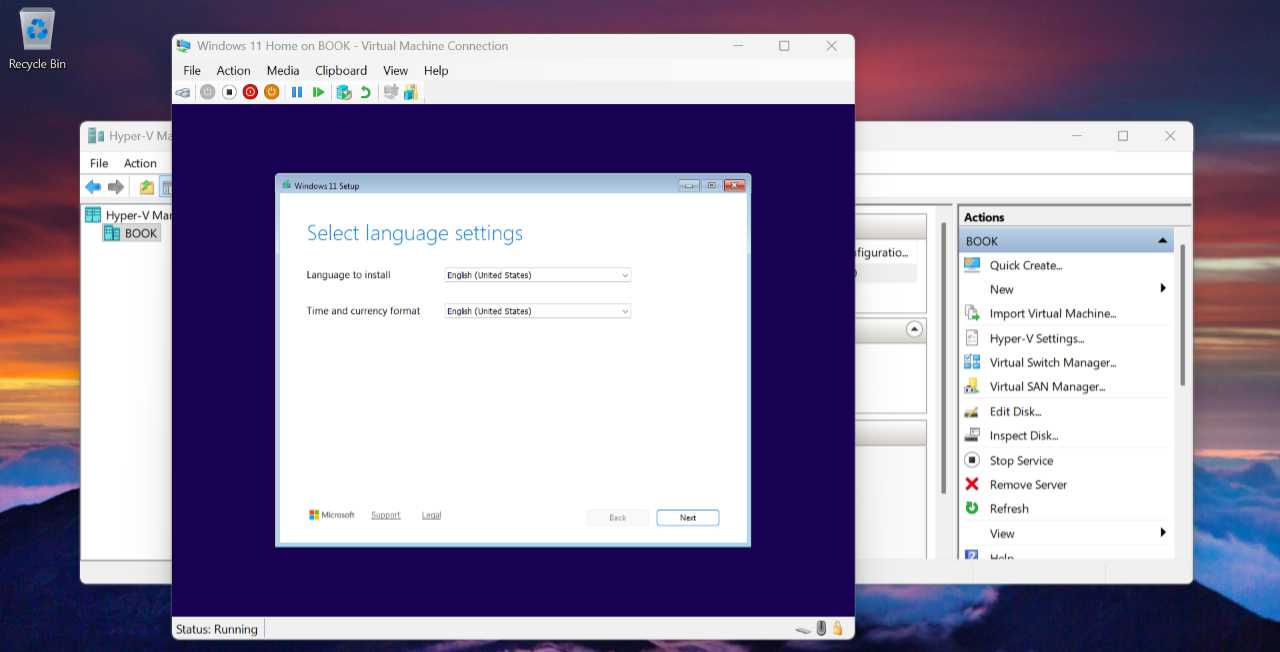
Once the OS is fully installed and running properly in the VM, there are a few options to consider.
- Remove the ISO. Once the operating system is installed, you can detach the ISO file from the VM. To do so, display the Virtual Machine Connection window and choose Media > DVD Drive > Eject [name of ISO].iso.
- Copy text into the VM using the Clipboard. The Virtual Machine Connection window lets you paste text from the Clipboard of the host PC into the VM. This can be handy for many reasons, for example when you want to paste a Windows product key into an activation window. To do so, select Clipboard > Type clipboard text.
- Capture a screenshot of the VM. You can capture a screenshot of the VM by selecting Clipboard > Capture screen. This is particularly handy for offline interfaces like Windows Setup or the Lock screen where you can’t normally take a screenshot.
- Change the zoom level. By default, the Virtual Machine Connection windows will automatically scale the VM it contains, but you can specify a zoom level if you want or even display the VM full screen. Both options are in the View menu.
- Understand how Ctrl + Alt + Del works. Windows 11 uses the Ctrl + Alt + Del keyboard shortcut to display a special security screen with five options: Lock, Switch user, Sign out, Task Manager, and Cancel. But because this keyboard shortcut has to always work, it’s not possible to access this screen in a Windows-based VM using the normal shortcut because it always impacts the host operating system instead. But you can still use Ctrl + Alt + Del with a VM in Hyper-V: just type Ctrl + Alt + End instead. Or, choose Action > Ctrl + Alt + Del in the VM window’s menu.
Use checkpoints to save a VM’s state
Thanks to Hyper-V’s checkpoint feature, you can save the state of a VM at any time and then return the VM to that state later. This is handy if you’re about to make a major change to a VM and want a way to go back in time and reverse that change.
To create a checkpoint, select Action > Checkpoint in the “Virtual Machine Connection” while the VM is running.
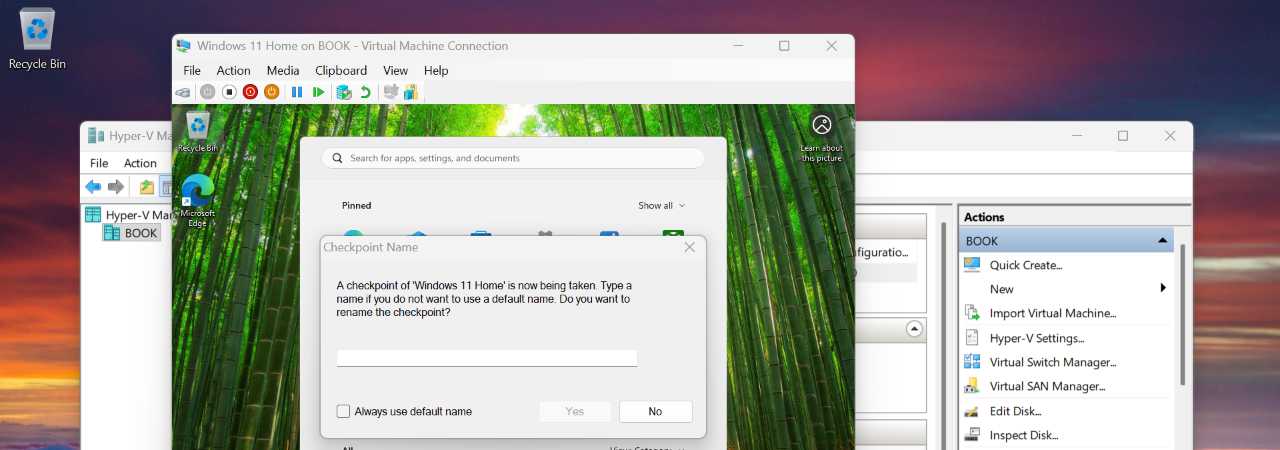
Tip: You can also create a checkpoint from Hyper-V Manager: Right-click the VM and select “Checkpoint.” Each checkpoint for a VM appears in the Checkpoints area in Hyper-V Manager
Later, you can return to any saved checkpoint and return the VM to the state it was in at that time. To do so, select the VM in Hyper-V Manager and view the available checkpoints in the “Checkpoints” section below “Virtual Machines.”
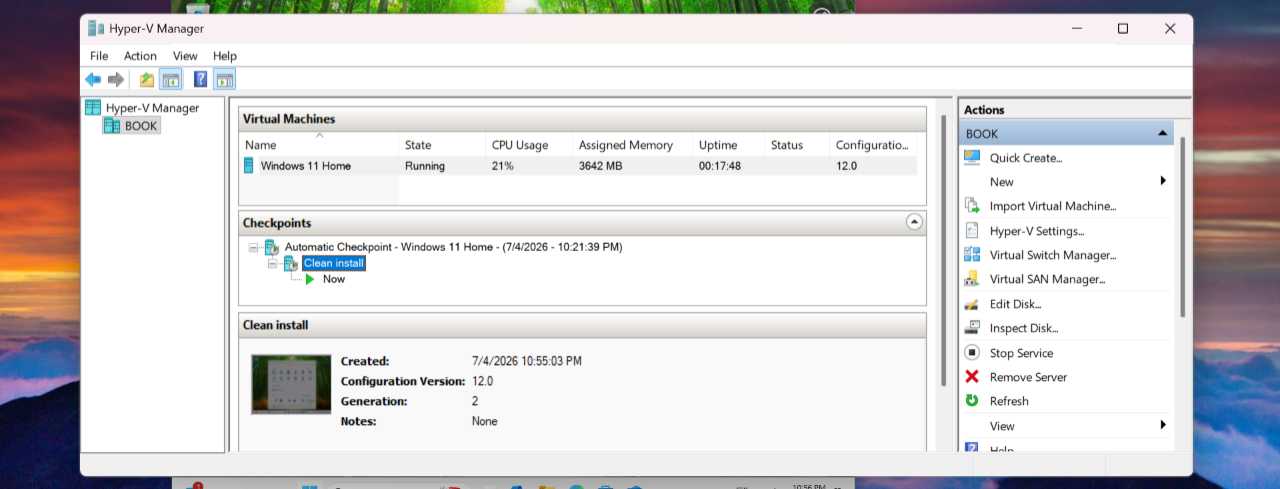
You will be prompted to apply the selected checkpoint. (And Hyper-V will offer to create a new checkpoint so you can get back to the present, so to speak, if the change doesn’t work out.)
Configure a VM’s settings
Each VM has its own custom settings, some of which you configured when you first created it. But you can customize these settings at any time if needed.
Tip: Well, not at any time: Many VM settings can only be configured when the VM is not running. So make sure to shut down the VM first.
To access the settings for a VM, right-click it in Hyper-V Manager and choose “Settings.” The VM Settings window appears.
Some key settings to consider include:
- Boot order. As with firmware settings on a real PC, you can configure the order in which boot devices are checked to start up the operating system. This happens in Settings > Hardware > Firmware.
- Security. You can determine whether Secure Boot and Trusted Platform Module (TPM) are supported in Settings > Hardware > Security.
- RAM. To change how much RAM is allocated to the VM, visit Settings > Hardware > Memory. If you enabled dynamic memory, which you should, you can also specify the minimum and maximum amounts of RAM the VM can use.
- Storage. Every VM gets a single virtual hard drive (VHD), but you can add more–or add a DVD drive (which can be an ISO file) or shared drive–in Settings > Hardware > SCSI Controller.
- Automatically start the VM when the PC starts. By default, Hyper-V VMs won’t run until you tell them to. But if you are going to use a VM all the time for whatever reason and want it to start up automatically when you sign in to Windows, you can configure it to do so in Settings > Management > Automatic Start Action.

Gain unlimited access to Premium articles.
With technology shaping our everyday lives, how could we not dig deeper?
Thurrott Premium delivers an honest and thorough perspective about the technologies we use and rely on everyday. Discover deeper content as a Premium member.