Multitasking
- Paul Thurrott
- Jul 08, 2026
-
0
Multitasking
Windows 11 offers a rich set of multitasking features like Clipboard, Alt + Tab, Task view, Snap, Do not disturb and Focus, Task Manager, and Desktops.
Clipboard
The Windows Clipboard allows you to share information stored in one app–the source app–with a second app–the destination app–using well-understood copy, cut, and paste operations. It has evolved over the years to include rich text formats including those supported by Microsoft Office applications and multiple graphics formats. And File Explorer uses Clipboard-based copy, cut, and paste operations for copying and moving files between different locations in the file system.
Defaults
The Clipboard can only hold a single item by default, and it exists solely in RAM, so it is not persistent and will not survive a reboot. That item is stored in multiple formats when necessary, however, for maximum compatibility. For example, if you copy or cut formatted text from a Microsoft Word document, that item is stored in the Clipboard in multiple formats so that it can retain its formatting or be pasted as plain text, depending on the destination application.
Customize
Windows 11 provides the most advanced version of Clipboard yet. In addition to supporting all the functionality you remember from previous Windows versions, you can also enable a Clipboard history feature to store multiple items in the Clipboard at once and sync Clipboard text between multiple PCs.
Tip: Cross-device Clipboard sync requires you to sign in to Windows 11 with a Microsoft account.
Use Clipboard history to copy multiple items to the Clipboard
To help overcome the Clipboard’s most obvious limitation–it can hold only a single item at a time–Windows 11 provides an optional Clipboard history feature that lets you save multiple items to the Clipboard.
Enable Clipboard history
To enable Clipboard history, open the Settings app and navigate to System > Clipboard.
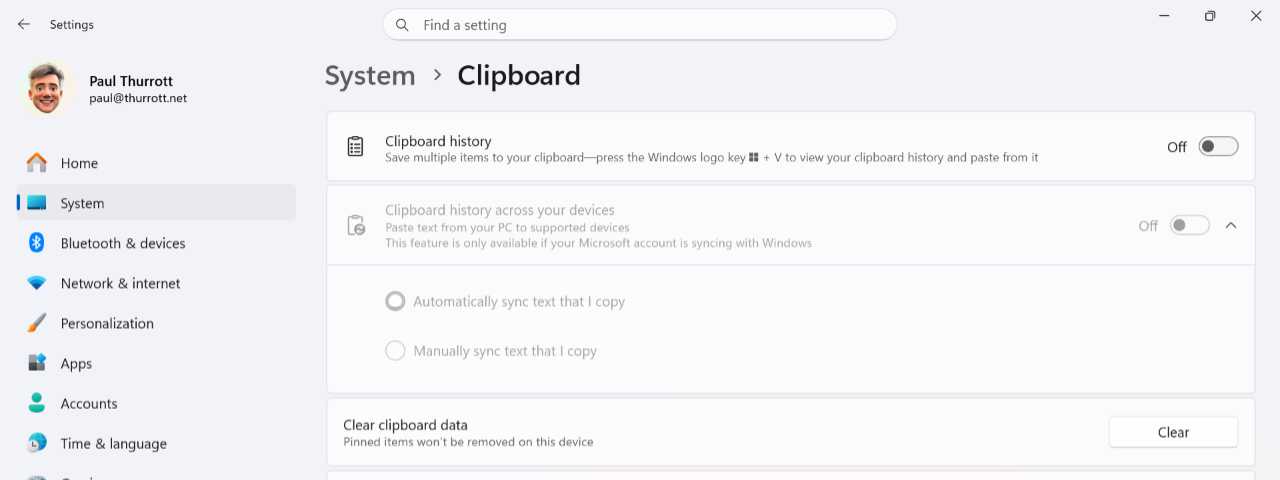
Then, configure the setting “Clipboard history” as “On.”
Keyboard shortcut: Alternatively, you can simply type Windows key + V, the keyboard shortcut used to paste one of multiple items stored in Clipboard history; if this feature isn’t yet enabled, the Clipboard history window will appear and present a “Turn on” button so you can enable this feature.
Now, when you copy something to the Clipboard, it will be added to the Clipboard without replacing whatever was in the Clipboard previously. But there are a few caveats:
- Clipboard history can store up to 25 items
- Those items can be text, HTML, and bitmap graphics only
- Each item must be 25 MB or smaller
The Clipboard will still work normally with items that do not meet those criteria. But unsupported items will not appear in Clipboard history.
Use Clipboard history
With Clipboard history enabled, normal paste operations will work as before: If you use the Ctrl + V keyboard shortcut, for example, Windows 11 will paste the most recent item that was added to the Clipboard.
But now you can use the new Windows key + V keyboard shortcut to display the Clipboard history window so you can choose which item to paste.
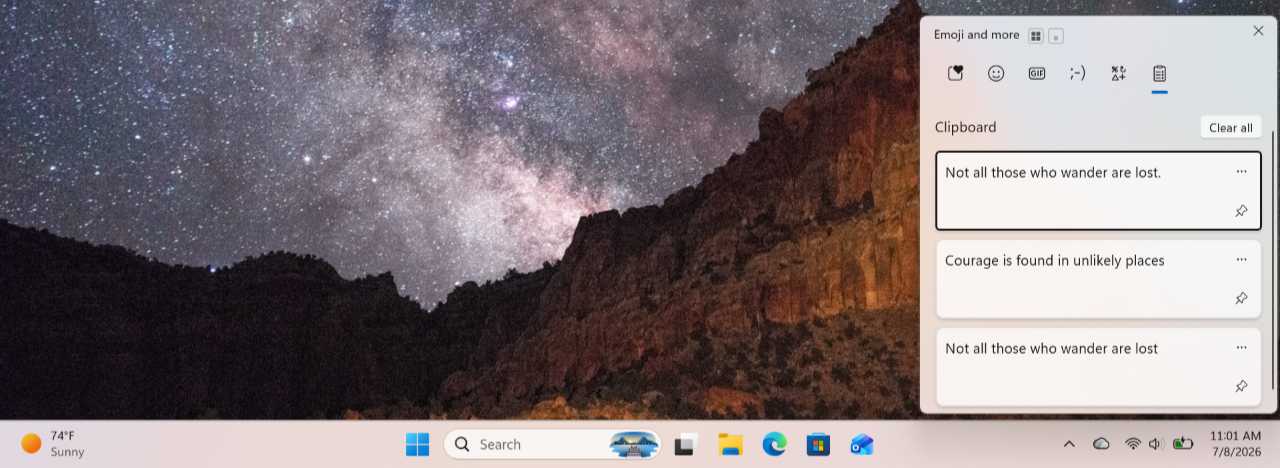
Using this pop-up window, you can select from the items that are available in the Clipboard. In this example, there are three items, all of which are plain text. (Each is a quote from J.R.R. Tolkien.)
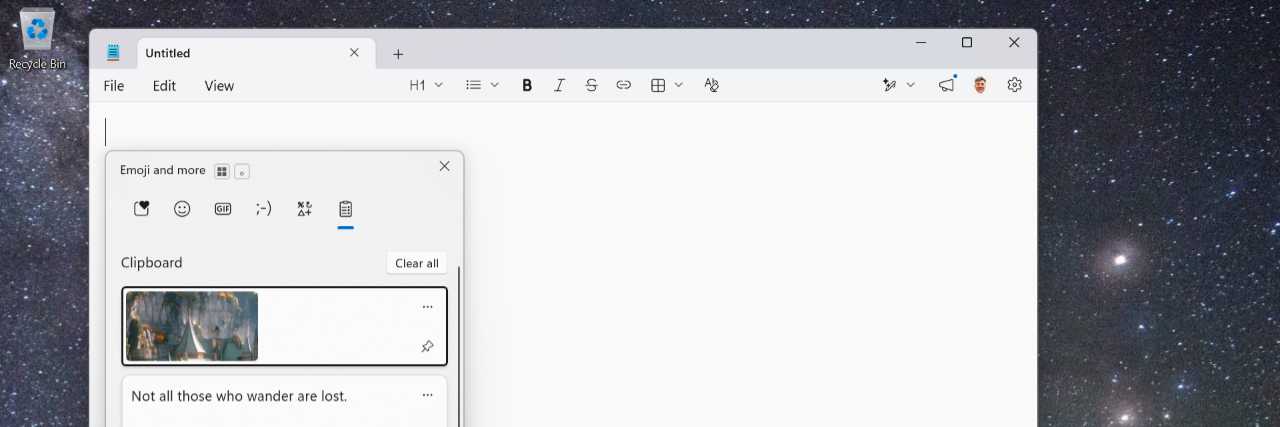
Because the Clipboard works differently with different types of items and with different apps (each of which has its own capabilities and limitations), what you see here–and what you can paste–may vary. For example, if you copy an image from Microsoft Paint to the Clipboard and then try to paste it to Notepad, a plain text editor, you will see that the graphic appears in Clipboard history, even though you can’t paste it into Notepad.
Do more with Clipboard history
In addition to basic copy and paste operations, Clipboard history supports some other useful features. They are:
- Pin item. If you find yourself pasting one of the items in Clipboard history repeatedly, you can pin it so that it remains in Clipboard history, won’t be overwritten, and will even survive reboots. To do so, open Clipboard history, find the item you wish to pin and then click its “Pin item” (pushpin) icon.
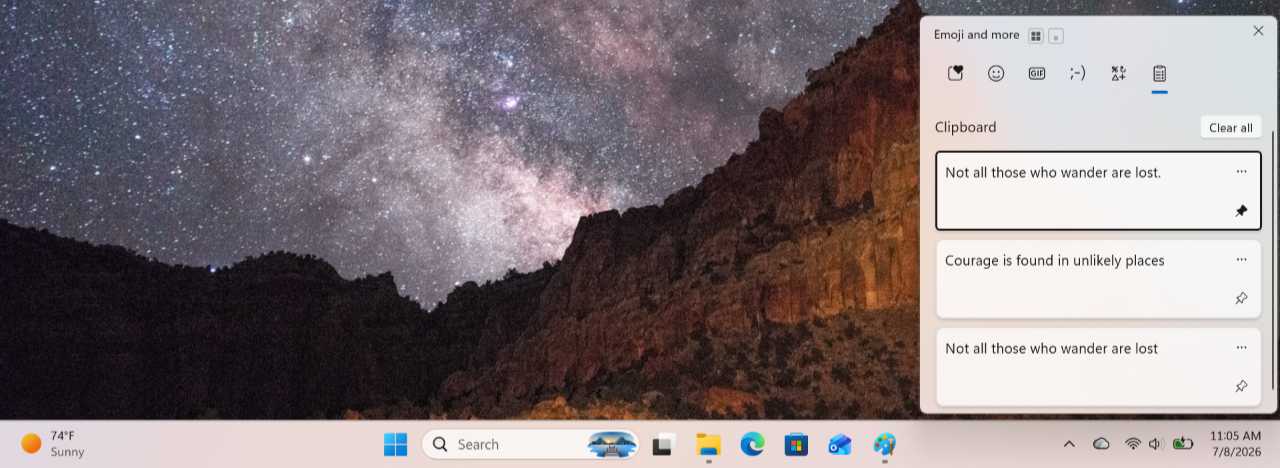
Tip: Yes, you can pin multiple items to Clipboard history.
- Paste item as text. The Clipboard supports multiple text formats, including rich text like that created by Microsoft Word. If you want to ensure that text stored in Clipboard history is pasted as plain text, select its “See more” link (“…”) and then the “Paste as text” (clipboard) icon that appears.
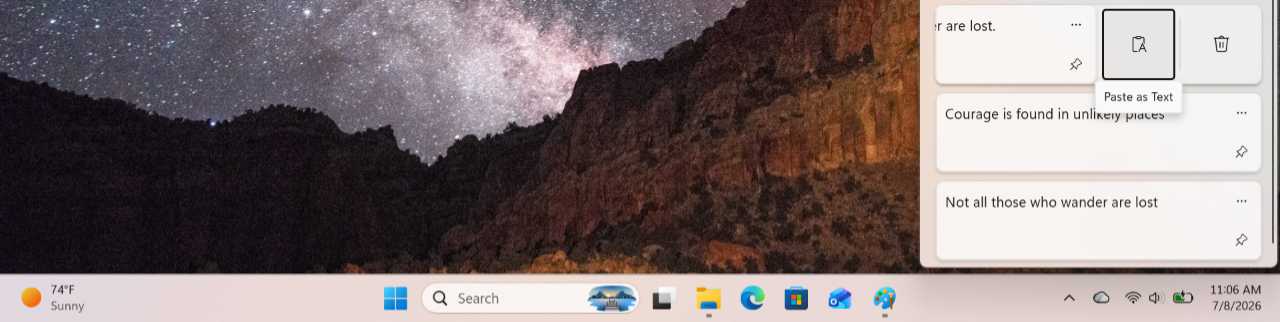
- Delete item. To remove an item from Clipboard history, select its “See more” link (“…”) and then the “Delete” (trashcan) icon that appears.
- Delete all items. To remove all the items from Clipboard history, select the “Clear all” button in the Clipboard history window.
Sync the Clipboard across your PCs
Windows 11 supports a feature that lets you copy text to the Clipboard on one PC and then paste it on another PC. This feature is not enabled by default, and you have to enable it on each PC you intend to use.
Tip: This feature requires Clipboard history to be enabled, and it requires you to sign in to Windows 11 with a Microsoft account.
To enable Clipboard history sync, open the Settings app, navigate to System > Clipboard, and configure “Clipboard history across your devices” to “On.”
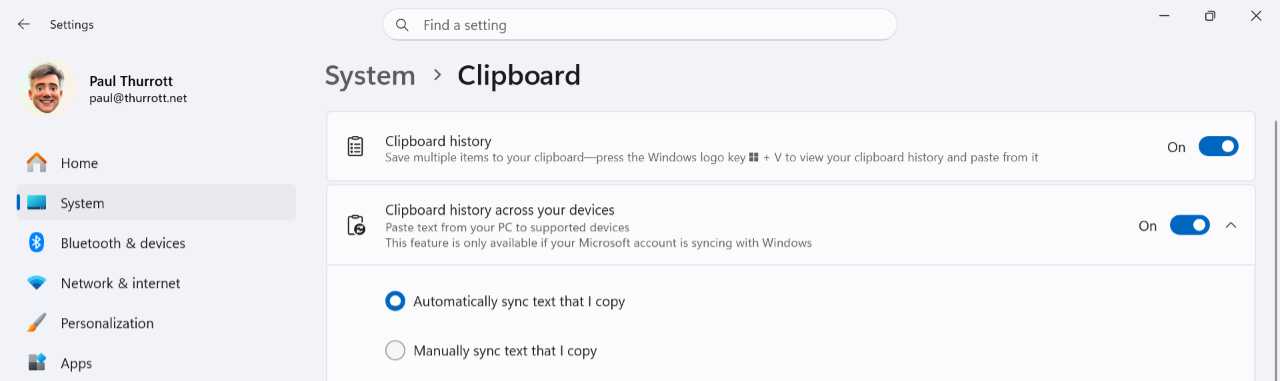
If you expand that item, you can see that “Automatically sync text that I copy” is enabled. You can switch this to a manual sync, but automatic syncing is generally the better choice.
Alt-Tab
Alt-Tab is the simplest and oldest form of multitasking between apps and other windows in Windows. It works much as it always has in Windows 11: There’s no graphical interface for launching this feature, so you have to hold down the Alt key and then tap Tab to do so. When you do, a grid of app and window thumbnails appears in a window that displays on top of all other windows.
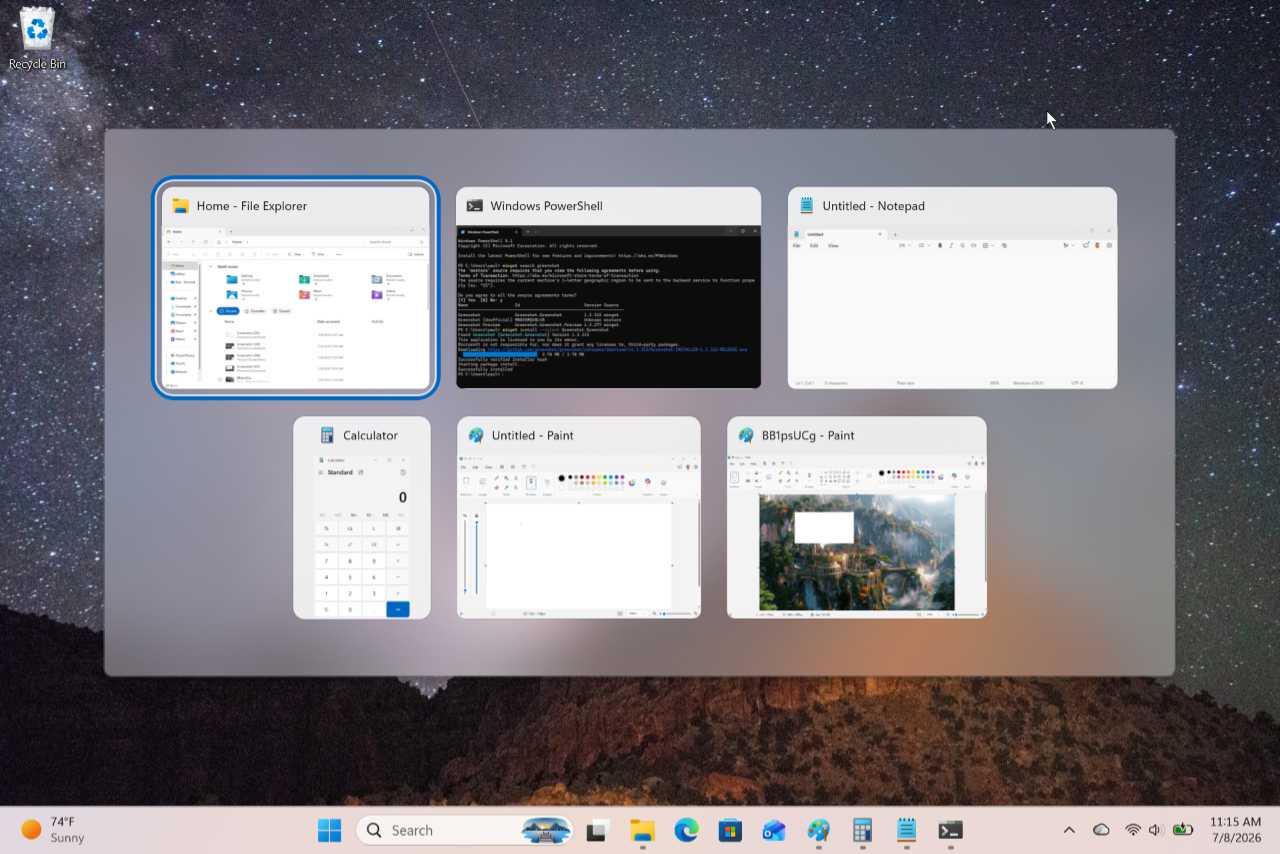
Tip: If you have a laptop with a touchpad that supports gestures, you can also display Alt + Tab by swiping
Defaults
By default, Task view is configured so that snapped apps and windows appear in Task view twice, once for the snapped window group and once for the standalone app window, so you can switch to either.
- Alt + Tab doesn’t just display open app and window thumbnails by default, it also displays the three most recent tabs you accessed in Microsoft Edge.
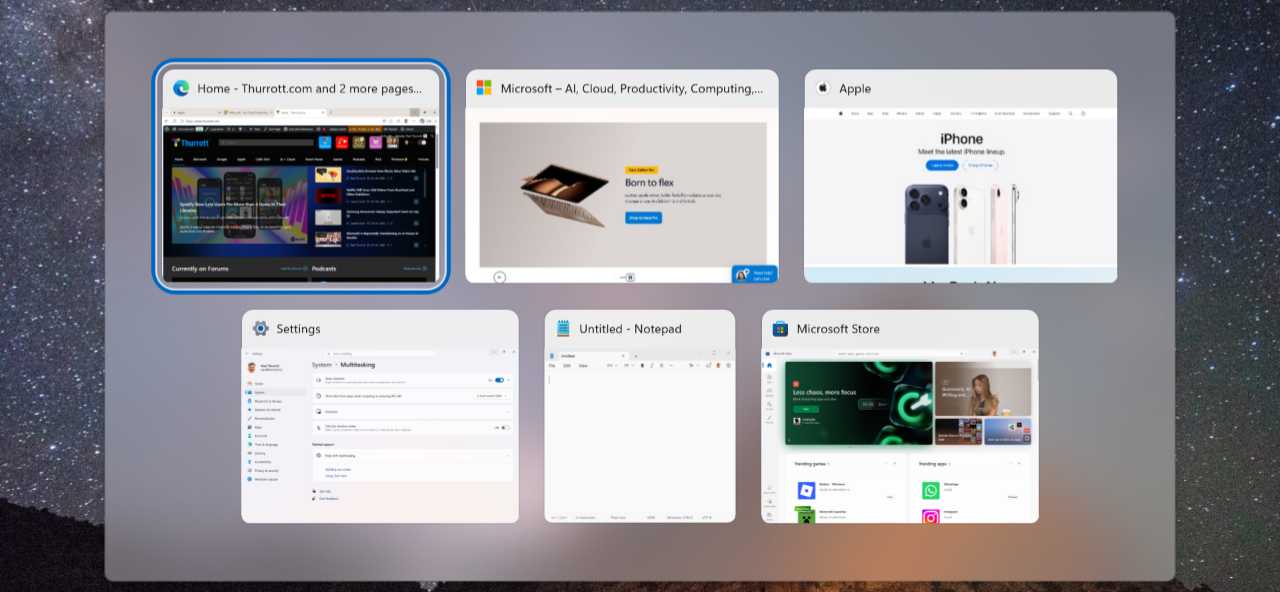
- If you are using multiple Desktops–the Windows 11 term for virtual desktops–Alt-Tab will display only those apps and windows (and Edge tabs) that are open on the current desktop.
Customize
You can customize some Alt-Tab behaviors in the Settings app. Navigate to System > Multitasking to see the available options. Key options include:
- Snap windows > Show my snapped windows when I hover over taskbar apps, in Task View, and when I press Alt+Tab. If you don’t want to see snapped window groups in Alt + Tab, you can disable this option.
- Show tabs from apps when snapping or pressing Alt+Tab. If you use Microsoft Edge and like being able to access individual tabs in Alt-Tab, you can configure this so that Alt + Tab displays the most recent 3, 5, or 20 Edge tabs. If you do not want to see Edge tabs in Alt + Tab, you can configure this to “Don’t show tabs.”
- Show all open windows when I press Alt + Tab. This isn’t immediately obvious, but this setting determines whether Alt + Tab displays open apps and windows from all desktops or from just the current desktop.
Use Alt-Tab to switch between open windows
When you open Alt-Tab, the thumbnail for the next window in the z-order–the list of available apps and other windows, listed in the order in which they were most recently accessed–is selected. (Put another way, the window you most recently accessed is selected.) So you can quickly switch to this window by letting go of the ALT key. Alt-Tab closes when you do so.
Indeed, you can quickly toggle between the two most-recently-accessed windows by repeatedly typing ALT + TAB.
To select another app or window, hold down the Alt key, and then repeatedly tap the Tab key. As you do so, the selection will change. When the app or window you want is selected, release the Alt key and that will jump to the forefront.
Tip: You can also type Alt + Shift + Tab to move through the Alt-Tab z-order in reverse.
Task View
Task view works much like Alt-Tab in that it lets you switch between open apps and other windows (i.e. “tasks”). But it offers some key advantages over Alt-Tab as well. It’s persistent and doesn’t require the same keyboard gymnastics. It can be accessed by mouse using a handy Taskbar item. And it also lets you access Windows 11’s virtual desktop feature, called Desktops.
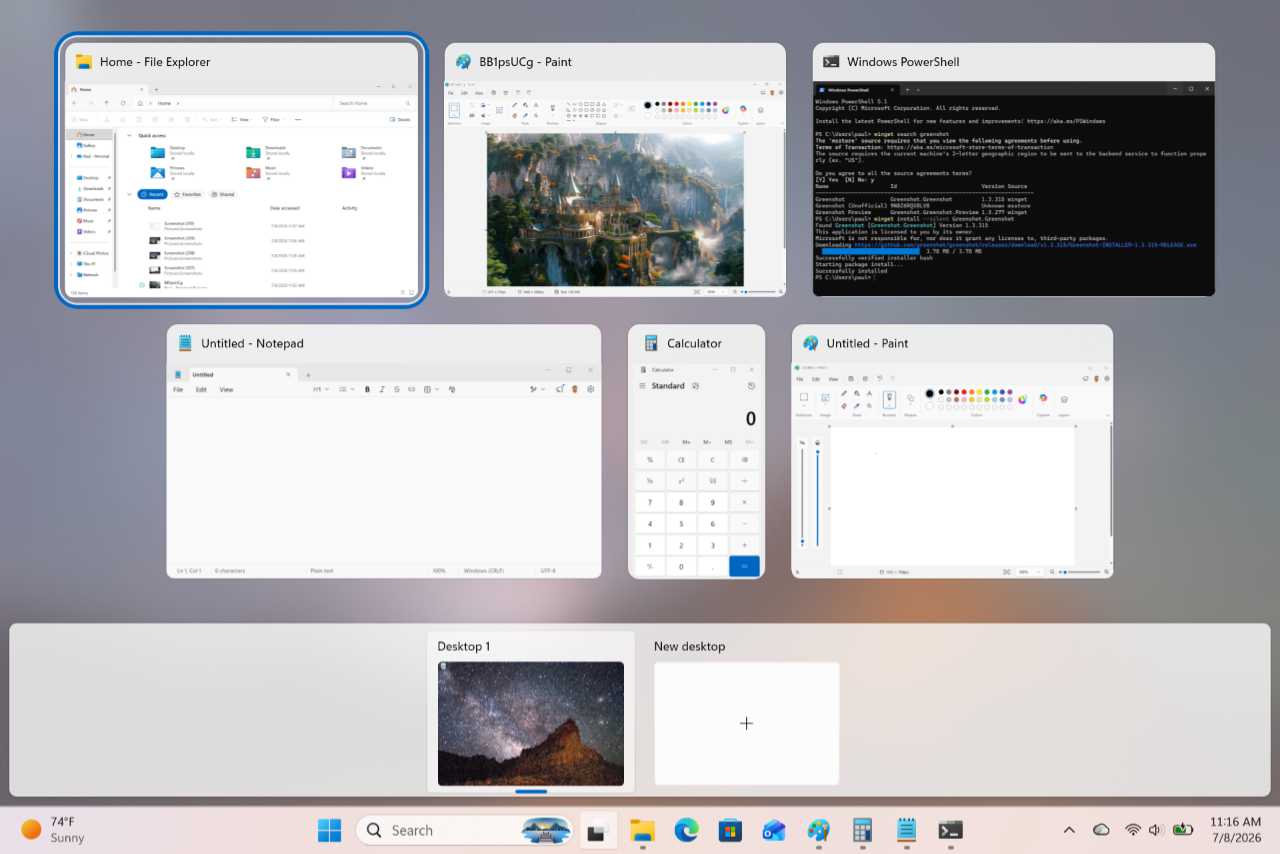
Tip: Task view is curiously missing one key feature that’s available in Alt-Tab: While Alt-Tab can be configured to display individual Microsoft Edge tabs, Task view cannot. Instead, you will see a single thumbnail for Microsoft Edge in Task view.
To open Task view, click the Task view item in the Taskbar.

Keyboard shortcut: You can also type Windows key + Tab to display Task view.
Task view displays an Alt+Tab-like switcher at the top, with thumbnails representing each open app and window. But there is also a Desktops pane on the bottom for accessing any available virtual desktops or creating a new virtual desktop.
Defaults
By default, a Task view icon appears on the Windows 11 Taskbar. Task view is configured so that snapped apps and windows appear in Task view twice, once for the snapped window group and once for the standalone app window, so you can switch to either. And if you are using multiple Desktops–the Windows 11 term for virtual desktops–Alt-Tab will display only those apps and windows (and Edge tabs) that are open on the current desktop.
Customize
To determine whether a Task view item appears on the Taskbar, open Settings and navigate to Personalization > Taskbar. You can configure the “Task view” option under “Taskbar items” to “Off” to remove this item from the Taskbar. Which isn’t a horrible idea if you can remember the Windows key + Tab keyboard shortcut and want to save some space on the Taskbar.
As with Alt-Tab, you can also customize some Task view behaviors in the Settings app by navigating to System > Multitasking to see the available options. Key options here include:
- Snap windows > Show my snapped windows when I hover over taskbar apps, in Task View, and when I press Alt+Tab. If you don’t want to see snapped window groups in Task view, you can disable this option.
- Show all open windows when I press Alt + Tab. This setting determines whether the thumbnails at the top of Task view display open apps and windows from all desktops or from just the current desktop.
Use Task view to switch between open apps and windows
Task view displays bigger thumbnails than Alt-Tab for some reason. But there’;s still a selection rectangle and Task view handles the z-order similarly: The currently focused window is first in the grid of thumbnails, followed by the other most-recently-accessed windows in order.
To switch to another open window, simply click the appropriate thumbnail. Task view closes when you do so.
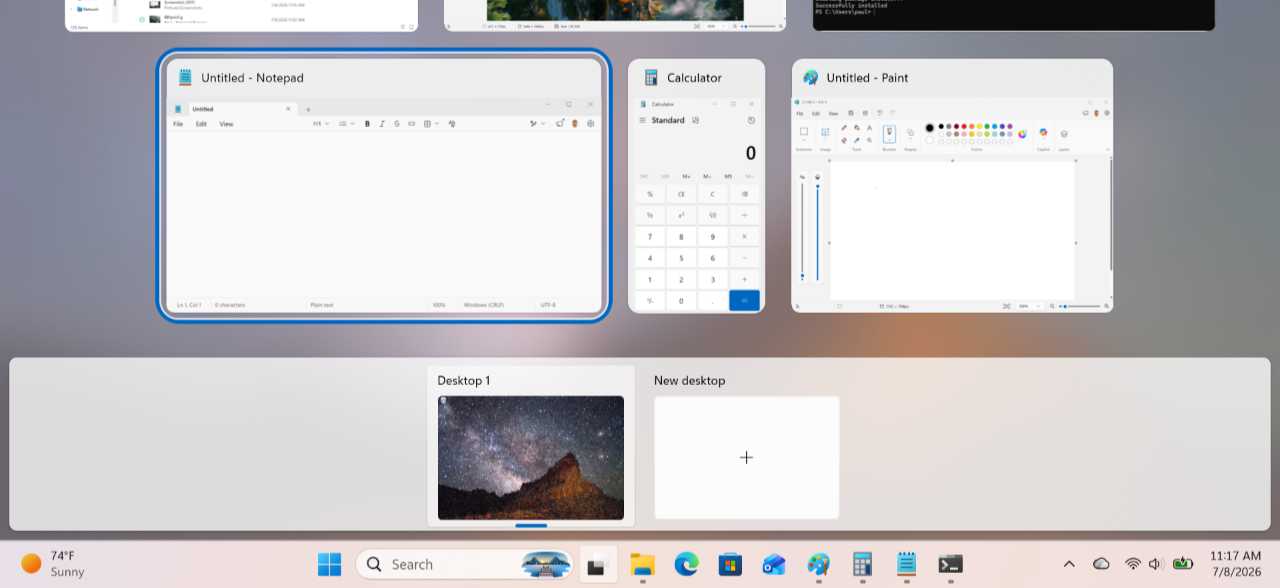
Keyboard shortcut: If you like using the keyboard, you can use the Arrow keys to navigate through the available app and window thumbnails. Then, tap Enter or Space to switch to the selected window.
Snap
Snap is a set of Windows 11 features that helps you organize how your open apps and other windows appear on-screen. In its simplest configuration, you can snap two windows side-by-side, with each window occupying 50 percent of the screen.
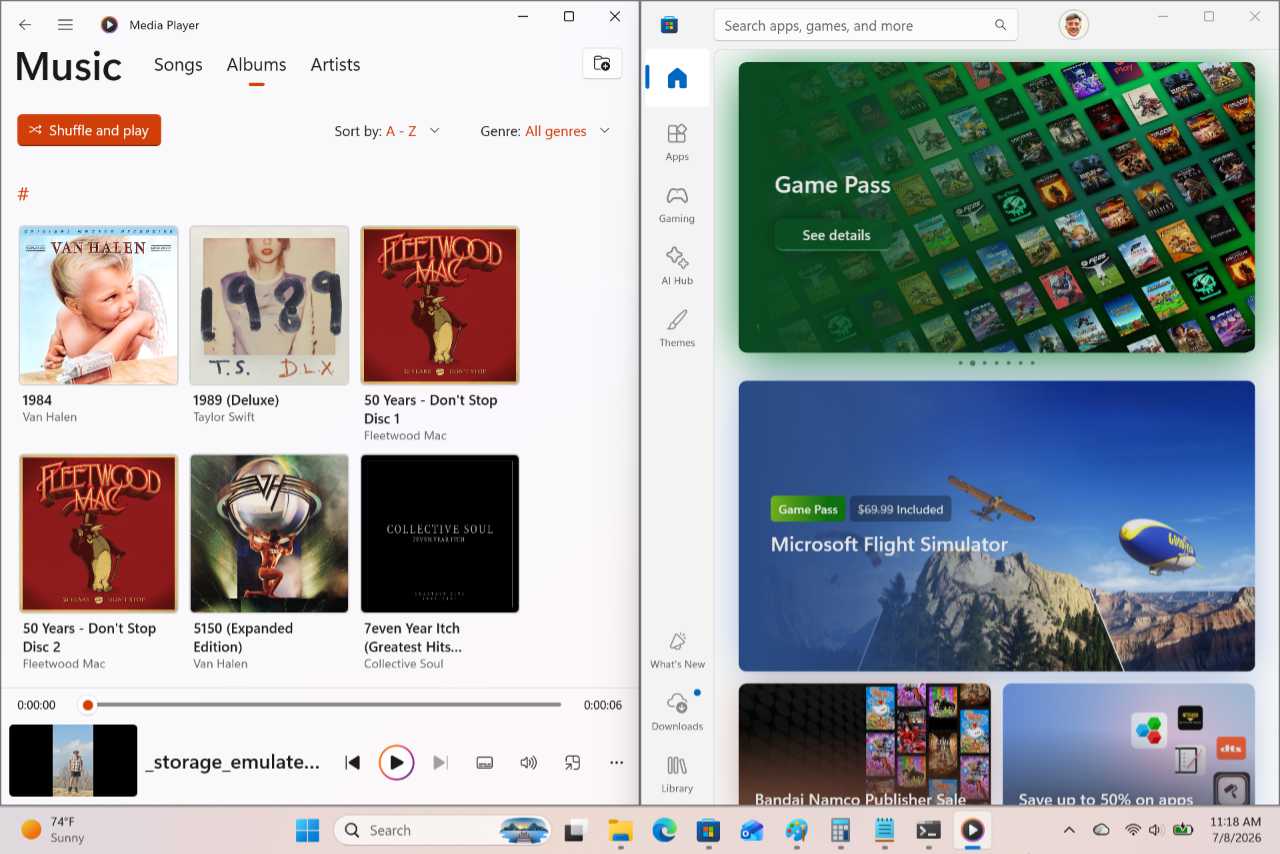
But Snap also lets you position three, four, or more windows on-screen in interesting layouts.
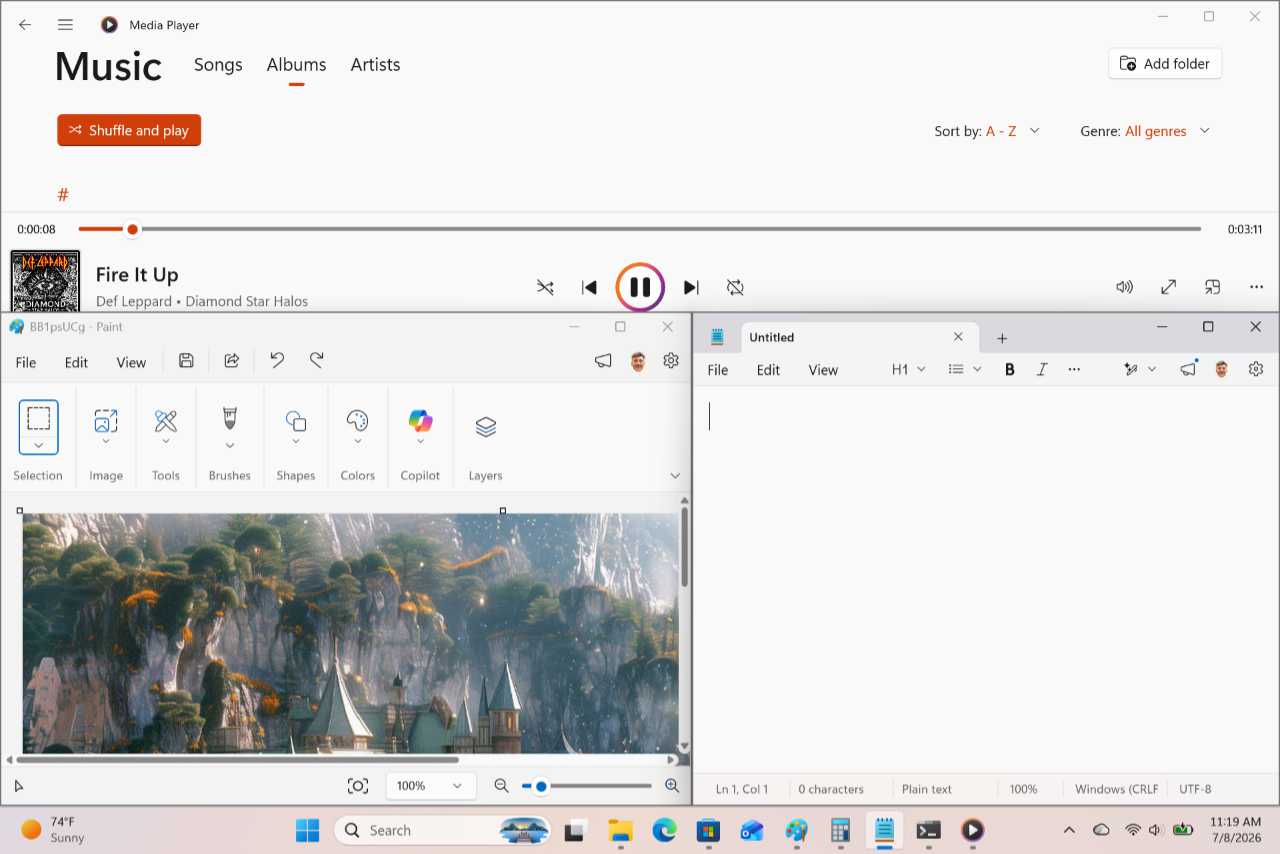
The possibilities are only limited by your display’s capabilities–including its resolution, scaling, physical size, and orientation–and your needs. If you have a higher resolution display or have configured display scaling to a smaller value, you may be offered additional layout options.
There are four primary Snap features:
Snap. This is used to snap an open window to a screen edge or corner, and to maximize and minimize a window.
Snap suggestions. When you snap one window, Windows 11 will suggest other windows you can snap in the remaining space.
Snap layouts. This feature is used to determine how multiple windows will be arranged on-screen, and it displays layout suggestions based on which apps are currently open.
Snap assist. After you’ve snapped a window directly or with Snap layouts, Snap assist helps you position the other window(s) you will snap into the on-screen layout.
Snap groups. This feature helps you return to previously created Snap layouts.
Defaults
Snap is configured in the following ways by default:
- Snap suggestions appear on-screen when you snap a window.
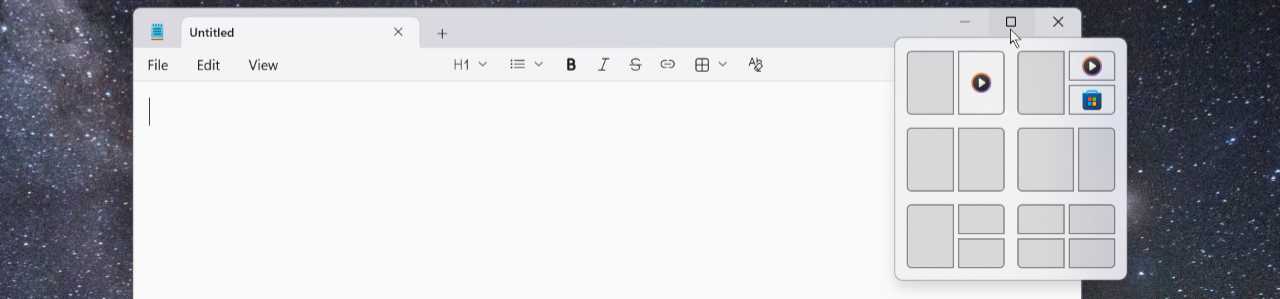
- A Snap layouts pop-up appears when you mouse-over a window’s “Maximize” button.
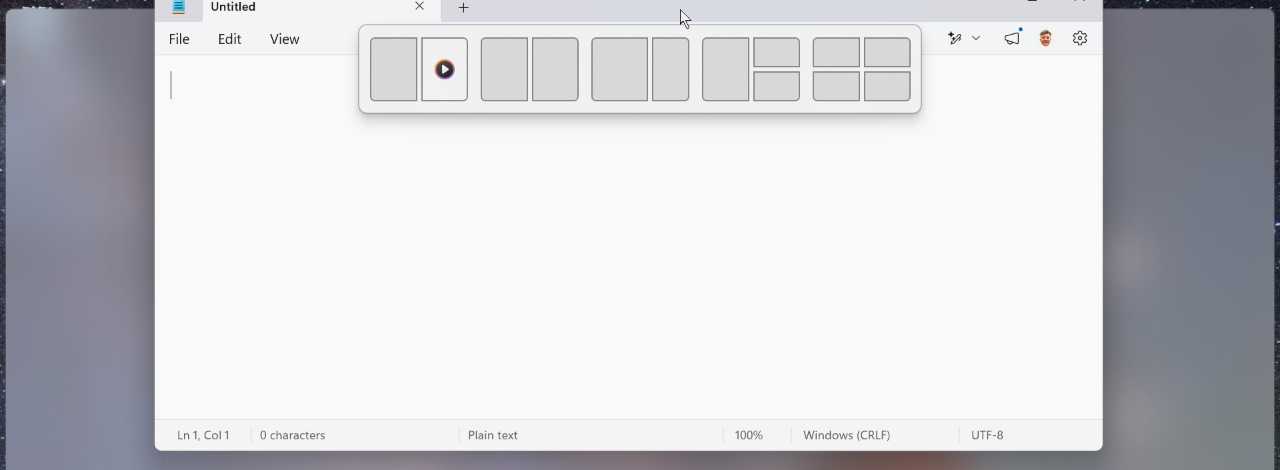
- You can access a Snap bar with Snap layouts options when you drag a window towards the top of the display with the mouse.
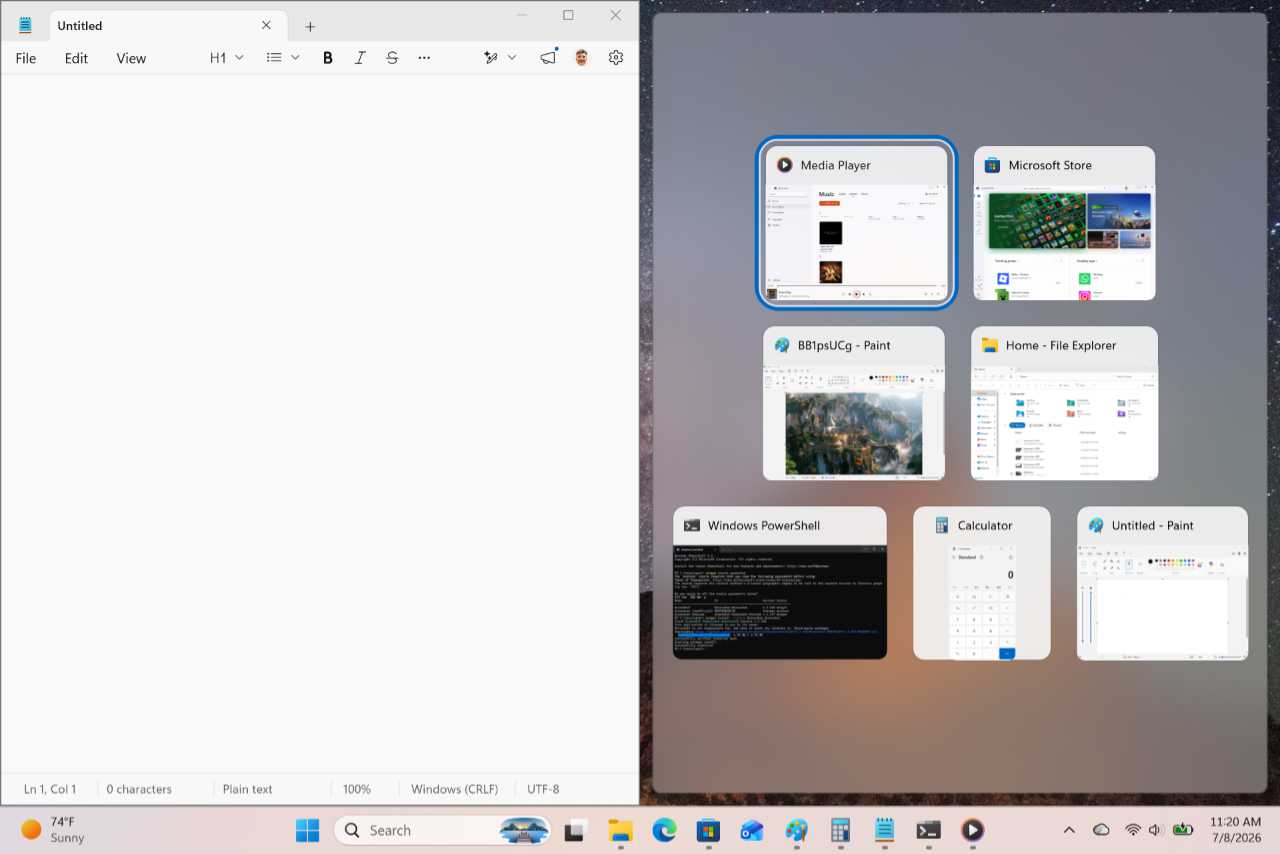
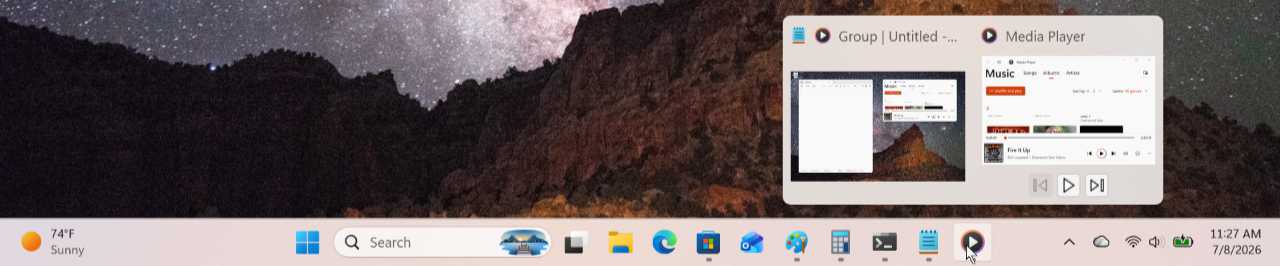
- Snapped window groups appear in Alt-Tab, Task view, and when you mouse over the Taskbar shortcut button for any app in a snap group.
- When you use the mouse to drag a window so that it will be snapped, you can snap it before reaching the screen edge.
Additionally, Snap provides a lengthy list of keyboard shortcuts so you can use various Snap features without taking your hands off the keyboard. Some of the more commonly used keyboard shortcuts include:
- Snap a window to the left side of the display: Windows key + Left arrow
- Snap a window to the right side of the display: Windows key + Right arrow
- Maximize a window: Windows key + Up arrow
- Restore a maximized window: Windows key + Down arrow
- Minimize a window: Windows key + Down arrow
- Display available Snap layouts for the current window: Windows key + Z
Customize
All Snap customization occurs in Multitasking settings: Open the Settings app, navigate to System > Multitasking, and expand the “Snap windows” item so you can see the normally hidden options.
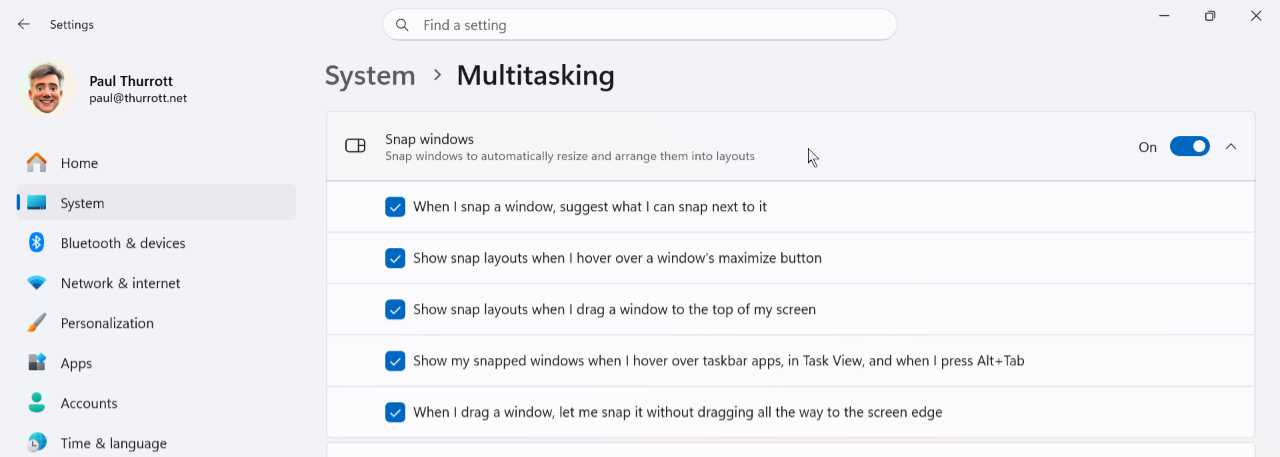
Here, you can configure the following:
- Disable Snap. To disable Snap entirely, just configure the “Snap windows” setting to “Off.”
- Disable individual Snap features. The several options you can see when you expand the “Snap windows” item let you configure individual Snap features on or off. For example, if you want to disable the Snap bar, which I find annoying, configure “Show snap layouts when I drag a window to the top of my screen” to “Off.”
- Determine whether Snap can access individual Microsoft Edge tabs. By default, Snap works with open apps and windows and the three most recent tabs you’ve accessed in Microsoft Edge. But you can configure how many tabs Snap can access or disable this feature entirely by configuring the option “Show tabs from apps when snapping or pressing Alt+Tab.”
Snap windows manually
If you only need to snap two or four windows, you can do so manually using drag-and-drop via your mouse, touchpad, multitouch, or keyboard shortcuts.
Snap two windows side-by-side
To snap a window to either side of the screen, drag it towards one of those screen edges. When you get close, a guide will appear showing where the window will be snapped if you let go of it.
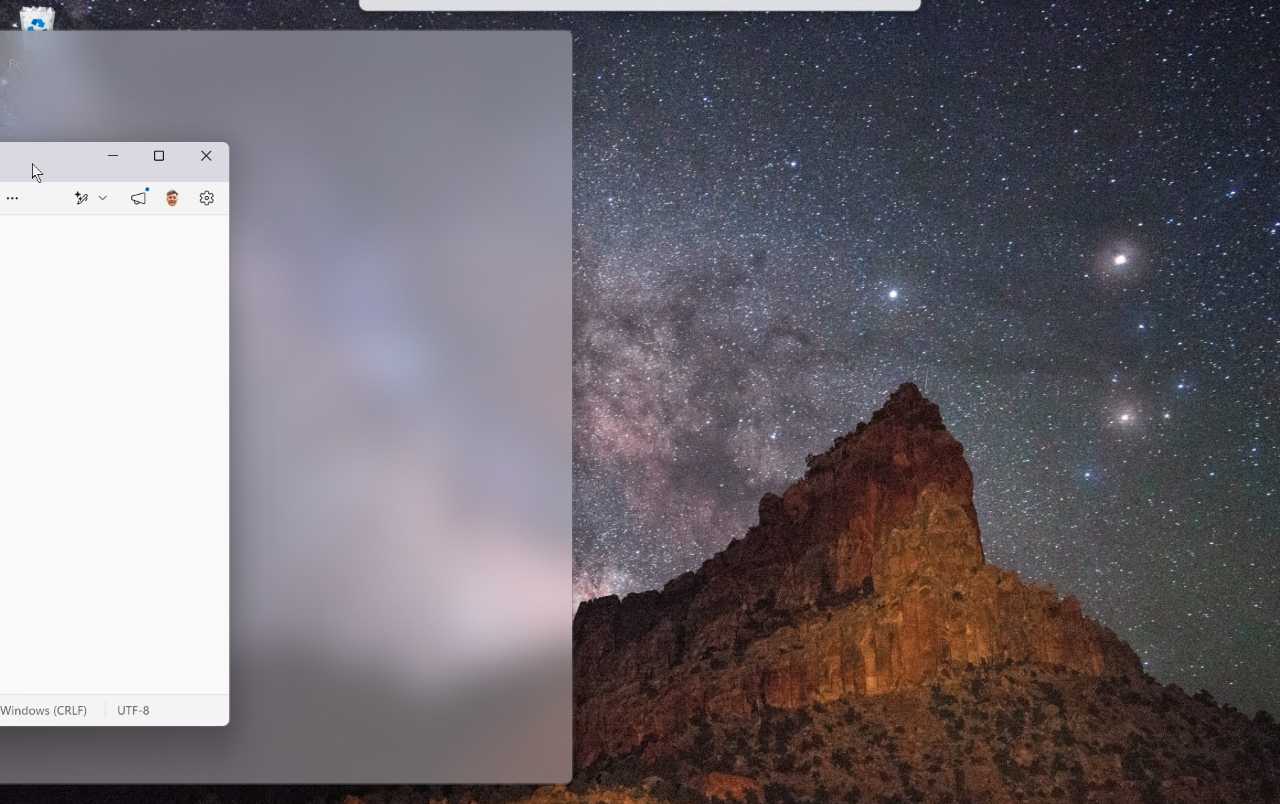
Let go of the window to snap it. When you do, Snap assist jumps in and shows you the other available windows that can be snapped in the remaining space.
Select the window you want and it will snap into place as well. Now you have two windows side-by-side.
Snap four windows
You can also manually snap four windows so that each occupies 25 percent of the Desktop.
To get started, drag a window into one of the screen corners. As with the previous example, a guide appears, in this case showing you that the window can occupy 25 percent of the screen.

When you let go of the window, Snap assist once again appears, but this time it’s in one of the three remaining areas.
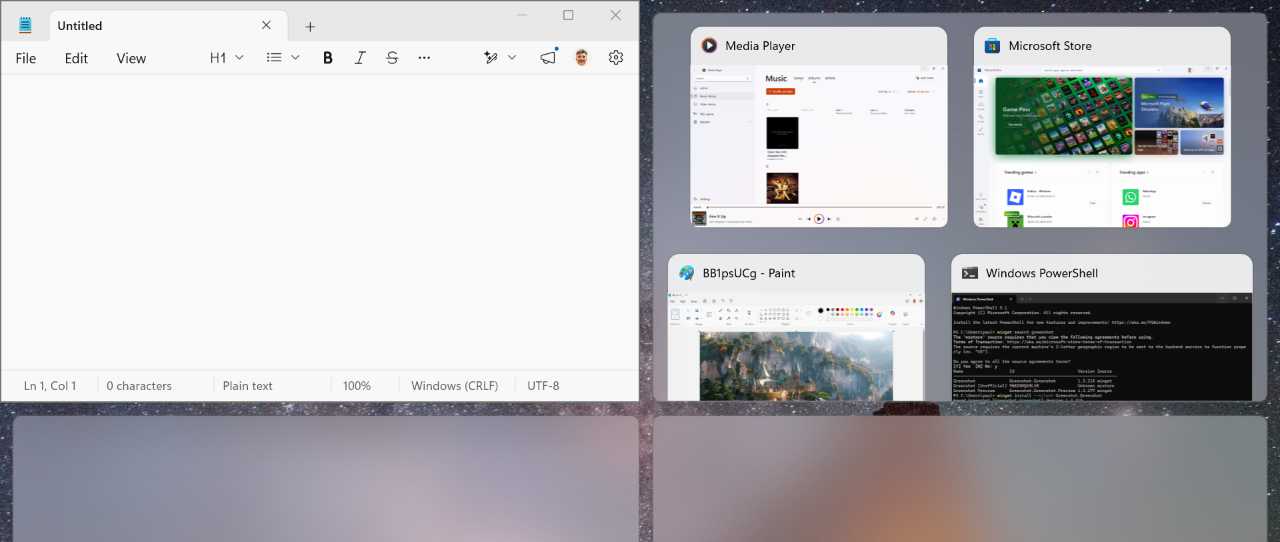
As before, you can simply select the window you wish to occupy that space. The difference is that Snap assist will appear three times, once for each available space in turn.
Use Snap to maximize, restore, or minimize a window
You can also use Snap to maximize or minimize a window.
To maximize a window, drag it to the top edge of the screen and let go when the guide appears, indicating that doing so will result in a maximized window.
Use Snap layouts to arrange windows
Snapping windows manually works well enough, but it only supports a few layouts. For this reason, Microsoft created a feature called Snap layouts that offers the same layouts we just looked at and a few others. These include two-window layouts in which one window is wider than the other and one or more three-window layouts, depending on your screen properties and configuration.
Snap layouts also offers suggestions that will recommend which apps, Edge tabs, and other windows you may wish to use in some layouts.
There are two primary ways to access Snap layouts: By dragging a window or by mousing-over the window controls on a window.
Use Snap layouts by dragging a window
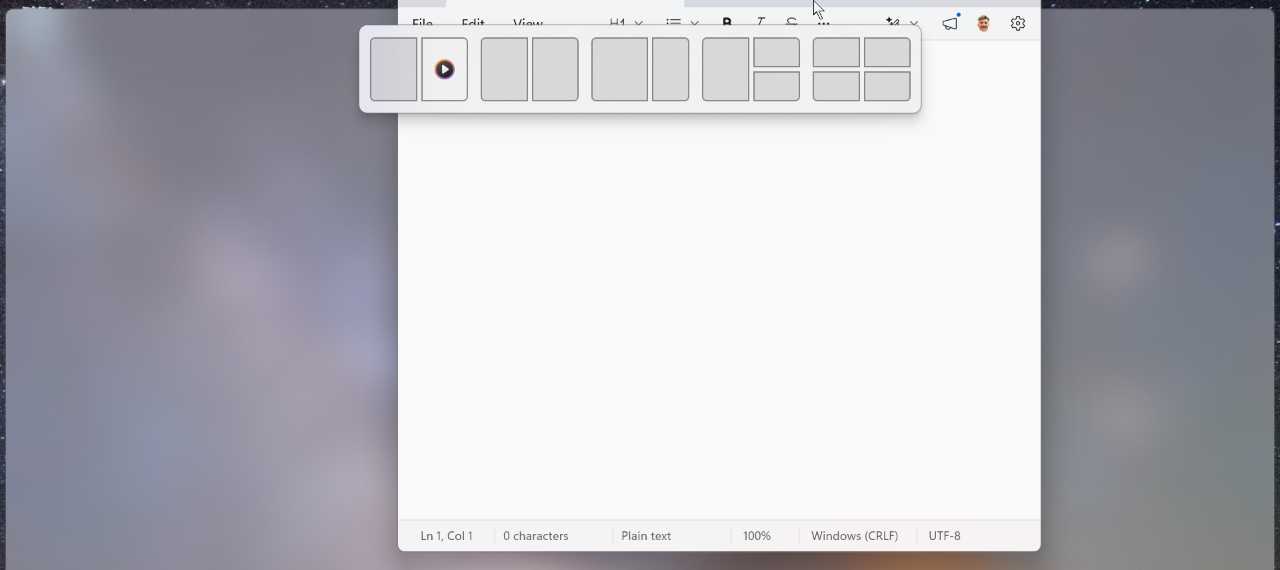
To get started with Snap layouts, grab the first window you wish to snap with the mouse cursor or via touch and move it a bit. When you do, the bottom edge of the Snap bar appears at the top of the screen.

To view the available layouts, drag the window toward the Snap bar. When you get close, it expands and displays available Snap layouts.

If you drag the window over one of the available layouts, a snap area is highlighted and a snap guide appears on-screen to indicate where that window will move when you let go of it.

When the window is in the position you want, let go of it. Then, Snap assist will prompt you to position a window in each of the remaining snap areas provided by the selected layout, as before.
Note that some of these layouts have app suggestions that appear as small icons representing the suggested apps. These work differently than the layouts without suggestions. When you select a suggested layout, all the relevant apps and windows will snap into their respective places in one step.
Use Snap layouts by mousing-over the window controls of a window
You can also access Snap layouts by mousing over the Maximize/Restore window button of the currently focused window. When you do so, a Snap layouts pane appears right there.
The suggestions you see when invoking Snap layouts this way often vary from those the system recommends when you drag the window. But other than that, everything else works as described above.
Use Snap groups to restore a previous layout
After using Snap layouts to arrange two or more windows in a particular layout, you may find that you need to use other apps or windows. And that when you’re done doing so, you want to return to the previous layout you were using. You could manually find and restore each window, of course. Or you can use a feature called Snap groups to restore them all with a single click.
To do so, you must first create a Snap layout with two or more windows. Then, you can minimize one or more of those windows, minimize all windows, open and use one or more other windows, or whatever. Later, you can return to the original layout using Alt-Tab or Task view, as the available layouts will appear in the grid of thumbnails in each alongside each available app or window. Click the group thumbnail to restore the entire layout (that is, to restore all the windows in that layout to their previous positions).
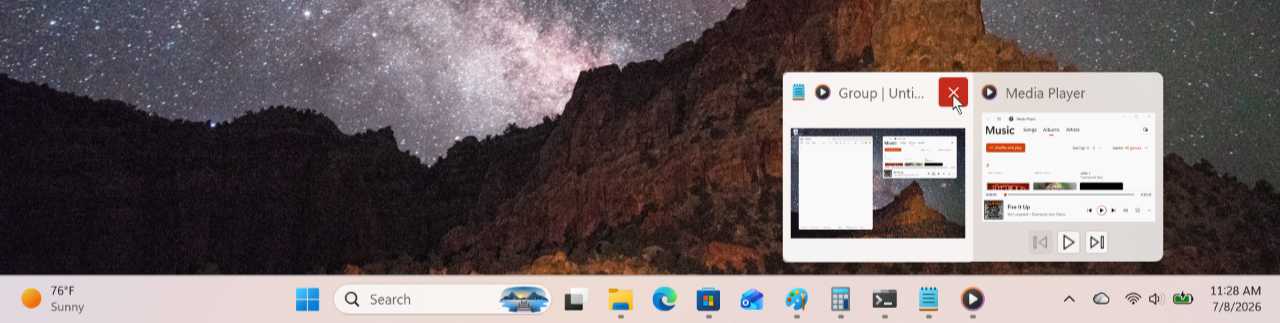
Alternatively, you can mouse-over the Taskbar shortcut for one of the apps or windows that are part of a layout to see a pop-up with two thumbnails, one for the Snap group and one for just that window.
Keyboard shortcut: You can restore a previous layout with the keyboard, too. First, type Windows key + T to display The thumbnail for the first shortcut on the Taskbar. Then, use the Right arrow key to select the correct shortcut, if necessary. Then, tap Up arrow to select the group. Finally, tap Enter to restore it.
Tip: To quickly close a Snap layout and close all its windows, mouse over the Taskbar shortcut for one of its windows and select the Close button in the group thumbnail.
Do not disturb and Focus
Do not disturb and Focus are two related Windows 11 features that are designed to minimize distractions and help us stay focused on our work. The former silences notifications, much like a similar feature on Android and iPhone. And the latter builds on Do not disturb by creating a configurable focus session that also removes other distractions so you can work more effectively.
Do not disturb
Do not disturb silences notifications and sends them directly to the Notifications center. When Do not disturb is enabled, Windows 11 and installed apps cannot display notification banners or play sounds.
Defaults
Do not disturb is typically off by default, but Windows 11 will automatically enable this feature when you’re playing a game, duplicating a display, using an app in full-screen mode, or when you set up Windows 11 for the first time or have just installed an annual feature update. Do not disturb is also enabled when you start a focus session.
There are three visual indicators when Do not disturb is enabled:
- “Do not disturb” (bell) icon appears to the right of the time/date display in the Taskbar.

- The “Do not disturb” button at the top of the Notification center is set to “On.”
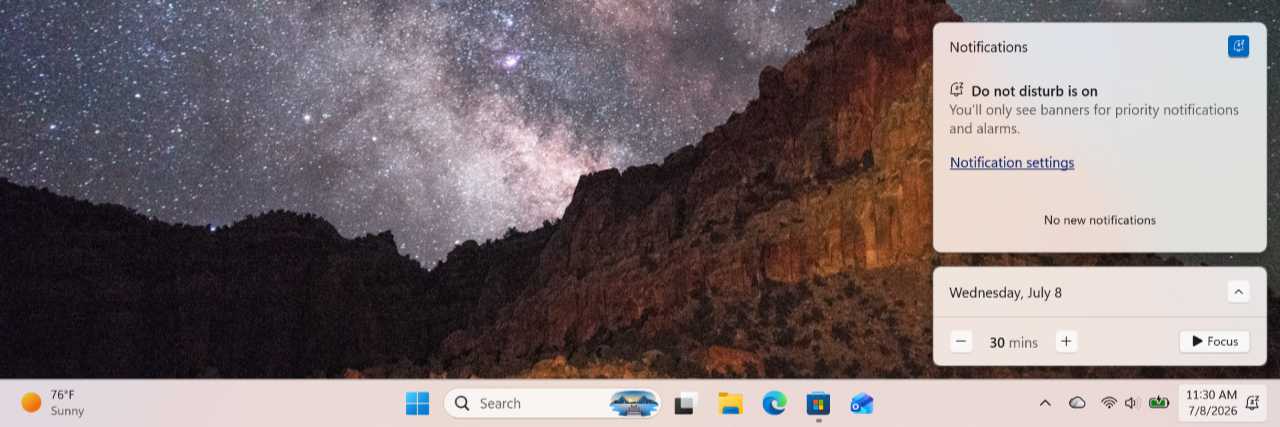
- The “Do not disturb” option in the Settings app at System > Notifications is set to “On.”
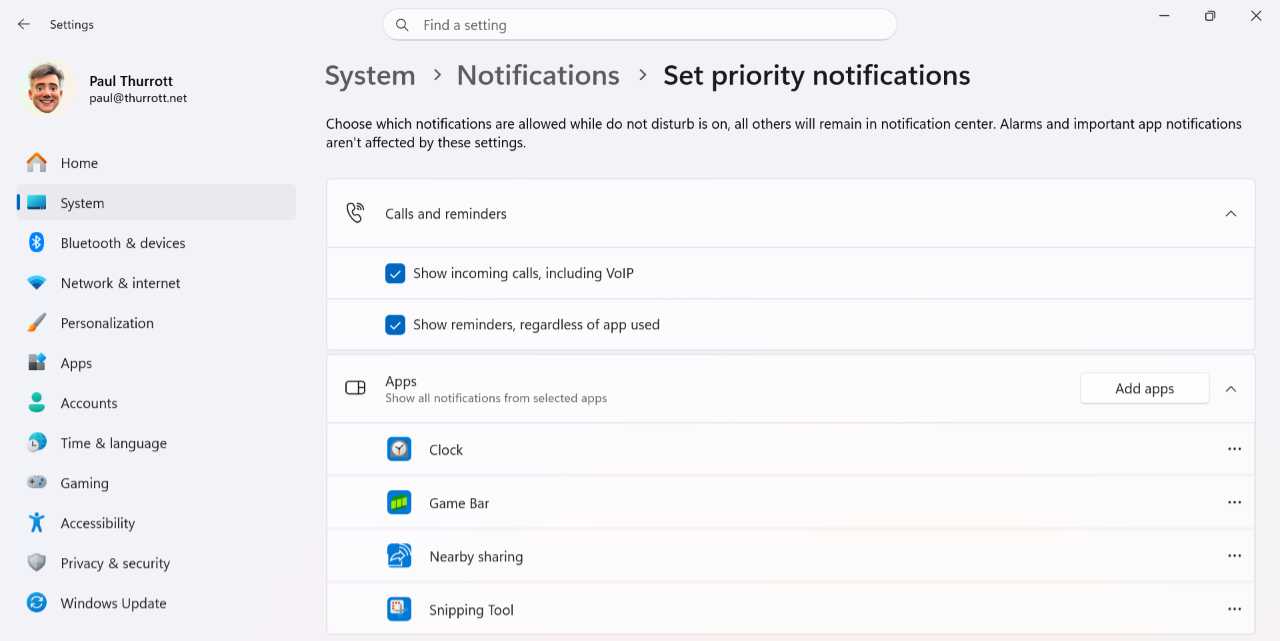
You can toggle Do not disturb on or off manually in the Notification center and in Settings. However it is enabled, Windows 11 will block most banner notifications and sounds and send the former directly to the Notification center. There are exceptions, however: By default, calls and reminders, and notifications from the Clock (for alarms), Game Bar, Nearby sharing, and Snipping Tool apps are configured as priority notifications and are allowed when Do not disturb is on.
Customize
You customize the behavior of Do not disturb in the Settings app by navigating to System > Notifications. Here, you will find several options for this feature:
Notifications. You can use this toggle to disable all notifications in Windows 11, which renders Do not disturb moot.
Notifications > Show notification bell icon. This option is found by expanding the “Notifications” item. When enabled, a “Notification” (bell) icon will always appear next to the time/date display in the system tray in the Taskbar. When there are no pending notifications, this icon takes on an empty shape. And when there are notifications, or when Do not disturb is enabled, the icon changes accordingly.

Do not disturb. You can use this option to manually toggle Do not disturb on or off.
Turn on do not disturb automatically. You can expand this item to determine when Do not disturb is automatically enabled. In addition to the conditions noted earlier, you can use this interface to enable this feature during certain times, which can be useful.
Set priority notifications. This item displays the Set priority notifications page in Settings where you can configure which apps and system services can bypass Do not disturb. You can remove pre-configured options and add new apps to the list.
Focus
Focus builds on Do not disturb by eliminating even more distractions so that you can better concentrate on work. It does so by helping you create a so-called focus session in the Clock app in which Do not disturb is enabled and app icons in the Taskbar will not flash alerts or display badge notifications.
Defaults
Focus is disabled by default, and it remains disabled when Do not disturb is enabled.
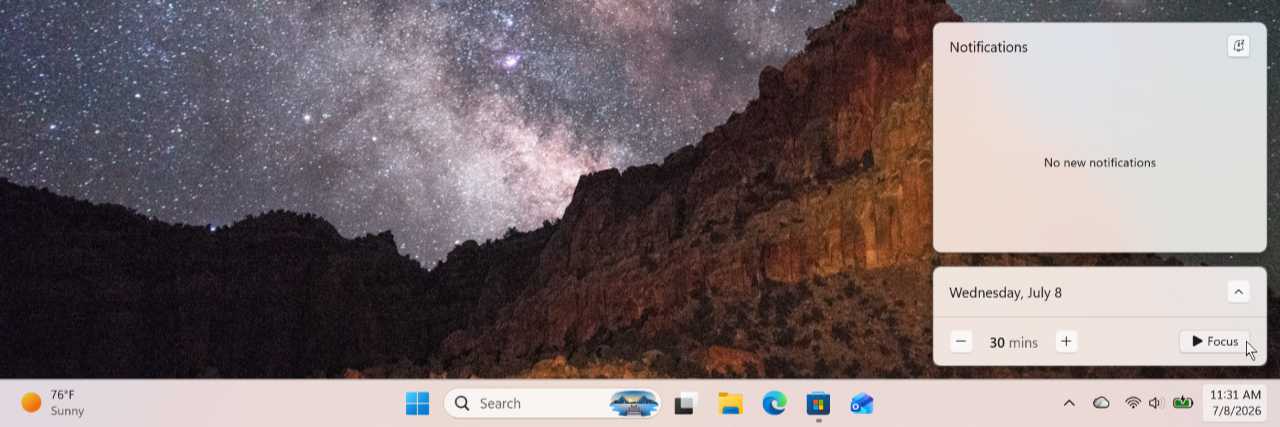
You can start a focus session by:
- Opening the Notification center and clicking the “Focus” button at the bottom of the Calendar pane.
- Opening Focus settings in the Settings app (at System > Focus) and clicking the “Start focus session” button.
- Opening the Clock app and clicking the “Start focus session” button in the default Focus sessions view.
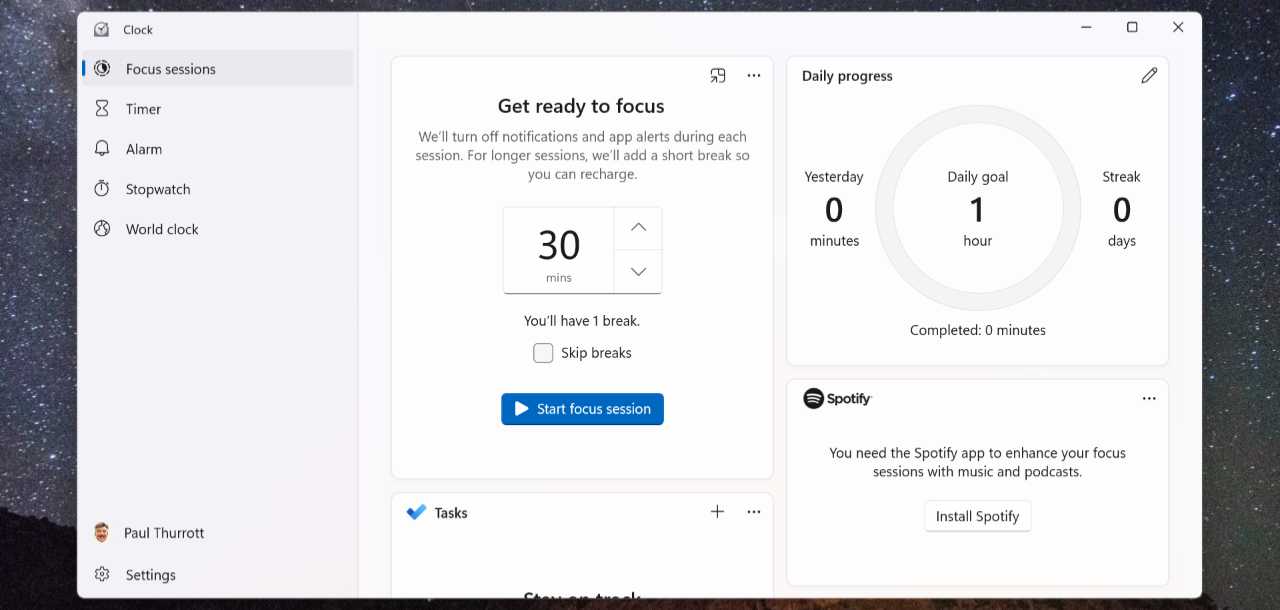
A focus session lasts for 30 minutes.
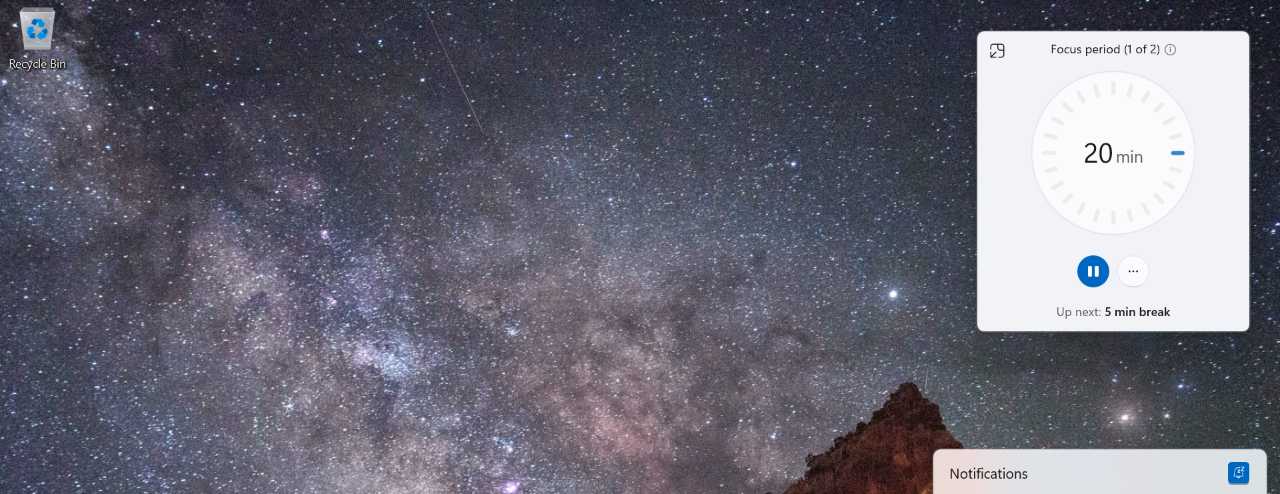
If you start a focus session from the Notification pane or Settings app, the Clock app appears on-screen with a minimalist interface that displays a focus timer–which counts down the remaining time in the session–and “Pause focus session” and “See more” buttons. This window is set to be “Always on top” so that it appears over all other apps and windows, but you can resize this window and move it around on-screen as needed.
If you start a focus session from the Clock app or while that app is running, Clock displays normally and you can check in on the “Focus period” area in the default Focus sessions view as needed.
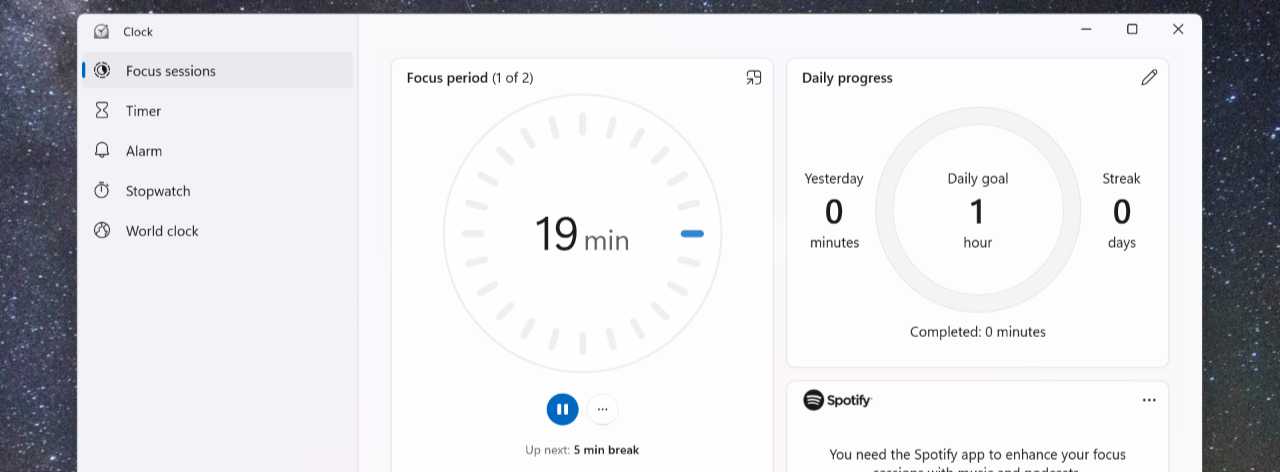
While in a focus session, you can view your progress, pause the focus session, or reset the focus session (after pausing).
Customize
You configure Focus in the Settings app by navigating to System > Focus.
The following options are available here:
- Start focus session. This button is used to toggle a focus session on or off.
- Session duration. The default focus session is 30 minutes, but you can change it to any time frame you prefer.
- Show the timer in the Clock app. This option determines whether the Clock app appears in a minimalist, always on top interface when you enable a focus session.
- Hide flashing on taskbar apps. If you want apps to get your attention by flashing their Taskbar button, you can disable this option.
- Turn on do not disturb. It’s not clear why any would disable Do not disturb while in a focus session, but you can.
You can also customize a focus session using the Clock app. When you launch this app, it displays the Focus session view by default and provides the following options:
- Session duration and breaks. In the “Get ready to focus” area, you can configure the duration of the focus session and whether it will prompt you to take breaks.
- Daily goal. By default, Focus is configured with a daily goal of one hour engaged in a focus session, but you can click the “Edit your daily goal” (pencil) icon in the “Daily progress” area to configure that otherwise.
- Tasks. If you sign in with a Microsoft account, you can integrate your to-do list in the Tasks app and then add tasks or assign tasks to focus sessions in the “Tasks” area.
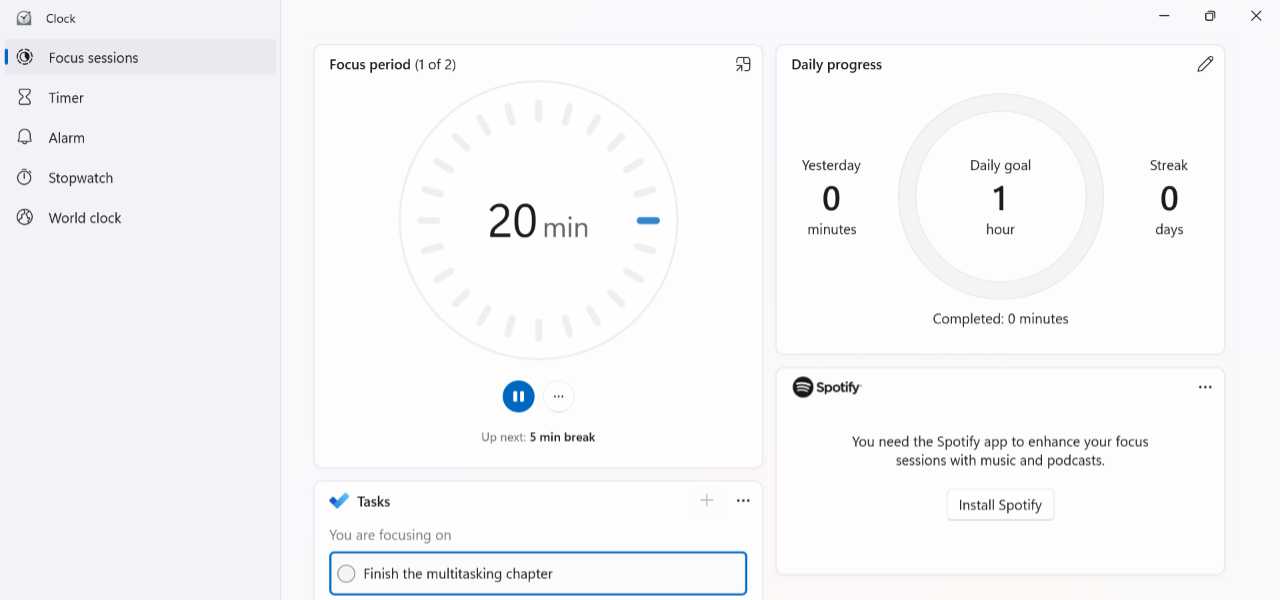
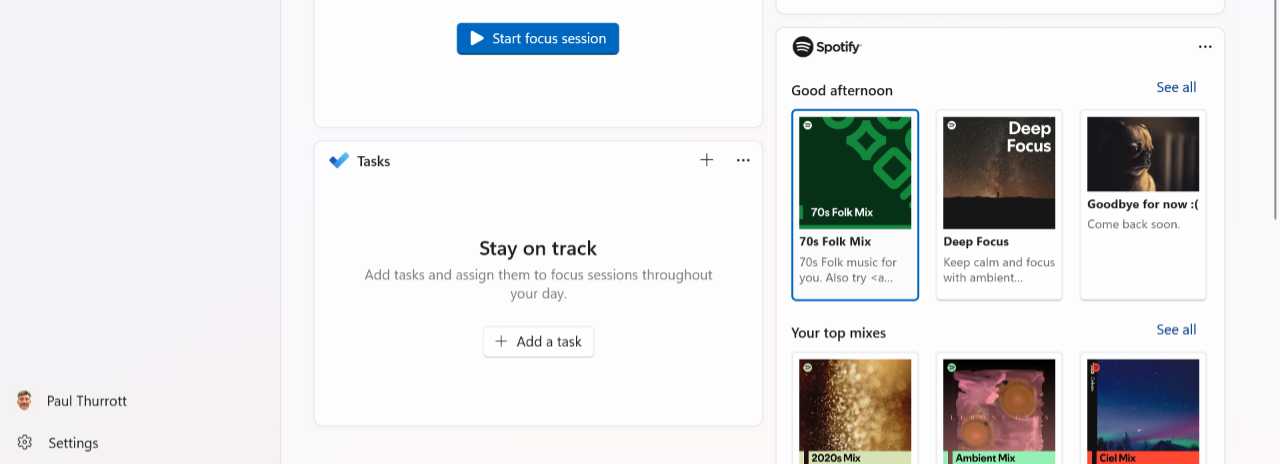
- Spotify. If you download and install the Spotify app from the Microsoft Store, you can link your Spotify account to Focus and then configure focus-oriented music or podcasts to play while you’re in a focus session.
Task Manager
Task Manager is a powerful system utility that provides task management, startup application management, and other advanced features mostly aimed at more sophisticated users. In Windows 11, Task Manager has been updated with a simpler and more modern user interface and a handful of useful new features.
Defaults
You can launch Task Manager using several different methods:
- Start and Windows Search. Open Start, type task, and then select “Task Manager” from the search results.
- Taskbar context menu. If you right-click the Taskbar, you will see a “Task Manager” item in the context menu that appears.

- Quick link menu. Right-click the Start button to display the Quick link menu and then select “Task Manager.”
Keyboard shortcut: You can also display Quick link by typing Windows key + X.
Keyboard shortcuts. There are two keyboard shortcuts for Task Manager. You can type Ctrl + Shift + Esc to open the app directly. Or, type Ctrl + Alt + Del to display the Secure Attention Sequence (SAS) screen, which displays a “Task Manager” item in a short list of options. This is the most resilient way to start Task Manager because it works even if the Windows 11 user interface is corrupt or unavailable.
Task Manager features a collapsed but expandable navigation bar on the left that provides access to the several views it offers. Most views display a search box, and all views include a “Run new task” button.
Task Manager provides the following views:
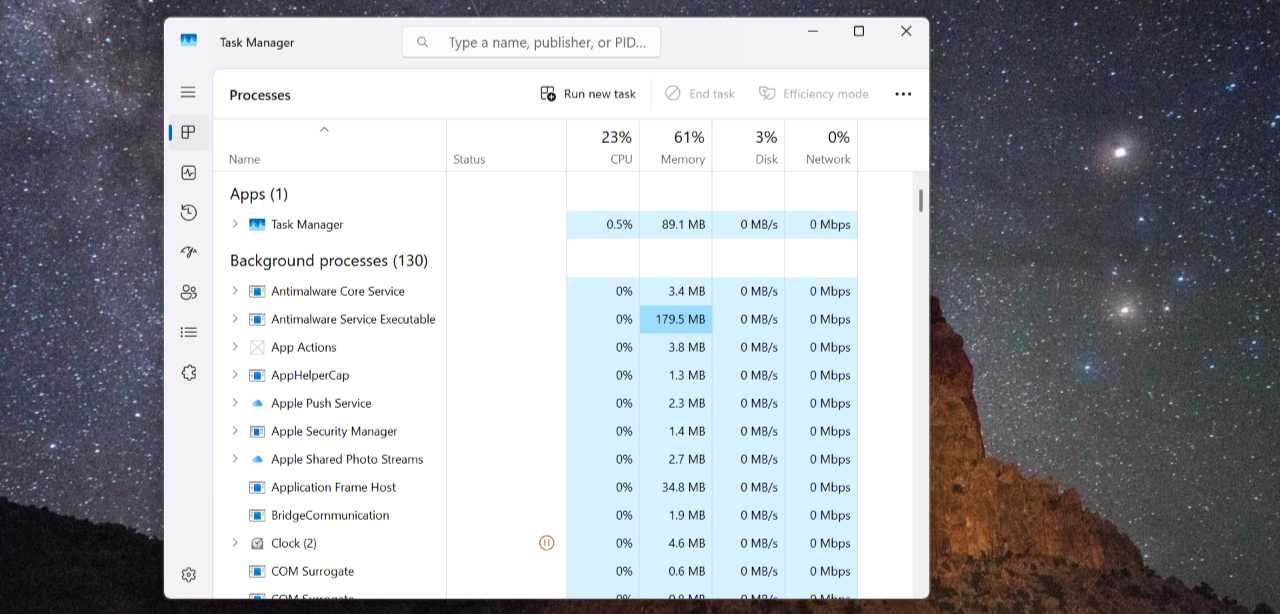
- Processes. This default view is used to manage running apps and services, and it provides a high-level view of how your PC’s key resources are being utilized.
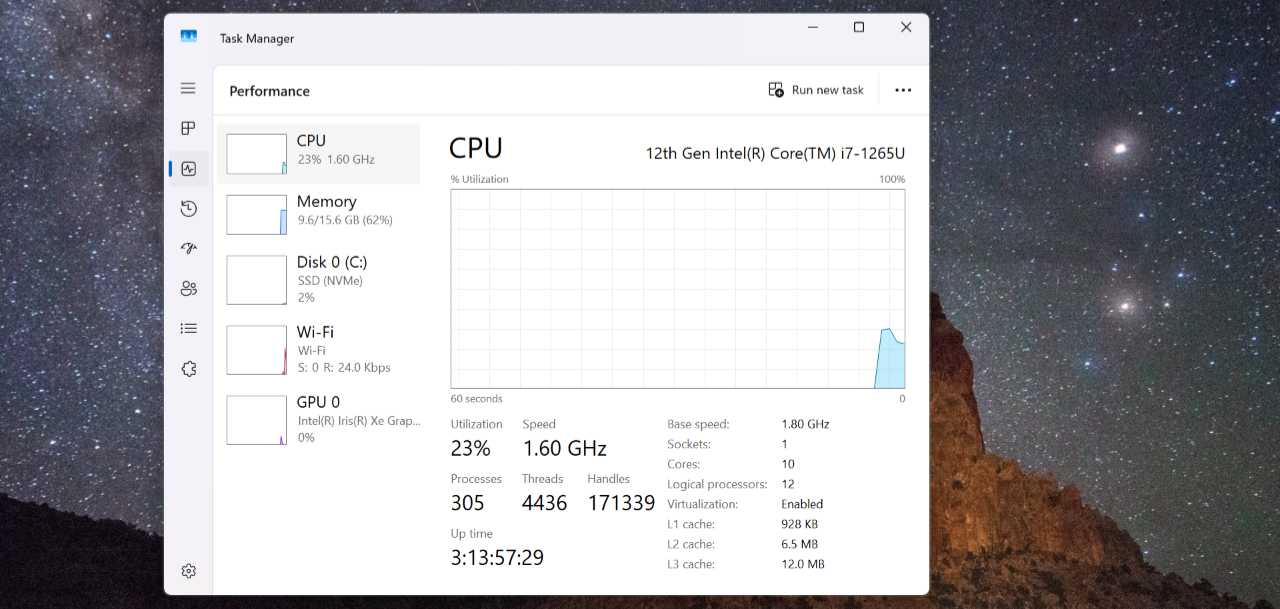
- Performance. This view provides dynamic graphs displaying real-time statistics and other information about the usage of the PC’s CPU, memory, disks, network connections, NPU (if available), and graphics processors (GPUs). There’s no interaction to be had here. Instead, you can learn more about the hardware in your PC and how it’s being used.
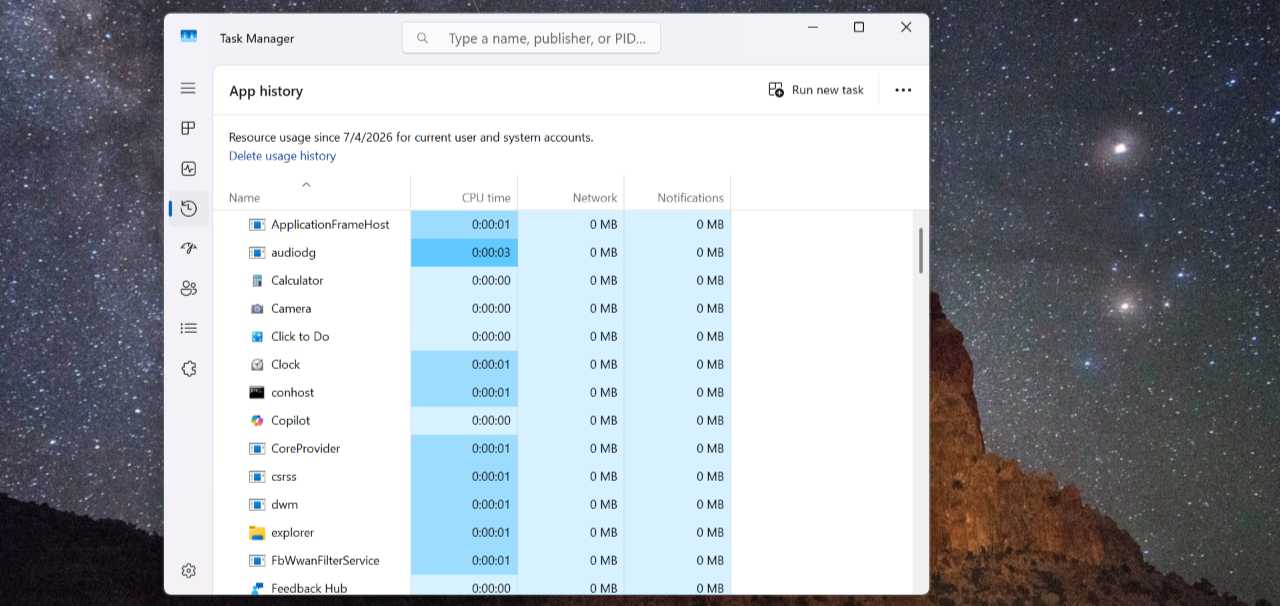
- App history. This curious view displays how each of the apps installed on your PC has consumed certain resources over time. You can sort the view by CPU time, Network, or Notifications by default. Or, right-click one of those headers to add other criteria like Metered network, Non-metered network, Downloads, and Uploads.
Startup apps. This view displays which apps have been configured to run automatically when the PC starts up and what impact each has on the startup speed.
Tip: There is a more modern interface for this capability in the Settings app, found in Apps > Startup.
- Users. This view is most useful when there are two or more people signed in to Windows 11 simultaneously as it provides a peek at the processes running under each account. You can ignore this view if the PC is only used by a single person.
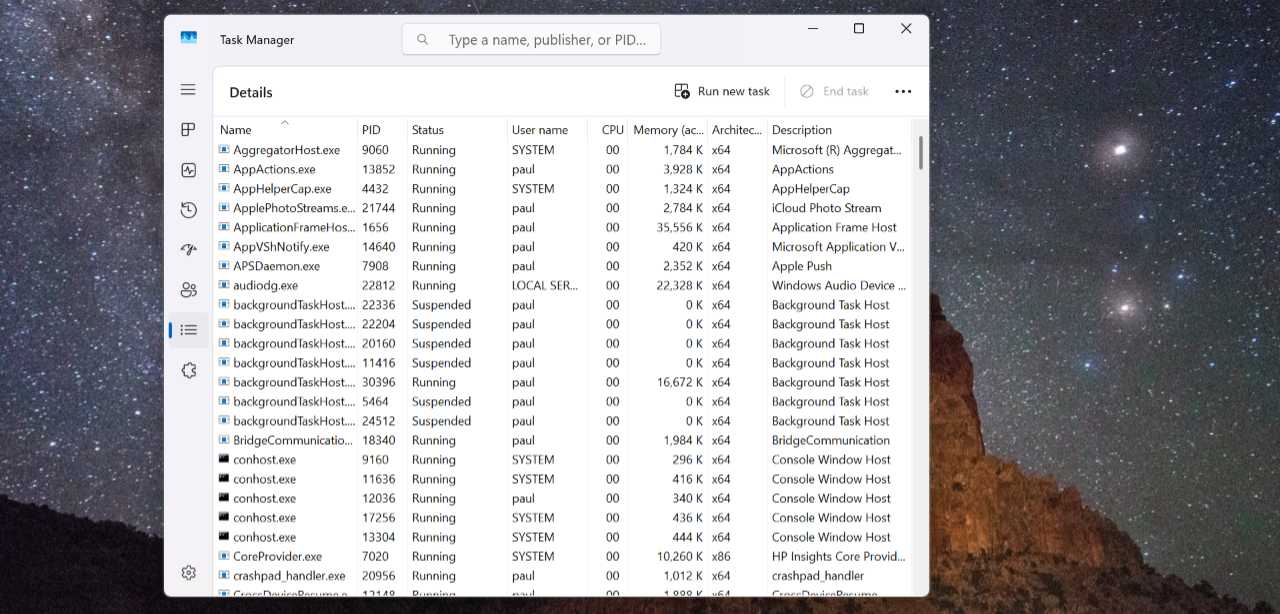
- Details. This view provides a detailed rundown of each process that is running on your system. But this one is interactive: You can right-click any process to see various actions you can take.
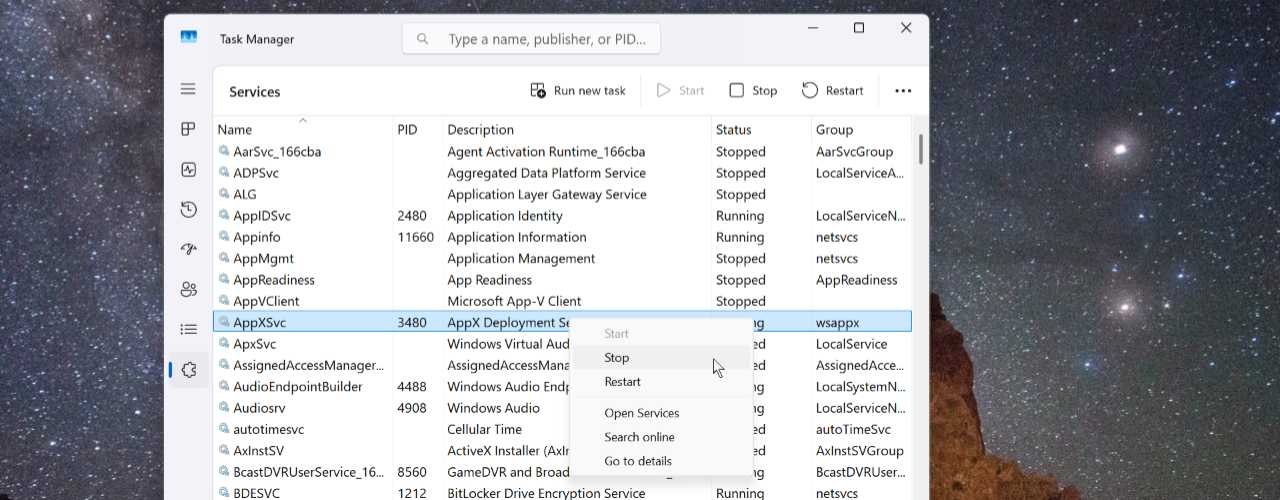
- Services. This view allows you to see and configure the services (background processes) that are available on your PC. To see which actions are available, right-click a service in the list. The most common reasons to use this view are to start, restart, or stop a process.
Configure
You can access Task Manager settings in the app by clicking the “Settings” (gear) button at the bottom of the navigation pane.
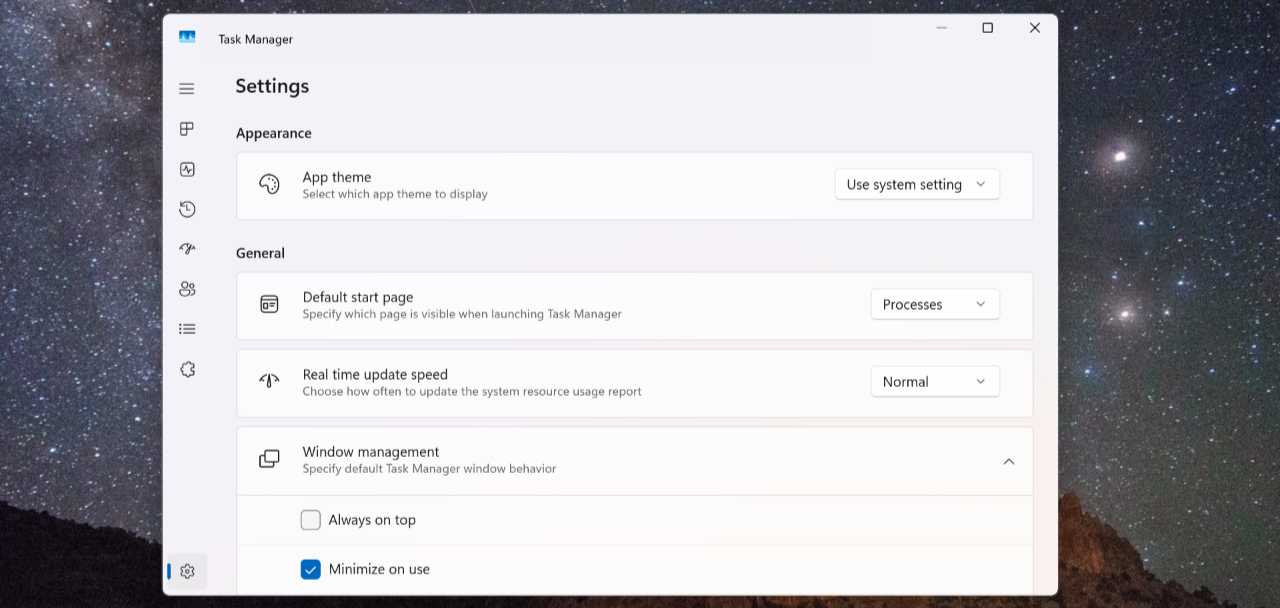
Key options here include:
- Default start page. If you would rather launch Task Manager into a different view than Processes, you can configure that here.
- Window management. It’s worth reviewing each of the three sub-options here. For example, you may want to enable “Always on top.”
Manage apps and processes
Task Manager is most often used because an app is behaving badly, or the PC is performing slowly, and so it makes sense that Processes–which is used to manage running apps and processes–is the default view. Chances are, this is why you’re here in the first place.
Processes provides a live and dynamic list of running processes–divided into Apps, Background processes, and Windows processes sections–and a columnar display that shows about each app and process, including a real-time visualization of how many resources each is consuming.
By default, Processes shows a single informational column called Status and four resource columns displayed using simplified heat maps that indicate resource utilization (where darker is more): CPU, Memory, Disk, and Network. You can sort the display by selecting a column heading. For example, to display the apps and processes by memory utilization, select the Memory heading.
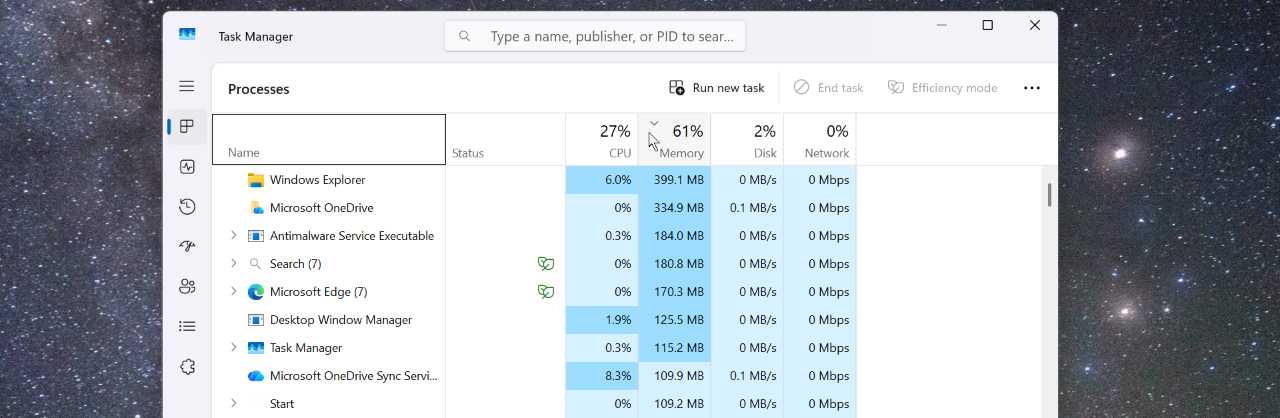
Tip: As noted, this Task Manager view is live. That means that the values you see in each column–and the order in which the processes are listed–can change as you’re viewing it. To temporarily pause this behavior and “freeze” the view in place, hold down the Ctrl key.
Fix a badly behaving app or process
If you find that an app or process is over-utilizing one or more system resources, you can try to fix it using Task Manager. There are two general approaches, one of which only addresses CPU usage and one of which will fix any problem assuming you don’t mind it potentially being destructive.
Fix an app or process that is abusing the CPU
If you examine the Processes view and discover that an app or process is over-utilizing the CPU, you can try to fix it by running the app in Efficiency mode, a Windows 11 feature that throttles a process’s CPU priority and improves its energy efficiency.
To do so, select the app or process in the Name column and then click the “Efficiency mode” button at the top. (Or, alternatively, right-click the item and choose “Efficiency mode” from the context menu that appears.) When running in Efficiency mode, the app or process will display a green “Efficiency mode” (leaf) icon in the Status column.
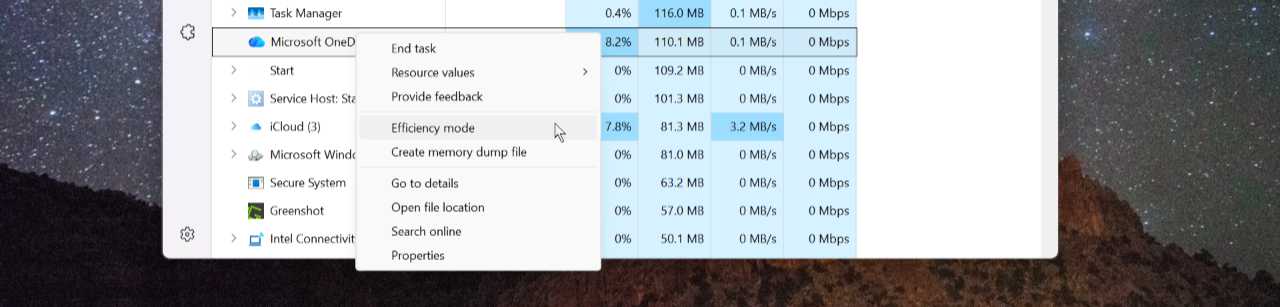
Tip: The Efficiency mode options will sometimes be grayed out, indicating that throttling the process would negatively impact the system. Also, core Windows processes cannot be put into Efficiency mode.
Kill an app or process
Efficiency mode can’t help when an app is over-utilizing non-CPU resources like RAM or disk access. Likewise, it’s sometimes not available and apps can crash or hang. In these cases, your only choice is to take the drastic and potentially (data) destructive step of terminating an app or process.
To do so, select the app or process and then click the “End task” button in the command bar. (Alternatively, right-click the app or process and choose “End task” from the context menu that appears.)
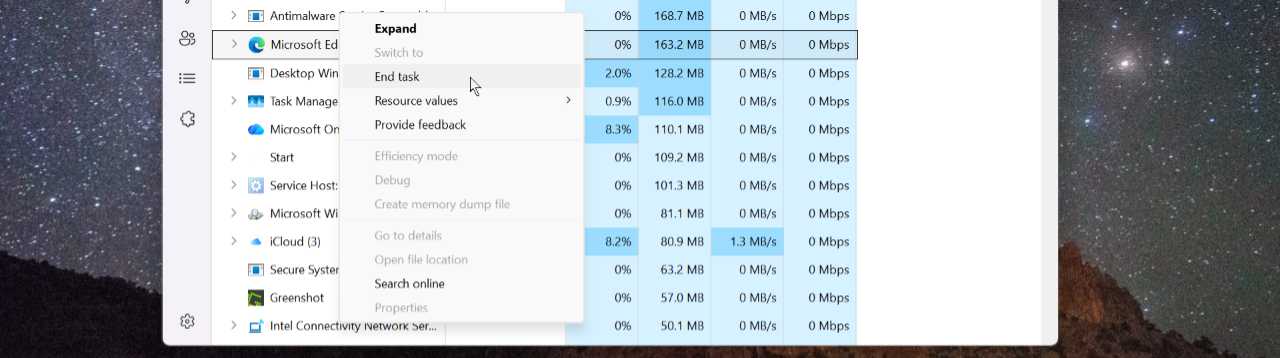
The app or process will be killed immediately, freeing up whatever system resources it was using.
Tip: If you find yourself doing this a lot, you can end those tasks that have visible windows more quickly via an optional End task feature that appears when you right-click an app shortcut button in the Taskbar. To enable this feature, open the Settings app, navigate to System > Advanced, and toggle the “End Task” option at the top of this page to “On.”
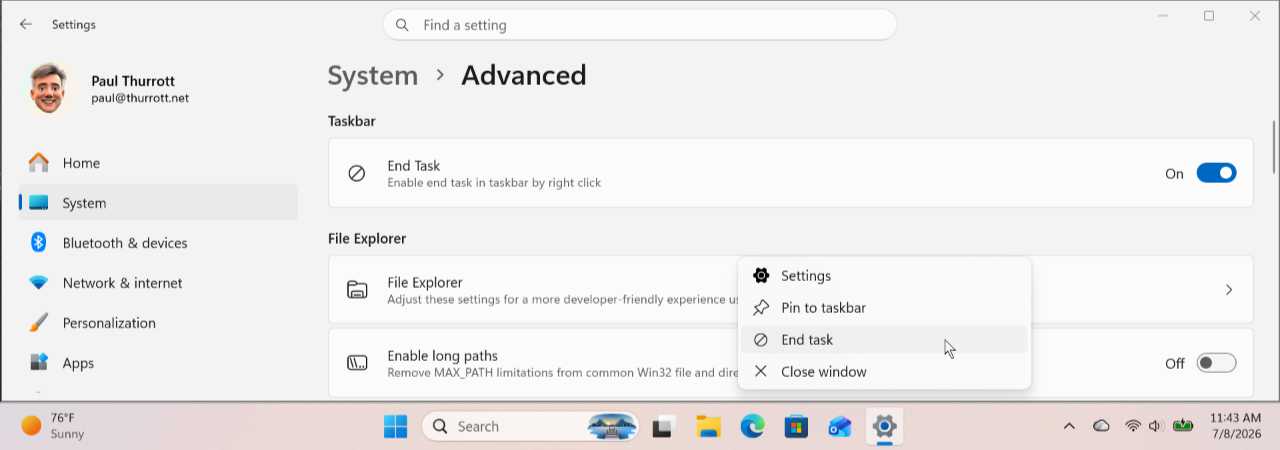
Run a new task
For the most part, it makes sense to use Windows Search to find and run apps that aren’t pinned to Start or the Taskbar. But Windows has always offered other ways to do this, including some that predate Windows Search.
For example, you can use the Run app–easily found via Search or by typing Windows key + R–to open an app, assuming you know its file name.
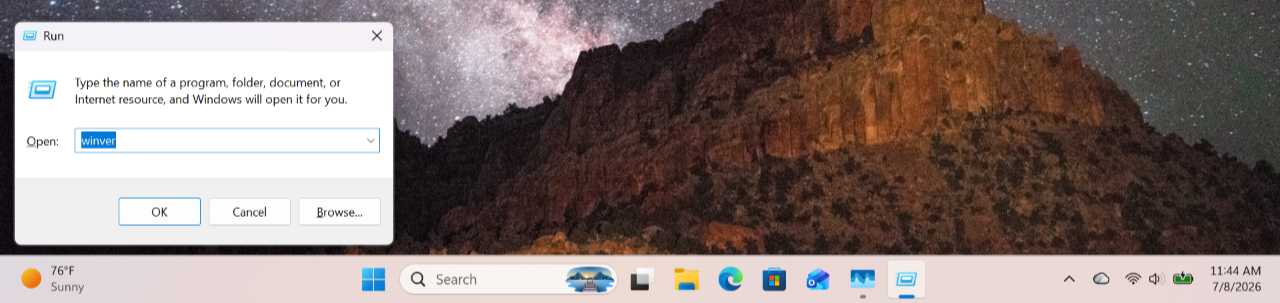
Another method is to use Task Manager, which features a prominent “Run new task” button in all its views. Run new task has two advantages over the Run app: Because Task Manager is available even if the Windows user interface is corrupted or hung, you can use it to restart that interface, plus it allows you to easily run an app with administrative privileges.
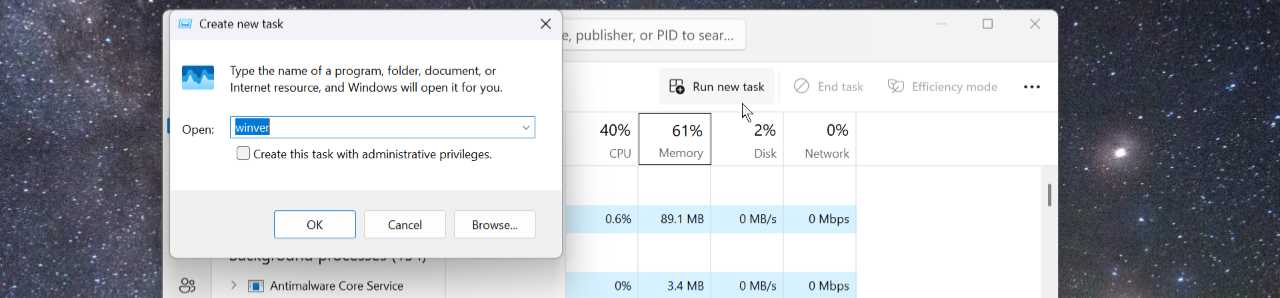
Tip: “Run new task” also has the same limitation as the Run app. You need to know the file name of the app you wish to run.
Here’s the most common reason to access this feature: If the Windows 11 user interface isn’t working properly, type Ctrl + Shift + Esc (or Ctrl + Alt + Del) to open Task Manager, click the “Run new task” button, and then type “explorer.exe” (no quotes) in the “Open” text field and tap Enter. Voilà! You’re back up and running again.
Keyboard shortcut: When you’re using Task Manager, you can also type Alt + N to launch the Run new task dialog.
Desktops
Windows 11 includes a feature called Desktops that lets you create multiple virtual desktops, each with its own apps, and then easily switch between them. Desktops is useful in various situations, and it helps reduce window clutter and cognitive overload by letting you group related apps–perhaps by project or type–in their own virtual desktops.
Defaults
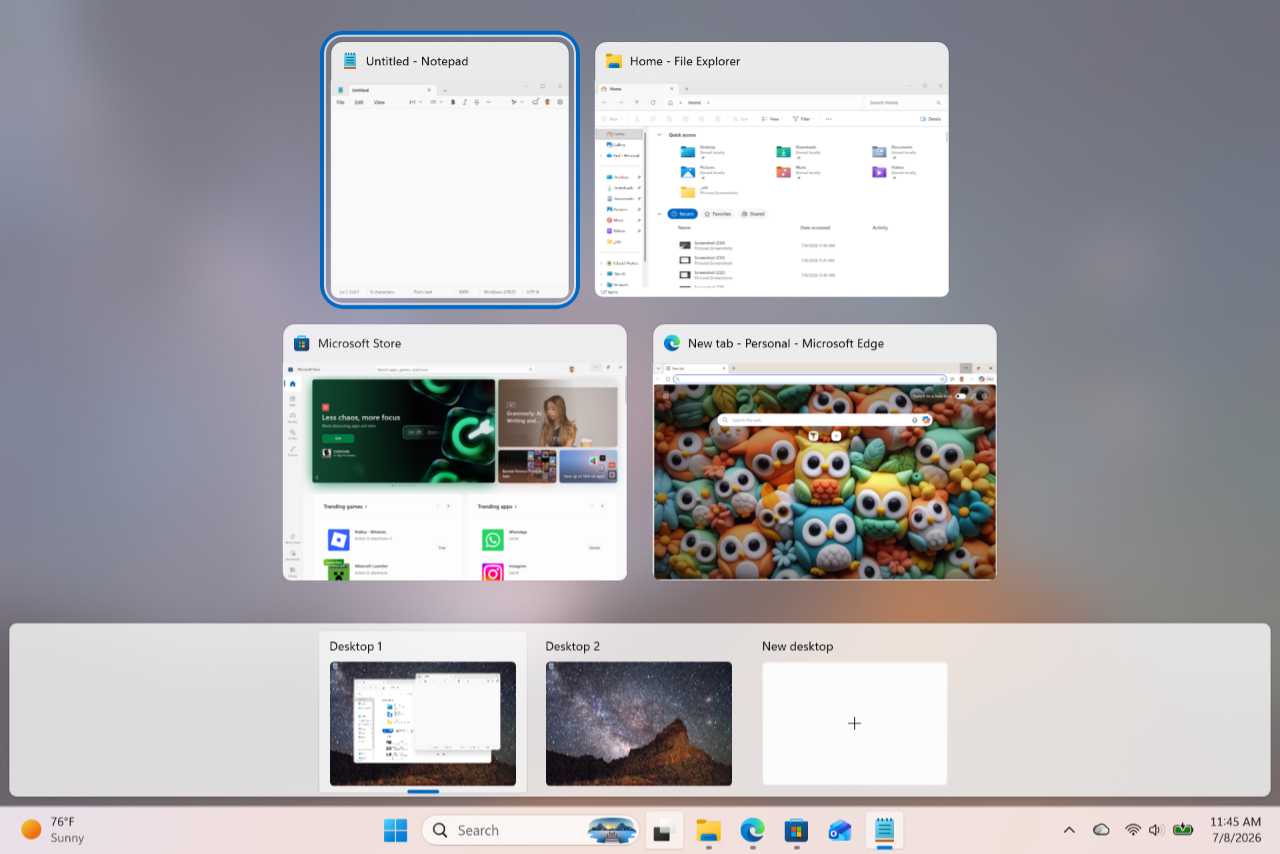
Desktops is enabled by default and always available in Windows 11 via Task view. You display Task view by clicking the “Task view” item on the Taskbar or by typing Windows key + Tab.
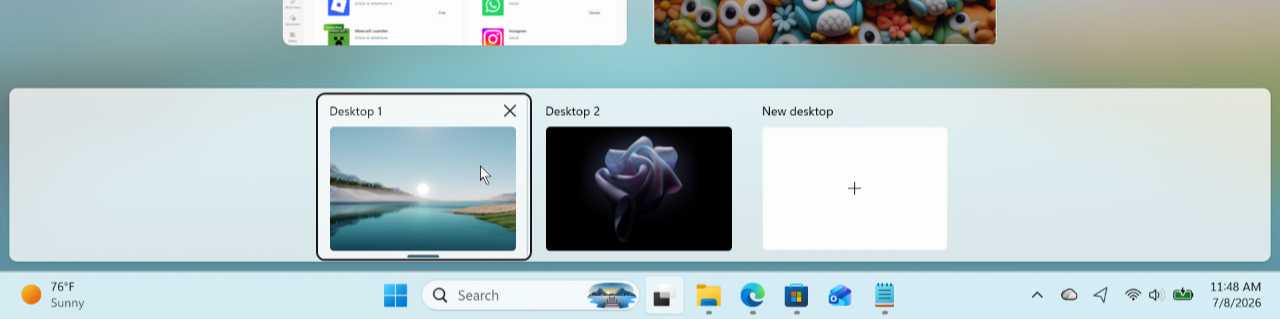
By default, Windows 11 uses a single desktop named Desktop 1. You can add additional desktops, switch between, and otherwise manage these virtual desktops in Task view.
Apps and windows you open in a virtual desktop will appear on the Taskbar in that desktop by default. Likewise, when you use Alt + Tab or Task view to switch between open apps and other windows, these interfaces will only display thumbnails for those apps that are open in the current virtual desktop.
Virtual desktops and whatever customizations you make to them are persistent and are available after each reboot.
You can perform the following Desktops-related actions in Task view:
- Create a new virtual desktop. Click the “New desktop” tile at the bottom of Task view and a new virtual desktop called Desktop 2 will appear to the right of Desktop 1 in the Desktops pane at the bottom. Subsequent new virtual desktops are named Desktop 3 and so on.

Keyboard shortcut You can also type Windows key + Ctrl + D to create a new virtual desktop.
- Switch between virtual desktops. To switch between virtual desktops, open Task view and click the virtual desktop you want.
Keyboard shortcuts: Alternatively, you can switch to the next virtual desktop by typing Windows key + Ctrl + Right arrow. Or, type Windows key + Ctrl + Left arrow to switch to the previous virtual desktop.
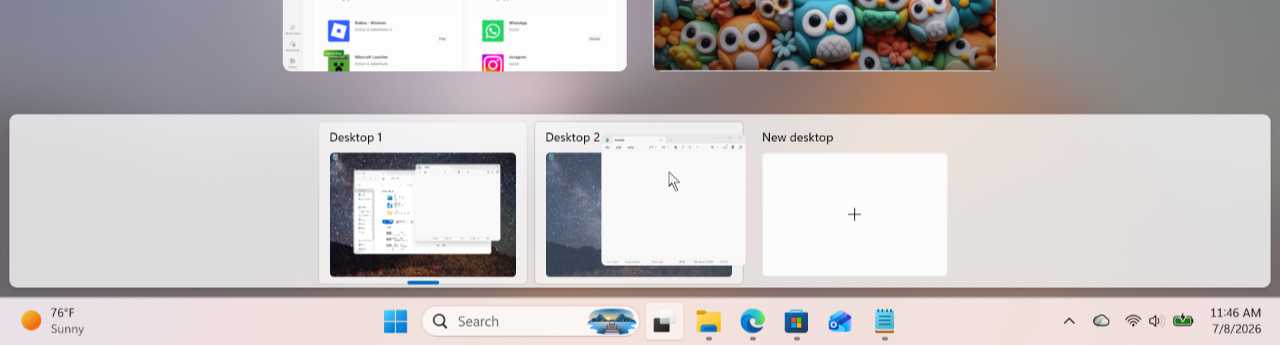
- Move an app or window to a different virtual desktop. To move an app or window from one virtual desktop to another, navigate to the source desktop, open Task view, and then drag the app or window’s thumbnail from the top of Task view into the tile representing the destination desktop. When you let go of the mouse, the app is moved to the new location.
- Close a virtual desktop. To close a virtual desktop, open Task view and click the “Close” button (“X”) in the upper right of its tile. Any open app windows in that virtual desktop will move to the virtual desktop to its left.

Keyboard shortcut Or, type Windows key + Ctrl + F4 to close the current virtual desktop.
Tip: You cannot close the leftmost virtual desktop, which is actually the “real” Desktop that’s named Desktop 1 by default.
- Reposition a virtual desktop in the Desktops z-order. You can move a virtual desktop right or left in Task view using drag-and-drop. Alternatively, right-click a virtual desktop tile and choose “Move left” or “Move right” from the pop-up menu that appears.
Customize
There are a few Desktops settings in the Settings app, and you can separately customize individual virtual desktops to some degree in Task view.
Customize Desktops
To access Desktops settings, open Settings and navigate to System > Multitasking. There, you will find an expandable “Desktops” item with two options.
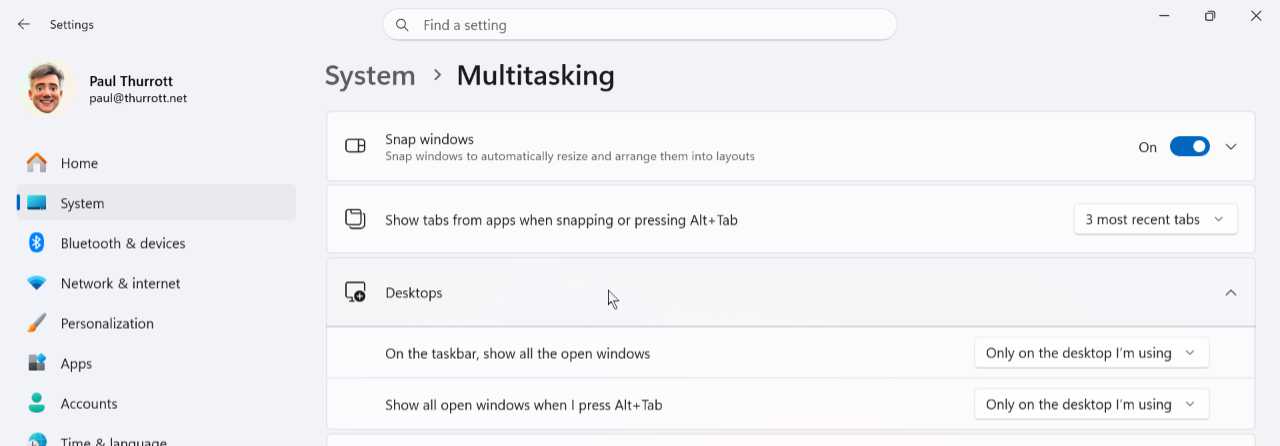
They are:
On the taskbar, show all open windows. If you want the Taskbar in each virtual desktop to display buttons for all open apps and windows, and not just those open in this virtual desktop, you can change this to “On all desktops.”
Show all open windows when I press Alt+Tab. To display thumbnails for all open apps and windows in Alt + Tab and Task view, and not just those open in the current virtual desktop, you can change this to “On all desktops.”
I recommend leaving each of those options in the default configuration: The point of Desktops is to isolate related apps and windows from the others you have open in other virtual desktops.
Customize a virtual desktop
You can customize each virtual desktop you use in Task view. To do so, open Task view and right-click a virtual desktop to display a pop-up menu with several options.
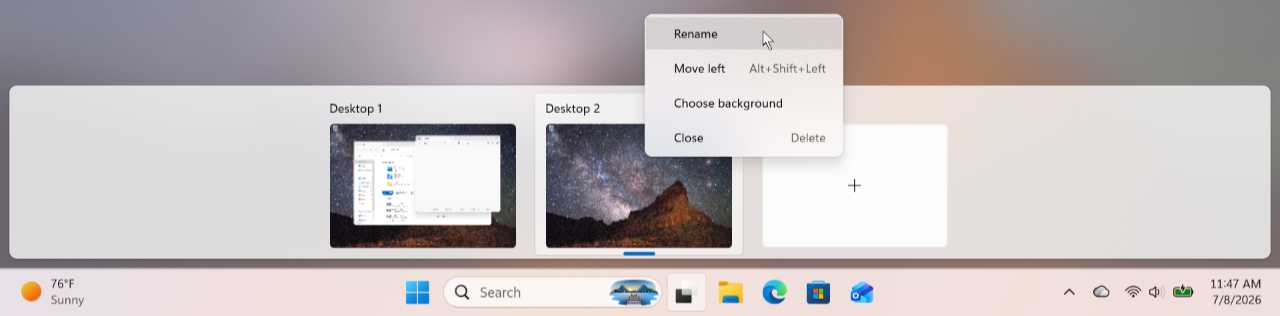
Available customizations include:
- Rename the desktop. If names like Desktop 1 and Desktop 2 are too limiting, you can rename any virtual desktop, including the default desktop.
- Choose a background. To visually differentiate each virtual desktop, you can assign each a unique background image. And only a background image: If you configure any virtual desktop with a Windows Spotlight, Slideshow, or solid color as the background, it will be used for all virtual desktops.

Gain unlimited access to Premium articles.
With technology shaping our everyday lives, how could we not dig deeper?
Thurrott Premium delivers an honest and thorough perspective about the technologies we use and rely on everyday. Discover deeper content as a Premium member.