File Explorer (24H2)
- Paul Thurrott
- Nov 04, 2024
-
0
File Explorer is the Windows 11 file management app, and it looks and works much like its predecessors in earlier Windows versions.

But there have been some improvements and other changes since Windows 10 and the initial versions of Windows 11, too. In addition to its simpler and more modern appearance, File Explorer features a tabbed user interface similar to that found in Microsoft Edge and other web browsers, an updated home page with new customization choices, an updated navigation pane, a new Gallery view for your photo collection, a Details pane with file thumbnails and other contextual information, and more. This chapter focuses largely on these new and unfamiliar features.
Access multiple file system views with tabs
The tabbed user interface is the most obvious change to File Explorer in Windows 11. As with the similar feature in web browsers and other apps, File Explorer tabs lets you manage multiple views, in this case of your PC’s file system, simultaneously in the same window.

That said, you can only see one view at a time, of course. To work with two or more views side-by-side, you can still open multiple File Explorer app windows.
Create and close a tab
To create a new tab, click the “Add new tab” button (“+”) at the top of the File Explorer window, and to the right of the rightmost tab. (File Explorer always displays at least one tab.) The new tab will appear and display the File Explorer home page by default.
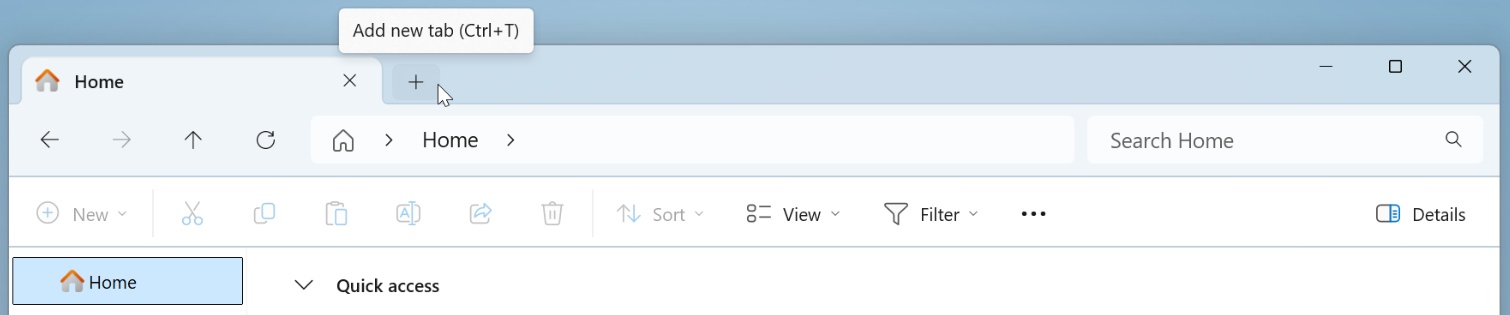
You can also type CTRL + T to create a new tab.
To open a new tab to a specific location, right-click that location–in the navigation pane or elsewhere in File Explorer–and choose “Open in new tab.”
To close a tab, select its “Close tab” button (it resembles an “X”).
You can also type CTRL + W to close the currently selected tab.
Basic tab management
Each tab works like its own File Explorer window, so you can navigate to whatever file system location you like in each.
To navigate between tabs, simply click the tab you wish to use.
Or, type CTRL + TAB to switch to the next tab in the row, and type CTRL + SHIFT + TAB to switch to the previous tab.
To reorder the tabs, grab the tab you wish to move and then drag it left or right to a new location in the row of tabs. Release it when it’s where you want it.


Drag a file between tabs
One of the many reasons you may have opened two File Explorer windows in the past was so that you could drag one or more files between two different locations in the file system. But the new tabs in File Explorer allow you to do so as well.
To get started, make sure you have at least two tabs open: One for the location that contains the file you wish to copy or move, and one in which you’ve navigated to the destination where you would like that file to go. Then, simply drag the file in the source tab up to the row of tabs and over the tab representing the destination. As you do, the contents of that tab appear. Then, drag it down into the files area and release it.
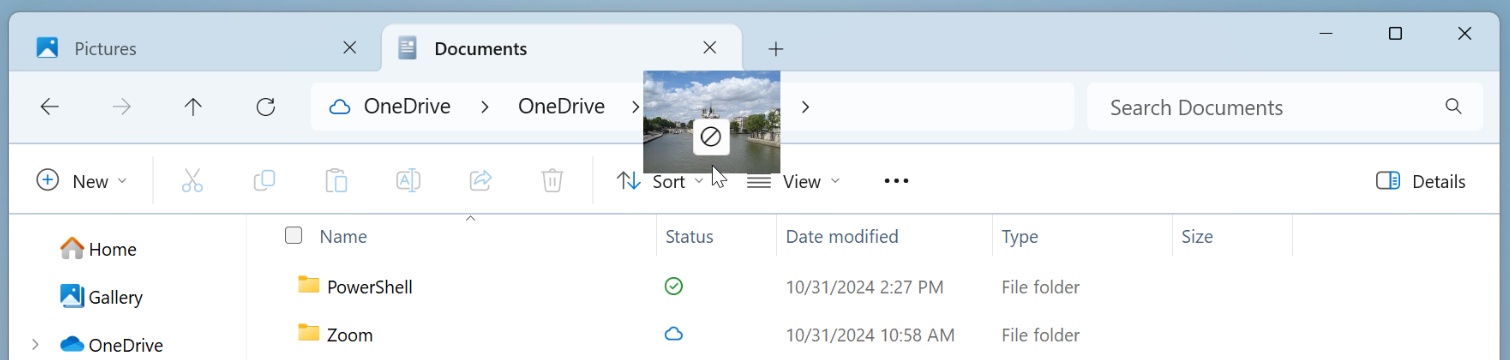
When you perform this operation normally, you move the file from its original location, the source, to the destination. If you prefer to copy the file–leaving the original in its place and creating a duplicate in the destination–then right-drag the file instead. When you release it in the destination, a context menu will provide you with several choices, among them “Copy here.”
Or, just use the CTRL + C/CTRL + X (Copy/Cut) and CTRL + V (Paste) keyboard shortcuts you learned decades ago.
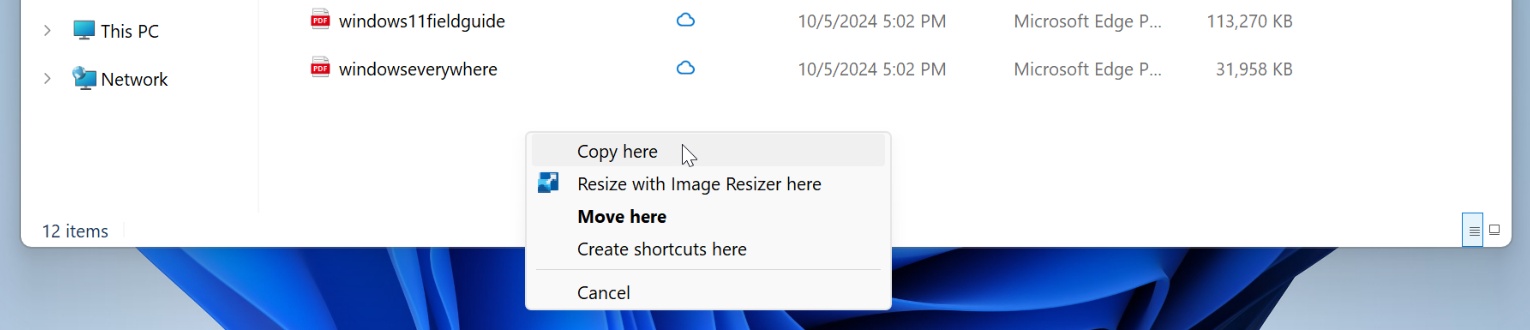
The above assumes you are copying or moving a file between two folders on the same drive. The rules change when you cross over to a second drive or a network location: In those cases, the default operation on a drag and drop is copy, not move. If you wish to move the file between drives, right-drag it and choose “Move here” from the context menu that appears.
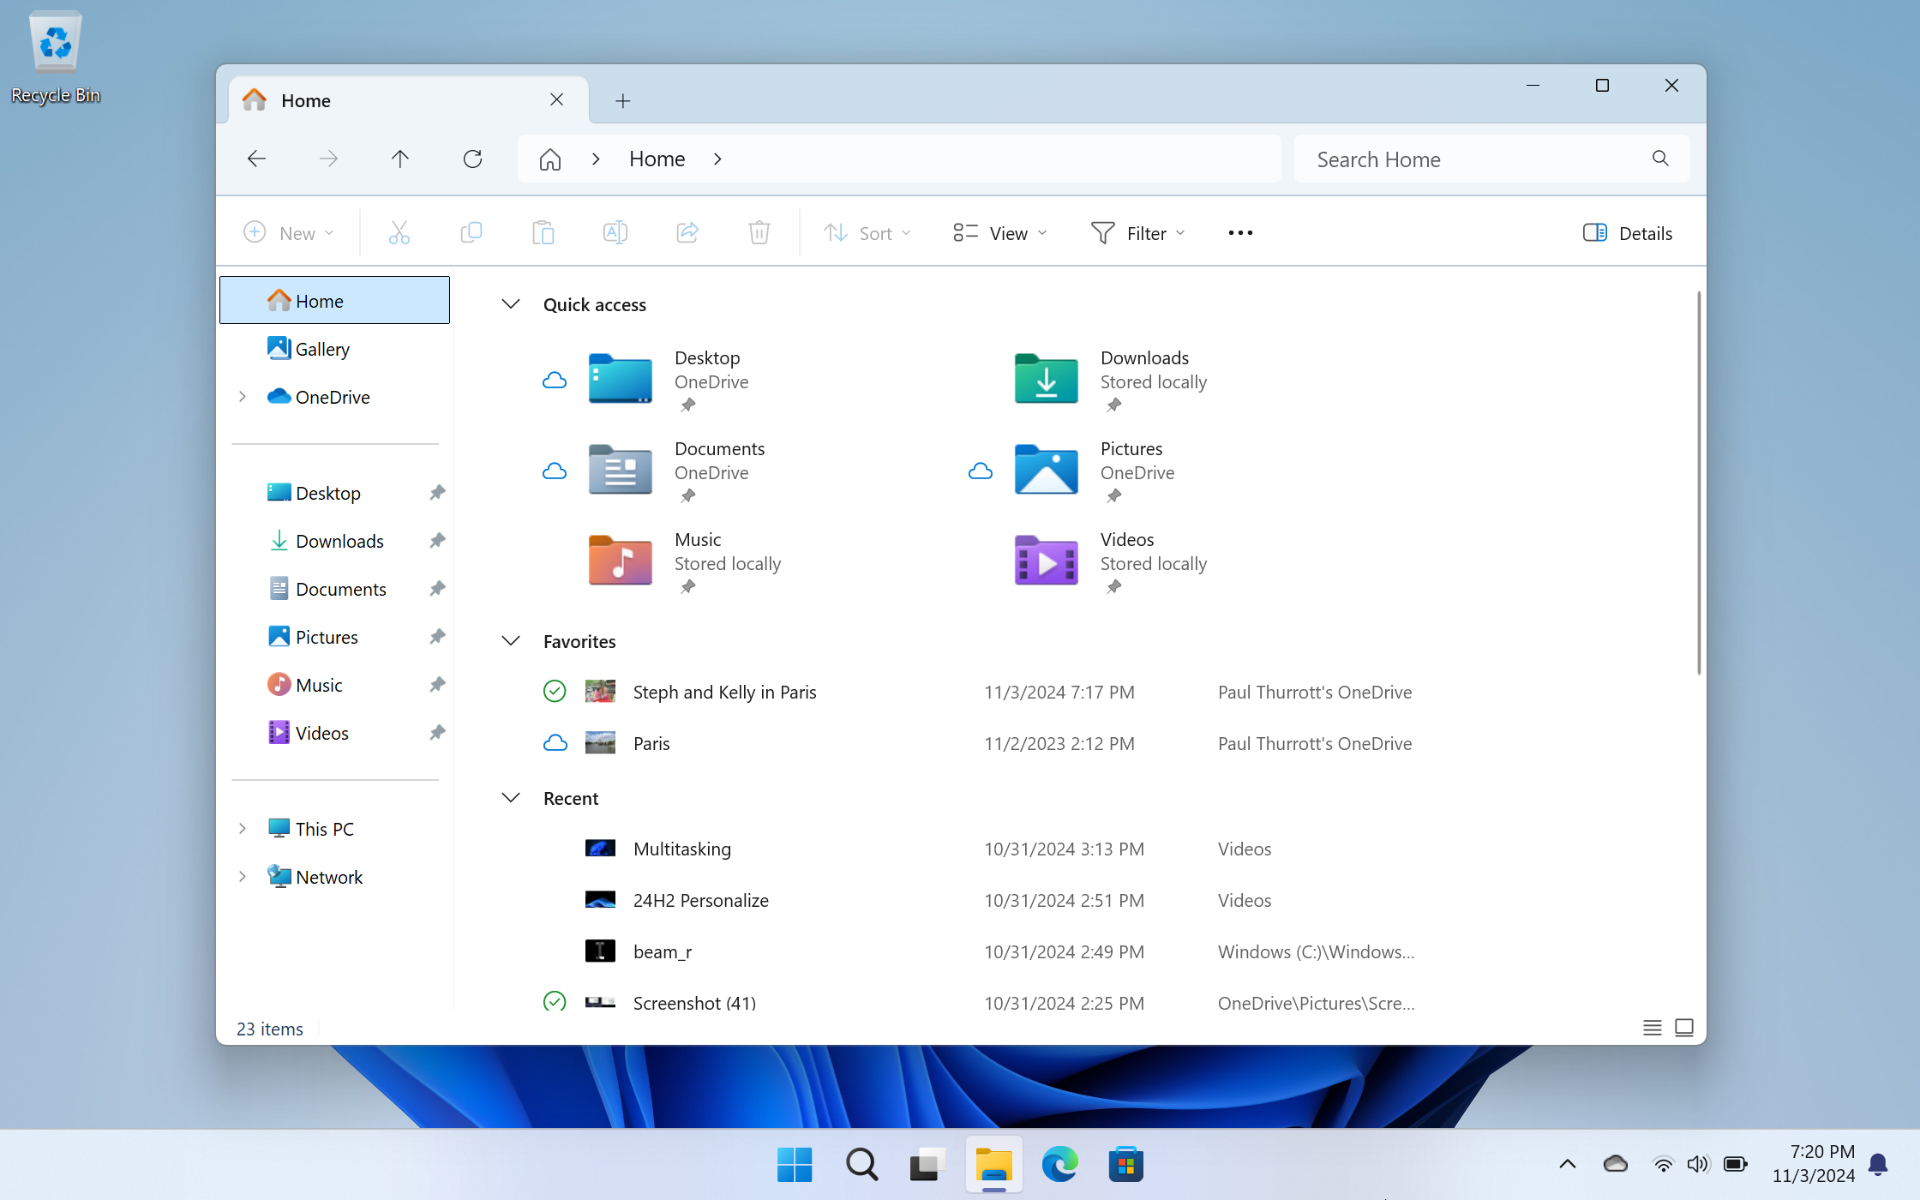
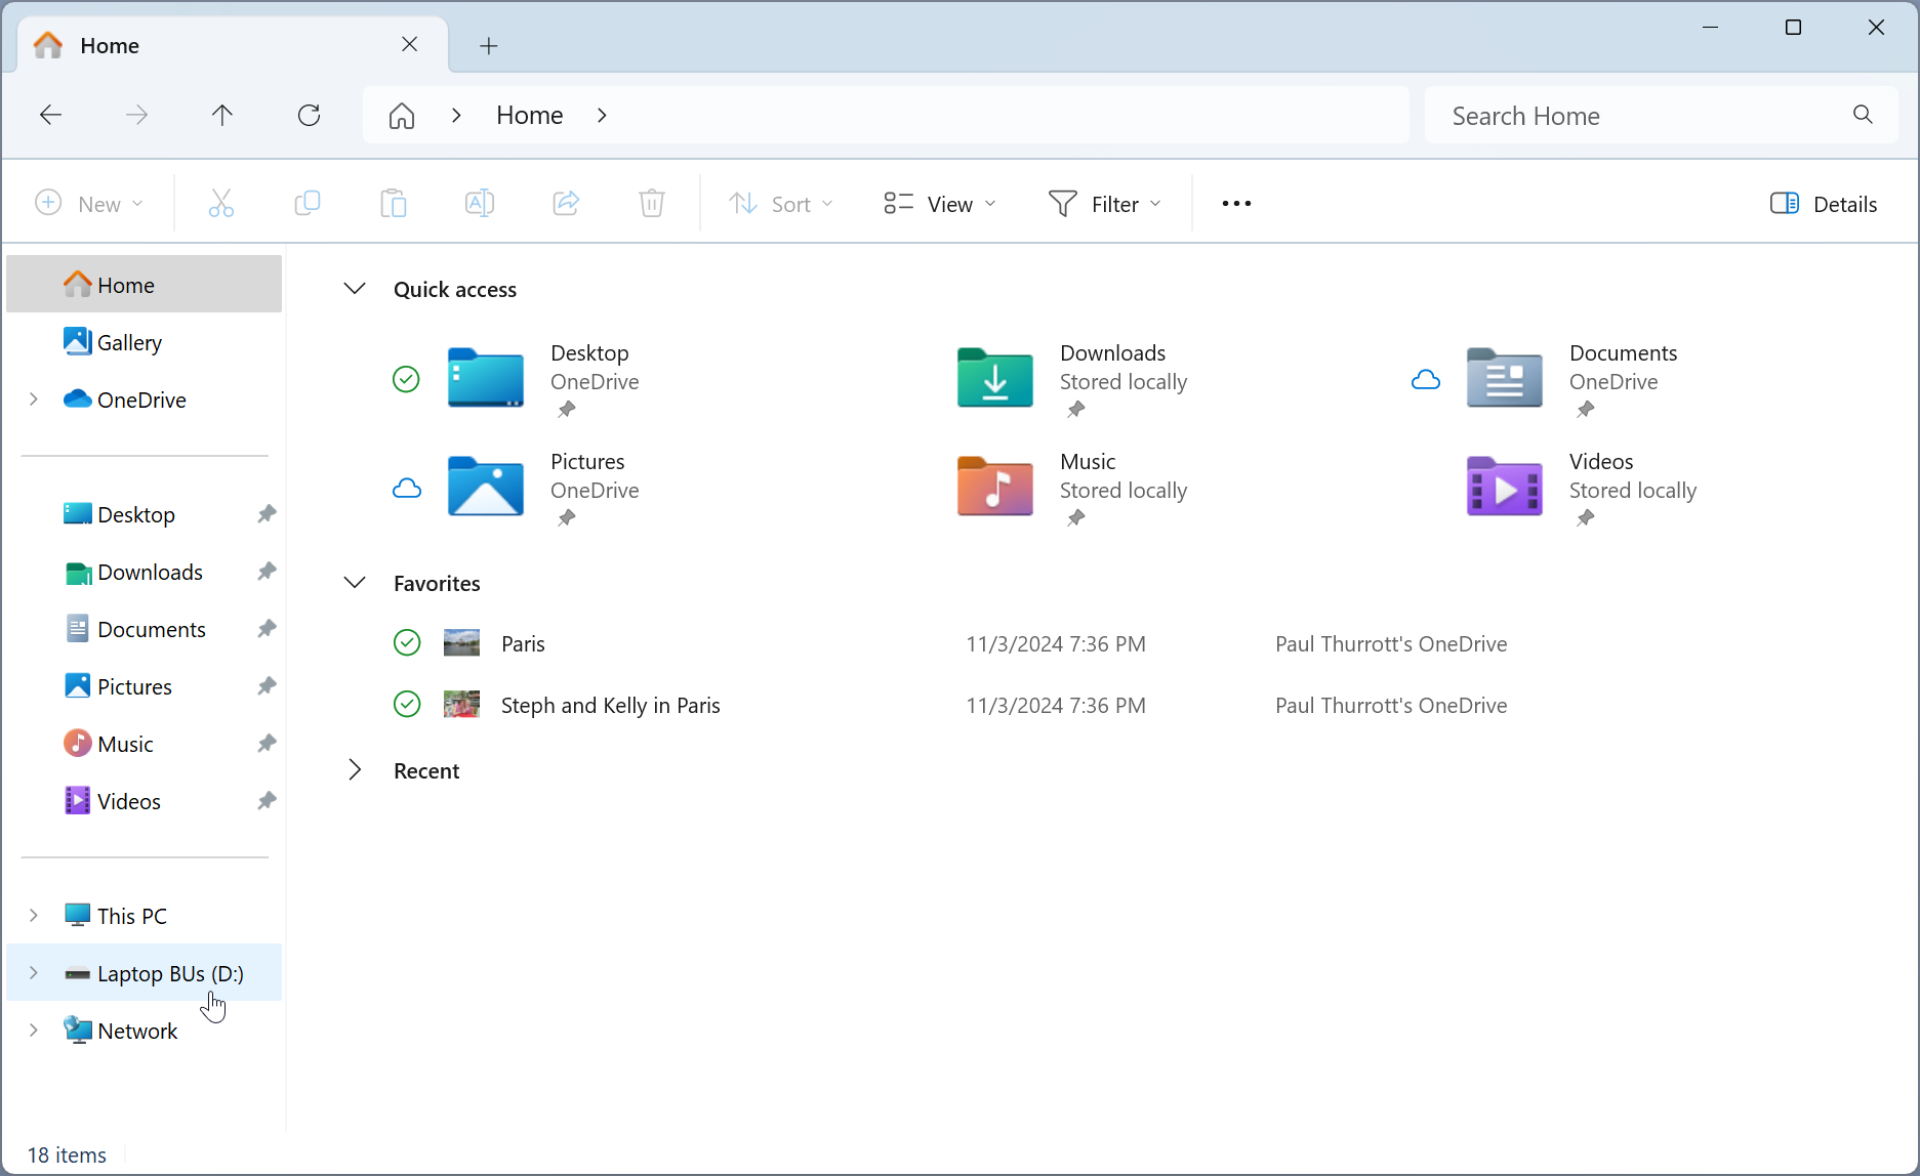
Understand the File Explorer home page
The Windows 11 File Explorer displays a home page by default. This page doesn’t correspond to a file system location but instead presents a simpler and potentially more useful selection of frequently accessed folders and files. This is similar to how File Explorer worked in Windows 10. But there have been some changes since then, too.
First, the name of this home page has changed, from Quick access to Home. And second, where the Quick access view in Windows 10 provided two sections, Quick access (frequently used folders) and Recent (the most recently used documents and other files), the Home view in Windows 11 adds a third section, Favorites. This section displays any documents or other files that you have marked as being a favorite, similar to how the Microsoft Edge web browser works with web pages.
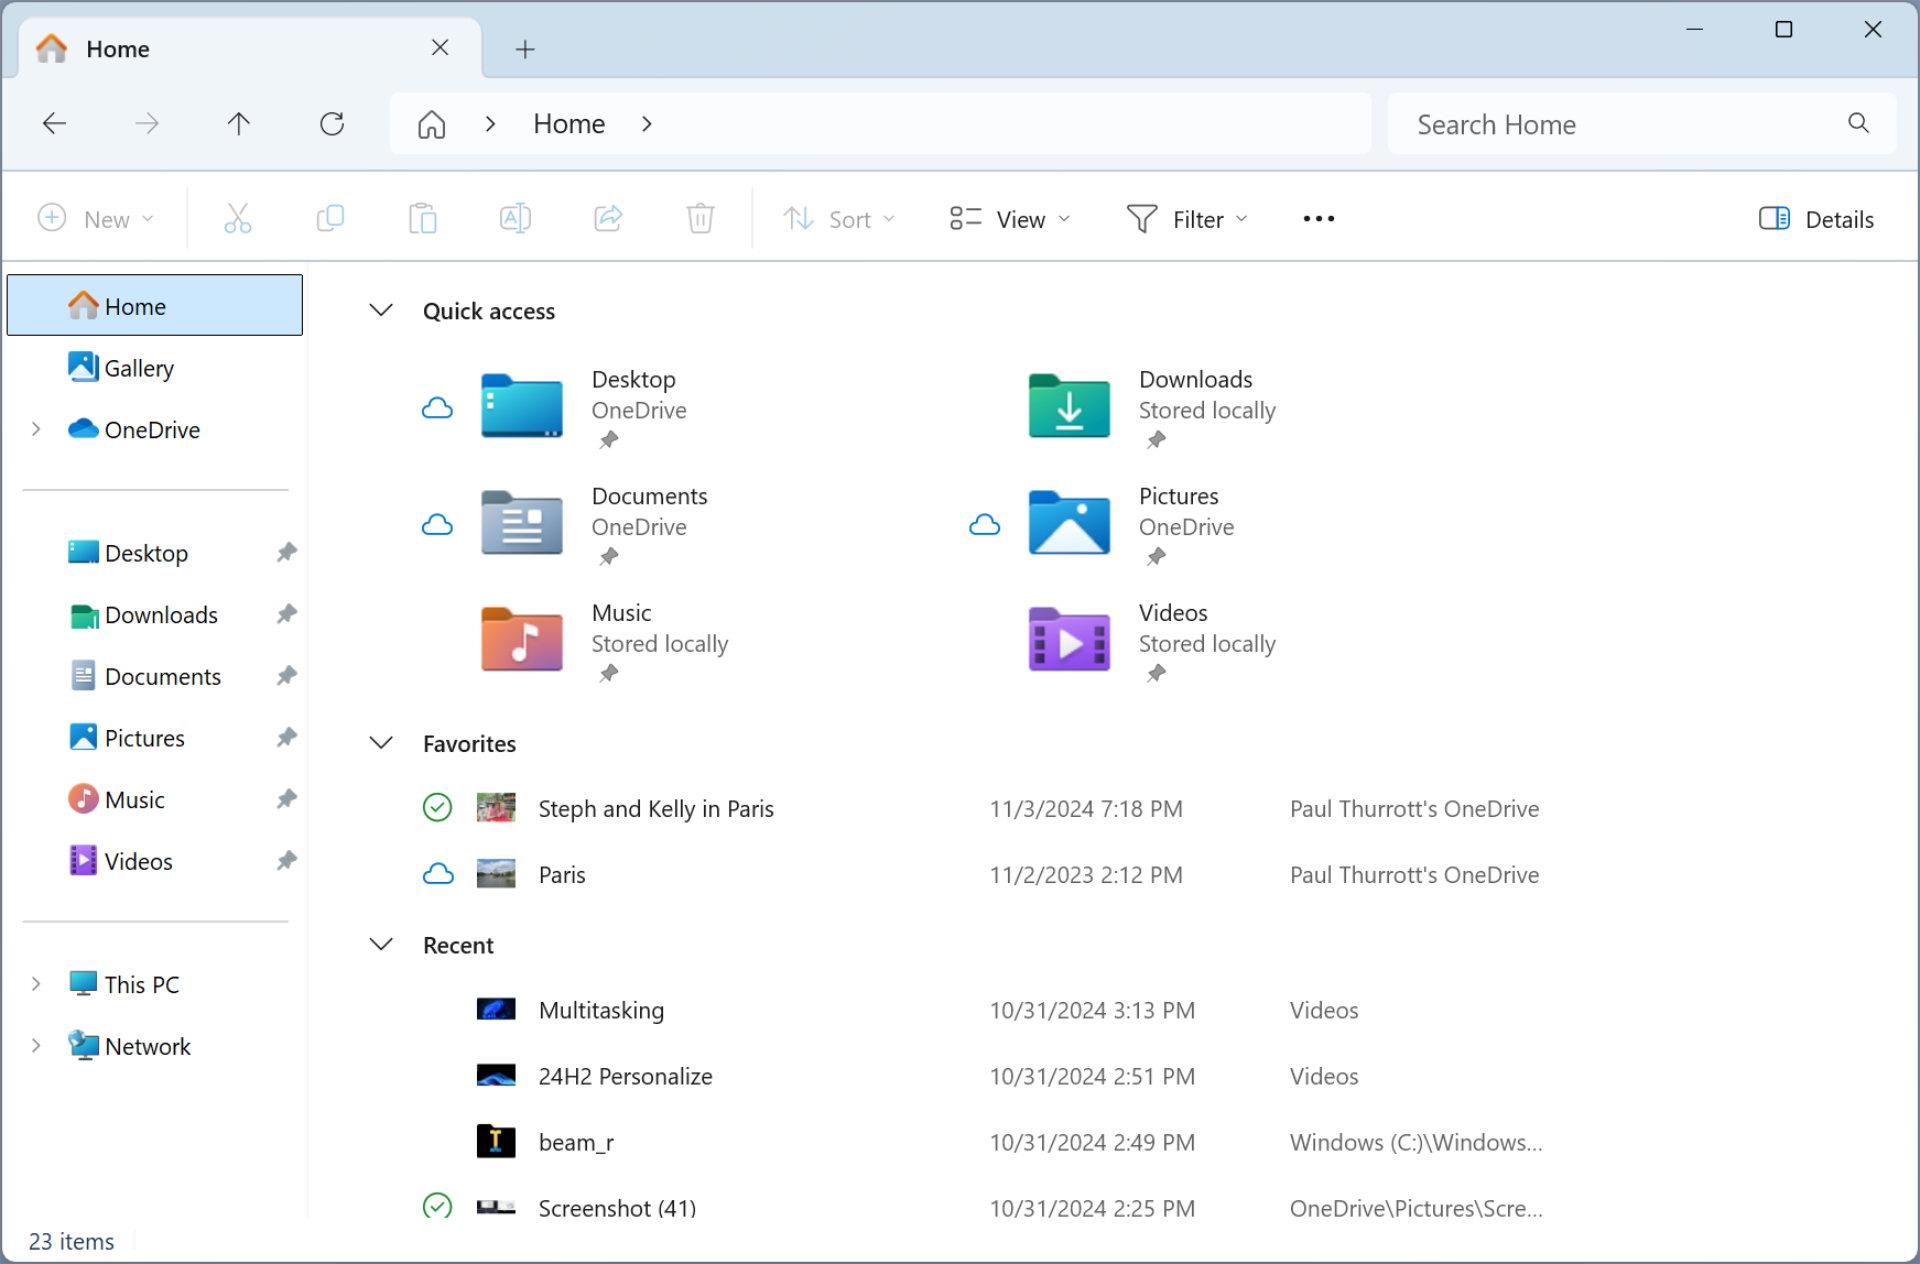
To mark any file as a favorite, right-click it in File Explorer and choose “Add to Favorites” from the context menu that appears. Likewise, you can reverse this change by right-clicking it–in the Favorites section of the Home view in File Explorer or in its file system location–and choosing “Remove from Favorites.”
If you sign in to Windows with a Microsoft Work or School account, you will also see a fourth section in Home called Recommended that automatically displays relevant document and file shortcuts from your organization.
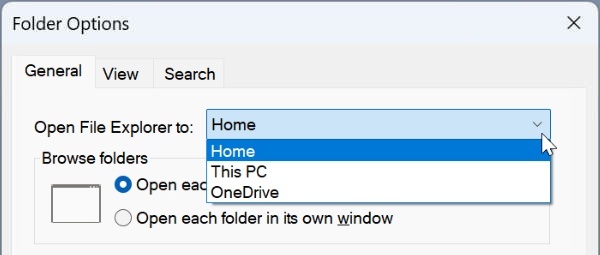
You can customize the File Explorer home page to use This PC or OneDrive as its home page instead of Home. This is described later in the chapter in Customize the File Explorer home page.
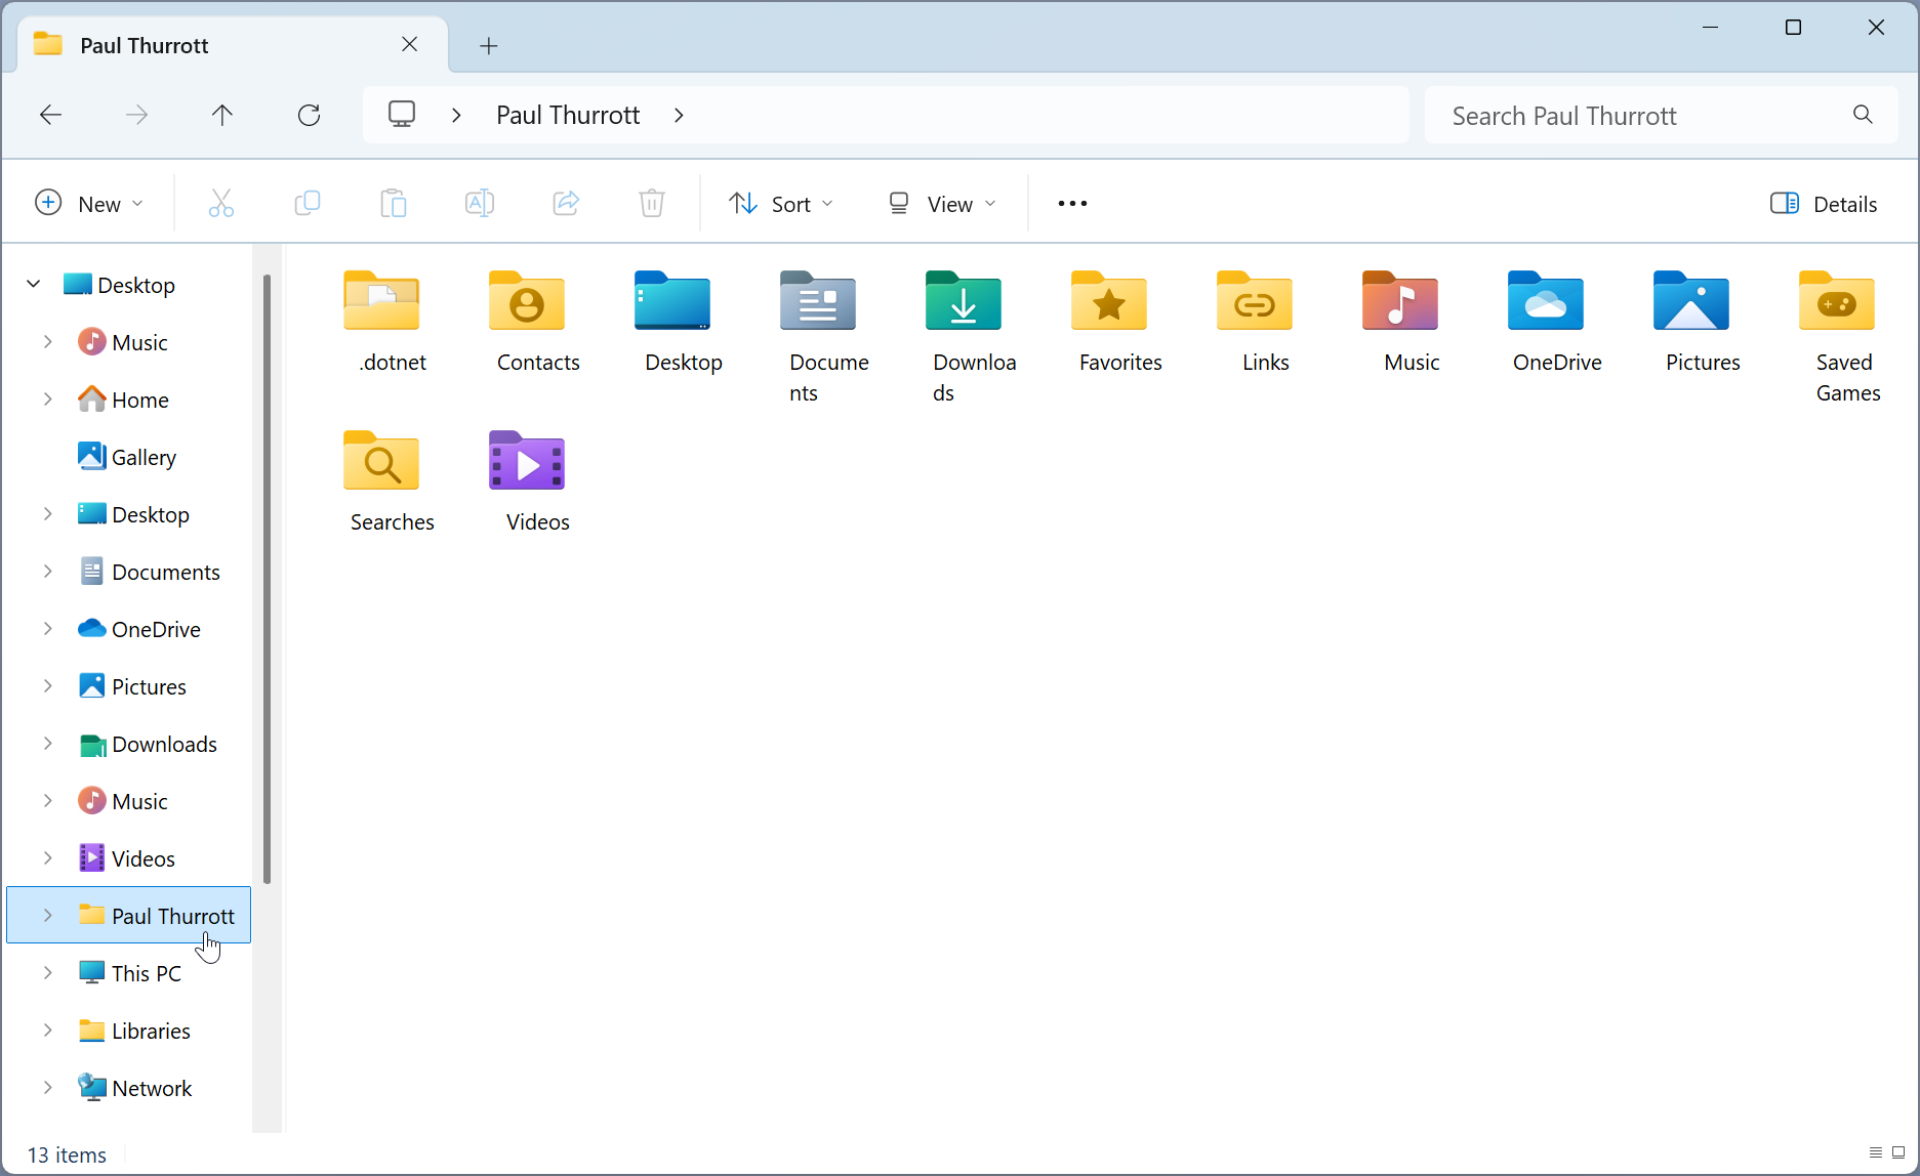
Access commonly used locations with the navigation pane
The File Explorer navigation pane has been redesigned to focus less on the complexity of your PC’s file system and more on the folders and files you need to access regularly. As such, it provides three main sections from top-to-bottom, with Home, Gallery, and OneDrive items–the latter of which is named like Your name- Personal if you signed in to Windows with a Microsoft account–in the top section, your Quick access folder locations in the middle, and file system links for This PC and Network in the bottom by default.
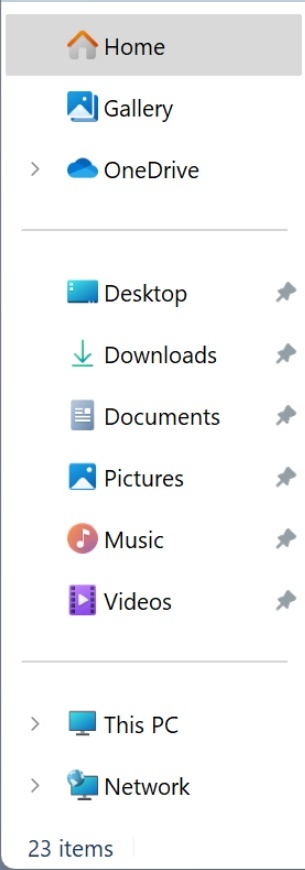
The Quick access section displays the same folders you see in the Quick access section of the Home view. And it’s dynamic, so it will change as you use the PC. We discuss how you can customize this feature below in Customize Quick access.
Interact with the Address bar
Microsoft has “modernized” the Address bar in Windows 11 version 23H2, which means that it’s been rewritten from scratch and offers a few subtle new features.
Understand the icons and buttons in the Address bar
First, the File Explorer Address bar now recognizes and visually identifies local folders–any folder that exists only on this PC–and cloud folders–any folder that is on this PC but also synced with OneDrive and thus available from anywhere–in distinct ways.
OneDrive identifies the type of folder you are viewing with an icon or button in the far left of the Address bar. In a local folder view, you will see a non-interactive icon that usually looks like a computer display.

There are other local folder icons, too. For example, File Explorer’s Home view will display a home icon, and Gallery uses a unique photo gallery icon.
When viewing a cloud folder–again, any folder that is synced with OneDrive–you will see a button at the far left of the Address bar with a distinctive blue cloud icon and accompanying OneDrive status text.


This button is also interactive: If you click it, a OneDrive flyout appears so you can quickly view your cloud storage usage and access two icons that open OneDrive on the web and OneDrive settings, respectively.
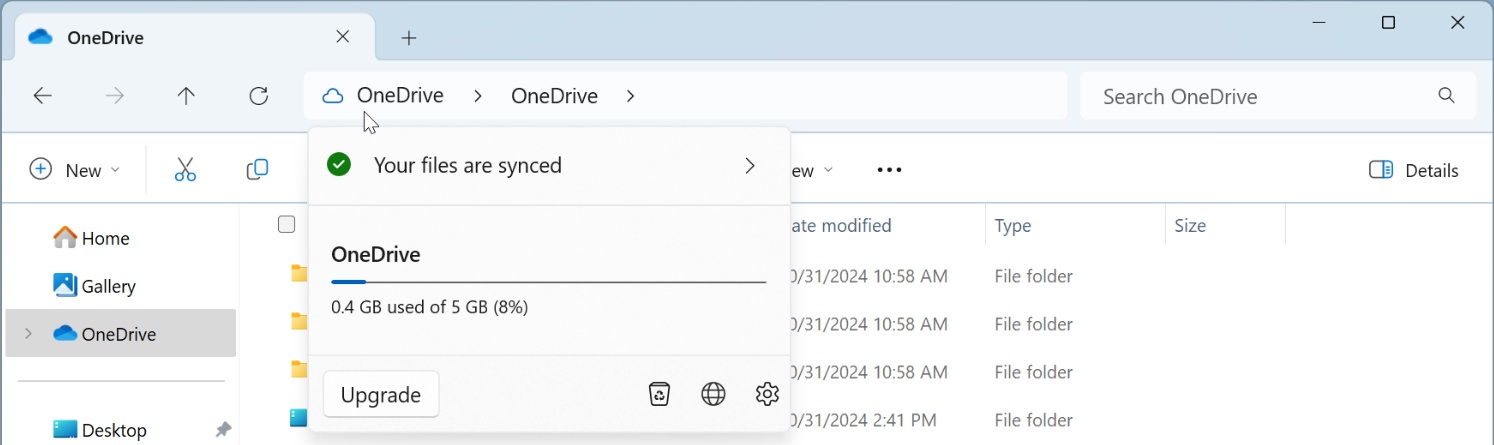
Microsoft also uses this feature to badger you into using OneDrive Folder Backup if you are not already doing so: When you view a folder that could be protected with Folder Backup–Desktop, Documents, Pictures, or any of the sub-folders they contain–the Address bar button will display a message nagging you to use Folder Backup.


You can learn more about Folder Backup in the OneDrive chapter.
Understand the path display in the File Explorer Address bar
File Explorer’s Address bar displays a simplified view of the file system path of the location you’re currently viewing by default. In this example, we’ve navigated to C:\Windows\Web\Wallpaper\Windows, a folder that contains two Windows 11 background images.

As you can see, the Address bar separates each part of that path with a “>” character. And because the window is not wide enough to display every part of the path, some parts are hidden behind a “…” character. If you click that, you see the hidden parts of the path.

To see a more traditional depiction of the path of the currently displayed location, just click a blank area of the Address bar.


Move or copy a file using the Address bar
The Address bar is interactive: You can, for example, arbitrarily navigate up in the path by clicking any of its path parts.
Less obviously, you can move or copy a file (or multiple files) in the current view by dragging (or right-dragging) it into the Address bar and letting it go on the path part to which you wish the file(s) to be moved (or copied). As you hover over any path part in the Address bar, a tooltip appears to let you know what will happen if you let go of the file(s) there.

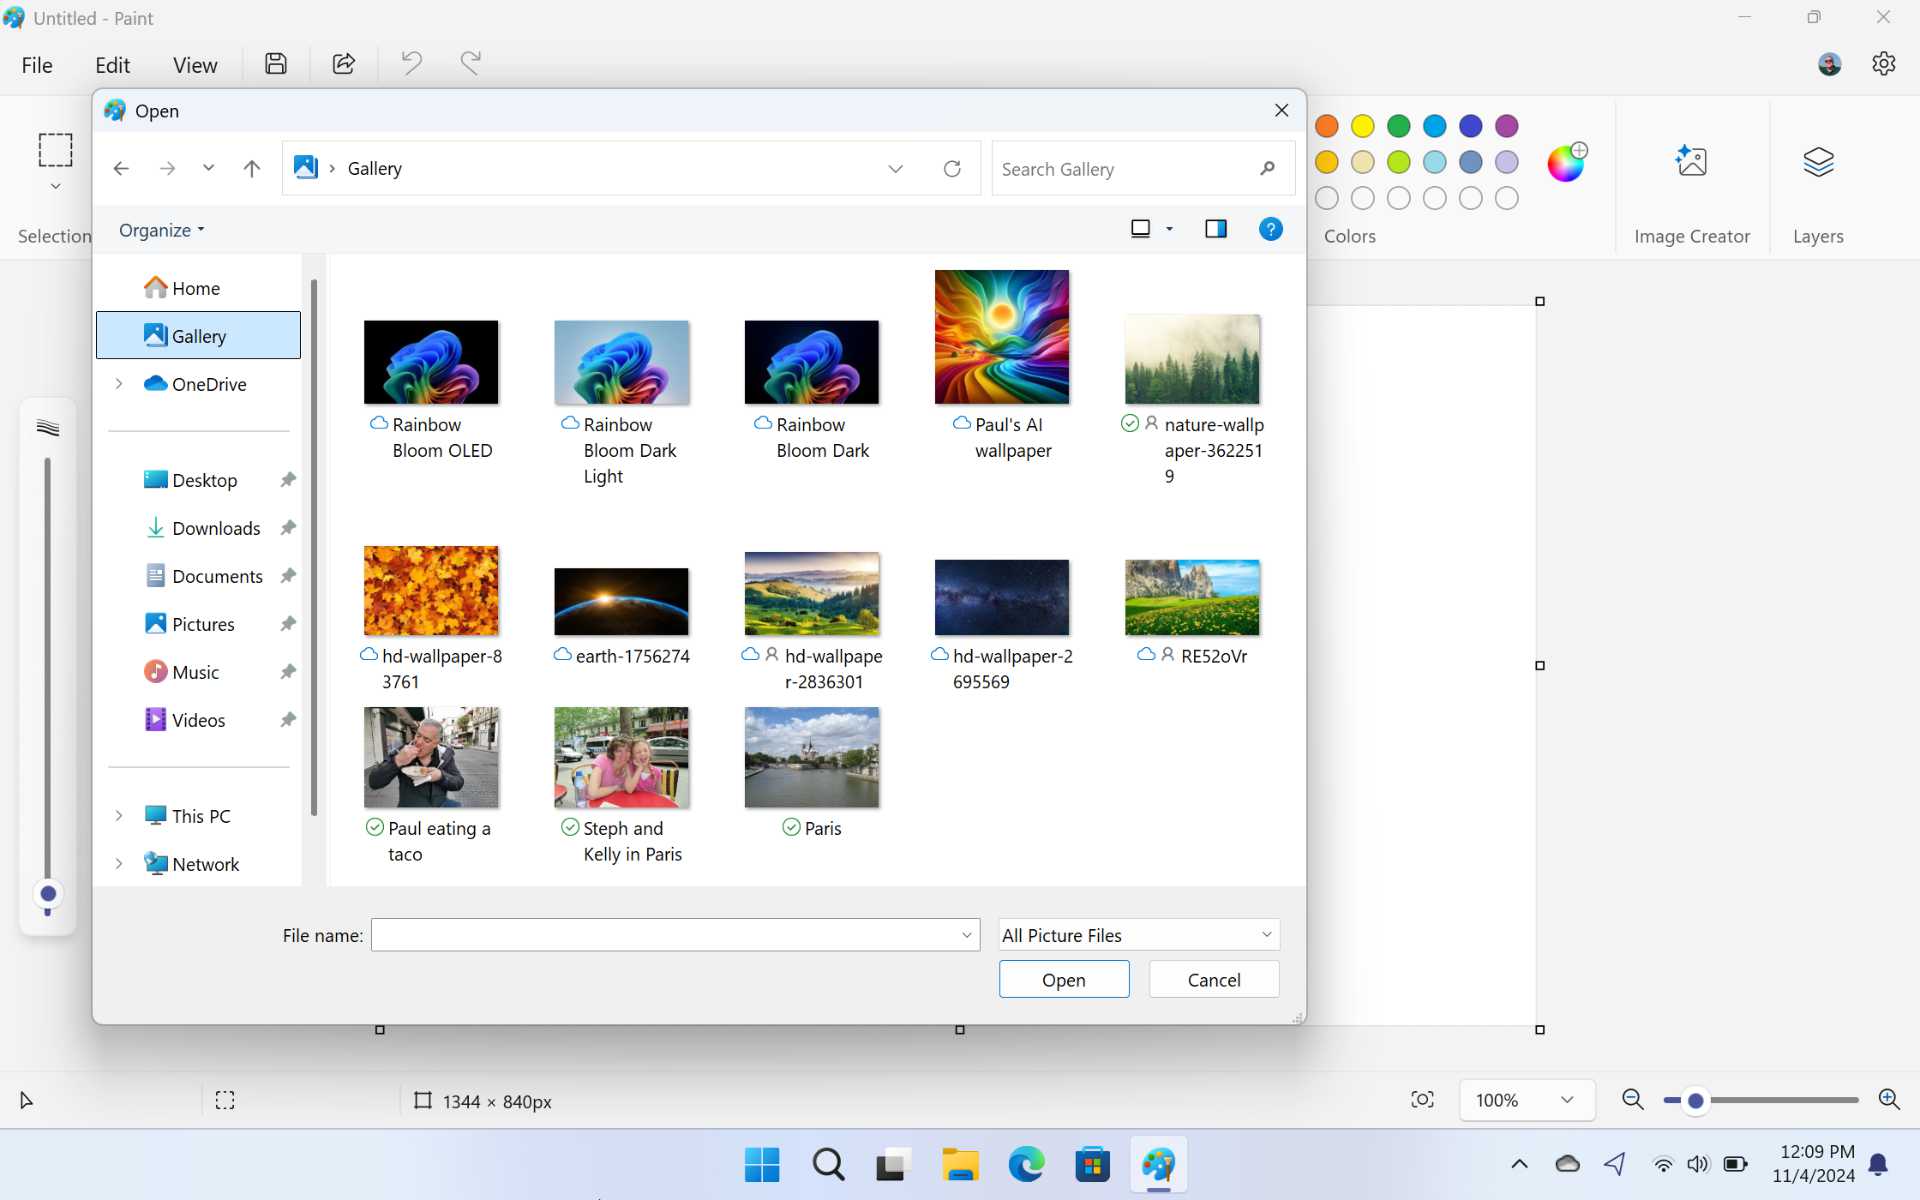
Use Gallery to view your photo collection
File Explorer now features a prominent new Gallery view, accessible via the top section of the navigation bar, that displays your photo collection using rich thumbnail images, with the most recent images at the top.
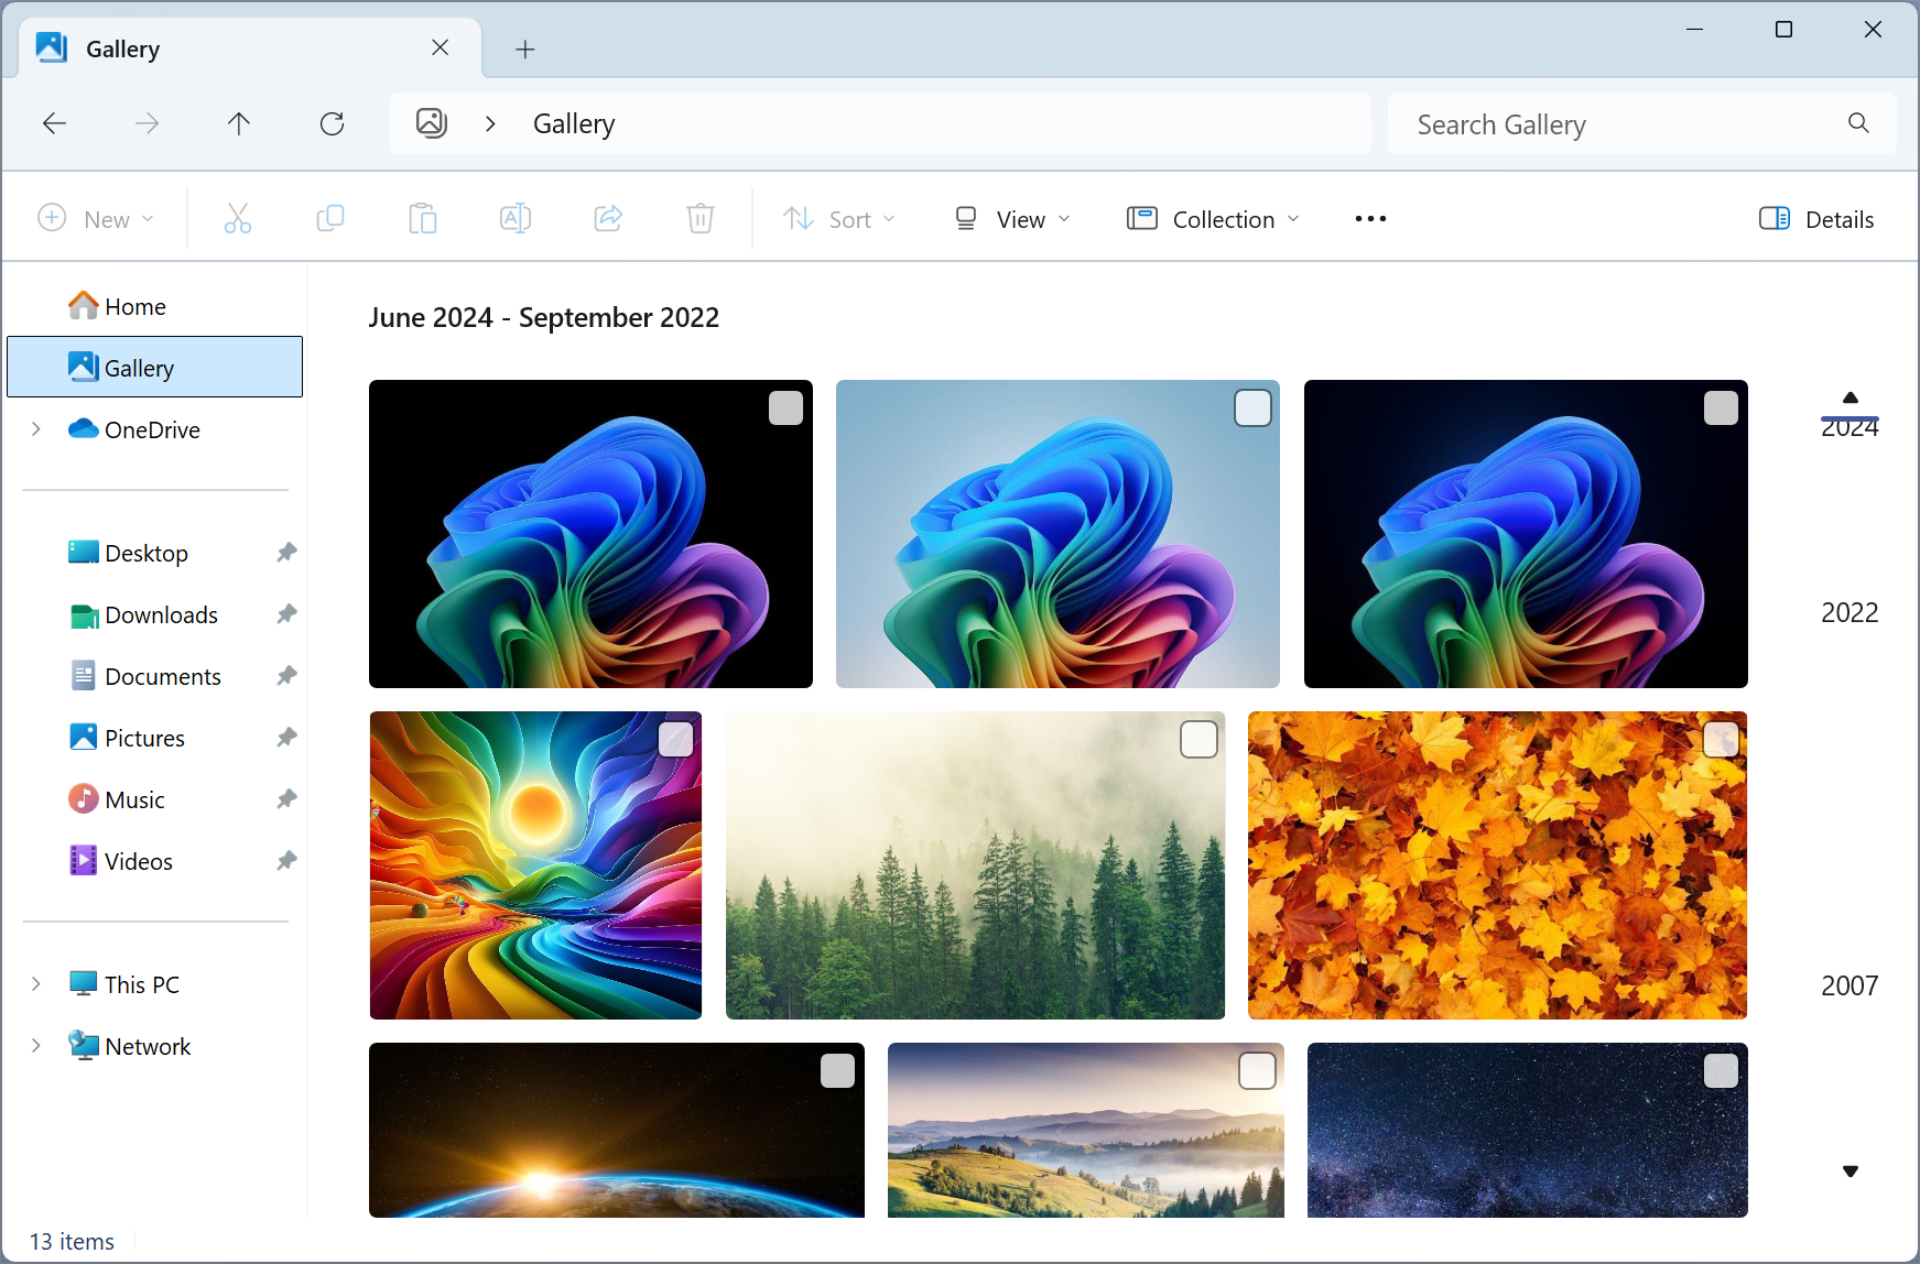
If this view looks familiar, that’s because it’s the same as the All Photos view in the Photos app. And for that reason, it may seem superfluous at first. But those who work with images a lot will find Gallery easier and quicker to use than Photos. And if you open an image from this view, it will still display normally in the Photo app’s lightweight photo viewer window by default.
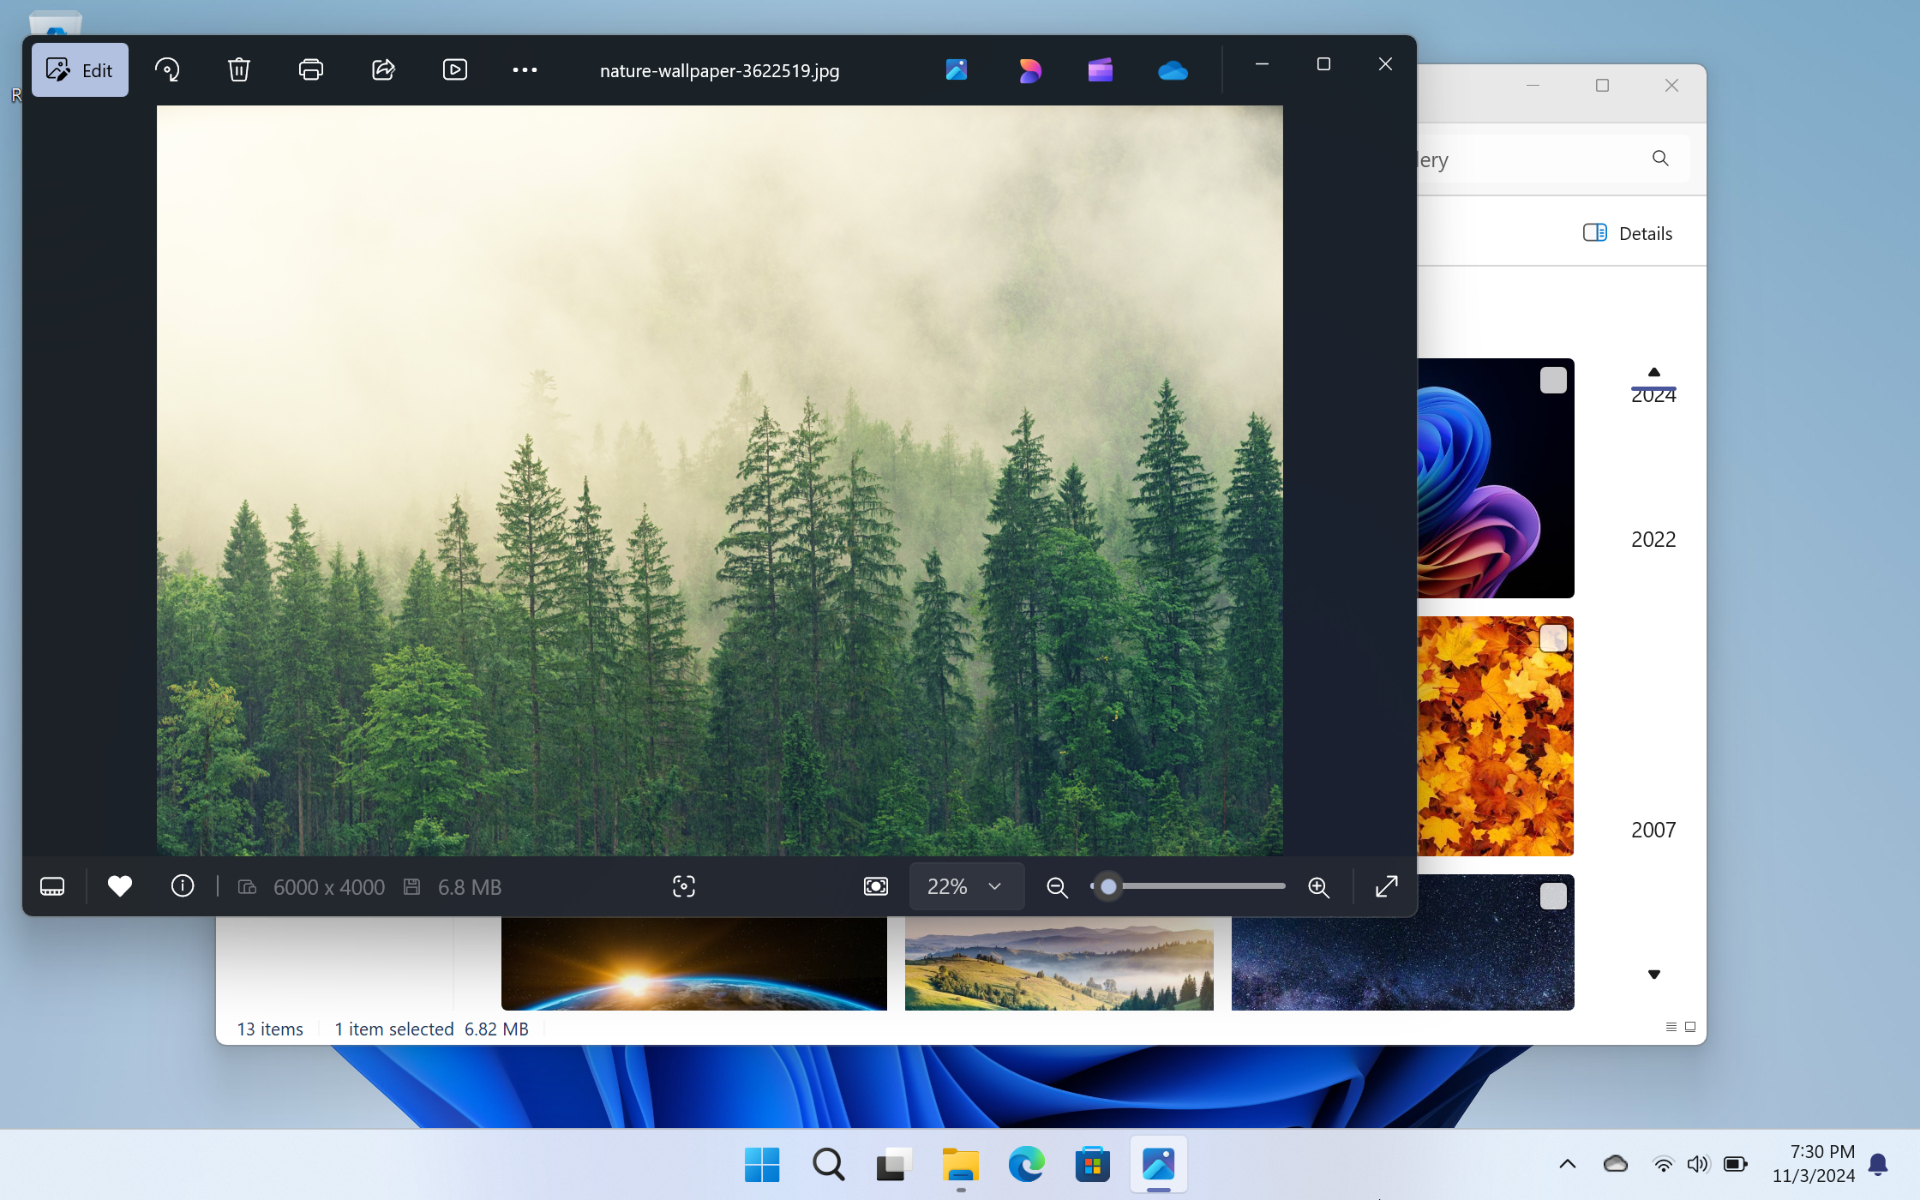
Better still, Gallery appears in the standard File Open dialog, so it’s available via most apps too.
Configure where Gallery looks for your photos
By default, the Gallery photo collection displays an aggregate view of the photos and other images it finds in your local Pictures folder and your OneDrive Pictures folder. But you can configure which folder(s) it uses with the Gallery Locations dialog: Click the “Collection” command bar button, then select “Manage collection” in the menu that appears.
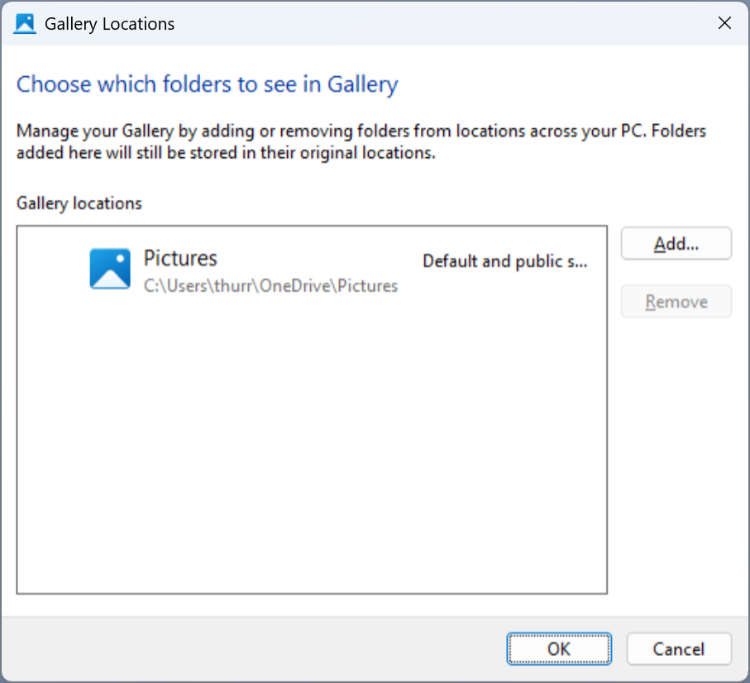
You can also use the “Collection” menu to toggle the display of images in individual folders. If you find this feature useful, consider adding often-used sub-folders like Screenshots, Camera roll, or similar to the locations that Gallery uses so that you can display just the contents of one of those folders as needed.
Add your phone photos to Gallery
If you are not using the OneDrive mobile app on your phone to back up its photos to Microsoft’s cloud storage service, they will not appear automatically in Gallery (or on your PC otherwise). For this reason, you will see an “Add your phone photos” button in the File Explorer command bar while browsing the Gallery.

If you click this button, a window displaying a QR code appears so you can scan it your phone’s camera to install the OneDrive mobile app.
Once you set up this feature on your phone, all the photos it contains will be synced to a Camera roll folder in your OneDrive Pictures folder. And they will now appear in Gallery.
The “Add your phone photos” button is about as dumb as it can be: It appears even if you are backing up your phone photos to OneDrive. The only way to remove it that we’ve found is to pair your phone with Phone Link.
Remove Gallery from File Explorer
Not a fan of Gallery? You can remove it, if you don’t mind fiddling with the Registry: Windows 11 doesn’t provide a user interface for doing so.
To remove Gallery from the File Explorer navigation pane, open a Terminal window with Administrator privileges. (Open Start, type terminal, right-click “Terminal” in the search results, and select “Run as Administrator” from the context menu that appears.) Then, type the following command line followed by ENTER:
reg.exe add “HKEY_CURRENT_USER\Software\Classes\CLSID\{e88865ea-0e1c-4e20-9aa6-edcd0212c87c}” /f /v “System.IsPinnedToNameSpaceTree” /t REG_DWORD /d 0x00000000
Then, reboot your PC (or restart Explorer.exe using Task Manager, if you’re comfortable doing that). Gallery is no longer available in File Explorer.
You can reverse this change (again using Terminal with Administrator privileges) with the following command line:
reg.exe add “HKEY_CURRENT_USER\Software\Classes\CLSID\{e88865ea-0e1c-4e20-9aa6-edcd0212c87c}” /f /v “System.IsPinnedToNameSpaceTree” /t REG_DWORD /d 0x00000001
As before, you need to reboot your PC or restart Explorer.exe to see the change.
Learn more about files with the Details pane
Microsoft has added a new Details pane to File Explorer that displays a thumbnail or icon, plus meta-data for the currently selected file. The Details pane appears on the right side of the files area and is toggled on and off via a new button at the far right of the File Explorer command bar.
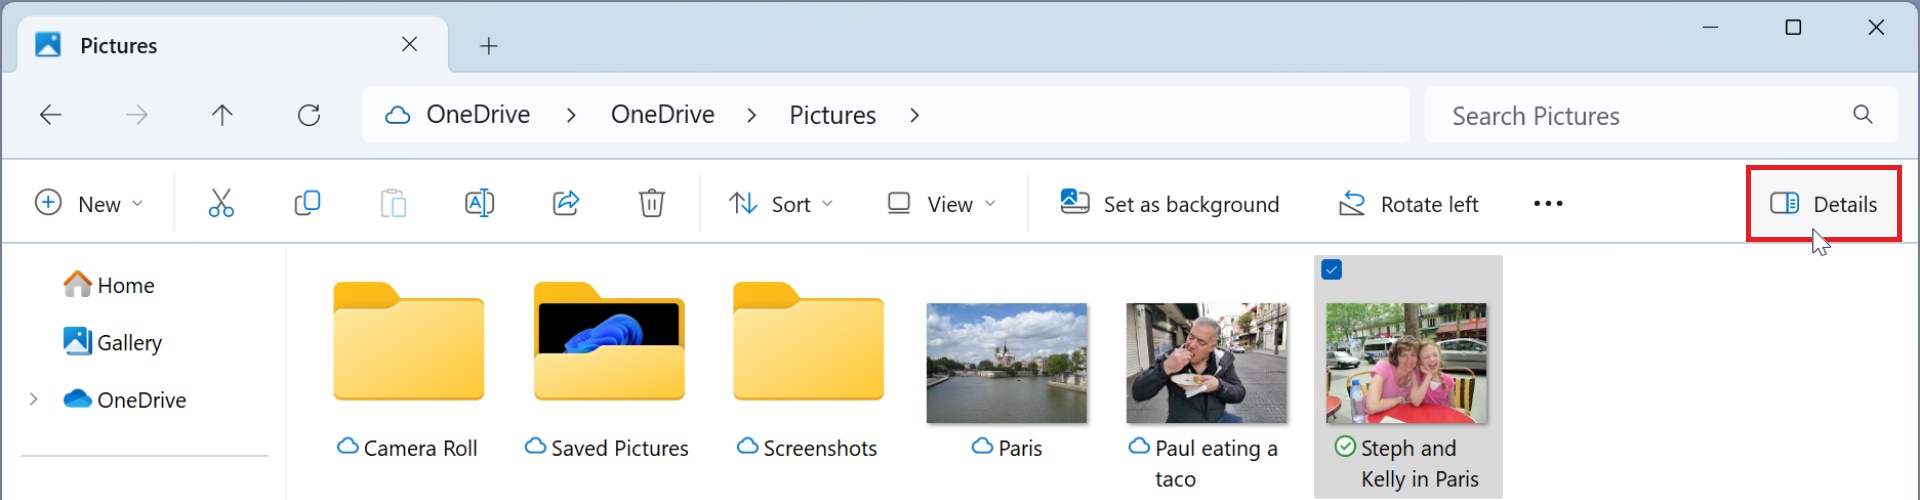
You can also type ALT + SHIFT + P to toggle the Details pane.
What you see in the Details pane will depend on the type of the selected file. There is a thumbnail preview for image files, for example, while many other file types will simply display an icon.
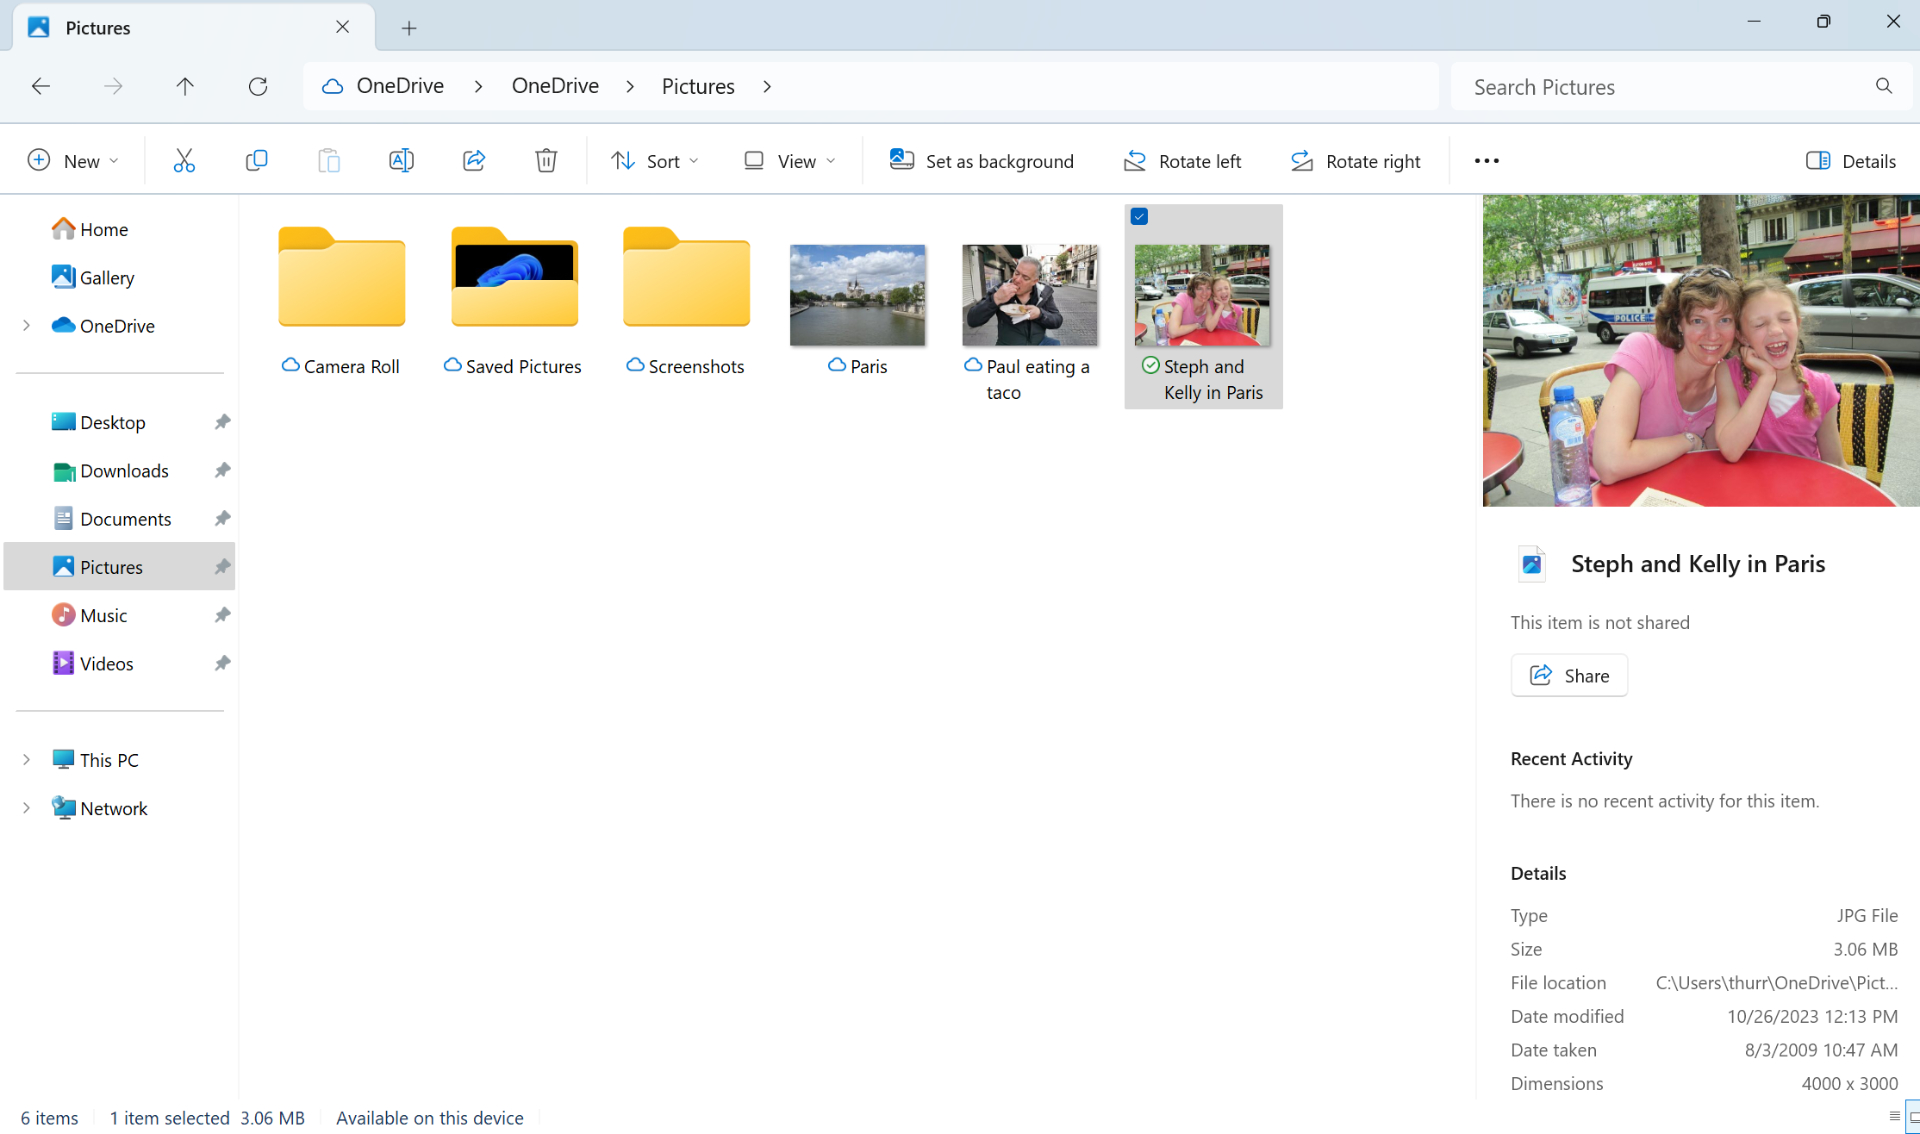
The Details pane works with individual files only. It can’t display information about two or more files.
Below that, you will find a “Share” button that duplicates the “Share” button in File Explorer’s command bar, some selection of meta-data about the file that also varies by type, and a “Properties” button that opens the selected file’s property sheet, a legacy interface for displaying file information.
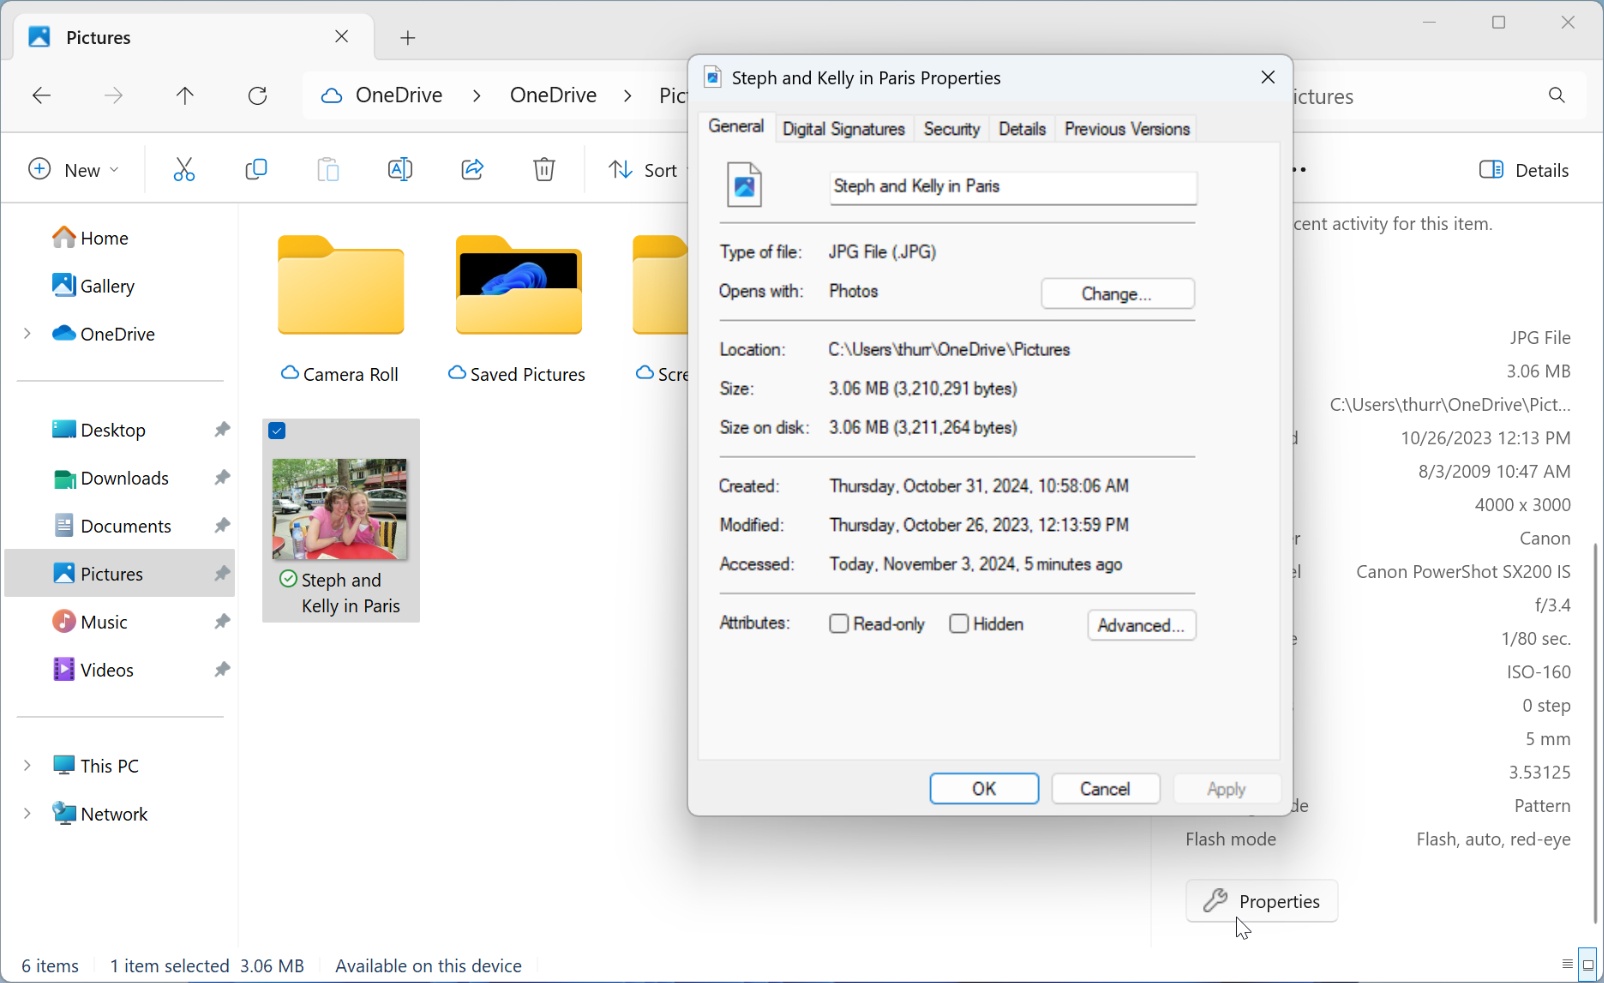
The Details pane is in many ways a modern replacement of sorts for the property sheet, though the latter provides a lot more information about each file.
Work with archive files
File Explorer has long offered integrated support for the ZIP archive file format via a feature called compressed folders. This feature lets users compress (“zip”) one or more files into a ZIP archive and extract (“unzip”) files from a ZIP archive. But it also simplifies the use of ZIP archives by allowing them to work like normal folders: You can open a ZIP archive like a folder, browse its contents, copy or move content to or from the archive, and perform other basic file operations.
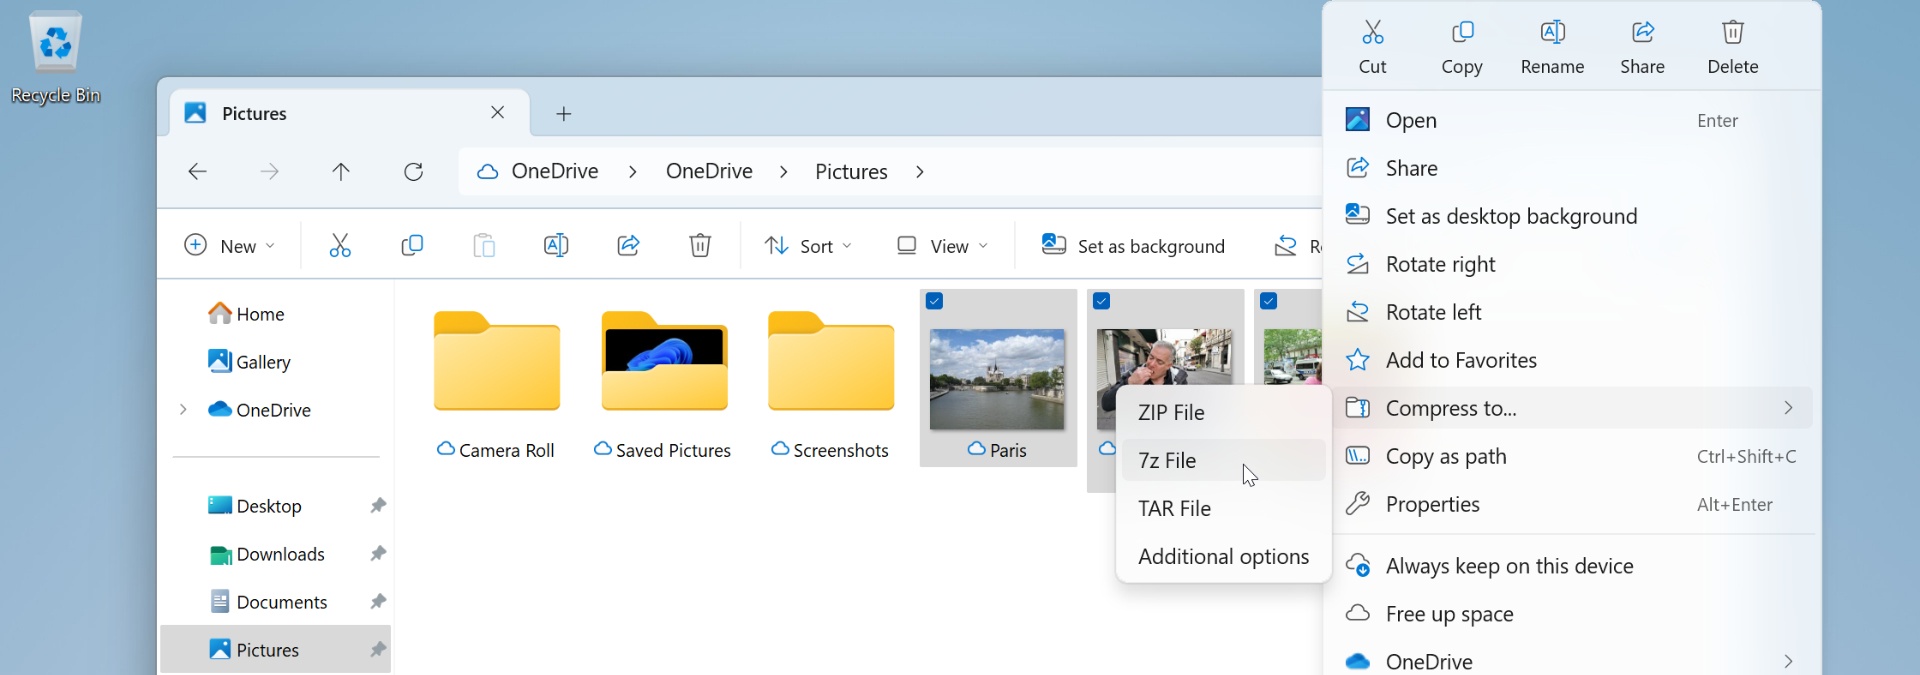
With Windows 11, Microsoft has extended compressed folders to support compressing and extracting other archive file formats. So you can now create, view, and extract archive TAR (.tar, .tar.gz, .tar.bz2, .tar.zst, .tar.xz, .tgz, .tbz2, .tzst, and .txz), and 7-ZIP (.7z) archive file formats–plus ZIP files, as before–without needing to install a third-party app.
To create a compressed archive file, select one or more files in File Explorer (or the Desktop), right-click, and then choose “Compress to…” and then the appropriate archive format. When you make your choice, Windows will create the file in the current folder (or on the Desktop) and then prompt you to name it.
To open a compressed archive file, just double-click it to display its contents like a normal folder inside a File Explorer window.
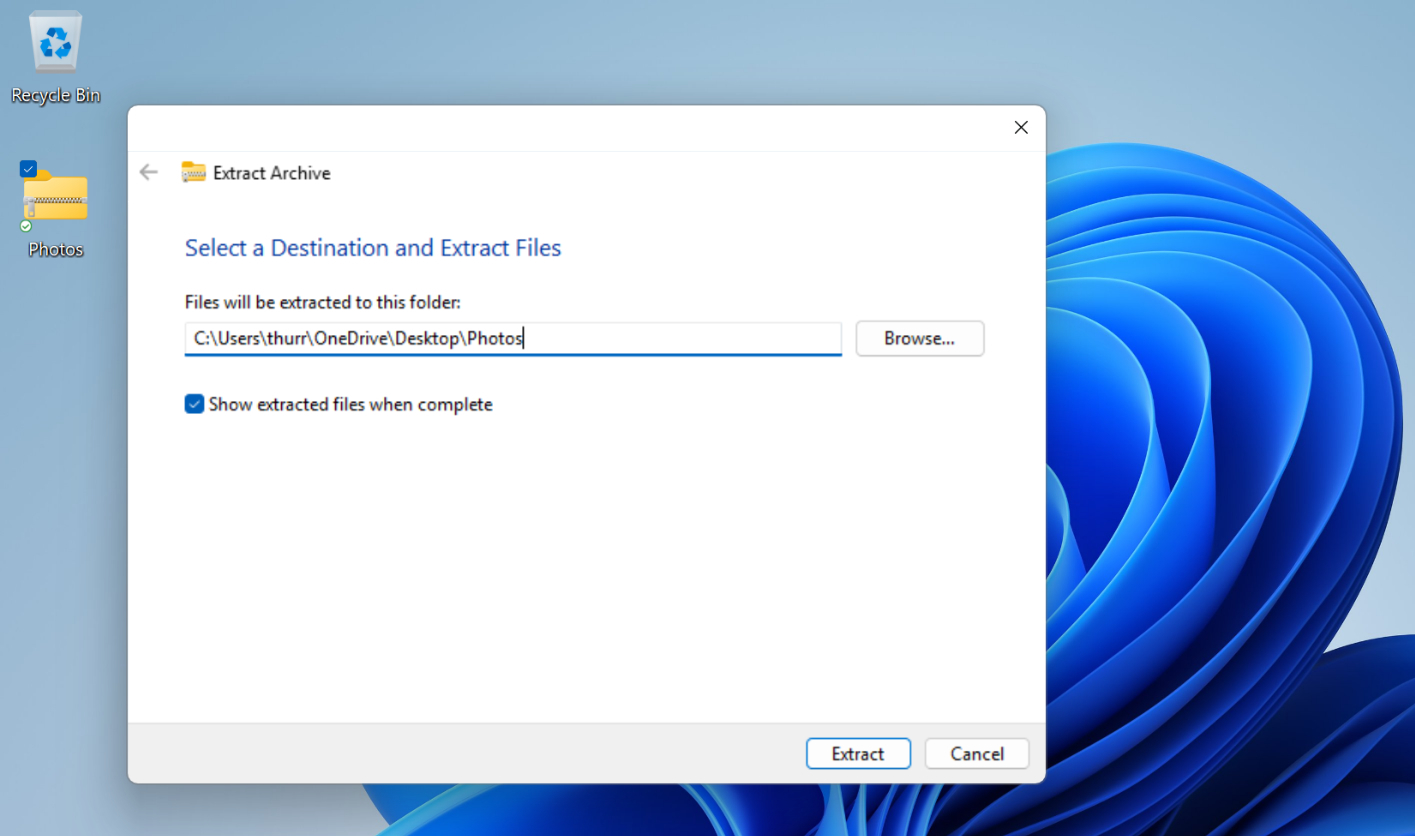
To extract a compressed archive file, right-click it, select “Extract All” and then click “Extract” in the Extract Archive window that appears (after optionally changing the destination path).
Customize File Explorer
While File Explorer will work well for most users without modification, power users and others may wish to customization how it works.
Configure the File Explorer home page
By default, File Explorer opens to the Home view, which displays your Quick access folders, favorite files, and recently accessed files. But you can customize the home page so that it opens to This PC or OneDrive if you prefer.
To do so, select “See more” (“…”) in the File Explorer command bar and then select “Options” to display the Folder Options window.
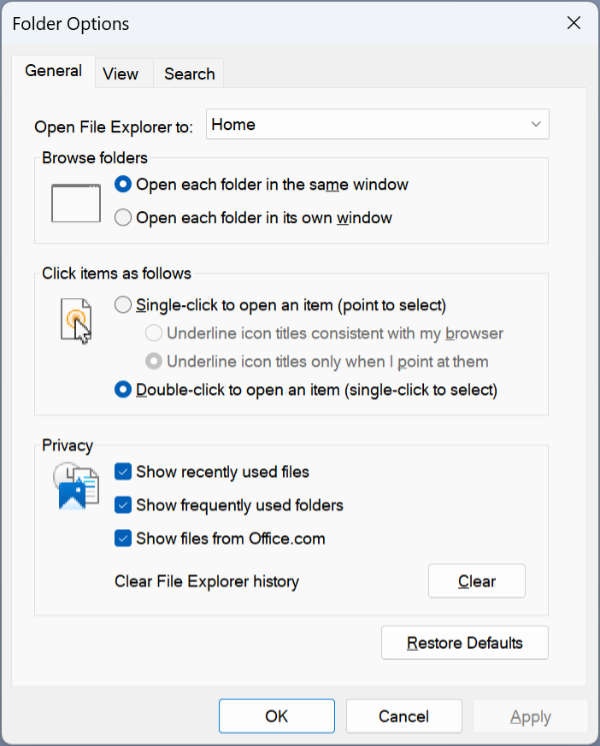
In the default General tab, select “Open File Explorer to:” to display the choices.
Customize Quick access
By default, Quick access displays your Desktop, Downloads, Documents, Pictures, Music, and Videos folders. But as you access other folders frequently, they will be added to Quick access automatically as well.
This behavior is also configured in Folder Options. You can find the relevant options in the Privacy section on the General tab, and are all enabled by default.
They are:
Show recently used files. This option determines whether the Recent section in the Home view displays recently used files from your PC, in reverse chronological order (most recent first).
Show frequently used folders. This determines whether the Quick access view–in Home and in the navigation pane–dynamically changes to display folders you access frequently. If you don’t want Windows changing the folders that appear in Quick access–in your navigation pane and in the Home view–be sure to uncheck this option.
Show files from Office.com. This option determines whether recently used files from Office.com on the web are displayed, in reverse chronological order, in the Recent section in the Home view. In other words, it will display documents you recently accessed via a web browser, and perhaps on another PC or device.
Customize the navigation pane
You can also customize which items appear in the navigation pane to some degree.
To see most of what’s possible, right-click a blank area of the navigation pane. When you do, a context menu appears.
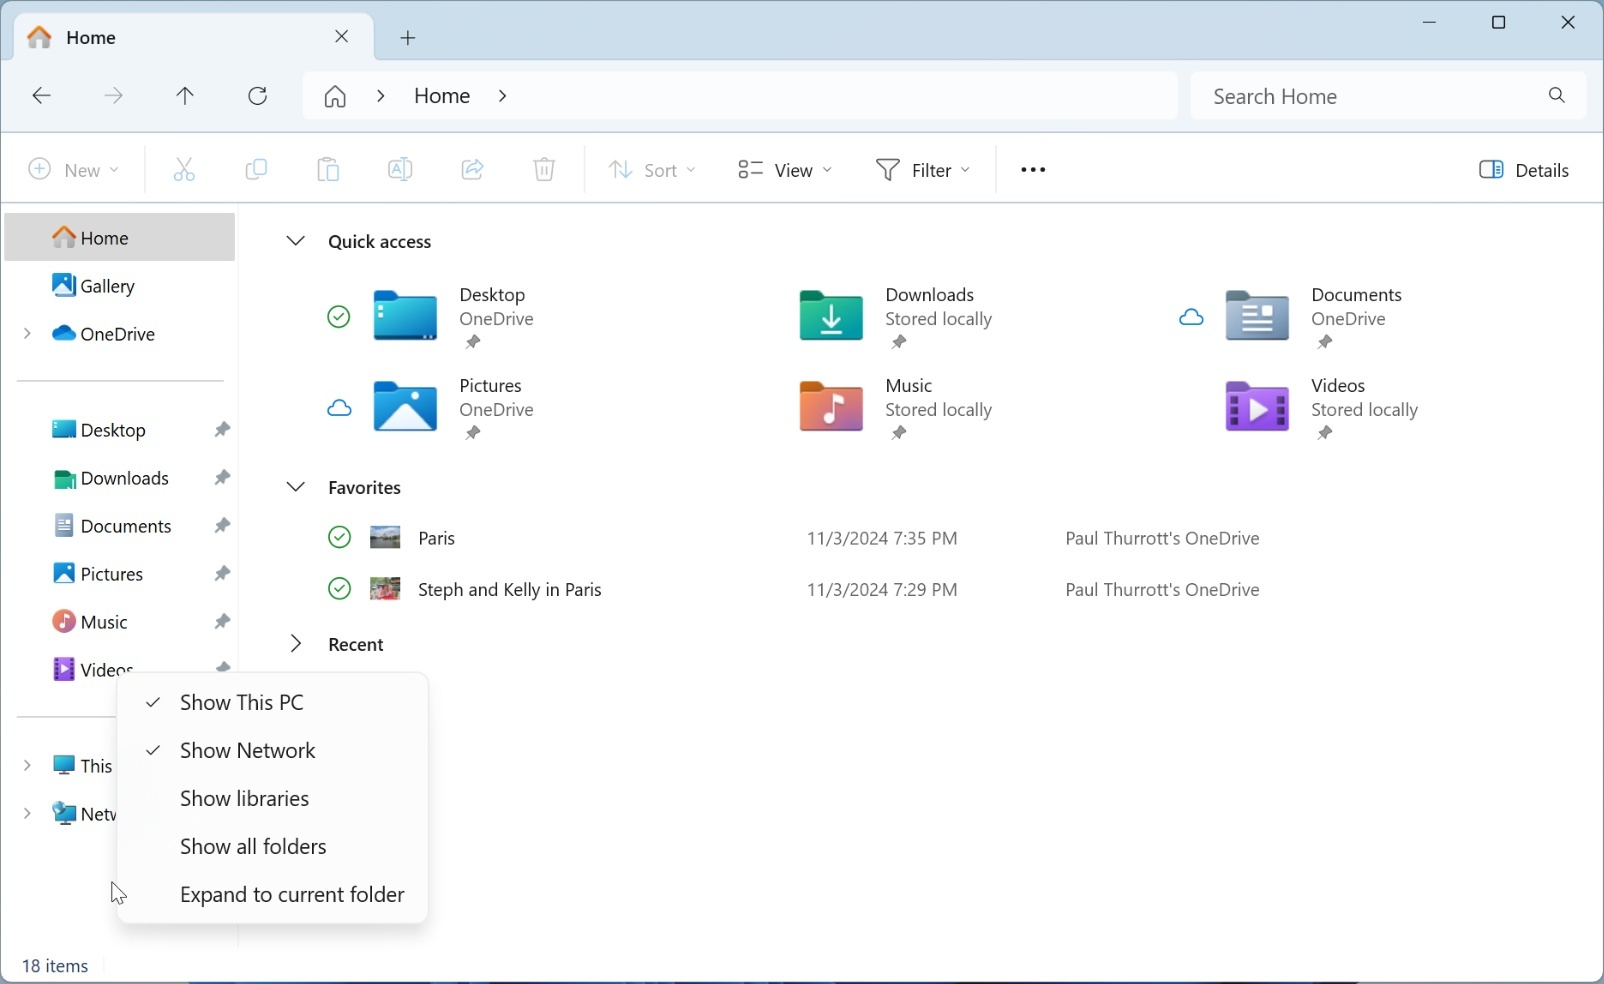
Some of these choices are obvious enough: you can remove the “This PC” and “Network” links, for example, though we strongly recommend not doing so. But the other three links require a bit of explanation.
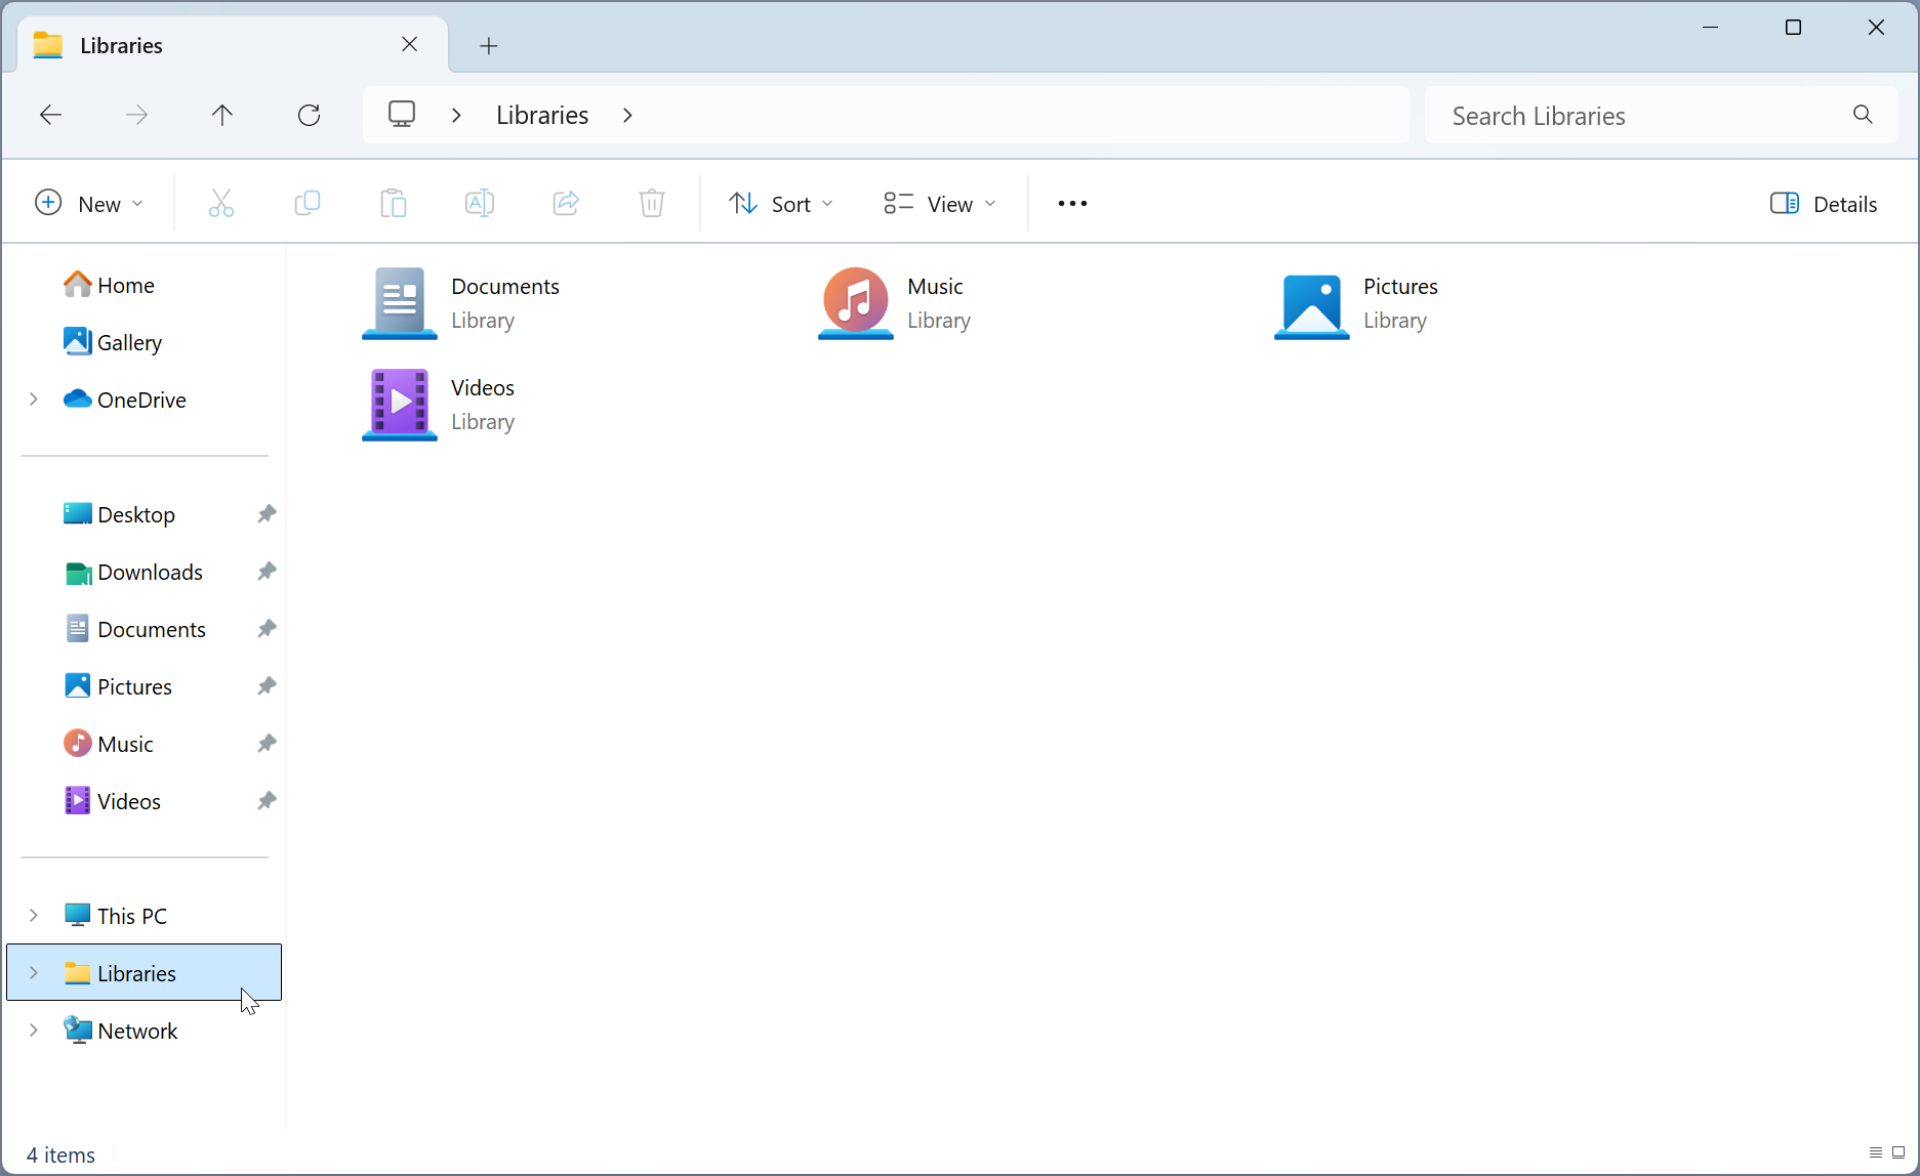
Show libraries. This displays a link to a legacy Windows feature called libraries, which are virtual folders that display views derived from the actual contents of multiple physical folders. For example, the Documents library might display the contents of your personal Documents folder plus the Documents folder in your OneDrive. This feature was deprecated because most users found it too complex, and unless you know you need this, we do not recommend enabling it here.
The new Gallery feature works like a library in that it, too, is a view derived from multiple locations in the file system. It’s like a library for photos and other images.
Show all folders. You might assume that enabling this option would display a link called All folders, but that’s not what happens. Instead, it changes the navigation pane into a folder tree view similar to the old File Manager application from legacy Windows versions. So in addition to not using the standard three navigation pane sections, it adds legacy file system nodes like Control Panel and Recycle Bin. We don’t recommend this change to most, but it may appeal to certain old-timers.
Expand to current folder. When enabled, this option will cause the relevant link in the navigation pane to always expand to the location of the current folder or another view. For example, if you are displaying the contents of C:\Windows\, the “This PC” link in the navigation pane will be expanded so that you can see the path–with “Local Disk (C:) and “Windows” nodes below it–to that location.

Put simply, we feel that most users are best served by the default navigation pane layout.
All the navigation pane customization options are also available in Folder Options. Just navigate to the View tab and scroll down to the bottom of Advanced settings. There, you will find a section called Navigation pane.

Most of these options map to the options you see when you right-click an empty area of the navigation pane–“Expand to open folder” is the same as “Expand to current folder,” and so on–but one option, “Always show availability status,” is only available from this user interface.
This is a OneDrive feature, and we discuss this option in the OneDrive chapter.
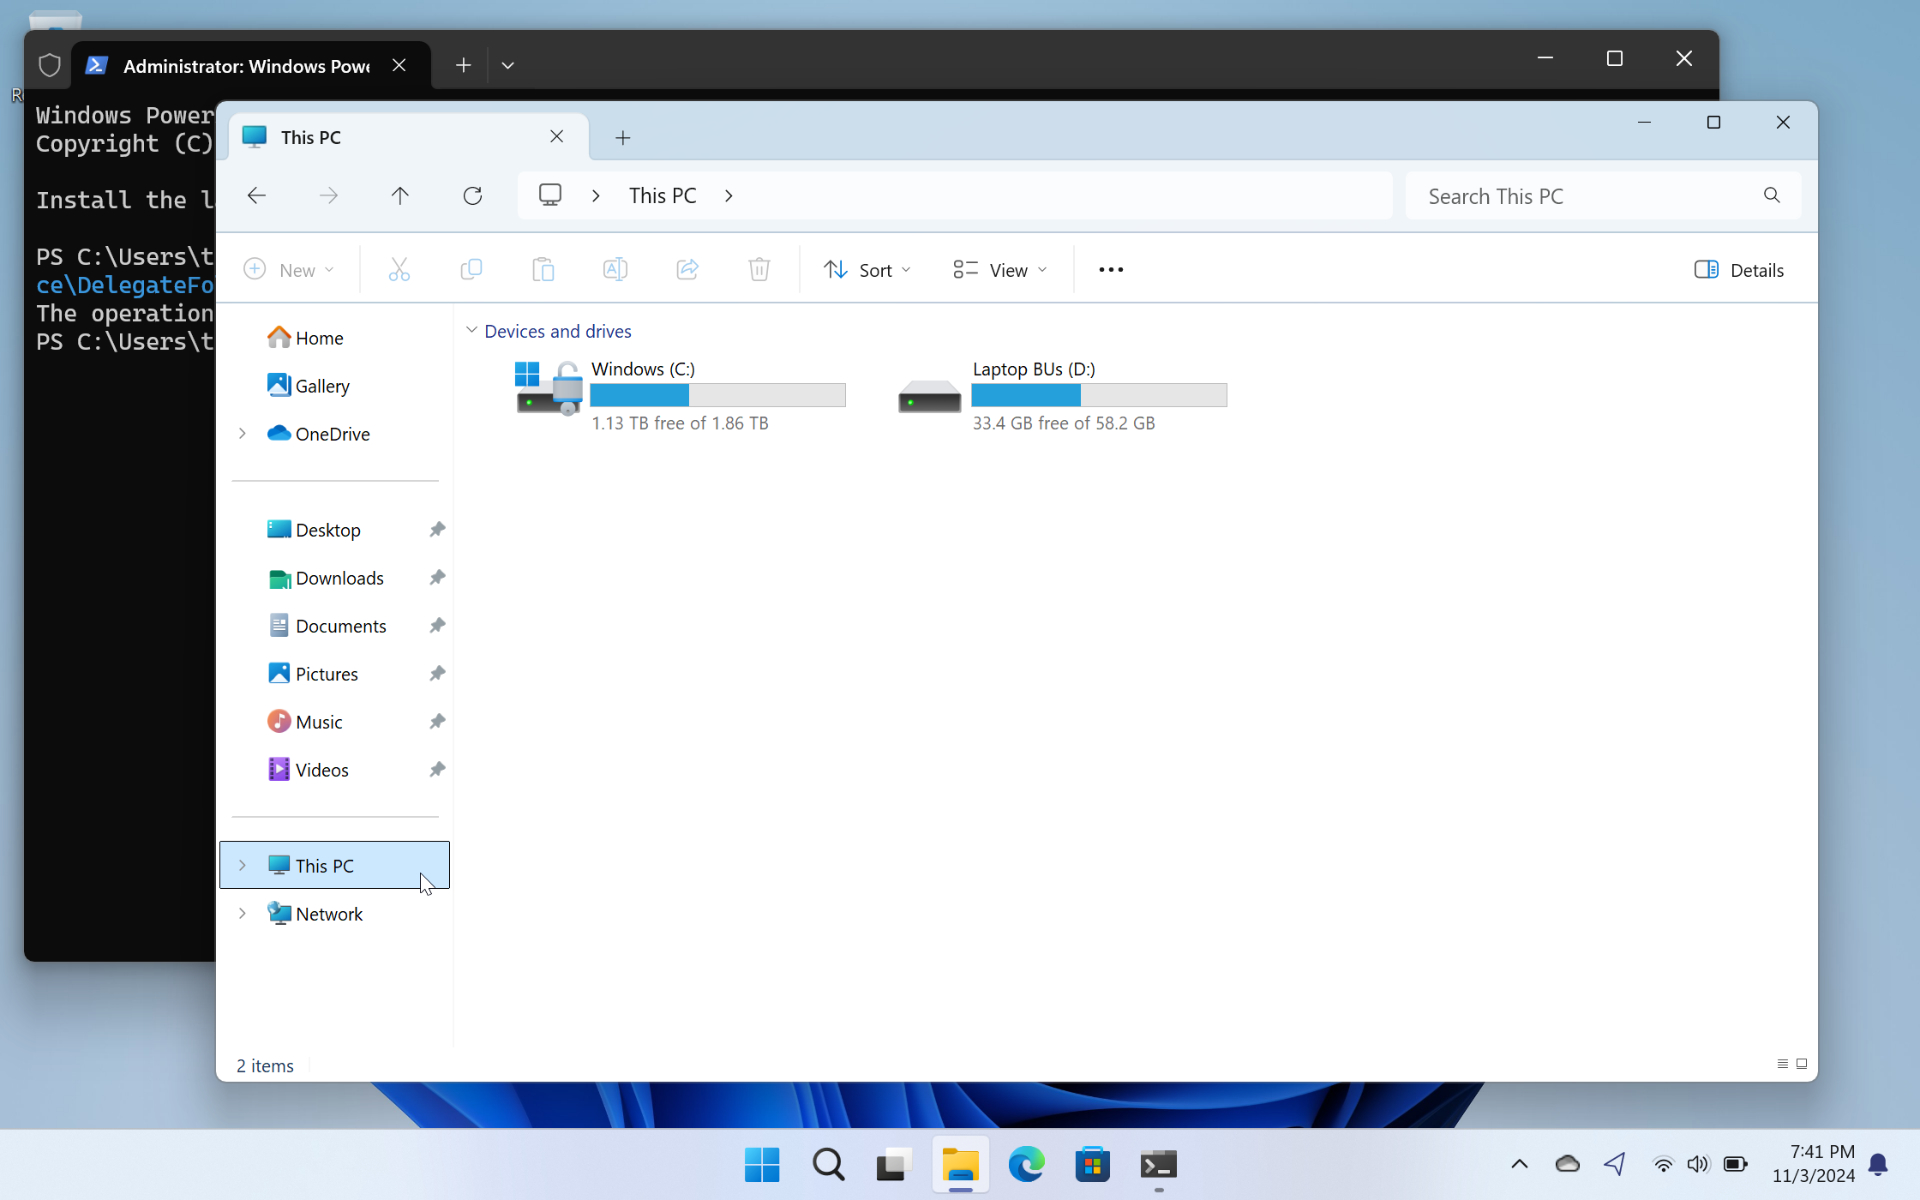
Customize how removable drives appear in File Explorer
When you connect removable storage–usually USB-based–to your PC, one or more drive entries appear at the bottom of the File Explorer navigation pane, each with a corresponding drive letter. Here, you can see a single new entry, for “Laptop BUs,” that was assigned to drive letter D.
This may be desirable: This new entry gives you an obvious place to click if you’d like to see the contents of that drive. But you may instead find it superfluous, and a waste of on-screen real estate. You can configure Windows to automatically open any newly attached removable drive in a File Explorer window. And you can always access the removable drive along with any other PC storage by navigating to the This PC view.
You can learn how to configure what happens when you connect removable drive to your PC in the Storage chapter.
There’s no interface that lets you configure File Explorer to not display removable drives. But you can make this change using the Registry.
To do so, open a Terminal window with Administrator privileges and then type the following command line followed by ENTER:
reg.exe delete “HKEY_LOCAL_MACHINE\SOFTWARE\Microsoft\Windows\CurrentVersion\Explorer\Desktop\NameSpace\DelegateFolders\{F5FB2C77-0E2F-4A16-A381-3E560C68BC83}” /f
As soon as you hit ENTER, the drive(s) will disappear from the navigation bar in File Explorer, but you’ll still be able to access them in the This PC view.
You can reverse the change (again using Terminal with Administrator privileges) with the following command line:
reg.exe add “HKEY_LOCAL_MACHINE\SOFTWARE\Microsoft\Windows\CurrentVersion\Explorer\Desktop\NameSpace\DelegateFolders\{F5FB2C77-0E2F-4A16-A381-3E560C68BC83}” /f /ve

Gain unlimited access to Premium articles.
With technology shaping our everyday lives, how could we not dig deeper?
Thurrott Premium delivers an honest and thorough perspective about the technologies we use and rely on everyday. Discover deeper content as a Premium member.