Local Accounts (24H2)
- Paul Thurrott
- Nov 08, 2024
-
2
A local account is a Windows 11 sign-in account that exists only on the PC on which it is created. Microsoft sometimes refers to this type of account as an offline account because it can be created even when the PC is offline: When you initially sign in to Windows 11 with a Microsoft account or Work or school account, you must be online so that you can authenticate your user credentials with Microsoft or your organization.
There are good reasons to sign in to Windows 11 using a Microsoft account or Microsoft Work or school account–security and convenience key among them–and, of course, Microsoft makes it very difficult to do otherwise. But it’s still possible to use Windows 11 with a local account if you prefer that configuration for some reason.
To be clear, we recommend that most people do not sign in to Windows 11 with a local account as you will have a better–and safer–overall experience using a Microsoft account. But more sophisticated users who know what they’re doing can use a local account securely. And doing so can eliminate some of the bad behaviors we see in Windows 11, in particular the silent, forced usage of OneDrive Folder backup.
If you prefer using a local account, this chapter can help you do so using the more secure possible configuration.
What changes when you use a local account
For the most part, a local account looks and behaves much like a Microsoft account. But there are some key differences.
These include:
No password required. You are not required to protect a local account with even a simple password, though doing so is obviously insecure. This is a particularly serious problem if you give the local account administrative capabilities, as a thief could access content in other Microsoft accounts or work or school accounts configured on that PC. We strongly recommend configuring a password, at which point you can use a Windows Hello PIN or facial or fingerprint recognition for an even more secure experience.
No two-step verification. Where your Microsoft account (or Work or school account) can be–and should be–protected with two-factor authentication (2FA), which makes your account and the personal data it protects more secure, a local account is not (and cannot be).
No device encryption by default. When you sign in to Windows 11 with a Microsoft account, the PC’s storage is automatically protected with device encryption, a full-disk encryption solution that helps protect the documents and other data it contains from being stolen or otherwise accessed by others. To date, Microsoft has not offered this functionality to those who sign in to Windows 11 with a local account.
That changed in Windows 11 version 24H2, though there are additional steps to take to enable this critical feature. We discuss how to enable device encryption after signing in with a local account later in this chapter.
If you are using Windows 11 Pro with a local account, any account type can enable BitLocker drive encryption, a more advanced form of device encryption. This is done via the BitLocker Drive Encryption control panel, which can be found with Search.
You can learn more about BitLocker in the Device Encryption chapter.
No account recovery. Because your Microsoft account is managed by Microsoft, you can recover your account if you forget your password or the account is somehow compromised. There are no such protections with a local account, and if you forget your password or lose it, you’re simply locked out of your PC and whatever data it contains.
No settings sync. When you sign in with a Microsoft account, Windows 11 used a feature called Windows Backup to sync a limited set of settings–accessibility settings, saved passwords, language preferences, and more–to that account in the cloud so that they can be restored when you sign in with that same account on a different PC. This functionality is not available with a local account, which exists on only that one PC.
You can learn more about this functionality in the Windows Backup chapter.
No automatic sign in to apps and Windows 11 experiences. When you sign in to Windows 11 with a Microsoft account, you are automatically signed in to Microsoft Store apps, OneDrive, Widgets, and other Windows 11 experiences as well. You can’t use some apps and experiences with a local account, and while you can sign in to them with a Microsoft account later, you must do so manually–one app at a time–or configure that Microsoft account in Windows 11 Settings.
Some Microsoft Store apps work without a Microsoft account, and some provide a subset of the functionality you receive when you’re signed in with a Microsoft account. For example, the Microsoft Store app runs without a Microsoft account, and it even lets you download free apps and games without first signing in.
Sign in to Windows 11 with a local account
There are several ways to create a local account and use that as your Windows 11 sign-in account. We discuss three in this chapter.
- Create a local account when you first set up a new PC, or when you reset an existing PC.
- Sign in to Windows 11 with your Microsoft account and then convert the sign-in to a local account.
- Sign in to Windows 11 with your Microsoft account, add a local account as a new sign in account, switch to that sign-in account, and then remove the initial Microsoft account sign-in.
For many reasons, it makes more sense to initially sign in to Windows 11 with a Microsoft account–as per the second and third options above–because doing so will automatically enable device encryption on the PC and associate its Windows 11 license with you via your Microsoft account. But you can at least manually enable device encryption if you choose the first method.
Sign in to Windows 11 the first time you turn on your PC
When you first power up a new PC, or when you’ve reset Windows 11 on an existing PC, you’re presented with the Windows Setup Out-of-Box Experience (OOBE), which steps you through the process of creating and configuring a sign-in account. This is straightforward if you want to use a Microsoft account (or a Work or school account): You just choose the account type (“for personal use,” which equates to a Microsoft account, or “for work or school”), sign-in and authenticate, and off you go.
But this process is more complicated if you wish to use a local account because Microsoft doesn’t provide an option in the OOBE for doing that anymore.
Fortunately, there is a workaround.
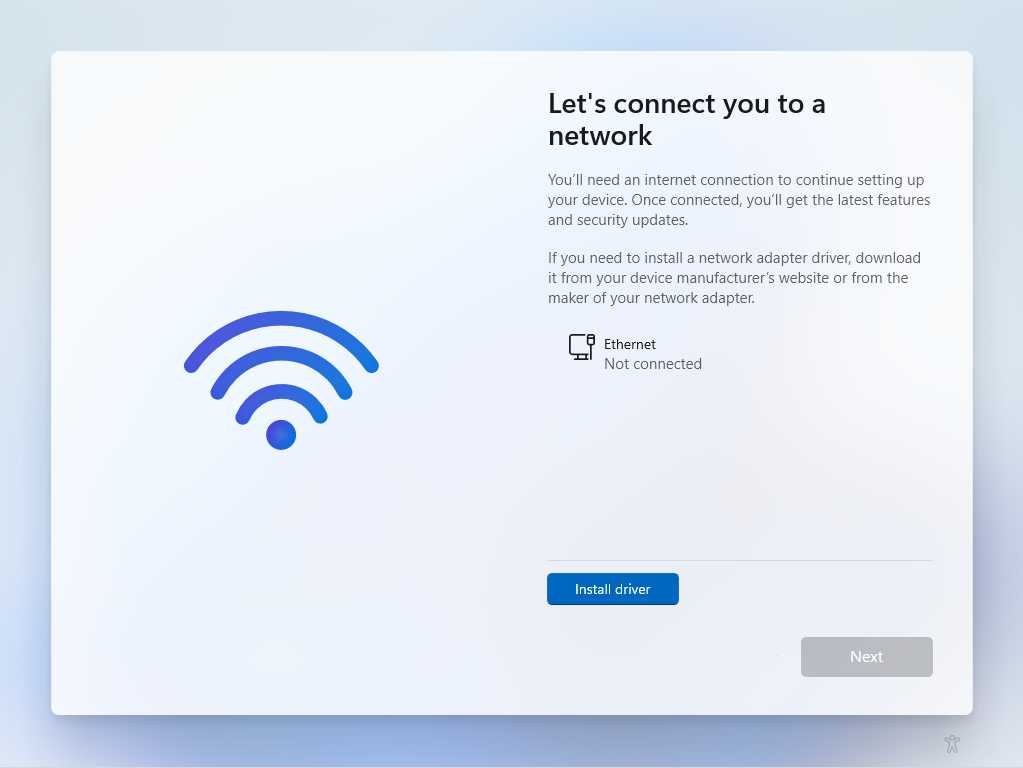
First, make sure the PC isn’t connected to the Internet via an Ethernet cable. Then, start it up and step through the OOBE normally until you reach the screen titled Let’s connect you to a network.
Type SHIFT + F10 to display a Command Prompt window, which lets you execute Windows applications using a command line interface. Make sure the Command Prompt window is selected and then type the following command:
> oobe\bypassnro
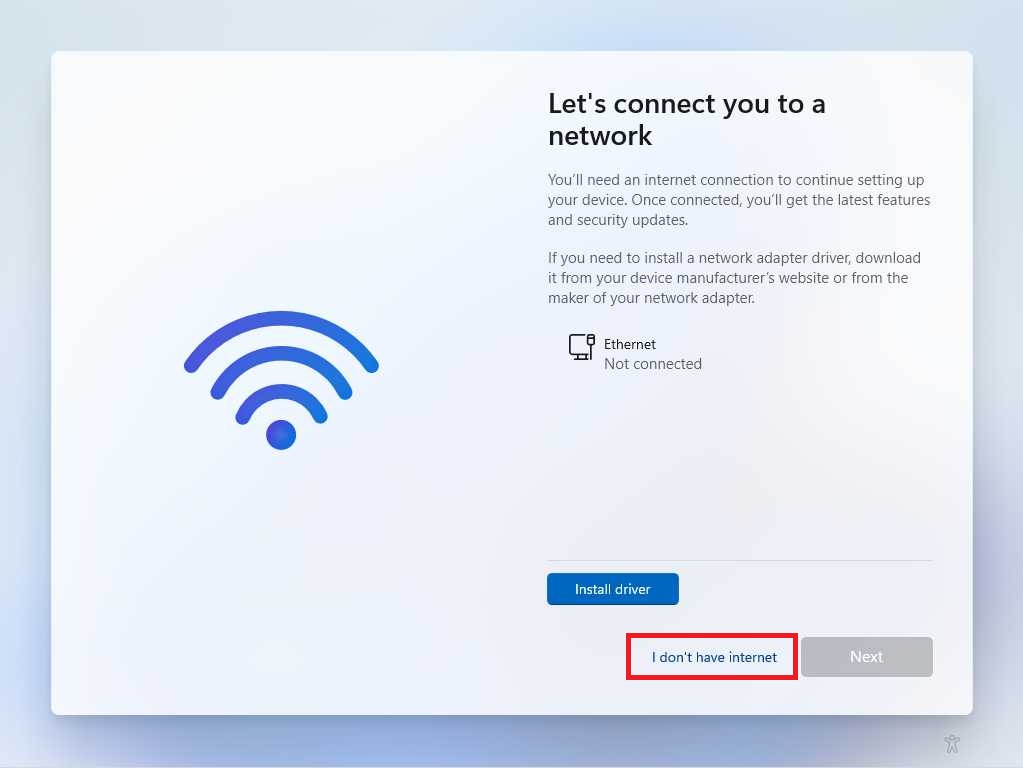
When you tap ENTER, the PC reboots and the OOBE starts over. Step through it as before. When you get to the “Let’s connect you to a network” screen, you will see a new link near the bottom right titled “I don’t have internet.”
Click this link to display the Windows 11 license agreement, which you must agree to. This is followed by the “Who’s going to use this device?” screen.
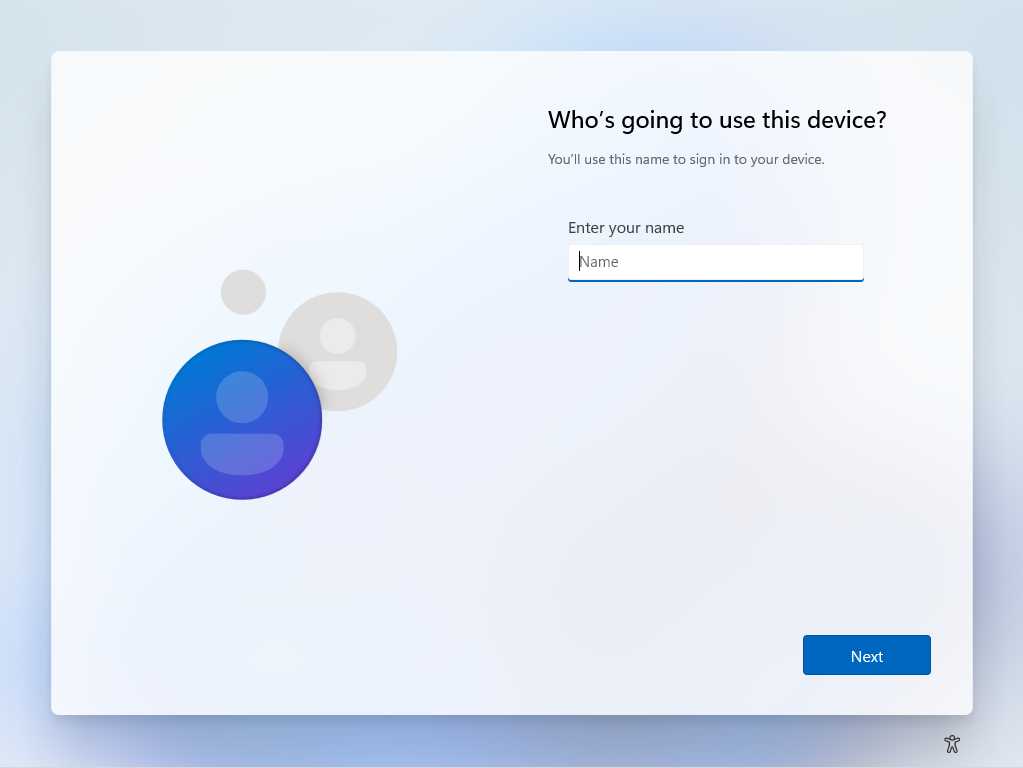
Now, just enter a local account name (like Paul) in the “Enter your name” field and click “Next.” Then, you will be prompted to enter a “super-memorable password,” which is optional. Do so (or not, we explain how to secure this account properly below), click “Next,” and then step through a truncated OOBE that includes only the privacy configuration screen. When it’s done, the Windows 11 Desktop will appear with a cleaner than usual Start menu.

Next, configure your Wi-Fi connection (or plug-in to Ethernet) to get online.
From here, you should follow the instructions later in this chapter to secure the local account. When that’s done, reference the Windows 11 Personalization First Steps chapter to see how to perform other important post-installation tasks.
We discuss the OOBE local account workaround in the Overcome Windows 11 Setup Annoyances chapter as well.
Convert a Microsoft account to a local account
The simplest way to switch from a Microsoft account to a local account on an existing PC is to convert your Microsoft account sign in to a local account.
You cannot convert a work or school account to a local account.
To do so, open the Settings app and navigate to Accounts > Your info. Then, select the “Sign in with a local account instead” link next to “Microsoft account” under “Account settings.”
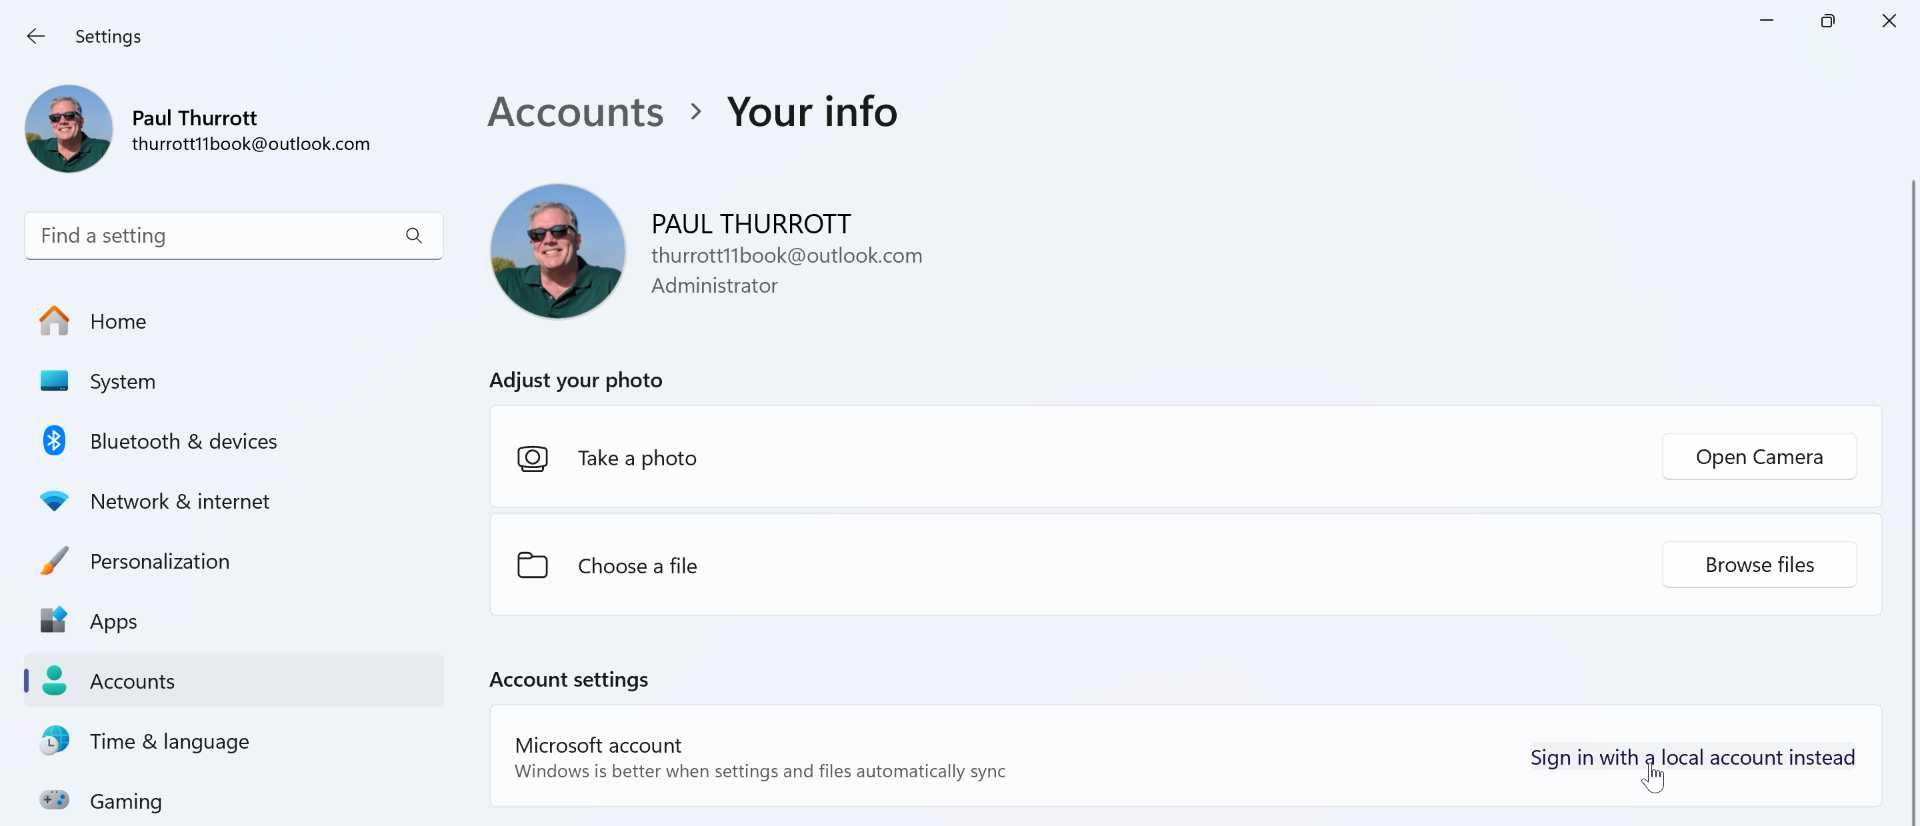
When you do, a “Switch to a local account” pane appears.
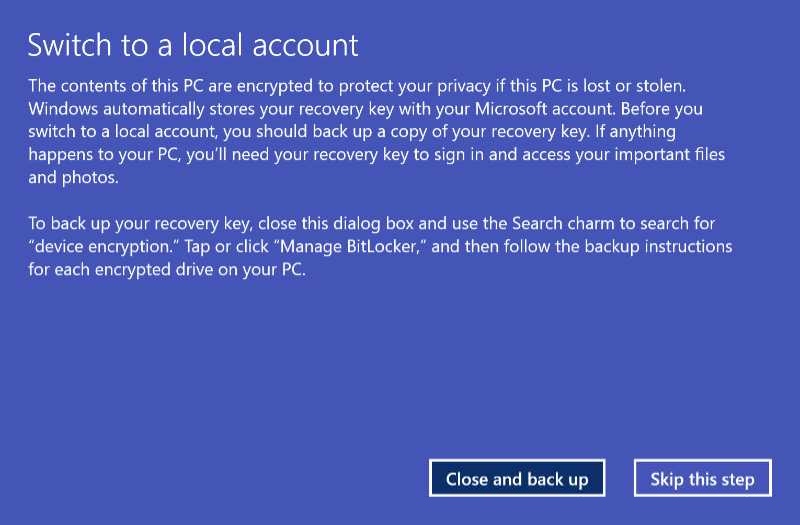
Here, you are instructed to back up your device encryption recovery key, which was automatically saved to your Microsoft account. You should do so before continuing: Otherwise, it’s possible that a hardware glitch could lock you out of the PC.
Once that’s complete, click “Skip this step” to continue. You will be asked if you’re sure. Click “Next” and then authenticate yourself–by entering your Windows Hello PIN or facial or fingerprint recognition–as prompted. Then, you are asked to create a new local account.
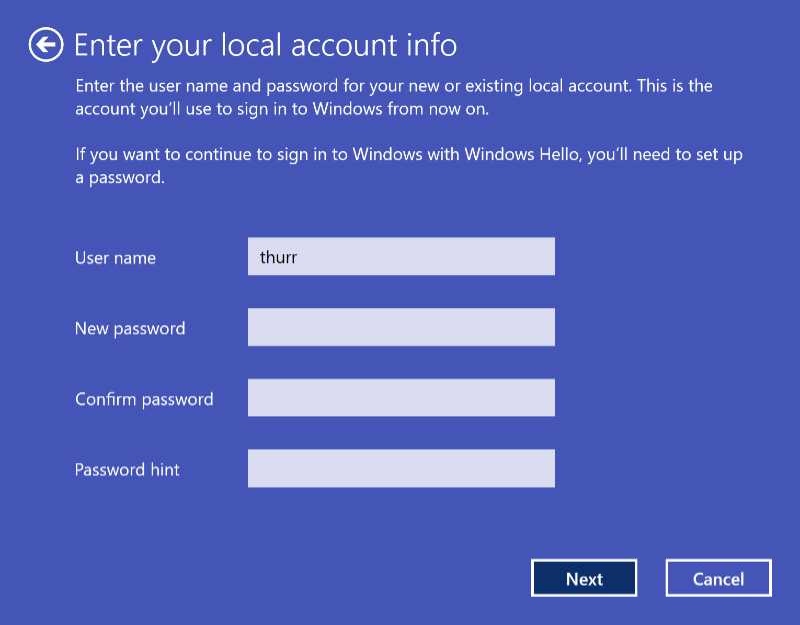
Here, you can enter a username for the new local account–Windows will use the first four letters of your Microsoft account’s email address otherwise–and, optionally, a password (with an associated a password hint).
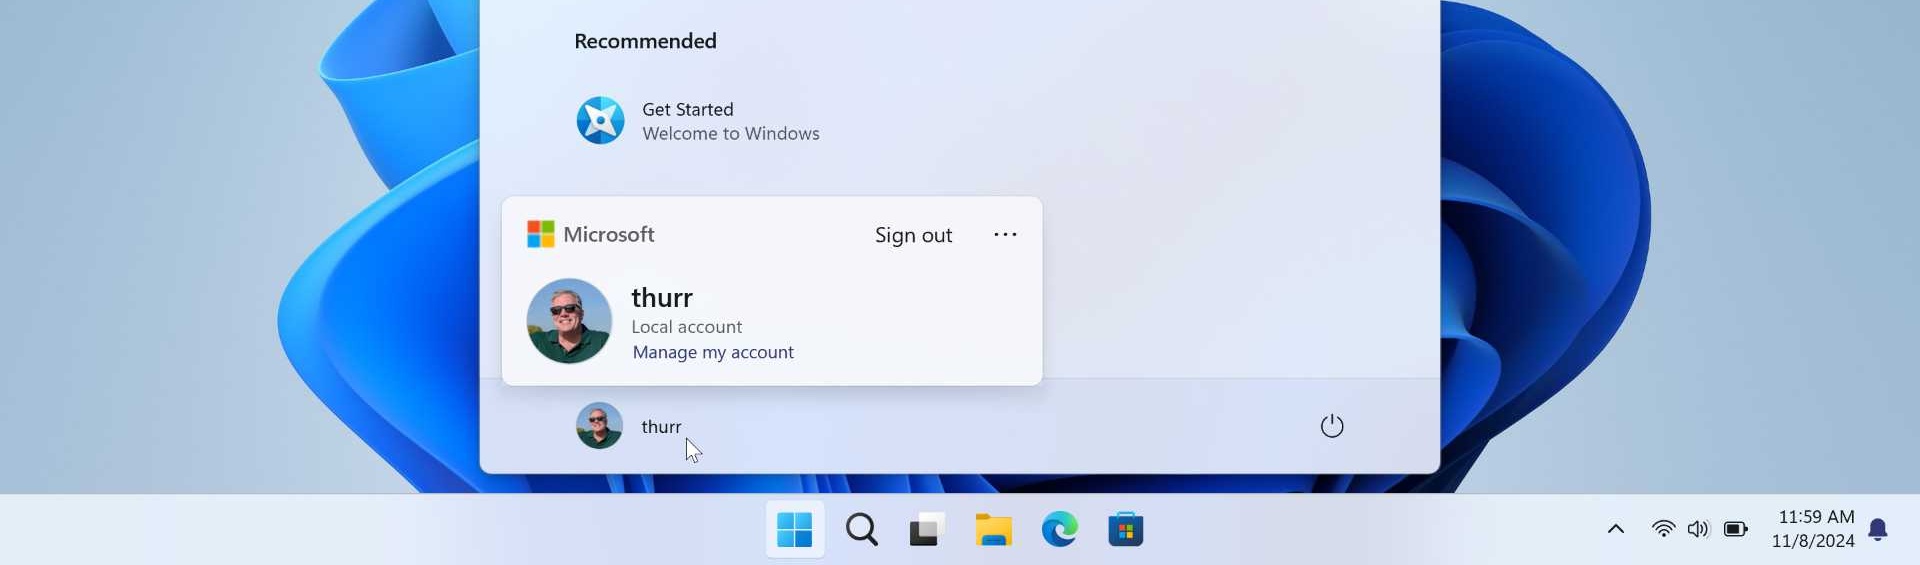
When that is complete, click “Sign out and finish.” You will be signed out of your Microsoft account and your new local account will appear on the Sign in screen. When you sign in, you’ll discover that most things are where you left them. But you are now using a local account, of course.
You can also convert a local account to a Microsoft account. This works much like the process described above, but you will not need to sign out and then resign in again: Just sign in to your Microsoft account as prompted, optionally enable Windows Hello facial or fingerprint recognition (if available), and create a PIN. That’s it.
Add a local account and remove the Microsoft account
Alternatively, you can switch to a local account using a multistep process by which you sign in to Windows 11 using a Microsoft account, create a new local account, configure it as an Administrator, sign out of your Microsoft account, sign in with the local account, and then delete the original Microsoft account while using the local account. It’s not as complicated or time-consuming as it sounds. Maybe.
To do so, open the Settings app and navigate to Accounts > Other users. Then, click the “Add account” button next to “Add other user” in the section “Other users.”
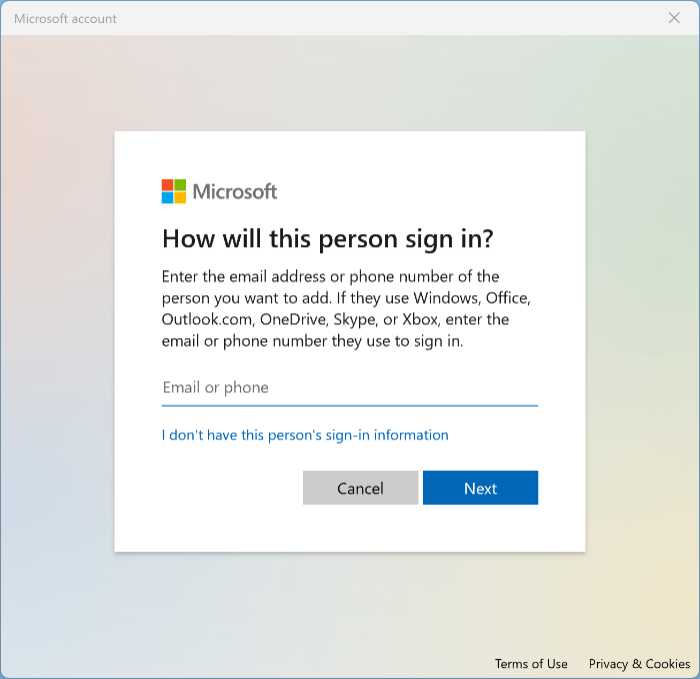
In the “How will this person sign in?” window that appears, click the “I don’t have this person’s sign-in information” link. The “Create account” window appears.

Here, select the “Add a user without a Microsoft account” link. The “Create a user for this PC” window appears.
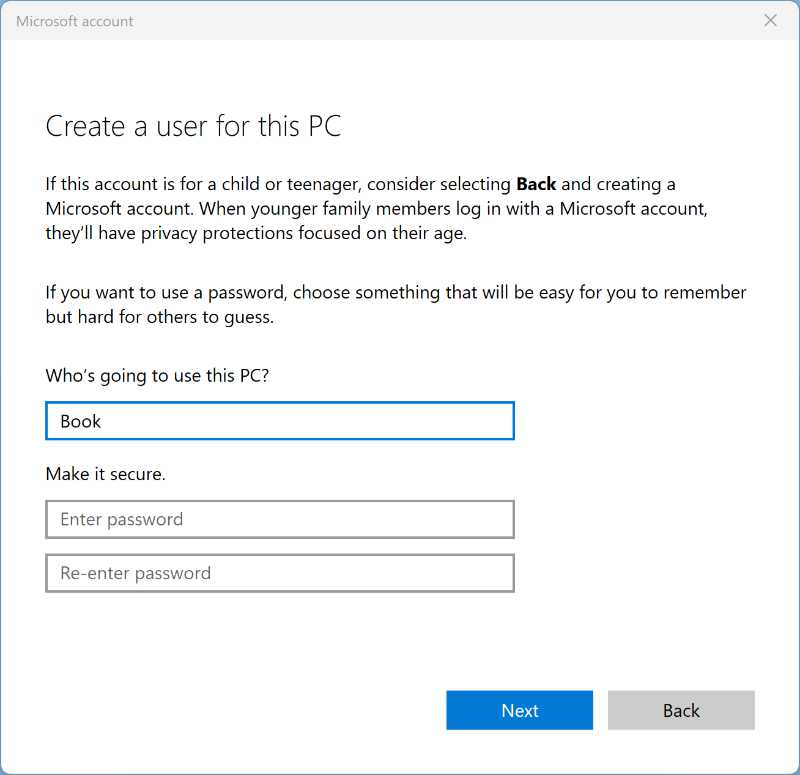
Enter the username and password you wish, and then click “Next.”
The password is optional, but be sure to add one. Otherwise, you won’t be able to configure a Windows Hello authentication method–a PIN, or facial or fingerprint recognition–later. Plus, a passwordless local account is completely unprotected. (Because there is no way for Microsoft to help you recover a local account, you will need to answer three security questions if you add a password.)
You will now see the new account listed under “Other users.”
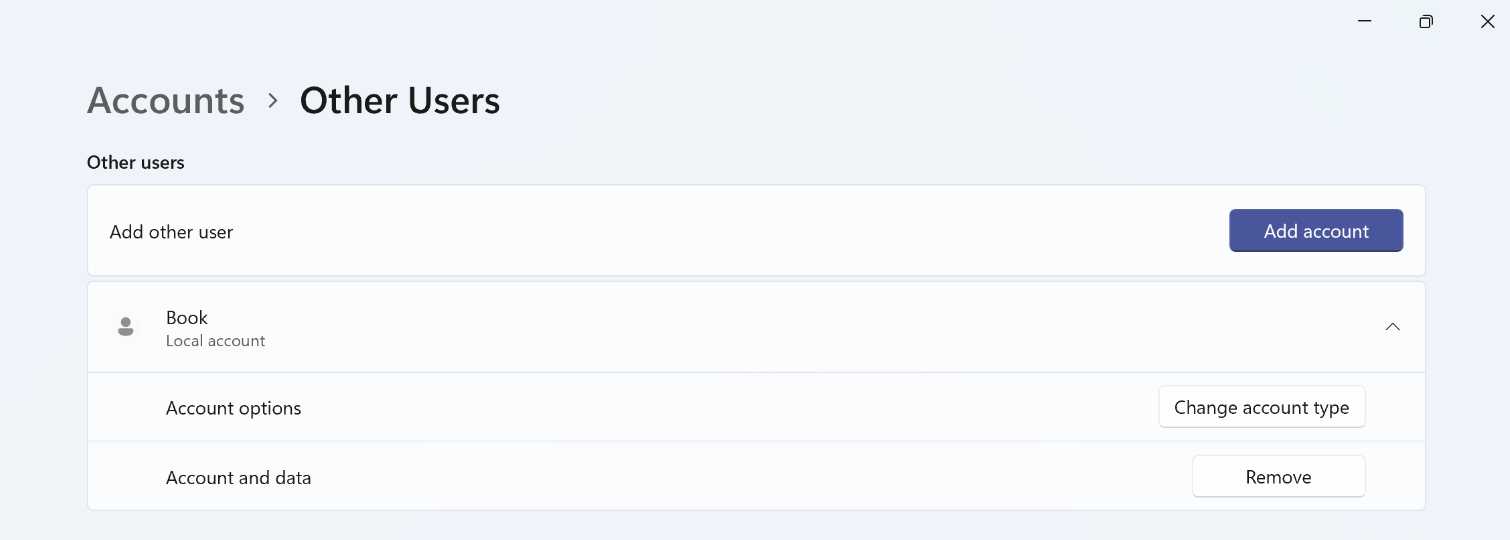
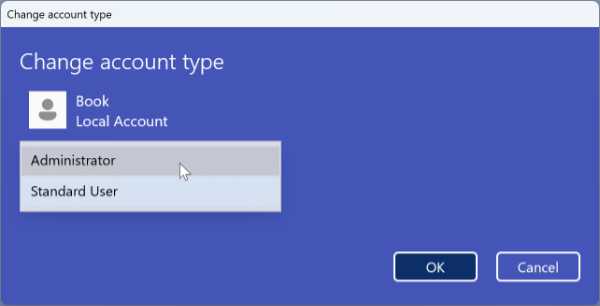
Select the local account to expand the view if necessary. Then, click “Change account type.” In the “Change account type” window that appears, select “Administrator” from the “Account type” drop-down and then click “OK.”

Now, close Settings and any other open applications and windows and sign out of the Microsoft account. The most obvious way is to open Start, select your user account in the lower left, and then choose “Sign out” from the resulting pop-up menu.
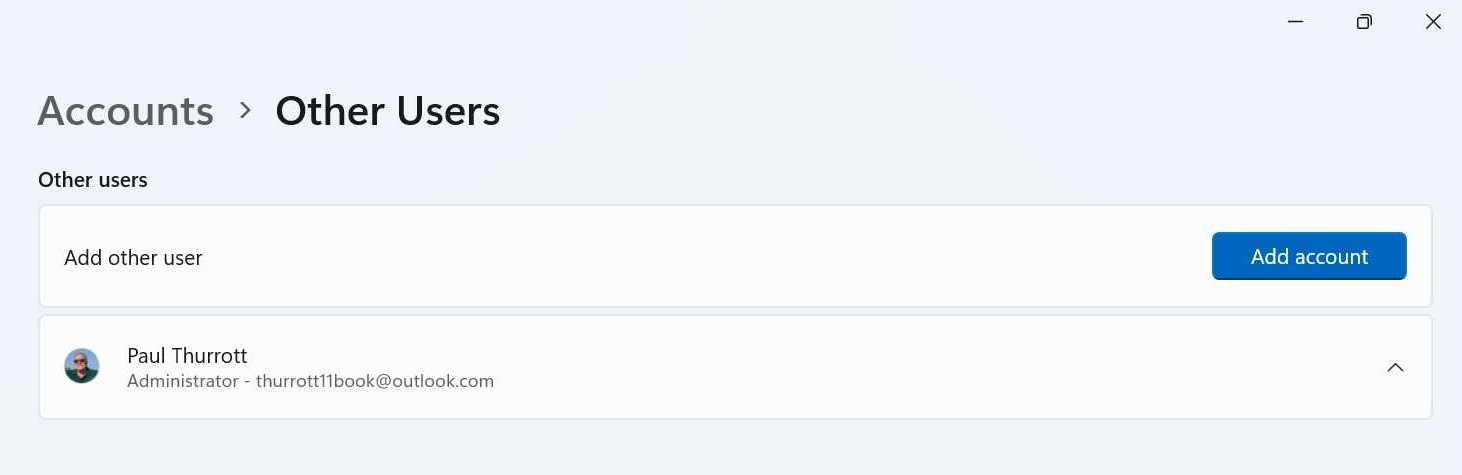
In the Sign in screen that appears select the new local account in the lower left and sign in: You’ll have to deal with a truncated version of Windows Setup’s Out-of-Box Experience (OOBE) in which you choose the privacy settings for your PC before landing on your clean, new Windows 11 Desktop. Then, open the Settings app and navigate to Accounts > Other users. There, you will find the original Microsoft account you used to set up Windows.
Select that account to expand the view.
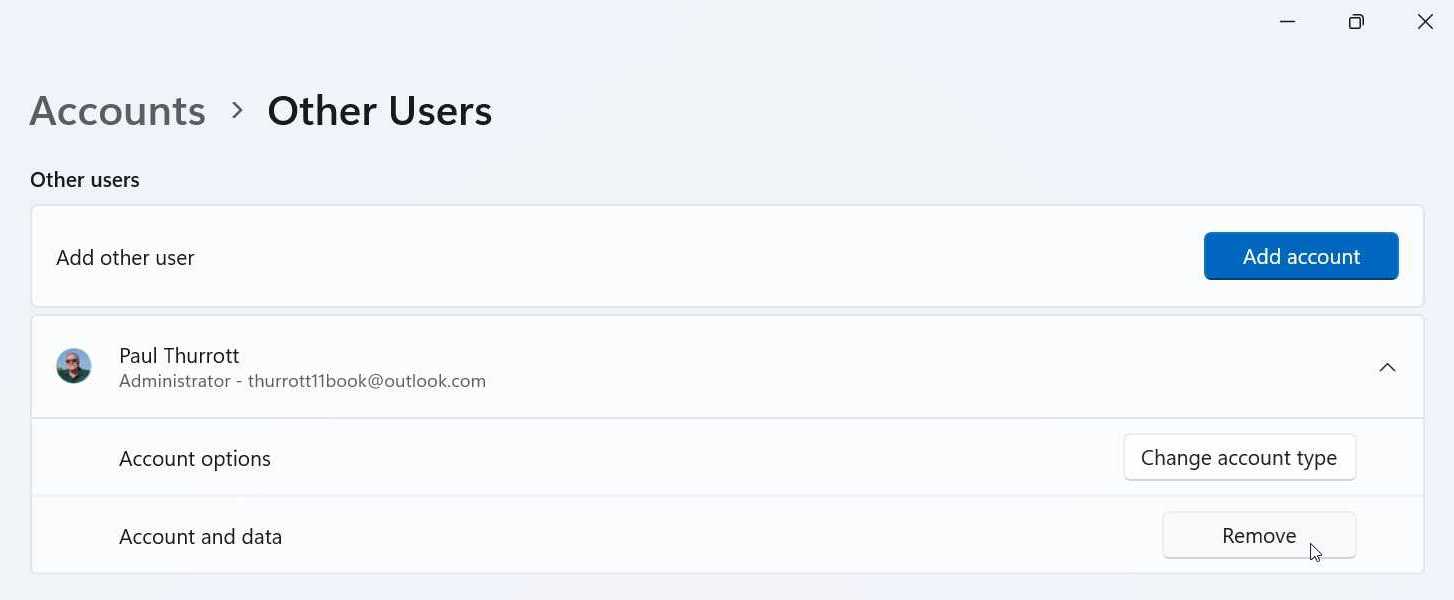
Then, click the “Remove” button for the Microsoft account. In the “Delete account and data?” window that appears, click “Delete account data.” After a bit of work, the window will close as the account is removed.
From here, carefully step through the instructions in the remainder of the chapter.
Properly configure and secure your local account
If you’re going to use a local account sign-in with Windows 11, you must take additional steps to secure the PC and that account to ensure that both are safe from physical theft.
Activate device encryption
The first step is to activate device encryption.
If you first signed in to Windows 11 with a Microsoft account and then converted or switched to a local account, you can skip this step.
You can learn more about this feature in the Device Encryption chapter.
To do so, open the Settings app and navigate to Privacy & security > Device encryption. With Windows 11 version 24H2 and newer, this feature is enabled by default, even when you first sign-in with a local account. But it’s not activated because a local account user can’t automatically back up the encryption recovery key to their OneDrive account, as is the case with Microsoft accounts and Work or school accounts.
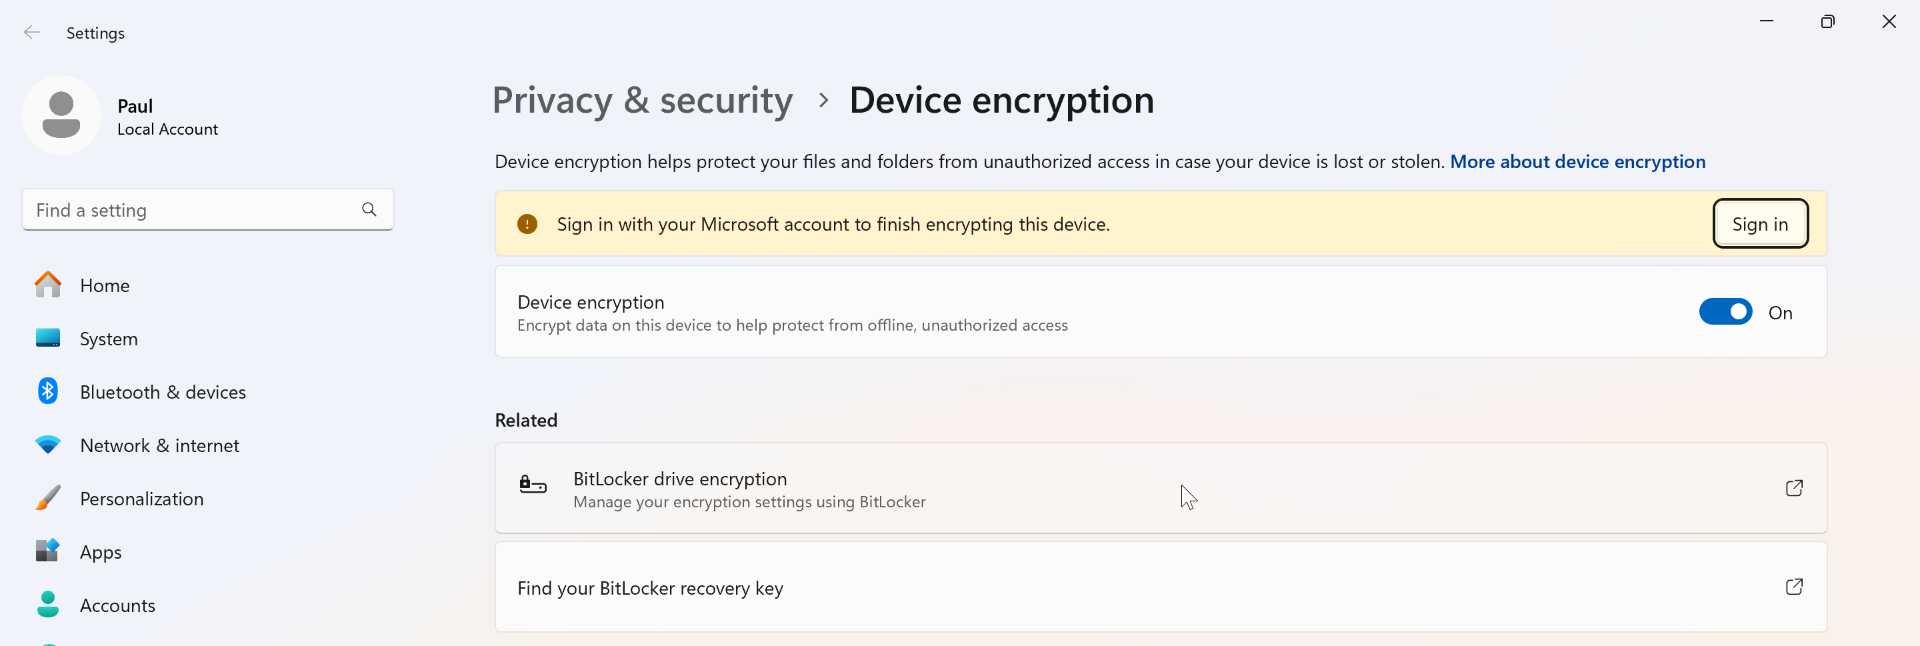
If you are using Windows 11 Home, you have no choice here: You must sign-in to your Microsoft account to activate device encryption. So, click the “Sign in” button and sign-in and authenticate as prompted. When prompted with a window that reads, “Use this account everywhere on your device,” do not choose “Next. Instead, click “Microsoft apps only.”
If you are using Windows 11 Pro, you will see two BitLocker-related links in the “Related” section of Device encryption as shown in the shot above. So you can skip the Microsoft account sign-in. Instead, click “BitLocker drive encryption” to launch the BitLocker Drive Encryption control panel.
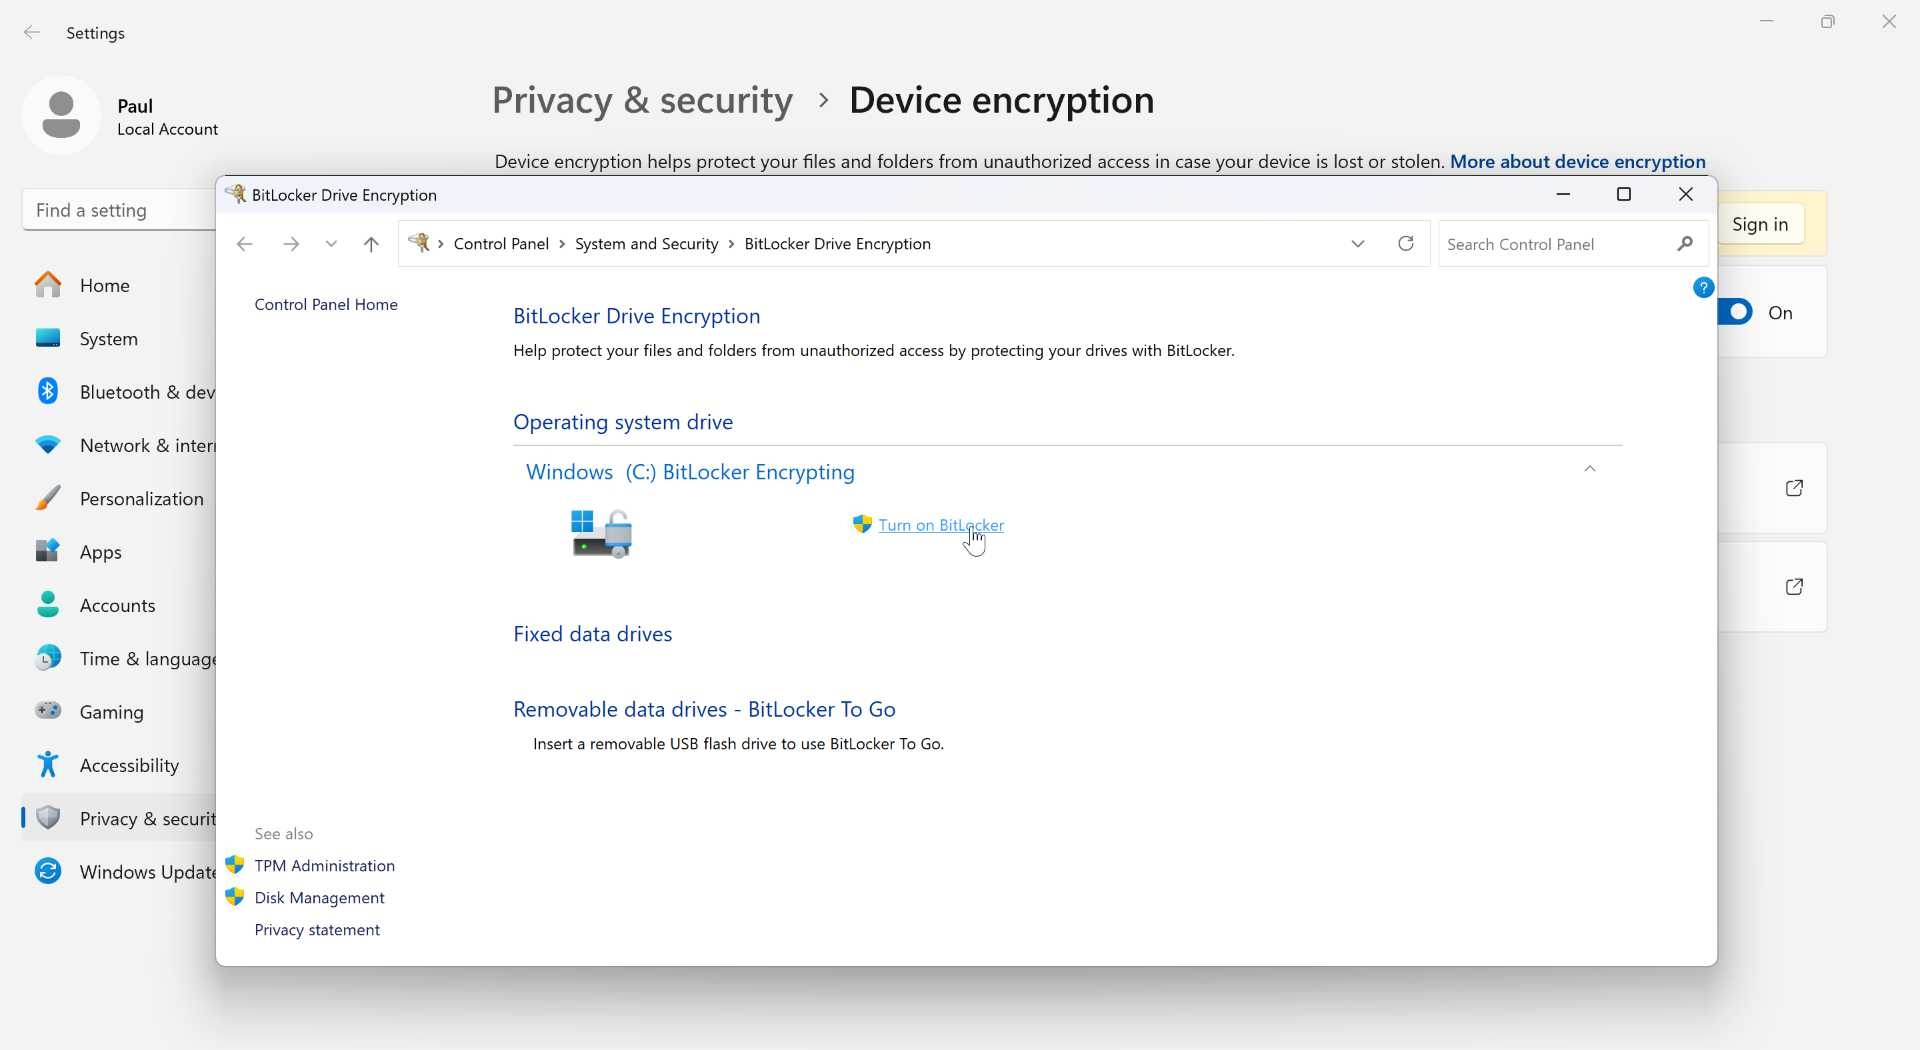
Click “Turn on BitLocker.” You are prompted to back up your recovery key and choose between saving it to your Microsoft account, saving it to a file (which can’t be on the disk that will be encrypted), and printing it on paper. Choose accordingly–it’s not a bad idea to save it in at least two different ways–and then activate BitLocker as prompted.
You can learn more about BitLocker, which is essentially a more configurable and managed version of device encryption, in the Device Encryption chapter.
From here, BitLocker will begin encrypting the disk. You can close the BitLocker Drive Encryption control panel window and use your PC normally while it does so.
Add a password and PIN to your local account
If you skipped adding a “super memorable password” during the OOBE, you should add a password–and a PIN, which is required when you sign in to Windows 11 with an account that uses a password–now.
If you first signed in to Windows 11 with a Microsoft account and then converted or switched to a local account, you can skip this step.
To do so, open the Settings app and navigate to Accounts > Sign-in options. Click “Sign-in options” in the top “Account settings” section. Then, click “Password” on the Sign-in options page. The item expands to reveal a single option. Click the “Add” button, and then add and confirm the new password and supply a password hint (which, yes, is mandatory).
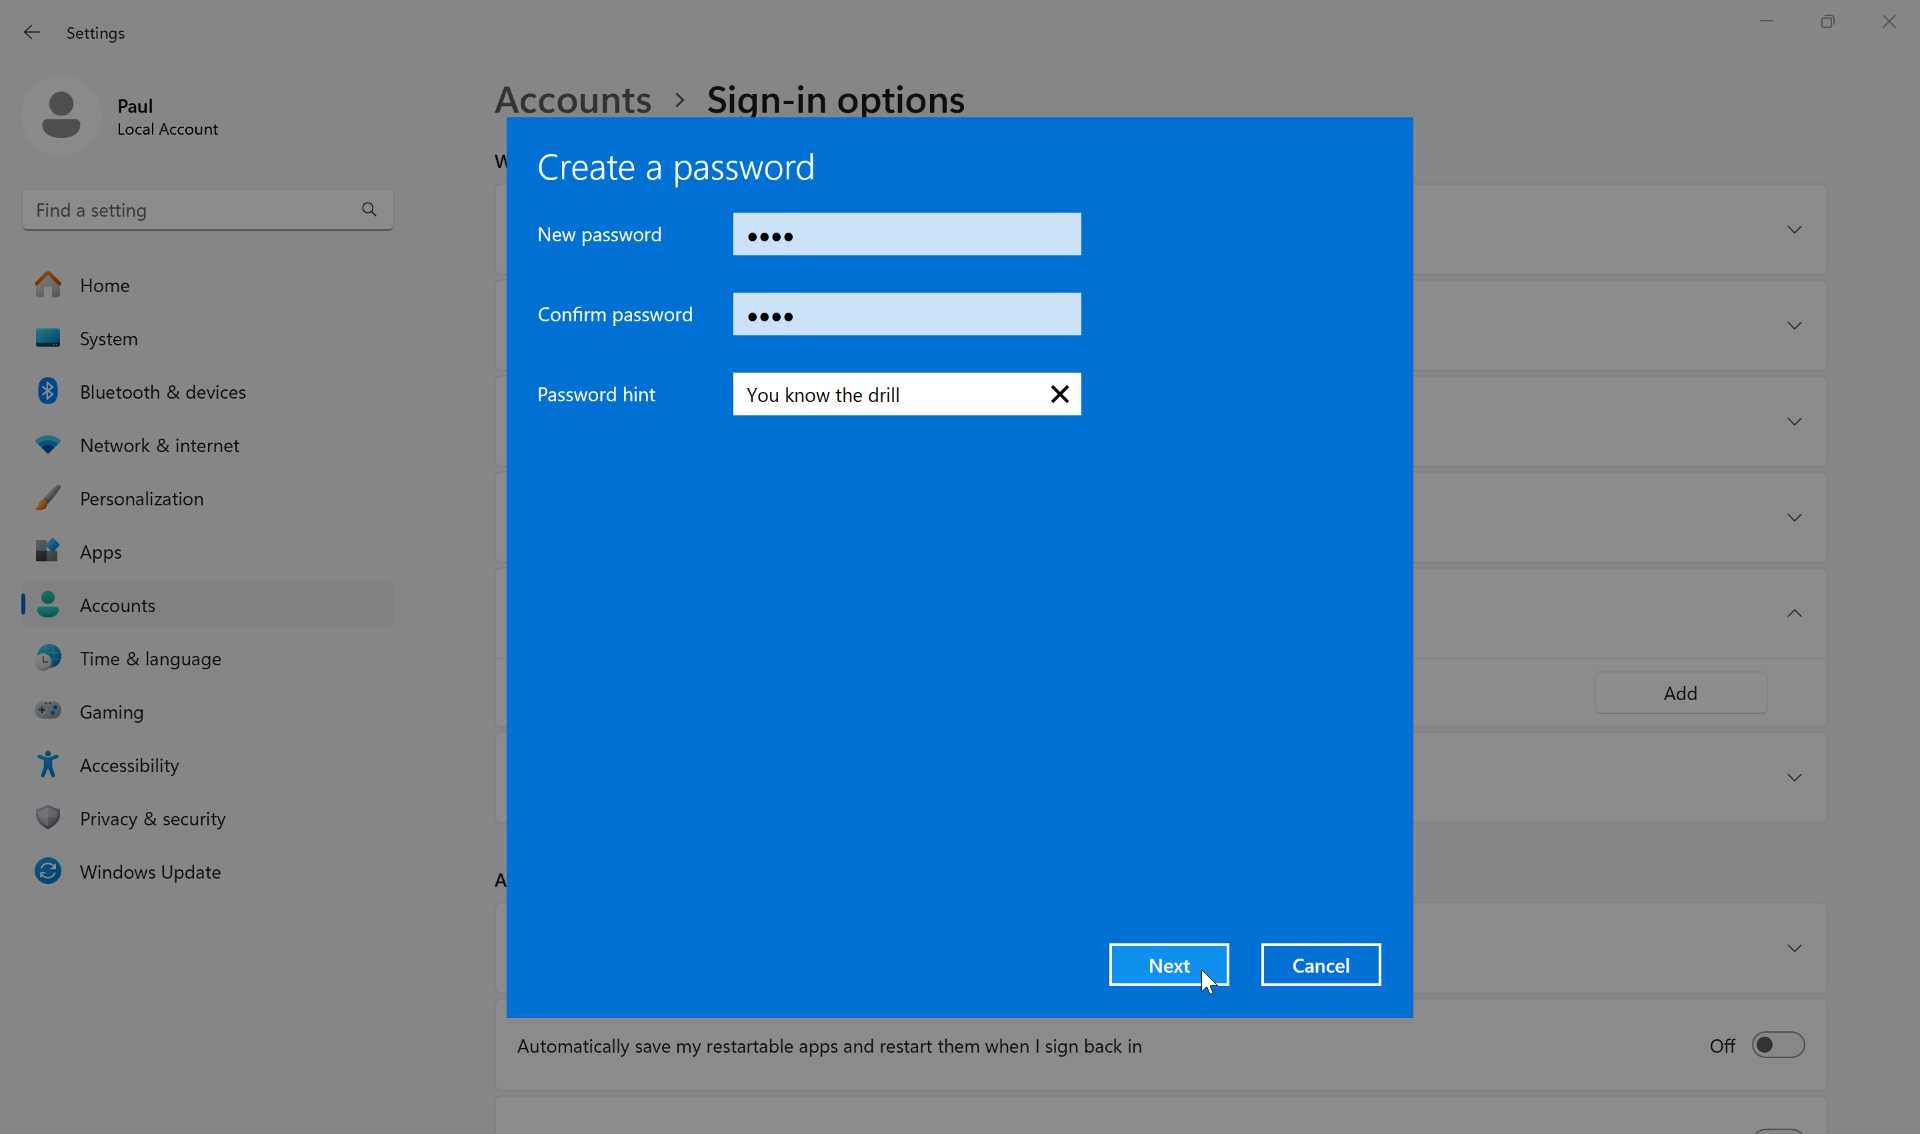
Click “Next” to finish.
Now, click “PIN (Windows Hello)” under “Ways to sign in” on the Sign-in options settings page. As with the “Password” item described above, this item will expand to reveal a single option. Click the “Set up” button, enter your password as prompted, and then enter a PIN, twice, in the “Set up a PIN” dialog.
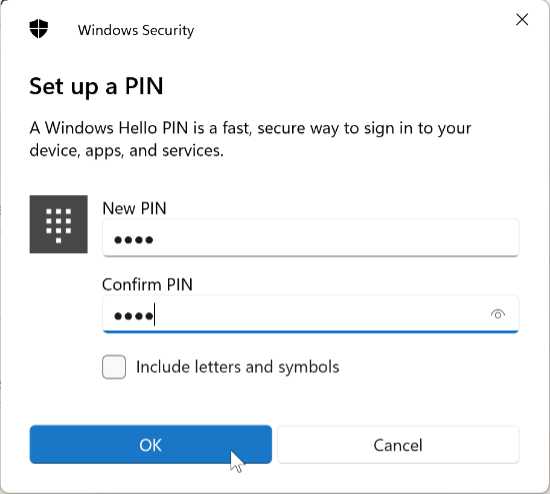
Click “OK” to finish
Add Windows Hello facial recognition and/or fingerprint recognition to your local account
Next, you should add a more sophisticated Windows Hello authentication method to your local account. This will be facial recognition, fingerprint recognition, or both, depending on the capabilities provided by your PC.
You do so on the same page in Settings that you added the password and PIN: Look for the “Facial recognition (Windows Hello)” and “Fingerprint recognition (Windows Hello)” items in Sign-in options settings to see which is available. And then enroll in each normally.
It’s straightforward, but you can learn more about these features and the enrollment process in the Windows Hello, Presence Sensing, and Dynamic Lock chapter.
Update Windows and the in-box apps
As with any clean installation of Windows 11, you should visit Windows Update in the Settings and the Downloads page in the Microsoft Store app and check for updates in both. Keep checking until there are no more updates, and reboot as prompted.
If your PC maker supplies an app for downloading driver updates, check that as well.
Sign-in to apps and services that require a Microsoft account
With your PC and local account in a reasonably good place security-wise, you can now think about signing in to apps and services that require a Microsoft account. There are at least four buckets of apps to consider here: OneDrive, Microsoft Edge, the Microsoft 365 desktop app suite (Office), and then whatever in-box Store apps you use.
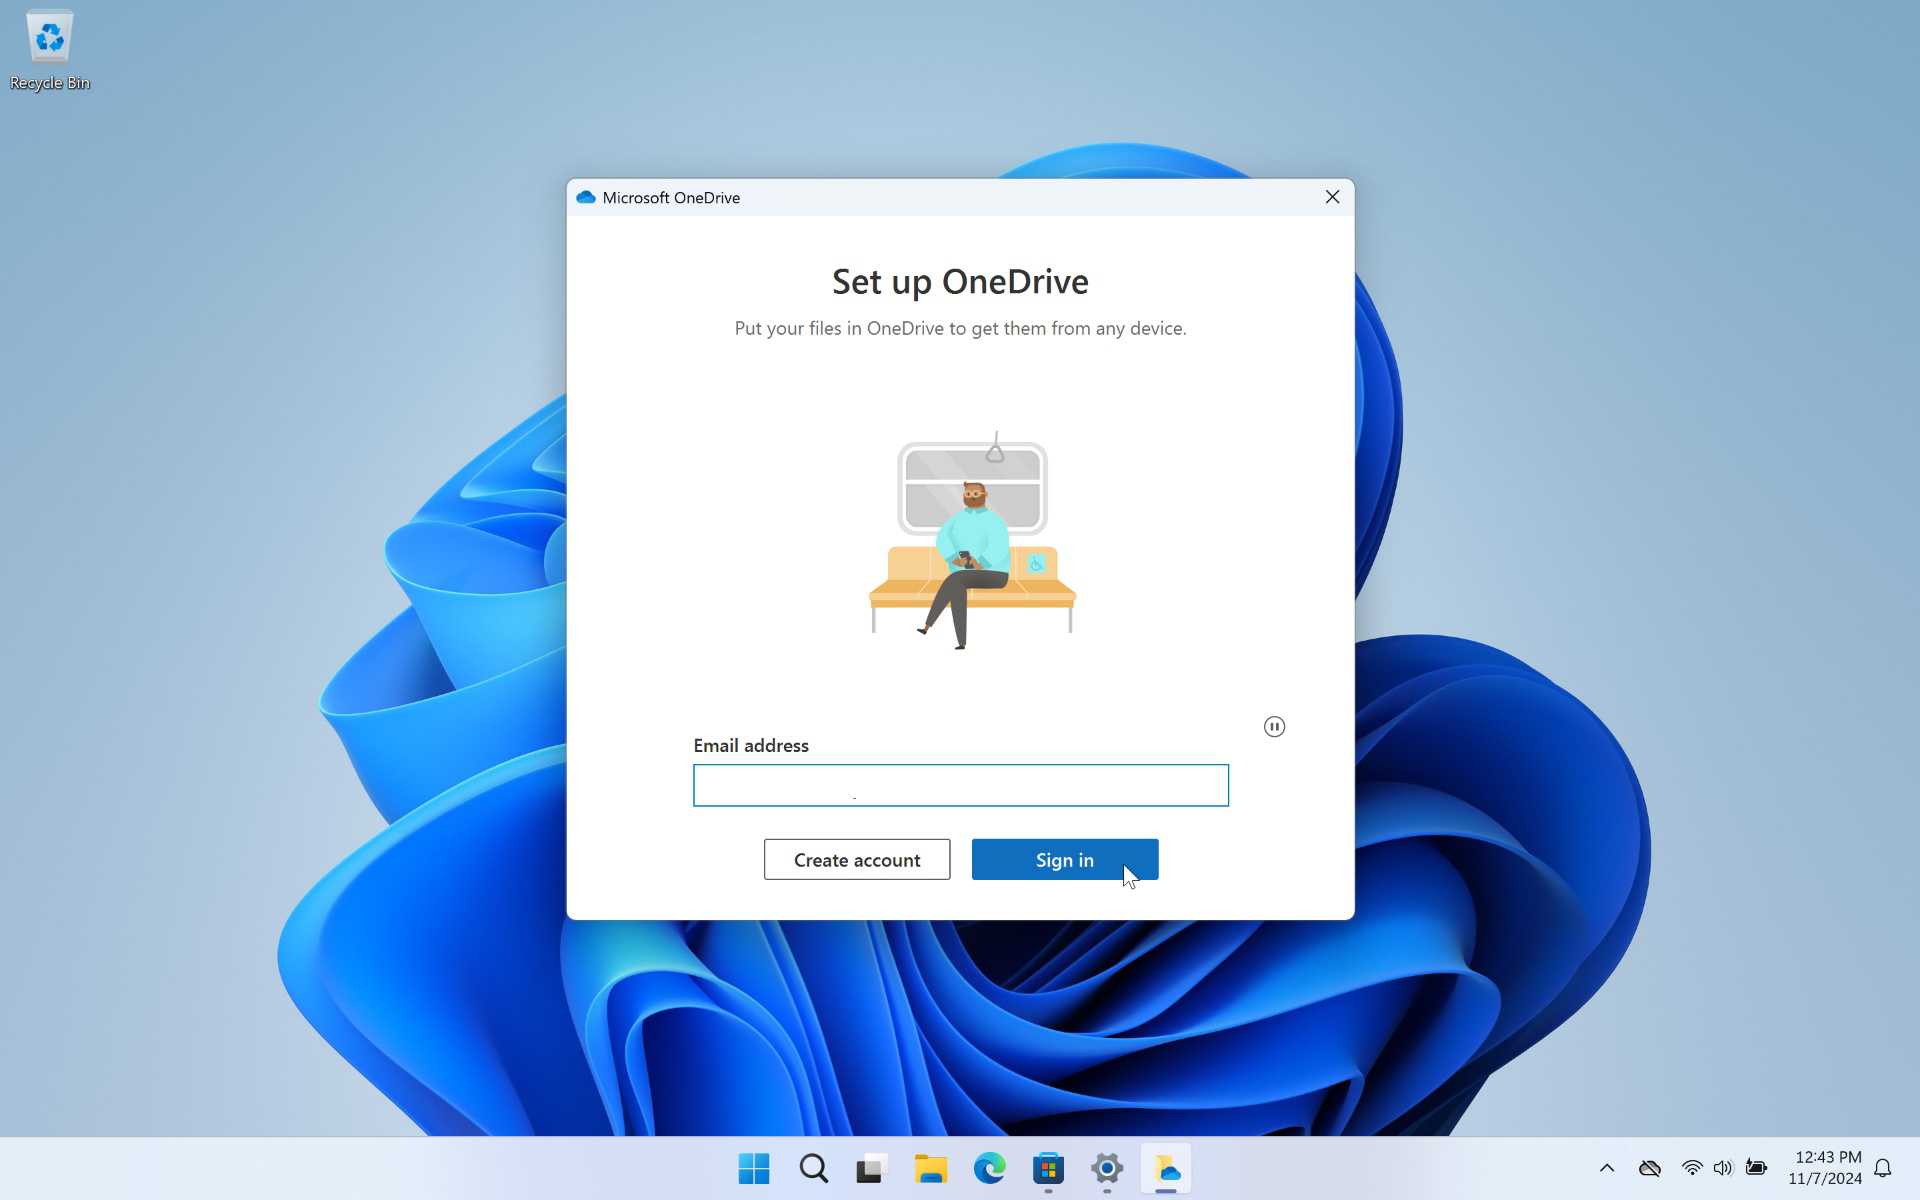
Sign-in to OneDrive. If you intend to use OneDrive, find and click its (cloud-shaped) icon in the system tray and then sign-in and authenticate as prompted. This sign-in only works for OneDrive, and it doesn’t impact Windows 11 otherwise. When this is done, you can configure and use OneDrive normally as described in the OneDrive chapter.
If you aren’t going to use OneDrive, you should disable it so that it doesn’t try to run each time you reboot the PC. This is also described in the OneDrive chapter.
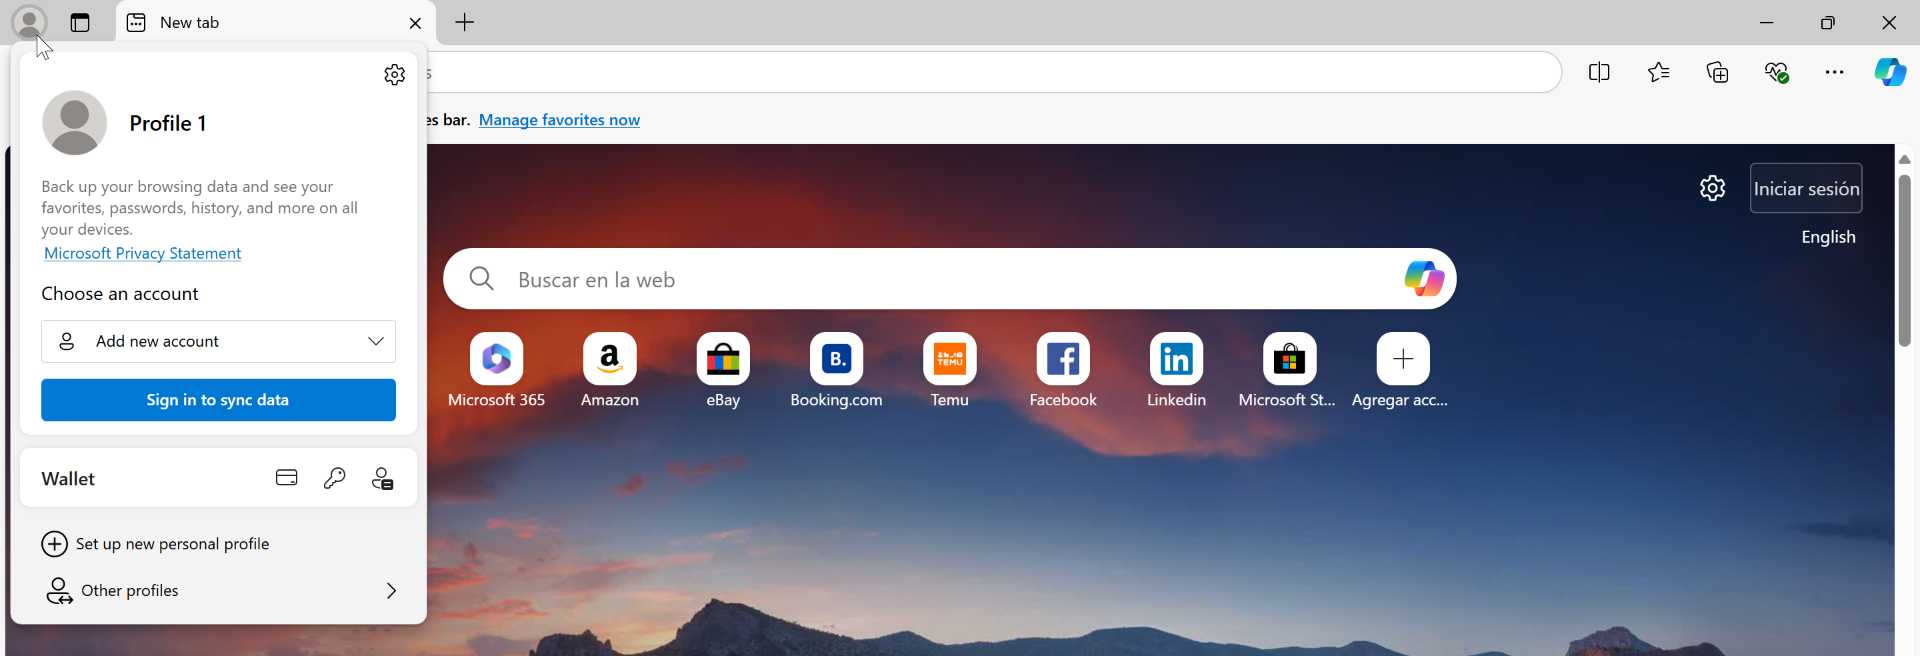
Sign-in to Microsoft Edge. Like OneDrive, Microsoft Edge requires its own sign-in, and if you’re using a local account, that sign-in will be for Edge only and will not impact Windows 11 otherwise. You can sign-in during the Microsoft Edge initial configuration wizard. Or you can just do it later by clicking the Profile icon in the upper-left of the app window and clicking “Sign in to sync data.” After you sign-in and authenticate, your Edge custom settings and extensions will sync, and the browser will work normally, for better or worse.
If you’re not going to use Microsoft Edge, you can simply ignore this browser after installing your preferred browser and configuring that as the default.
Sign-in to the Microsoft 365 desktop app suite (Office). Most PCs come with the Microsoft 365 desktop app suite (formerly called Microsoft Office), but if you’re a subscriber and it’s not installed, you can download and install it from the Microsoft 365 website. Either way, if you’re going to use any of these apps, open of them–Word, Excel, PowerPoint, or whatever–and sign-in with your Microsoft account as prompted. (Or, navigate to File > Account to do so manually.)
Create an app account and use it to sign-in to Microsoft Store apps. Windows 11 lets you configure one or more Microsoft accounts as an app account that you can use to sign in to compatible apps like the Microsoft Store, Xbox, Clipchamp, and many more. You should configure your Microsoft account as an app account now–be sure to choose the “Microsoft apps only” option during the wizard–and then change its “Sign in options” setting to “All apps need to ask me to use this account” on the Accounts > Email & accounts settings page. Then, when you launch a compatible app, you can use that account to sign-in on an app-by-app basis.

You can learn more about this in the Accounts Used by Other Apps chapter.
And that’s about it. From here, you can just use your local account sign-in with Windows 11 normally.

Gain unlimited access to Premium articles.
With technology shaping our everyday lives, how could we not dig deeper?
Thurrott Premium delivers an honest and thorough perspective about the technologies we use and rely on everyday. Discover deeper content as a Premium member.