Customize Your Windows 11 Privacy Settings
- Paul Thurrott
- Jun 15, 2026
-
0
Windows 11 violates your privacy by default, and it will then go on to badger you to let it do so to an even greater degree repeatedly as you use it. And while Microsoft provides a sea of privacy-related options to configure, it’s not possible to fully disable certain behaviors using the interfaces in Windows 11. For example, there’s no way to fully prevent Microsoft from collecting telemetry data, which it uses to help make the system more reliable for everyone. Instead, all you can do is minimize the amount of data that Windows 11 collects within the confines that Microsoft has established.
Your first chance to configure your Windows 11 privacy settings and the resulting data collection comes during the Windows 11 Setup Out of Box Experience (OOBE), which appears when you first set up a new PC or perform an upgrade or clean install.
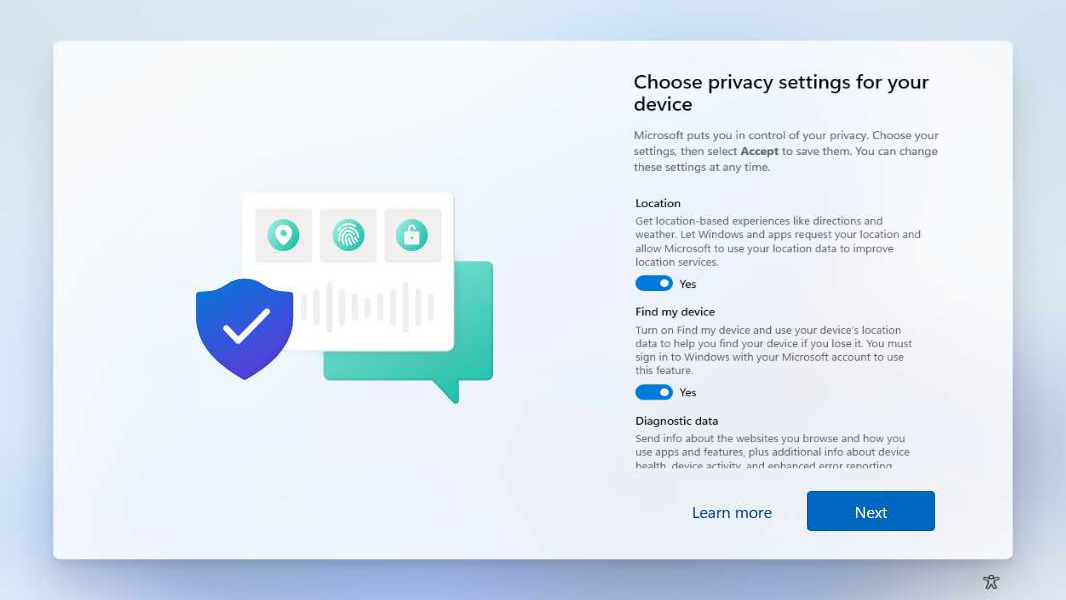
In this screen, you are given the chance to disable several privacy settings, all of which are otherwise enabled by default. My advice is to disable all of these settings except for “Location,” “Find my device,” and, if available and you enjoy this functionality, “Presence,” during the OOBE.
But it’s possible if not likely that you might have skipped past this screen during Windows Setup like Microsoft wants or don’t remember how you configured these options. So this chapter explains my recommendations further and helps you correct any mistaken privacy settings configurations you may have made during the initial Windows 11 configuration.
If you can’t be bothered wading through all this–Microsoft purposefully scatters the most important Windows 11 privacy options throughout the Settings app and, as noted, doesn’t even offer a way to turn off telemetry–then you can skip ahead to Completely disable Windows 11 telemetry and tracking at the end of the chapter. There, I describe a third-party utility that fixes the privacy issues in Windows 11 with just a few clicks.
Manually configure key Windows 11 privacy settings
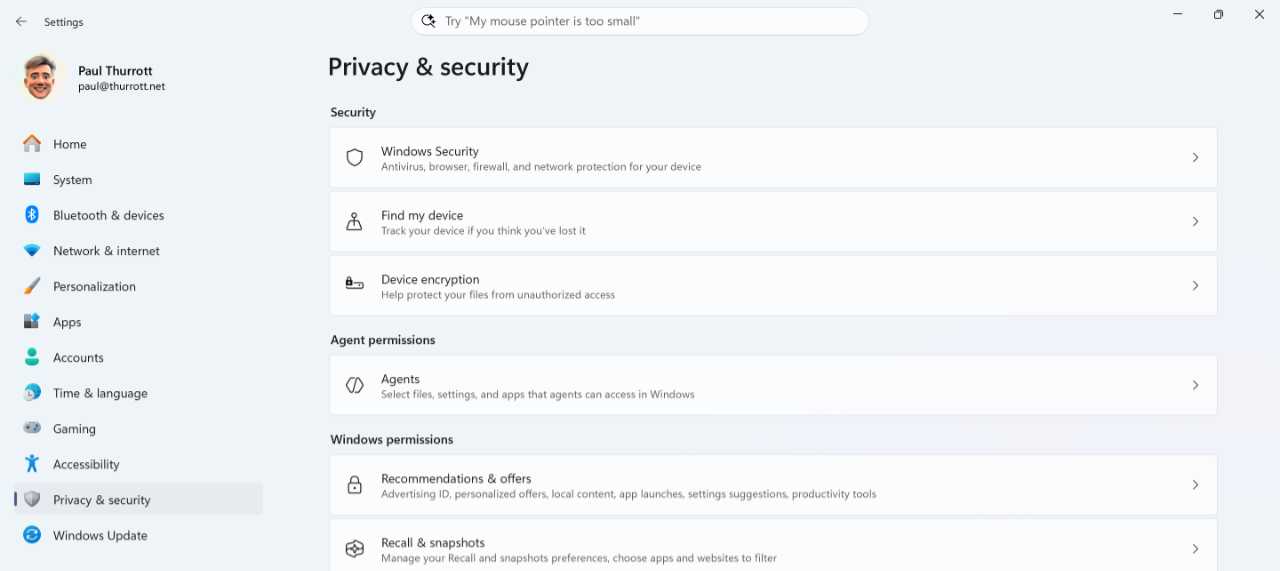
You review and manage Windows 11 privacy settings by opening the Settings app and navigating to Privacy & security.
Examining all of these options is tedious, and it’s unclear which are the most important to consider changing. That’s by design: Though Microsoft provides an incredible list of privacy-related options to consider–what I call privacy theater–the most obvious and desirable option, for disabling the telemetry data that Windows 11 sends back to Microsoft automatically, is not among them.
Given this, I have repeatedly scoured this mountain of privacy settings to try and determine which are the most deserving of your attention. And I am surprised to report that the several privacy settings that Microsoft presents during the OOBE are, in fact, among the most important. And so the most obvious way you can protect your privacy while using Windows 11 is to configure these settings correctly.
Hopefully, you will make these configuration changes during the OOBE, before you start using Windows 11. But if not, this section explains where you can find these options in Privacy & security settings. Perhaps not surprisingly, they’re spread out all over the place.
Location
When Location services is enabled, Windows provides your location data to apps and services like Widgets and the Weather app that need this information to provide a custom experience. Windows and Microsoft Store apps can also individually request to use your location data.
The catch is that Microsoft will also use your location data to improve its location services. But because doing so is mostly innocuous or even desirable, I recommend configuring setting this setting to “On.”
To do so, open Privacy & security settings and select “Location” under “App permissions.”
Here, you can toggle location services globally, toggle it for all apps, or individually determine which apps can access your location data.
Find my device
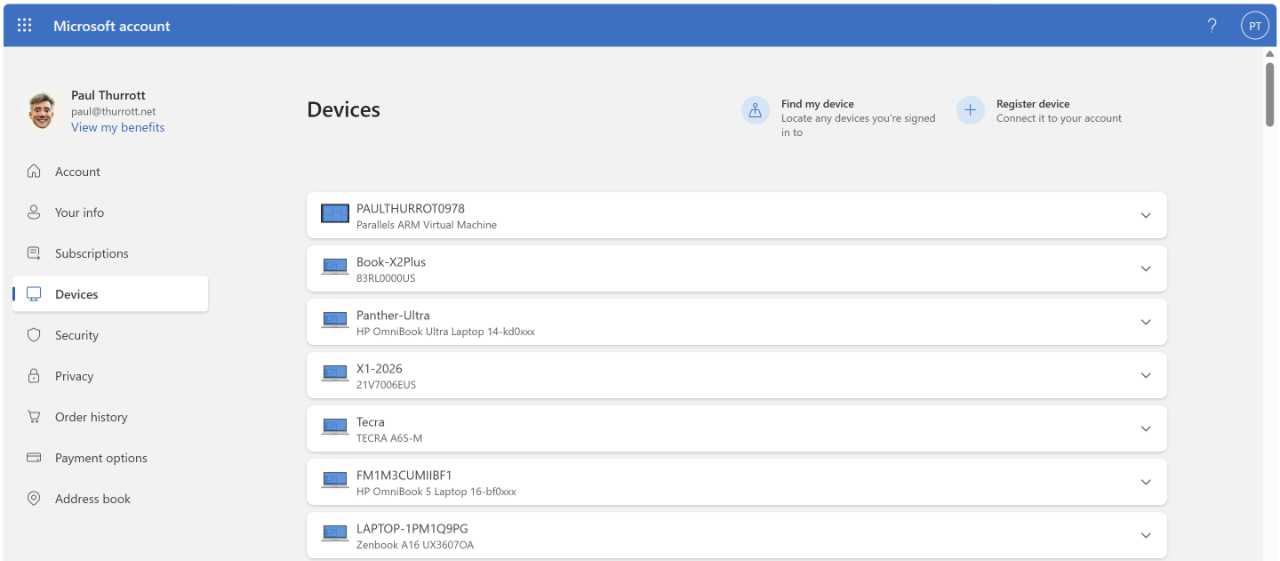
Windows 11 supports Microsoft’s Find my device service, which stores the last known location of the PC you are now using in your Microsoft account. You can view all the PCs and other devices associated with your Microsoft account and access Find my device on the Microsoft account website.
Find my device is an incredibly useful feature. Because it can help you find a lost or stolen PC, I recommend configuring this setting to “On.”
To do so, open Privacy & security settings and select “Find my device” under “Security.” This one is easy, it’s either “On” or it’s “Off.”
Optional diagnostic data
Microsoft requires that individuals using Windows 11 allow it to collect telemetry data–which it calls diagnostic data here and in its Windows privacy report–so that it can detect, diagnose, and fix problems with everyone’s PCs as quickly as possible.
Tip: You can find out which data it collects on the Microsoft Learn website, but you cannot disable this data collection as an individual using tools built into Windows 11: Only corporations with thousands of users that pay Microsoft a lot of money each year can do that. But you can do so with a third-party utility. Check out the section Completely disable Windows 11 telemetry and tracking to learn more.
Basic telemetry data is one thing, and one might make an argument that this data improves the Windows 11 experience for everyone and is thus a net positive. But Microsoft would like to collect even more data, including your web browsing history, connectivity and configuration data, inking and speech data, typing data, and more. I strongly recommend configuring this setting to “Off,” which will disable this additional, optional, and more dubious data collection.
To do so, open Privacy & security settings, select “Diagnostics & feedback” under “Windows permissions,” and ensure that “Send optional diagnostic data” is set to “Off.”
Tip: You may wish to delete the diagnostic data that Microsoft has collected on this PC already. You do so by clicking “Delete diagnostic data” on this page and then clicking the “Delete” button that appears. Unsurprisingly, Microsoft doesn’t offer a way to automate this so that it happens on a schedule automatically.
Tip: Don’t bother with the “View diagnostic data” option: The data you view in the Diagnostic Data Viewer that it mentions is raw XML, an unfriendly markup language that is not in any way useful.
Inking & typing
This setting will send additional and optional data associated with inking and typing to Microsoft so that it can improve its language recognition and suggestion capabilities.
Though this is the most innocuous of the privacy settings you can configure during Windows Setup, I recommend configuring this setting to “Off,” which will disable this optional data collection.
To do so, open Privacy & security settings, navigate to “Diagnostics & feedback” under “Windows permissions,” and locate “Improve inking and typing.” You can expand this option to make sure you’re not sending too much data to Microsoft.
Tip: There is another inking and typing setting in Privacy & security settings called “Inking and typing personalization,” which you can find under “Windows permissions” too. This setting is related to the custom dictionary that Microsoft creates for you as you write with a smart pen and/or keyboard and is generally innocuous and useful and should be left enabled. That said, you may want to review your custom dictionary from time to time here. And, if desired, you can delete the entire dictionary (but not, oddly, individual words).
Personalized offers
When enabled, this setting lets Microsoft use your diagnostic data, including optional diagnostic data (aside from web browsing history) if enabled, so that it can offer you “personalized tips, ads, and recommendations.”
This is really just about advertising: There is nothing “tailored” about the experiences that Microsoft offers Windows 11 users. Instead, it spams you with advertisements to use its other products and services. For this reason, I strongly recommend not enabling this feature. Instead, configure it to “Off.”
To find this setting, open Privacy & security settings, navigate to “Recommendations & offers” under “Windows permissions,” and make sure “Personalized offers” is configured to “Off.”
And while you’re here, disable the following options too.
- Show notifications in Settings. This setting determines how often Settings can notify you when there is a problem related to your Microsoft account or other system-level configuration. As it notes, Settings will still display “required notifications” if you configure this to “Off.” Do so, as the non-required notifications are just advertisements for Microsoft apps and services.
- Recommendations and offers in Settings. Microsoft peppers Windows 11 with so-called suggestions, which are really just advertisements for other Microsoft apps, services, or features. There is no benefit to these intrusions.
Advertising ID
Related to the above setting, Microsoft will assign a unique identifier called an advertising ID to your user account on each PC you use so that it and third-party advertisers can track your activities online, see which websites and apps you use, and then offer you customized advertisements based on that data.
For obvious reasons, you should not enable this setting: Instead, configure it to “Off.” To do so, open Privacy & security settings, click “Recommendations & offers” under “Windows permissions,” and then locate the option “Advertising ID.”
Tip: I occasionally hear from readers who believe that targeted advertising is somehow preferable to non-targeted advertising. It’s not. Non-targeted ads are just as effective as those that track you online, and there is no benefit to allowing Microsoft and its advertising partners to track your activities.
Presence
On PCs with compatible proximity sensors, the OOBE will display this additional setting so that you can globally enable or disable the Windows 11 Presence Sensing feature, which the system uses to physically detect you and automatically wake up the PC when you approach, turn off the display when you leave, and dim the screen when you look away.
Presence Sensing is an incredibly useful set of features. But when you enable it in the OOBE, Windows 11 will by default also allow apps–downloaded from the Microsoft Store and the web–to access Presence Sensing too. This is not mentioned in the OOBE, so I recommend reviewing this later in Privacy & security settings. Unless, of course, you are comfortable with apps using this feature.
To review this setting, open Privacy & security settings, scroll down to “App permissions” and click “Presence Sensing.”
Here, you can choose how to configure this set of features. If you toggle “Presence Sensing access” to “On,” you can separately consider whether you should enable apps–Store and/or desktop apps specifically–to access these features.
Additional privacy settings to consider changing
In addition to the several big bucket privacy settings that Microsoft presents to you during the Windows Setup OOBE, there are several others hidden away in Privacy & security settings worth examining and, in most cases, configuring differently.
Windows permissions > Recommendations & offers
Allow websites to access my language list. This seemingly innocuous and even useful setting is less useful than it may appear: Your “language list”–which for most people is a single language–is geographically broad and can be used by Microsoft and others to fingerprint you. I disable this option.
Tip: You can find your language settings, including the list of languages configured on this PC, in the Settings app too. Navigate to Time & language > Language & region and review the language(s) listed in the “Language” section.
Improve Start and search results. This easily misunderstood feature has nothing to do with tracking your activities and is instead exactly what Microsoft claims: It can make the results you obtain with Search more accurate for you. That is, if you fumble-finger while searching for the Calculator app and mistakenly type cam but then select “Calculator” from the search results, the next time you search and type cam, “Calculator” will be the top choice in the results (ahead of “Camera,” which is technically more accurate). I recommend leaving this setting “On.”
Windows permissions > Diagnostics & feedback
Feedback frequency. Windows 11 will prompt you to provide it with feedback from time to time, often after a system or app failure. In a perfect world, Microsoft would respond to this feedback by improving the product and by letting you know that it appreciates your efforts. But this is not a perfect world, and Microsoft appears to ignore most of the feedback it receives about Windows 11. So there is no reason for you to be bothered with prompts to provide it: Configure this option to “Never.”
Windows permissions > Search permissions
Search my accounts. By default, Windows Search will personalize the results it provides using your content in Bing, OneDrive, Outlook, and other Microsoft services tied to your Microsoft account (and/or Microsoft Work and School account). If you don’t want this, configure the Microsoft account option (and/or the Work or school account option) to “Off.”
Search the contents of online files. As per the above option, you can configure this or the OneDrive sub-option to “Off” if you don’t use cloud storage services or just want Windows Search to search only your PC’s storage.
Show search highlights. You should disable “Show search highlights,” as this feature is designed solely to put you in front of Microsoft advertising displayed on Microsoft online services like MSN and Bing.
Learn more: I discuss Search highlights in the Search chapter as well.
Completely disable Windows 11 telemetry and tracking
While I try to focus on the built-in functionality in Windows 11 in this book, Microsoft makes it difficult or impossible to perform certain tasks, many related to its ongoing enshittification of this platform. And so we must occasionally turn to third-party utilities that let us do what Microsoft does not.
Win11Debloat is among the best of those utilities. It’s free and lets any Windows 11 user de-enshittify the system in a myriad of ways. Here, however, I will focus solely on its privacy-protecting capabilities, most notably its ability to completely disable telemetry tracking.
Learn more: I have a separate book, De-Enshittfy Windows 11, that goes into far more detail about Win11Debloat and other ways you can make Windows 11 work for you and not against you. You can learn more, and if interested, buy the book, at Leanpub.
To get started, visit the Win11Debloat page on GitHub. In the Usage section, its author explains how to get started, but the short version is to open Terminal with administrator privileges and run the following command line.
& ([scriptblock]::Create((irm “https://debloat.raphi.re/“)))
This command runs a remote script that downloads and runs the Win11Debloat app.
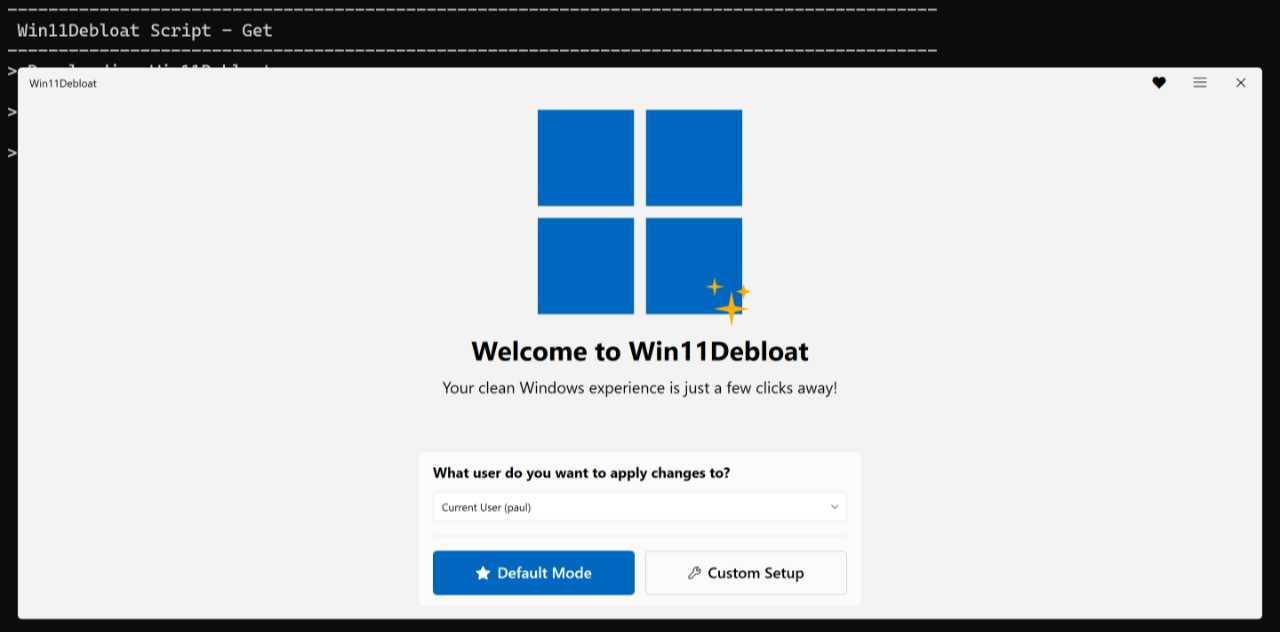
From here, click “Custom Setup” to navigate to the App Removal stage. We’re not removing any apps, so click “Next” to navigate to the System Tweaks page. This is where things get interesting: The “Privacy & Suggested Content” section in the upper-right contains a “Disable telemetry, tracking & targeted ads” option you will select to turn off telemetry completely.
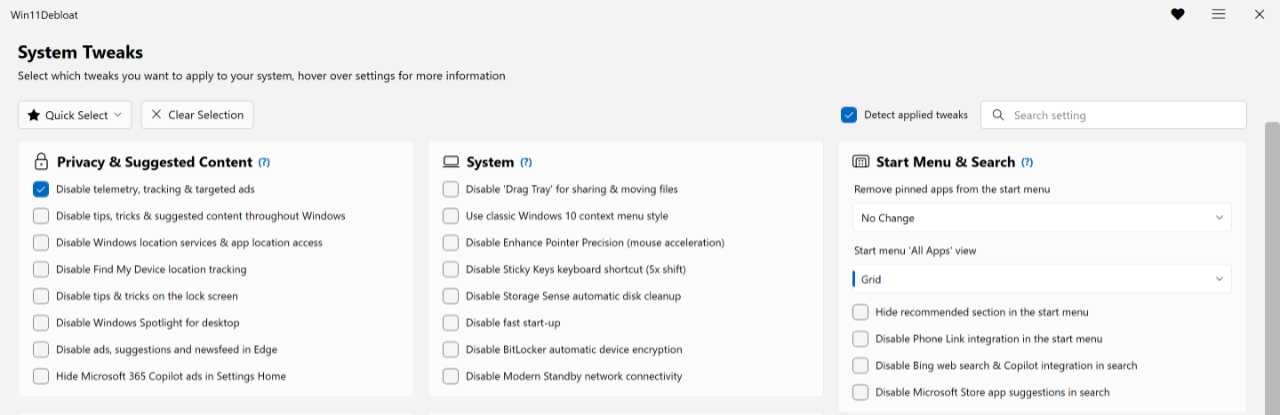
That’s everything you have to do, but since we’re here, you might consider selecting the following options as well:
- Disable tips, tricks & suggested content throughout Windows
- Disable tips & tricks on the lock screen
- Disable ads, suggestions and newsfeed in Edge
- Hide Microsoft 365 Copilot ads in Settings Home
Whatever you choose, click “Next” to continue and then “Apply Changes.” When it’s done configuring Windows 11, you can click “Close” to exit the app.

Gain unlimited access to Premium articles.
With technology shaping our everyday lives, how could we not dig deeper?
Thurrott Premium delivers an honest and thorough perspective about the technologies we use and rely on everyday. Discover deeper content as a Premium member.