Taskbar (24H2)
- Paul Thurrott
- Oct 06, 2024
-
0
Though most of the items it contains are now centered by default, the Windows 11 Taskbar looks and works much like those in previous Windows versions. But it has also been simplified, so some options you may have used in the past are either missing or can be found elsewhere.

Get to know the Taskbar
The Windows 11 Taskbar sits at the bottom of the display, below the Desktop. It consists of several areas, each with its own unique functionality.
Where did it go?
The Windows 11 Taskbar is a lot less sophisticated than its Windows 10 counterpart, and much of its predecessor’s functionality is now missing or harder to find in Windows 11.
Some key missing interfaces include:
Move the Taskbar to another screen edge. With Windows 10, you could move the Taskbar from its default position at the bottom of the screen to any of the other screen edges. This is no longer possible in Windows 11: The Taskbar can only appear at the bottom of the screen.
No small icons. With Windows 10, you could resize all the Taskbar icons–Start, Taskbar items, and app shortcuts–to a smaller icon size. This is no longer possible in Windows 11: The icons only support a single size.
Quick Launch. Windows 10 supported a vestigial feature called Quick Launch, which was a toolbar with icons for legacy features like Control Panel. Quick Launch is no longer available in Windows 11.
Toolbars. It’s not just Quick Launch: While Windows 10 let you optionally display and create multiple toolbars, this functionality is no longer available in Windows 11.
Lock Taskbar. The Windows 10 Taskbar supported a Lock/Unlock toggle that would prevent or allow you to move icons around, respectively. This option is not available in Windows 11. Instead, it is always in an unlocked state.
Taskbar context menu. When you right-clicked a blank area of the Windows 10 Taskbar, it would display a long menu of options. But this menu is much simpler in Windows 11: It displays a small context menu with just two options, “Task Manager” and “Taskbar settings.”
Here’s a quick rundown of the major Taskbar areas from left to right.
Widgets
The Widgets icon displays the weather forecast and other notification information and sits at the far left side of the Taskbar. If you hover over this icon with the mouse cursor or click it, the Widgets interface opens.

You can also open Widgets by typing WINKEY + W.
You can learn more about Widgets in the Widgets chapter.
Start button
The Start button is used to open the Windows 11 Start menu, and it cannot be removed from the Taskbar or modified in any way.

You can also display Start by tapping the START key on your keyboard.
You can also right-click the Start button to display the Quick link menu, which provides access to a handy list of technical and legacy Windows utilities.
You can also open Quick link by typing WINKEY + X.
You can learn more about Start and the Quick link menu in the Start chapter.
Taskbar items
By default, Windows 11 displays three so-called Taskbar items–Widgets (noted above), Search, and Task view. Search and Task view are found to the right of the Start button.

As with Widgets, Search and Task view are each described in more detail in their respective chapters.
You can also open Search by typing WINKEY + S (or WINKEY + Q, oddly). And you can also open Task view by typing WINKEY + TAB.
Pinned app shortcuts
In addition to the aforementioned Taskbar items, Windows 11 comes with several default app shortcuts that let you quickly launch often-used apps from a readily available interface. Microsoft provides the first four–Copilot, File Explorer, Microsoft Edge, and Microsoft Store, and sometimes one more–while your PC maker can add up to three more of their own. What you see here can vary from PC to PC.

As with previous Windows versions, you can remove any or all of the default Taskbar items and app shortcuts; only the Start button is required. And you can, of course, add your own app shortcuts and determine the positions in which they appear on the Taskbar. This is discussed in Determine which items appear on the Taskbar, below.
Windows 11 provides some useful keyboard shortcuts for those who like to keep their fingers on the keyboard.
To select the first pinned app shortcut in the Taskbar, type WINKEY + T.
Then, you can move the selection box right or left by tapping the RIGHT ARROW or LEFT ARROW keys, respectively.
And you can launch the selected app by tapping the ENTER or SPACE keys.
Finally, you can also move that selection box to the first pinned app shortcut by tapping the HOME key. Or to the last shortcut by tapping the END key.
You can also directly launch any pinned app by typing WINKEY + some number, where some number represents that app’s shortcut’s position in the Taskbar. For example, to launch the third pinned application, type WINKEY + 3. Note that this doesn’t apply to built-in Taskbar items, like Start, Search, Task view, and Widgets, though each has its own keyboard shortcut as noted elsewhere in the book.
System tray
The Windows 11 Taskbar still provides a system tray area–sometimes still called the notification area or system notification area–as before, with various status notification icons, some of which can be hidden in an overflow area accessed by the chevron icon at the far left of the system tray.

You can drag and drop these icons to rearrange them if you’d like.
Three of the stock items in the system tray–“Network,” “Volume,” and “Power”–always appear and work differently than before. In Windows 10, each of these items would display its own user interface in a flyout when clicked. But now clicking any of them will display the new Quick settings pane.
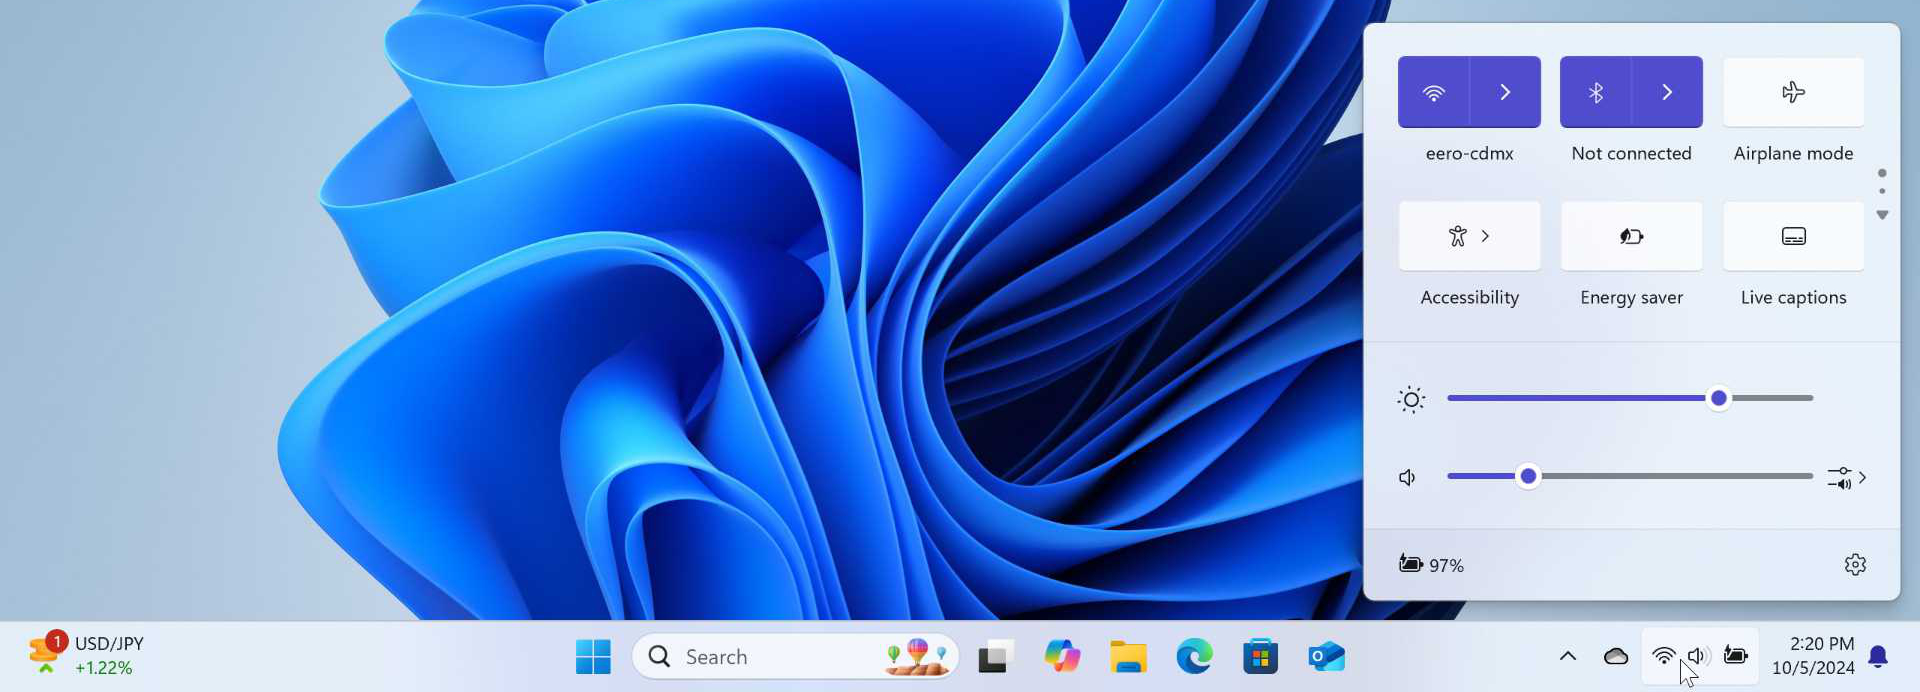

You can also display Quick settings by typing WINKEY + A. This was the keyboard shortcut for the Action Center in Windows 10, but that interface isn’t available in Windows 11.
As its name suggests, Quick settings is a quicker and more convenient way to access key system settings, including networking, Bluetooth, screen brightness, and volume.
Oddly, these three stock items–“Network,” “Volume,” and “Power”–behave as before when you right-click them: Each displays a simple context menu with options related to that specific item.
You can learn more about Quick settings in the Quick Settings chapter.
Time and date
To the right of the system tray, you will find a time and date display. If you click this display, the Notifications and Calendar panes will appear, stacked vertically on the right side of the Desktop.
Depending on the vertical size and resolution of your display, the Calendar pane, which can be toggled between collapsed and expanded views, may be collapsed by default, hiding its calendar grid.
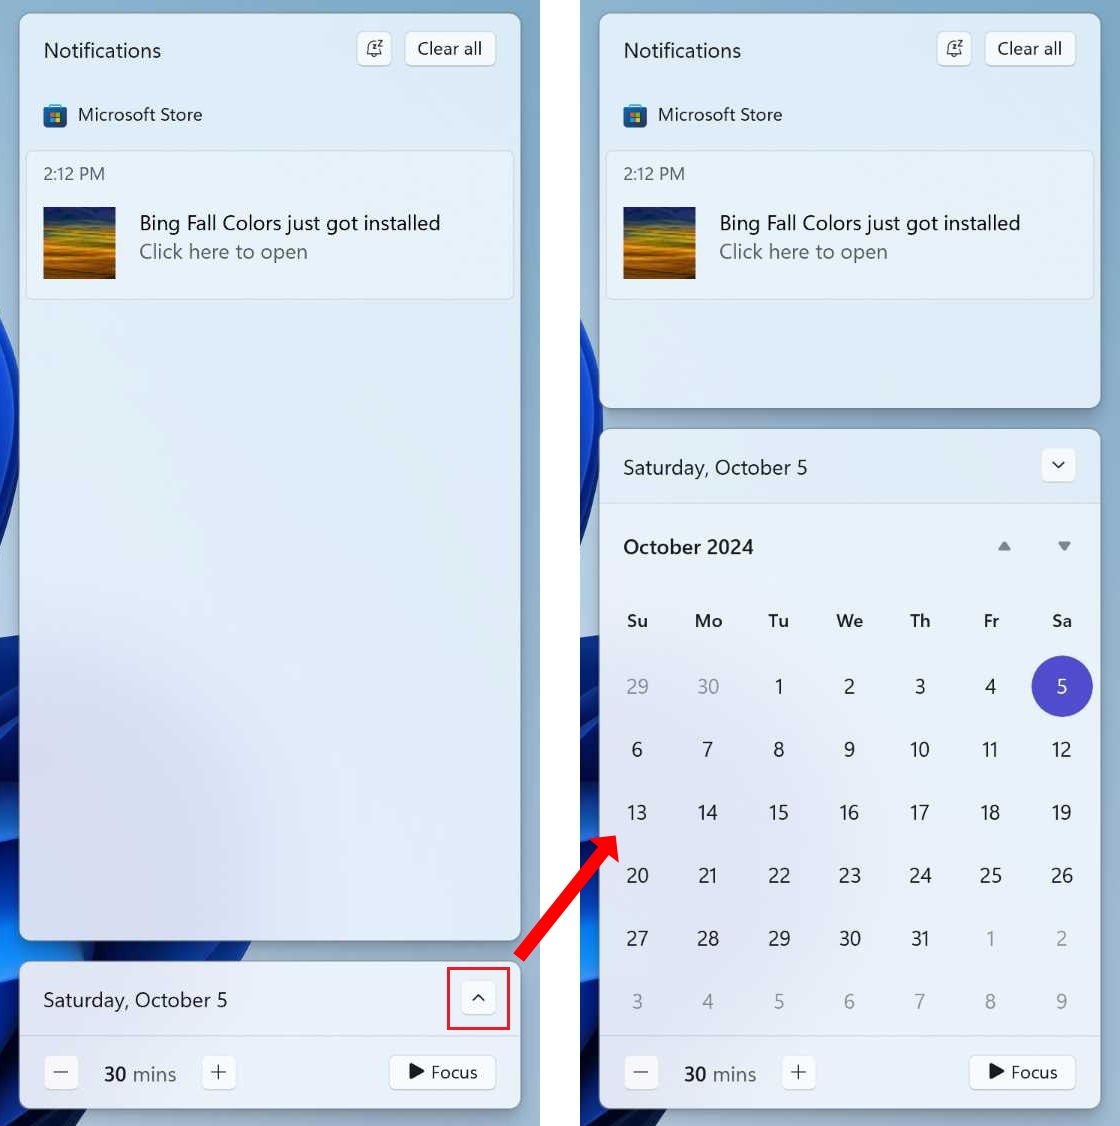
You can also display the Notifications and Calendar panes by typing WINKEY + N. Though they are separate, there is no way to display only one or the other.
If you right-click time and date, you will see options for adjusting the date and time, and accessing notification settings.
Notifications
The Notifications pane works much like the top area of the Action Center in Windows 10: It collects app and system notifications you have not seen or handled. You can remove individual notifications or, with the “Clear all” button, remove all remaining notifications. You can also use the Settings (“…”) link associated with an app or individual notification to access various options.
The Notifications pane also provides a “Do not disturb” button that toggles Windows 11’s Do not disturb feature.
You can learn more about Do not disturb in the Do Not Disturb and Focus Assist chapter. And you can learn more about notifications in the Notifications chapter.
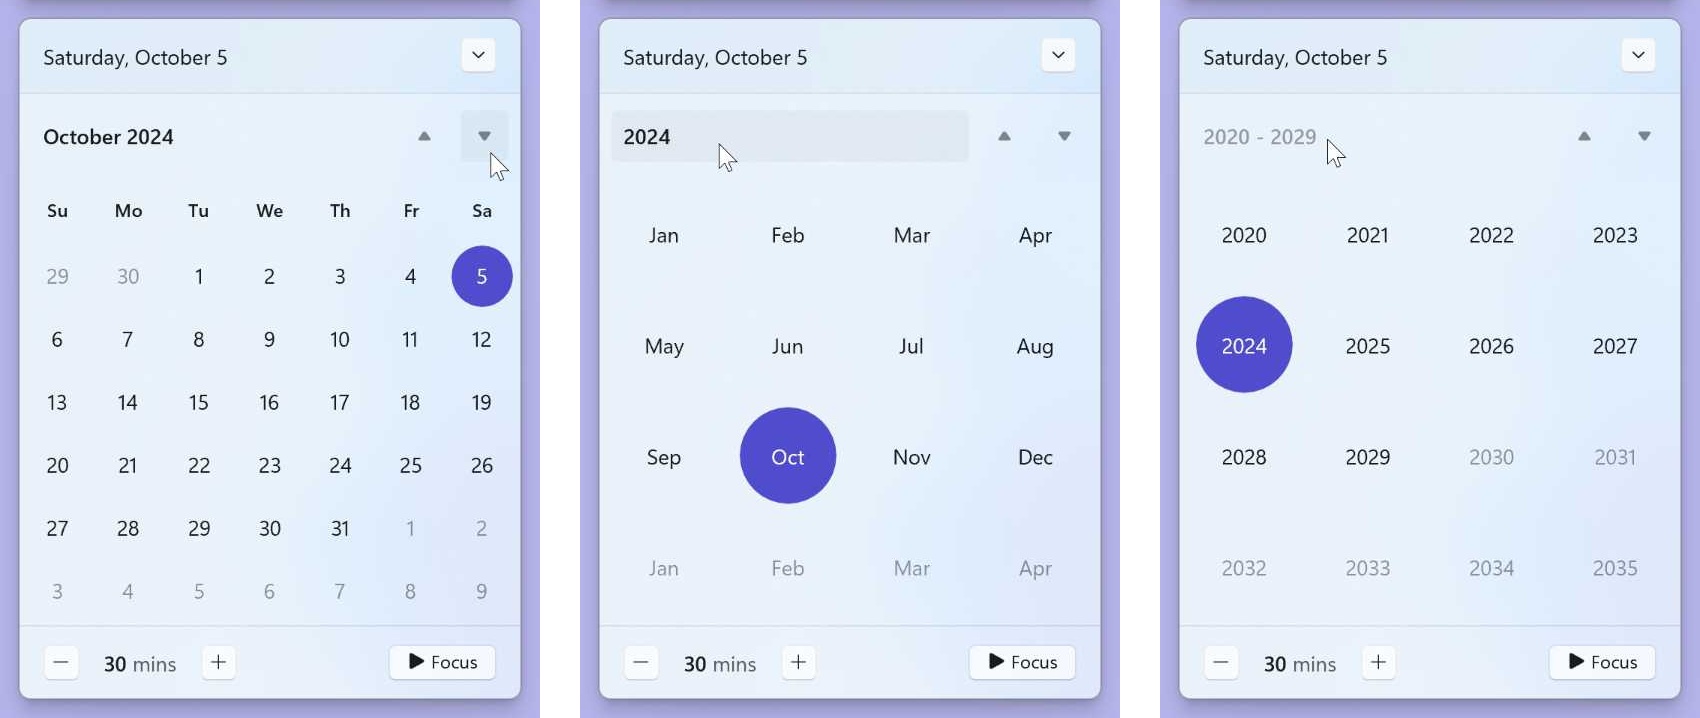
Calendar
The Calendar pane displays the current date and a calendar grid centered on the current month. It is not interactive per se, but you can navigate through the calendar in various ways. Using the “Up” or “Down” arrow buttons–or the scroll wheel on your mouse or a two-finger gesture on your touchpad–you can scroll back and forward through time. You can jump top a new month in the current year by clicking the current month button at the top. And then you can jump to a new year from there by clicking the current year at the top.
Where did it go?
Windows 10 supported a much more functional Calendar pane that also appeared when you selected the time and date display in the Taskbar. That Calendar pane integrated with your online calendars and could show an agenda view that listed upcoming events from your calendars. And you could even create new events from the interface.
Unfortunately, none of those features are available in Windows 11.
Show desktop
It’s well hidden and difficult to see, but there is a small “Show desktop” button at the far right of the Taskbar, to the right of the date and time display. As noted in the Desktop chapter, this is used to toggle the display state of all of your open apps and other windows. That is, when you click this button, all open apps and windows will immediately minimize, displaying the Desktop.
When you click “Show desktop” again and all of those same apps and windows will be restored to their previous open state, location, and size.
Understand Taskbar behaviors
The Windows 11 Taskbar is entirely new to Windows 11, so it isn’t based on the versions of this feature from Windows 10. This explains why the new Taskbar is simpler than before, but it also helps to explain–but not excuse–why there are so many missing features. As bad, different parts of the Taskbar work inconsistently.
You can see the first impact of this redesign when you right-click an unused area of the Taskbar: In Windows 10, this resulted in a long context menu full of options, but Windows 11 displays a context menu with just two items, “Task Manager” and “Taskbar settings.”


If you select the second item in that context menu, the Settings app opens and navigates to Personalization > Taskbar. Many of the customization options we discuss later in the chapter are found on this page in Settings. But let’s first consider how this behavior impacts how you interact with the Taskbar.
In previous Windows versions, the Taskbar and most of the items it contained were objects with which you could directly interact. This was in keeping with the desktop interface that Microsoft first delivered with Windows 95, which was an object-based system where each on-screen item had associated actions you could perform. Clicking an object typically launched that object, while right-clicking it provided other options.
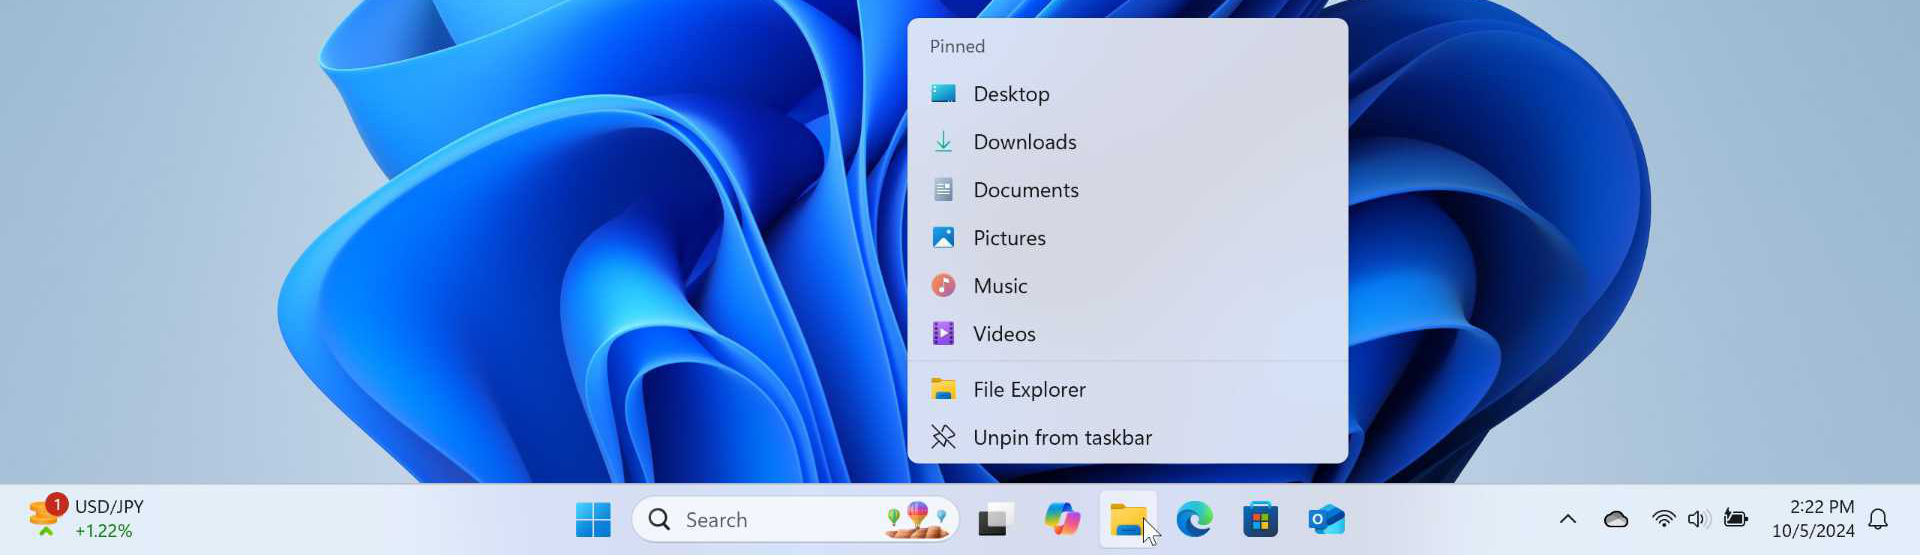
This system continues forward into Windows 11, but it’s inconsistently implemented. For example, if you right-click Widgets, Search, Copilot, or Task view, nothing happens. But app shortcuts on the Taskbar–like those for File Explorer, Microsoft Edge, Microsoft Store, and all others–do support direct interaction via right-click: These shortcuts display a Jump List menu specific to that object, as is normal.
The system tray has likewise changed. In Windows 10, you could click the “Network,” “Volume,” and “Power” icons in the tray to display flyouts that were specific to each icon. But in Windows 11, it doesn’t matter which of those icons you select because the new Quick settings pane appears in each case. You can right-click each of these items in Windows 11 to display an item-specific context menu, as before. But these menus are typically simplified and have fewer options now. (This is described earlier in the chapter.)
There’s nothing you can do about these changes. Instead, you just have to live with the fact that different types of items on the Taskbar behave differently when you click or right-click them.
You can still directly customize some aspects of the Taskbar. For example, you can rearrange the app shortcuts on the Taskbar using drag-and-drop. And you can remove them via a right-click context menu choice. Likewise, some system tray icons can be similarly moved (but not removed).
Customize the Taskbar
Most (but not all) Taskbar customization occurs via Taskbar settings. You can quickly find this interface by right-clicking the Taskbar and choosing “Taskbar settings.”

You can also display Taskbar settings by opening the Settings app and navigating to Personalization > Taskbar.
Determine which items appear on the Taskbar
By default, Windows 11 displays a Start button, four Taskbar items–Widgets, Search, Copilot, and Task view–plus several app shortcuts. You can remove all of those items except for the Start button, change the position of any app shortcut, and add your own app shortcuts.
You cannot rearrange the Taskbar items.
Remove unnecessary Taskbar items
None of the Taskbar items–again, Widgets, Search, and Task view–are strictly necessary because each of the underlying experiences can be launched with a keyboard shortcut (or, in the case of Search, via a Search bar in Start). And you may not even use some of these features. Either way, removing some (or all) of the Taskbar items will open up a lot of on-screen real estate for your own app shortcuts. So we recommend removing as many of these as possible.
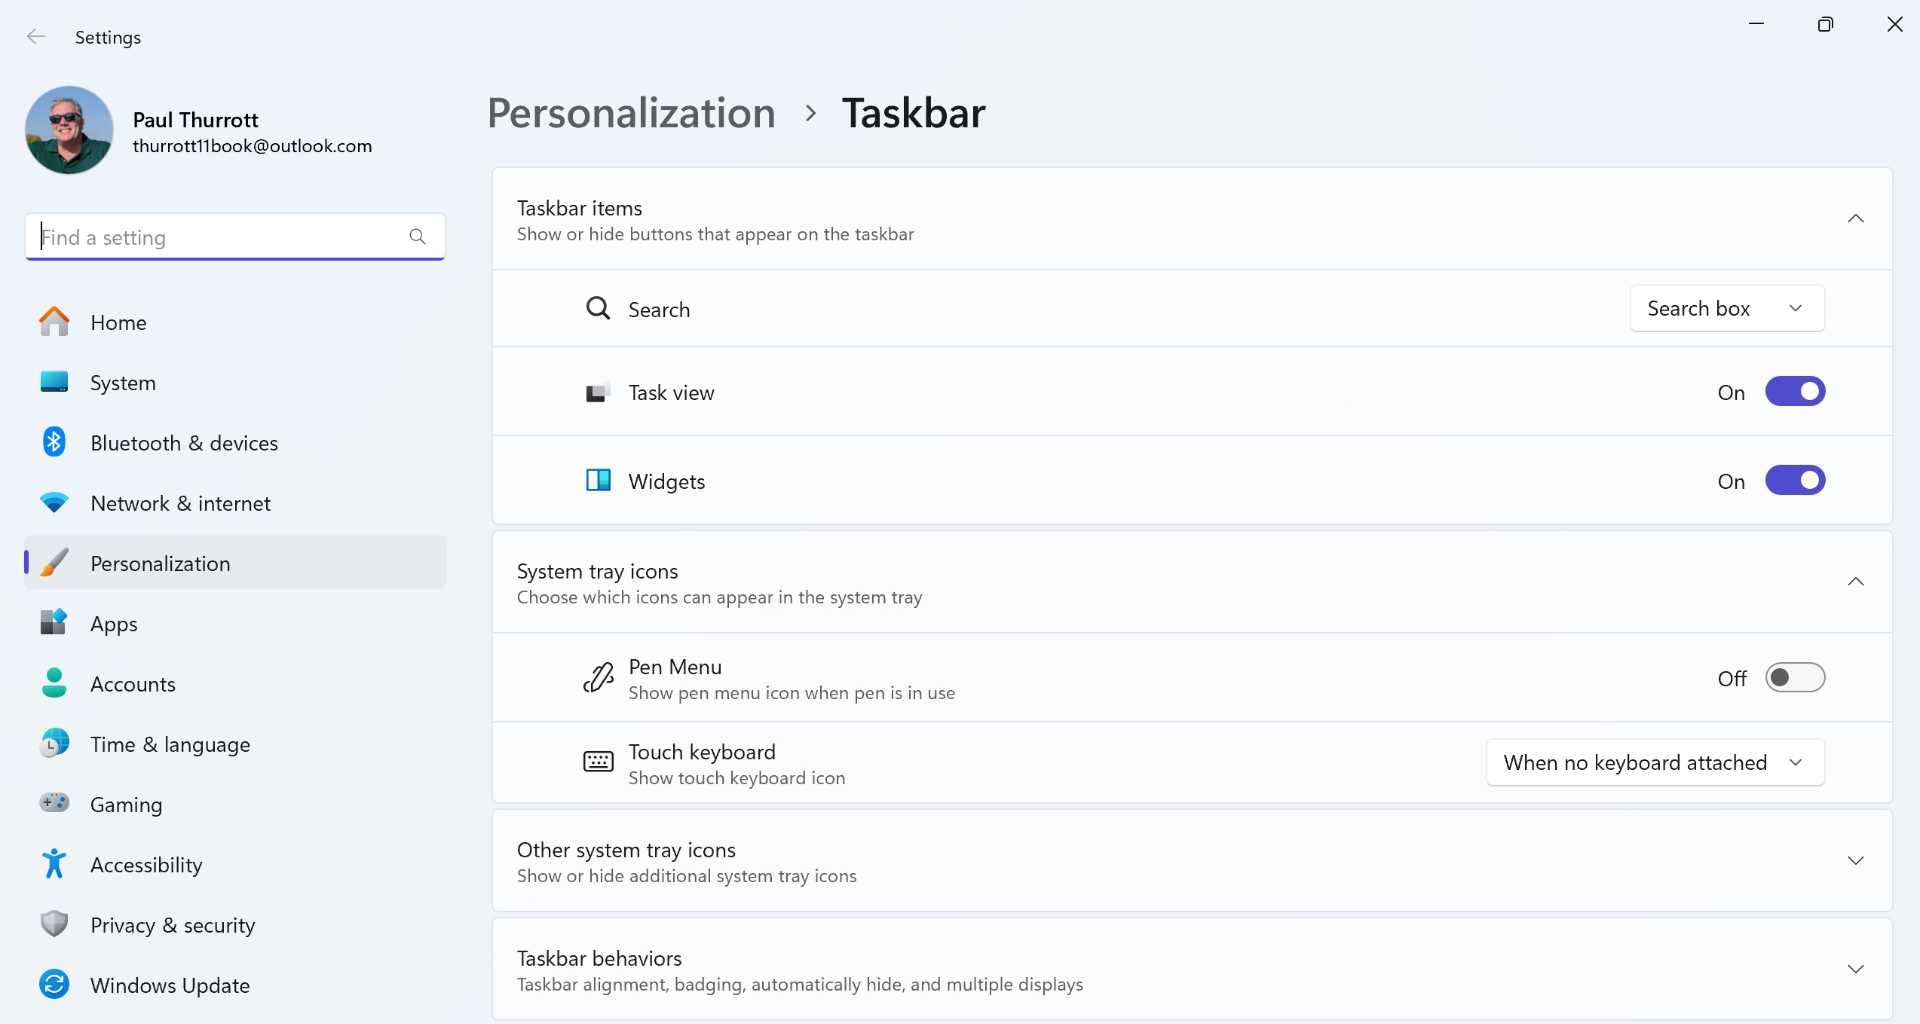
To remove some or all of the Taskbar items, open Taskbar settings. The first area at the top, called Taskbar items, provides a set of display choices for Search and toggles for Copilot, Task view, and Widgets. Just set each you don’t need to “Off.”
Manage app shortcuts
App shortcuts are not managed in Taskbar settings in the Settings app. Instead, you can add shortcuts to the Taskbar from Start and elsewhere and move or remove shortcuts directly from the Taskbar.
Add an app shortcut. To add an app shortcut to the Taskbar, open Start (or Search), find the app shortcut you wish to add to the Taskbar, right-click it, and choose “Pin to taskbar” from the context menu that appears.
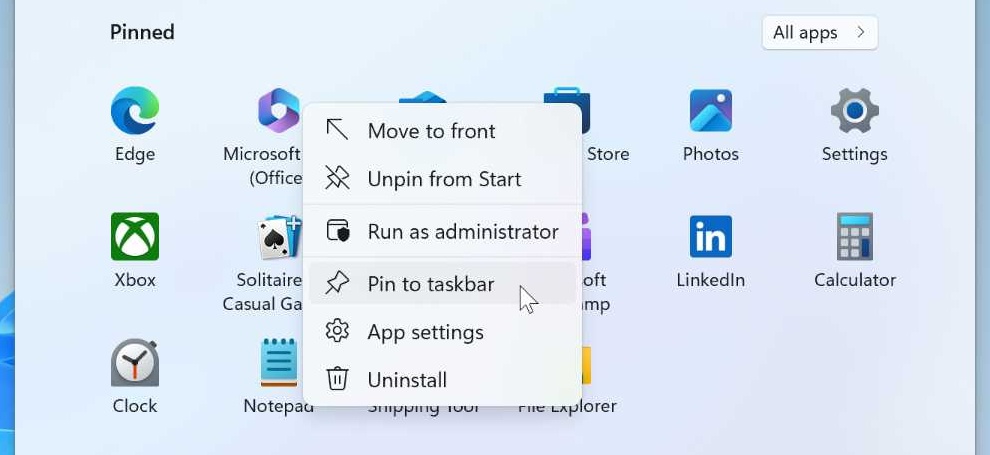
Alternatively, you can also drag and drop app shortcuts from Start into the Taskbar to pin it there as well. This works from the Pinned area and All apps view.
There are other, more complicated ways to find apps to pin as shortcuts to the Taskbar, including using File Explorer, but the methods noted above are the easiest and most obvious.
Reposition an app shortcut. To reposition an app shortcut, simply select and hold it with the mouse cursor, drag it left or right to a new location, and then drop it where you want it.

Remove an app shortcut. To remove an app shortcut from the Taskbar, right-click it and choose “Unpin from taskbar” from the context menu that appears.
Align the Taskbar (and Start) to the left side of the display
By default, Windows 11 centers the Taskbar items and app shortcuts on-screen (as it does for Start when you click the Start button). But you can optionally left-align these items so that the system resembles the Windows 10 look and feel.
To do so, open Settings (WINKEY + I), navigate to Personalize > Taskbar, expand “Taskbar behaviors,” and change the Taskbar alignment option from “Center” to “Left.”

Manage system tray icons
Windows 11 lets you configure which icons appear in the system tray using Taskbar settings. Unfortunately, there are two different areas to examine for some reason.
They are:
System tray icons. In this section, you will see toggles for three system tray icons that are typically only useful on tablet and 2-in-1 PCs with smart pens and multitouch interfaces: Pen menu, Touch keyboard, and Virtual touchpad. Unless you use these features regularly, you can safely toggle each to “Off” to hide them.
![]()
Other system tray icons. This area works differently: It lists all the icons that will display when necessary, but you can toggle any of them to “Off” to hide them in the system tray’s overflow area, which is accessed by selecting “Show hidden icons” (the caret icon) at the far left of the system tray. If an icon is set to “On,” it will appear on the Taskbar. Otherwise, it will appear in the overflow area flyout.
![]()
Manage Taskbar behaviors
The Windows 11 Taskbar may not offer the vast wealth of customization capabilities of its predecessor, but it does offer several useful settings you can configure in Taskbar behaviors.
Configure the Taskbar alignment
By default, Taskbar alignment is set to “Center,” but you can change it to “Left” if you want it to appear similarly to Windows 10 and previous Windows versions.
Automatically hide the Taskbar
By default, the Taskbar remains fixed to the bottom of the screen, but you can use this option to hide the Taskbar when you’re not interacting with it. To access a hidden Taskbar, just mouse down to the bottom edge of the screen: it will slide up and become visible.
You can also display the Taskbar when it’s hidden by pressing WINKEY + T.
Show badges on Taskbar apps
The Taskbar shortcuts for some Windows apps can display an overlay called a badge that indicates that something in the app requires your attention. You might have an unread email message, as seen by the badge on the Microsoft Outlook icon below.
![]()
This feature is enabled by default, but you can disable it if desired.
Show flashing on Taskbar apps
Some Windows apps flash their Taskbar shortcut icon when something happens, like a notification. This feature is enabled by default, but you can disable it if desired.
Configure the Taskbar for multiple displays
Those who use two or more external displays–sometimes called secondary displays–with their PCs, and have them configured to extend the internal display, have a few unique Taskbar options to consider in Taskbar behaviors.
You configure multiple displays in Display settings: Open the Settings app (WINKEY + I) and navigate to System > Display and ensure that the presentation mode is set to “Extend these displays” and not “Duplicate these displays” or one of the other options.
They are:
Show my taskbar on all displays. Enabled by default, you can uncheck this option to show the Taskbar on only the main (or internal) display.
When using multiple displays, show my taskbar apps on. This is set to “All taskbars” by default, but you can change it to “Main taskbar and taskbar where window is open” or “Taskbar where window is open” if you prefer.
You can learn more about using Windows 11 with multiple displays in the Displays chapter.
OK, there is technically a third option here related to multiple displays, called “Combine taskbar buttons and hide labels on other taskbars.” This is described below.
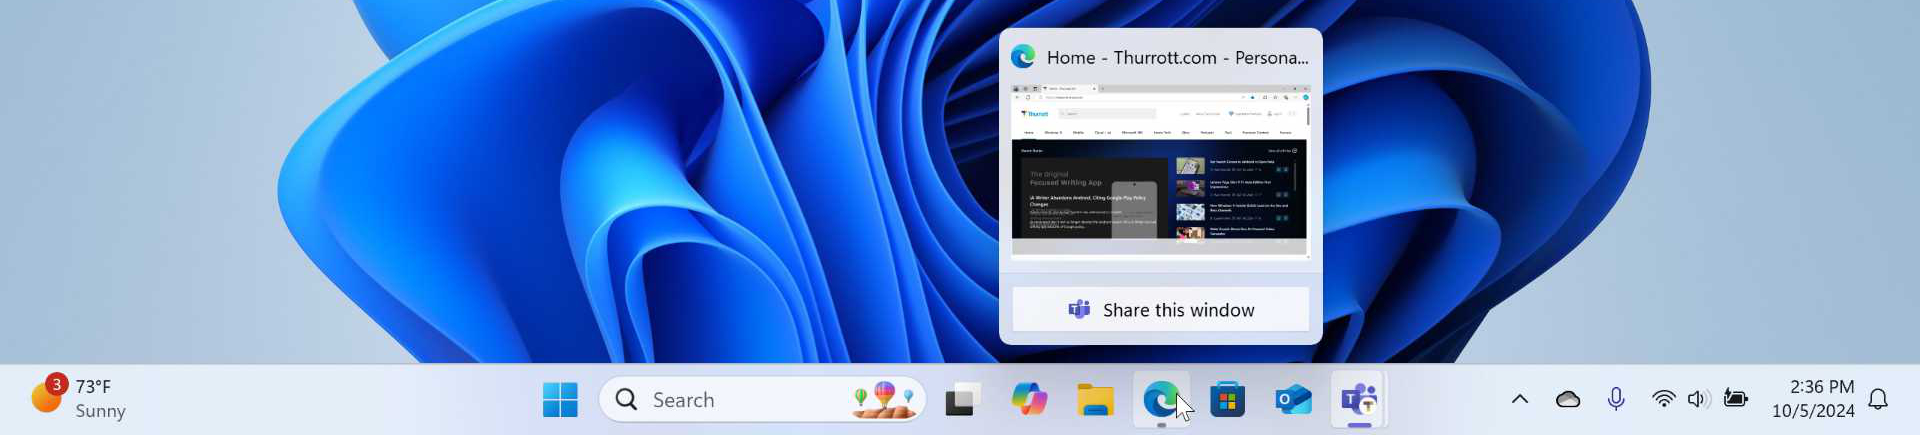
Configure window sharing from the Taskbar
The business version of Microsoft Teams is often used to share the screen with other people during a meeting. But with the “Share any windows from my taskbar” option enabled–as it is by default–you can share just a single app window instead. You do so by mousing over the app’s Taskbar shortcut during a Microsoft Teams meeting (using a work profile only): A “Share this window” button appears in its thumbnail pop-up.

Configure Show desktop
Show desktop is enabled in Windows 11 by default. But if you’d rather not use this feature, you can disable it by setting “Select the far corner of the taskbar to show the desktop” to “Off.”
Combine Taskbar buttons and hide labels
By default, the Taskbar displays a single shortcut for each app shortcut it contains, and these shortcuts do not include a text label. But you can configure the Taskbar to display a separate shortcut for each app window, each with its own text label. To do so, configure “Combine taskbar buttons and hide labels” to “When taskbar is full” or “Never.”

If you use multiple displays, you can also configure “Combine taskbar buttons and hide labels on other taskbars” similarly.
Note that if the Taskbar isn’t wide enough to display all its contained items, it will display a “Taskbar overflow menu item (“…”) you can click to display the hidden items.

By default, the clock in the Windows 11 time and date display only shows the hours and minutes. But you can also display the seconds if you’d like, though doing so could reduce the battery life on a portable PC. This setting used to be in Taskbar settings, but now it’s found in Date & time settings (Settings > Time & language > Date & time). Look for “Show seconds in system tray clock (uses more power)”.

Gain unlimited access to Premium articles.
With technology shaping our everyday lives, how could we not dig deeper?
Thurrott Premium delivers an honest and thorough perspective about the technologies we use and rely on everyday. Discover deeper content as a Premium member.