Upgrade to Windows 11 on Unsupported Hardware
- Paul Thurrott
- Oct 01, 2022
-
0
Though Windows 11 is largely identical to Windows 10 internally, Microsoft changed the hardware requirements and will block the upgrade on many PCs that run Windows 10 successfully.
Key among these new requirements are:
CPU. Where Windows 10 required a 32-bit or 64-bit microprocessor running at a 1 GHz or faster clock speed, Windows 11 requires a 64-bit, dual-core microprocessor running at 1 GHz or faster. Furthermore, Windows 11 now requires newer Intel, AMD, or Qualcomm microprocessors. The requirements vary somewhat by CPU architecture, but for the most part, supported processors first arrived in 2018 or later. For example, Windows 11 requires 8th-generation Intel Core processors or newer (with a few bizarre exceptions).
TPM. Where Windows 10 could use a Trusted Platform Module (TPM) 1.2 or newer chipset to improve security and the experience of using a feature called BitLocker drive encryption, Windows 11 requires a TPM 2.0 or newer chipset.
RAM. Windows 10 required at least 1 GB of RAM for a 32-bit system and 2 GB of RAM for a 64-bit system. Windows 11 is 64-bit only and it requires at least 4 GB of RAM.
Storage. Windows 10 could be installed on a system with 32 GB or more of hard disk or solid-state storage. Windows 11 requires 64 GB or more.
Some of the new requirements are reasonable. For example, we don’t believe you should install Windows 11 on a system with less than 8 GB of RAM or 256 GB of storage. But others are considered controversial because they are largely arbitrary and appear designed solely to convince users to upgrade and purchase new Windows 11-based PCs.
If you have an unsupported PC, you can work around these restrictions and upgrade to Windows 11.
Downsides include:
- It’s unsupported. You can’t turn to Microsoft or your PC maker if you have software issues.
- Microsoft could stop delivering updates. This is almost certainly a hollow threat, but Microsoft does warn that “if you proceed with installing Windows 11 [on unsupported hardware], your PC won’t be entitled to receive updates, including but not limited to security updates.”
- Potential security issues. Microsoft argues that its processor and TPM requirements are for security reasons, but that’s only partially true. If your PC has a TPM 1.2 or TPM 2.0 chipset and an unsupported microprocessor, it will be no less secure than Windows 11 running on supported hardware.
- Annoying desktop watermark. Microsoft displays a watermark text overlay on the desktop when you use Windows 11 on an unsupported PC. We explain how to remove that in Remove the annoying desktop watermark, below.
Upgrade to Windows 11 on an unsupported PC
In Windows 11 Hardware Requirements and Recommendations, we describe how you can use Microsoft’s PC Health Check app, which is included with Windows 10, to determine whether your PC meets the new Windows 11 hardware requirements. Or, you can simply download a Windows 11 Setup ISO from Microsoft and give it a go, only to receive the bad news from Setup.
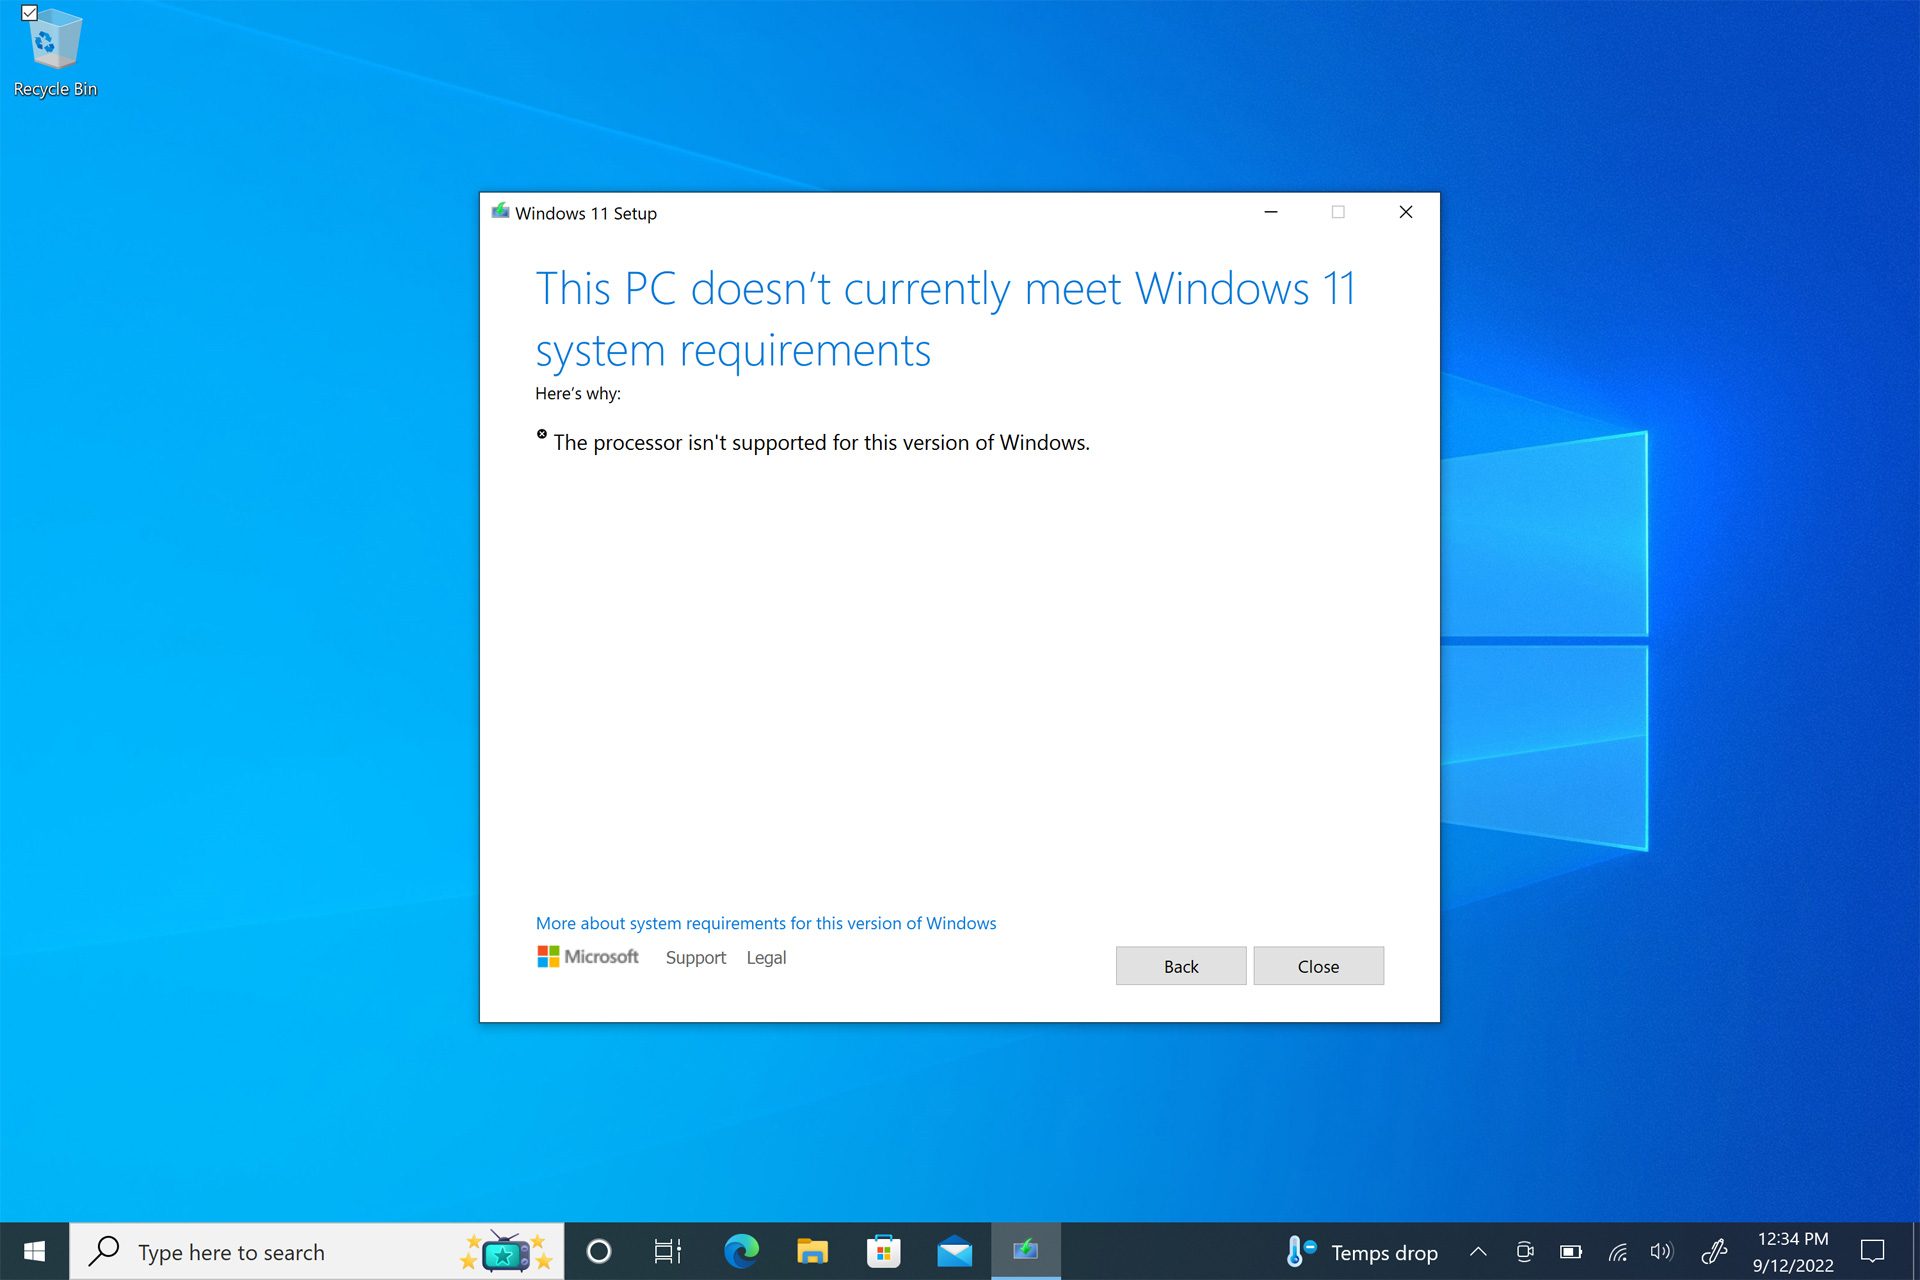
Don’t worry, you can still upgrade to Windows 11. Here’s how.
A>Should you upgrade on unsupported hardware?
A>It depends. If your PC doesn’t meet the RAM or storage requirements, bypassing this check to upgrade to Windows 11 could be a mistake. Likewise, if you have a very old Intel, AMD, or Qualcomm microprocessor, we don’t recommend upgrading. But those with a microprocessor that just misses the cutoff—like a 6th- or 7th-Gen Intel Core processor—should have no issues running Windows 11.
First, open the Registry Editor, which is easy to find with Search. Then, navigate to HKEYLOCALMACHINE\SYSTEM\Setup\MoSetup in the navigation pane on the left.

Right-click on the MoSetup key—it looks like a folder—and select “New” and then “DWORD (32-bit) Value” from the context menu that appears. A new value—which resembles an item in a folder—will appear, with its name (New Value #1) highlighted so you can easily rename it. Rename it to AllowUpgradesWithUnsupportedTPMOrCPU.

Next, double-click on this new value to edit it. Change the entry in the “Value data” field from 0 to 1.
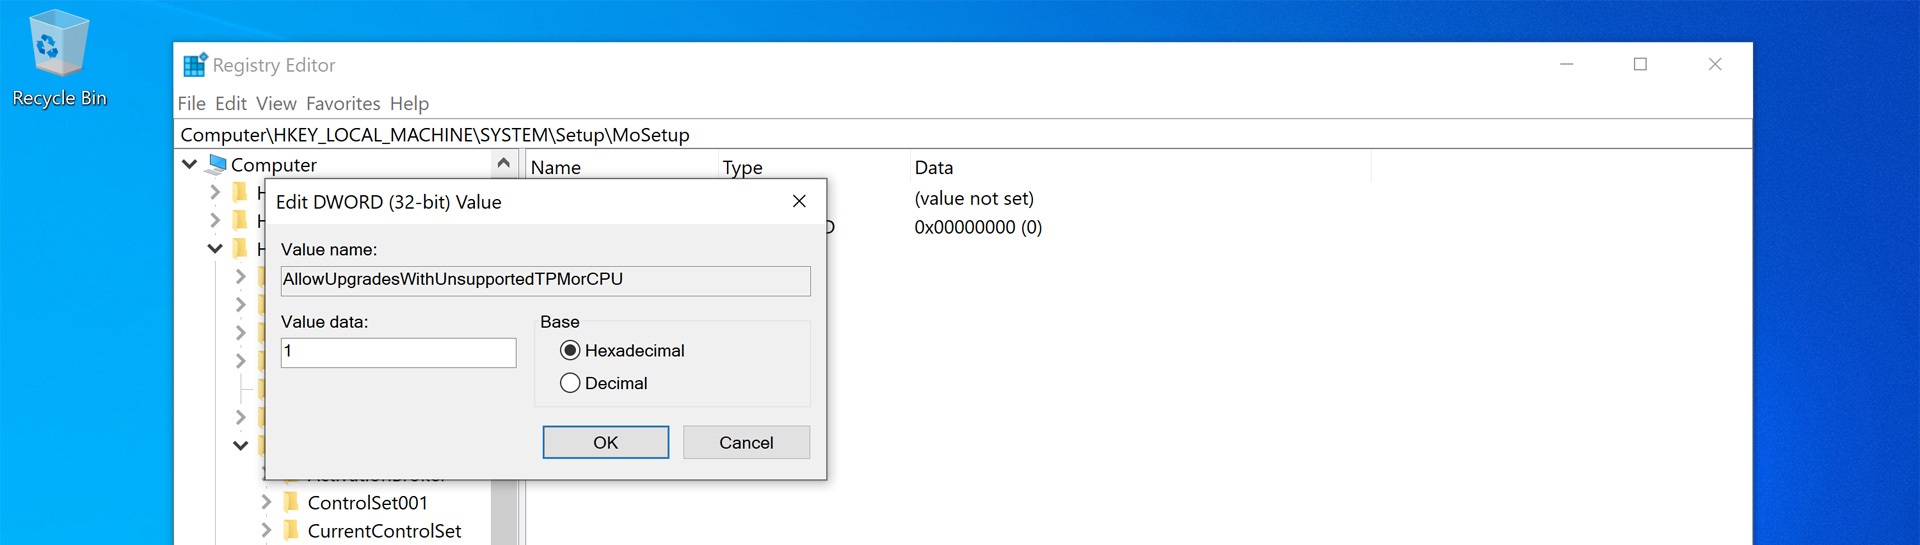
Then click OK, close the Registry Editor, and reboot the PC.
Now, you can run Windows 11 Setup again. This time, the upgrade will progress normally, though you will be warned one last time about the system requirements.

Just click the Accept button to keep going.
Remove the annoying desktop watermark
One side effect of running Windows 11 on an unsupported PC is that it will eventually display an annoying warning message in the form of a watermark on the Desktop. You don’t need to put up with this harassment.
To remove the watermark, open the Registry Editor and navigate to HKEYCURRENTUSER\Control Panel in the navigation pane on the left. Expand the Control Panel key to see whether there is a key named UnsupportedHardwareNotificationCache.
If not, right-click on Control Panel, select “New” and then “Key” from the context menu that appears, and then name the new key “UnsupportedHardwareNotificationCache” (no quotes). Then, right-click the UnsupportedHardwareNotificationCache key and choose “New” and then “DWORD (32-bit) Value” in the context menu, and name the value “SV2” (no quotes).
In the right pane, double-click the “SV2” value to edit it.
Change the entry in the “Value data” field to 2. Then, click OK, close Registry Editor, and reboot your PC. The watermark will be gone.

Gain unlimited access to Premium articles.
With technology shaping our everyday lives, how could we not dig deeper?
Thurrott Premium delivers an honest and thorough perspective about the technologies we use and rely on everyday. Discover deeper content as a Premium member.