Displays
- Paul Thurrott
- Dec 05, 2022
-
0
In Customize the Display, we discuss some of the basics of configuring your PC’s display. This includes changing the display resolution, scaling, and text size, and enabling and configuring Night Light and, when supported by your display, HDR.
This chapter focuses on more advanced topics related to displays, including multiple display configurations, wireless displays, and how you can use your PC as a wireless display for another PC.
Connect to a secondary display
Windows lets you connect a second display—or even multiple displays—and use them all together in a variety of configurations. Most people with multiple display setups use two displays, but the system works similarly with three or more displays as well.
How you connect a second display to your PC will vary from PC to PC.
Many laptop users will add an external display and use that in tandem with the device’s built-in display, perhaps with a USB-C or Thunderbolt dock and additional peripherals like a keyboard, mouse, and webcam. In this configuration, the external display could be connected via a USB-C cable directly to the laptop, or it could connect to a dock with a USB-C, HDMI, or DisplayPort cable.
Desktop computers typically offer more expansion capabilities than laptops, and they can include dedicated video card that have their own display connections. USB-C is common on desktop PCs, of course, but most will use HDMI or DisplayPort to connect with one or more displays.
PCs of all kinds can also connect wirelessly to compatible displays using a technology called Miracast. And you can even use one PC’s display as a wireless display for another PC; this is typically done with laptops, which have an display built-in.
Add a second display to your PC
When you connect a second display to your PC using a USB-C, HDMI, or DisplayPort cable, Windows 11 will recognize the new device, trill a notification sound and display a pulsing animation to indicate its success, and make it available for you to use.
As noted in Device Basics, Windows 11 uses built-in class drivers to make this initial connection, but in some cases you can obtain better drivers and related utilities via Windows Update or the display maker’s website. This is worth investigating, but if you’re using a second USB-C-based display for standard productivity work, the drivers Windows provides are usually all you need.
By default, Windows 11 configures a two-display setup in what’s called Duplicate mode, where both displays mirror each other and present the same view, with the same resolution and display scaling on each. If the two displays have different default resolutions, it will use the lower of the two resolutions on each.
This may be the configuration you’re looking for. But many will want each display to have its own desktop, each with different apps, use its native resolution, and perhaps have a custom display scale. Fortunately, Windows 11 supports a wide variety of options when it comes to using two or more displays.
Choose a display option
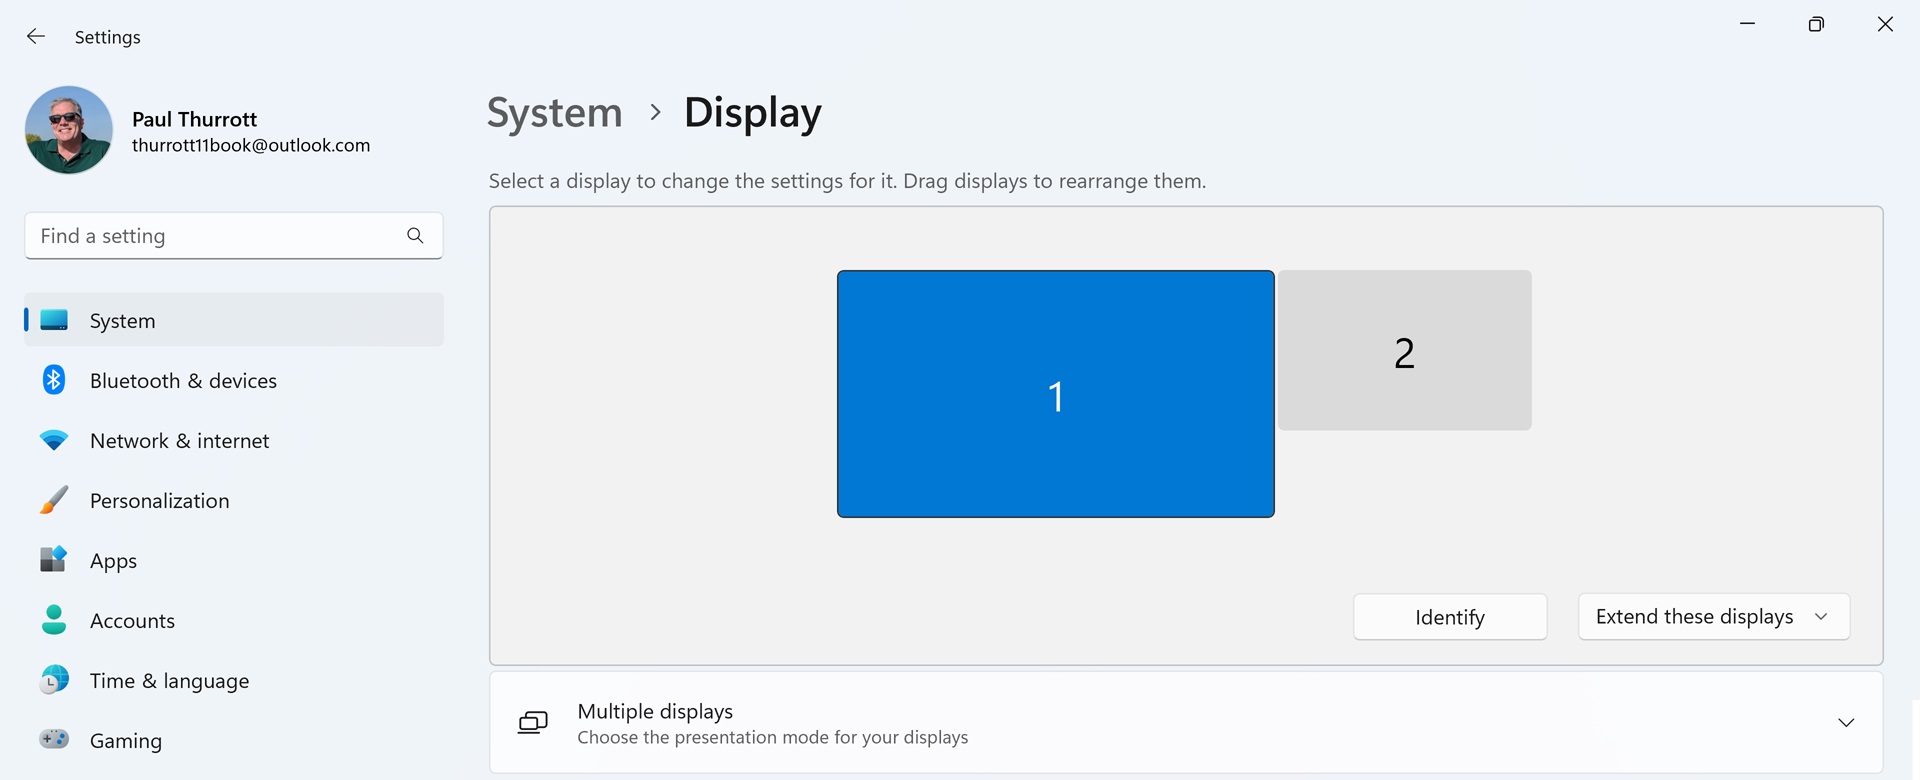
When you use Windows 11 with a single display, Display settings in the Settings app (System > Display) is straightforward enough: each of the settings you see here applies to that one display, as expected.
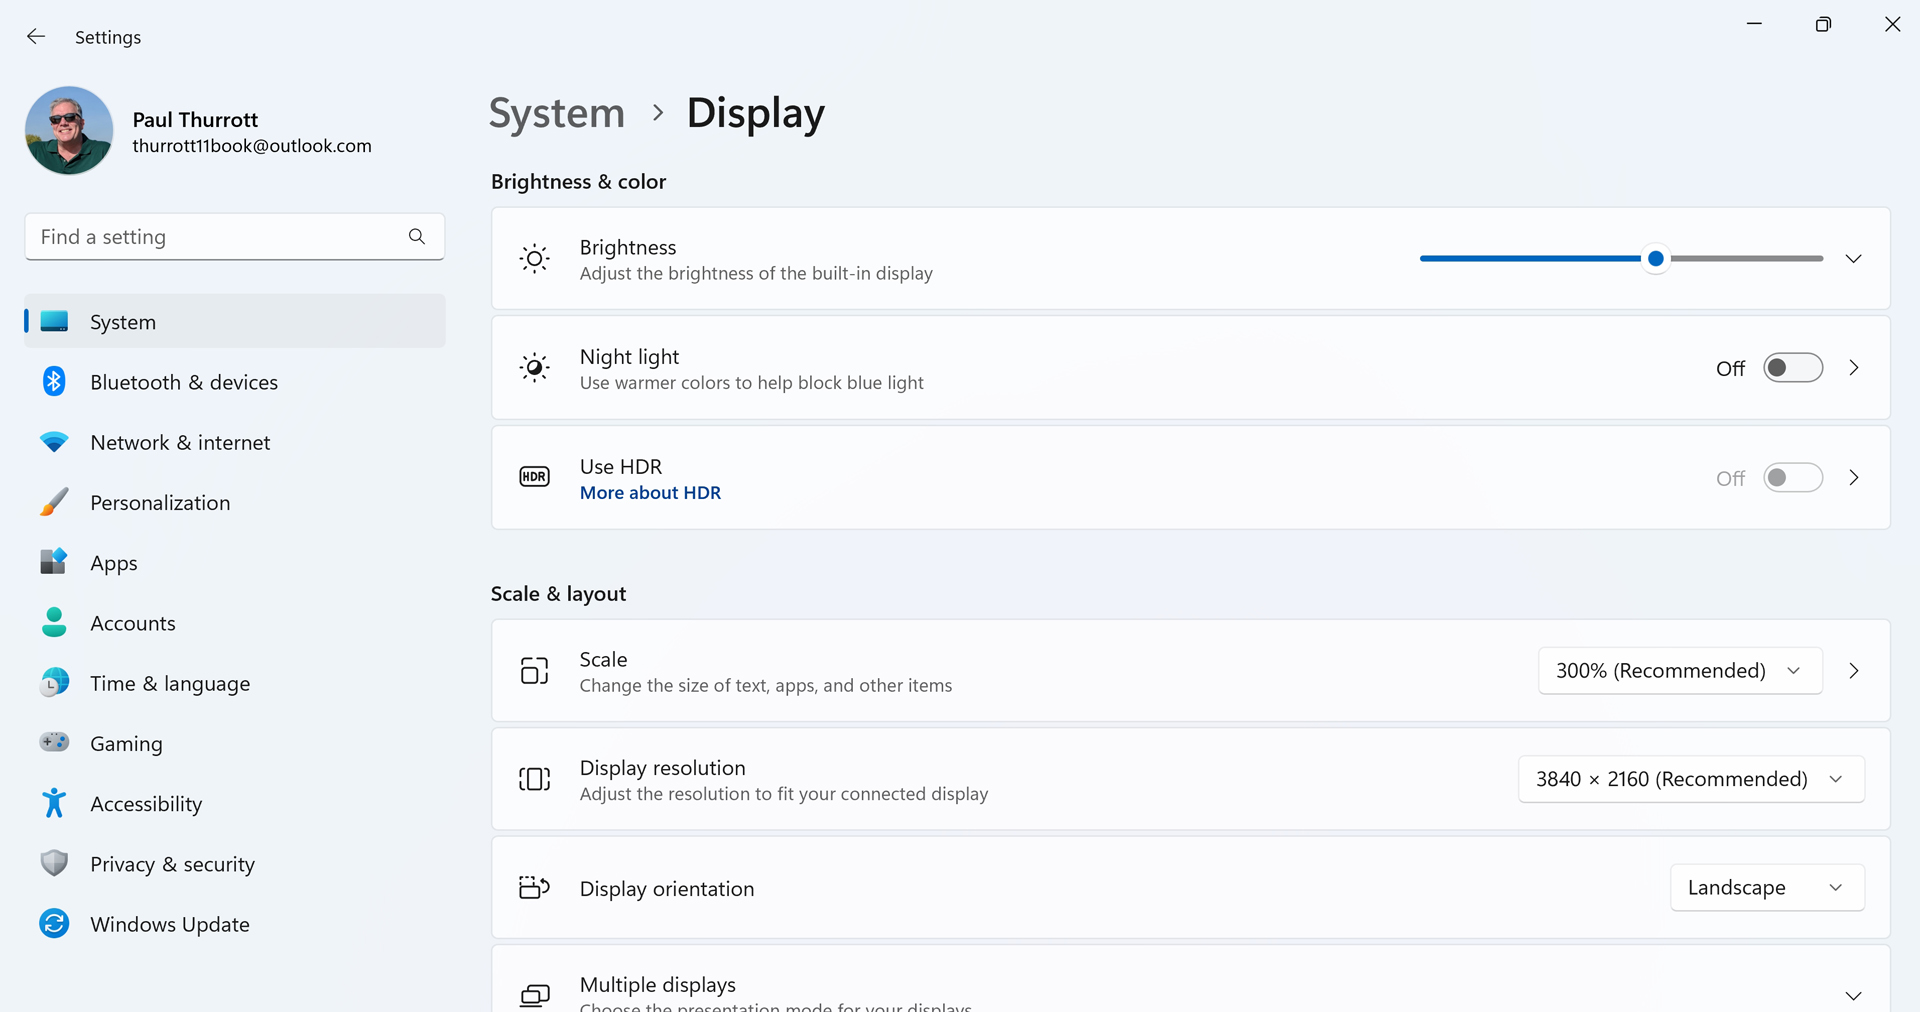
When you add a second display, Display settings changes to accommodate the new configuration. A new graphical display appears at the top of the page so that you can configure the layout of the displays, identify which is which, and choose a display option. Too, the “Multiple displays” set of options, which was previously at the bottom of the “Scale & layout” section, has moved up and is now found above the “Brightness & color” section.
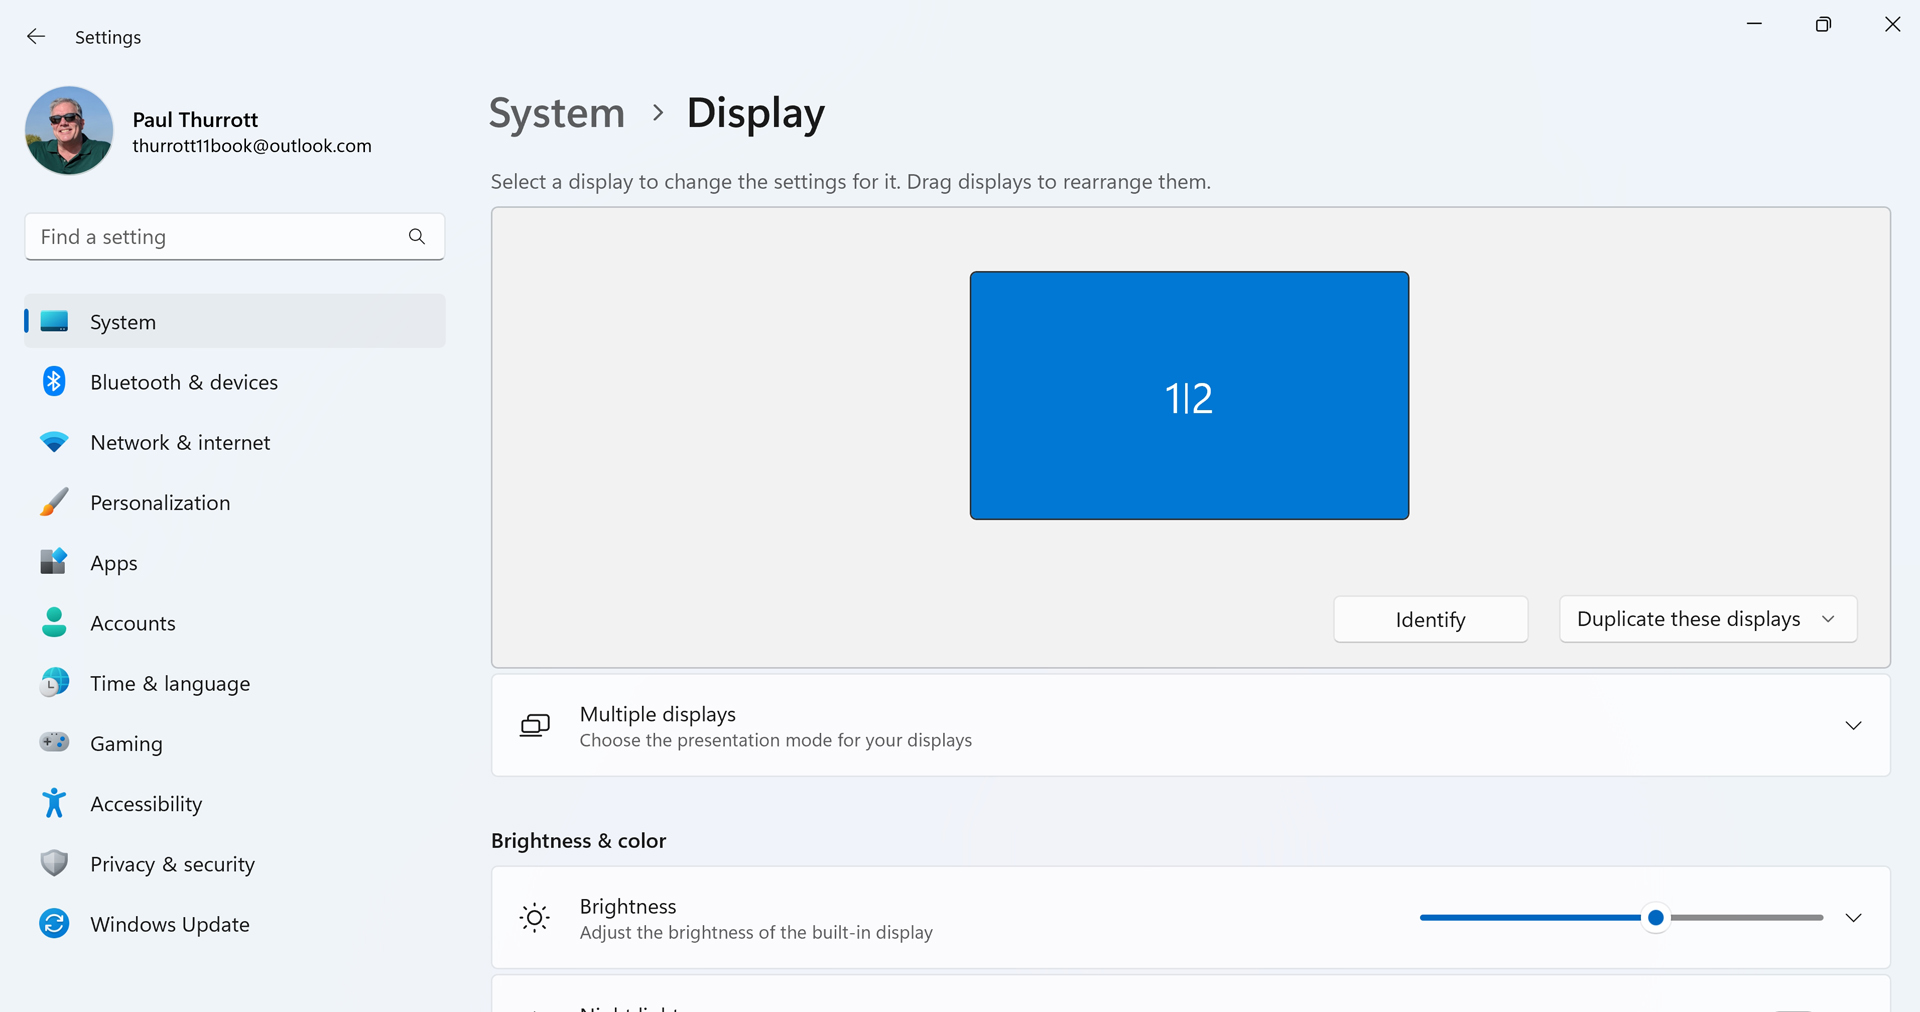
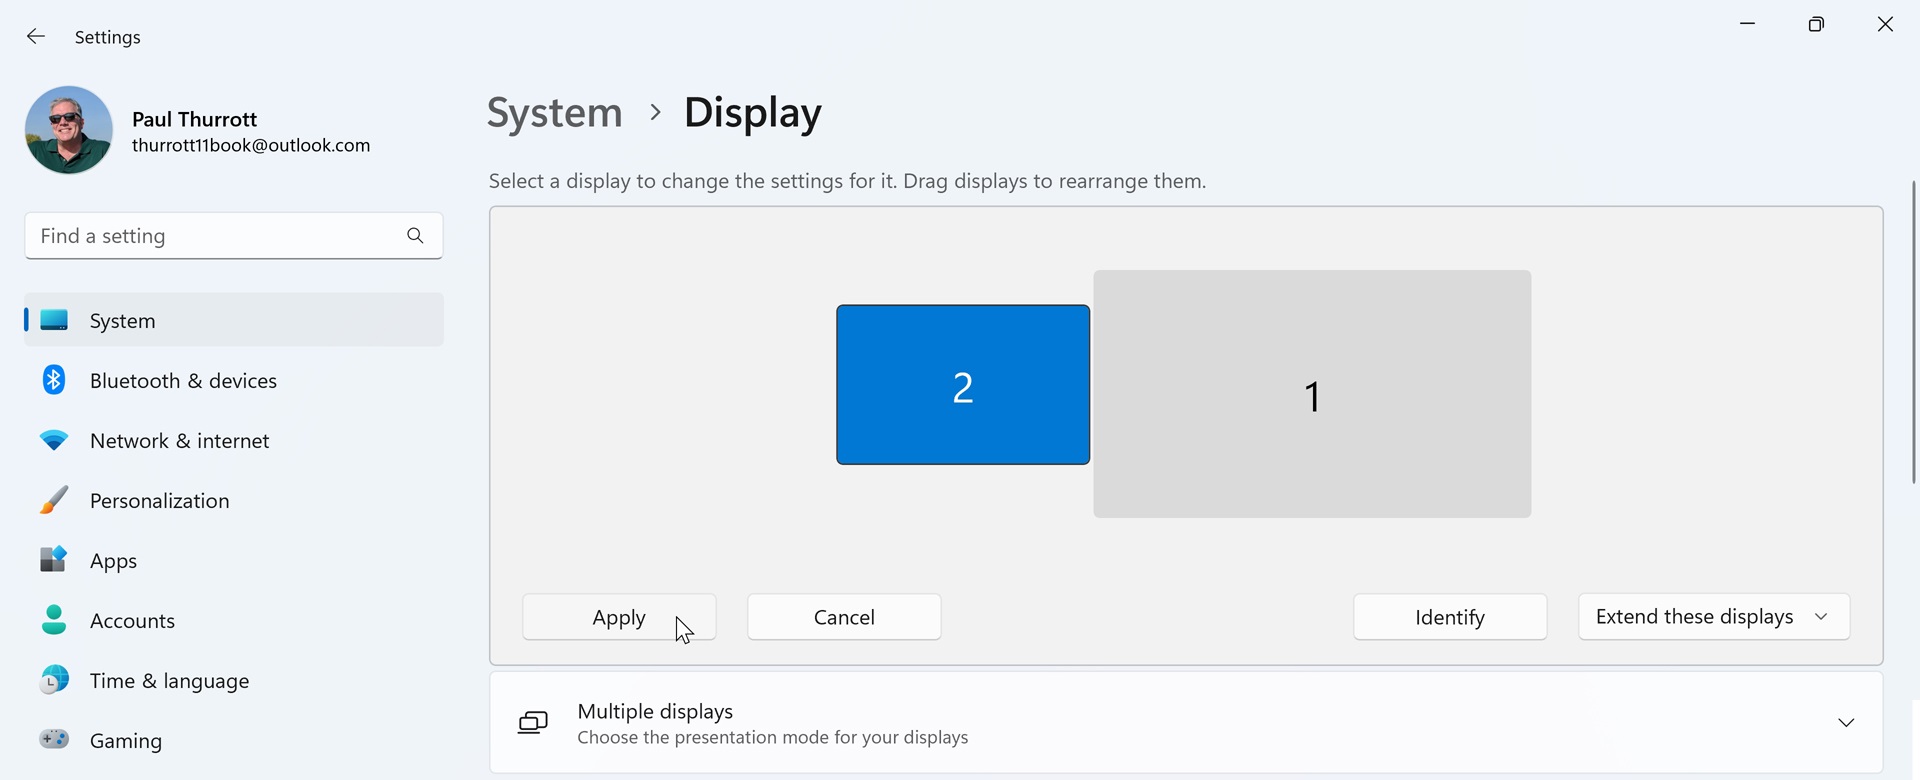
You should examine the display options first. This is done by selecting the drop-down in the lower right of the display layout area. It’s currently set to “Duplicate these displays,” indicating that the PC is in Duplicate mode.

You don’t have to accept the default display configuration that Windows provides. The following display options are available:
Show only on 1 (PC screen only). Here, the second display is not used and your PC only uses its primary display.
Duplicate these displays (Duplicate). In this default configuration, the PC’s primary display is mirrored on the second display. As noted above, Windows 11 will use the lower resolution of the two for both displays.
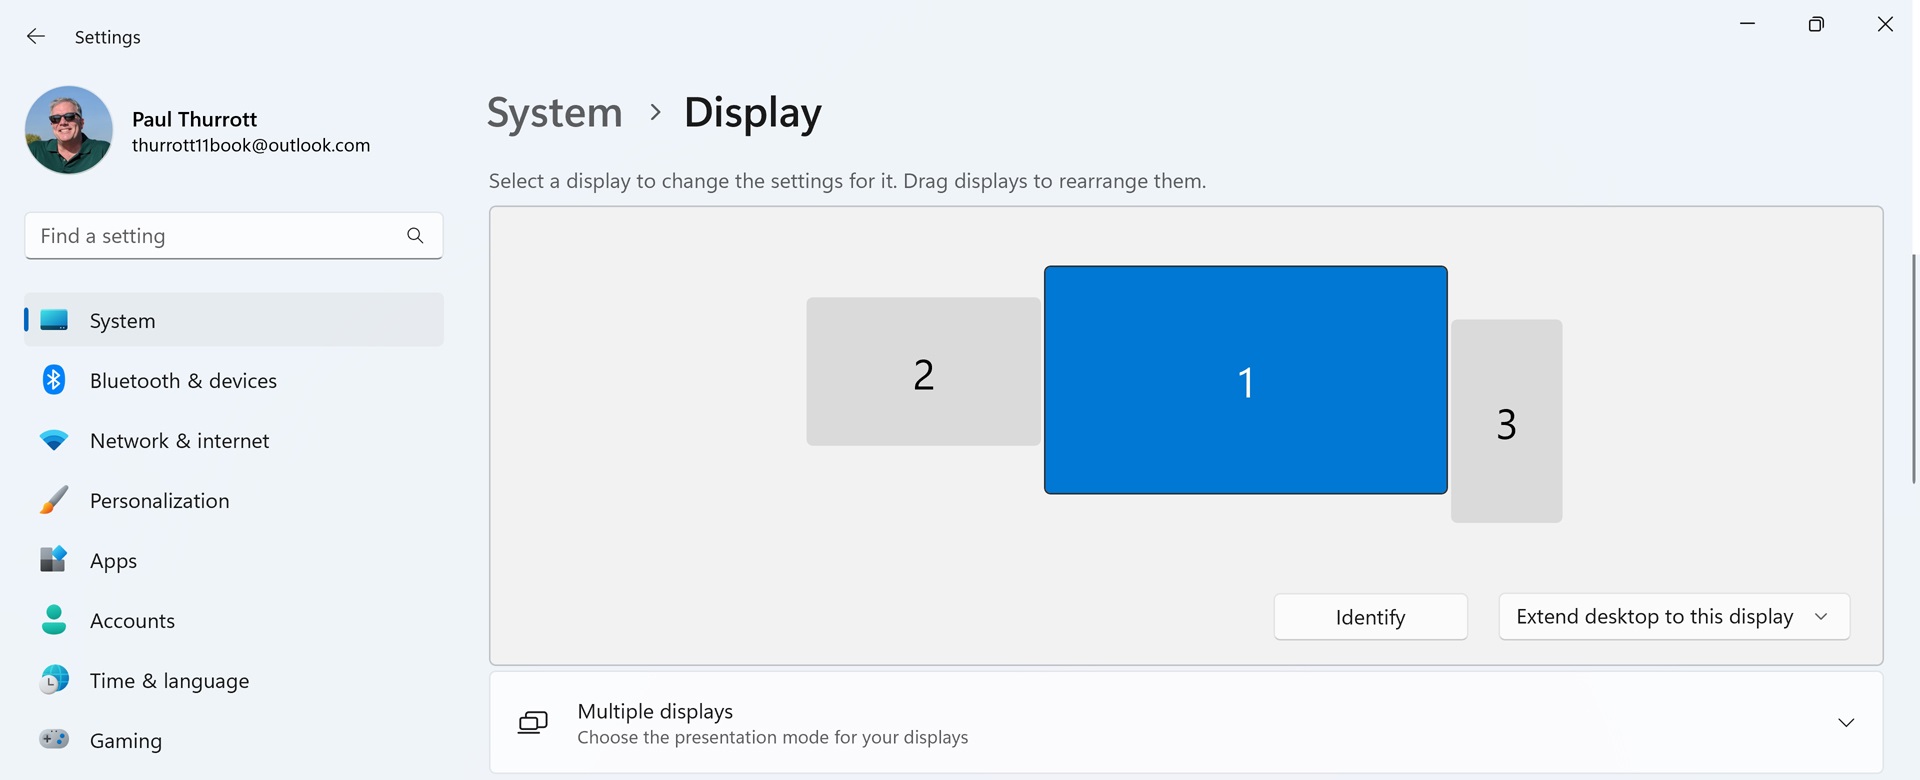
If you are using three or more displays, you will see different Duplicate mode options. For example, with a three-display configuration, you will see “Duplicate desktop on 1 and 3” and “Duplicate desktop on 2 and 3” options here instead.
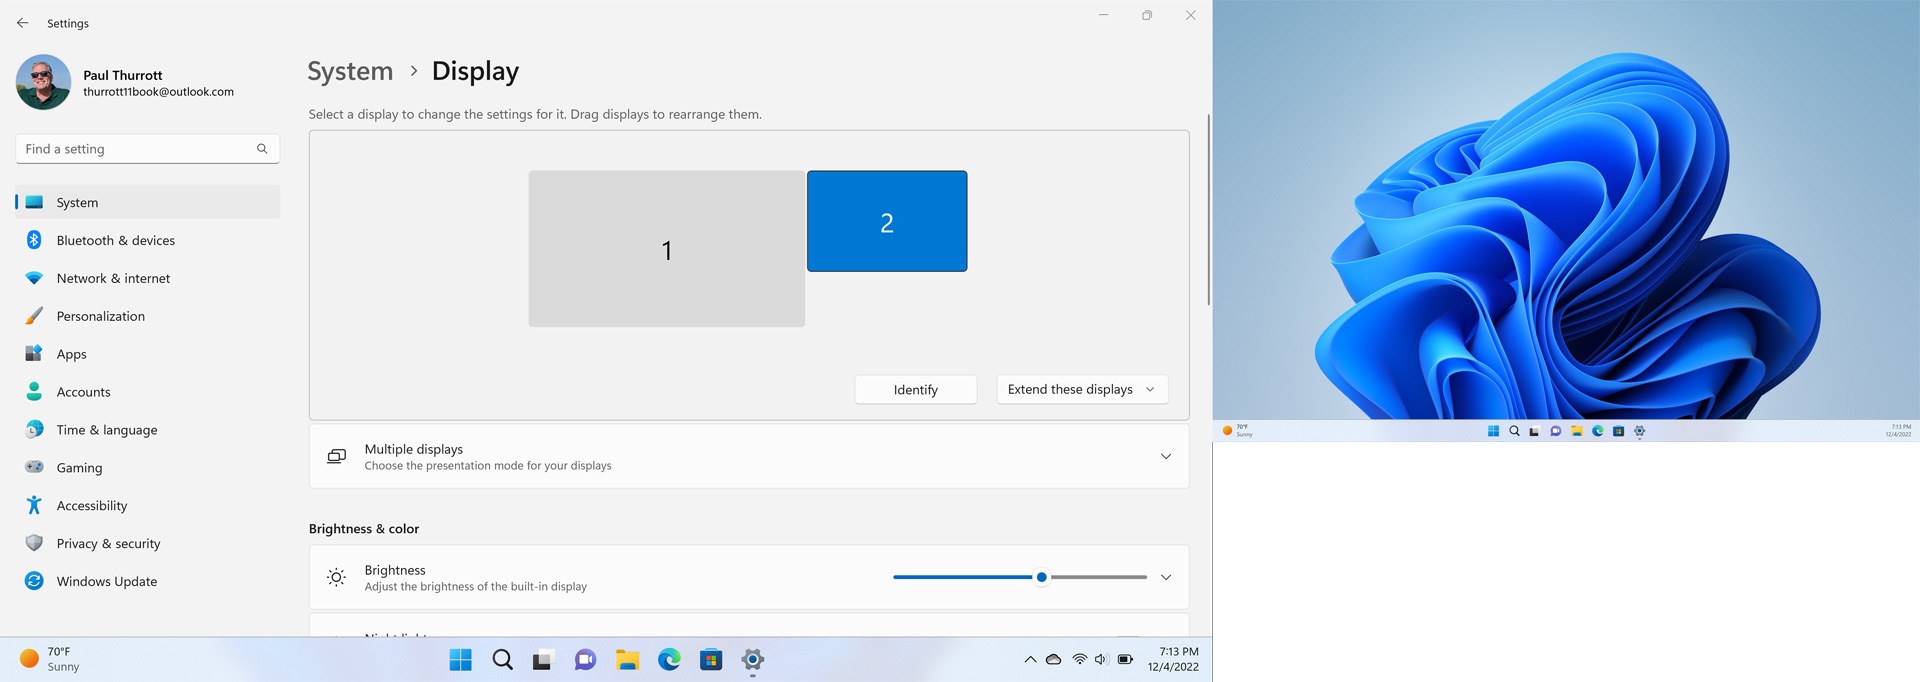
Extend these displays (Extend). This mode extends the screen across both displays, giving you multiple Desktops and Taskbars and a bigger area for apps and other windows, As good, the display will use its native resolution.
Show only on 2 (Second screen only). In this configuration, the primary display is disabled and only the second display is used.
If you are using three or more displays, you will see a “Disconnect this display” option here instead.
Some display options—like display scaling, orientation, and brightness—are configured independently for each display. Refer to the Customize the Display chapter for more information.
Choose a display option more quickly
You don’t need to open the Settings app to configure a display option with multiple displays: just type WINKEY + P to display the Project pane.
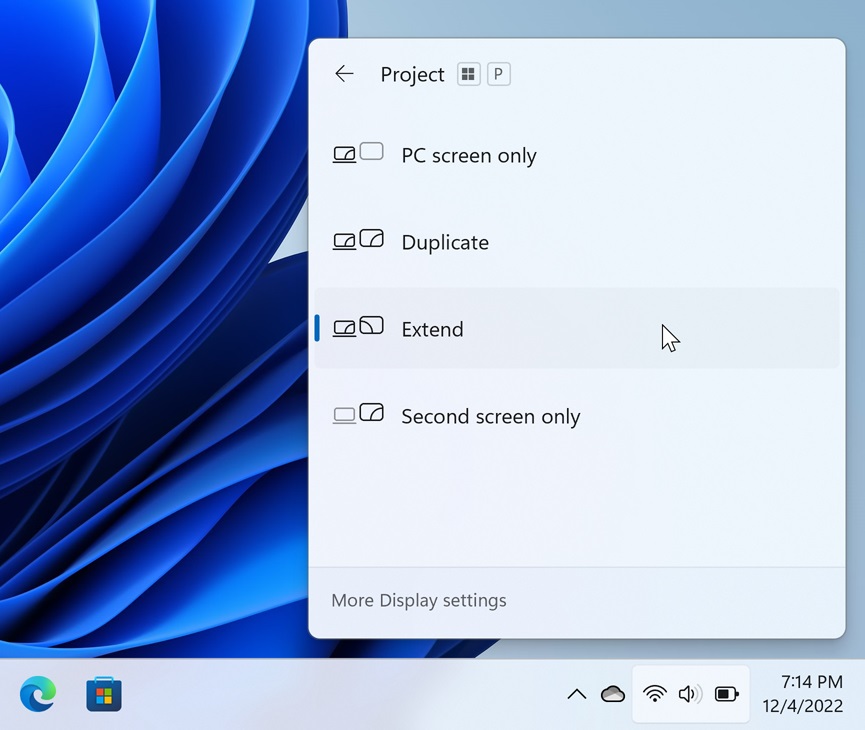
Here, you can choose the display option you want—PC screen only, Duplicate, Extend, or Second screen only—and get right to work.
You can also access the Display pane by opening Quick settings and clicking the Project quick setting button.
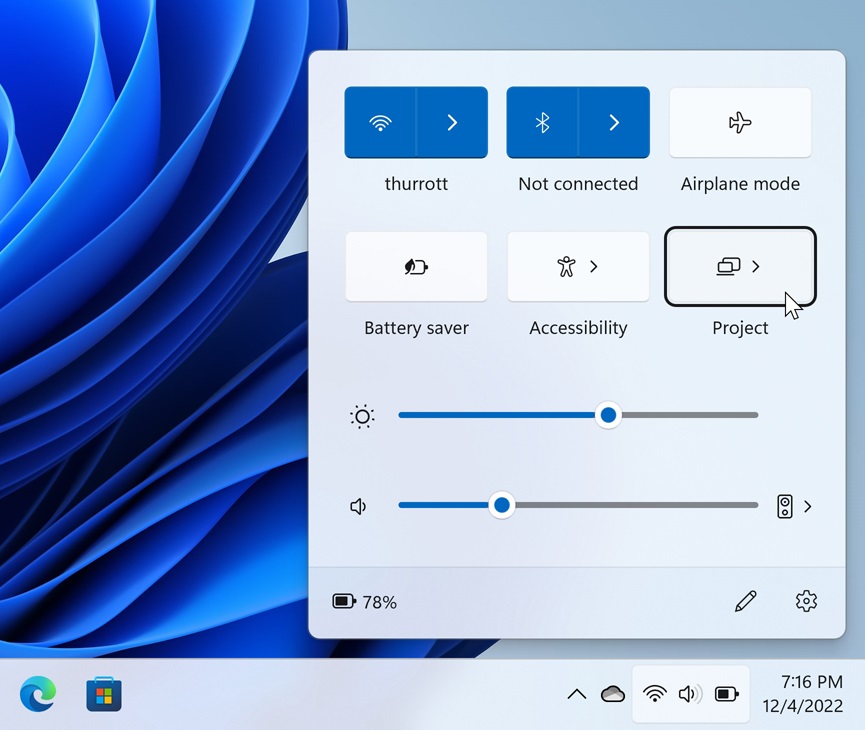
If you don’t see a Project quick setting button, you can add one. This is described in Quick Settings.
Configure your display layout
If you’re using two or more displays in Extend mode, each will appear as a separate display in the display layout area in Display settings.
Windows chooses a default layout in which the two displays are next to each other, with the primary display on the left and the secondary display on the right. It also chooses a relative size for each display that is based on its understanding of the physical size and resolution of each. (And can thus be inaccurate.) If this isn’t how your actual displays are in front of you, you can—and should—use this interface to drag and drop each so that the layout seen onscreen mimics real life as closely as possible.
Why is that? Because you will be moving the mouse cursor between each display, Windows needs to know where those displays are in the real world: if the second display is to the left of the first display, for example, you will want to move the mouse cursor off the left edge of the first display and have it appear in the right location on the right side of the second display.
Changing the layout couldn’t be easier: just use your drag-and-drop skills to move one or more of the displays around in the layout area until what you see onscreen mirrors the real world. Here’s a configuration with three displays, one of which is used in Portrait orientation. (You can find this option in “Display orientation” in the “Scale & layout” section of Display settings.)
Disconnect (and reconnect) a secondary display
If you’re using two or more displays in Extend mode, each can (and will) have its own open applications and other windows. When you remove a secondary display, perhaps by unplugging its cable, Windows 11 tries to gracefully handle the transition by moving open applications and other windows to the primary display (which is the first display unless you configured it otherwise) and minimizing those windows.
In another nice touch, Windows 11 (by default) remembers which applications and other windows were previously open on a secondary display. So when you reconnect that display, those windows should return to the proper display and should display at the same size and location as before.
Note that the Snap functionality described in Snap works across multiple displays as well. For example, you can use keyboard shortcuts like WINKEY + RIGHT ARROW to move a window not just across the current display but across all of your displays in turn.
Configure more options for multiple displays
If you regularly use two or more displays at once, there are more options to consider.
Configure multiple displays options
If you expand the “Multiple displays” item in Display options, you will see several options related to this configuration.

They are:
Make this my main display. The first display is automatically configured as your main display. But you can use this option to change the main display to another display: select the display you want in the layout area and then select “Make this my main display.”
Remember window locations based on monitor connection. By default, Windows 11 remembers which applications and other windows were previously open on a secondary display so that they can return there when the display is reconnected. If this isn’t the desired behavior, you can uncheck this option and the relevant apps and other windows will remain on the primary display when you reconnect the secondary display.
Minimize windows when a monitor is disconnected. When you remove a secondary display, Windows moves any apps and windows it contains to the main display and minimizes them. If you uncheck this item, those windows will still move to the main display when you remove the secondary display, but they will not minimize. (That is, they will remain open, either as a floating or maximized window.)
Ease cursor movement between displays. This feature is new to Windows 11 and it fixes a problem where the mouse cursor could sometimes get stuck as it moved between multiple displays in certain configurations. It’s enabled by default and should be left that way.
Detect other display. Windows 11 should automatically detect and configure a secondary display. But if you’ve connected a secondary display and nothing happens, you can use this button to try and manually detect the new display.
Connect to a wireless display. In addition to supported physically connected secondary displays, Windows 11 can also connect to compatible displays wirelessly. This is discussed later in the chapter.
Configure the Taskbar for multiple displays
If you’re using two or more displays in Extend mode, you can configure the Windows 11 Taskbar with additional options. For example, the Taskbar can be configured to show shortcut icons only for the applications and windows that are available on that display.
To do so, open the Settings app and navigate to Personalization > Taskbar. Then, locate the Taskbar behaviors area and expand it.
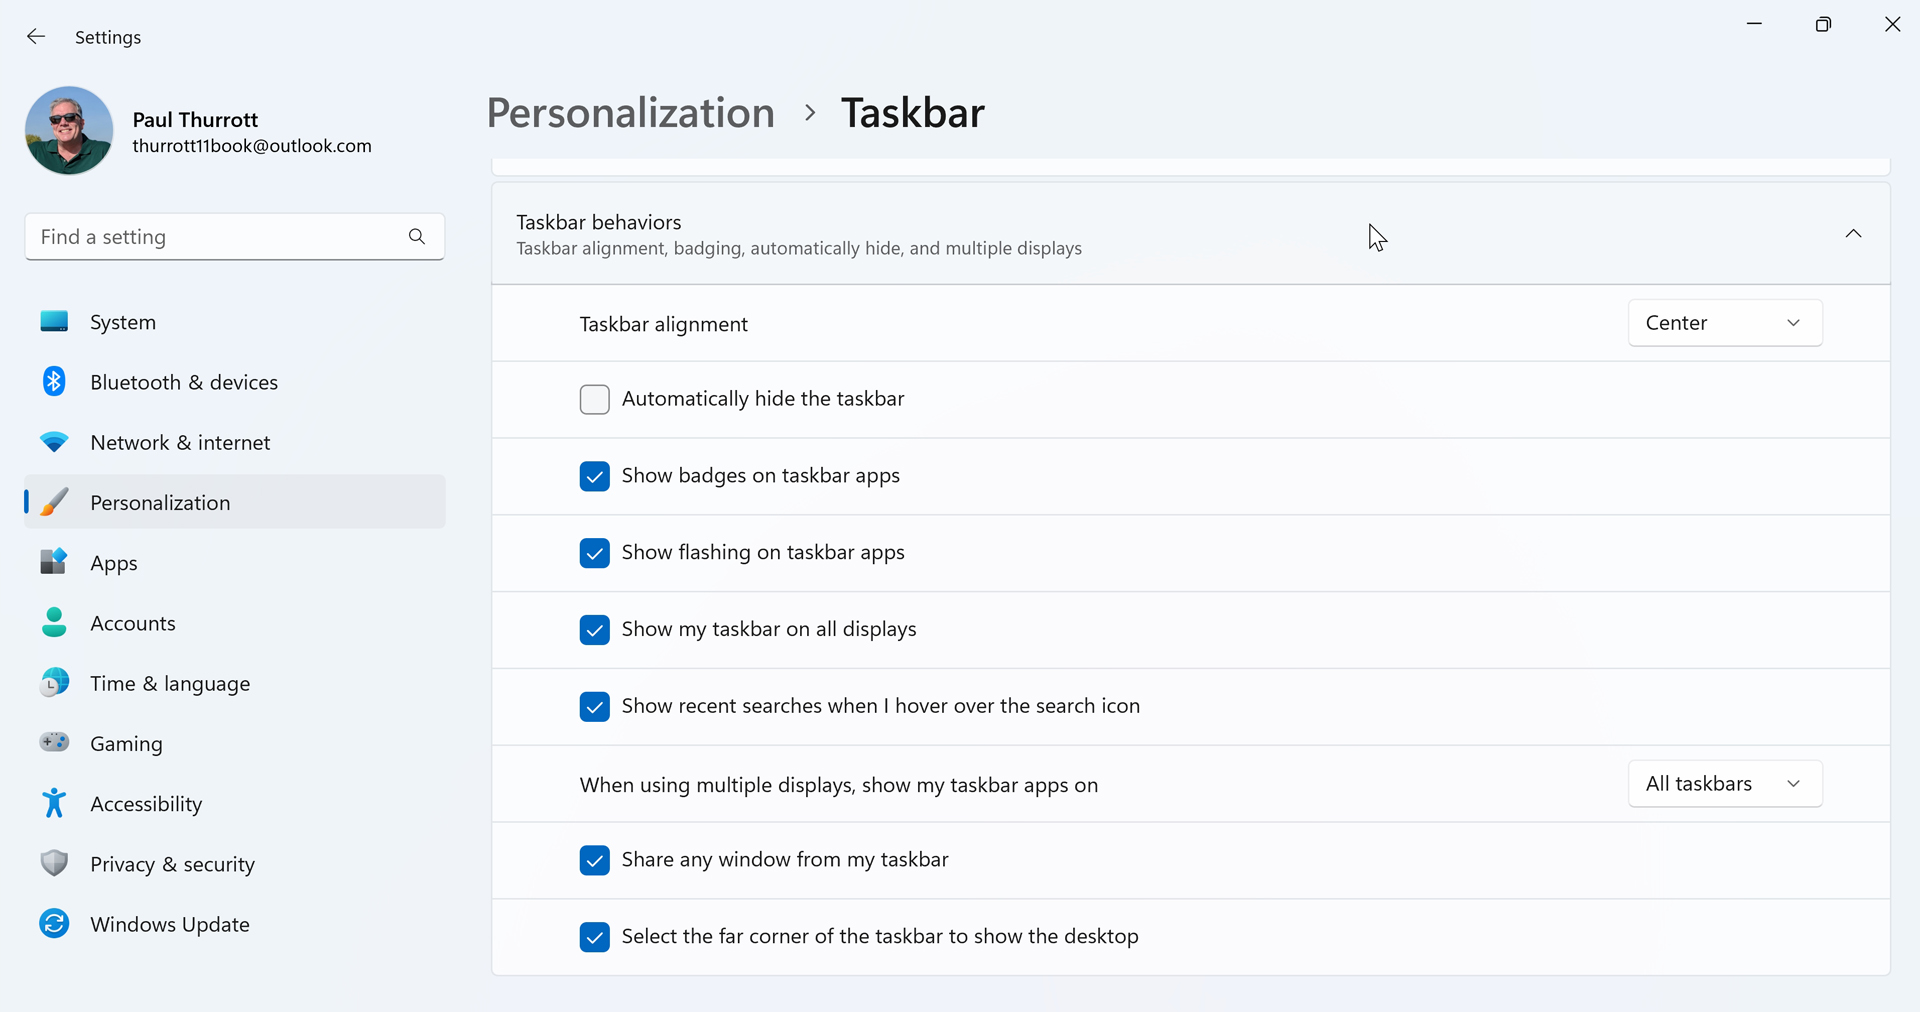
The following options are relevant to a multiple-display setup:
Show my taskbar on all displays. When enabled, as it is by default, each display will show the Taskbar. If you disable this option, the Taskbar will only appear on the main display. (And the option noted below will be grayed out.)
When using multiple displays, show my taskbar apps on. This option is set to “All taskbars” by default, meaning that the Taskbar on each display will be identical. But you can change it to “Main taskbar and taskbar where window is open” or “Taskbar where window is open.” We use that third choice and feel that most with multiple displays will want to do so as well.
Connect to a wireless display
You don’t necessarily need a cable to use an external display. Using a technology called Miracast, you can instead wirelessly cast to a compatible smart TV or other display.
Miracast utilizes Wi-Fi technology to establish a peer-to-peer connection between your PC (the Miracast source) and a Miracast-enabled display (the Miracast target).
As such, it has two requirements:
Your PC must include a Miracast-compatible Wi-Fi adapter. That means it supports either Wi-Fi Direct or Intel Wireless Display (WiDi) technology. These days, most PCs support one or the other.
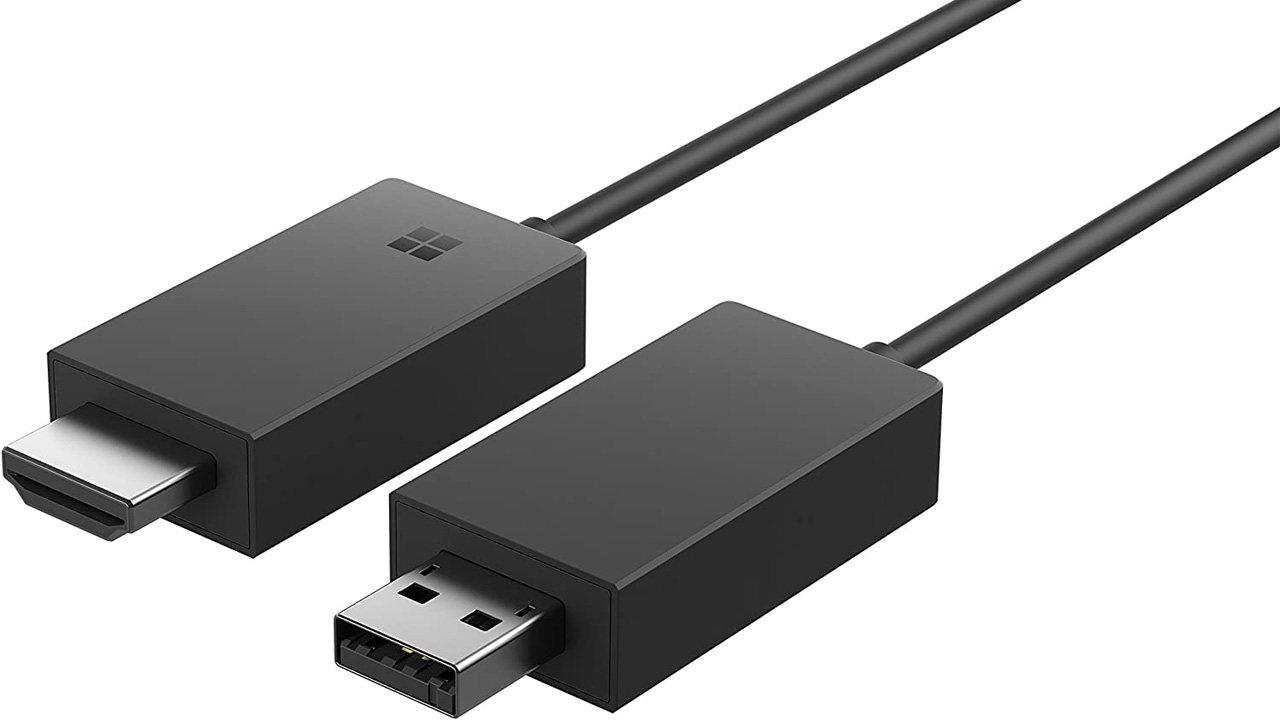
Your external display must be Miracast-compatible. This is somewhat uncommon, but you can also add Miracast capabilities to a smart TV or any other HDMI-capable display by purchasing an inexpensive adapter like the Microsoft Wireless Display Adapter.
If you meet the requirements, you can connect to a wireless display by opening the Cast pane. There are a few ways to do so:
Settings app. Open the Settings app, navigate to System > Display, expand “Multiple displays” and click the “Connect” button next to “Connect to a wireless display.”
Search. Open Search, type cast, and choose the “Connect to a wireless display” result. This will launch the same Settings app interface described above.
Keyboard shortcut. This is the fastest way, assuming you can remember the shortcut: just type WINKEY + K.
Quick settings. It’s not visible by default, but you can customize Quick settings to include a Cast quick setting button. This process is described in the Quick Settings chapter.
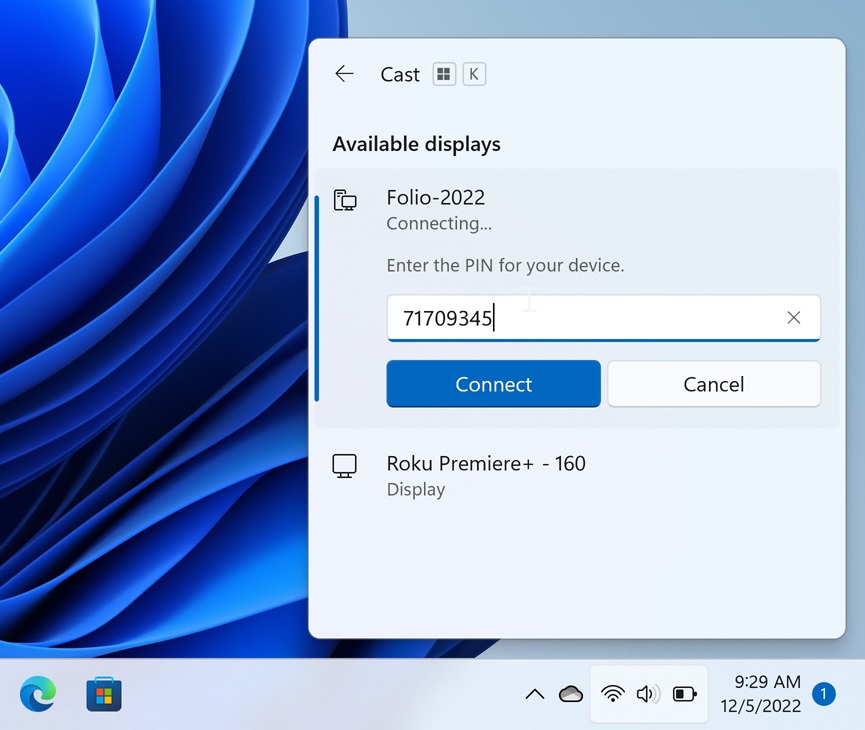
However you choose to do so, the Cast pane appears.
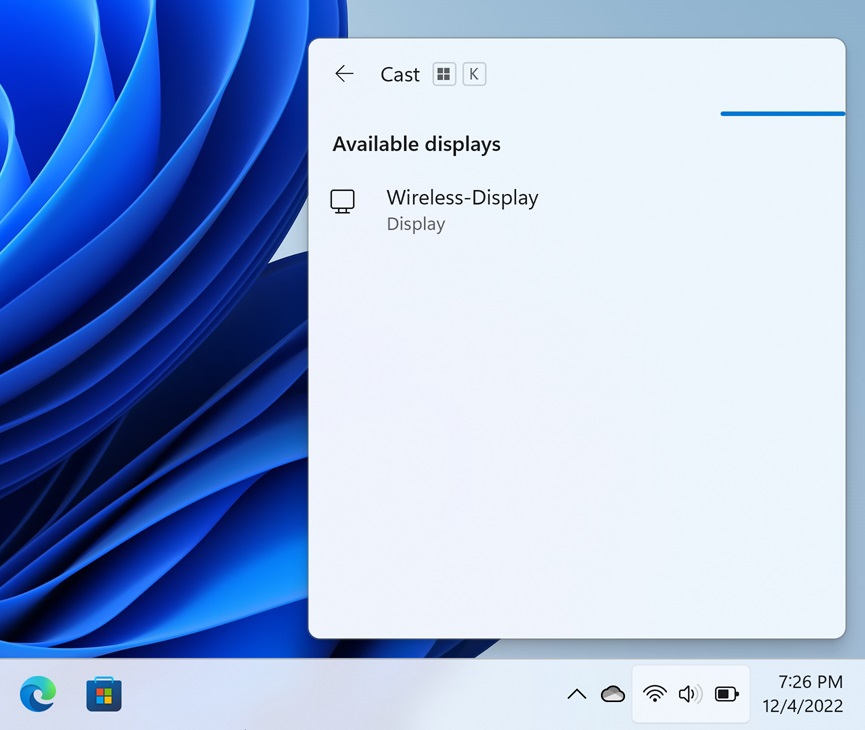
Select the wireless display from the list and Windows 11 will connect wirelessly to the display using the Duplicate mode by default, just like any other external display type. However, the Cast pane will provide the other display mode choices that you usually access using the Project pane or the Settings app, which is a handy convenience.
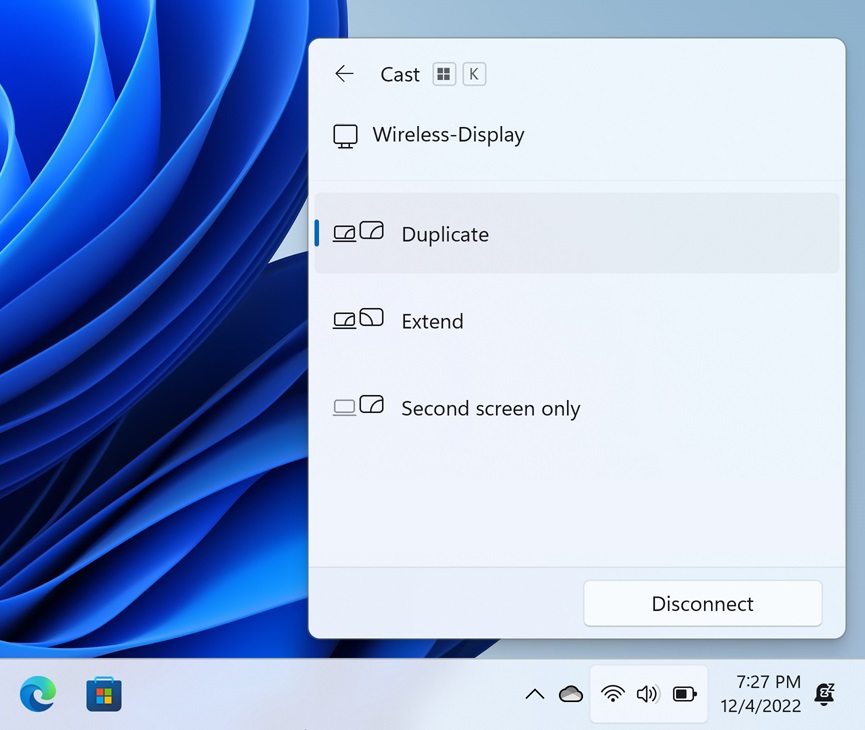
From here, the wireless display will function much like any other secondary display. To disconnect, open the Cast pane and choose “Disconnect.”
Use another PC as a wireless display
If you have another Windows 10- or 11-based laptop or other PC, you can use its display as a wireless display. This is an interesting use for a laptop you’re not using, perhaps, or an older PC that you just replaced.
Install the Wireless Display feature
First, you need to install an optional Windows 11 feature on the PC you intend to use as a wireless display. So open the Settings app and navigate to System > Projecting to this PC.
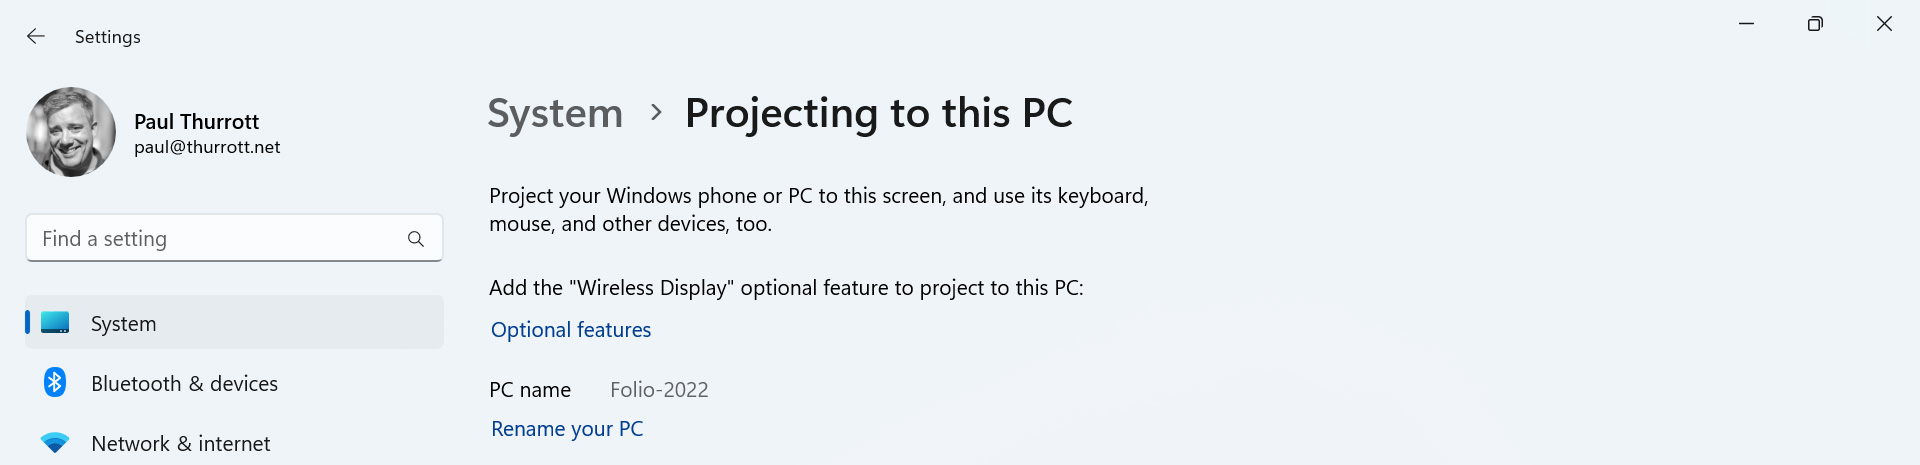
Click the “Optional features” link to open the Optional features page in Settings. (This can also be found by navigating to Apps > Optional features.)

Click “View features” next to “Add an optional feature” and then type wireless in the search box of the Add an optional feature window that appears.
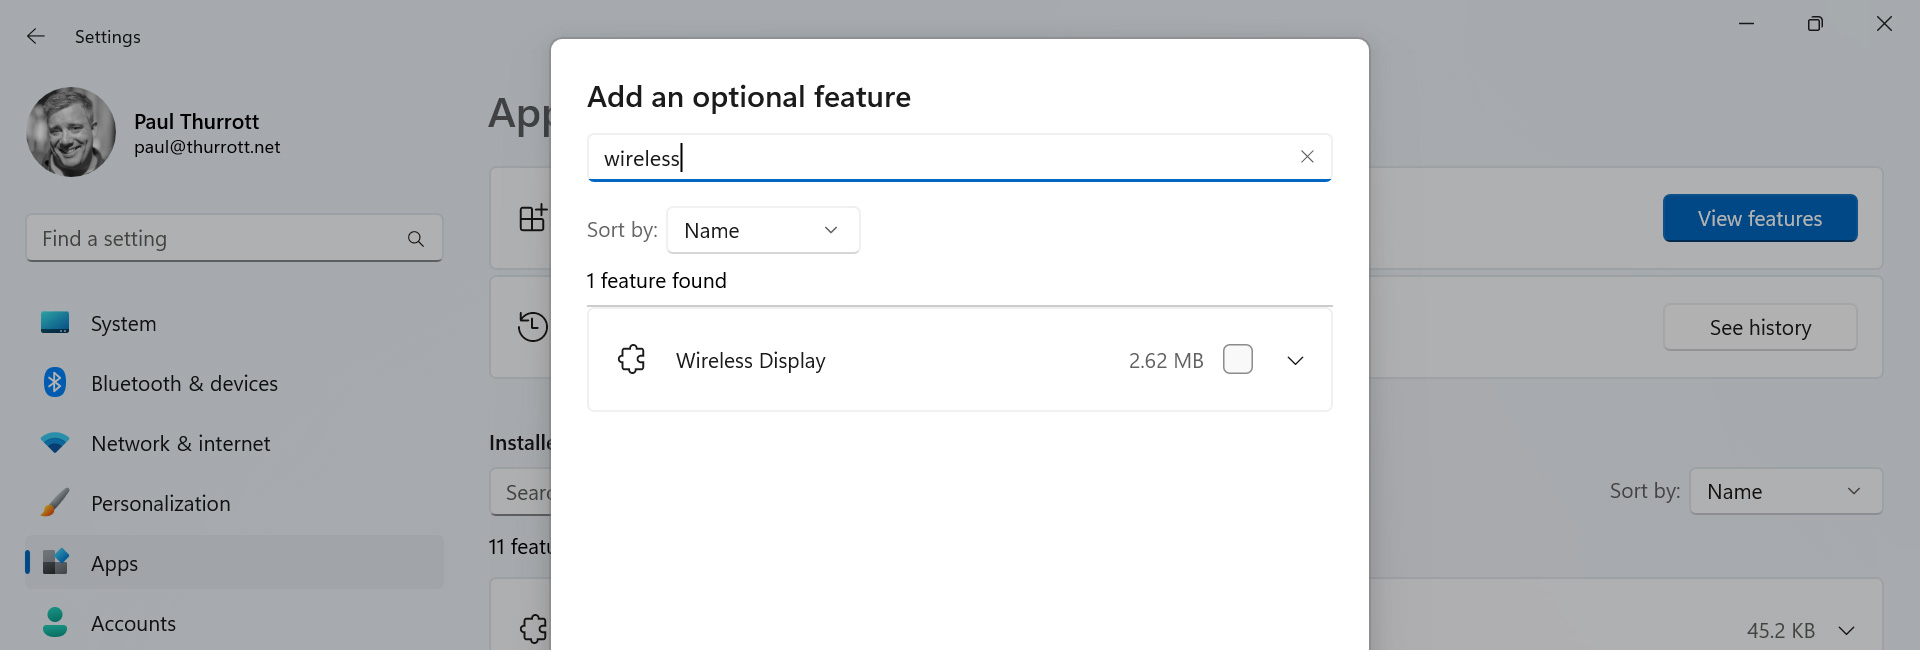
Check the box next to “Wireless Display” and click “Next” and then “Install.” The Wireless Display feature will install and display a progress animation right in the Settings app. When it’s done, Wireless Display will appear in the list of “Installed features.”
Configure your PC for use as a wireless display
Next, you should configure the PC you intend to use as a wireless display. To do so, open Settings and navigate to System > Projecting to this PC. This page now displays various options related to this feature.
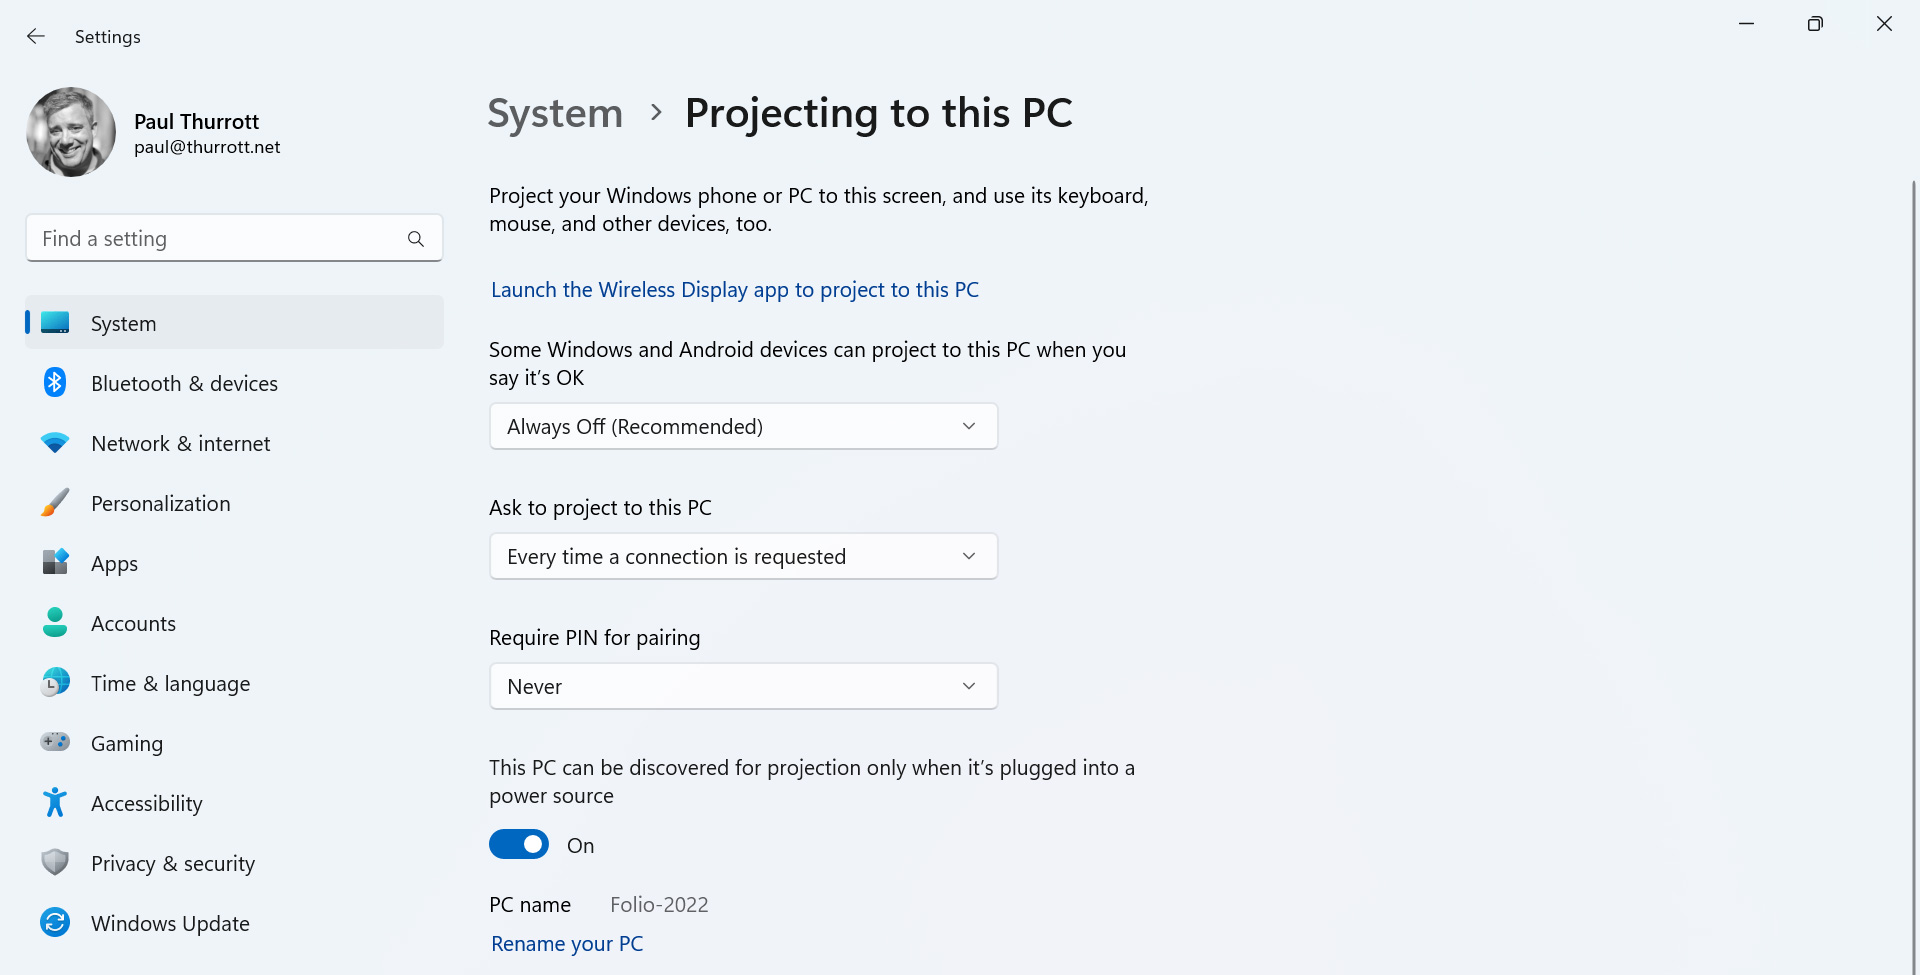
The following options are available:
Some Windows and Android devices can project to this PC when you say it’s OK. By default, the wireless projection capability is disabled (set to “Always Off”), so you will need to manually launch the Wireless Display app before you can connect to it from another PC. But you can change this option to “Available everywhere on secure networks” or “Available everywhere” if desired.
Ask to Project to this PC. This feature ostensibly controls how often you must OK connection requests from other PCs: the default is “Every time a connection is requested,” but you can also configure it to “First time only.” But it doesn’t appear to impact the connection experience at all.
Require PIN for pairing. By default, your PC will automatically accept all external connection requests, but you can use this option, which is set to “Never” by default, to require a PIN first. If you change this to “First Time” or “Always,” the person using the connecting PC will need to enter that PIN before they can connect. (This PIN appears on the Wireless Display app that’s described in the next section)
This PC can be discovered for projection only when it’s plugged into a power source. This option will only appear on a laptop or other portable PC.
Connect to a PC that’s being used as a wireless display
For the most part, using a PC as a wireless display works as you’d expect and like any other wireless display. But there are two main differences:
Wireless Display app. You must run the Wireless Display app on the PC you wish to use as a wireless display. Your PC won’t be available as a wireless display until you do.
You can find the Wireless Display app with Search. Or, open the Settings app, navigate to System > Projecting to this PC, and select the “Launch the Wireless Display app to project to this PC” link.
Mouse, keyboard, touch, and pen support. Because this wireless display is really a PC, you can optionally enable the use of the other PC’s mouse/touchpad, keyboard, multitouch display, and smartpen. So you can control what’s happening onscreen with either PC.
To get started, launch the Wireless Display app on the PC that’s being used as a wireless display.
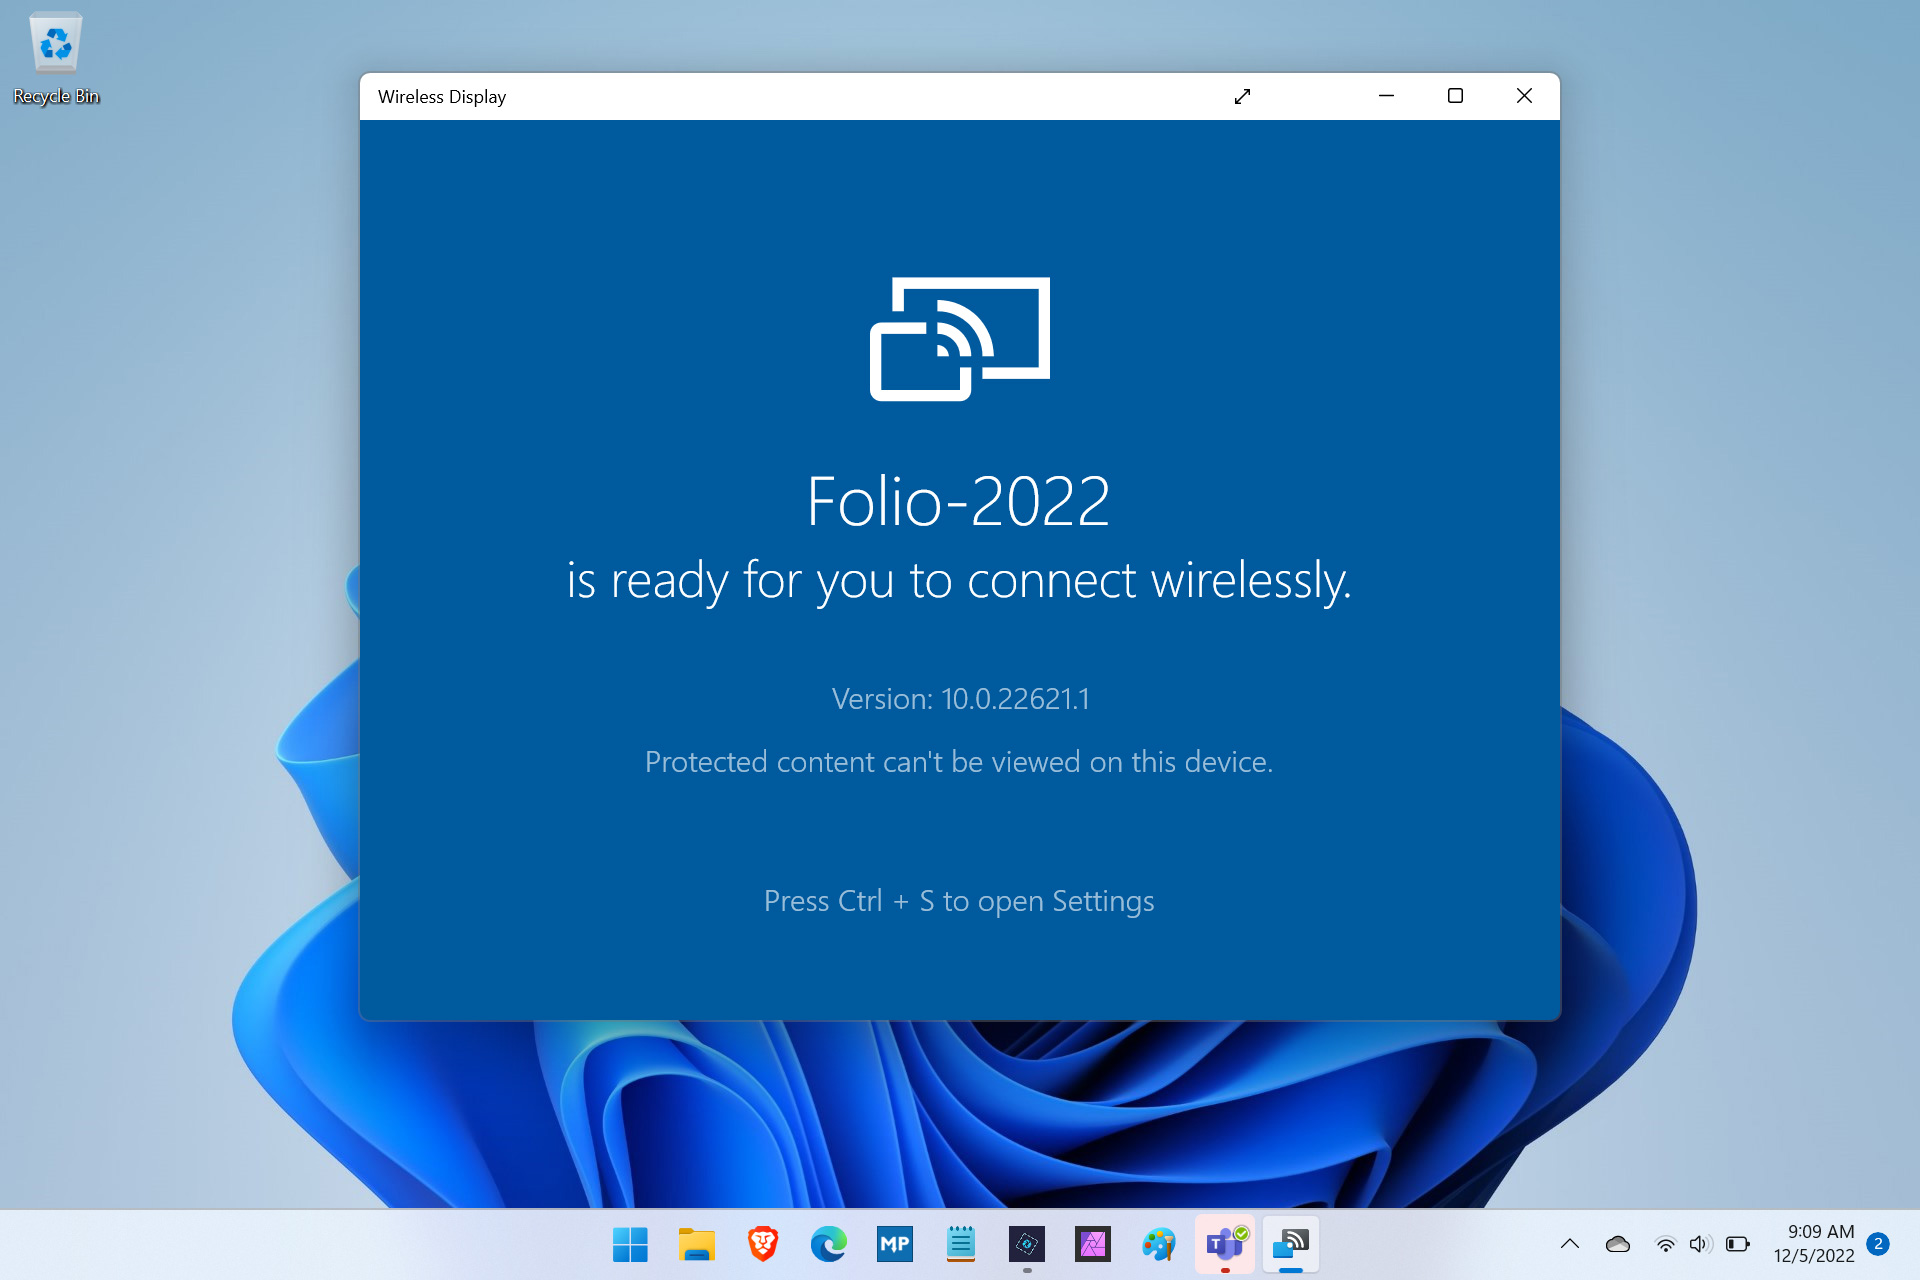
This app dates back to the dark days of Windows 8, when all non-desktop applications had to run in a true full-screen mode that hid even the Taskbar. As such, it’s a bit of an outlier in today’s more modern Windows 11 environment. But the Wireless Display app’s ability to display full-screen is important: if you used it windowed (floating) or maximized, the PC won’t seem like a wireless display.

To use this app effectively, you need to understand that it puts key user interfaces in its title bar. And that if the app is full-screen, you can access that title bar—and the UI it contains—by mousing up to the top edge of the screen.
To toggle full-screen mode, select the Full-Screen title bar button.

Also, you may be tempted to try the CTRL + S shortcut that the Wireless Display app advertises. There’s little reason to do so, as the settings interface is just a list of PCs that have already connected and a related blocked devices list. But if you open settings while the app is in full-screen mode, it’s not obvious how to exit it.
That’s why you need to know that you can display the app’s title bar if you mouse up to the top of the screen: there’s now a Back button at the far left of the title bar that will get you back into the app.

Now that you know how the Wireless Display app works, you can connect to it from another PC. And you do that the same way you connect to any compatible wireless display, with the Cast pane. But there are a few differences to consider.
If the PC to which you’re connecting requires a PIN, that PIN will be displayed in the Wireless Display app when the connection is initiated.
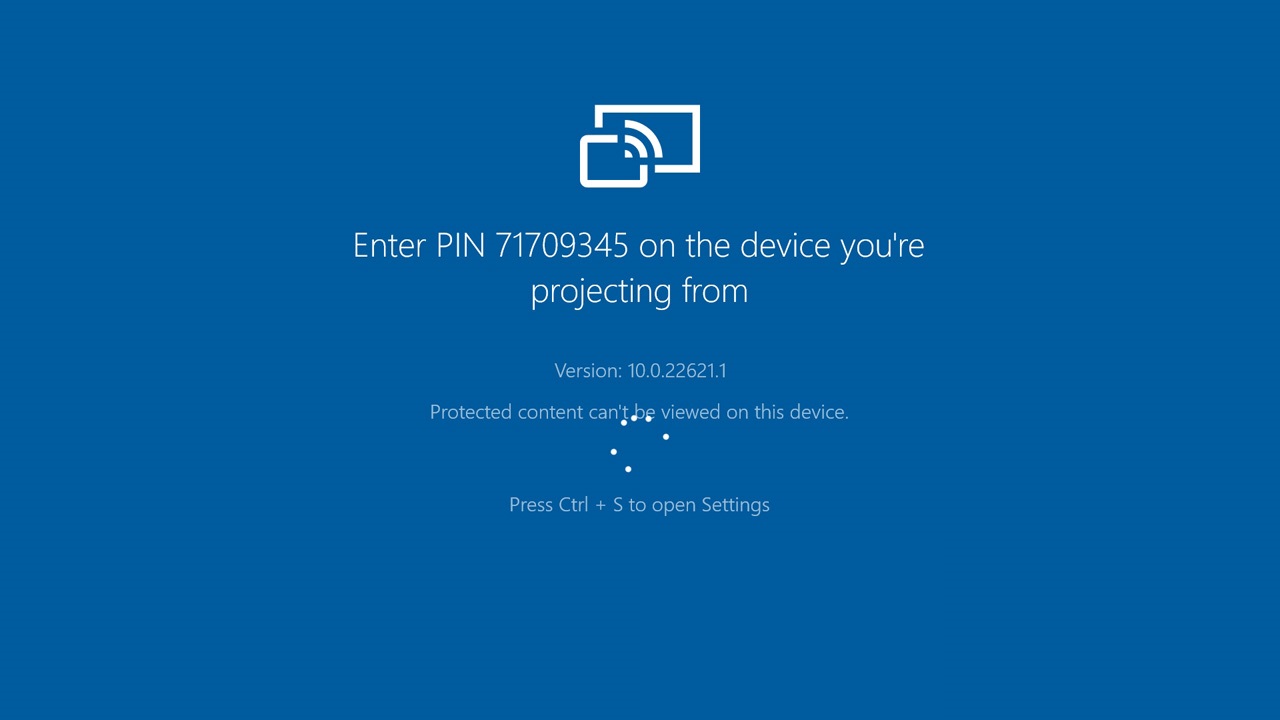
And you will need to enter this PIN into the Cast pane on the PC you’re actually using.
Also, because you’re connecting to a real PC, you will see an option to “Allow mouse, keyboard, touch, and pen input from this device” in the Cast pane after the connection is made. You can optionally enable this option to use any of those features on the PC you’re using as a wireless display.
You disconnect from a PC that’s being used as a wireless display the same way you do with any wireless display, via the Cast pane. When you disconnect, the Wireless Display app on the other PC closes too.

Gain unlimited access to Premium articles.
With technology shaping our everyday lives, how could we not dig deeper?
Thurrott Premium delivers an honest and thorough perspective about the technologies we use and rely on everyday. Discover deeper content as a Premium member.