Notifications
- Paul Thurrott
- Jan 08, 2023
-
1
Windows 11 supports notifications so that the system can alert you of events happening that are unrelated to whatever it is that you are doing at the time. Many apps integrate with this capability as well and deliver notifications via Windows 11.
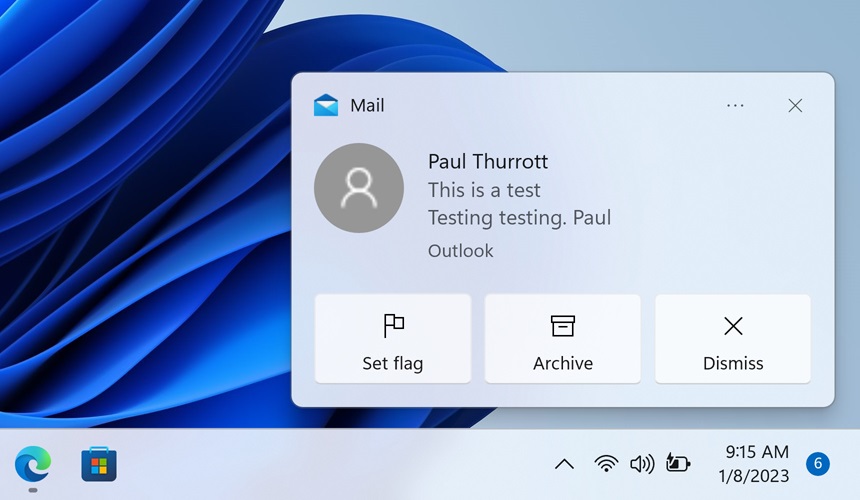
For example, the Mail app that comes with Windows 11 can display a notification banner—a small informative window that appears in the lower right corner of the screen—when you get a new email message.
Like the mobile apps that you might use on an Android phone, an iPhone, or an iPad, apps don’t need to be running to trigger notifications. Instead, they use background processes to display notifications as required. And they integrate with the Notifications pane in Windows 11 to store notifications that you missed so you can review them later.
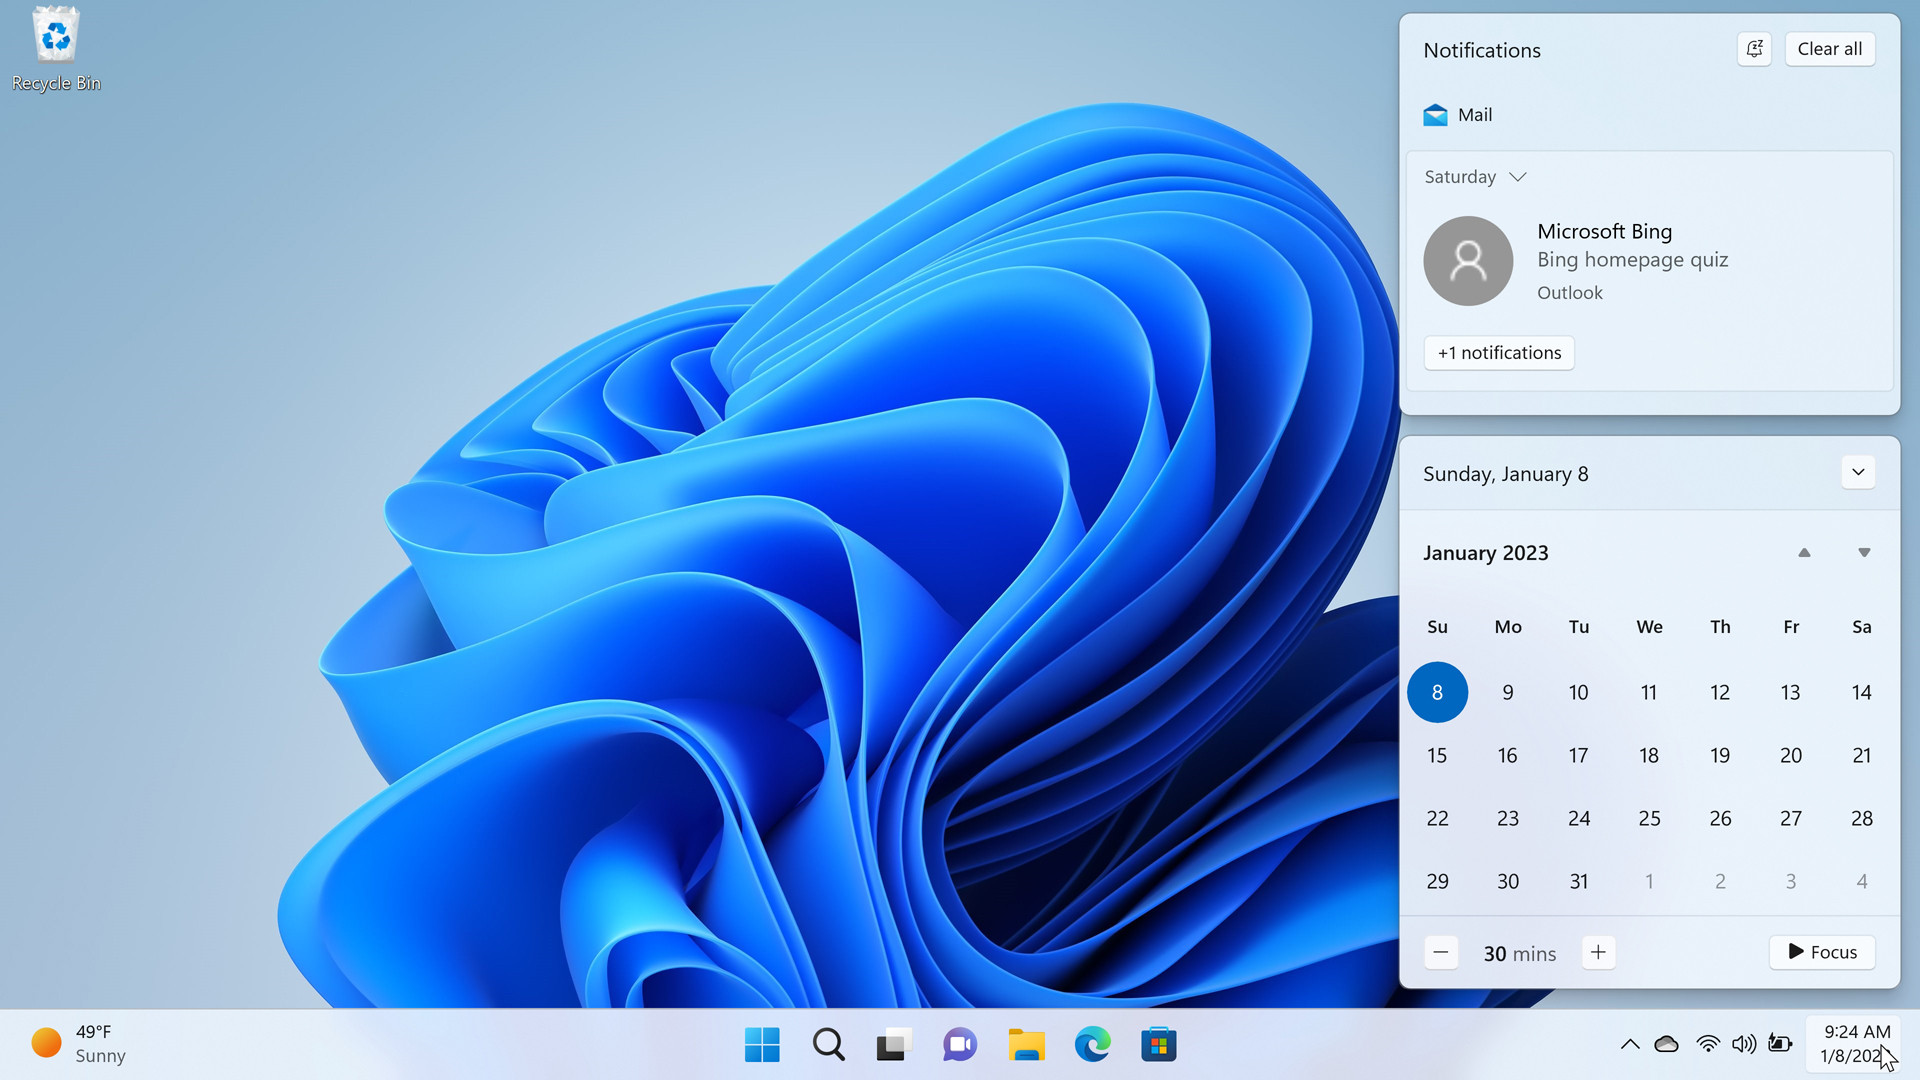
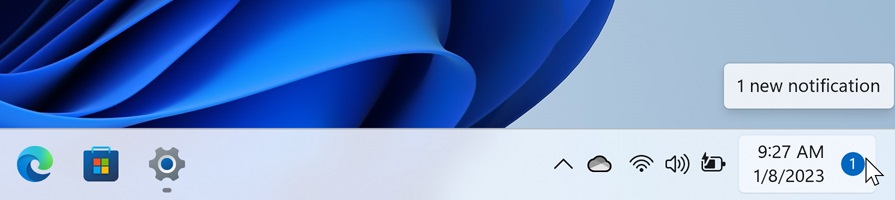
You open the Notifications pane—along with the Calendar pane—by clicking the time and date display at the far right of the Taskbar.
You can open Notifications and Calendar even more quickly by typing WINKEY + N.
Configure notifications
Depending on how you work and which apps you use, you could find yourself dealing with notifications frequently. So you may wish to spend some time configuring how notifications work.
You do so by opening the Settings app and navigating to System > Notifications.
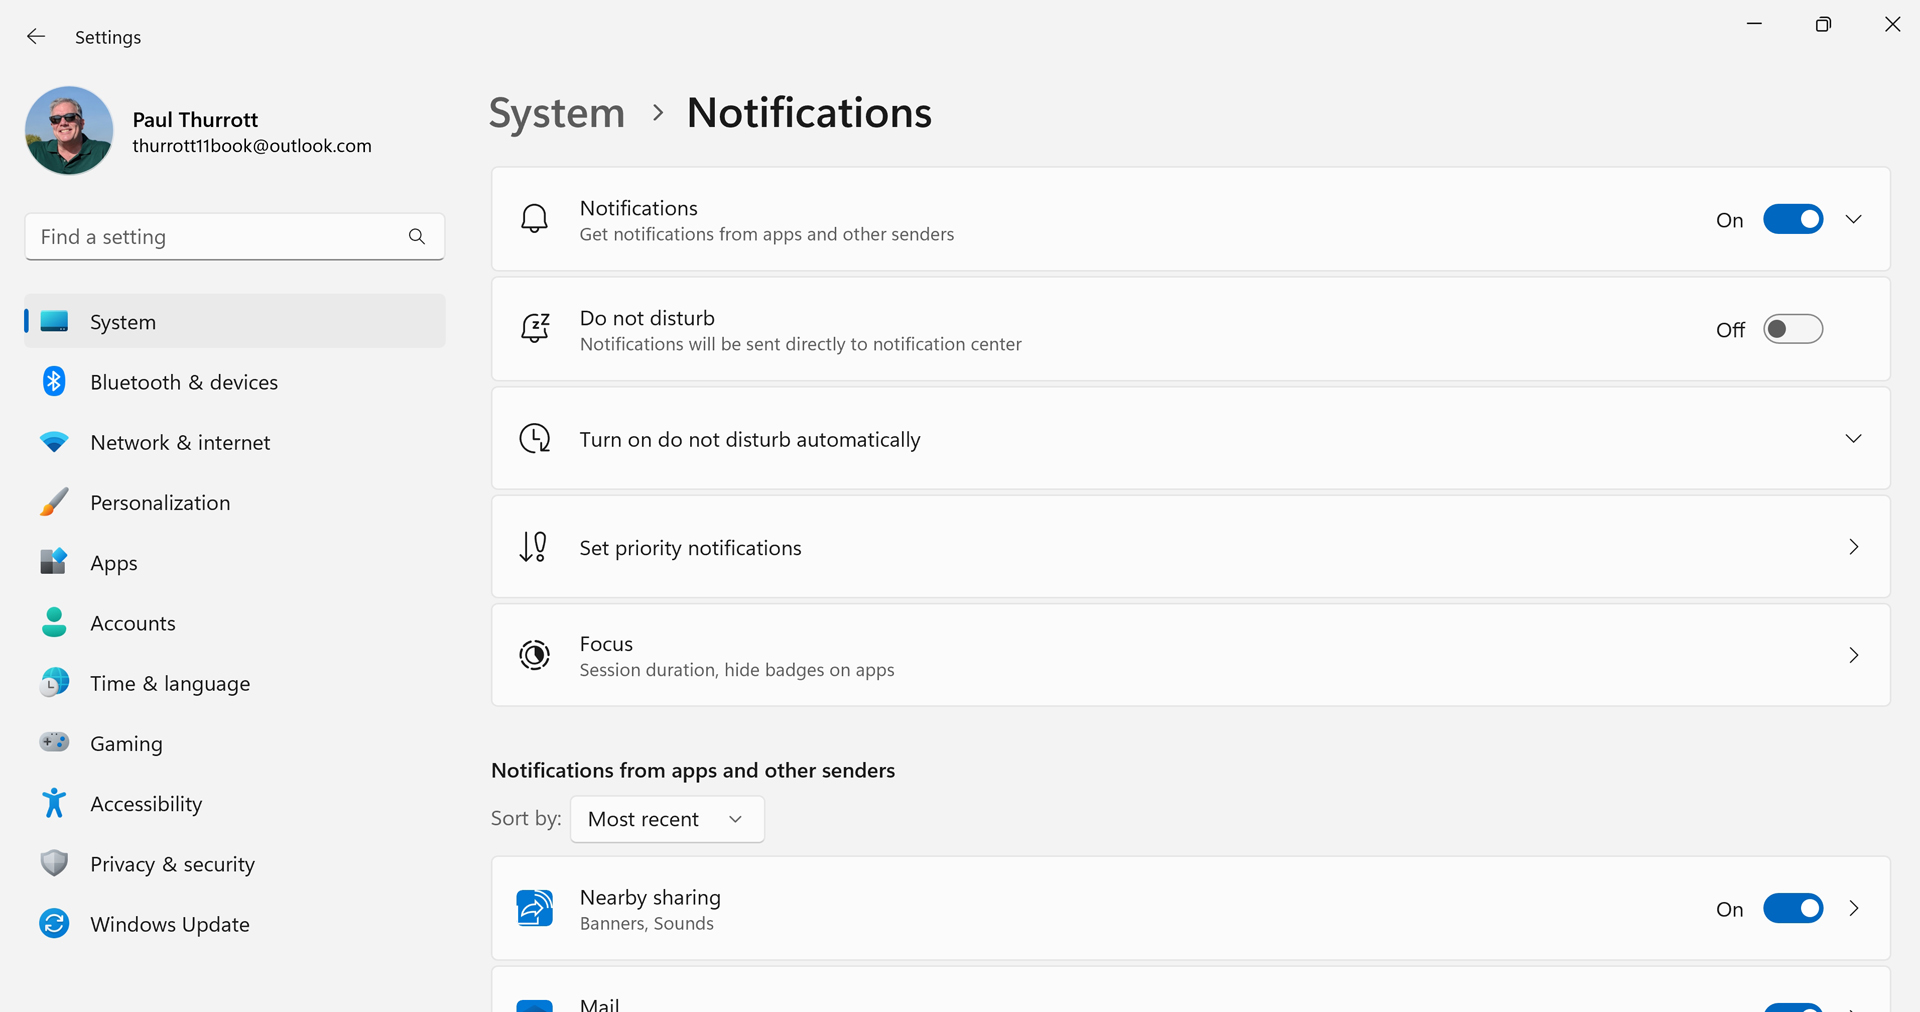
Here, you can make the following configuration changes:
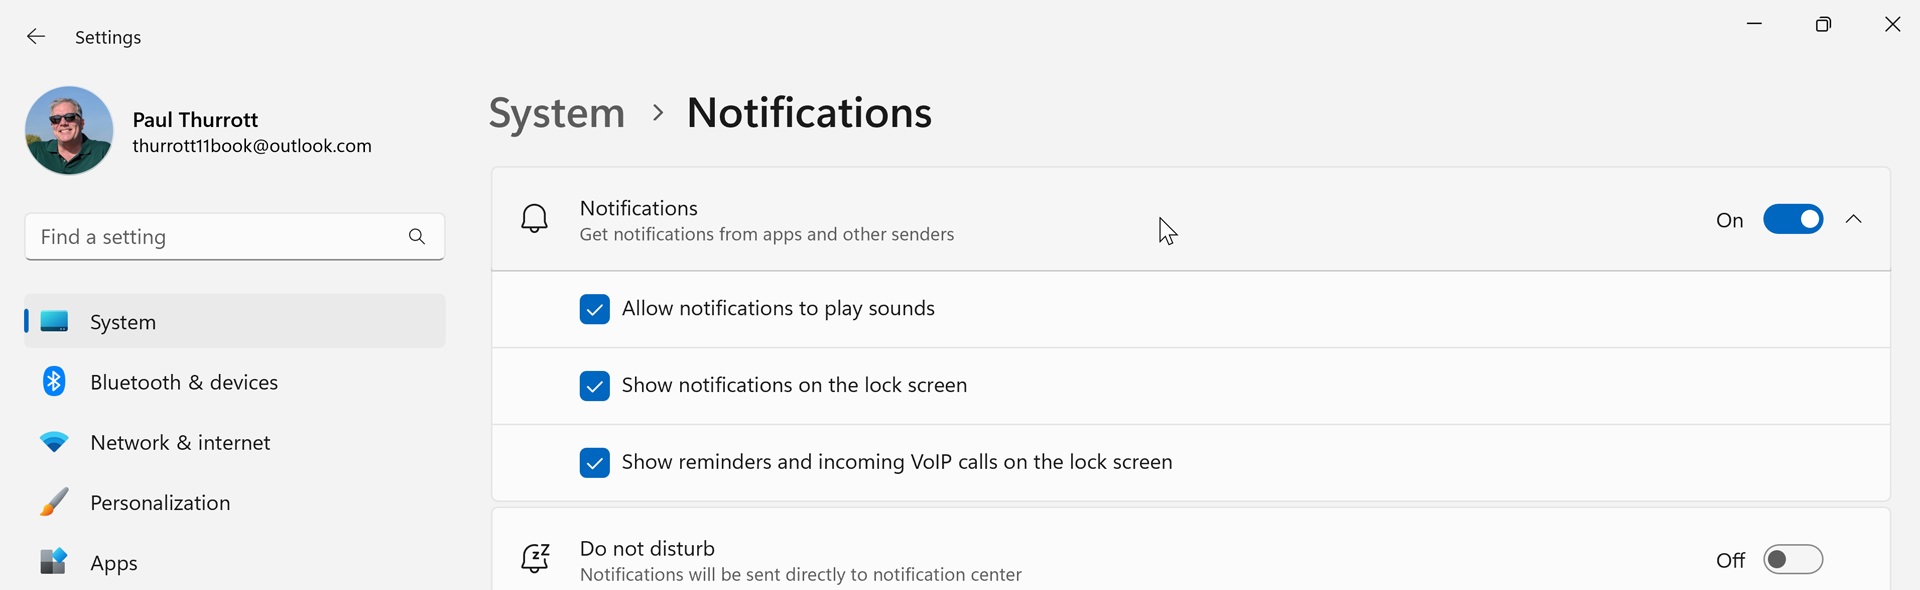
Toggle notifications and access additional options. The “Notifications” option here can be used to globally toggle notifications on or off. But you can also expand this option to display three more related options—“Allow notifications to play sounds,” “Show notifications on the lock screen, and “Show reminders and incoming VoIP calls on the lock screen”—which are all fairly obvious.
Access options related to Do not disturb. Three of the options here—“Do not disturb,” “Turn on do not disturb automatically,” and “Set priority notifications”—are related to Do not disturb, which is a handy way to temporarily disable notifications. Each is described in Do Not Disturb and Focus.
Access options related to Focus. The “Focus” option links to Focus settings, which helps you create a Focus session you can use to get work done without distractions. Focus and focus sessions are also described in Do Not Disturb and Focus.
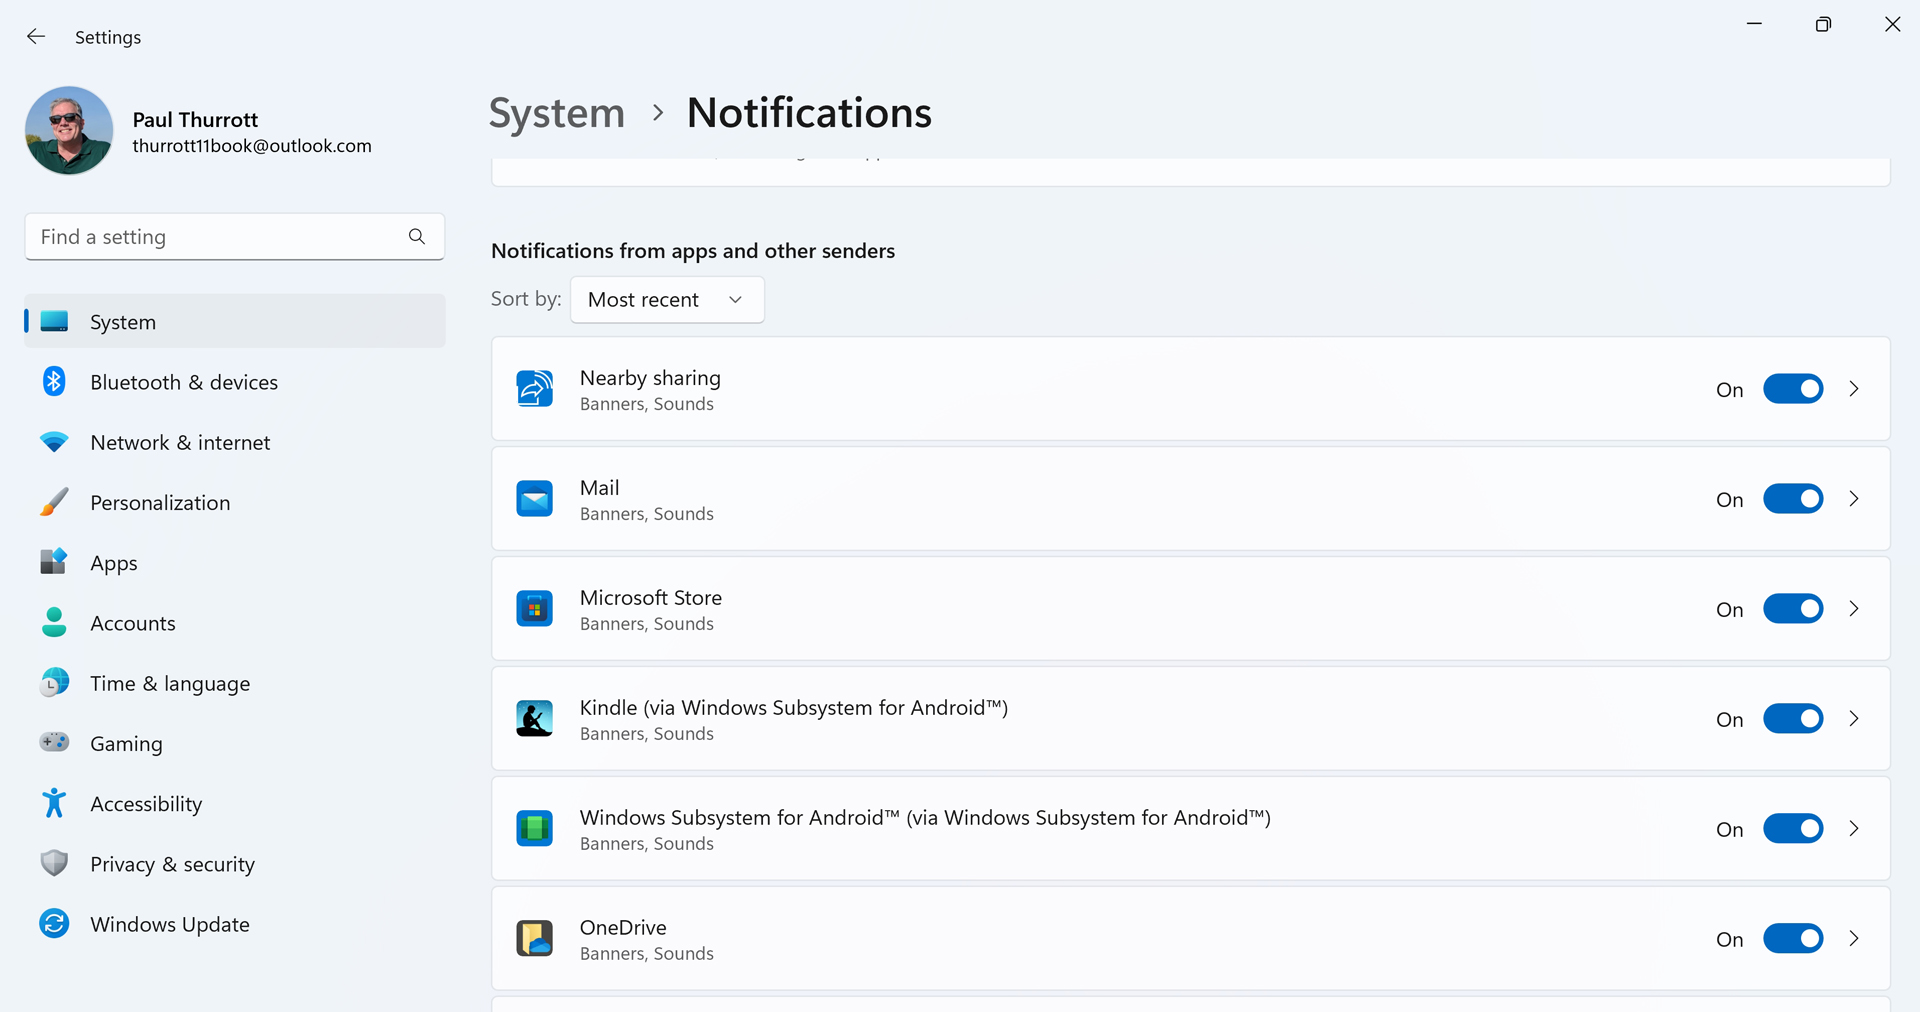
Configure notification settings for individual apps and other senders. The “Notifications from apps and other senders” area lets you configure notification settings for individual apps and system services. This capability is described in the next section.
Configure notifications for an app or system service
To globally disable all notifications for a single app or system service, locate it in the list under “Notifications from apps and other senders” and use the toggle switch to set it to “Off.”

You can also configure notifications for an app or system service in a more granular way. To do so, select that app or service in the list under “Notifications from apps and other senders” to display its notifications settings page.
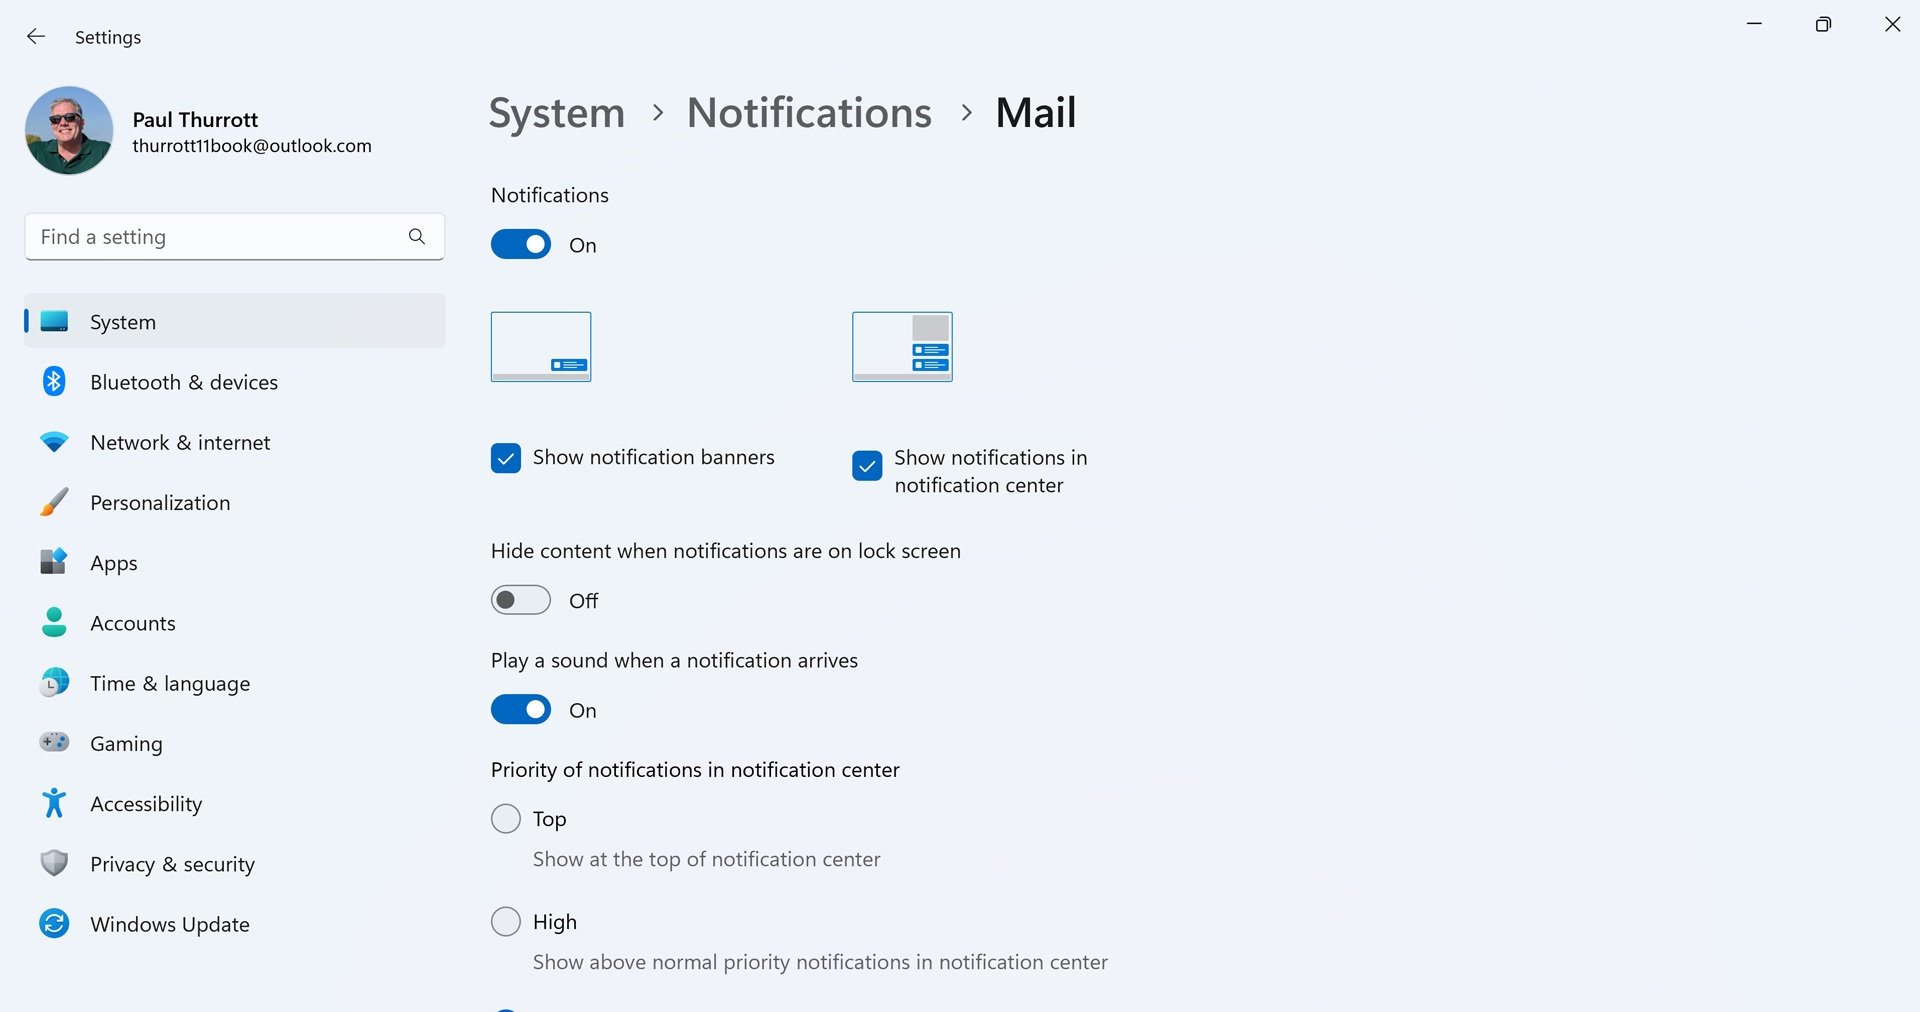
This page gives you much more control over app notifications: You can determine how and where they appear, whether a sound plays during a notification, and more.
You might proactively scan the list of apps that can display notifications and configure them in one go. But it’s more likely that you will handle this the way most do with their phones: you will determine that some app notifications are distracting or unnecessary when they start interrupting you, and then disable those notifications at that time.
Handle an app notification as it appears
Windows 11 will trigger a notification banner—a floating window that appears in the lower-right corner of the screen—whenever it or an app fires a notification. This banner will appear regardless of what you’re doing for the most part—it can appear over the desktop, over apps, and over the lock screen by default—though banners are disabled in some situations—during full-screen games, for example—and if Do not disturb is enabled.
Because notification banners seem to pop-up, they are still referred to as notifications “toasts” inside of Microsoft because the effect is—or at least was—somewhat similar to that of real toast popping out of a toaster.
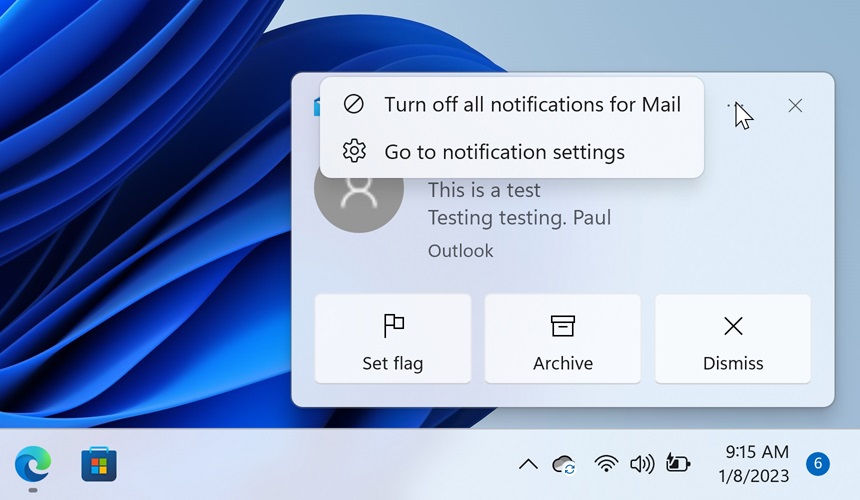
Notification banners vary by app. Some are interactive and provide options right on the window for dealing with the notification. In the image above, for example, you can see that Mail app notifications let you flag, archive, or delete a new email message right from the banner, without any need to launch the app.
If you select a notification banner before it disappears—they only stay visible for a few seconds—the underlying app that triggered that notification will open. But if you ignore or miss a notification banner, you can later view it and other notifications in the Notifications pane, as described below.
Notification banners also provide other options via the small Settings (“…”) and Close (“X”) icons, the latter of which dismisses the banner. If you select Settings, you will see a menu with choices for “Turn off all notifications for [app name]” and “Go to notification settings,” which opens the Settings app and navigates to System > Notifications.
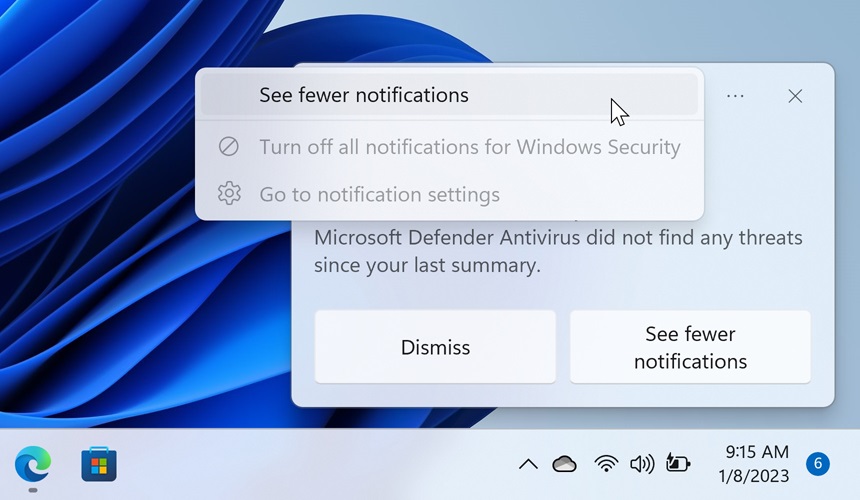
Some apps customize their notification banners. For example, Windows Security provides a weekly status update via a notification banner and it has a third item in its Settings context menu, “See fewer notifications.”
Handle previous app notifications
Previous notifications are collected in the Windows 11 Notifications pane so that they can be managed later. This pane—and the Calendar pane—appear when you select the time/date display on the right of the Taskbar. Otherwise, they are hidden and they cannot be toggled to remain displayed at all times.
You can collapse the Calendar pane using the small Collapse (down caret) button in its upper-right to give more space to the Notifications pane.
On a PC with multitouch capabilities, you can also open Notifications and Calendar by swiping in from the right edge of the screen. If you have a touchpad, swiping to the right on the touchpad will also open Notifications and Calendar.
You don’t need to manually check the Notifications pane for new notifications. Instead, it will subtly alert you when there are missed notifications via a number icon to the right of the time/date display. This number indicates how many new notifications await.
To access an app that triggered a notification, select the notification in the Notifications list. For example, if you select a newly-installed app as seen above, that app will launch.
When you access a notification this way, it is cleared from Notifications.
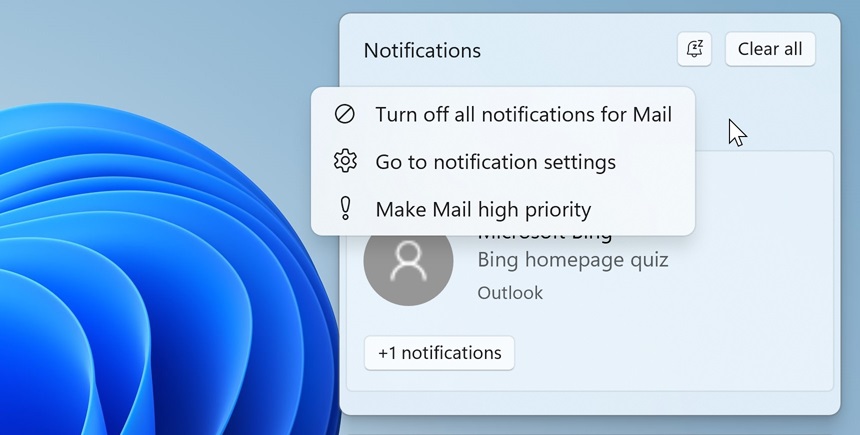
You can interact with many notifications directly from the Notifications pane, just as you can with notification banners. When you mouse over a notification in the Notifications pane, two new icons appear, Settings (“…”) and Clear (“X”), the latter of which will remove the notification if selected.
![]()
If you click Settings, a menu with two choices will appear: “Turn off all notifications for [app name]” and “Go to notification settings,” which opens the Settings app and navigates to System > Notifications. This mimics the interface seen in the original notification banner.
And if you mouse over the notification header—“Mail” in the example above—you will see similar app-level options: “Turn off all notifications for [app name],” “Go to notification settings,” and “Make [app name] high priority.” Selecting that last option will ensure that notifications from this app or system service are always at the top of the list in the Notifications pane.

Gain unlimited access to Premium articles.
With technology shaping our everyday lives, how could we not dig deeper?
Thurrott Premium delivers an honest and thorough perspective about the technologies we use and rely on everyday. Discover deeper content as a Premium member.