Hyper-V
- Paul Thurrott
- Apr 04, 2023
-
1
Windows 11 includes a hardware virtualization feature called Hyper-V that lets you run Windows and other operating systems in virtual machines (VMs). This technology is useful for a variety of reasons. For example, developers can use Hyper-V to test their applications and other software in other versions of Windows or in other operating systems.
Hyper-V requires that your PC’s processor-based virtualization functionality be enabled. And it probably is, but this must be configured in its firmware (BIOS) interface, not in Windows. How you access this interface varies by PC, so check with your PC maker if you’re not sure.
Hyper-V can be resource-intensive. If you think you will be using this feature regularly, be sure that your PC is a relatively high-end model with a fast processor, fast SSD storage, and at least 16 GB of RAM.
Install Hyper-V
Hyper-V requires Windows 11 Pro or higher, but it is possible to install it on Windows 11 Home using a workaround.
Install Hyper-V in Windows 11 Pro
To install Hyper-V, use the query features in Search and select “Turn Windows features on or off” from the results list that appears. The Windows Features control panel will open.
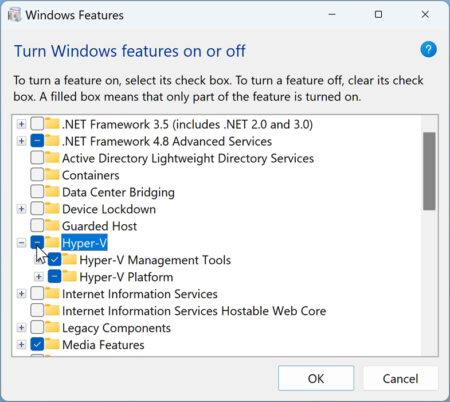
You will see an entry for Hyper-V in the list. Select it–and ensure that you’ve selected all of its sub-components–and then click OK. The features will be installed and then you will be prompted to restart the PC. Do so.
Install Hyper-V in Windows 11 Home
To install Hyper-V, open Notepad and copy and paste the following text into the blank document.
pushd "%~dp0"

dir /b %SystemRoot%\servicing\Packages\*Hyper-V*.mum >hyper-v.txt

for /f %%i in ('findstr /i . hyper-v.txt 2^>nul') do dism /online /norestart /add-package:"%SystemRoot%\servicing\Packages\%%i"

del hyper-v.txt

Dism /online /enable-feature /featurename:Microsoft-Hyper-V -All /LimitAccess /ALL

pause
Save the file with a .bat (for batch file) file extension. To do so, use a file name like hyperv.bat and change “Save as type” to “All files.” Save the file to your Desktop.
Now, right-click the batch file you created, select “Run as administrator” from the context menu that appears, and click “Yes” when prompted by User Account Control. The batch file will execute in a Command Prompt window.
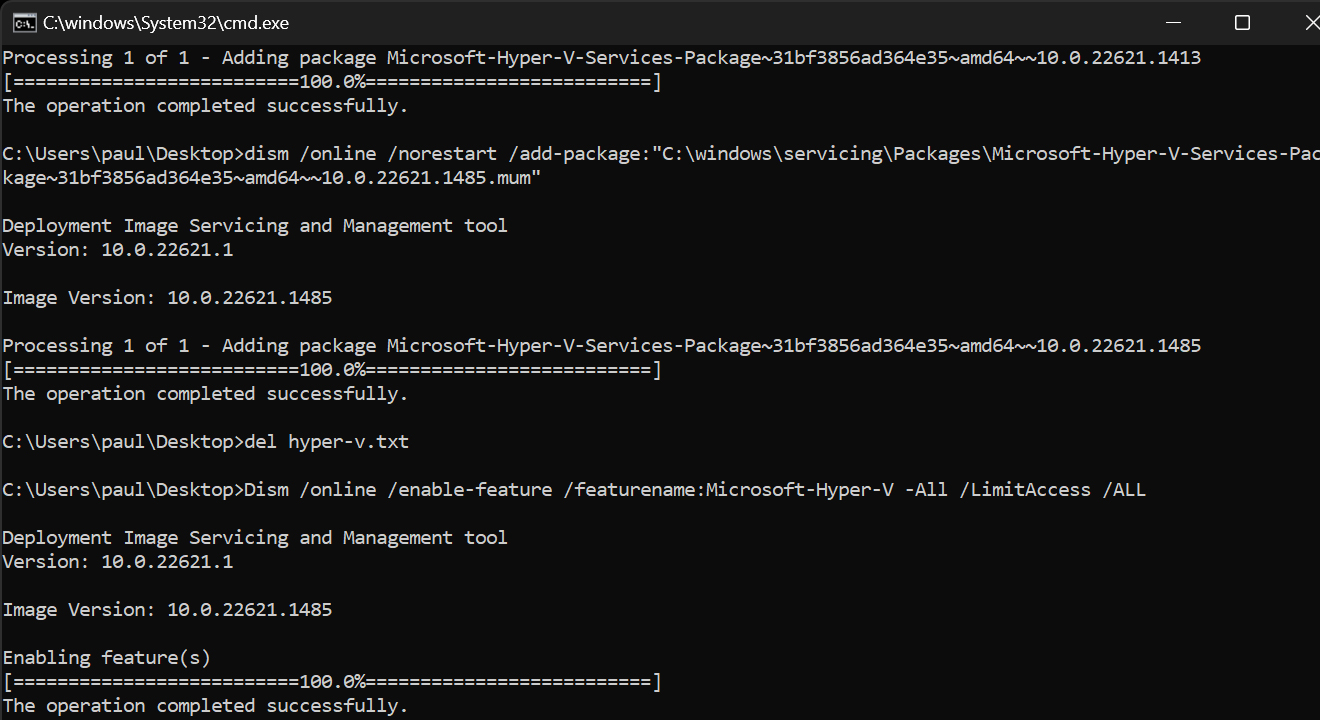

When it completes, you will be prompted to reboot your computer. Do so.
If you later choose to uninstall Hyper-V, you can do so via the Windows Features control panel. (This is true if you installed Hyper-V in Windows 11 Home, too.) Just uncheck “Hyper-V” in the list, click OK, and restart your PC when prompted.
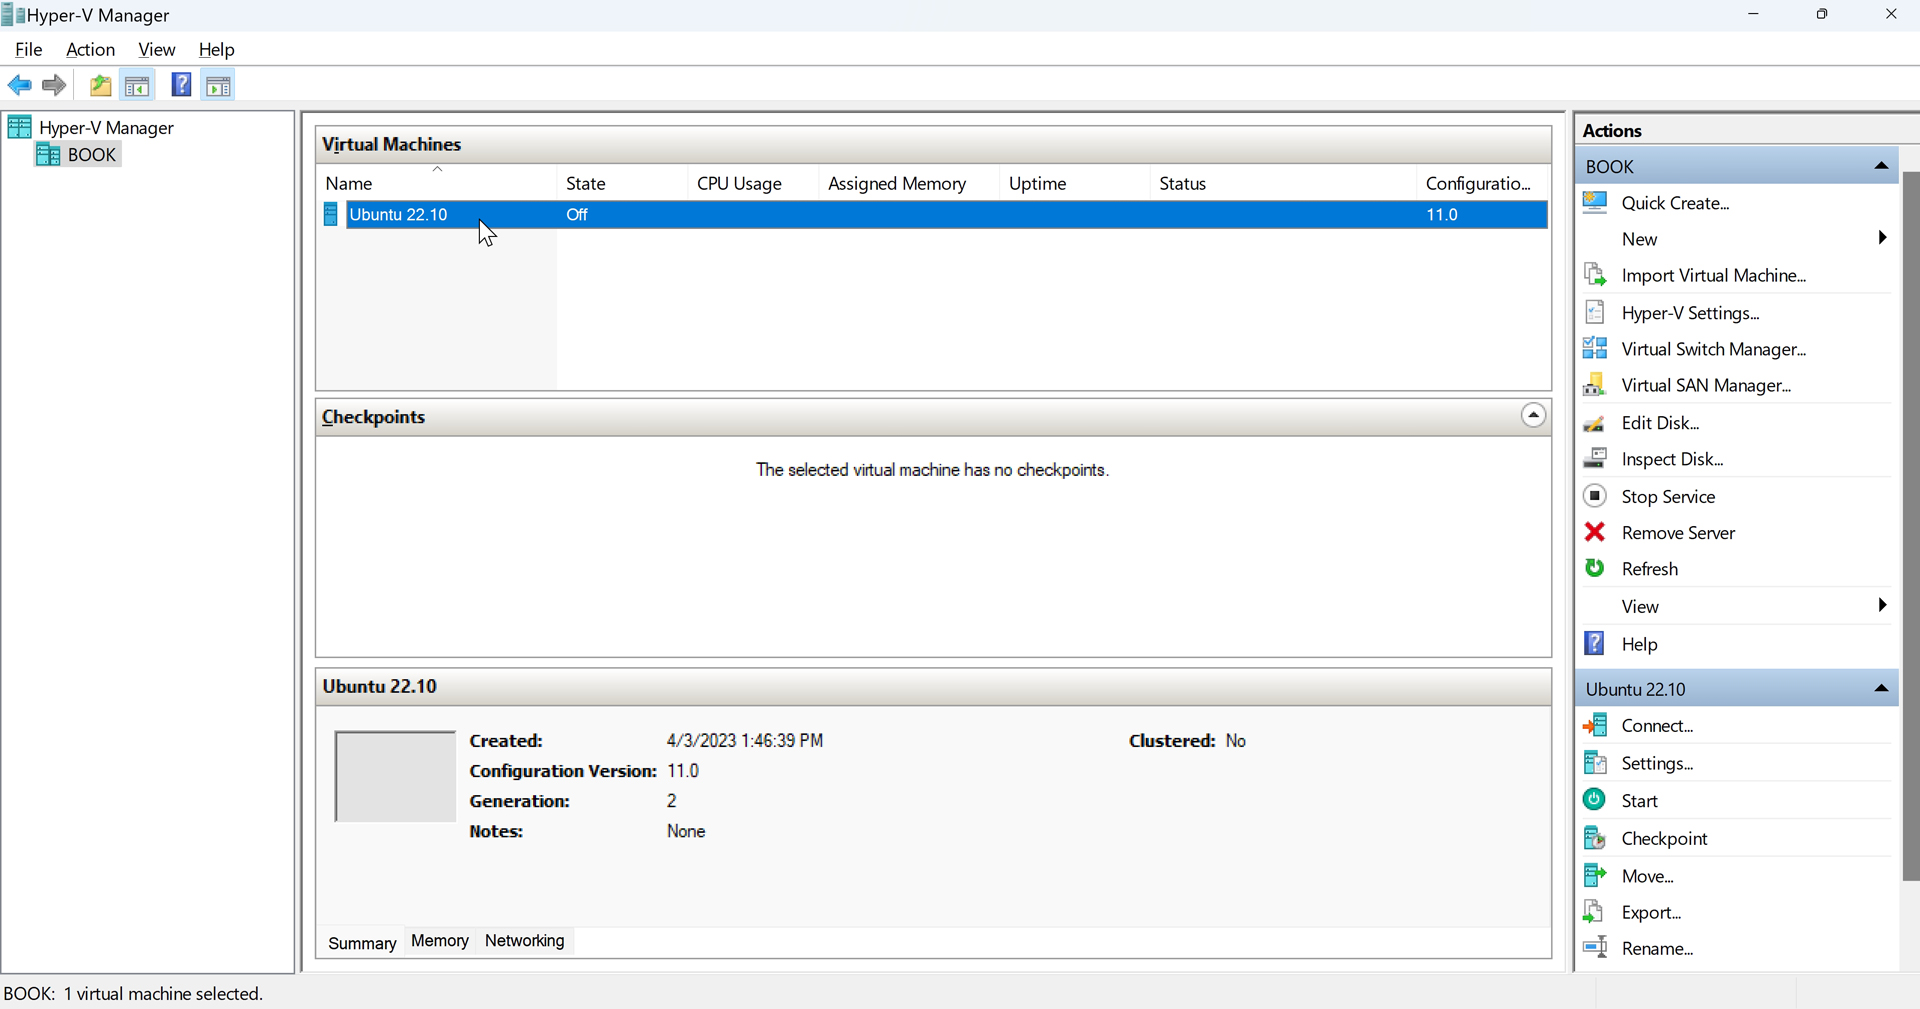
Get to know Hyper-V Manager
You use the Hyper-V Manager application to manage Hyper-V and its virtual machines (VMs), virtual hard disks (VHDs), and virtual floppy disks (VFDs).
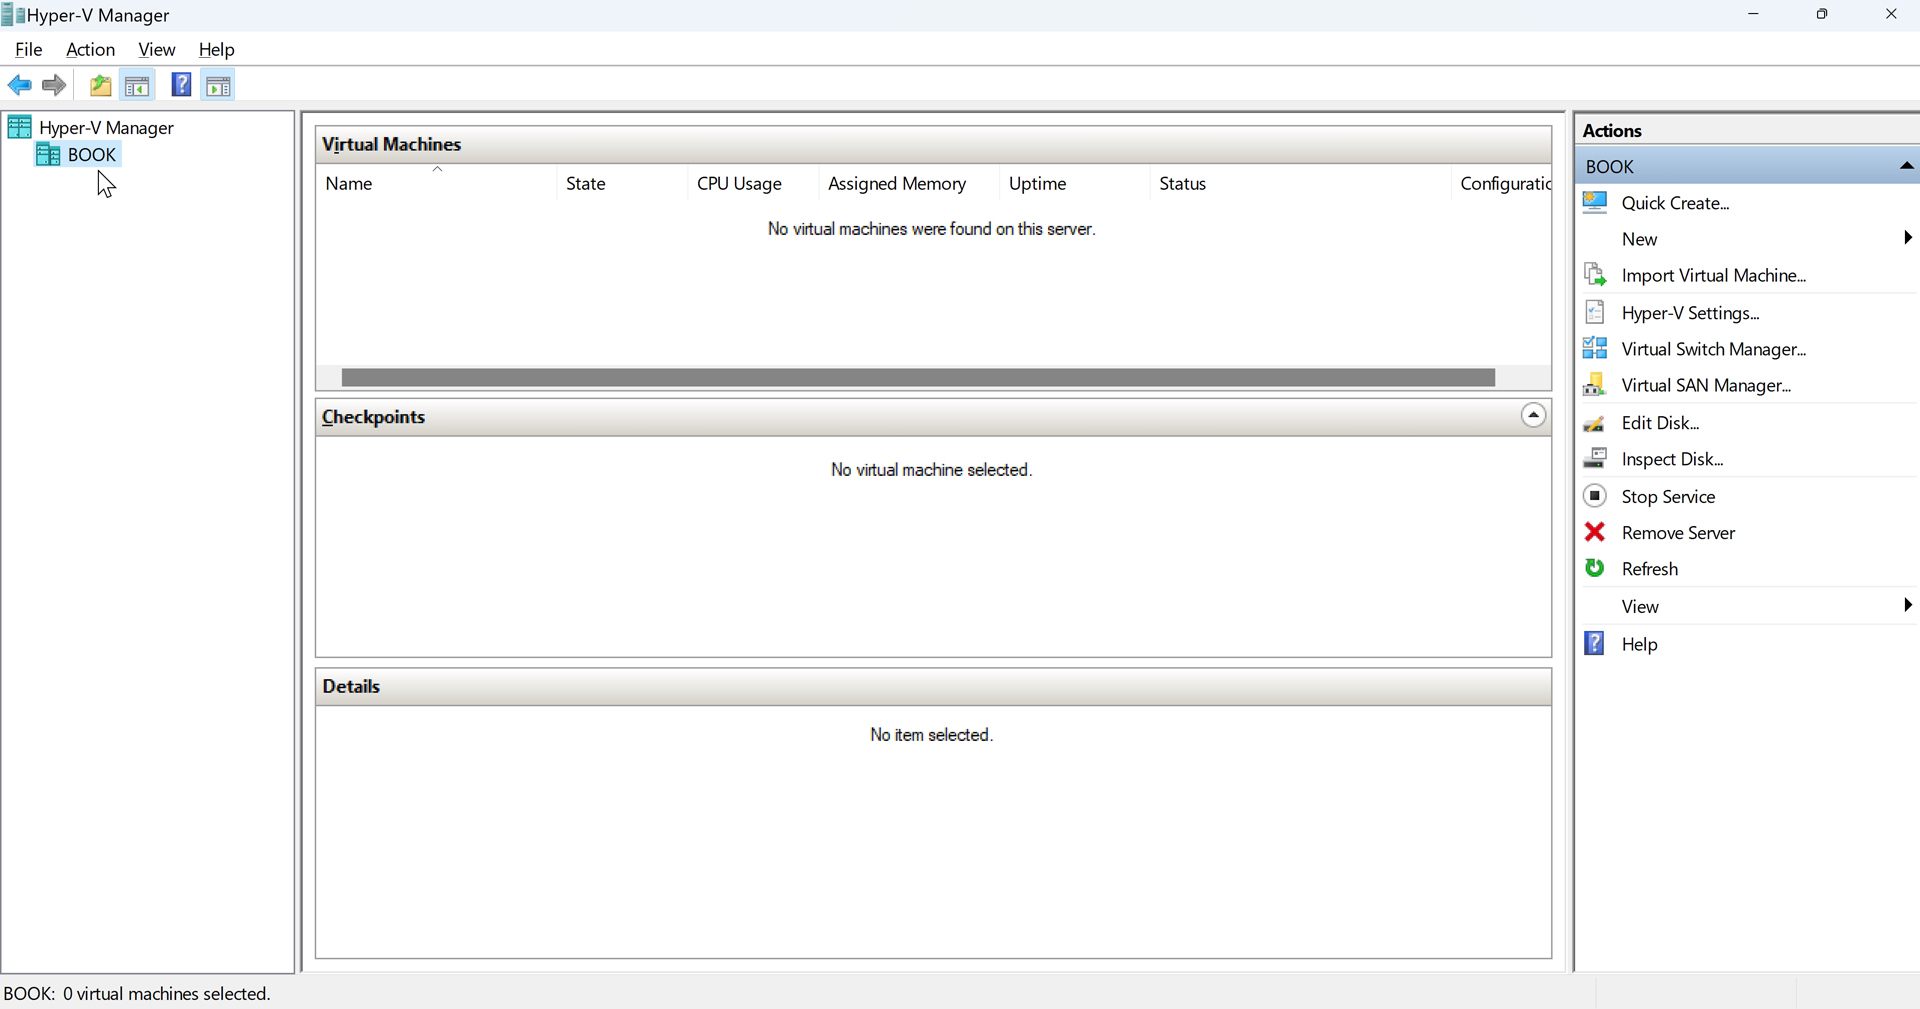
By default, Hyper-V Manager connects to local resources, meaning those VMs, VHDs, and VFDs that are stored on your computer. But you can also use this application to connect to remote instances of Hyper-V on your network or elsewhere on the Internet. In this chapter, we focus only on using Hyper-V locally.
Some of the key Hyper-V Manager experiences include:
Create a new virtual machine. Hyper-V Manager has manual and quick-create methods for creating VMs, in which you can then install, configure, and use Linux, Windows 10, or Windows 11. Since this is the primary purpose of this application, we examine this topic in the next section.
Create a new virtual disk. Each VM you create and use in Hyper-V Manager is configured with a single virtual hard disk (VHD). But you can arbitrarily create other VHDs for use with your VMs. Navigate to Action > New > Hard Disk to start the New Virtual Hard Disk Wizard, which will guide you through the process. Once the VHD is created, you can add it to a VM in that VM’s settings, under SCSI Controller: select Hard Drive, click “Add,” and find the VHD.
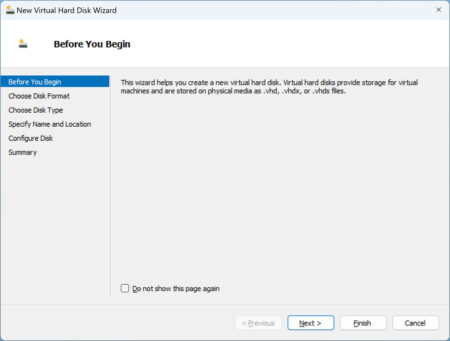
We recommending sticking with the VHDX disk format and using a “Dynamically expanding” disk type, the latter of which will save disk space.
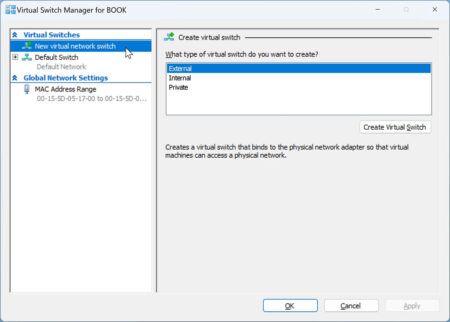
Create a virtual switch. Hyper-V Manager lets you create a manage virtual switches, which are virtual network connections, using a tool called Virtual Switch Manager. Otherwise, you can simply choose “Default Switch” so that a VM shares the same network connection as the host version of Windows 11.
Create and use virtual machines
Hyper-V Manager lets you create VMs using a “Quick Create” wizard that automates downloading the ISO (identical storage image of optical media) file for Ubuntu Linux, Windows 10, or Windows 11 installation media and then installing the system using a default configuration. Or you can use a more manual approach in which you download the ISO(s) you need yourself and then configure the VMs to your liking. We strongly prefer the latter approach and will document that here.
Create a new virtual machine
To install Linux, Windows 10, or Windows 11 in a Hyper-V VM, you will first download the correct ISO file to your PC.
Download links:
Then, open Hyper-V Manager and select Action > New > Virtual Machine. The New Virtual Machine Wizard opens.
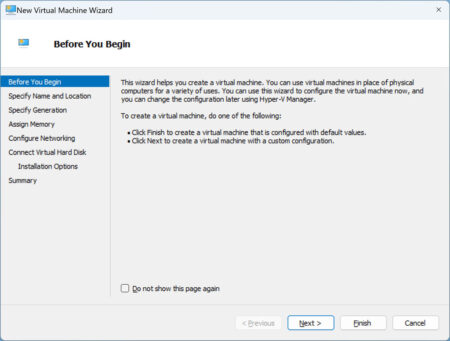
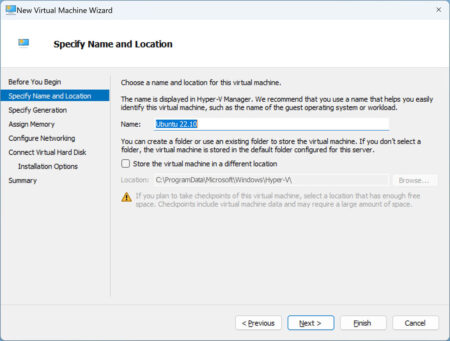
Click “Next.” In this page of the wizard, you will name the VM (“Ubuntu” or similar) and, optionally, choose to store it in a different location than the default.
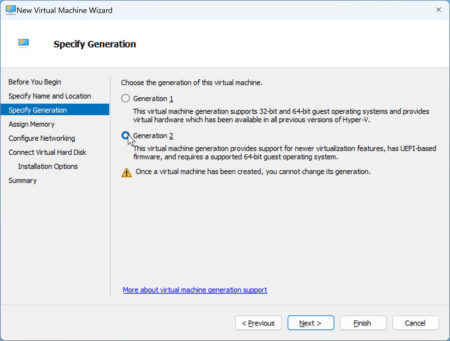
Click “Next.” In the Specify Generation page that appears, you will choose between a Generation 1 and Generation 2 VM. As the names suggest, Generation 2 is more modern and supports UEFI-based firmware instead of a legacy BIOS, so this is almost certainly the right choice.
Click “Next.” In the Assign Memory page, you will configure the amount of memory that will be allocated to this VM. What you choose here will depend on a variety of factors including how much RAM your PC has, which operating system you are installing in the VM, and how you intend to use the VM. But you can always change the memory allotment later.
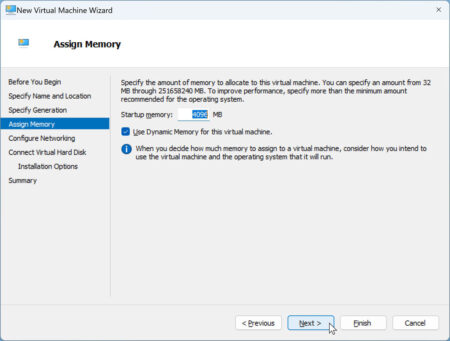
Leave the option “Use Dynamic Memory for this virtual machine” enabled.
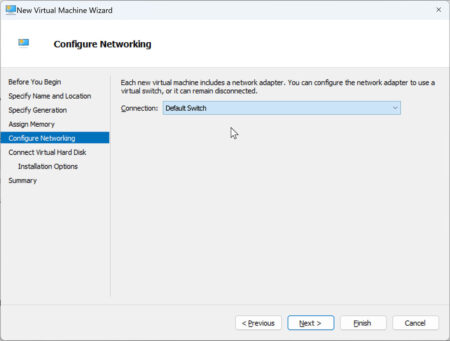
Click “Next.” In Configure Networking, you should configure a network connection. If your PC has only one network connection, you can use “Default Switch,” which means that the VM will share the same network connection as the host Windows 11 system.
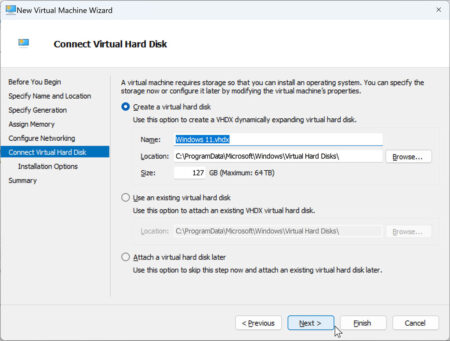
Click “Next.” You determine which VHD to use with the VM in the Connect Virtual Hard Disk page. By default, Hyper-V will create a new VHD with the same name as the VM. And that is what you will want most of the time. But you can use an existing VHD or choose to attach a VHD later too.

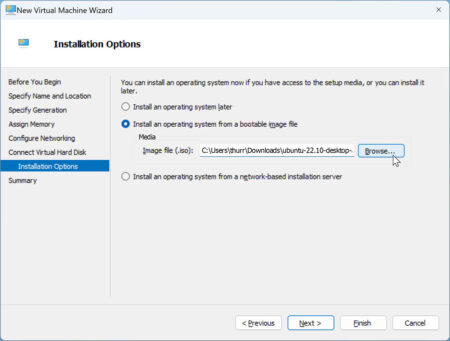
Click “Next.” In Installation Options, you will choose to install an operating system now or later. Typically, you will choose “Install an operating system from a bootable image file” and then select the ISO file you downloaded.
Click “Next.” In this final page, the New Virtual Machine Wizard reviews the settings you configured so you can check them one last time.
Click Finish and Hyper-V will create the new virtual machine. It will appear in the list of virtual machines in Hyper-V Manager.

Make specific configuration changes for Windows 11 or Ubuntu Linux
If you are installing Windows 11 or Ubuntu Linux in the VM, you have one more step: right-click the VM in the list and choose Settings to open the VM’s settings. Then, navigate to the Security page.

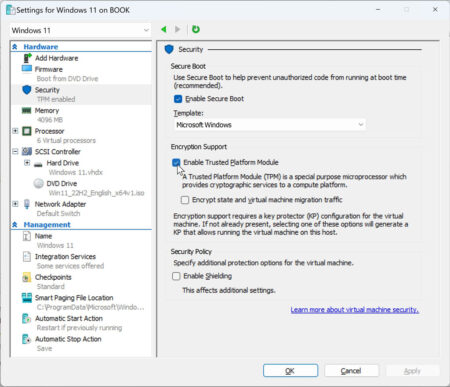
If you are installing Windows 11, check the option “Enable Trusted Platform Module.” This allows the VM to meet Windows 11’s hardware requirements. Otherwise, you will see an error when Windows Setup begins and won’t be able to continue.
If you are installing Ubuntu Linux, change the option “Template” to “Microsoft UEFI Certificate Authority.” Otherwise, the VM will not boot using the Ubuntu setup ISO.
Either way, click “OK” when you’re done.
Install and configure Windows 11 or Linux
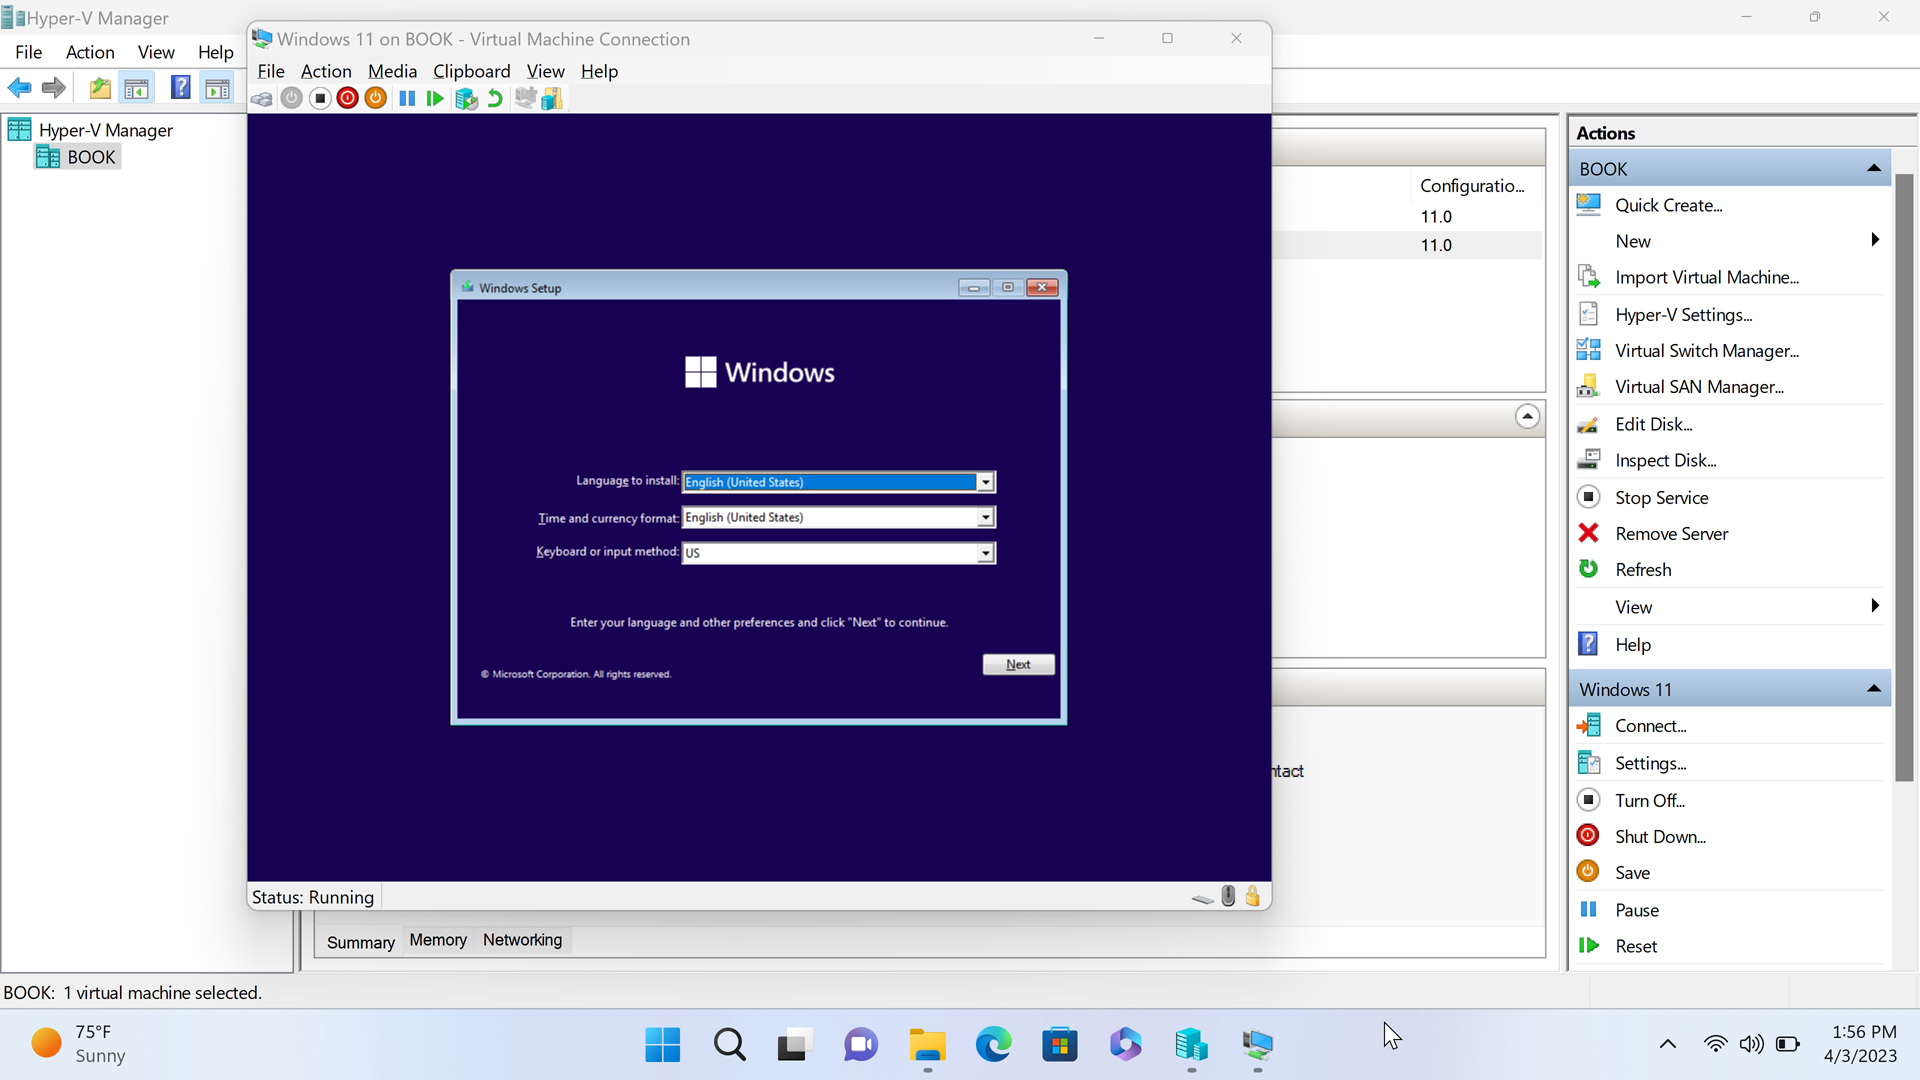
To install Windows 11 or Linux in a newly-created VM, double-click the VM in the virtual machines list in Hyper-V Manager. A Virtual Machine Connection window appears.
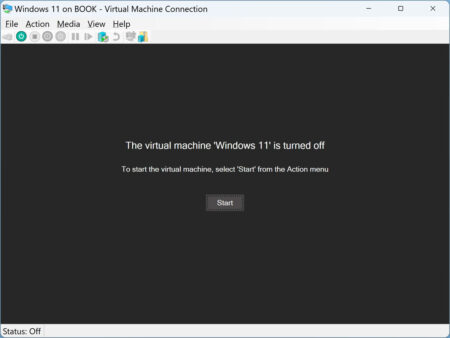
Click “Start” to power on the VM. From here, the VM mimics the behavior of a real PC, but in a software window. You can follow on-screen prompts to install the OS you chose.
Once the OS is fully configured and running properly in the VM, there are a few options to consider.
Remove the ISO. Once the operating system is installed, you can detach the ISO file from the VM. To do so, display the Virtual Machine Connection window and choose Media > DVD Drive > Eject [name of ISO].iso.

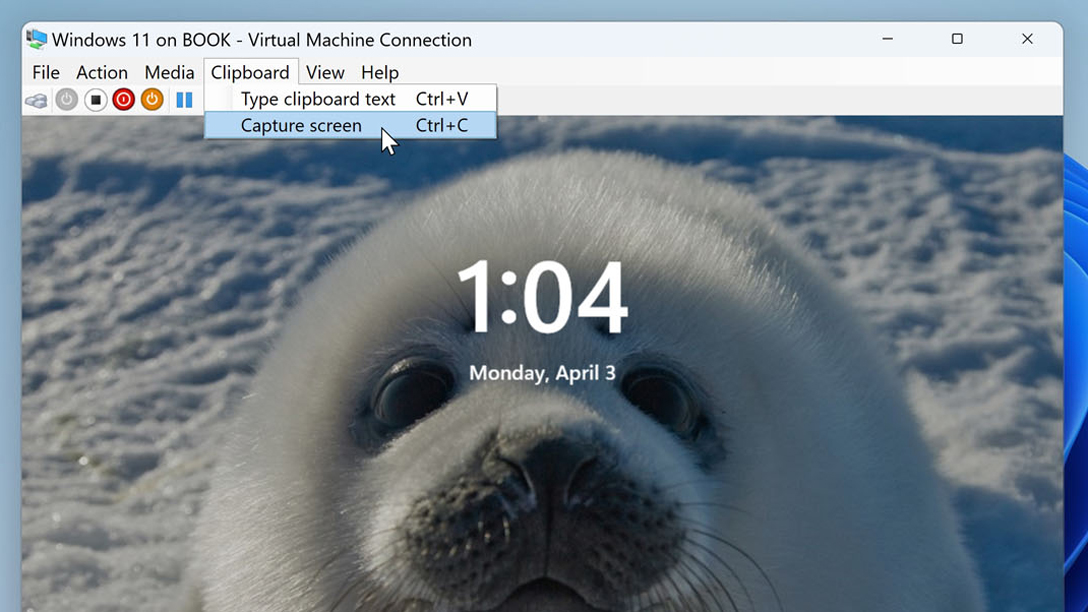
Copy text into the VM using the Clipboard. The Virtual Machine Connection window lets you paste text from the Clipboard of the host PC into the VM. This can be handy for a variety of reasons, for example when you want to paste a Windows product key into an activation window. To do so, select Clipboard > Type clipboard text.
Capture a screenshot of the VM. You can also capture a screenshot of the VM by selecting Clipboard > Capture screen. This is particularly handy for offline interfaces like Windows Setup or the Welcome screen where you can’t normally take a screenshot.
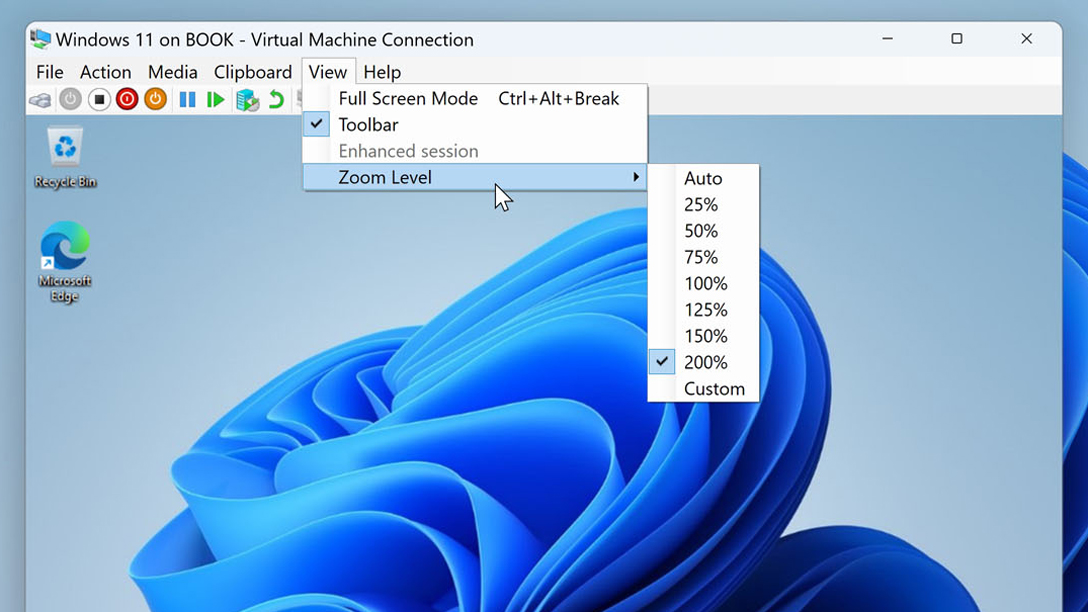
Change the zoom level. By default, the Virtual Machine Connection windows will automatically scale the VM it contains, but you can specify a zoom level if you want or even display the VM full screen. Both options are in the View menu.
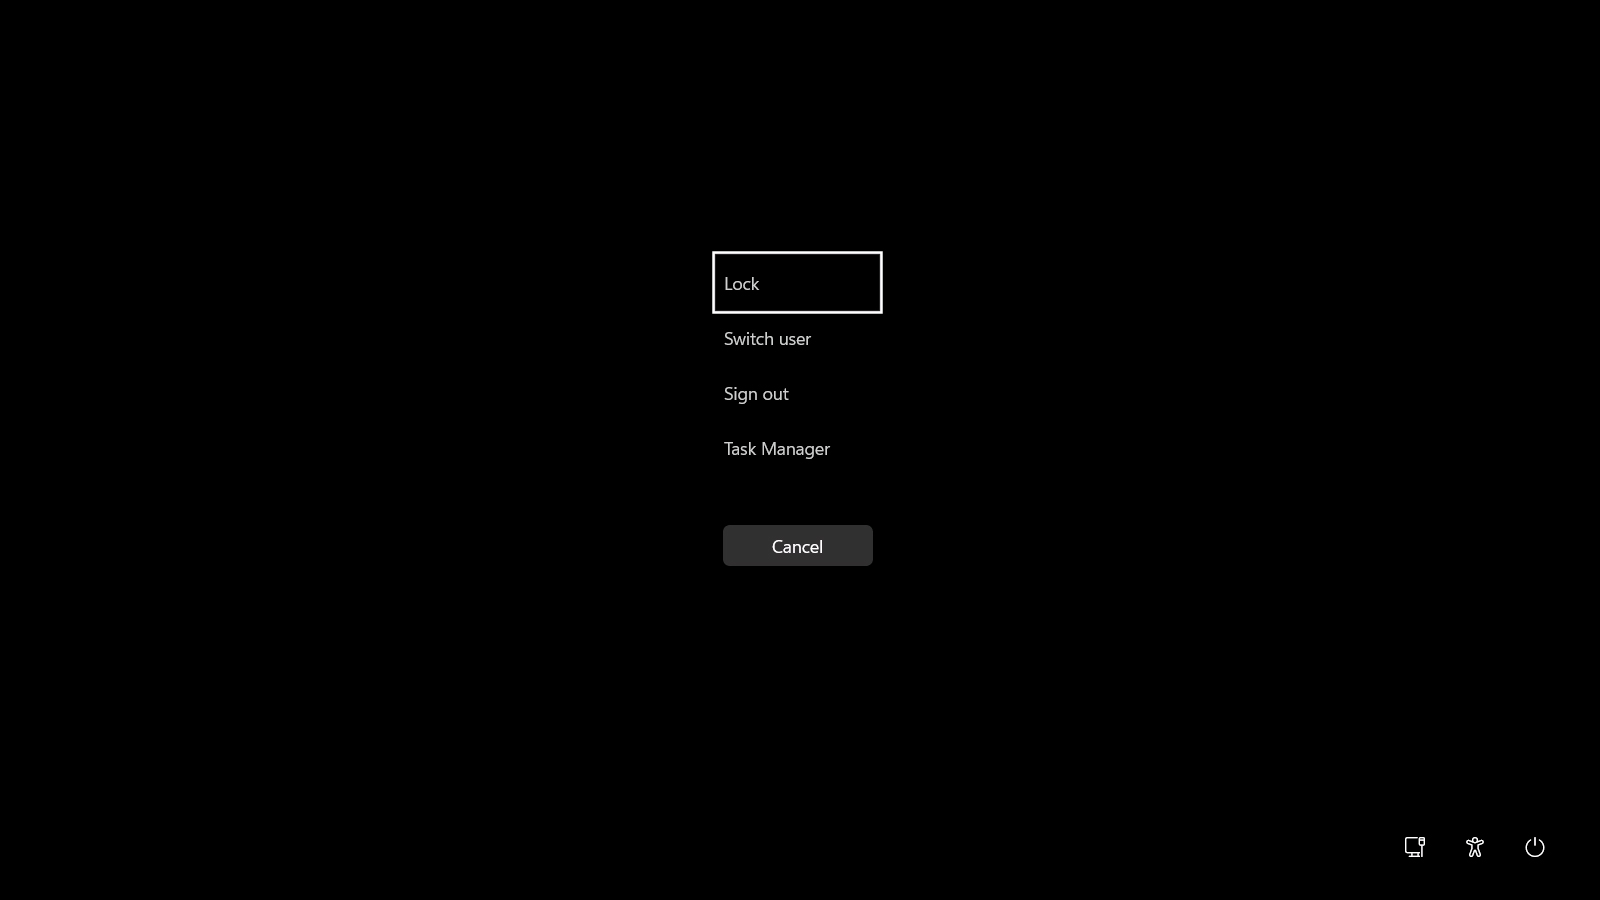
Understand how CTRL + ALT + DEL works. Windows 11 uses the CTRL + ALT + DEL keyboard shortcut to display a special security screen with five options: Lock, Switch user, Sign out, Task Manager, and Cancel. But because this keyboard shortcut has to always work, it’s not possible to access this screen in a Windows-based VM using the normal shortcut because it always impacts the host operating system instead. But you can still use CTRL + ALT + DEL with a VM in Hyper-V: just type CTRL + ALT + END instead. Or, choose Action > Ctrl + Alt + Del.

Use checkpoints to save a VM’s state
Thanks to a cool feature called checkpoints, you can save the state of a VM at any time and then return the VM to that state later. This is handy if you’re about to make a major change to a VM and want a way to go back in time and reverse that change.
To create a checkpoint, right-click the VM in Hyper-V Manager and select “Checkpoint.” Each checkpoint for a VM appears in the Checkpoints area in Hyper-V Manager.
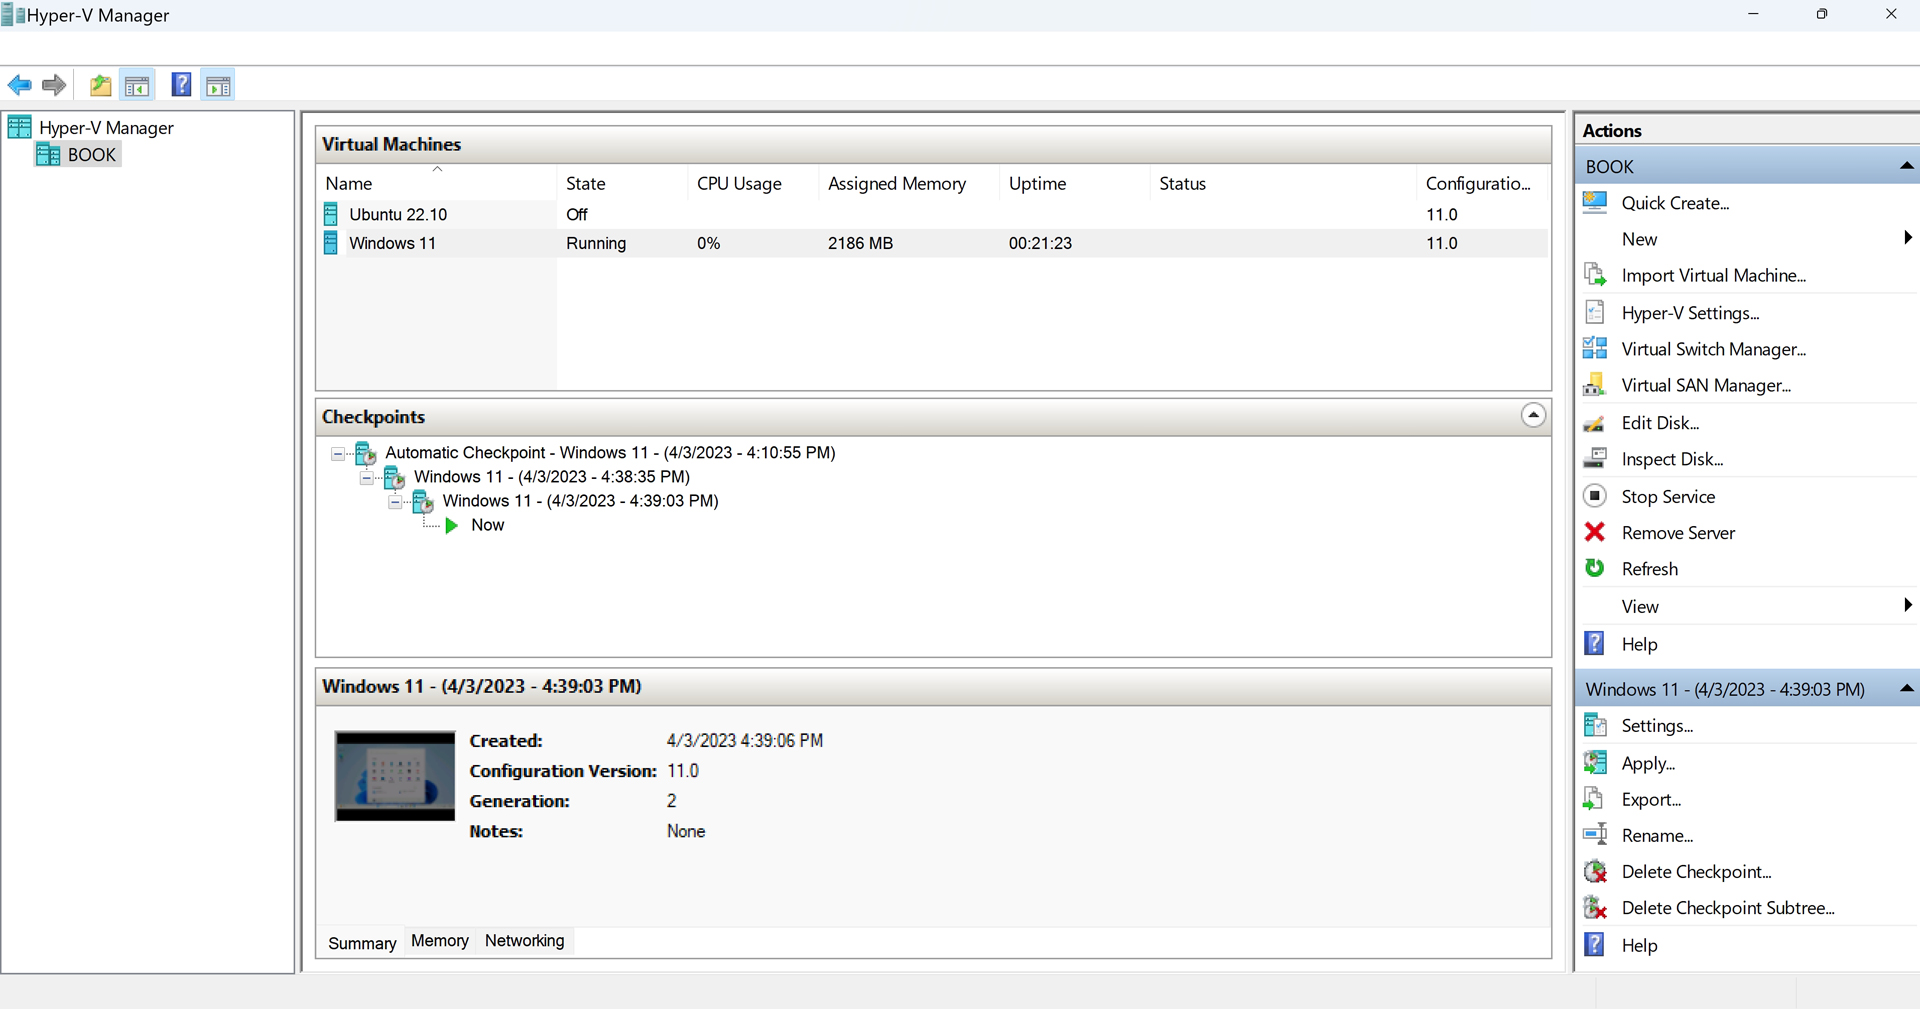
You can also create a checkpoint from the Virtual Machine Connection window: just select Action > Checkpoint.
Later, you can return to any saved checkpoint and return the VM to the state it was in at that time. To do so, select the VM in Hyper-V Manager, right-click the checkpoint to which you would like to return, and choose “Apply.”
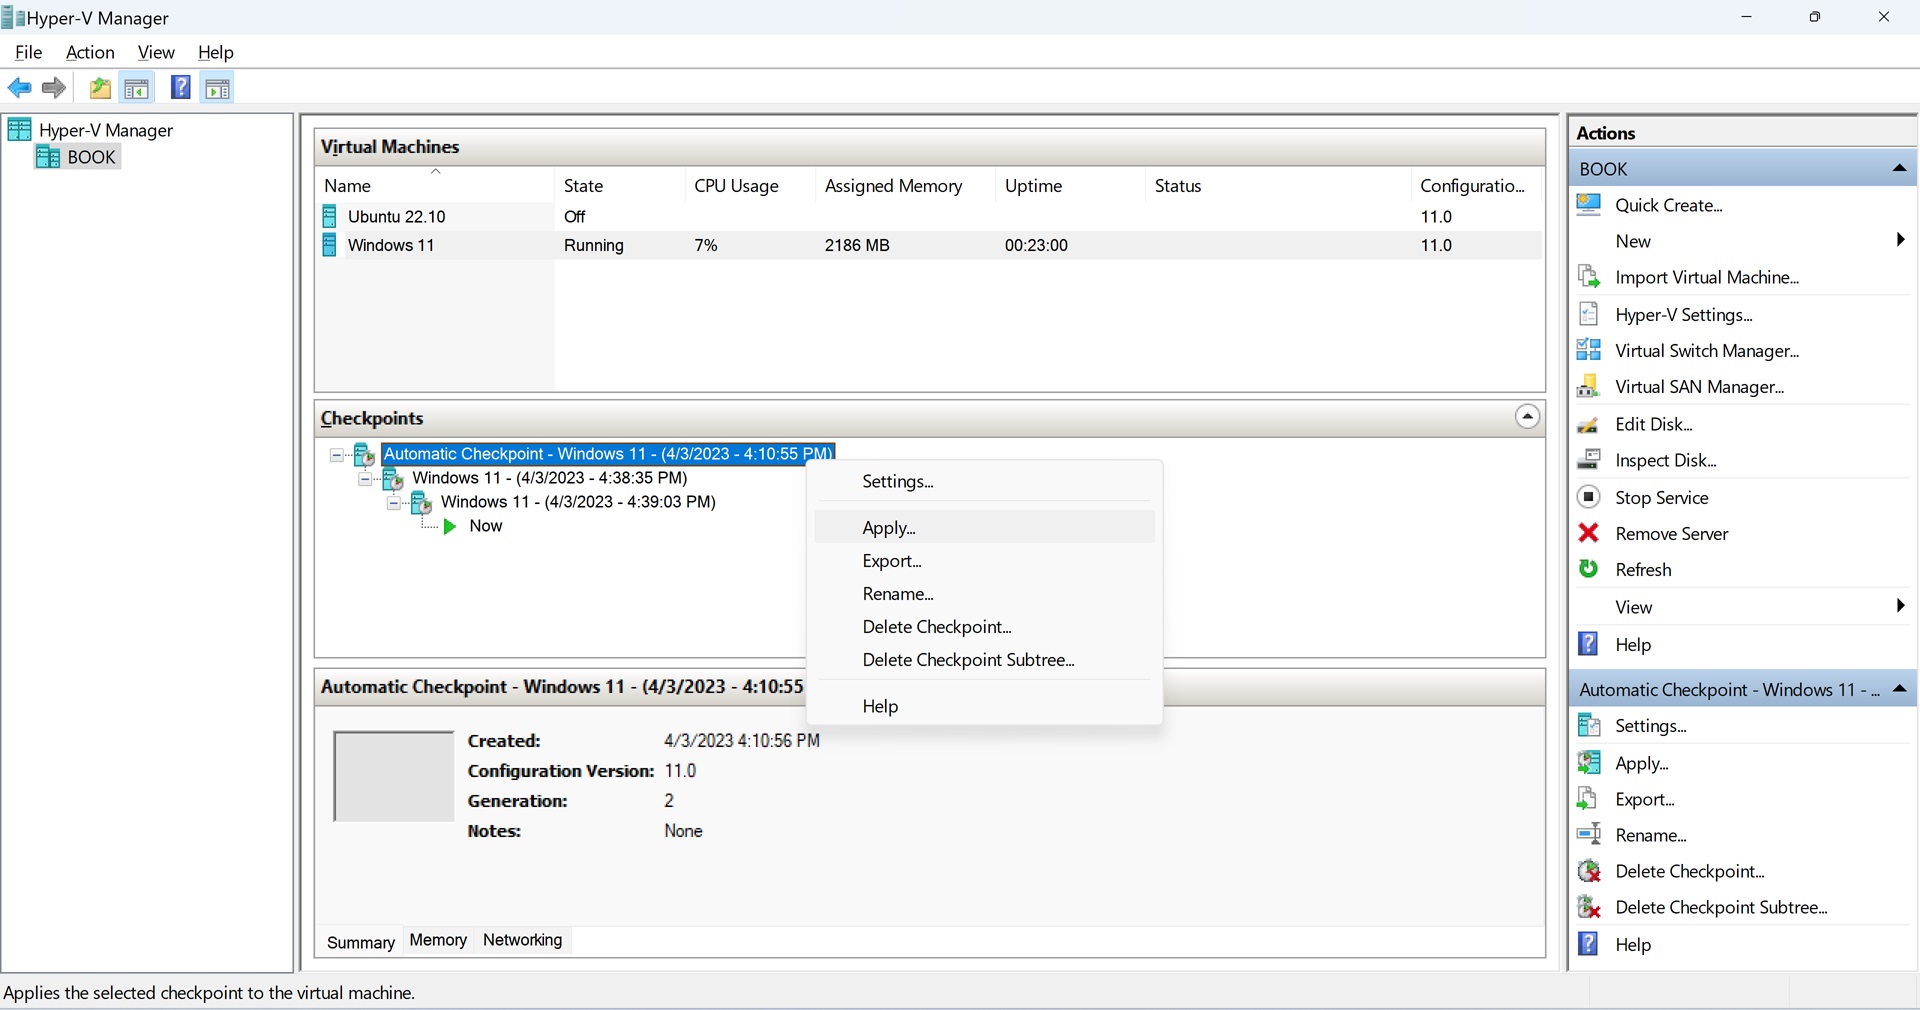
You will be prompted to apply the selected checkpoint. (And, in a nice touch, Hyper-V will offer to create a new checkpoint so you can get back to the present if the change doesn’t work out.)
Configure a VM’s settings
Each VM has its own custom settings, some of which you configured when you first created it. But you can customize these settings at any time if needed.
Well, not at any time: many VM settings can only be configured when the VM is not running. So make sure to shut down the VM first.
To access the settings for a VM, right-click it in Hyper-V Manager and choose “Settings.” The VM Settings window appears.
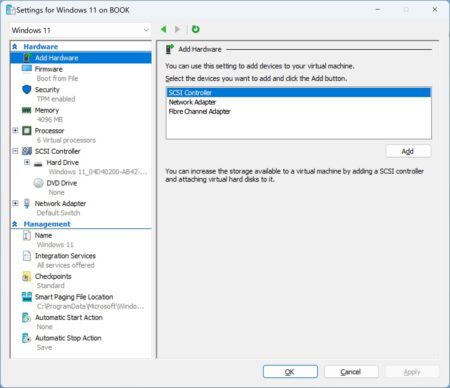
Some key settings to consider include:
Boot order. As with firmware settings on a real PC, you can configure the order in which boot devices are checked to start up the operating system. This happens in Settings > Hardware > Firmware.
Security. You can determine whether Secure Boot and Trusted Platform Module (TPM) are supported in Settings > Hardware > Security.
RAM. To change how much RAM is allocated to the VM, visit Settings > Hardware > Memory. If you enabled dynamic memory, which you should, you can also specify the minimum and maximum amounts of RAM the VM can use.
Storage. Every VM gets a single virtual hard drive (VHD), but you can add more–or add a DVD drive or shared drive–in Settings > Hardware > SCSI Controller.
Automatically start the VM when the PC starts. By default, Hyper-V VMs won’t run until you tell them to. But if you are going to use a VM all the time for whatever reason and want it to start up automatically when you sign in to Windows, you can configure it to do so in Settings > Management > Automatic Start Action.

Gain unlimited access to Premium articles.
With technology shaping our everyday lives, how could we not dig deeper?
Thurrott Premium delivers an honest and thorough perspective about the technologies we use and rely on everyday. Discover deeper content as a Premium member.