OneDrive (23H2) (Archived)
- Paul Thurrott
- Oct 29, 2023
-
1
OneDrive is Microsoft’s cloud storage service, and it can be accessed from the web, smartphones and other mobile devices, Macs, and PCs running Windows 10 or 11. That latter bit is of particular interest to us here: OneDrive is deeply integrated with Windows 11, allowing users to automatically back up and sync content between the cloud and their PCs.
What about storage?
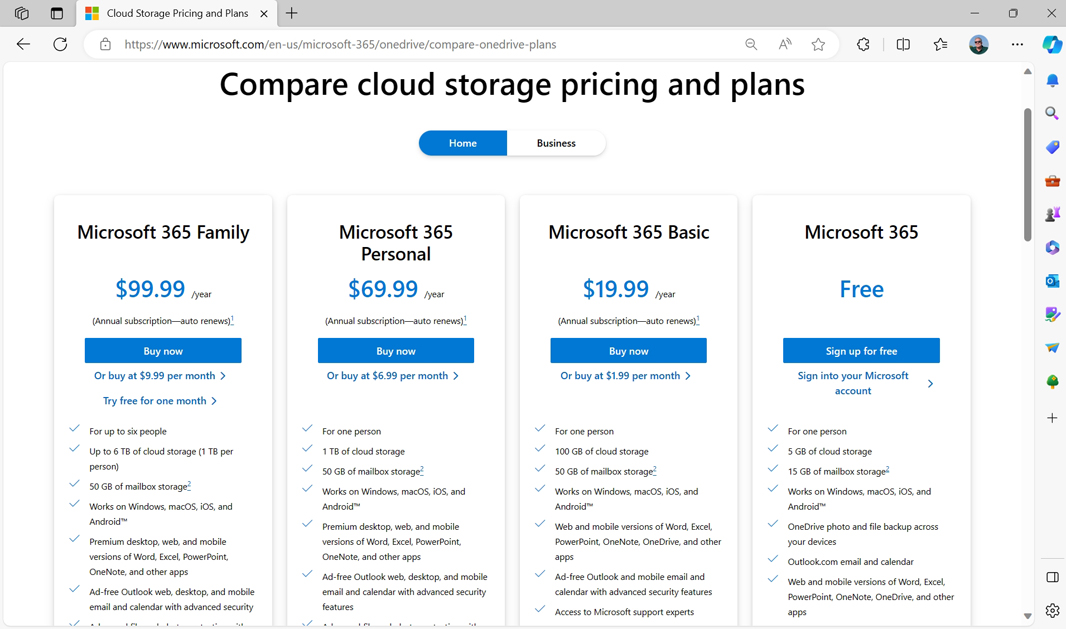
Everyone with a Microsoft account gets 5 GB of free OneDrive storage space. But you can pay more to get more storage: Those with a Microsoft 365 Basic ($19.99 per year) subscription get an additional 100 GB of storage, while those with Microsoft 365 Personal ($69.99 per year) or Family ($99.99 per year) subscriptions get an additional 1 TB of OneDrive storage per user. You can compare these offerings on the Microsoft website.
And once you have a Microsoft 365 subscription, you can add additional storage in 200 GB ($1.99 per month), 400 GB ($3.99 per month), 600 GB ($5.99 per month), 800 GB ($7.99 per month), or 1 TB ($9.99 per month) allotments. So a Microsoft 365 subscription is the best choice for those who need a lot of OneDrive storage.

Get to know OneDrive in Windows 11
Because Microsoft requires most users to sign in to Windows 11 with a Microsoft account, OneDrive is a key part of the experience.
During Windows Setup’s Out-of-Box Experience (OOBE), for example, you are told that some key user folders–Desktop, Documents, and Pictures–are being backed up automatically to OneDrive.
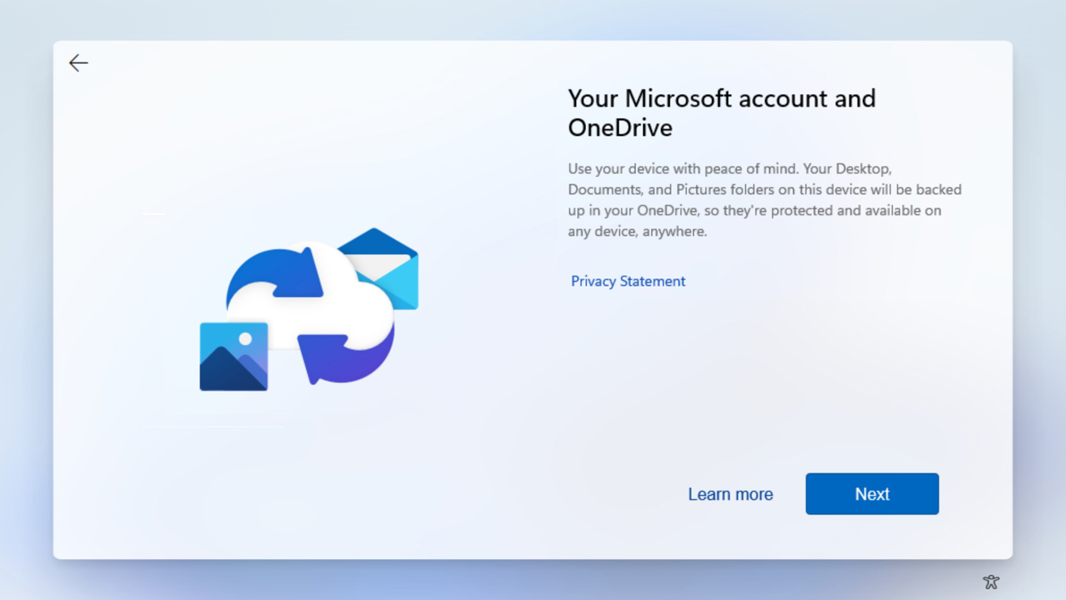
This feature is called Folder Backup and it is configured in OneDrive settings.
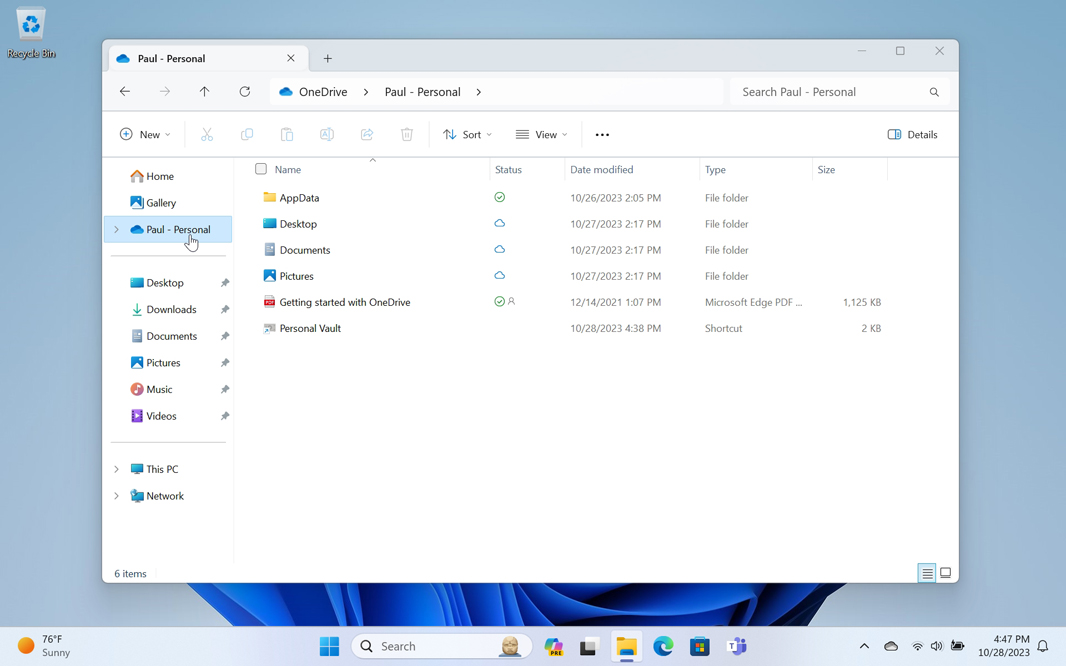
And when you open File Explorer and select the OneDrive entry in the navigation pane–it can be found in the top section and is called “User name – Personal”, you will see that the files in your OneDrive storage are accessible alongside the local files on your PC.
Best of all, you can configure some or all of it to be available offline, because Windows 11 can sync your OneDrive content locally using a feature called Files On-Demand.
We examine each of these capabilities in this chapter.
Configure OneDrive
Because of its deep integration with Windows 11, OneDrive offers a wide range of configuration options. These are available in OneDrive settings, which requires a multi-step process to find and open.
To do so, locate the OneDrive icon (it resembles a gray cloud) in the system tray. This might be visible on the Taskbar, but it could also be hidden in the Taskbar overflow area.
![]()
If you think you may use it a lot, you can drag the OneDrive icon from the Taskbar overflow area directly into the system tray where it will always be visible.
Select this icon to open the OneDrive pane. Then, select the Help & Settings icon (it resembles a gear) in the upper right to display a menu. Select the “Settings” item to display OneDrive settings.
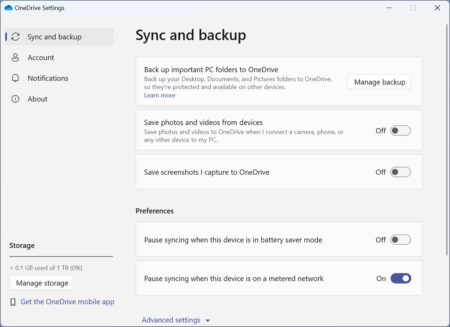
Here, you can access numerous OneDrive options across three main pages–Sync and backup, Account, and Notifications, plus About–each of which is accessible from the navigation pane on the left atop a quick peek at your cloud storage usage and a button so you can manage OneDrive on the web.
We will examine the most important OneDrive options in the following sections.
You can further configure OneDrive in File Explorer as well. This is described later in the chapter.
Configure OneDrive Folder Backup
By default, Windows 11 is configured to back up three key user folders–Desktop, Documents, and Pictures–to OneDrive. It does this by redirecting these file system locations to similar locations inside of OneDrive. That is, instead of using C:\Users\user-name\Desktop as the location for your Desktop folder, it will use C:\Users\user-name\OneDrive\Desktop.
You can also optionally back up (sync) the Music and Videos user folders to OneDrive as well.
We recommend that most users enable this feature, called Folder Backup (or enable it if it’s currently disabled), especially if you are paying for a Microsoft 365 account or extra OneDrive storage. Everything you store in one of these folders will be backed up–or synced, to be more accurate–to the cloud and will be accessible from any device that supports OneDrive. Additionally, if you sign into Windows 10 or 11 on another PC, the contents of those folders will likewise be synced to that PC so that those contents will be accessible there as well. You can edit, move, or delete files in those folders and the changes will be reflected everywhere.
That said, some people may not want to back up these folders to OneDrive because they don’t want to use up too much of their OneDrive storage allotment, don’t use those folders anyway, or use other cloud storage services.
Warning
In Windows 11 version 23H2, Microsoft has become particularly aggressive about pushing this feature on users, with regular advertisements to do so in the OneDrive app, File Explorer, and Start menu, and via pop-up banner notifications. We have even witnessed Microsoft silently re-enabling Folder Backup after we’ve explicitly disabled this feature. So those who do not wish to use Folder Backup will need to be especially vigilant until we discover how we can put a stop to this behavior. We will document any workarounds we find in this book immediately.
However you feel about Folder Backup, you should at least examine how this feature is configured when you upgrade to Windows 11 (or a new version of Windows 11) or set up Windows 11 on a new PC. And, if desired, disable the automatic backup of one or more of those folders.
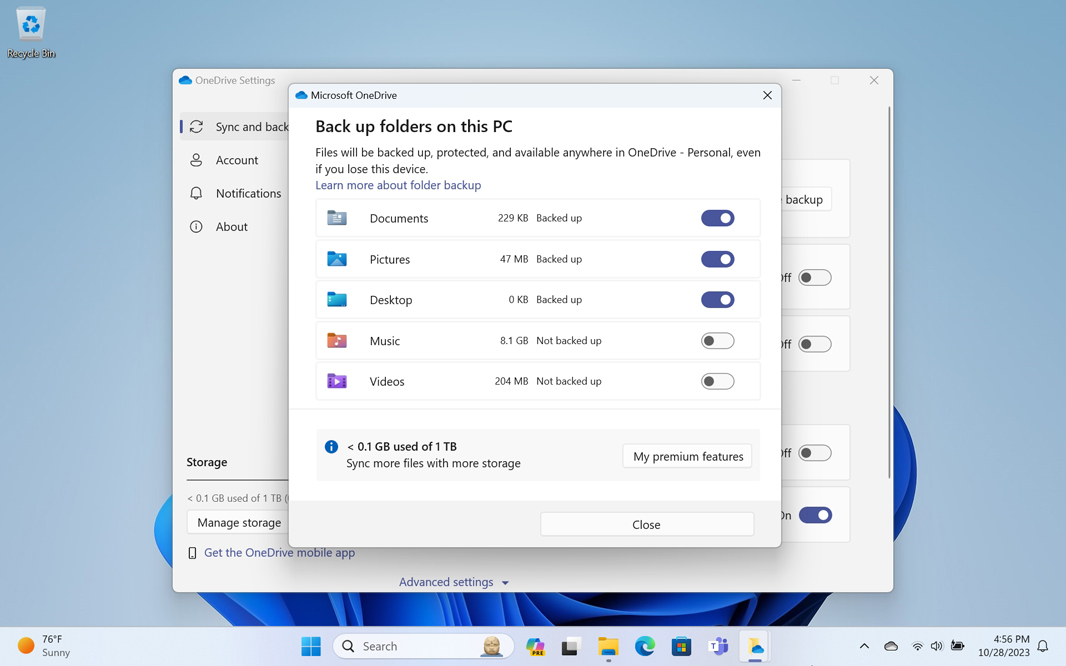
To do so, open OneDrive settings and navigate to the Sync and backup page if needed. Then, click the “Manage backup” button to display the “Back up folders on this PC” window.
Here, you will see On/Off toggle controls for the three folder locations that OneDrive automatically backs up–Documents, Pictures, and Desktop–plus two other important folders in your user account, Music and Videos. You can toggle each folder as you wish and then click “Save changes” or “Close” as needed.
Note, however, that making changes here will trigger certain behaviors.
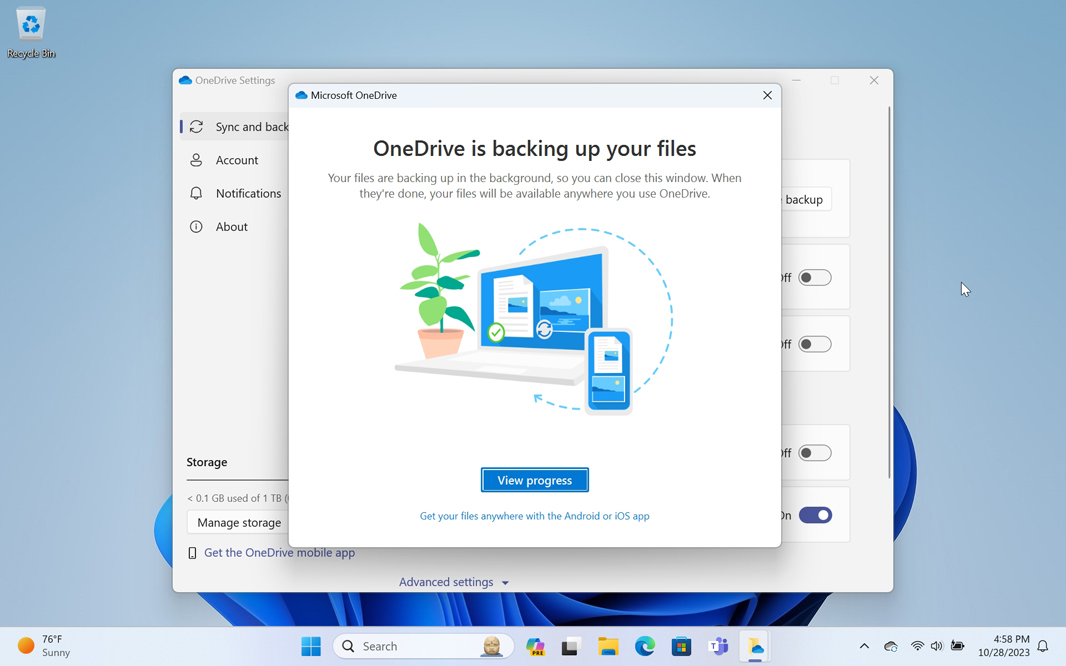
If you enable Folder Backup on one or more of these folders, OneDrive will display a window called “OneDrive is backing up your files.” You can just close this window and get back to work, or you can click “View progress” to watch the files sync in the main OneDrive window.
If OneDrive Folder Backup is enabled and you disable backup for one of the folders, OneDrive will ask you whether you’re sure you wish to “Stop backing up.” If then click “OK,” it will explain that the existing files were kept in the relevant OneDrive folder and that the local folder is now empty.
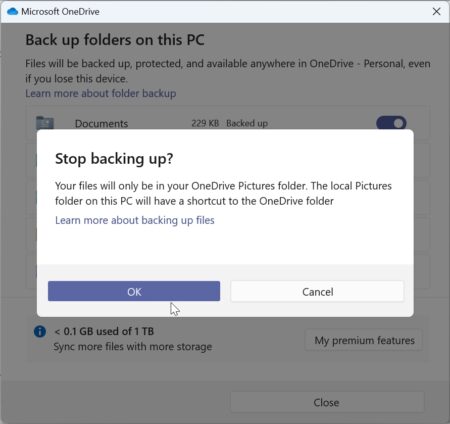
For example, if you stop backing up your Pictures folder, whatever files it contained will remain in C:\Users\user-name\OneDrive\Pictures. But when you open the Pictures folder in File Explorer going forward, it will C:\Users\user-name\Pictures. Which will be empty now.
Microsoft may also display a feedback window so you can explain why you stopped backing up the folder.
If you stop backing up two or more of these folders at the same time, you will need to step through each of the preceding steps for each folder. Microsoft really wants you to use Folder Backup.
Choose which OneDrive folders appear in Windows 11
By default, File Explorer will display the entire contents of your OneDrive storage in Windows 11. But you can choose to hide one or more folders from File Explorer and display only those folders you need to access from your PC.
One side effect of this change is that any files in a folder that were syncing to the PC will be deleted from the PC. These files will remain in OneDrive in the cloud, of course, and doing this will free up store space on your PC.
To make this change, open OneDrive settings and navigate to the Account page if needed. Then, click the “Choose folders” button to display the “Choose folders” window.
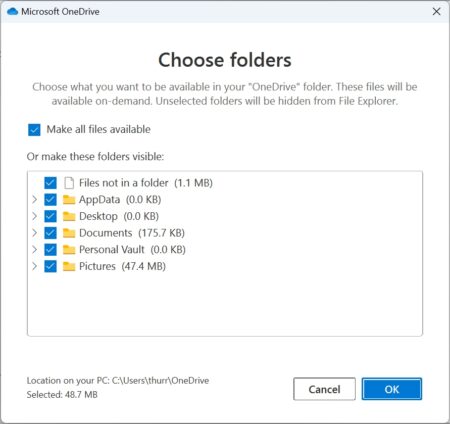

Here, you can expand and contract your OneDrive folder hierarchy and deselect those folders you don’t want to see on your PC. Press “OK” when you’re done. Then, open File Explorer and navigate to OneDrive to see the change: Any folders you unchecked will not be visible or available in File Explorer or any other apps.
Manage OneDrive notifications
By default, OneDrive can be a bit chatty, in that it displays notification banners for several different reasons, including informational alerts when the service has created an “On this day” slideshow. It can be particularly annoying if you disable OneDrive Folder Backup.
Some may find these notifications annoying and be tempted to disable them entirely (which you can do from a notification banner’s “Settings” (“…”) link or in the Settings app by navigating to System > Notifications). But you can also configure which types of notifications that OneDrive displays instead. That way you will see only the notifications that are relevant to you.
To do so, open OneDrive settings and navigate to the Notifications page. Then, review the available notification types and toggle those you don’t wish to see to “Off.”
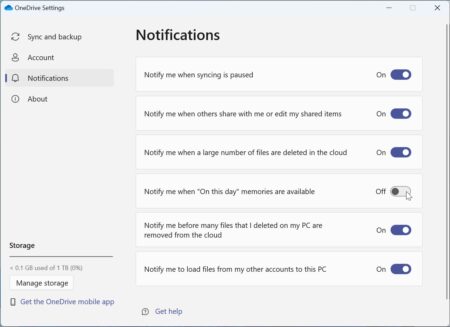
Sorry, you cannot disable notifications for Folder Backup. Again, Microsoft really wants you to use Folder Backup.
Change where OneDrive is located on your PC
By default, Windows 11 places your OneDrive folder inside of your user account folder structure, at C:\Users\user name\OneDrive. This isn’t something you need to think about all that often, since File Explorer provides a link to OneDrive in its navigation bar. But can move OneDrive to a new location if you’d like. For example, those with desktop PCs sometimes have two drives, with a solid-state drive as the system disk (C:\) and a large, traditional hard drive (D:\) that’s used for data. And you may wish to move OneDrive from C:\ to that larger D:\ drive.
To do so, open OneDrive settings and navigate to the Account tab. Then, click the “Unlink this PC” link. Windows will prompt you to explain what will happen if you proceed.
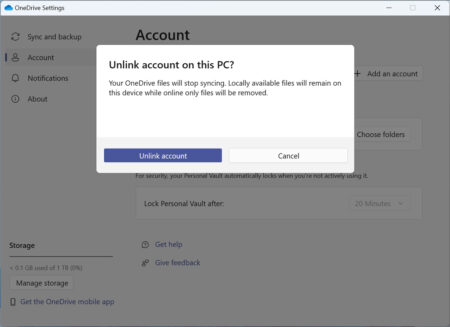
Click “Unlink account.” A “Set up OneDrive” window will appear.
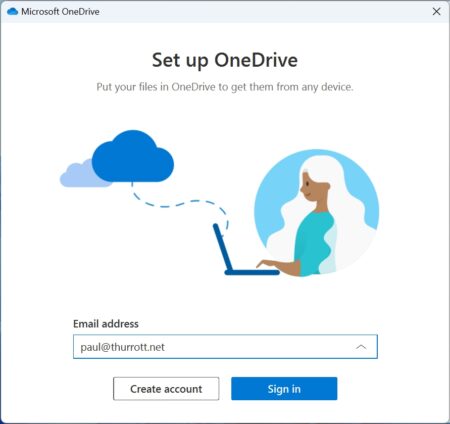
Enter the email address for your Microsoft account as prompted and handle any two-step authentication requirements. Then, step through a series of mostly promotional windows until you arrive at one titled “Your OneDrive folder.”
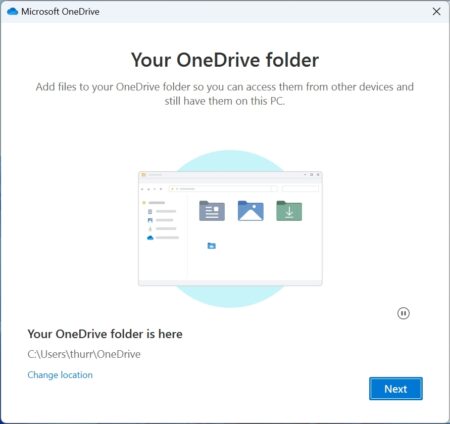
Here, you will find a link, “Change location,” that lets you choose a new location for the OneDrive folder. Simply use the “Choose your OneDrive location window”–a renamed Open file dialog–to choose a new location.
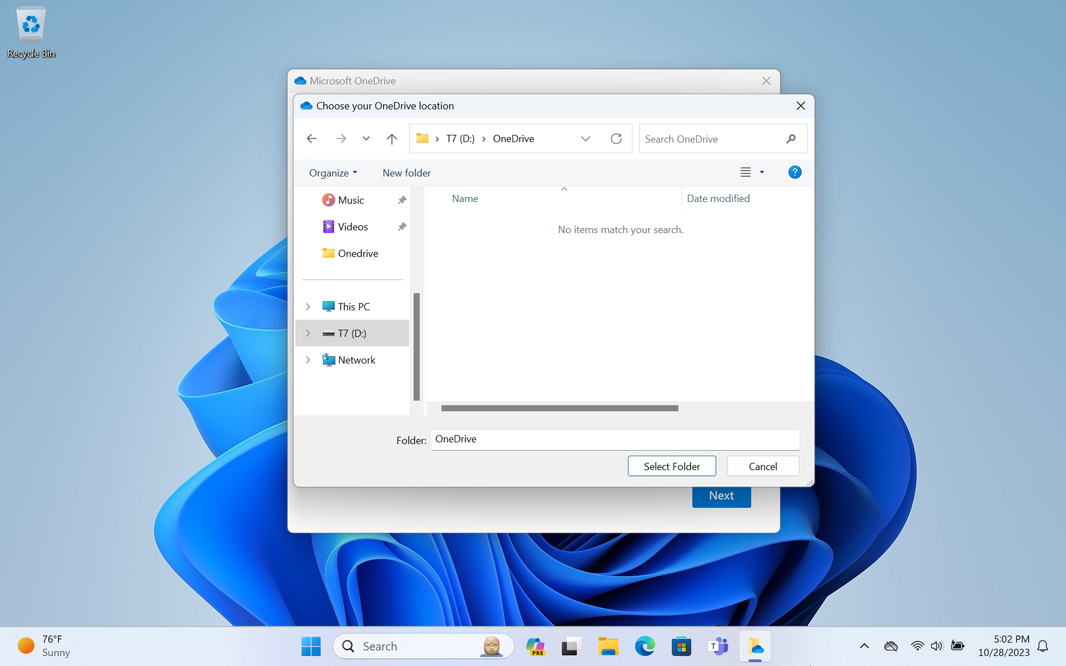
Note that a OneDrive folder will be created for you in whatever location you choose.
After this, you will need to step through several other windows in which you can configure OneDrive Folder Backup and then learn more about OneDrive. When you’re done, File Explorer will open to OneDrive, which is now in its new location in your PC’s file system.
The original OneDrive folder will remain on disk on your PC after this change, and it will contain any files you downloaded or synced to this PC. You can leave it there, of course, but if you delete it, it will free up whatever storage space it is taking up.
Configure File Explorer integration with OneDrive
Because most of the interactions you have with your OneDrive content occur in File Explorer, that application also offers a few OneDrive-related options you can configure.
Make OneDrive the default home page in File Explorer
If you use OneDrive extensively, you may wish to make OneDrive the default home page in File Explorer. When you make this change, File Explorer will navigate to the root of OneDrive every time it’s launched instead of the default Home view.
To make this change, open File Explorer, select the See more (“…”) command bar item, and then select “Options” from the menu that appears. The Folder Options window will appear. Here, select “user name – Personal” from the “Open File Explorer to:” drop-down and then select “OK.”
Display availability status in the File Explorer navigation bar
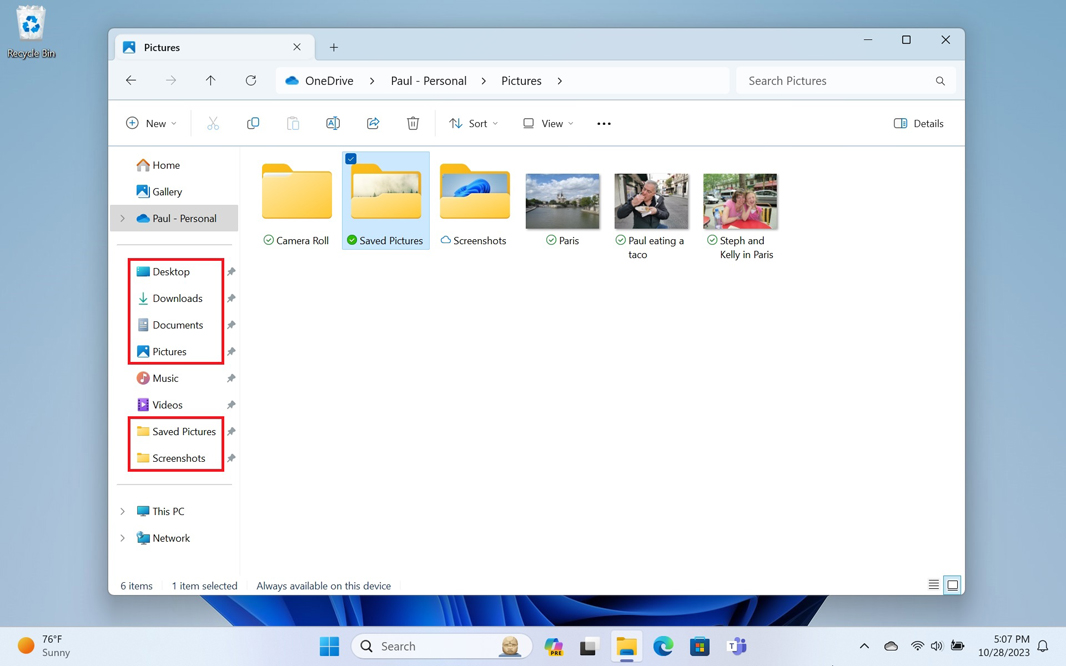
File Explorer displays an availability status icon for every OneDrive file and folder it displays in its main view. But you can enable this feature in the File Explorer navigation bar as well. This can be useful when OneDrive folders are displayed in the navigation pane. For example, you may pin OneDrive folder shortcuts to Quick access, which then appear in the navigation bar.
To understand how this changes things, consider the following window, in which there are five OneDrive folders, Desktop, Downloads, and Documents, plus Saved Pictures and Screenshots, pinned to Quick access. You can see these folders in both the Quick access area in the Home view on the right and in the navigation pane on the left.
And here is this same view, but with display availability status enabled.
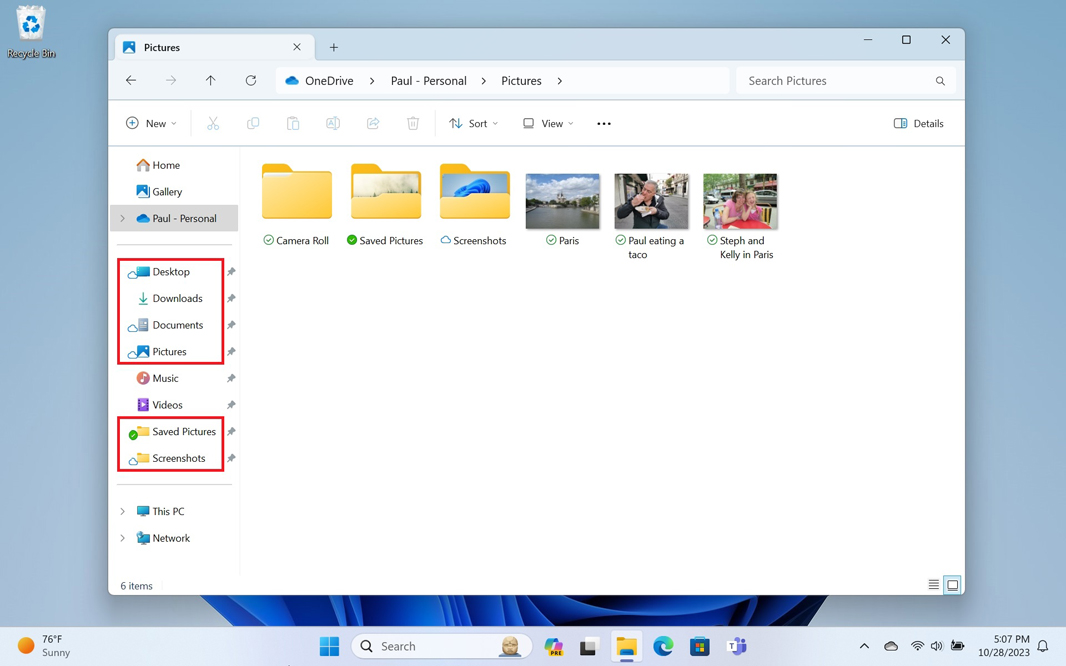

We discuss the various folder/file availability status types in the next section.
To make this change, open Folder Options (File Explorer > “See more” > Options), navigate to the View pane, and scroll down to the bottom of the list of options under Advanced settings. In the Navigation pane section, locate “Always show availability status” and enable that option.
Access your OneDrive content at any time with Files on Demand
Before cloud computing, we saved documents and other files to folders in the file systems of our PCs and might back them up from time to time to a removable or network-attached drive. But with OneDrive and other cloud-based storage services, a more reliable and secure strategy emerged. Now, we can automatically sync the documents and other files we work with to the cloud, ensuring that they are, in effect, backed up to a different geographical location and, as good, be easily accessible on other compatible devices.
Looking at OneDrive specifically, Microsoft’s cloud storage service deeply integrates with Windows 11 using a feature called Files On-Demand. When you view the PC’s file system using File Explorer, the contents of your OneDrive, including whatever folder structures you’ve created within there, are visible and accessible. Even better, you can optionally choose to make any or all of the contents of OneDrive available at all times by syncing those files to the PC so that they are available when the PC is offline. Any changes made on this PC are synced to the cloud and to any other connected PCs and devices. And any changes made elsewhere are likewise synced to this PC.
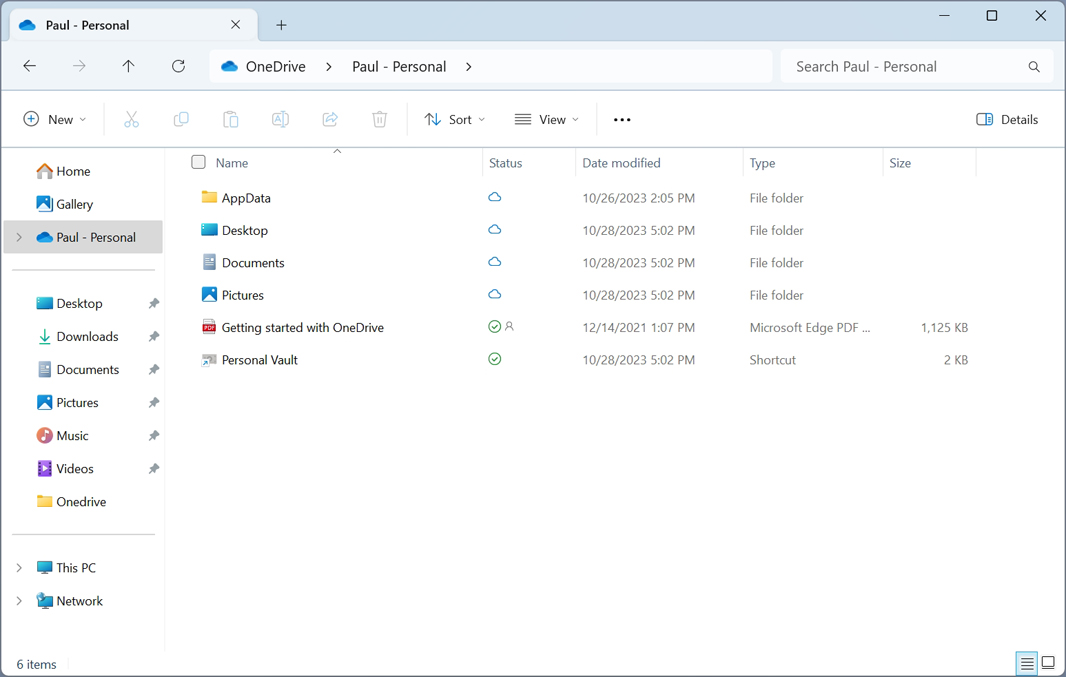
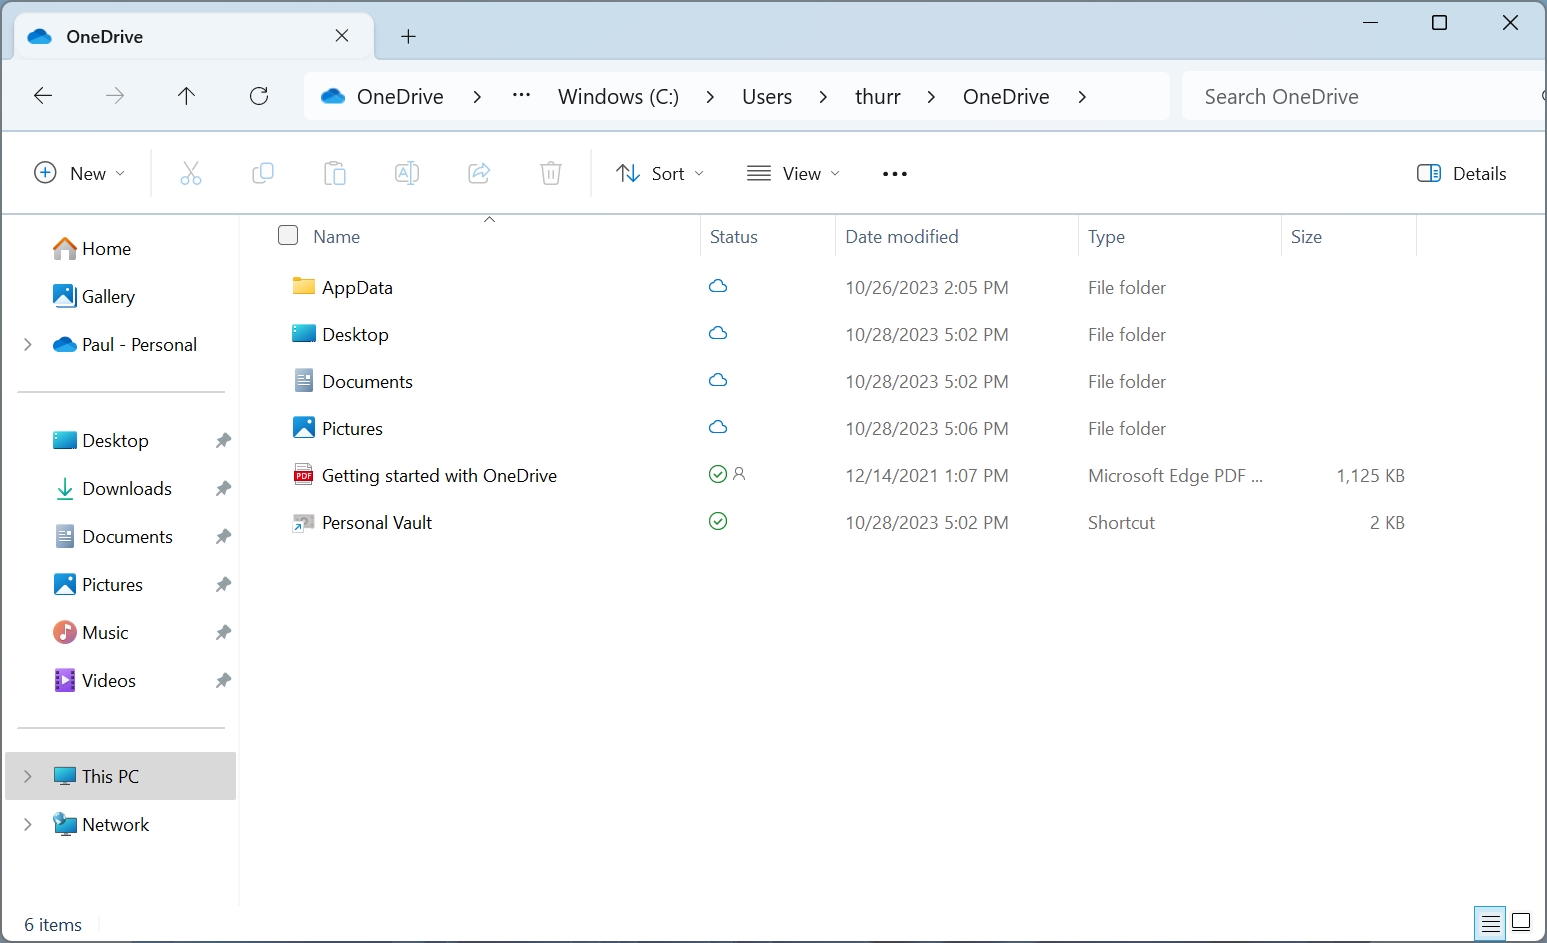
To see what this looks like, open File Explorer and select the “user name – Personal” icon in the top section of the navigation bar on the left. When you do, the contents of your OneDrive storage appear on the right.
This OneDrive entry in the navigation pane is a shortcut, a nicety that simplifies accessing your OneDrive files in Windows 11. But the files that make up the local version of these contents can also be found in your PC’s file system. To see this, open File Explorer and navigate to C:\Users\user name\OneDrive. You will (literally) see the same folders and files as when you select “user name – Personal” in the navigation bar. Only the path shown in the address bar is different.
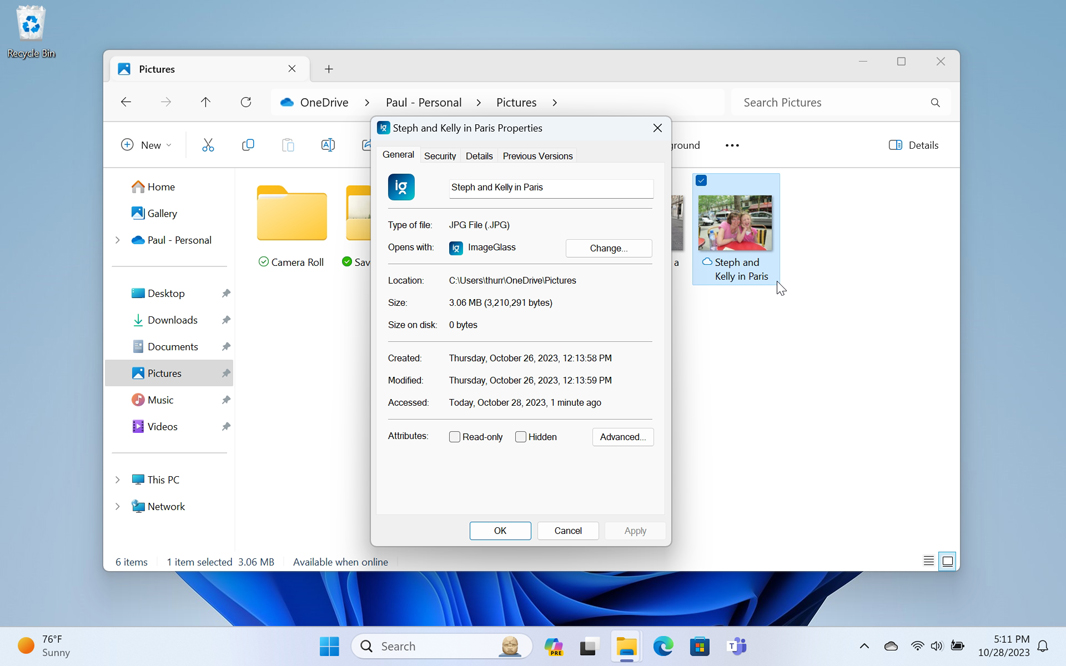
By default, any OneDrive-based files that you view using File Explorer are not actually on your PC. Instead, they are in the cloud and Windows displays a lightweight representation of those files, which includes thumbnails in many cases and even detailed file information. In the language of Files On-Demand, these files are said to be online-only files. They are visible in your PC’s file system. But they are not stored in their original form in the file system. This means they are not truly available when your PC is offline.
To better understand this, consider the following Properties dialog for an online-only file. As you can see, its size is 3.06 MB; this represents how much storage the file actually takes up. But its size on disk is (roughly) 0 bytes. It takes up almost no space at all. That’s the magic of Files On-Demand.
Make OneDrive files and folders always available, even when the PC is offline
Of course, the downside to online-only files is that they are only viewable in the file system and are unavailable for use when the PC is offline. But you can make them accessible in the file system, too, and doing so means they will be available when the PC is offline. Even better, this system keeps these files synced with the master files in OneDrive in the cloud. In the language of Files On-Demand, such files are said to be always available files.
There are two ways to do this:
Open the file. If you double-click an online-only file in File Explorer, it will download from OneDrive and then open normally. Henceforth, it will always be available.


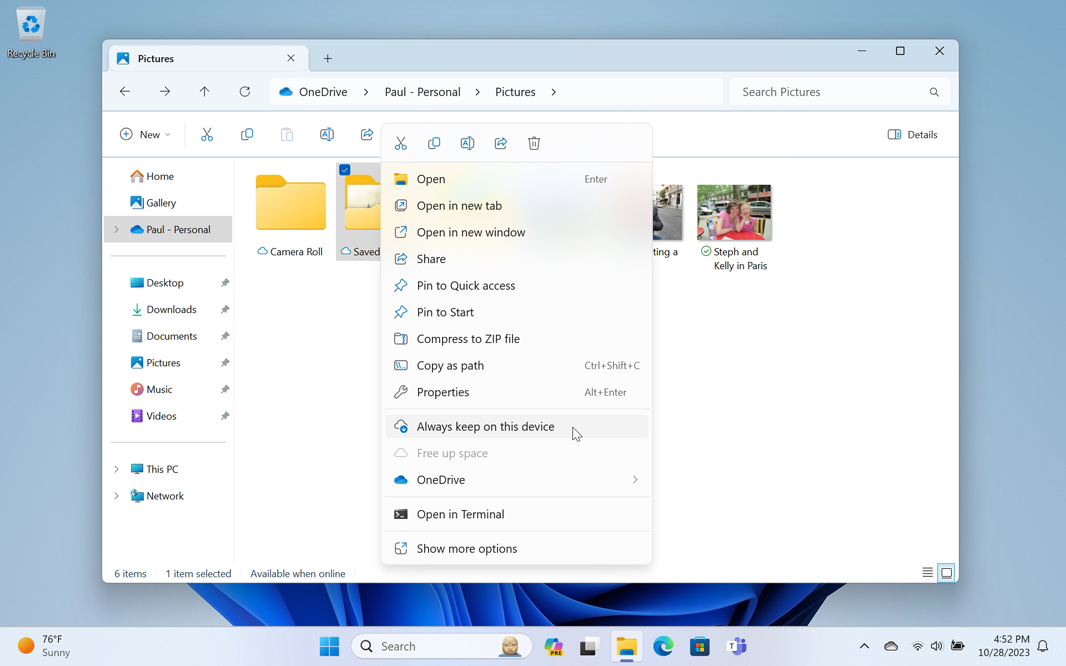
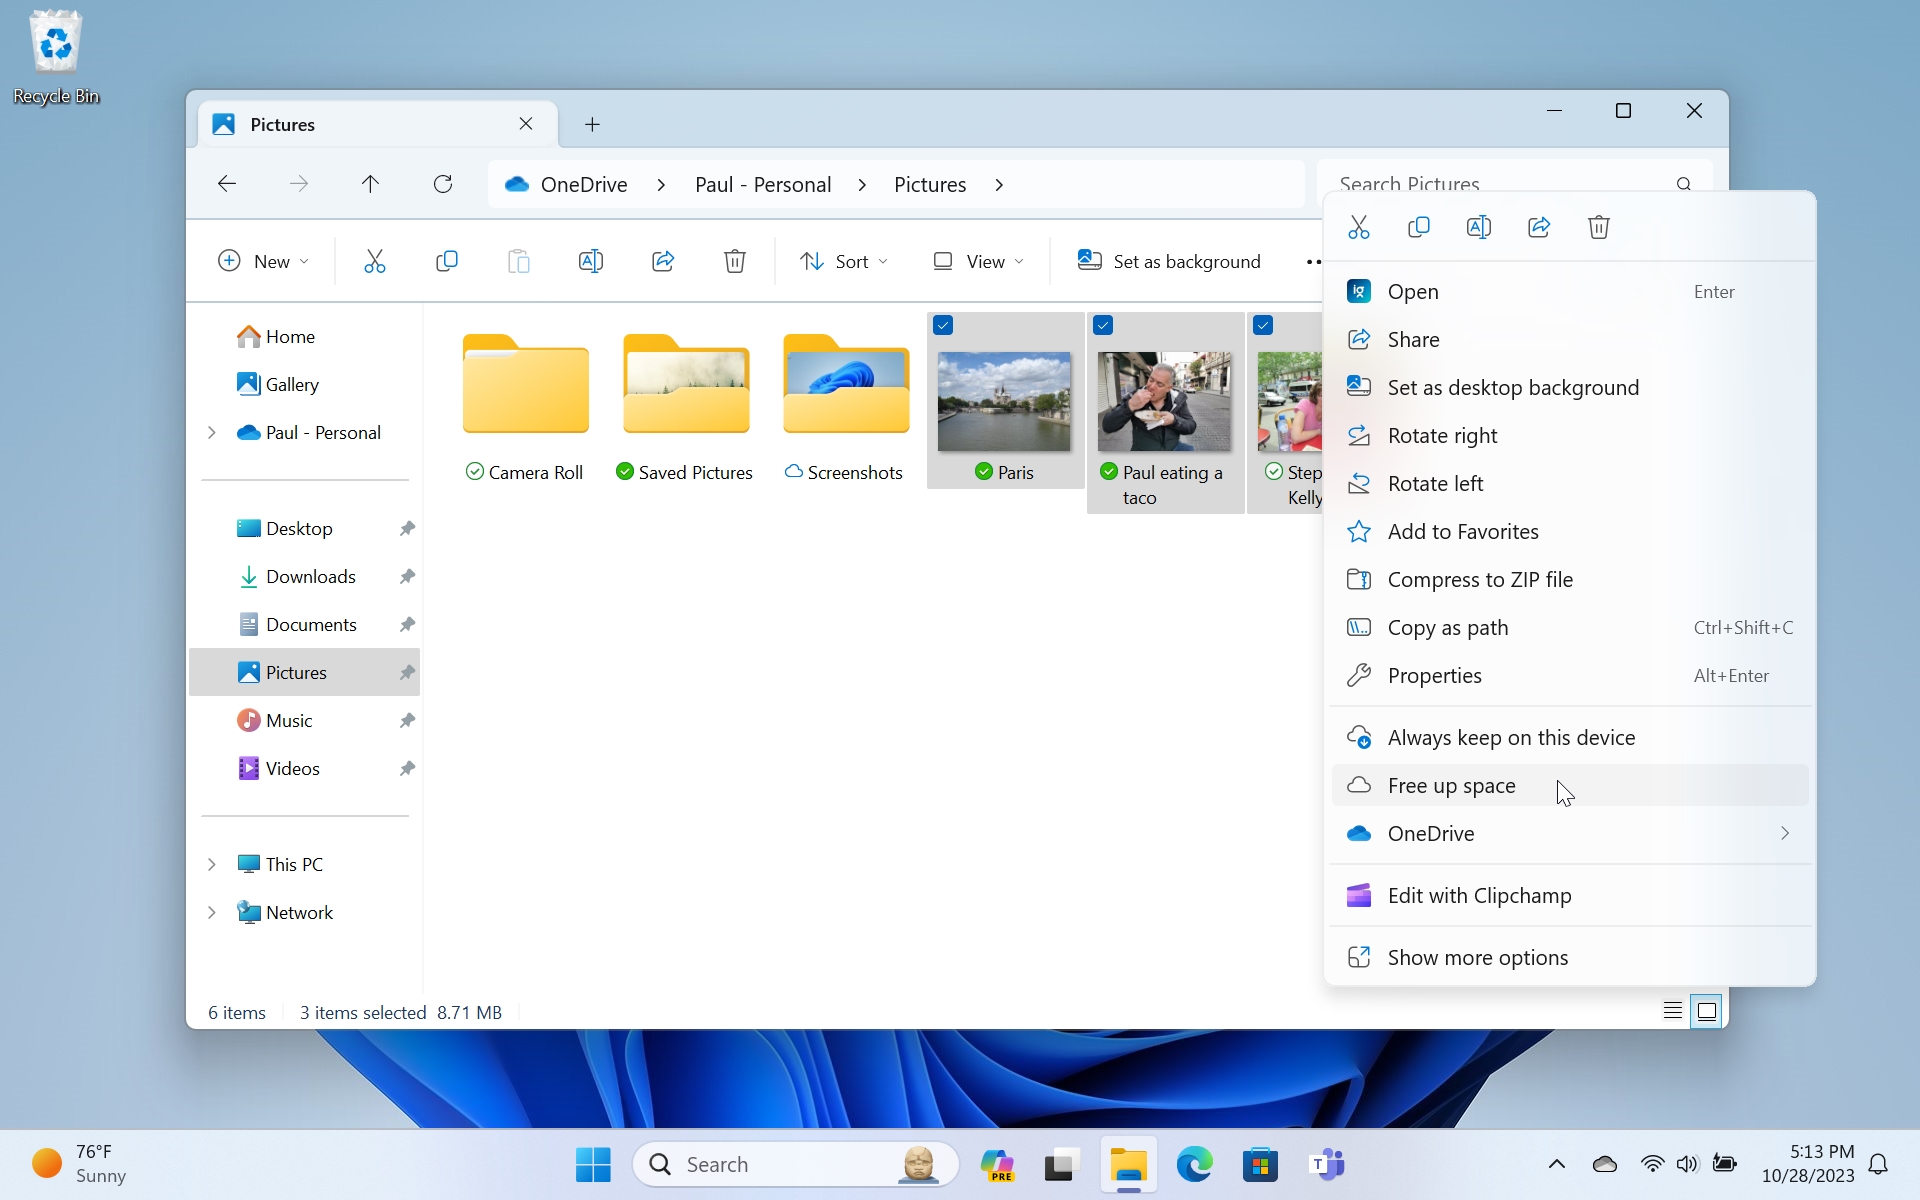
Configure one or more files or folders to always be available on this PC. If you right-click a file, folder, or selection of files and/or folders in OneDrive, you can select the “Always keep on this device” item in the context menu that appears to download the selected items to this PC and then keep them in sync with OneDrive in the cloud going forward.
Free up space by making synced files online-only
You can also reverse the changes described above. To remove the local version of an always available file and free up some local storage space, right-click it and choose “Free up space” from the context menu that appears.
This also works with multiple selected files at once and with entire folders.
Quickly determine which files are available offline and which aren’t
As you work with OneDrive files in File Explorer, you will notice that all OneDrive folder views display a Status indicator icon for each file in that folder. There are three possible icons, and their designs serve to help you quickly determine the offline availability of each.
They are:
![]()
![]()
This icon–a white cloud with a blue outline–means that the file is an online-only file. This is the default status for all OneDrive files, and it is the most common icon you will see.
![]()
![]()
This icon–a green checkmark on white–indicates that you double-clicked this file to open it locally. This file is available offline but it will transition into the next status state, below, over time.
![]()
![]()
This icon–a white checkmark on solid green–indicates that you explicitly marked this item to be always available, so it is synced with the cloud and available even if the PC is offline.
Share OneDrive files with others
File Explorer lets you share files with others using email, Nearby share, and compatible apps. But when the files you wish to share are stored in OneDrive, the experience changes. That’s because OneDrive doesn’t need to use your PC as an intermediary: Instead of manually sending these files to others, you can create a link for them to use so they can access the files directly from OneDrive. This link will let the other person view the file(s) in OneDrive in the cloud (in a web browser), download them, and, if allowed, even edit them.
To see this in action, select one or more OneDrive-based files and/or folders with File Explorer and then click the “Share” icon in the app’s command bar.
You can also right-click the selected files/folders and click the “Share” icon in the pop-up menu that appears.
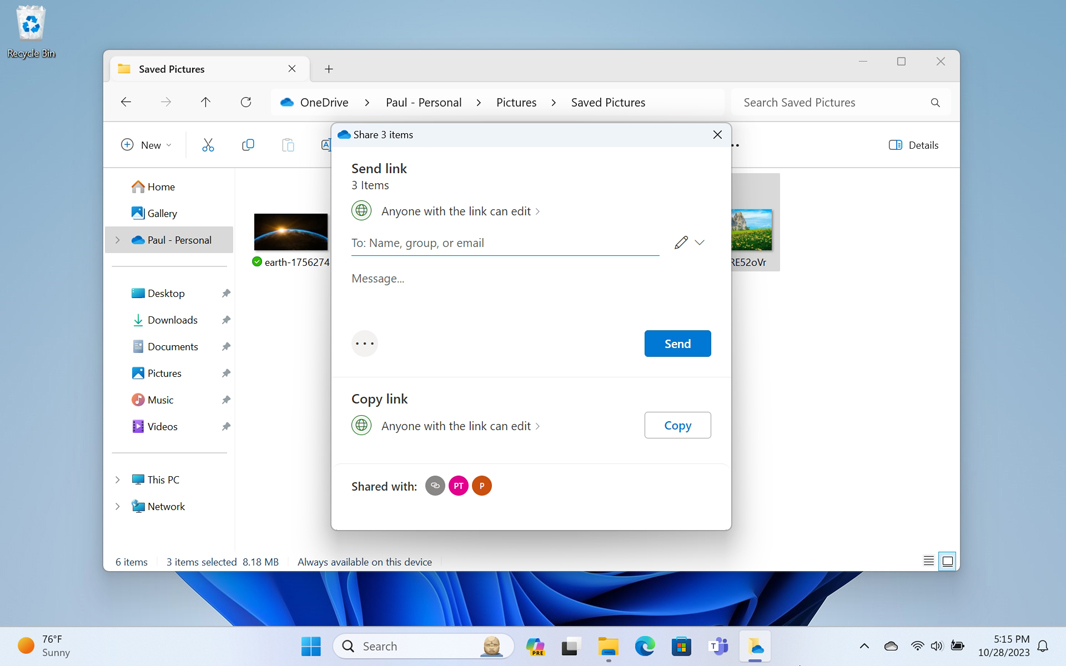
The OneDrive share window appears.
Here, you can choose how to send the link and configure permissions for the shared files. There are two choices, Send link and Copy link:
Send link. Here, you add recipients in the “To:” field, optionally add a message (body), and OneDrive will email the link to them via your Microsoft account using the Windows 11 Mail app. You can also configure permissions as noted below.
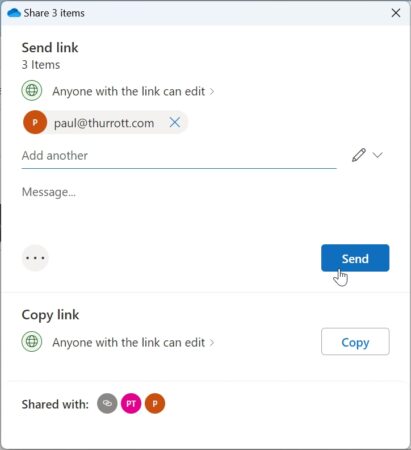
Or, you can select the “Share this link to More apps” button–it’s identified only as “…”–to display the normal Windows 11 Share window, which lets you share the link via other compatible apps or Nearby sharing.
Copy link. This choice will create the link and then display it for you so that you can copy it to the Clipboard and share it however you prefer. This is a good choice if you use a web-based email app like Gmail instead of the Windows 11 Mail app: just create a new email and paste it into the message. You can also configure permissions as noted below.
Each of the choices above lets you configure various permissions that will be applied to the OneDrive link that you are sharing. These permissions are displayed in a “Sharing settings” window.
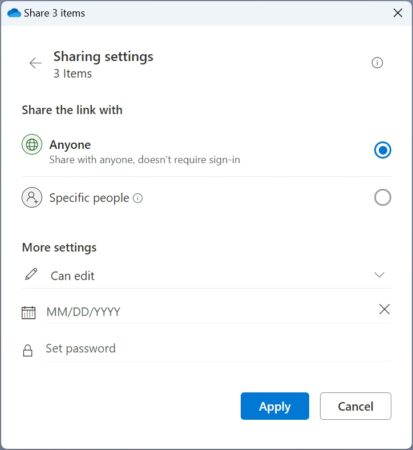
Available permissions include:
Share the link with. By default, anyone who is sent (or comes across) the link can access the file(s) you’re sharing. But you can configure the link so that it only works for specific recipients, which is probably the safer approach.
More settings. Here, you can configure whether the recipient can edit the file(s) you’re sharing–the default–or just view them. You can also optionally add an expiration date and/or password for the link.
Allow a recipient to edit a shared file isn’t as dangerous as it sounds: the recipients can edit the file(s) you shared in OneDrive, but those changes will be saved to a copy in their OneDrive and won’t impact the original.
The people who receive the link will access the files using their web browser (after entering the correct password, if you specify that).
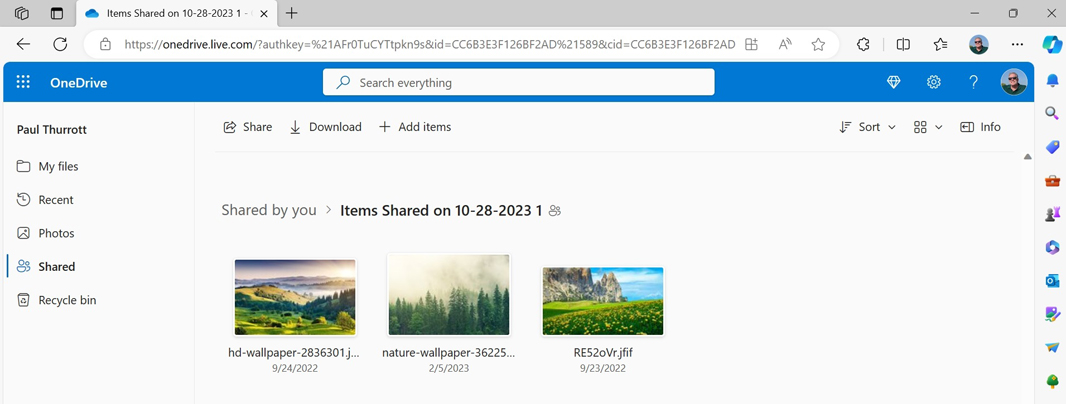

The experience will vary somewhat based on the permissions you configured. Anyone who can access the shared items can view each file in the browser and download them. And if you give them edit permissions, they can edit each file directly in OneDrive, though changes are saved to a copy in their OneDrive.
Protect your most important files with Personal Vault
OneDrive lets you securely store your most important or sensitive documents, photos, and other files in a specially-protected area called Personal Vault. Personal Vault is a top-level folder location in OneDrive, and it is accessible via the web, the OneDrive app on mobile, and via File Explorer in Windows 11. But it differs from other OneDrive folders in that it requires you to verify your identity when you access it.
That verification will be familiar to you if you use, as we recommend, your Microsoft account’s two-step verification protections.
All Microsoft account holders can store 3 files in Personal Vault, but if you have a Microsoft 365 account, there is no file limit.
Enable Personal Vault
To enable Personal Vault in Windows 11, open File Explorer and navigate to your OneDrive using the Navigation pane. There, you will see a Personal Vault shortcut icon–which resembles a safe and not a typical folder–alongside your other top-level OneDrive folders.

Next, try to open Personal Vault as you would any other folder, by double-clicking it. Windows will prompt you about this feature, explaining how it works.
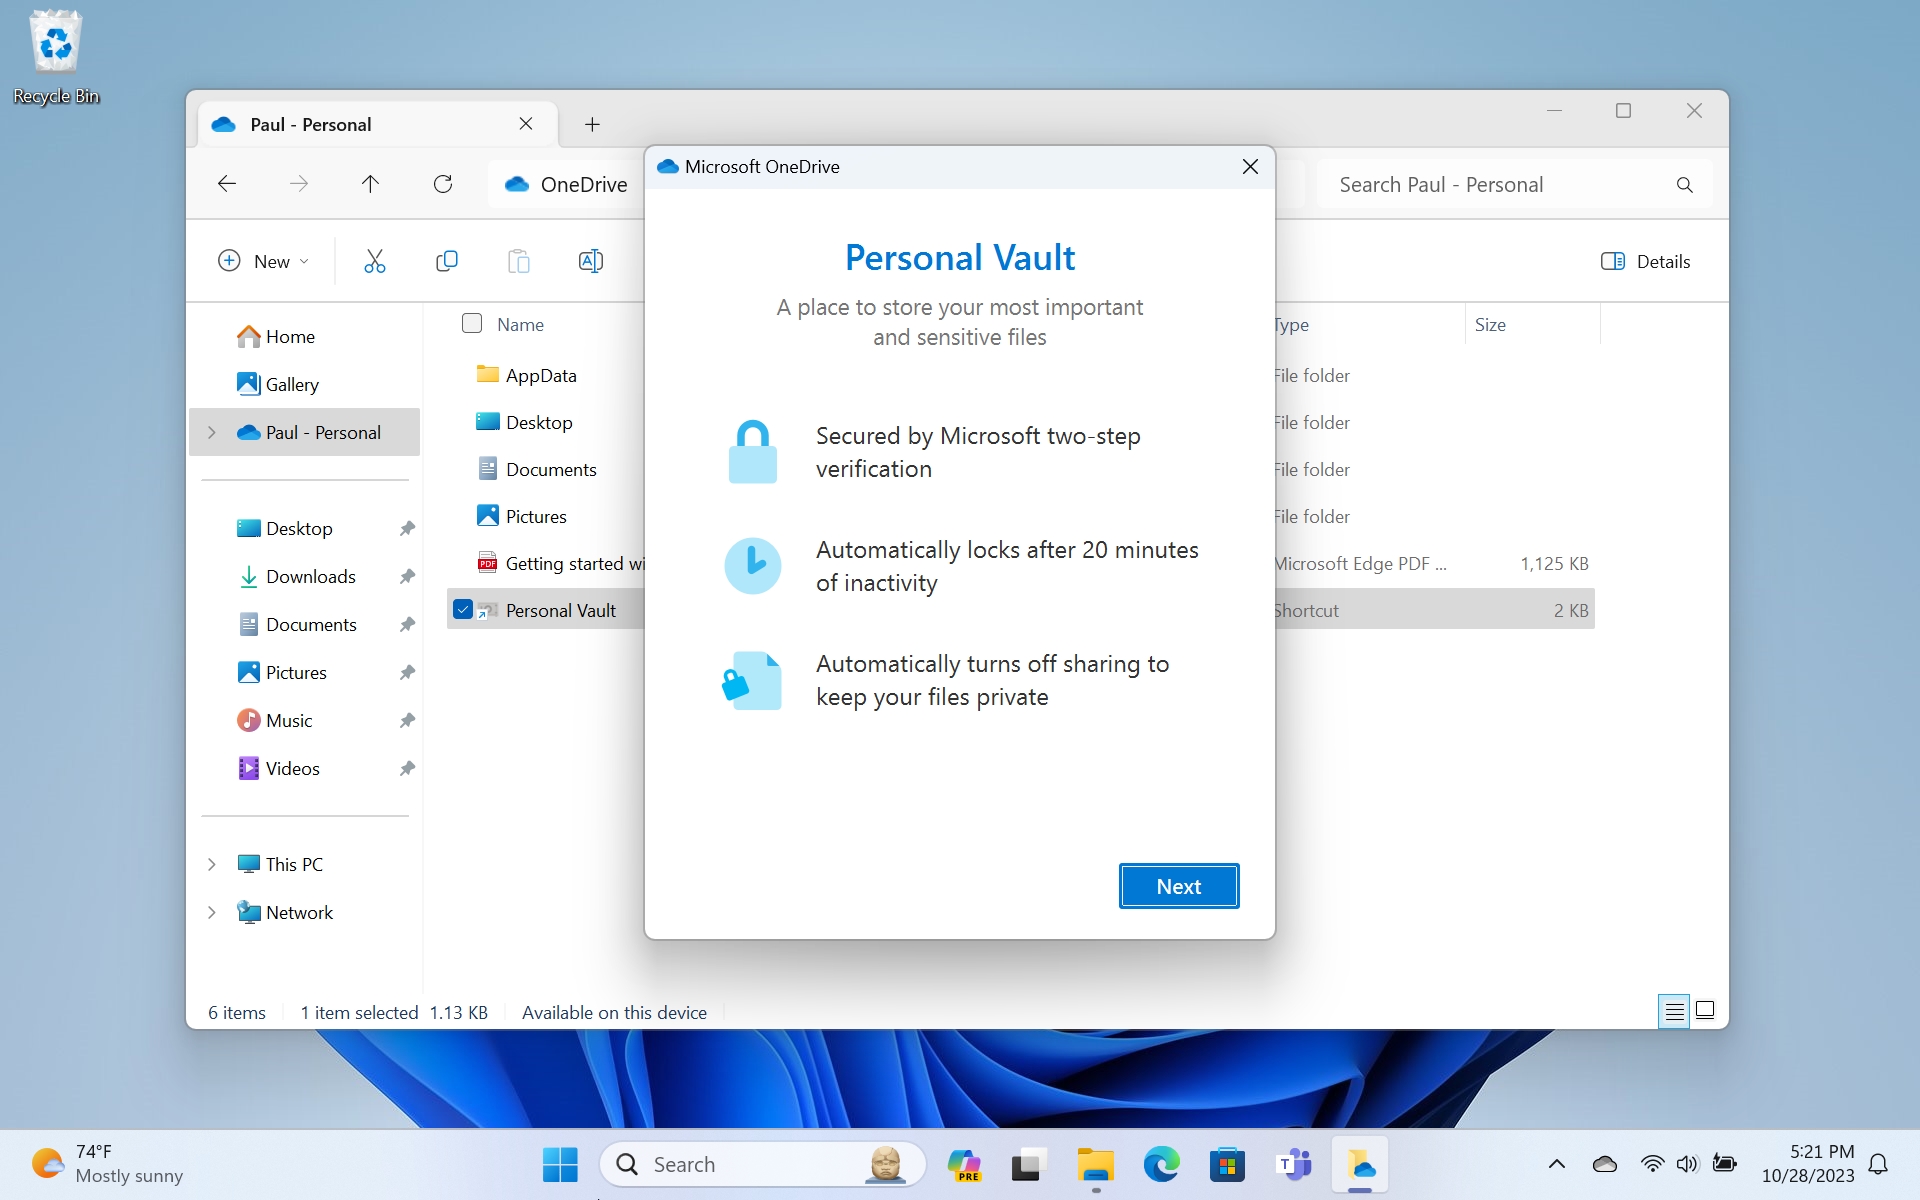

Click Next, then click “Allow” when prompted. Windows will display a User Account Control (UAC) permissions dialog. Approve that request.
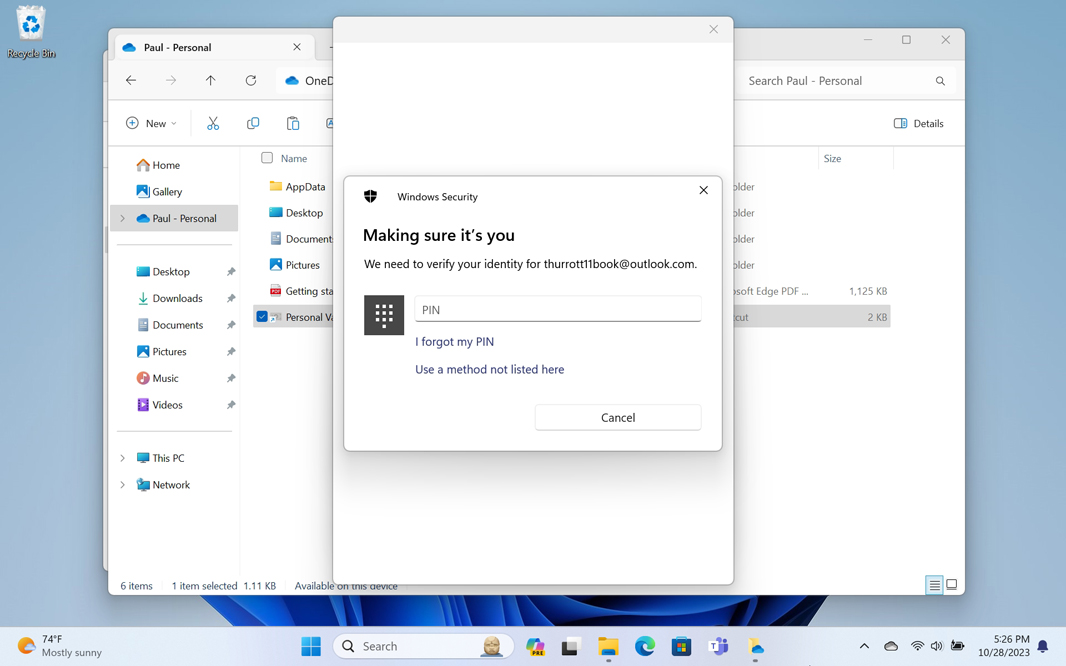
After a bit of work, another prompt will appear asking you to sign in to your Microsoft account using a two-step verification request that will be delivered to your phone. Complete that process, and the Personal Vault folder will open in File Explorer. It will be empty if you’ve never used it before
![]()
Access Personal Vault
Once Personal Vault is enabled on your PC, you can use it normally much any other folder. That is, you can copy or move files or folders into or out of Personal Vault, delete files or folders in Personal Vault, or perform any other standard file operations.
There is one security-related wrinkle: You will be prompted to verify your identity from time to time. This can happen if you’ve not used Personal Vault in a while. But it can also happen when you have been using Personal Vault, but 20 minutes have elapsed since the last access.
Files copied or moved into Personal Vault can of course be viewed, edited, and deleted from the web or the OneDrive mobile app as well. In both cases, you will be prompted to verify your identity each time.
Disable OneDrive
If you don’t use OneDrive, you may as well disable it. That will prevent the app from auto-starting when you sign into Windows, and you won’t see a OneDrive entry in File Explorer or a OneDrive icon in the system tray in the Taskbar
To disable OneDrive, open OneDrive settings, navigate to the Account page, and click the “Unlink this PC” link next to your profile picture. Then, in the “Unlink account on this PC?” window that appears, click “Unlink account.” The window will close, you will be signed out of OneDrive, and a “Set up OneDrive” window will appear.
Close that window and then click the OneDrive icon in the system tray. In the OneDrive window that appears–it’s now titled “OneDrive isn’t connected”–click the Help & Settings icon (gear) and then select “Quit OneDrive” from the menu that appears. You will be prompted one last time to tell Microsoft why on earth you are doing this.
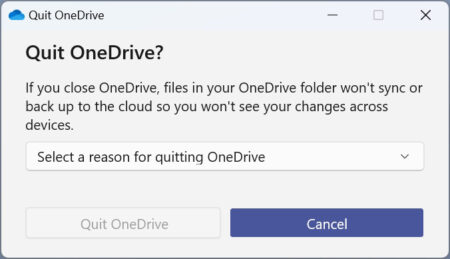
When you click “Quit OneDrive,” OneDrive will finally close.
But you’re not done yet: You have three more tasks to complete.
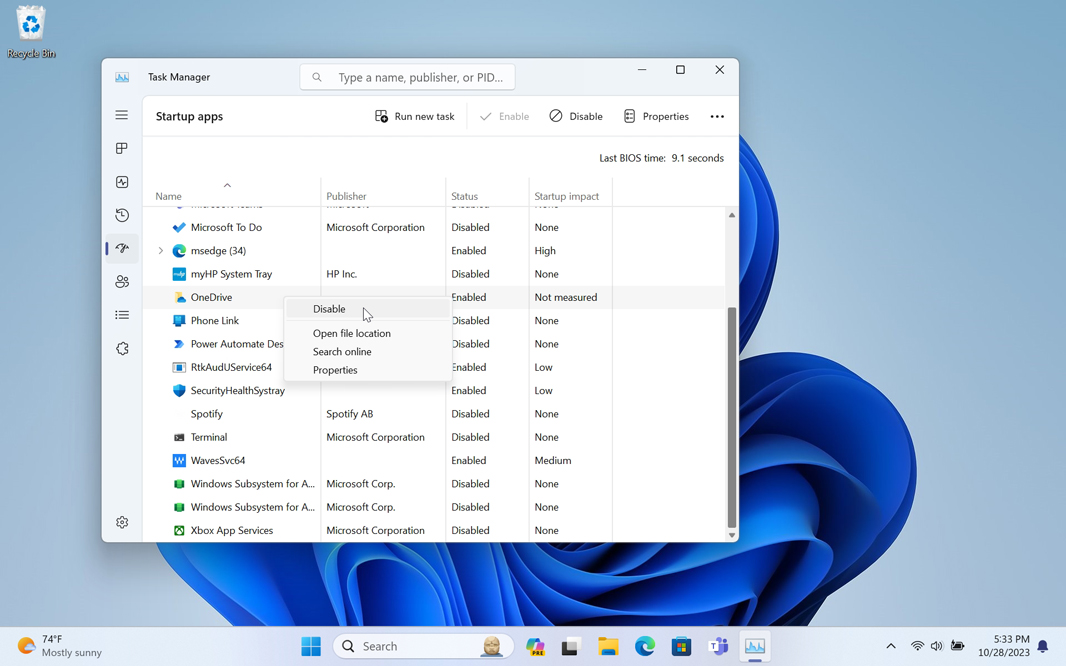
Next, open Task Manager (quickest way: type CTRL + SHIFT + ESC), and navigate to the Startup apps view. Locate the OneDrive entry in the list of startup apps, right-click it, and choose “Disable.” Then close Task Manager.
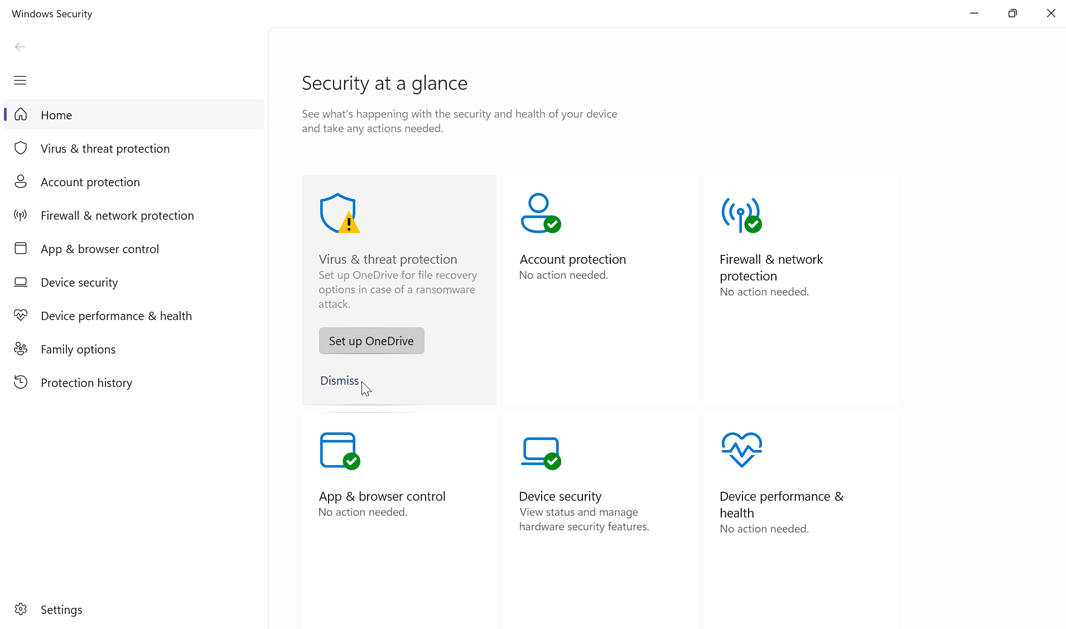
Then, locate the Windows Security icon in the system tray; it’s in the Taskbar overflow area by default. Taking note of the yellow warning bang on this icon, open Windows Security and you will see that the “Virus and threat protection” item has a warning about OneDrive not being enabled. Click “Dismiss” and then close Windows Security.
Finally, you may want to address the vestigial OneDrive folder in your user folder: Though OneDrive has been disabled, along with its entry in the File Explorer navigation pane, the OneDrive folder and any contents you previously synced to this PC will still be there and taking up storage space. You can see this by opening File Explorer and navigating to C:\Users\user-name: The blue OneDrive folder is still there.
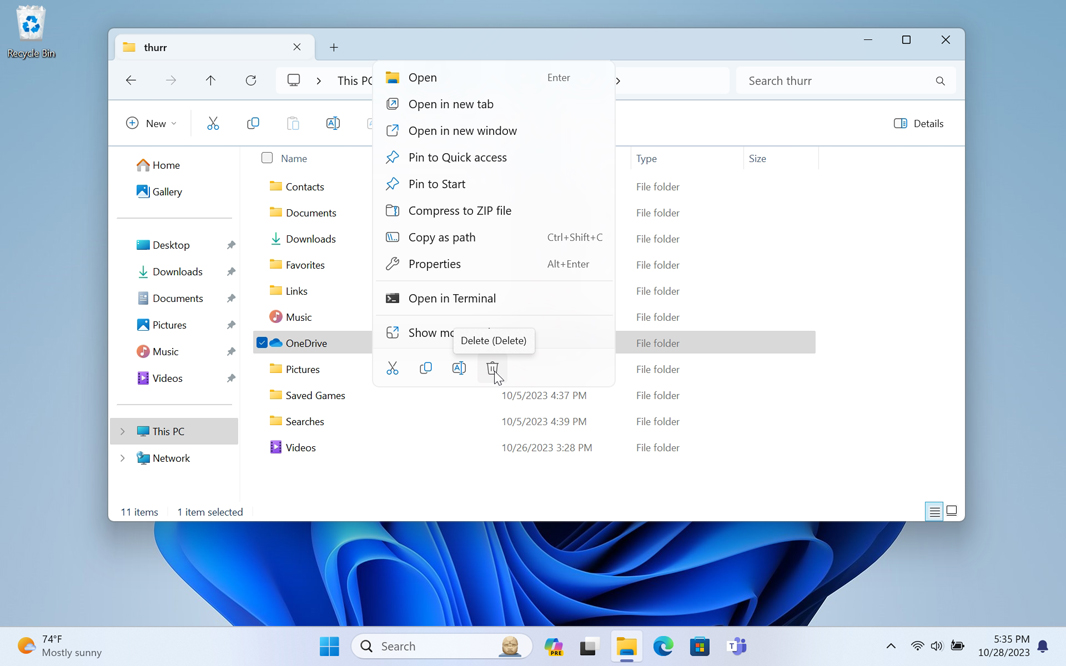
Now, you can simply delete that folder normally.
Remember, the files it contains are all synced to the cloud.
You should reboot your PC now as well.

Gain unlimited access to Premium articles.
With technology shaping our everyday lives, how could we not dig deeper?
Thurrott Premium delivers an honest and thorough perspective about the technologies we use and rely on everyday. Discover deeper content as a Premium member.