Windows 11 Version 23H2 Personalization First Steps (Archived)
- Paul Thurrott
- Nov 26, 2023
-
0
After you upgrade to or install Windows 11, or have signed into a new Windows 11 PC for the first time, you should make sure that everything is working properly and prepare your PC for the work ahead. This chapter can help: Here, we provide a list of several post-install tasks to perform as soon as you finish the Windows Setup Out-of-Box Experience (OOBE) and arrive at the Windows 11 Desktop for the first time.
The tasks in this chapter are grouped logically and can generally be completed in any order.
Configure the Desktop
When you first view your new Windows 11 Desktop, it’s likely that you will see several things that were configured for you by Microsoft or your PC maker that you wish to change immediately. The tasks in this section can help you decide which changes to consider across the Desktop itself, plus the Taskbar, Start, File Explorer, OneDrive, and more.
Configure the sound
Microsoft inexplicably configures Windows 11 to output sound at a very high volume by default. To lower it, open Quick settings by clicking the Volume icon in the system tray and use the volume slider. (Some PCs have volume keys on the keyboard as well.)
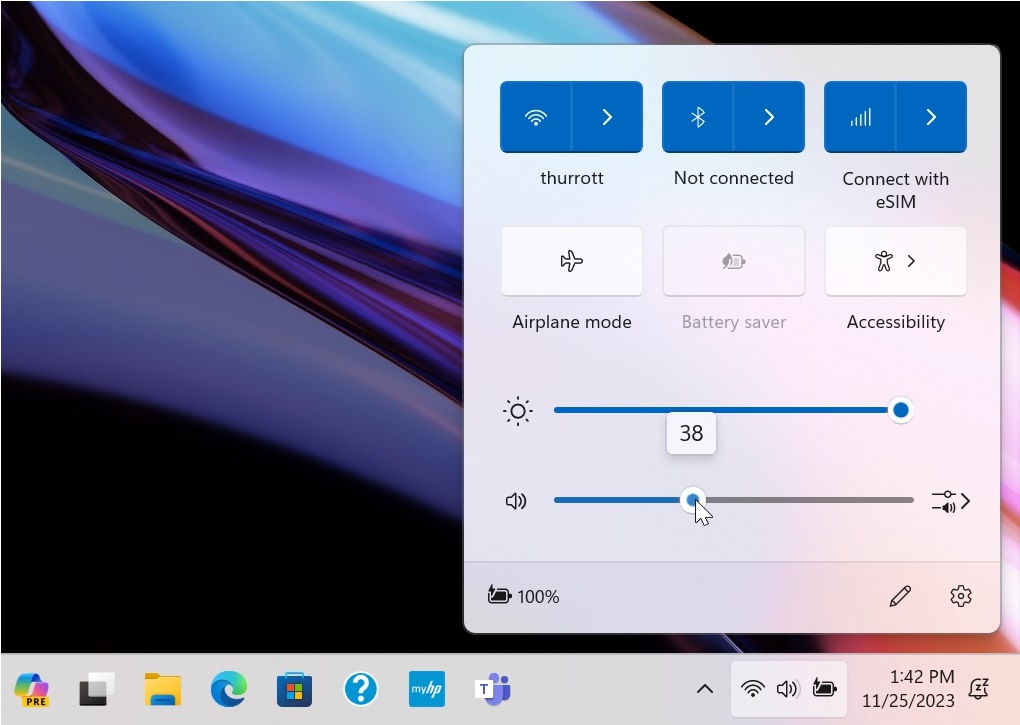
You can also open Quick settings by typing WINKEY + A.
You can learn more about Quick settings and its volume slider and sound output capabilities in the Quick Settings chapter.
Windows 11 is also configured with a sound scheme, set of sounds that play in response to certain events like notifications, device connections, and the like. But if you find these sounds irritating, as we do–the most common sound we seem to hear is related to typing errors and other mistakes–you can disable the default sound scheme.
To do so, open Start, type sounds, and select “Change system sounds” from the results to launch the Sound control panel.

Then, change the sound scheme to “No Sounds” and click “OK.”
Configure the date and time settings
In decades past, new Windows installations would often default to Pacific Time (where Microsoft’s headquarters are) or to whatever time zone your PC maker may have configured. But Windows 11 tries to automatically detect your location and then set the time and date accordingly. This usually works, but it’s smart to make sure.
First, check the time/date display in the far right of the Taskbar.

Even if both are correct, right-click the date/time display and select “Adjust date and time” in the context menu that appears to open the Settings app to its Time & date settings page.
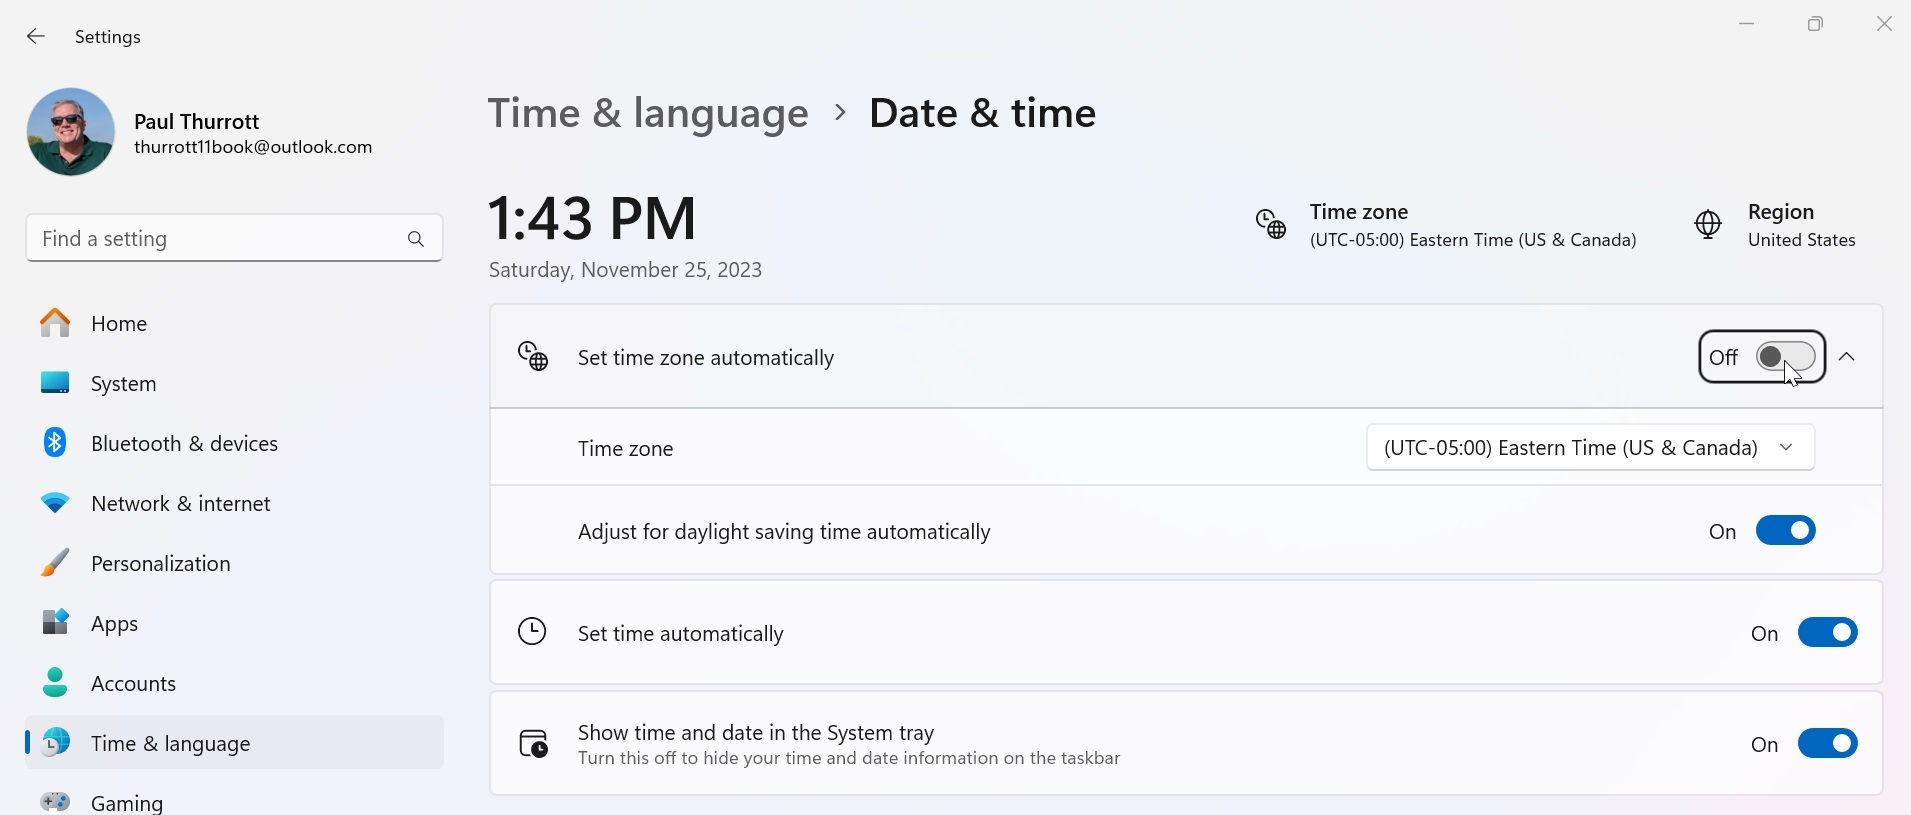
Here, you should examine two options, “Set time zone automatically” and “Set time automatically” to make sure both are set to “On.” If not, make that change.
Turn off Do not disturb
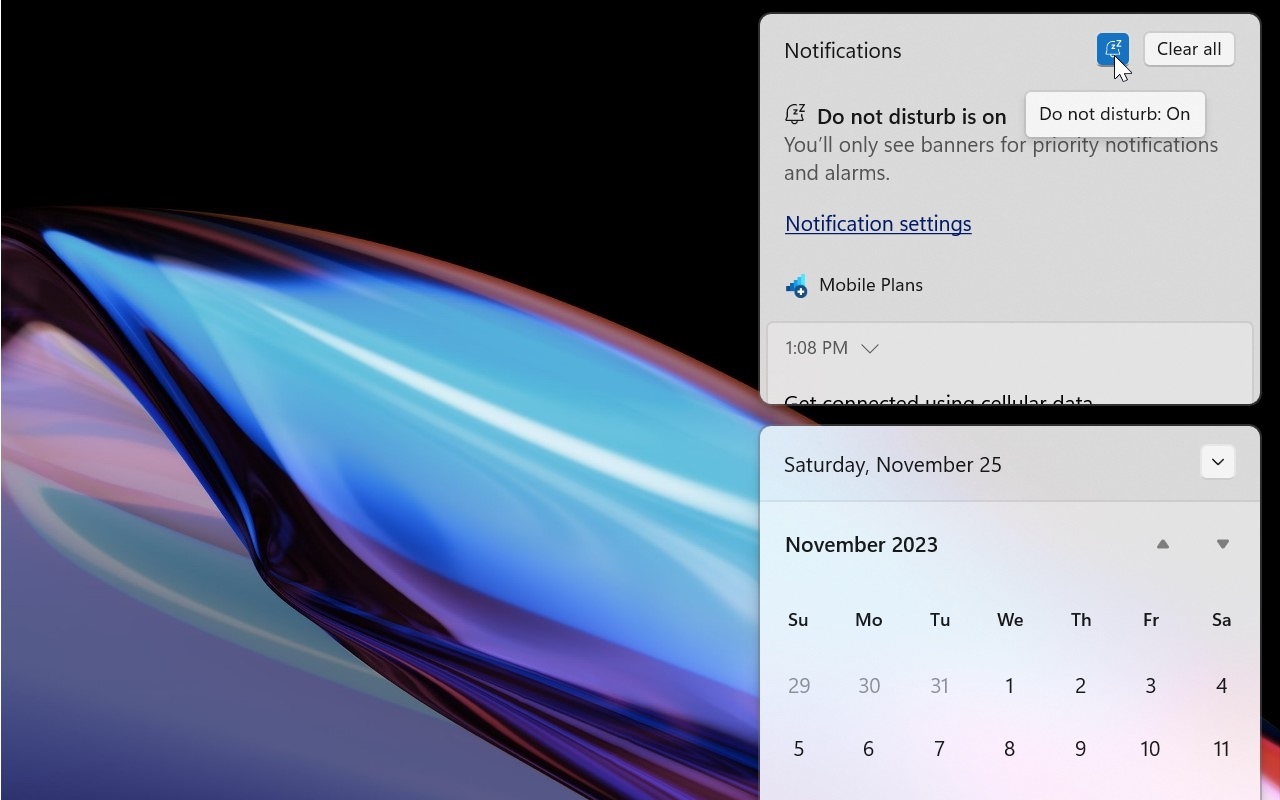
New to Windows 11, Microsoft enables a feature called Do not disturb the first time you boot into your new Desktop. It’s not clear why it made this change, but you will not receive most notifications until you disable it.
To do so, select the date/time display in the far right of the Taskbar to display the Notifications and Calendar panes. Then, click the “Do not disturb” toggle button in the top right of the Notifications pane.
Of course, you may enjoy the peace and quiet, too. In that case, simply leave Do not disturb as-is.
You can learn more about Do not disturb–and a related feature called Focus–in the Do Not Disturb and Focus chapter.
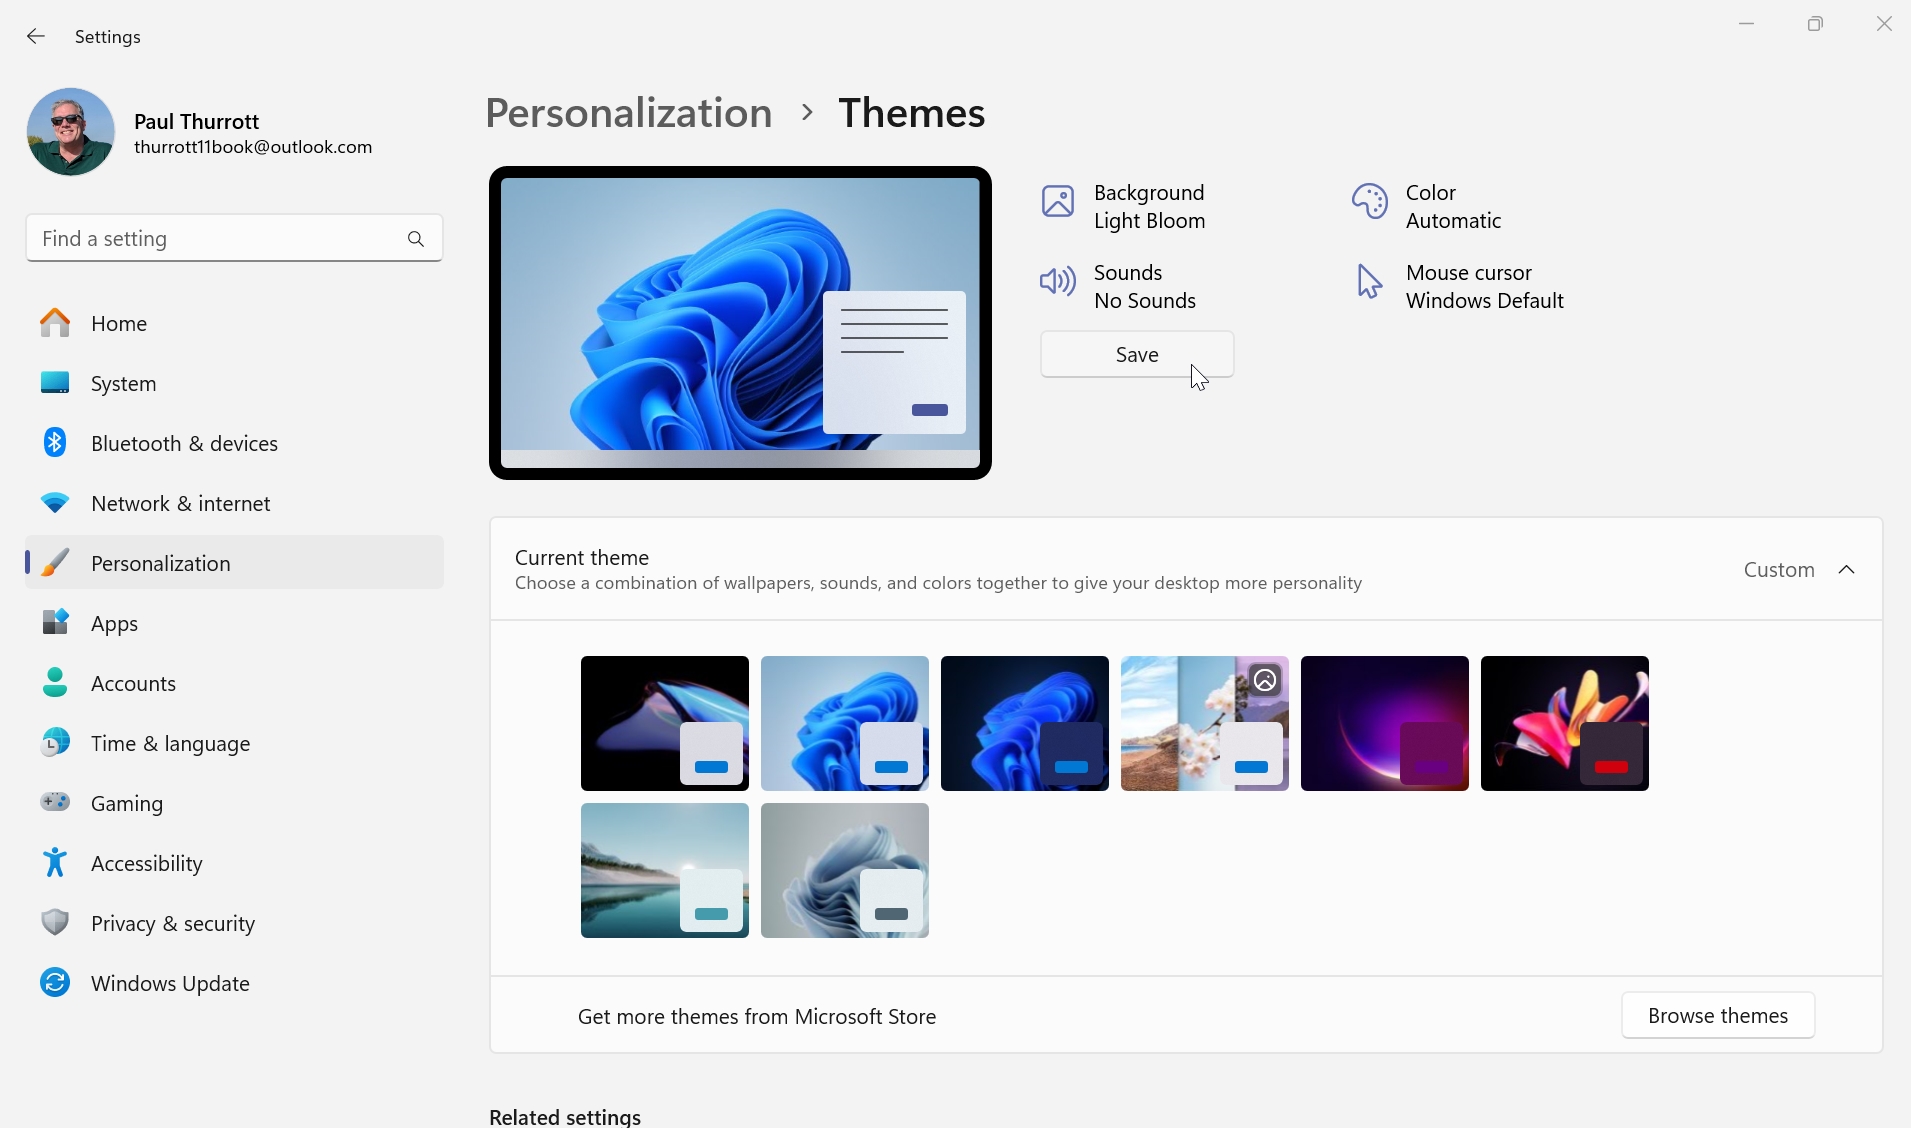
Configure the Desktop theme
In addition to supporting Dark and light modes like Windows 10, Windows 11 also supports themes, which combine a background, an accent color, a sound scheme, and a mouse cursor into a single item you can enable or change.
The default Windows 11 theme displays in Light mode and uses a dynamic background called Windows Spotlight, a medium blue accent color, a mellow sound scheme, and the default mouse cursor, but it’s likely that your PC maker configured a different default theme. Either way, you can change any or all of it as you like, and there’s no time like the present.
You change the theme in the Settings app (WINKEY + I) by navigating to Personalization > Themes. This page lets you save the currently configured background, colors, sounds, and mouse cursor as a new theme, switch between any available themes, and get more themes from the Microsoft Store.
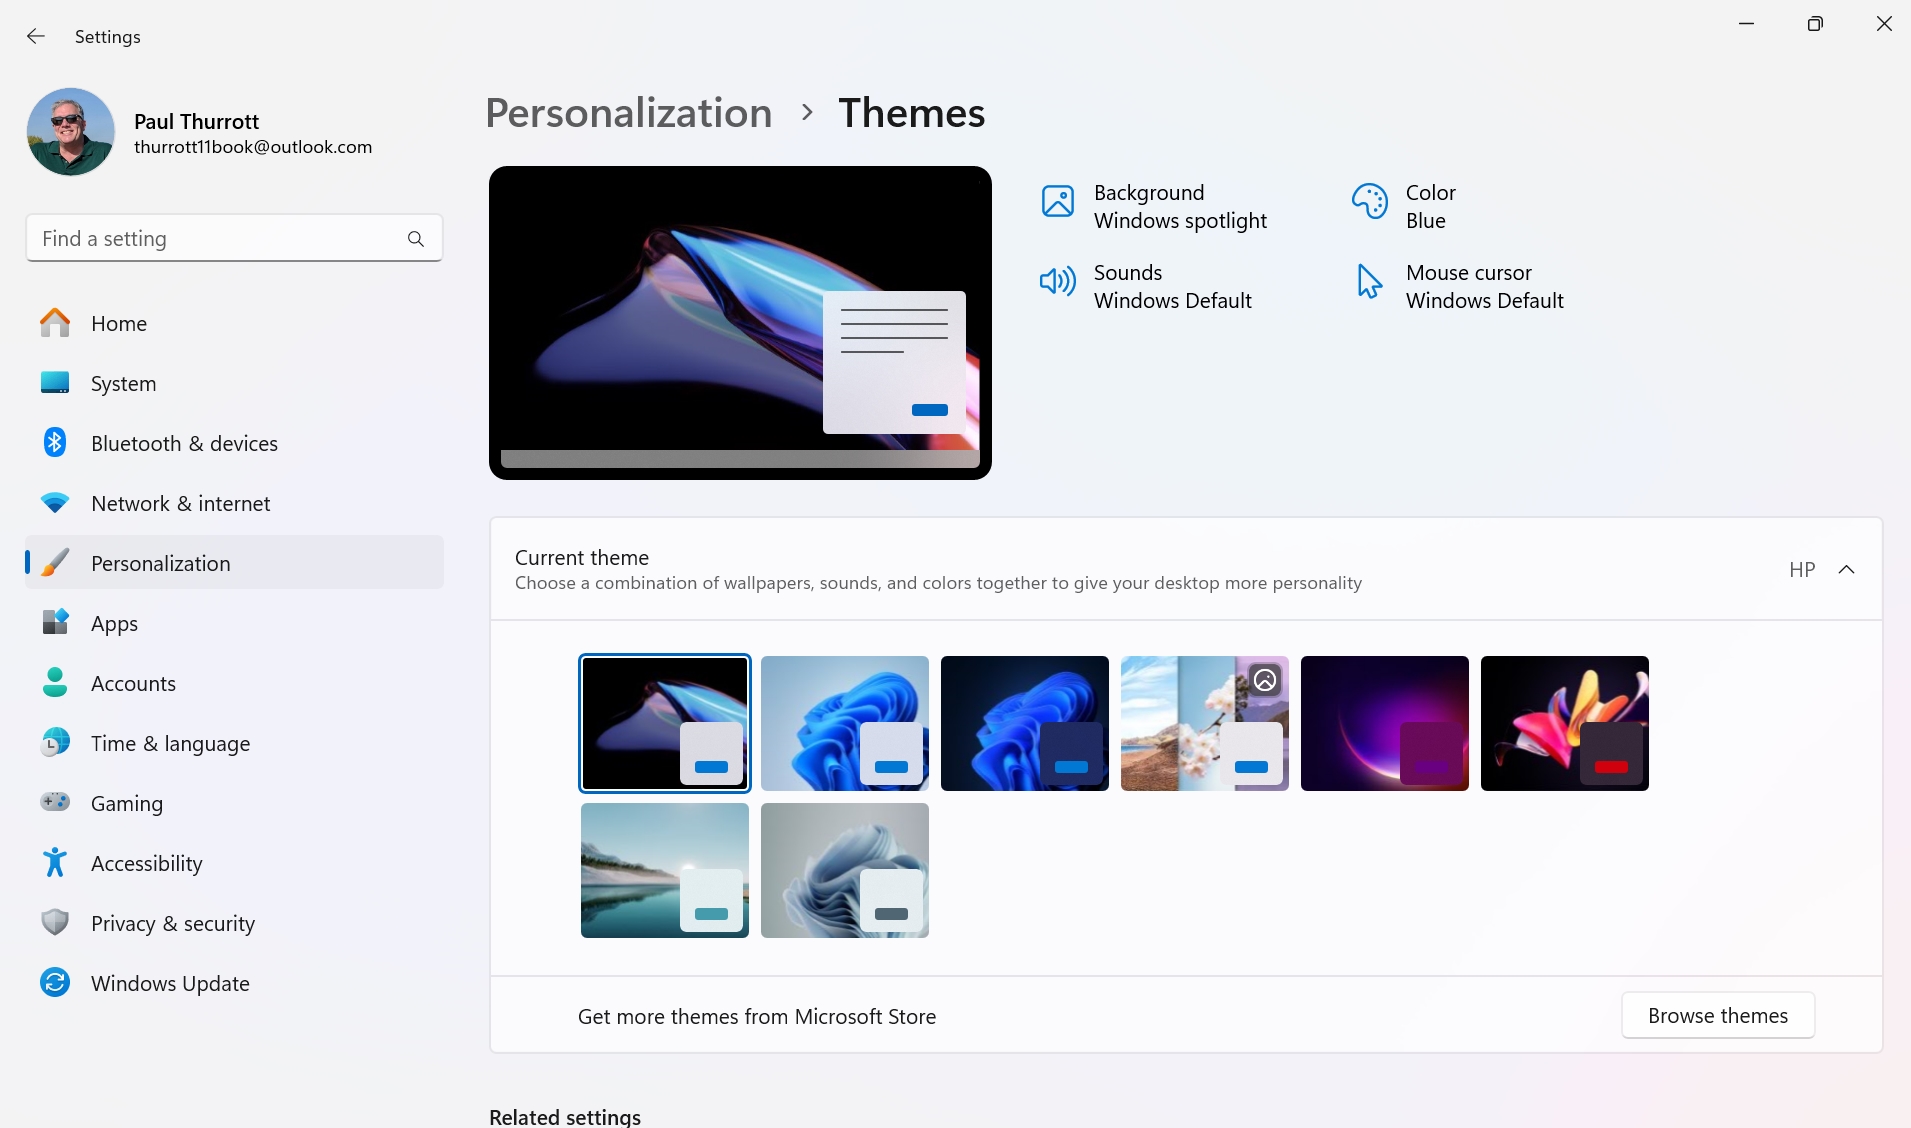
You can learn more about themes and the individual settings they configure in the Desktop chapter.
For the most part, we try to stick with the default Windows 11 theme in this book, but you can get a lot more creative with your own PC.
Configure File Explorer
While many will find that the Windows 11 file manager, called File Explorer, works fine in its default configuration, others may wish to make a few changes based on their needs. Key among these changes are configuring which view File Explorer displays as its home page and determining whether the app displays recently accessed files and folders.
These and other File Explorer features are configured using Folder Options. To access this window, open File Explorer, click the “See more” (“…”) button in the command bar, and then choose “Options” from the menu that appears.
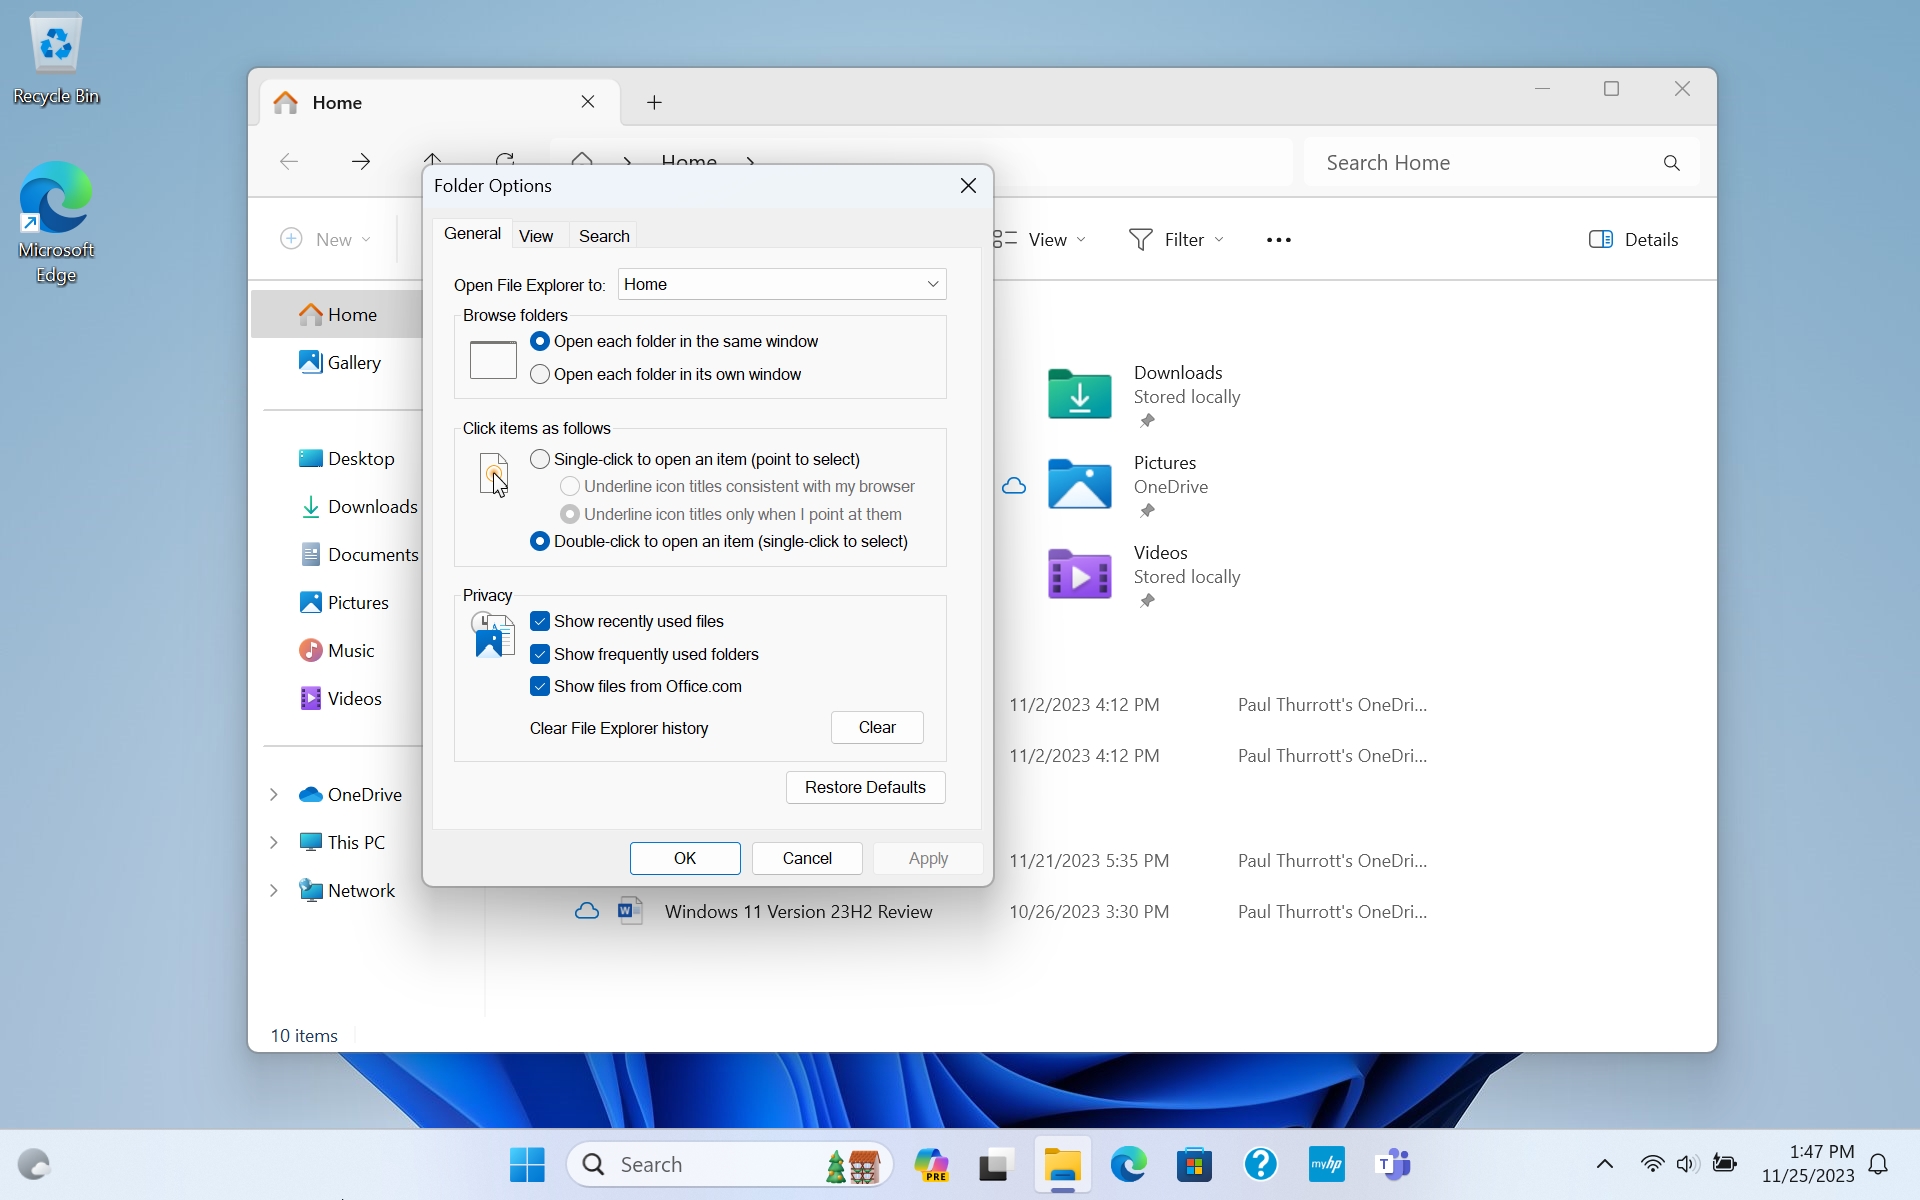
You can also open File Explorer by typing WINKEY + E.
You can learn more about File Explorer customization in the File Explorer chapter.
Configure OneDrive
Most people sign into Windows 11 using a Microsoft account (MSA). Among other things, that means that OneDrive, Microsoft’s cloud storage service, will be configured for that account and available in the file system via File Explorer and to compatible apps. But it’s likely that you will want to perform some additional configuration related to two specific OneDrive features right away: Folder Backup and Files on Demand.
We explore both features in more detail in the OneDrive chapter.
Configure OneDrive Folder Backup
OneDrive Folder Backup syncs up three important folders on your PC–Desktop, Documents, and Pictures–to identically named folders in your OneDrive cloud storage. And it will keep those folders synced across multiple PCs if you always sign into them with your Microsoft account. This can be useful, of course, but it’s not always configured in an ideal way.
Here’s the problem: When you first set up Windows 11, you were either given the option to enable OneDrive backup (if you are using Windows 11 Pro) or it was simply enabled for you without giving you a choice (if you use Windows 11 Home). This may not be what you want, but you can configure OneDrive Folder Backup the way you prefer once you’re using Windows 11.
To do so, find the OneDrive system icon in the system tray area, which can be tricky since it’s hidden by default. (You can display hidden system icons by selecting “Show hidden icons,” the caret-shaped icon to the left of the Network, Volume, and Power icons.)
Once you find the OneDrive icon, click it to open the OneDrive pane, and then navigate to “Help & Settings” (the gear-shaped button) > Settings. When the OneDrive Settings window opens, navigate to the Sync and backup tab and click “Manage backup.”
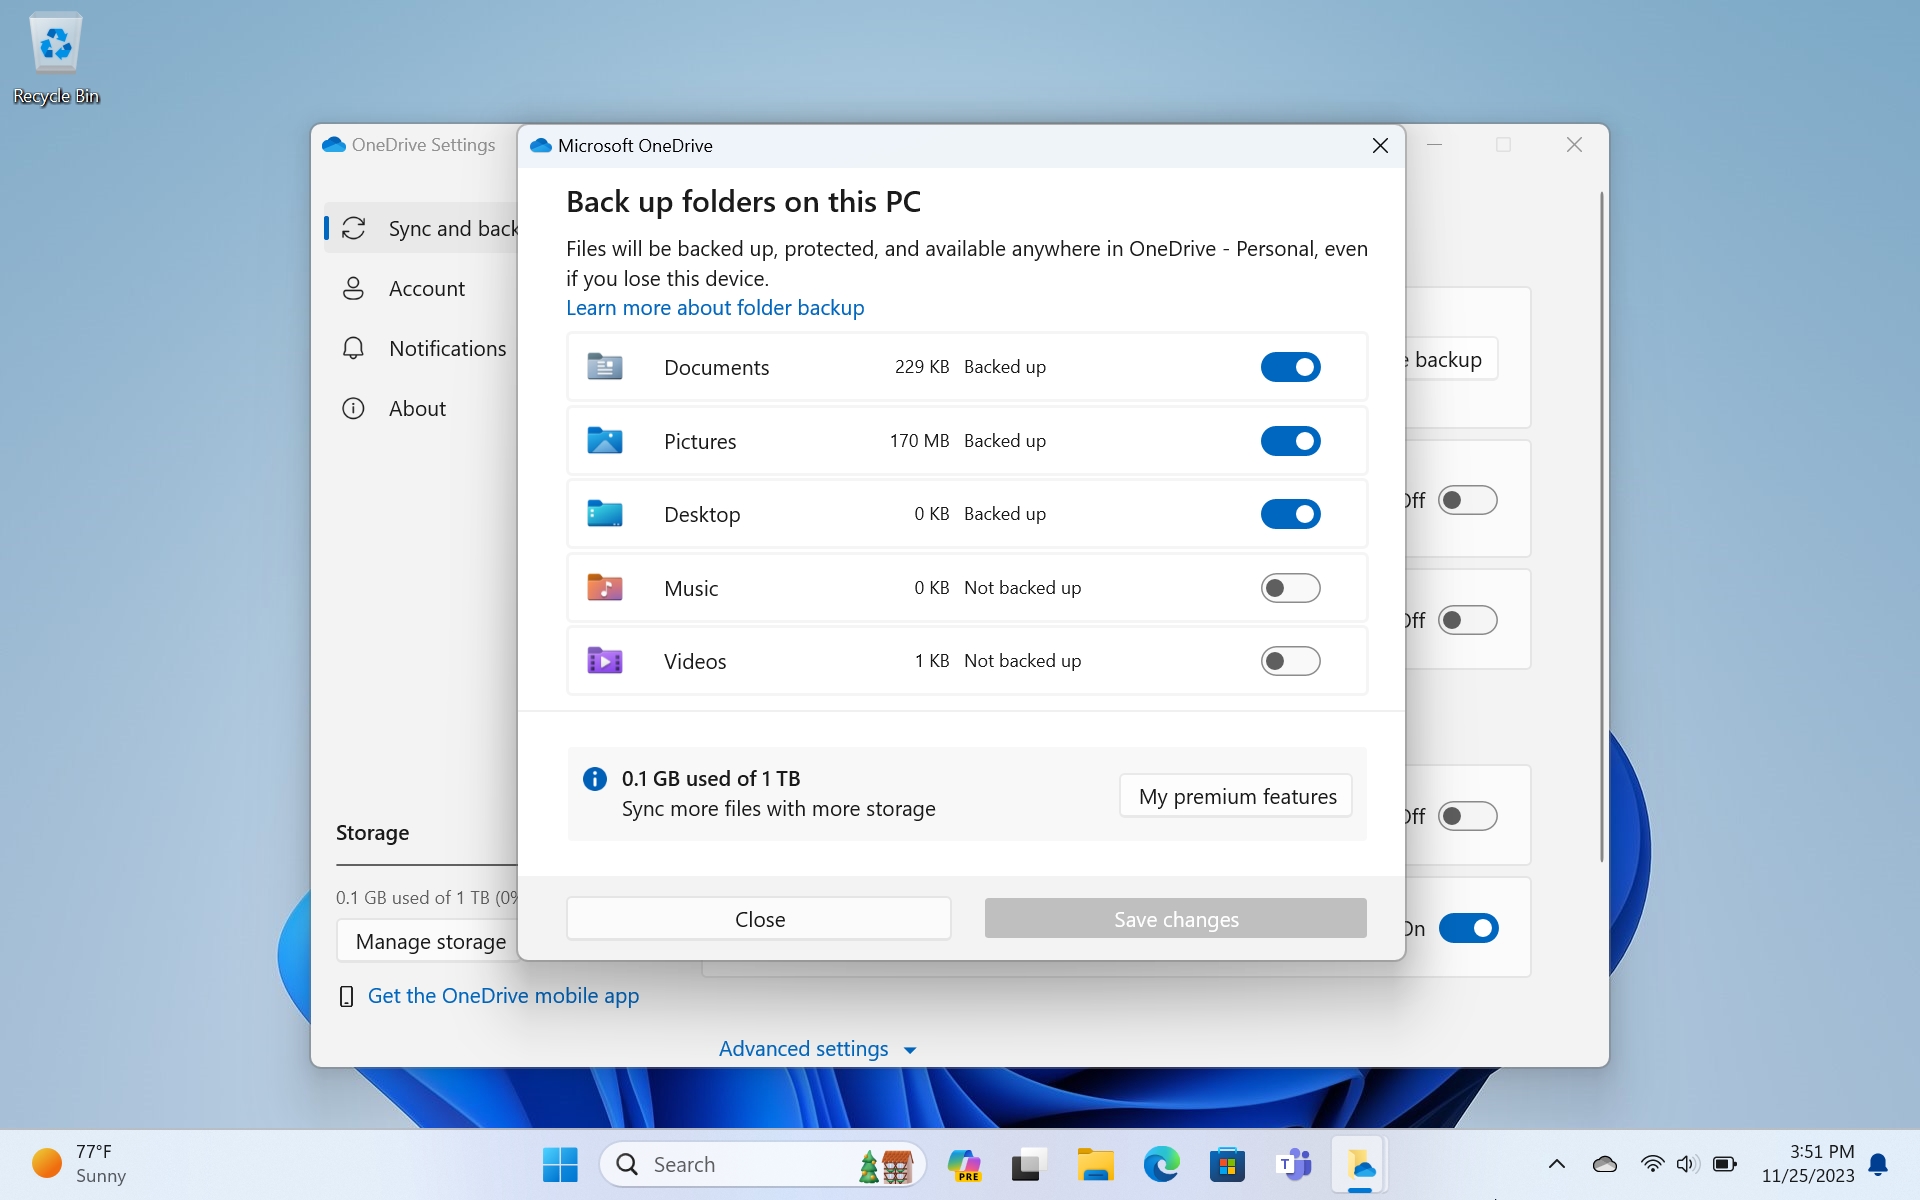
Here, you can easily configure which top-level OneDrive folders are synced between this PC and the cloud. If you don’t wish to sync any of these folders with OneDrive, for example, simply toggle each to “Off” and then click “Save changes.”
You can learn more about OneDrive Folder Backup in the OneDrive chapter.
Configure OneDrive for offline use
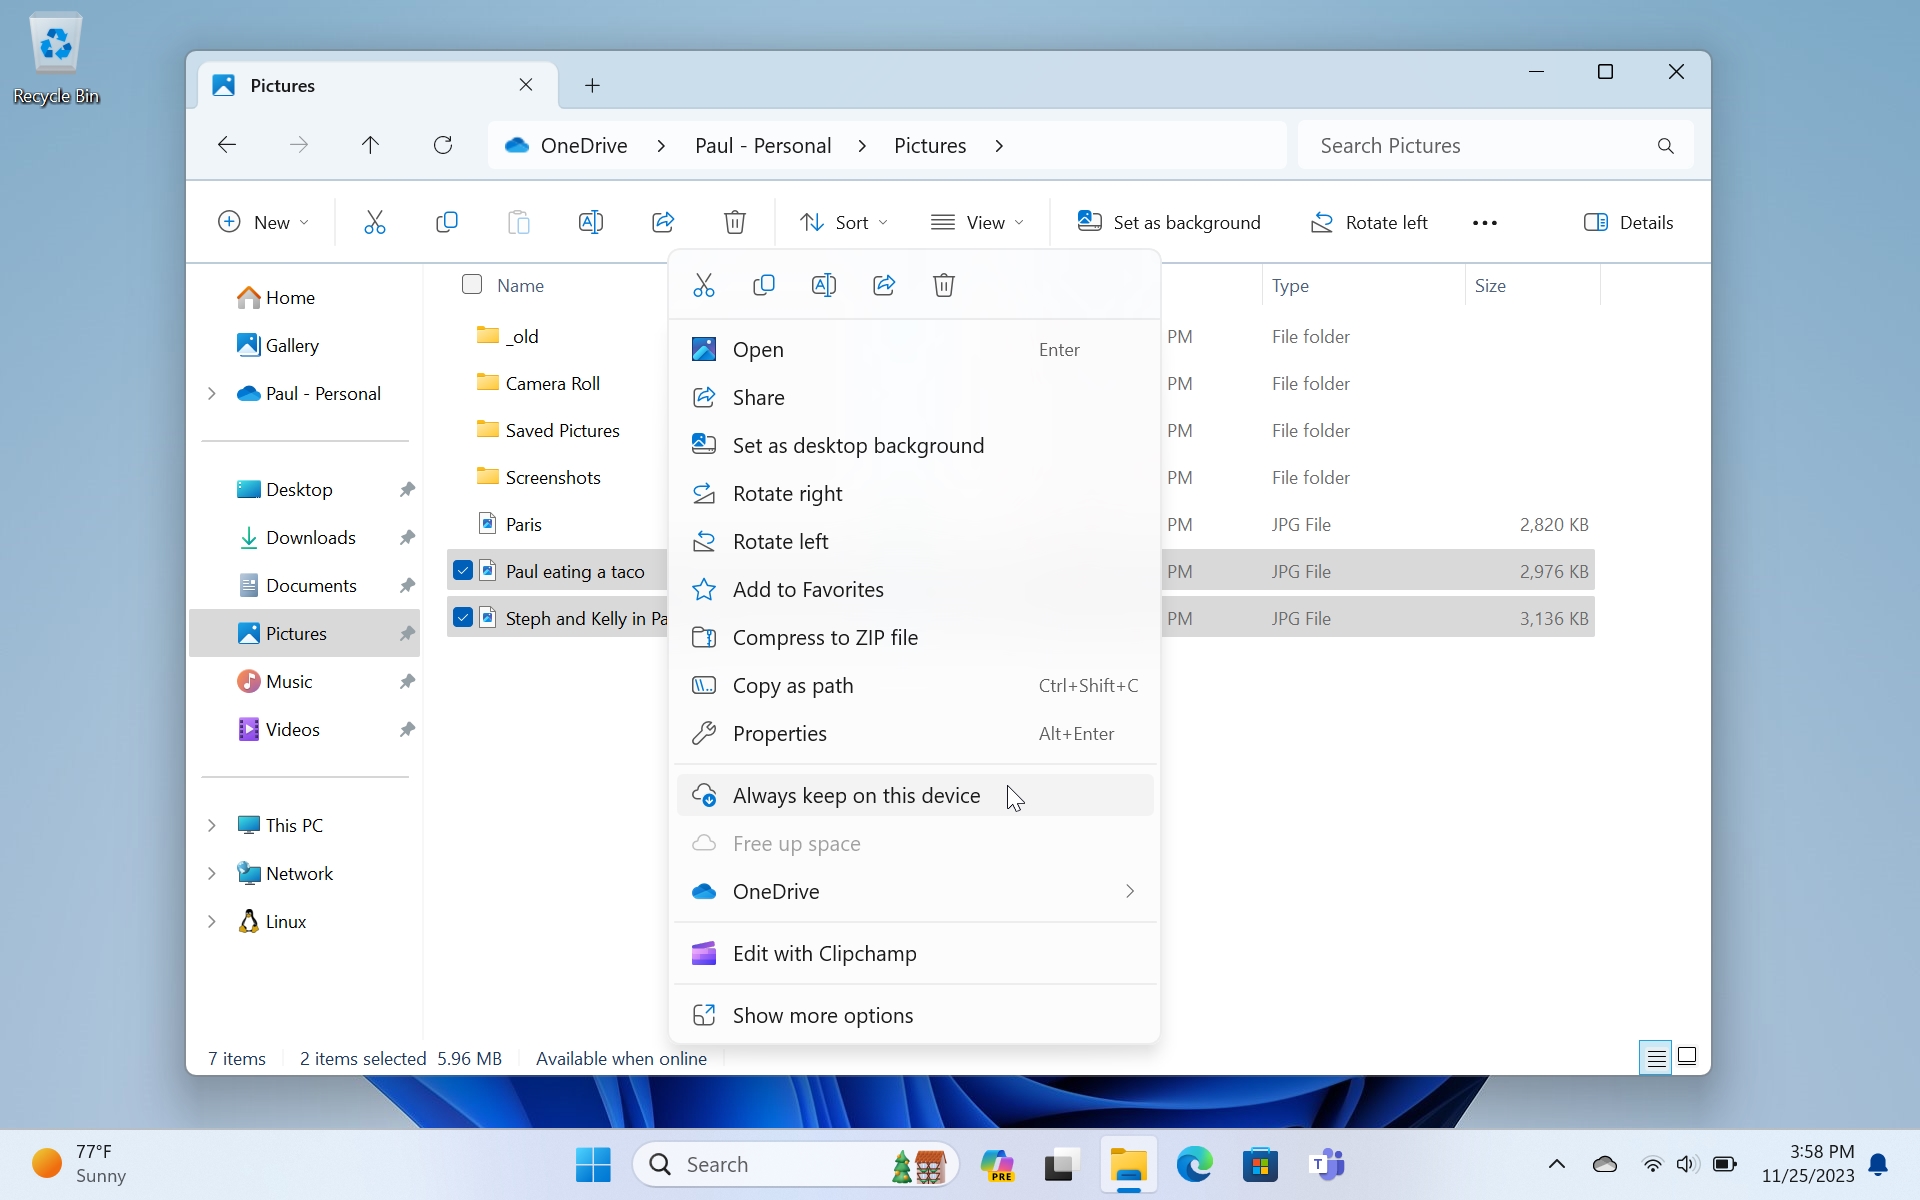
As noted above, Windows 11 makes the contents of your OneDrive storage available in File Explorer by default. But whatever files and folders you have in OneDrive are not fully downloaded to your PC, because that could take up a lot of space, take a long time, and use a lot of bandwidth. Instead, they are all available on-demand by default. This way, you can see your files and folders, and when you try to open a file, it will be downloaded to your PC and will then be available at all times, even when your PC is offline, and any changes you make will be synced to OneDrive.
This system may work well for some. But you may also want to mark some individual files or, more likely, some selection of OneDrive-based folders that could be full of files, to be available at all times.
To do so, find the files/folders in File Explorer–your OneDrive-based content is available via the “OneDrive – Personal” link in File Explorer’s navigation pane–and then right-click them in turn and select “Always keep on this device” from the context menu that appears.

There is a lot more to this feature, but OneDrive file access is covered in much more detail in the OneDrive chapter
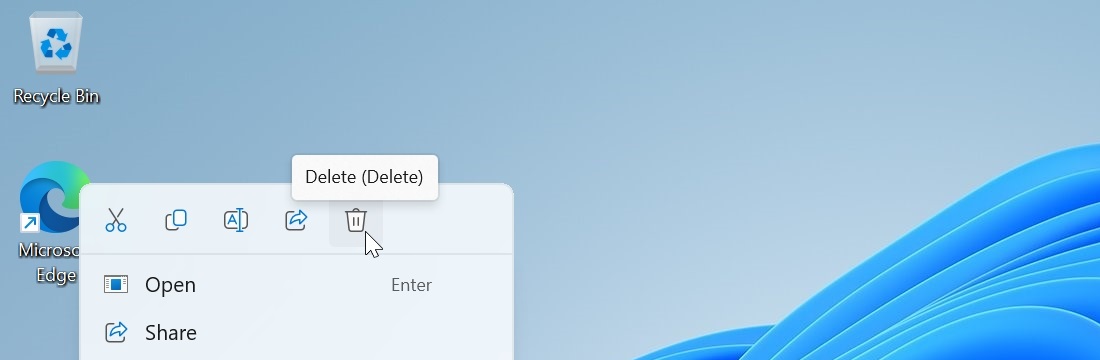
Clean up the Desktop
Microsoft puts a superfluous Microsoft Edge shortcut on the Desktop by default and it’s possible that your PC maker added a few app shortcuts of their own. This isn’t rocket science, but take a moment to delete them. It’s good for your soul and your well-being.
Configure Taskbar items and app shortcuts
Microsoft puts four Taskbar items–Widgets, Search, Copilot, and Task view–and four app shortcuts for File Explorer, Microsoft Edge, Microsoft Store, and Microsoft Teams (Free) on the Taskbar by default, and your PC maker can add a few more app shortcuts of its own. If you find any of these items to be unnecessary, you can remove them. Or, in some cases, configure them to work differently.
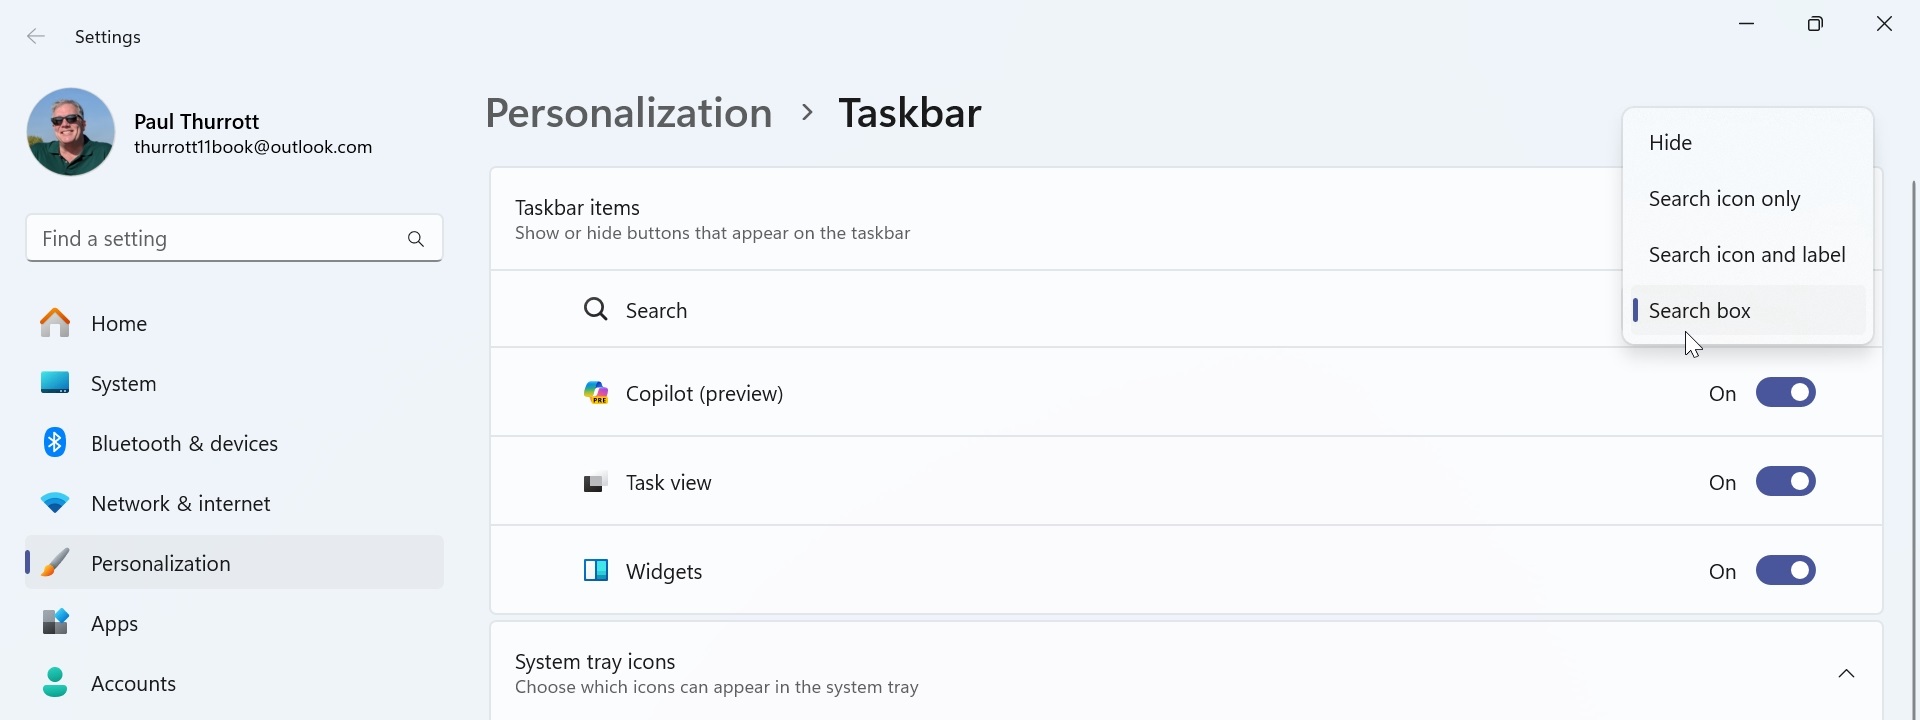
To remove one or more of the default Taskbar items, right-click an empty area of the Taskbar and choose “Taskbar settings.” The Settings app appears with the Taskbar settings page displayed.

We discuss these Taskbar items and why you may not need them in the Taskbar chapter if you’re not sure about this.
Here, you can toggle the Copilot, Task view, and Widgets Taskbar items, while Search has four display choices: “Hide,” “Search icon only,” “Search icon and label,” and “Search box” (the default).
We discuss the different Search item display options and how they impact the user experience in the Search chapter.
The Widgets item also supports additional display options, but these are found elsewhere, in Widget settings. To access this interface, open Widgets (by clicking the Widgets item in the Taskbar or typing WINKEY + W) and click your profile picture in the upper right of the widget board.
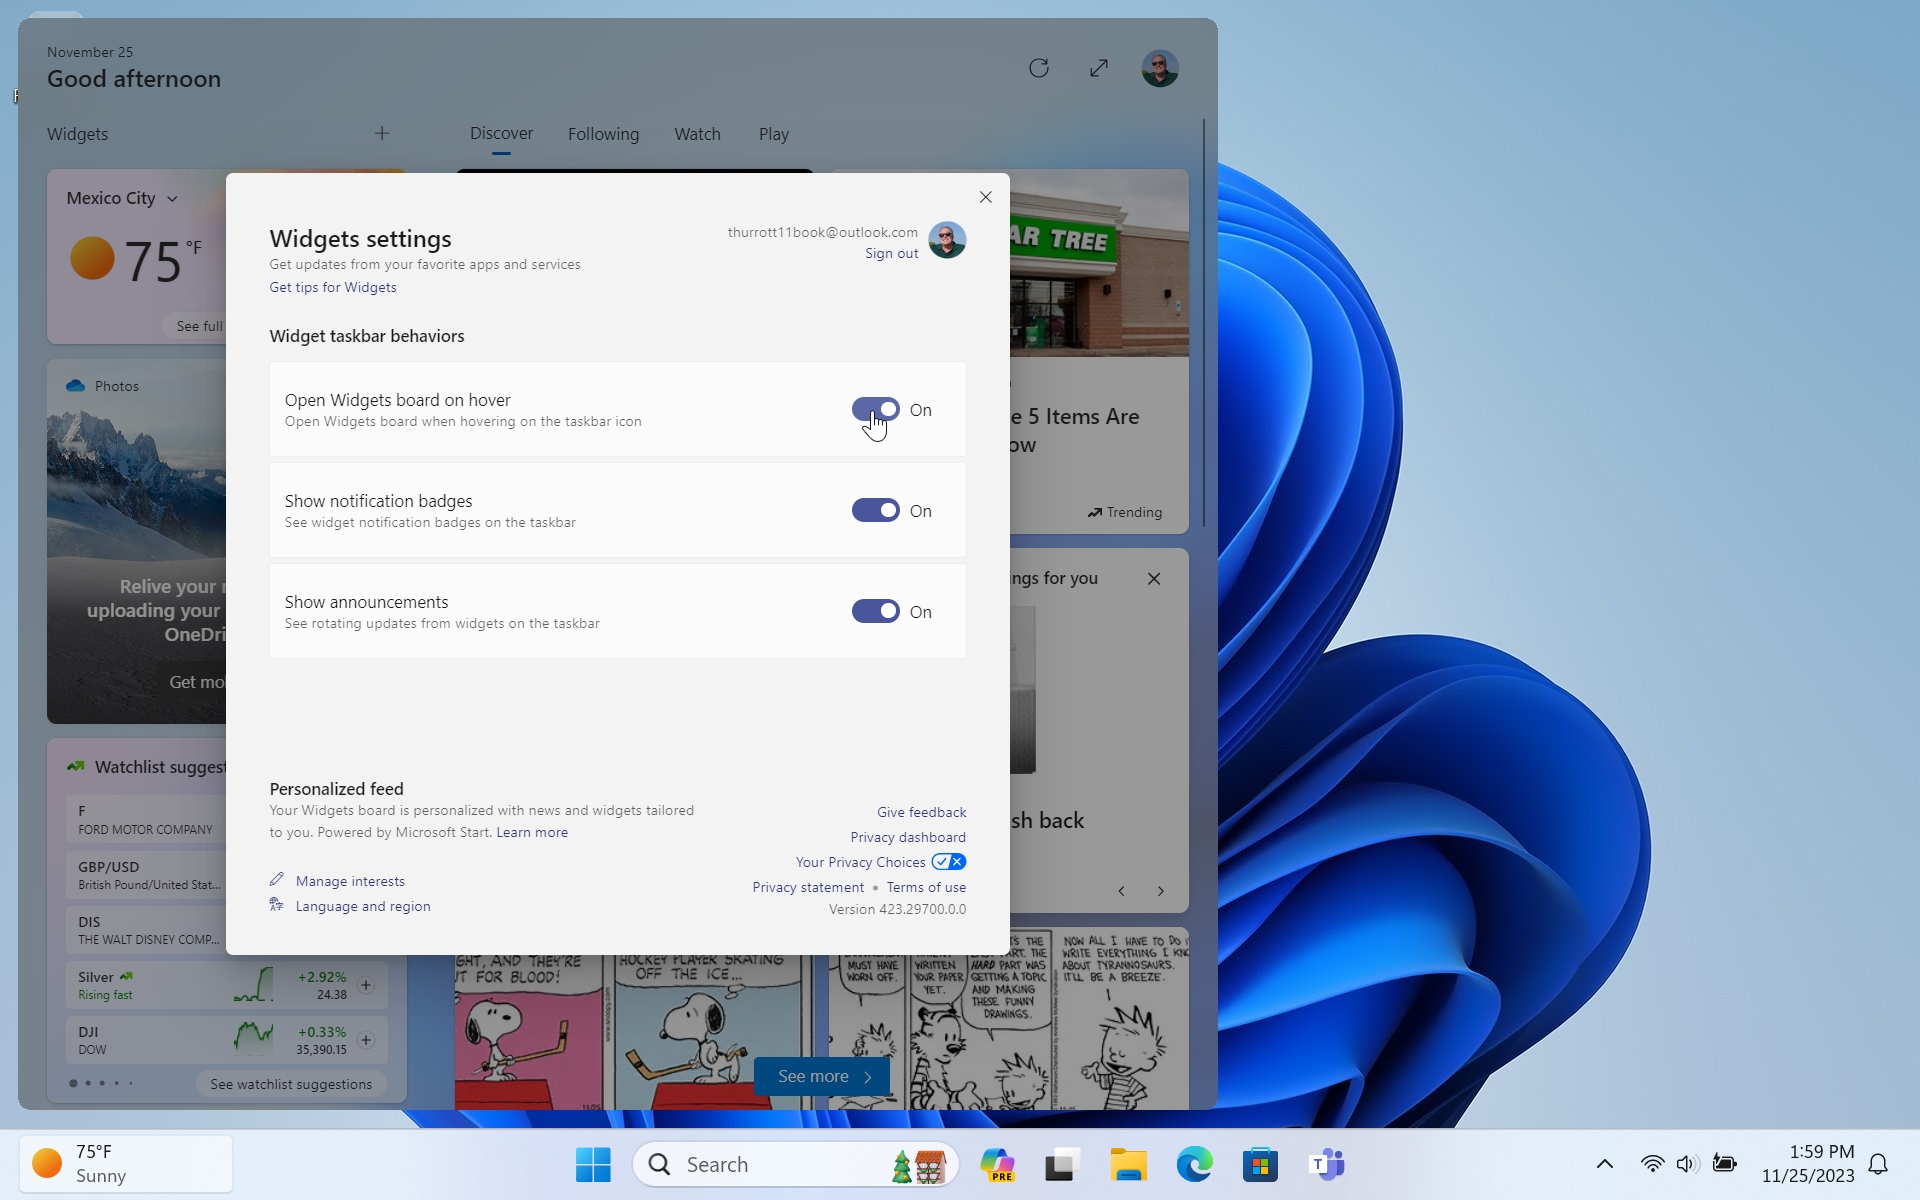

If all you want is the Widget’s weather display on the Taskbar, change each of these three options here to “Off.” Otherwise, examine the options and choose accordingly.
You can learn more about this feature in the Widgets chapter.
Removing Taskbar app shortcuts works as it did in previous Windows versions: Just right-click any you do not want and choose “Unpin from taskbar” in the context menu that appears.

Again, be sure to check out the Taskbar chapter for more.
Make Windows 11 even more secure
Windows 11 includes a dashboard called Windows Security that provides a front-end to all of the security capabilities of your PC. And while the system is of course configured securely by default, there are additional steps you can take to improve security even further by enabling some optional features that need to share anonymous information with Microsoft to function properly.
To see this, locate the Windows Security icon in the system tray’s hidden icons flyout. In a new Windows 11 installation, this icon, which resembles a blue shield, will often have a yellow “bang” overlay, indicating that there are improvements to be made.
![]()
To address the issue(s), click the icon to open Windows Security.
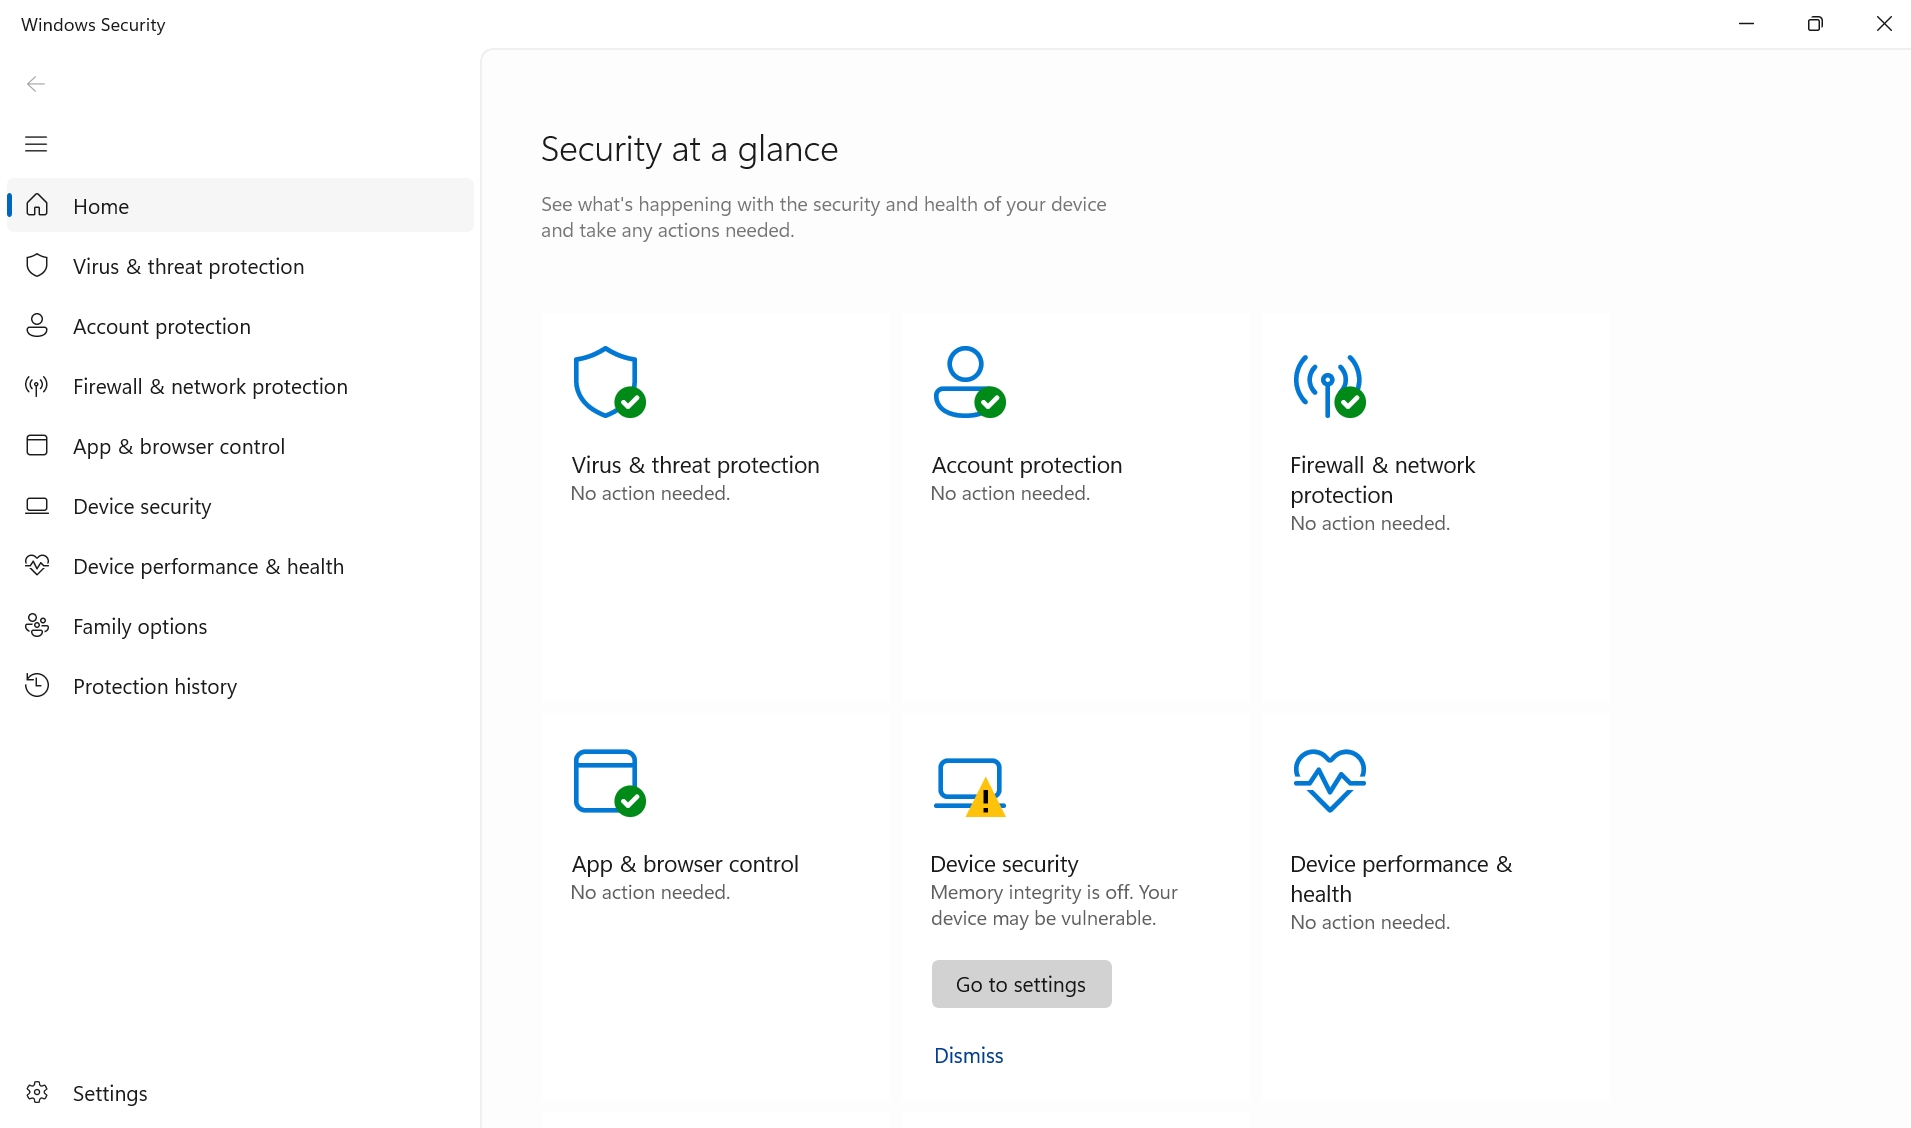
Here, you will see a grid of high-level security features. Those with a green checkmark are working optimally, but those with a yellow bang need attention. That is, you will likely need to enable one or more security features, which usually just involves clicking a button and approving a User Account Control (UAC) prompt.
What you see here can vary by PC–some security features are dependent on specific hardware components–but Reputation-based protection and Memory integrity are among the most common features you will need to manually enable. When you do so, Windows Security will be happy and its system tray icon will display a green checkmark overlay.
And, yes, you want to make Windows Security happy.
You can learn a bit more about these features and why you should enable them in the Windows Security chapter.
Configure Start
The Windows 11 Start menu is a major departure from its predecessors and may require a bit of time before you feel comfortable with it. But you can also configure its layout, which app shortcuts appear there, and other options. Some of this customization occurs directly in Start, as you can right-click and drag-and-drop many of the items it contains. But others occur in Start settings, which you can access in the Settings app by navigating to Personalization > Start.
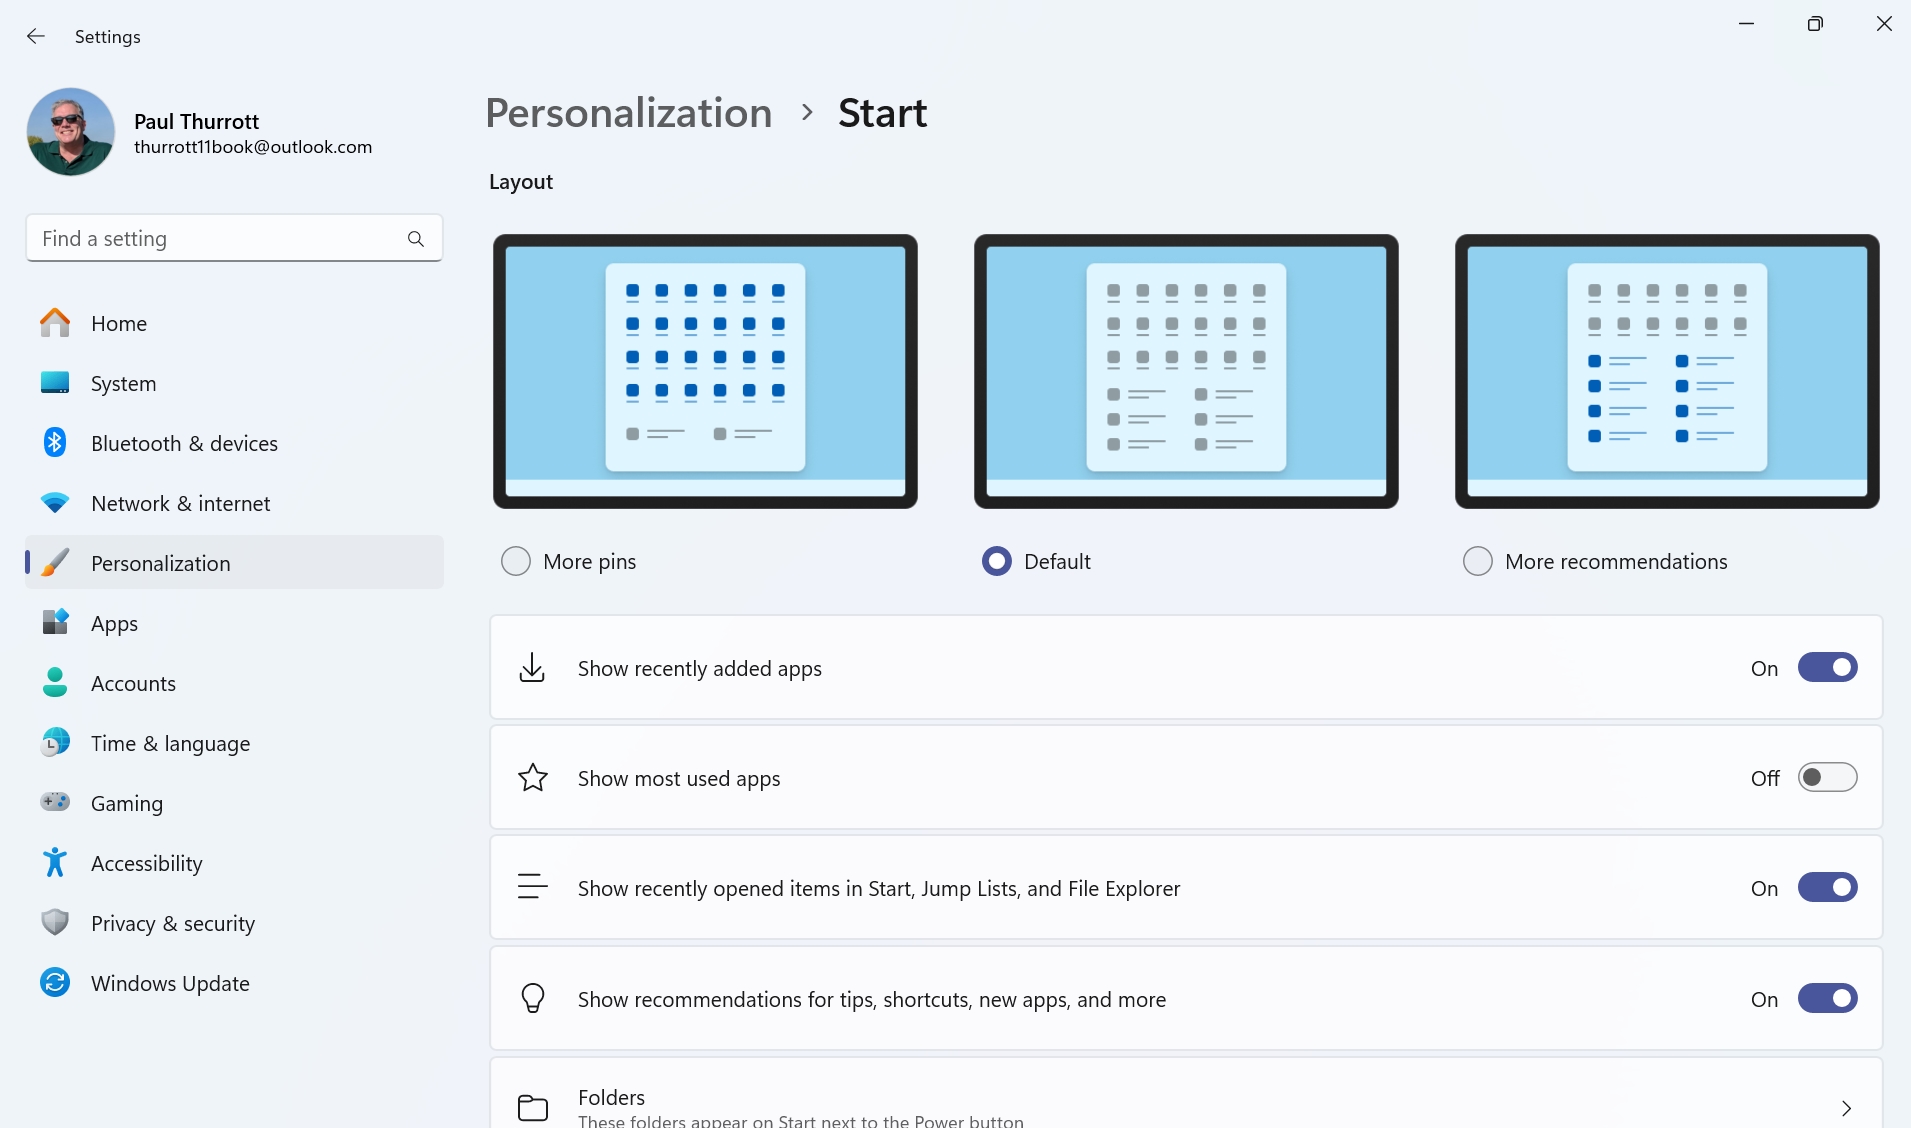
We cover Start customization in some detail in the Start chapter, but here are some ideas to get started:
Customize the layout. Start settings gives you three basic layouts to choose from, but you can also choose whether to display recently added and most-used apps in the Recommended section and configure one or more icons for system folders that can appear next to the Power button.
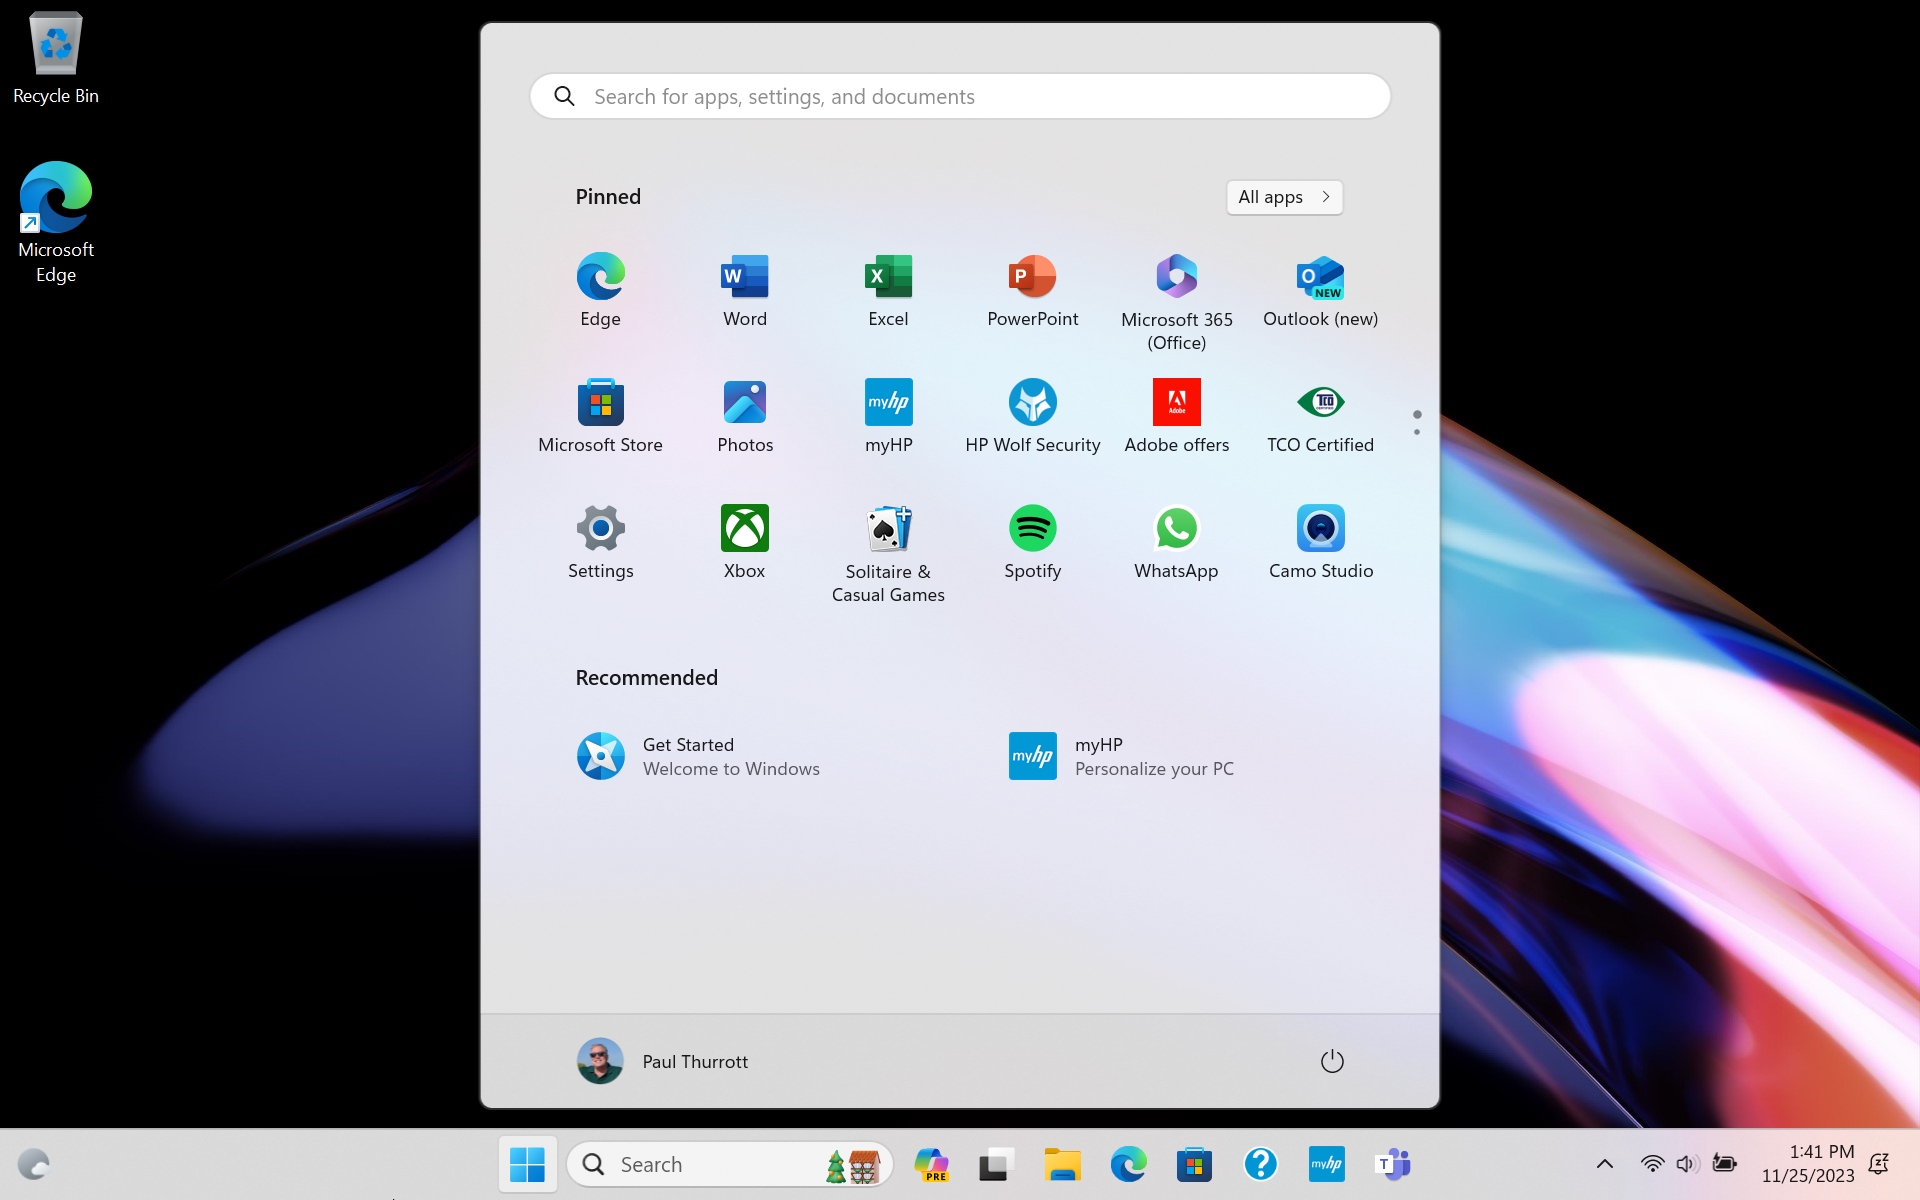
Remove or uninstall unwanted app shortcuts from the Pinned section. In addition to its so-called in-box apps, Windows 11 also includes a strange selection of sponsored app shortcuts–what we would call “crapware” or “bloatware”–supplied by Microsoft and/or your PC maker. You can easily remove any unwanted app shortcuts from the Pinned section in Start–just right-click each in turn and select “Unpin from Start”–but you can alternatively uninstall these app shortcuts for good as well. To do so, right-click the offending shortcut and choose “Uninstall”; if that option is not available, that means only the shortcut is present, so just choose “Unpin from Start.”
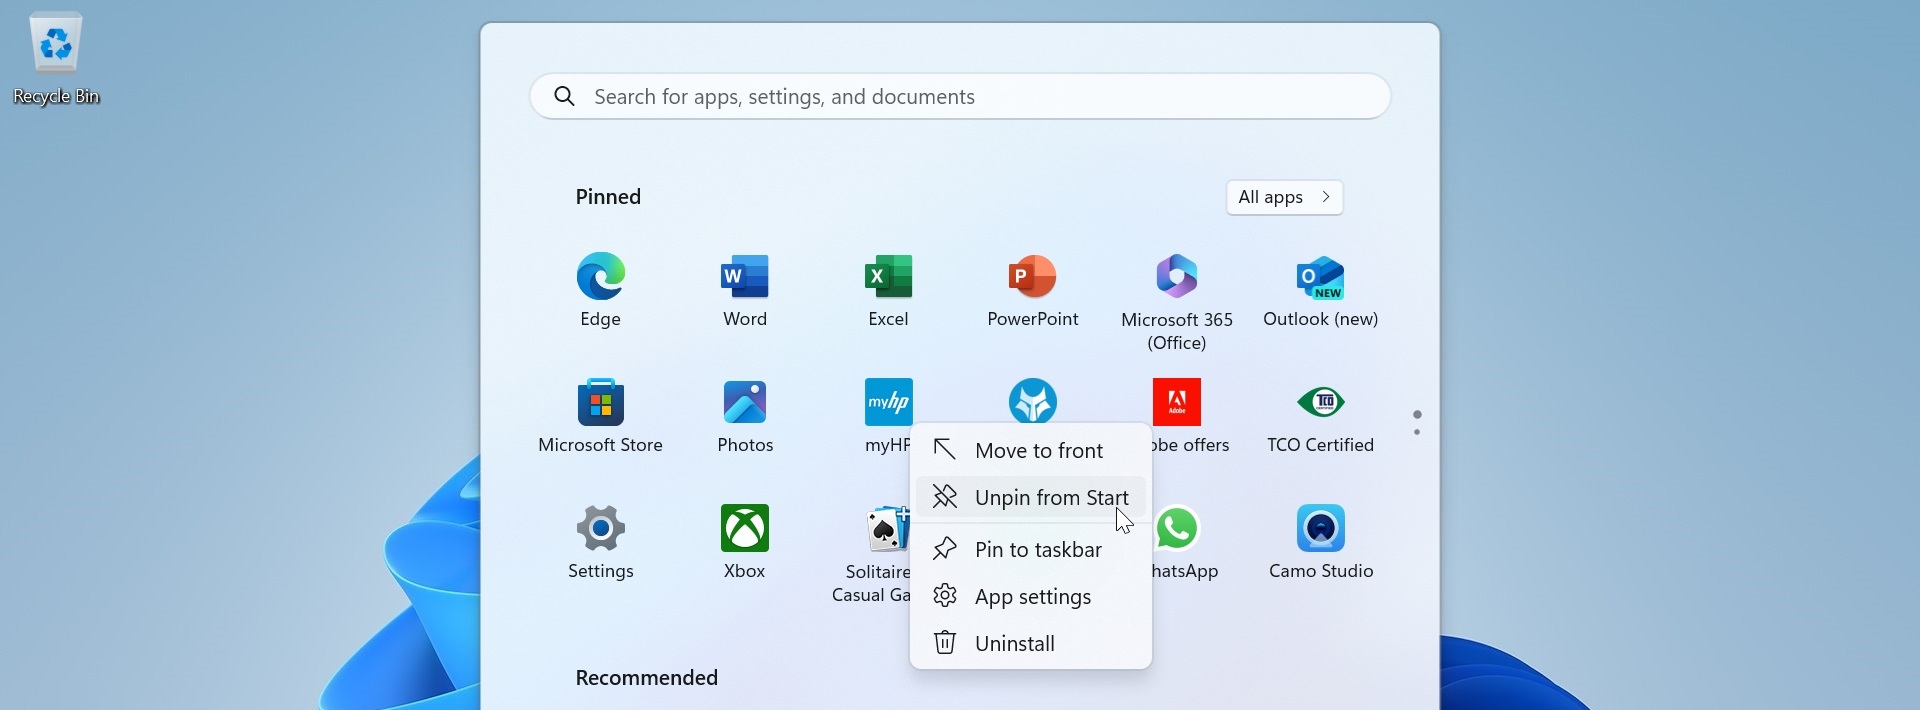
Some PC makers use a familiar trick to make it harder to remove certain crapware from your PC. If you can’t uninstall as described above, try right-clicking its shortcut and choosing “Open file location.” Then, just delete the shortcut in the File Explorer window that appears.
Add shortcuts for apps you use a lot to Pinned. You can also add shortcuts for the apps you use the most to the Pinned area in Start. The easiest way is to view the All apps list by clicking “All apps,” find the apps you wish to pin, and then right-click each in turn and choose “Pin to Start.” Once you have the app shortcuts you want in Pinned, you can drag and drop them to arrange them in the order you like.
You can also create folders in Pinned to organize shortcuts further: Just drag one app shortcut on top of another to get started.
Customize what appears in the Recommended section By default, the Recommended area is a curious mix of recently added apps and recently accessed documents and other files. But you can configure what displays here to some extent by toggling the “Show recently added apps” and “Show most used apps” options “On” or “Off.”
Again, we discuss Start customization more in the Start chapter.
End the nagging
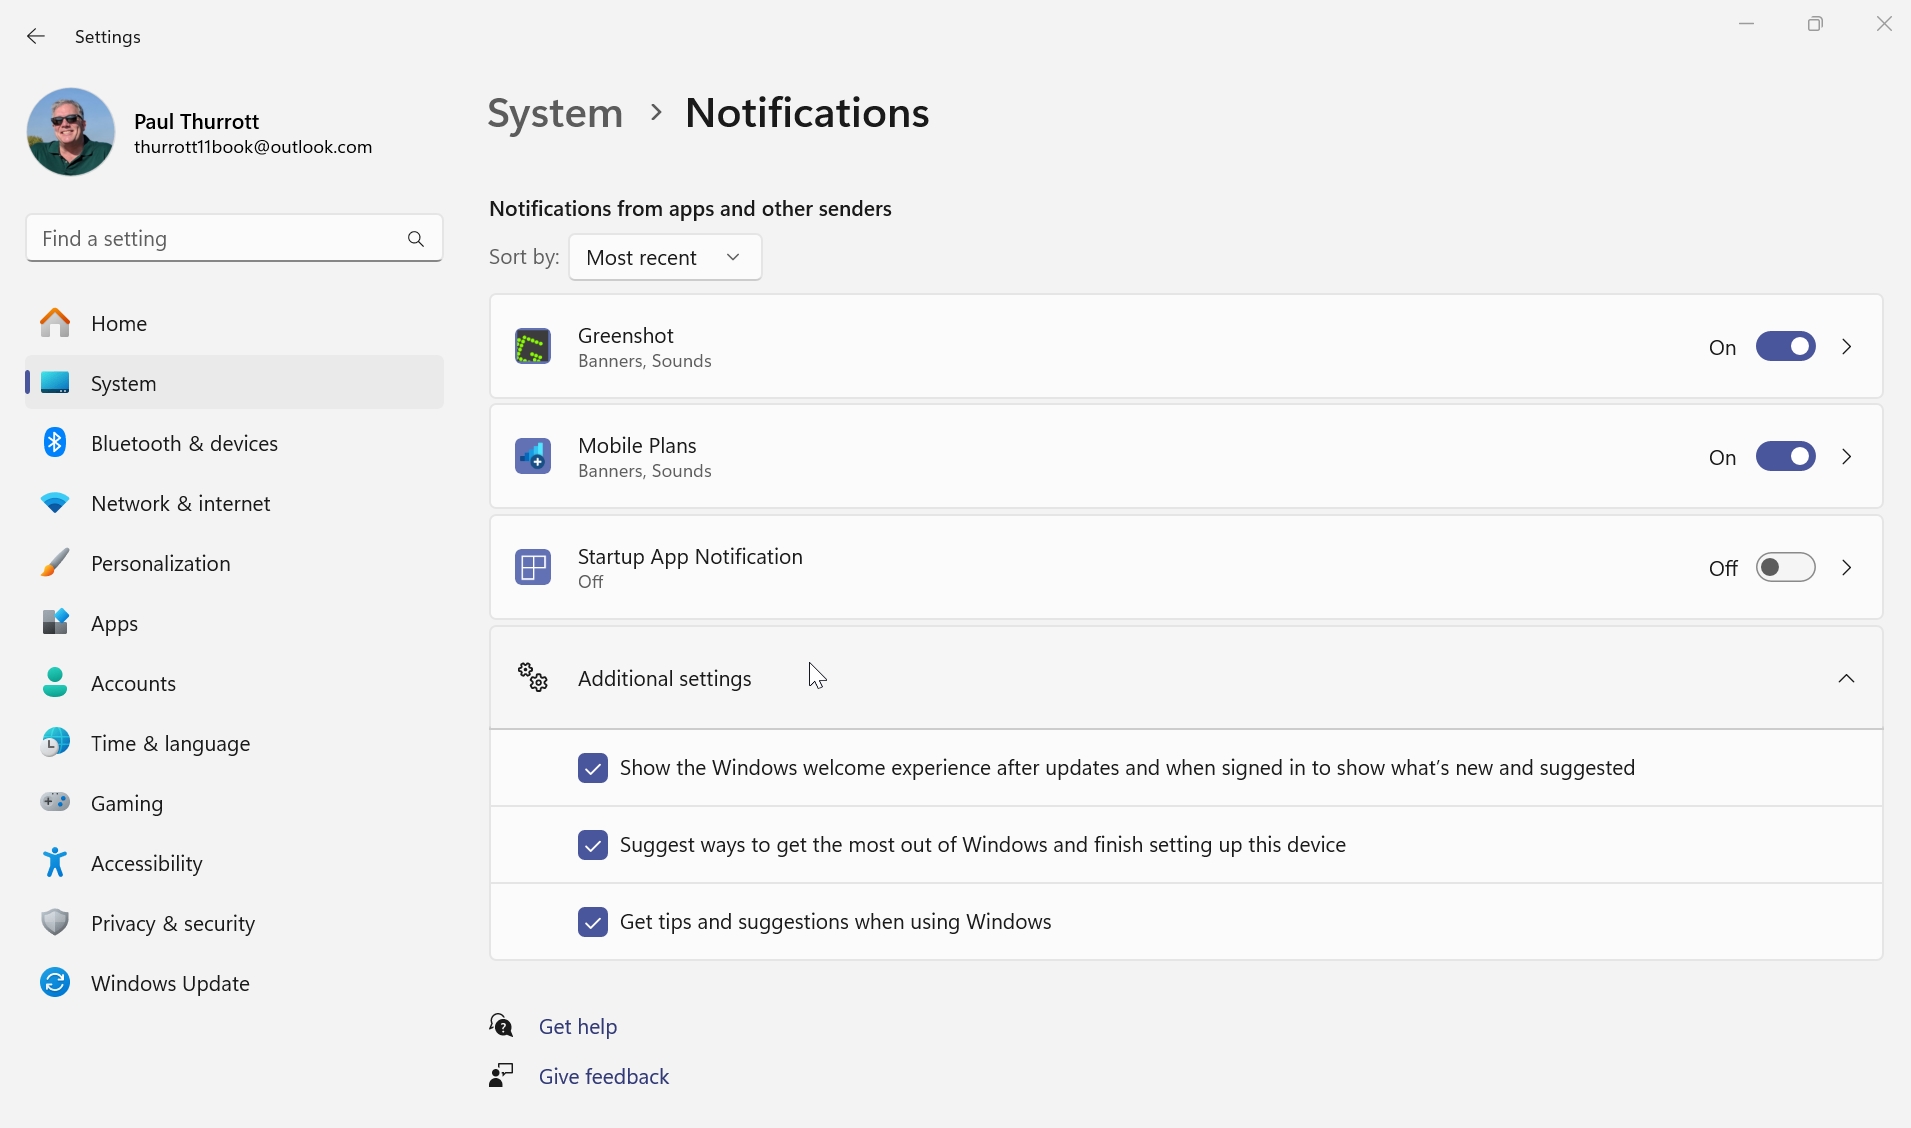
Microsoft displays a variety of nagging advertisements–what Microsoft calls “suggestions”–throughout Windows 11 in the form of banner notifications, in-line notifications in Start and Settings, and even full-screen experiences. But you don’t have to put up with these unnecessary distractions.


To disable this behavior, open Settings, navigate to System > Notifications, and then scroll down to the Additional settings section. Here, you will see three options to consider disabling: “Show the Windows welcome experience after updates and when signed in to show what’s new and suggested,” “Suggest ways to get the most out of Windows and finish setting up this device,” and “Get tips and suggestions as you when using Windows.” We recommend setting each to “Off.”
Update and configure the system
Windows 11 will keep itself up-to-date via automatic update downloads and installs, but it’s a good idea to get this process started and perform a few other related system maintenance tasks whenever you start using a PC or upgrade to the latest version of Windows 11.
Use Windows Update to get Windows 11 up-to-date
Check Windows Update–found in Settings (WINKEY + I) > Windows Update–for any software updates, rebooting as required, and rechecking until there are no more updates to install.
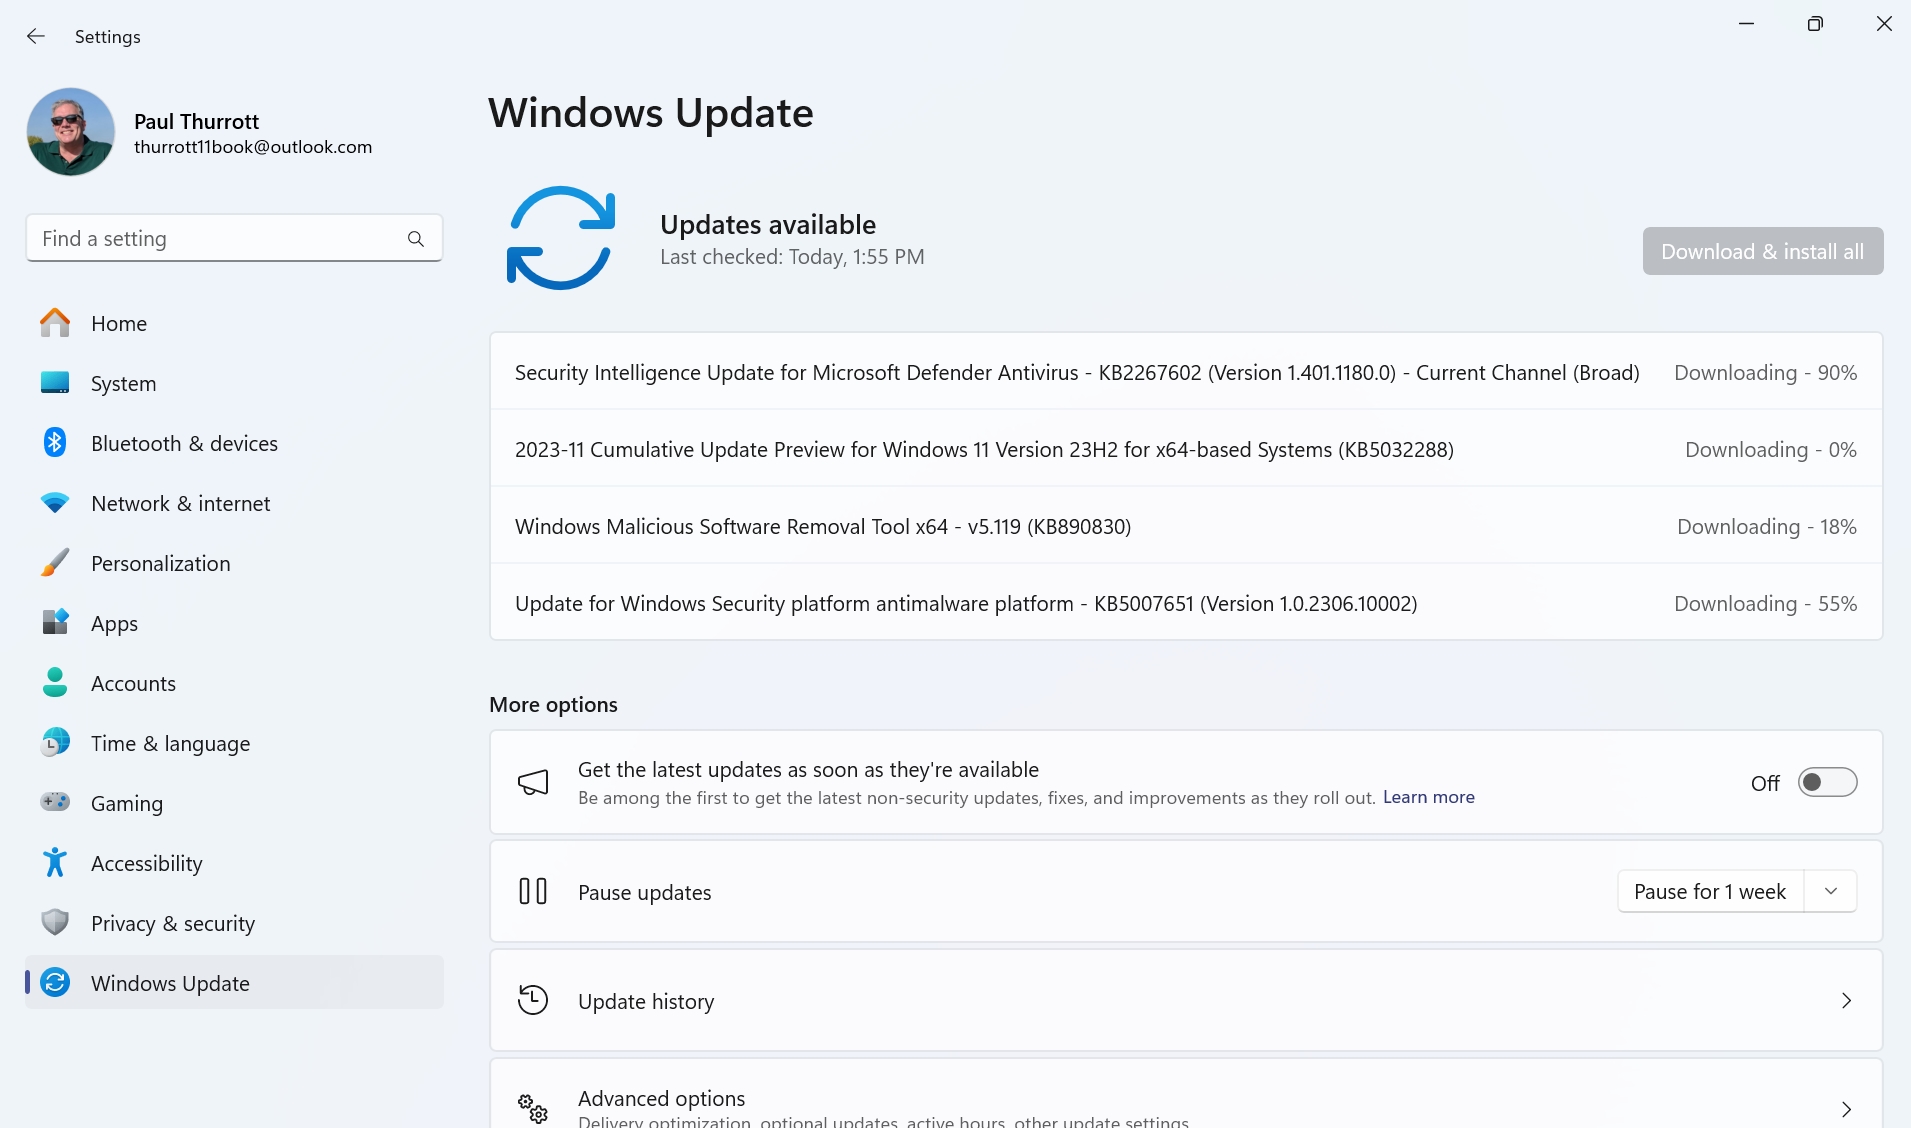
You can learn more about Windows Update and how it keeps Windows 11 up-to-date in the Windows Update chapter.
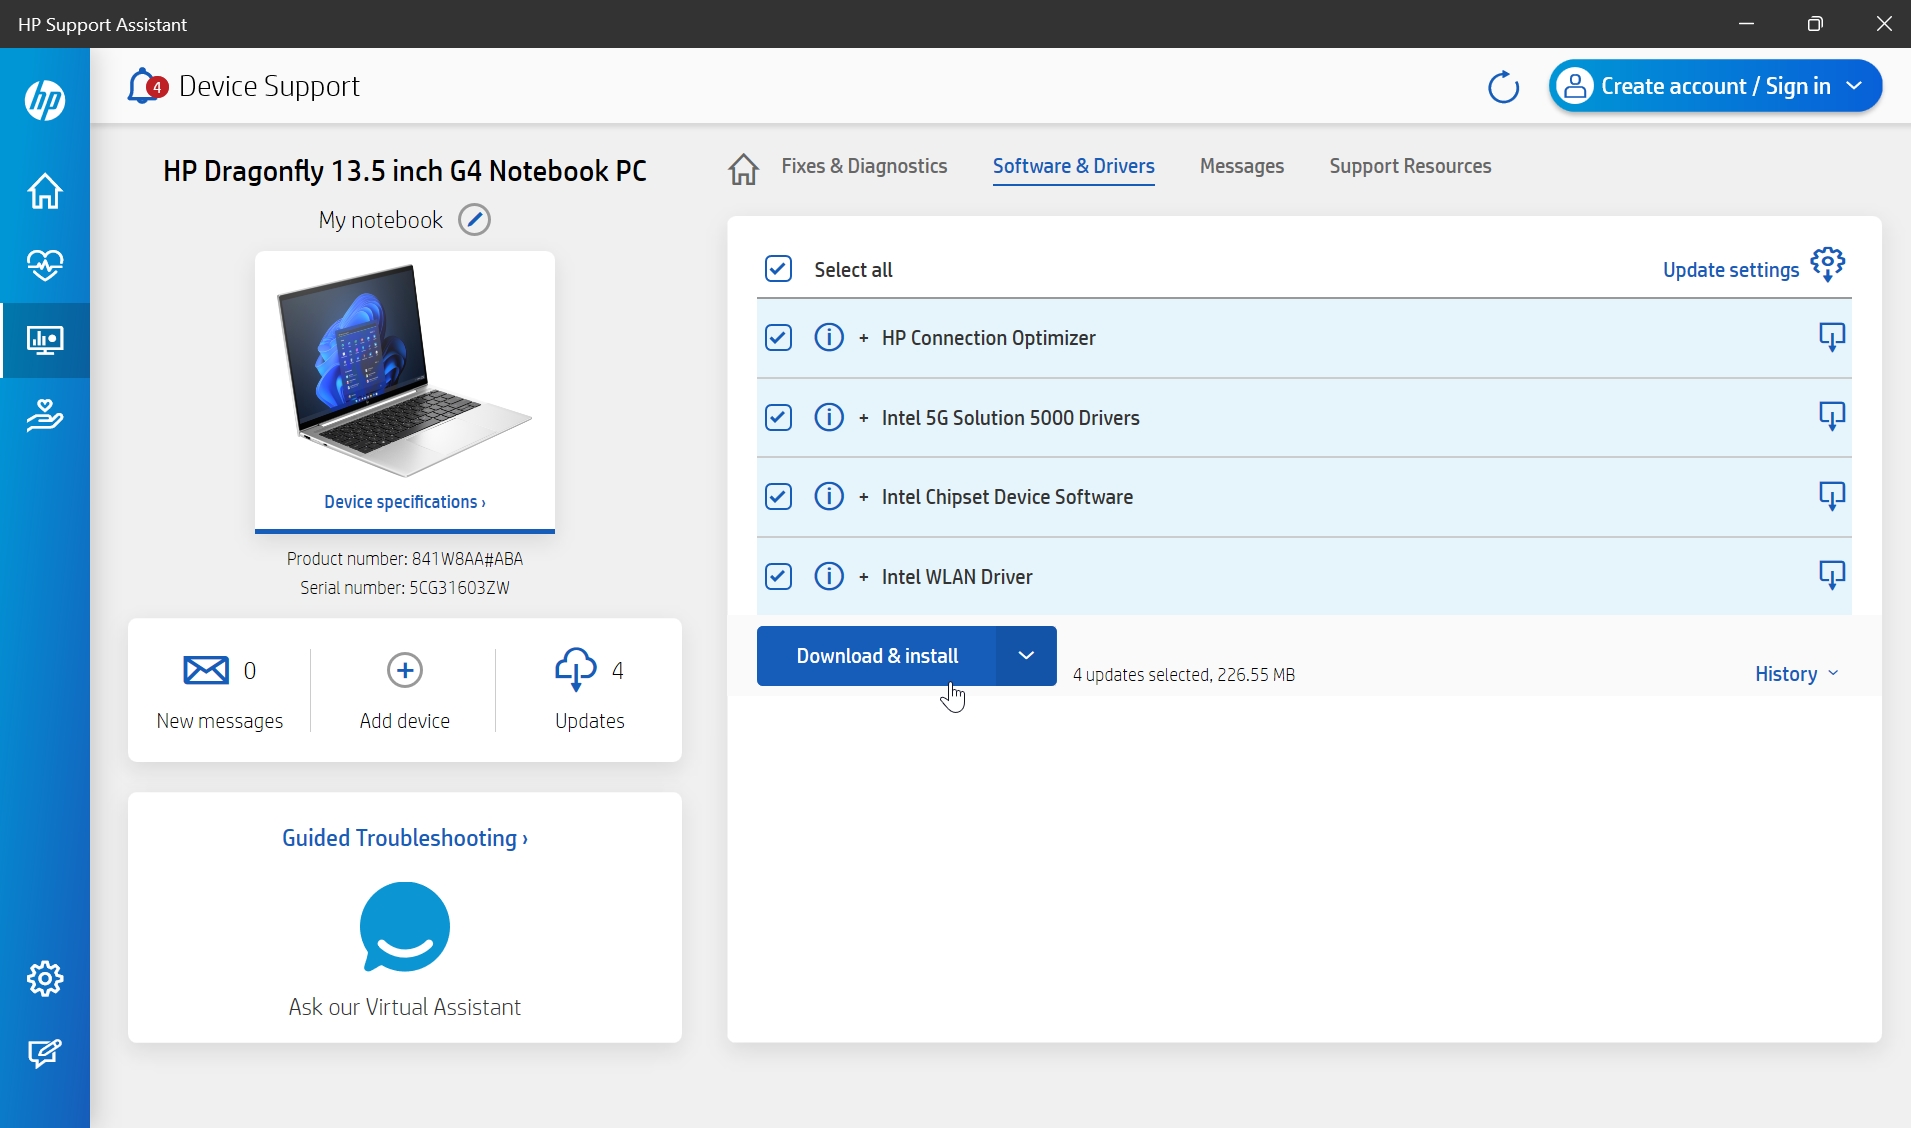
Run your PC maker’s support/driver update application
If you have just set up a new PC, check to see whether your PC maker provides a custom application–Dell Update, HP Support Assistant, Lenovo Vantage, or similar–for delivering software and driver updates specific to your PC. After Windows Update is completely up-to-date, use this application to install any updates your PC maker provides as well.
If your PC uses an Intel microprocessor and your PC maker doesn’t supply its own software and driver updater, you may also want to install the Intel Driver & Support Assistant, which provides regular updates for Intel microprocessors and other chipsets.
Not sure what kind of microprocessor your PC uses? No worries, there are a several ways to find out quickly. The easiest, perhaps, is to right-click the Start button in the Taskbar to open the Quick link menu, choose “System” and then view the “Device specifications” section in the About page that appears. The “Processor” entry there will identify your PC’s microprocessor, including the name of its maker, which will typically be AMD, Intel, or Qualcomm.
Create a recovery drive
Windows 11 includes built-in recovery tools, accessible in the Settings app and in a special boot environment called the Windows Recovery Environment. But because it’s possible that a future misconfiguration could make it impossible to boot the PC successfully, you should also have a way to run those recovery tools externally.
For this reason, Windows includes a utility that helps you make a USB-based recovery drive that you can use to boot your PC and fix problems. You can find this tool by searching for recovery drive with Search.
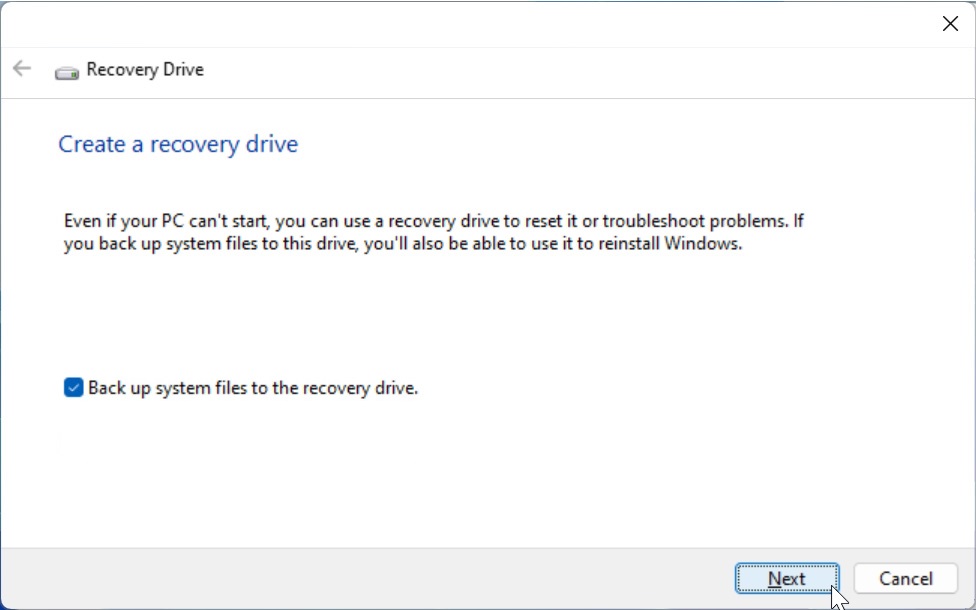
Because there is a better option, we recommend that you do not create a recovery drive. You should instead create USB-based Windows 11 installation media, a more versatile option that includes all of the Windows 11 recovery tools and the latest version of Windows Setup, so you can easily reinstall Windows 11 if needed.
Like a recovery drive, Windows 11 installation media requires a USB flash drive with at least 8 GB of storage.
We explain how to create this installation media in Create Windows 11 Version 23H2 Install Media.
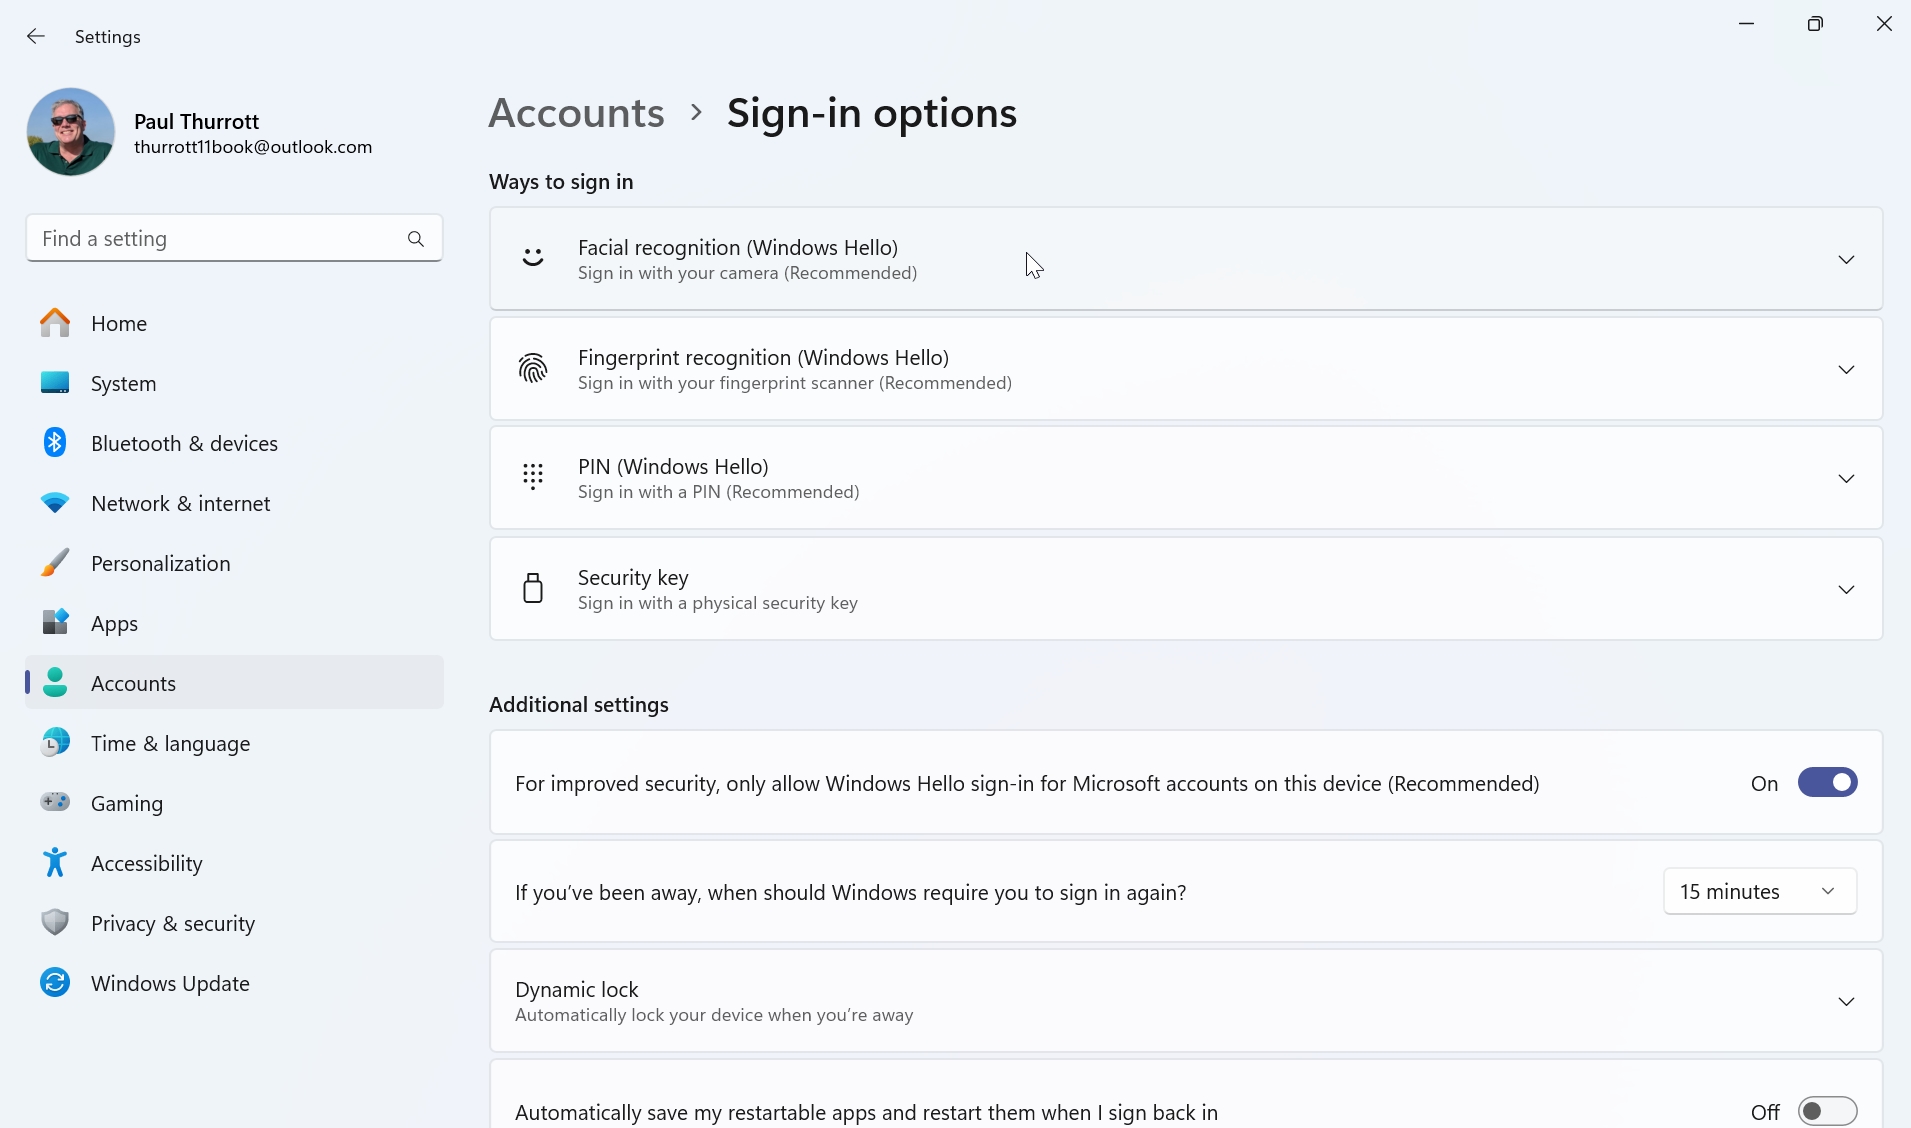
Configure Windows Hello and Presence sensing
If your PC is outfitted with a Windows Hello-compatible fingerprint reader or webcam, you can configure it to sign you into your Microsoft account using either of these biometric security features. This is quicker and more convenient than using a password or PIN. It’s also more secure.
To do so, open Settings and navigate to Accounts > Sign-in options. Here, you will see entries for Facial recognition (Windows Hello) and/or Fingerprint recognition (Windows Hello), depending on your PC.
Your PC may also ship with presence sensors that can detect when you or anyone else approaches or leaves the PC. If so, you can also configure the PC to optionally wake up when you approach–which makes Windows Hello facial recognition even more seamless–and dim the screen and go to sleep when you leave.
You also configure these features in the Settings app by navigating to System > Power & battery and expanding the “Screen and sleep” item under “Power.”
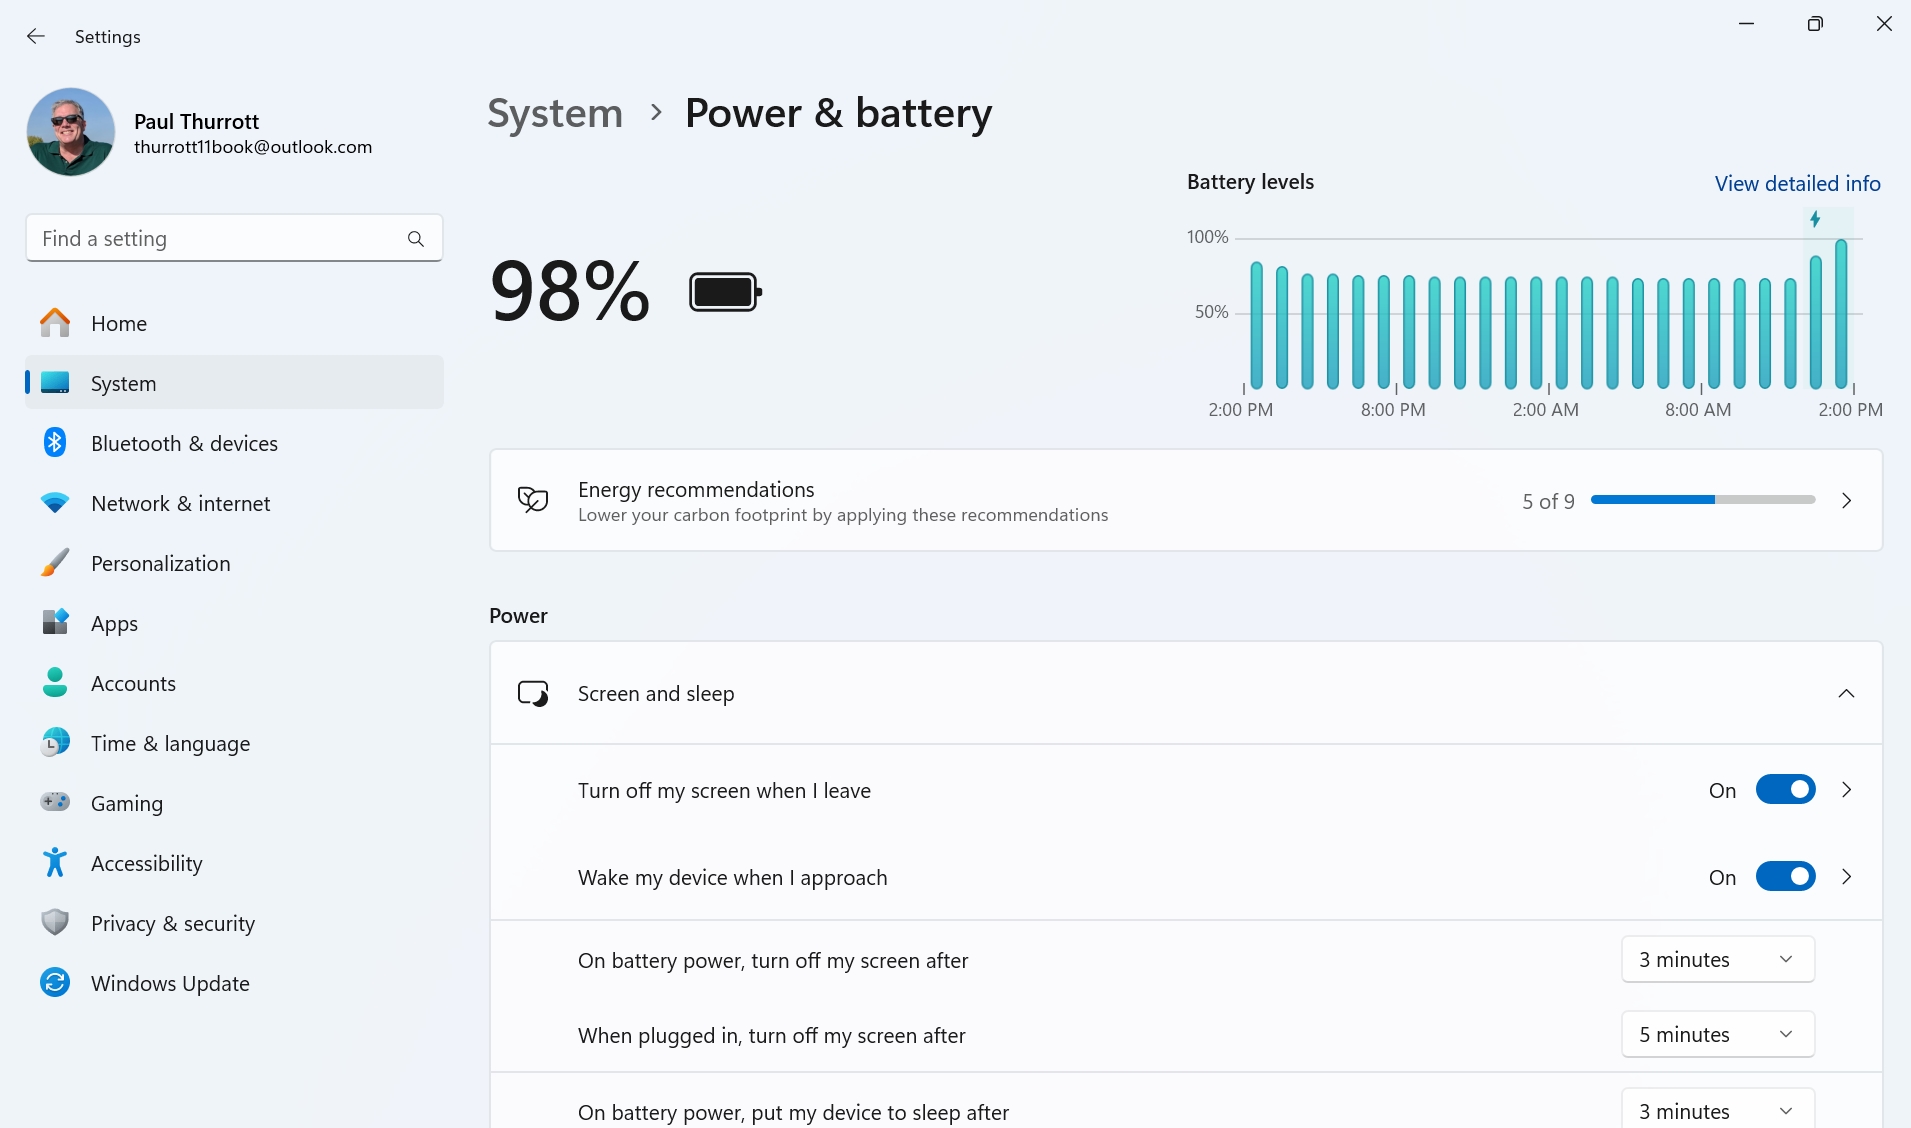
There, you will find two options, “Turn off my screen when I leave” and “Wake my device when I approach,” both of which open a separate Presence page in the Settings app with multiple settings for each.
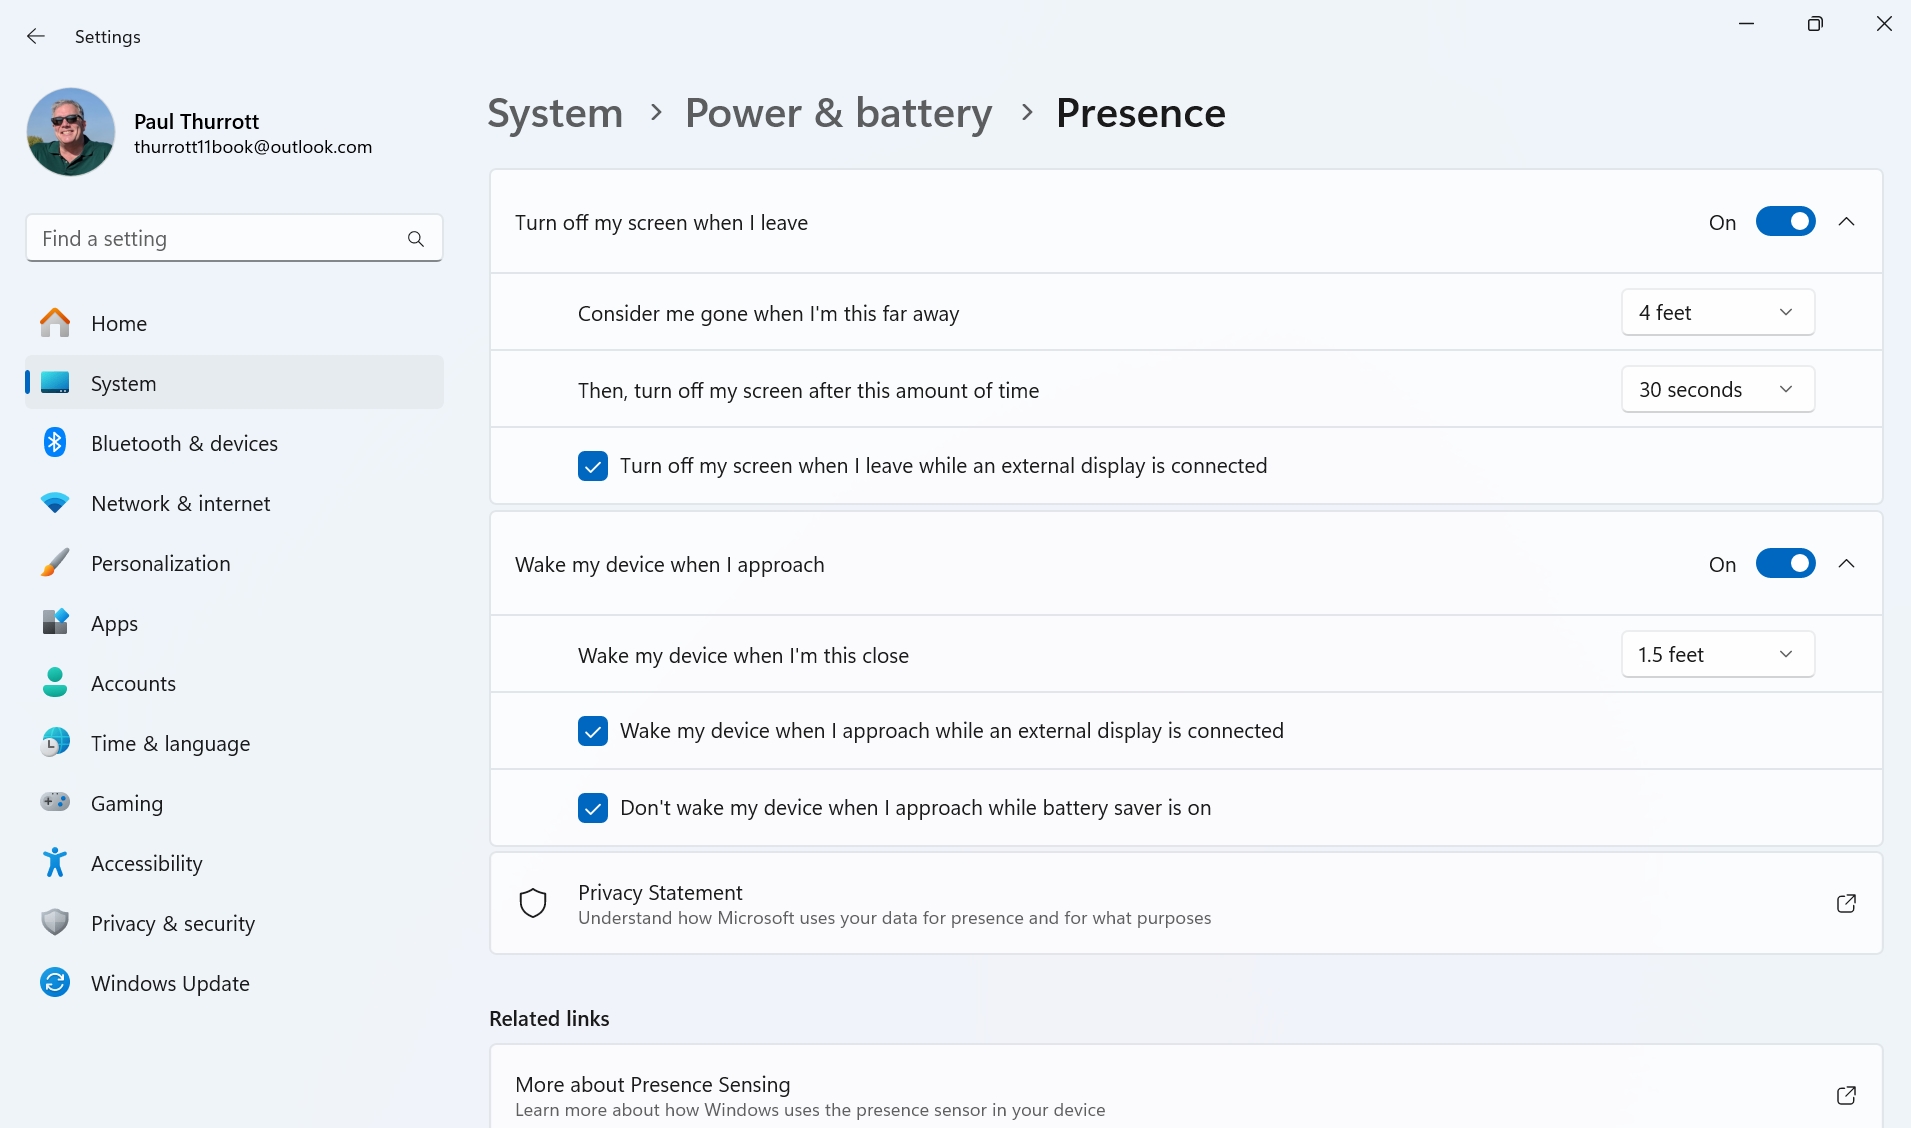
You can learn more about these features in the Windows Hello, Presence Sensing, and Dynamic Lock chapter.
Rename your PC
If you didn’t name your PC during the Out-of-Box Experience (OOBE), Windows Setup will create a unique but nonsensical name–like DESKTOP-TAKKU2G or similar–for the PC for you. You should rename it now because you will see your PC’s name referenced by OneDrive and other Microsoft services on the web and elsewhere, and it’s helpful to know at a glance which PC they’re referring to.
To do so, right-click on the Start button (or type WINKEY + X) to display the Quick link menu, and choose “System” from the list. In the System settings window that appears, click the “Rename this PC” button and then enter a name that makes sense to you–perhaps Pauls-PC, Laptop, or whatever–and click Next. You’ll be told you have to reboot the PC. Do so.
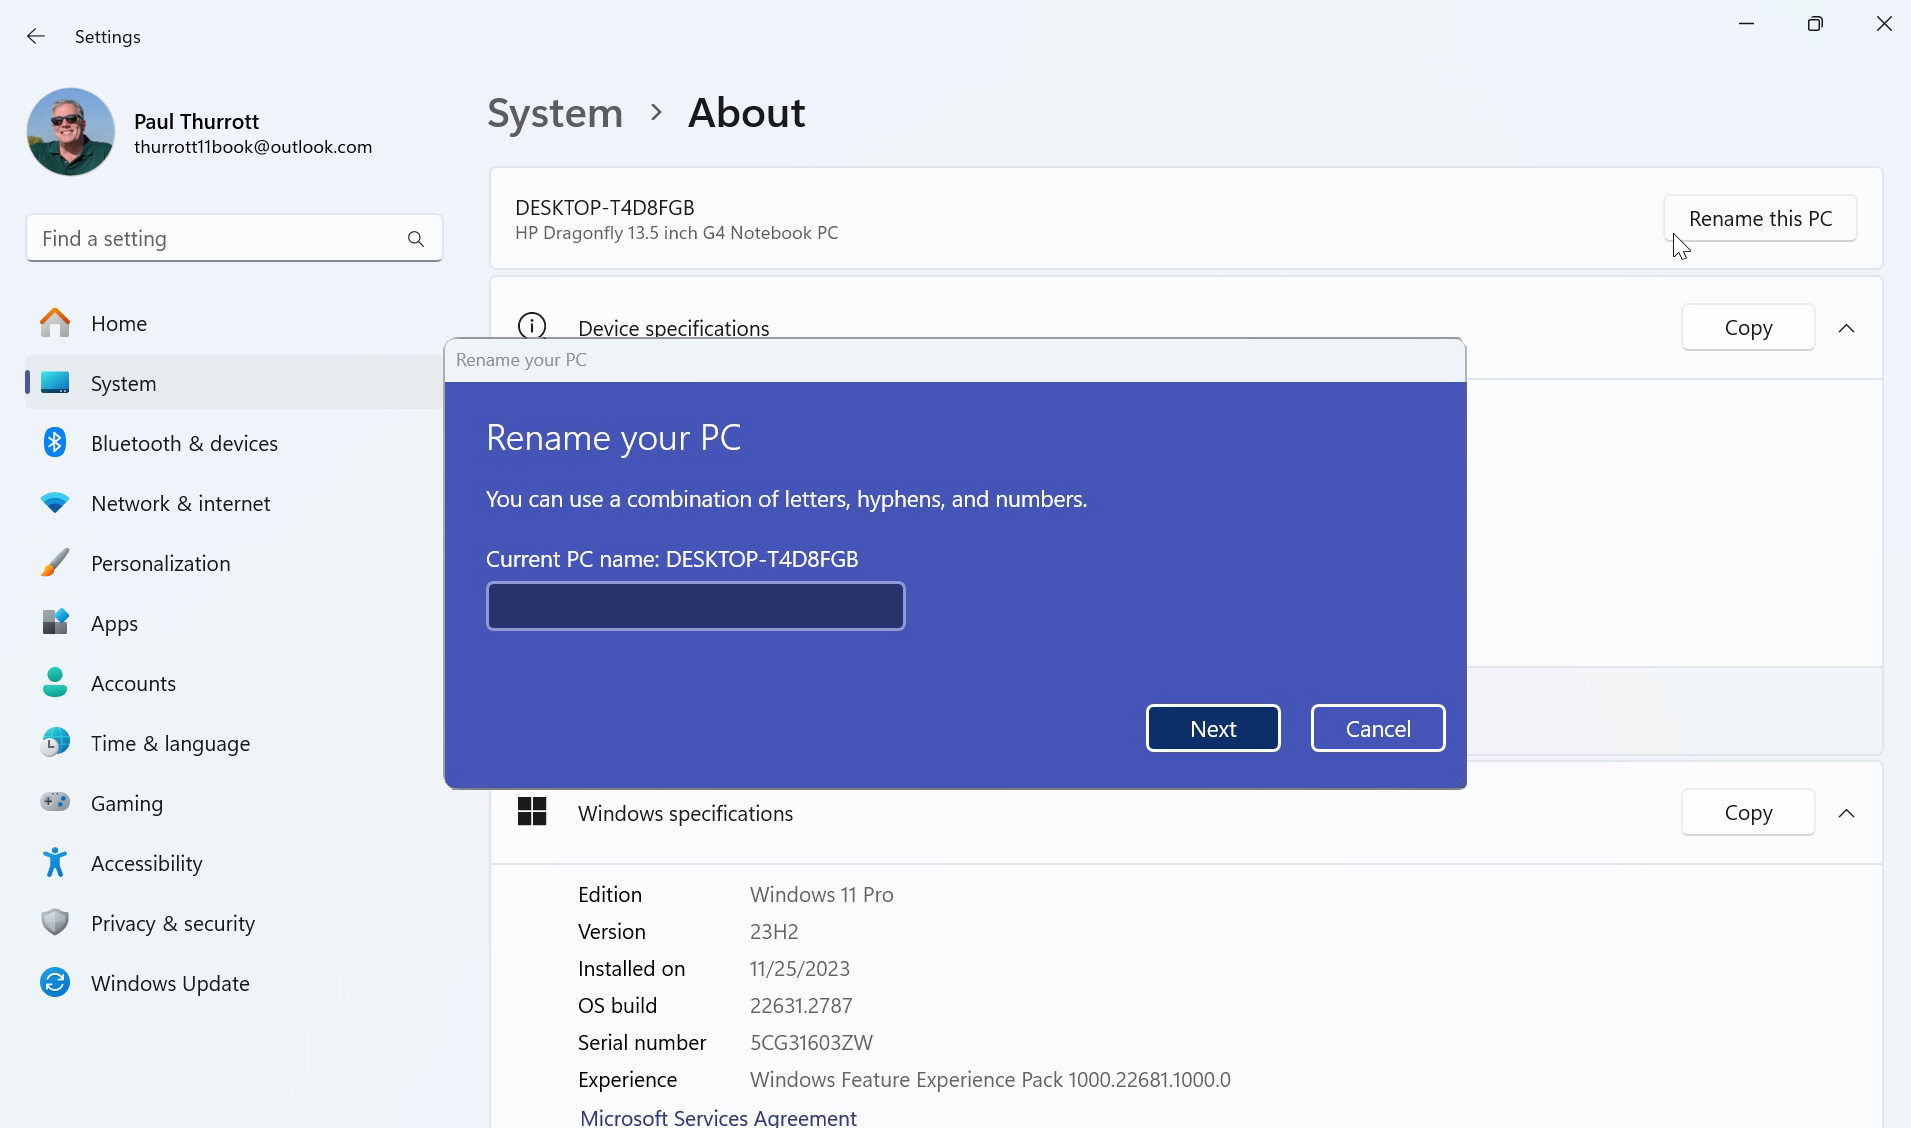
Sorry, you can’t use spaces or most special characters in the PC name. Someone please tell Microsoft it’s the 21st century.
Update and configure apps
Once the system is fully up-to-date and configured, you can turn your attention to the apps you will use. This includes in-box apps included with Windows 11 and those you download and install from the Microsoft Store and the web.
Update the in-box apps with the Microsoft Store
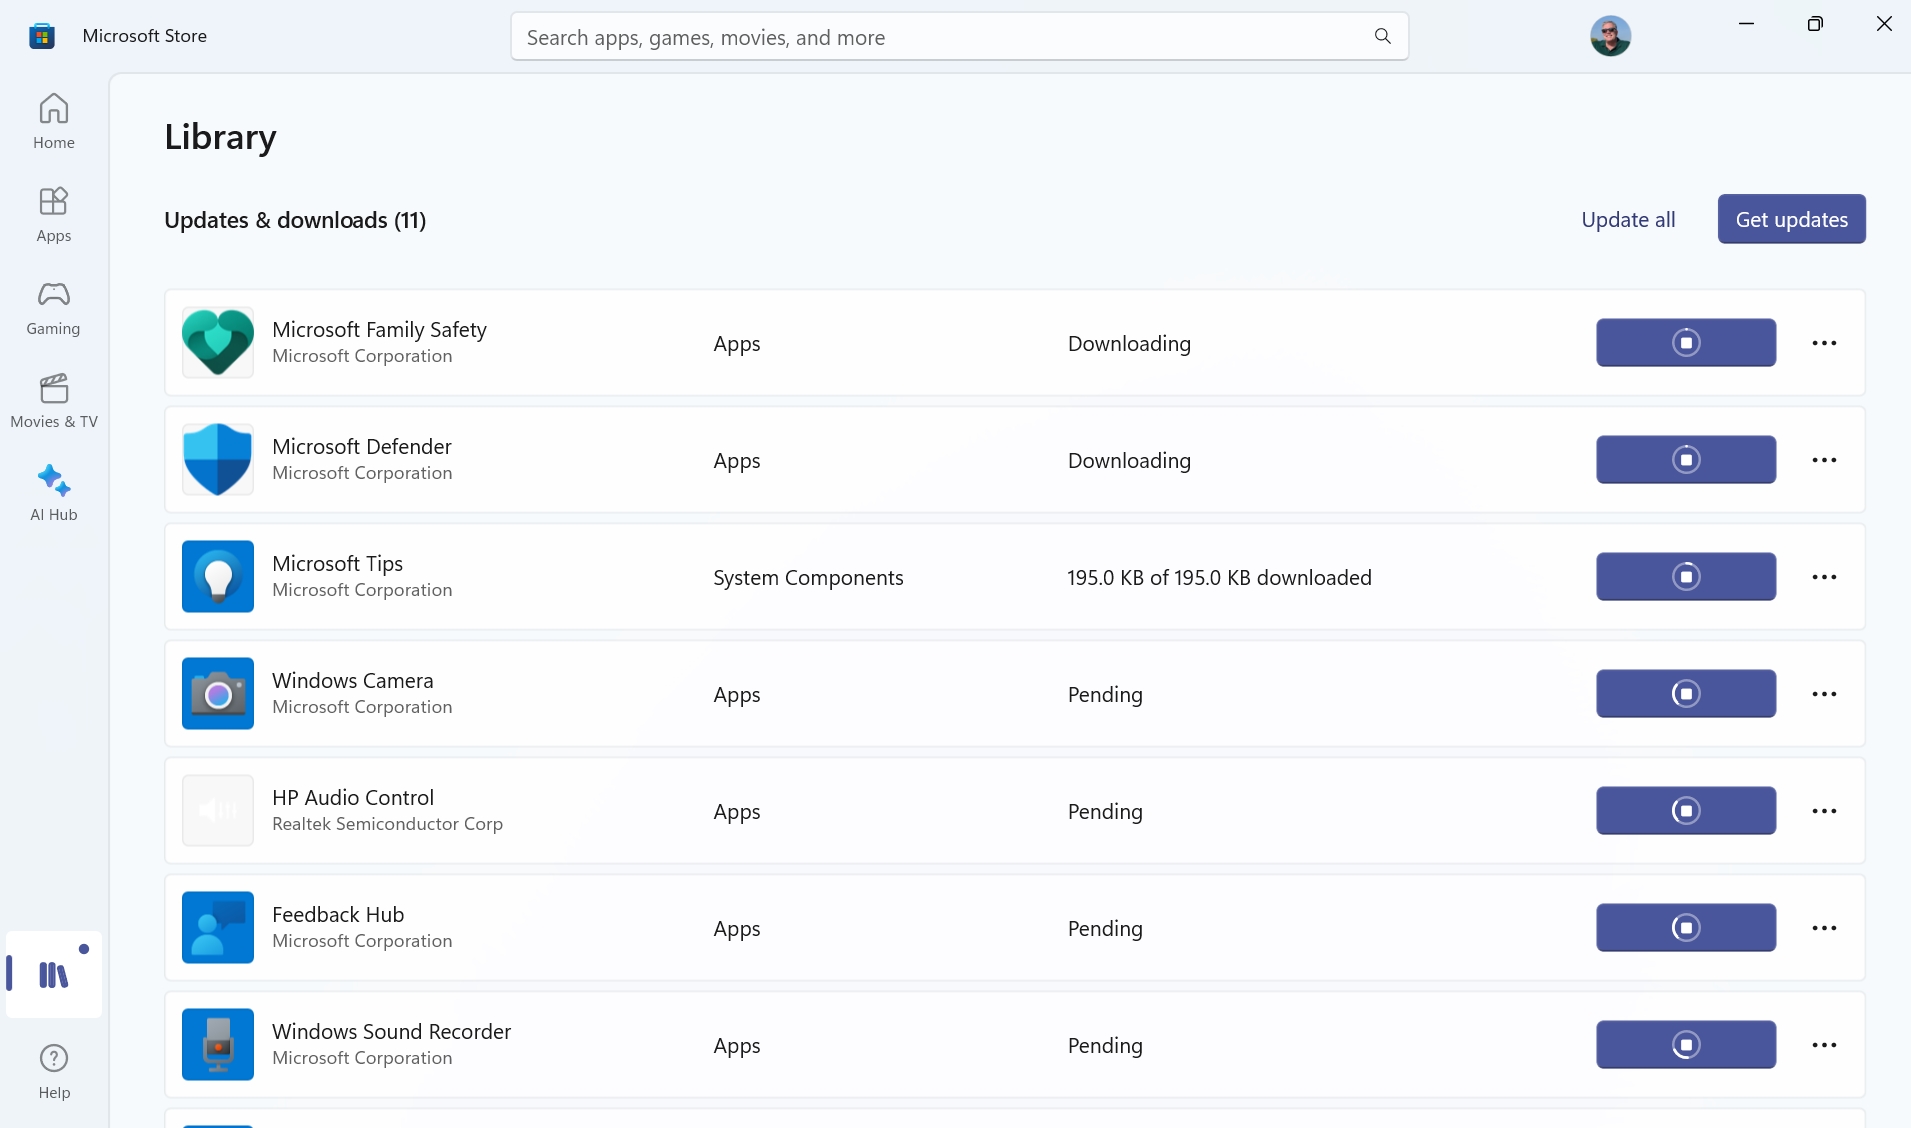
With the notable exception of Microsoft Edge, which provides its own updating mechanism, most of the Windows 11 in-box apps are updated through the Microsoft Store, and the system will automatically keep those apps up-to-date over time. But most of these apps will be out-of-date when you first set up Windows 11. So it’s worth manually updating them all this one time.
To do so, open the Microsoft Store app, select Library in the navigation pane on the left, and click the “Check for updates” button. If there is a “Get updates” link next to that button, click that too.

You can learn more about the Microsoft Store app in the Microsoft Store chapter.
Install the applications you need
While Windows 11 ships with a fairly robust selection of apps, everyone using this system relies on other apps, too, most of which aren’t made by Microsoft. These apps–the full versions of Adobe Photoshop and Premiere Pro, Google Chrome, Notion, and so many others–are typically downloaded from their respective websites and installed one by one as needed.
But you may not know that many of the apps you rely on can also be found in the Microsoft Store as well. And if you’ve purchased or downloaded those apps from the Store in the past, they will be available in your library so you can find them again more easily.
There are advantages to acquiring apps in the Store instead of from the web: Among them, it has liberal licensing policies that allow all Store apps to be used on 10 different PCs at the same time, and you never need to worry about authorizing and de-authorizing PCs as you sometimes do with web-acquired software. And the Store handles all updates going forward, so you never have to worry about keeping apps up-to-date.
To find your previously purchased and downloaded Microsoft Store apps, open the Store app, click Library in the navigation pane, and click the “Apps” button to display only your apps. Then, click “Soft and filter” and ensure that “Sort by name” is selected and “Show installed products only” is deselected. There it is, your personal apps library.
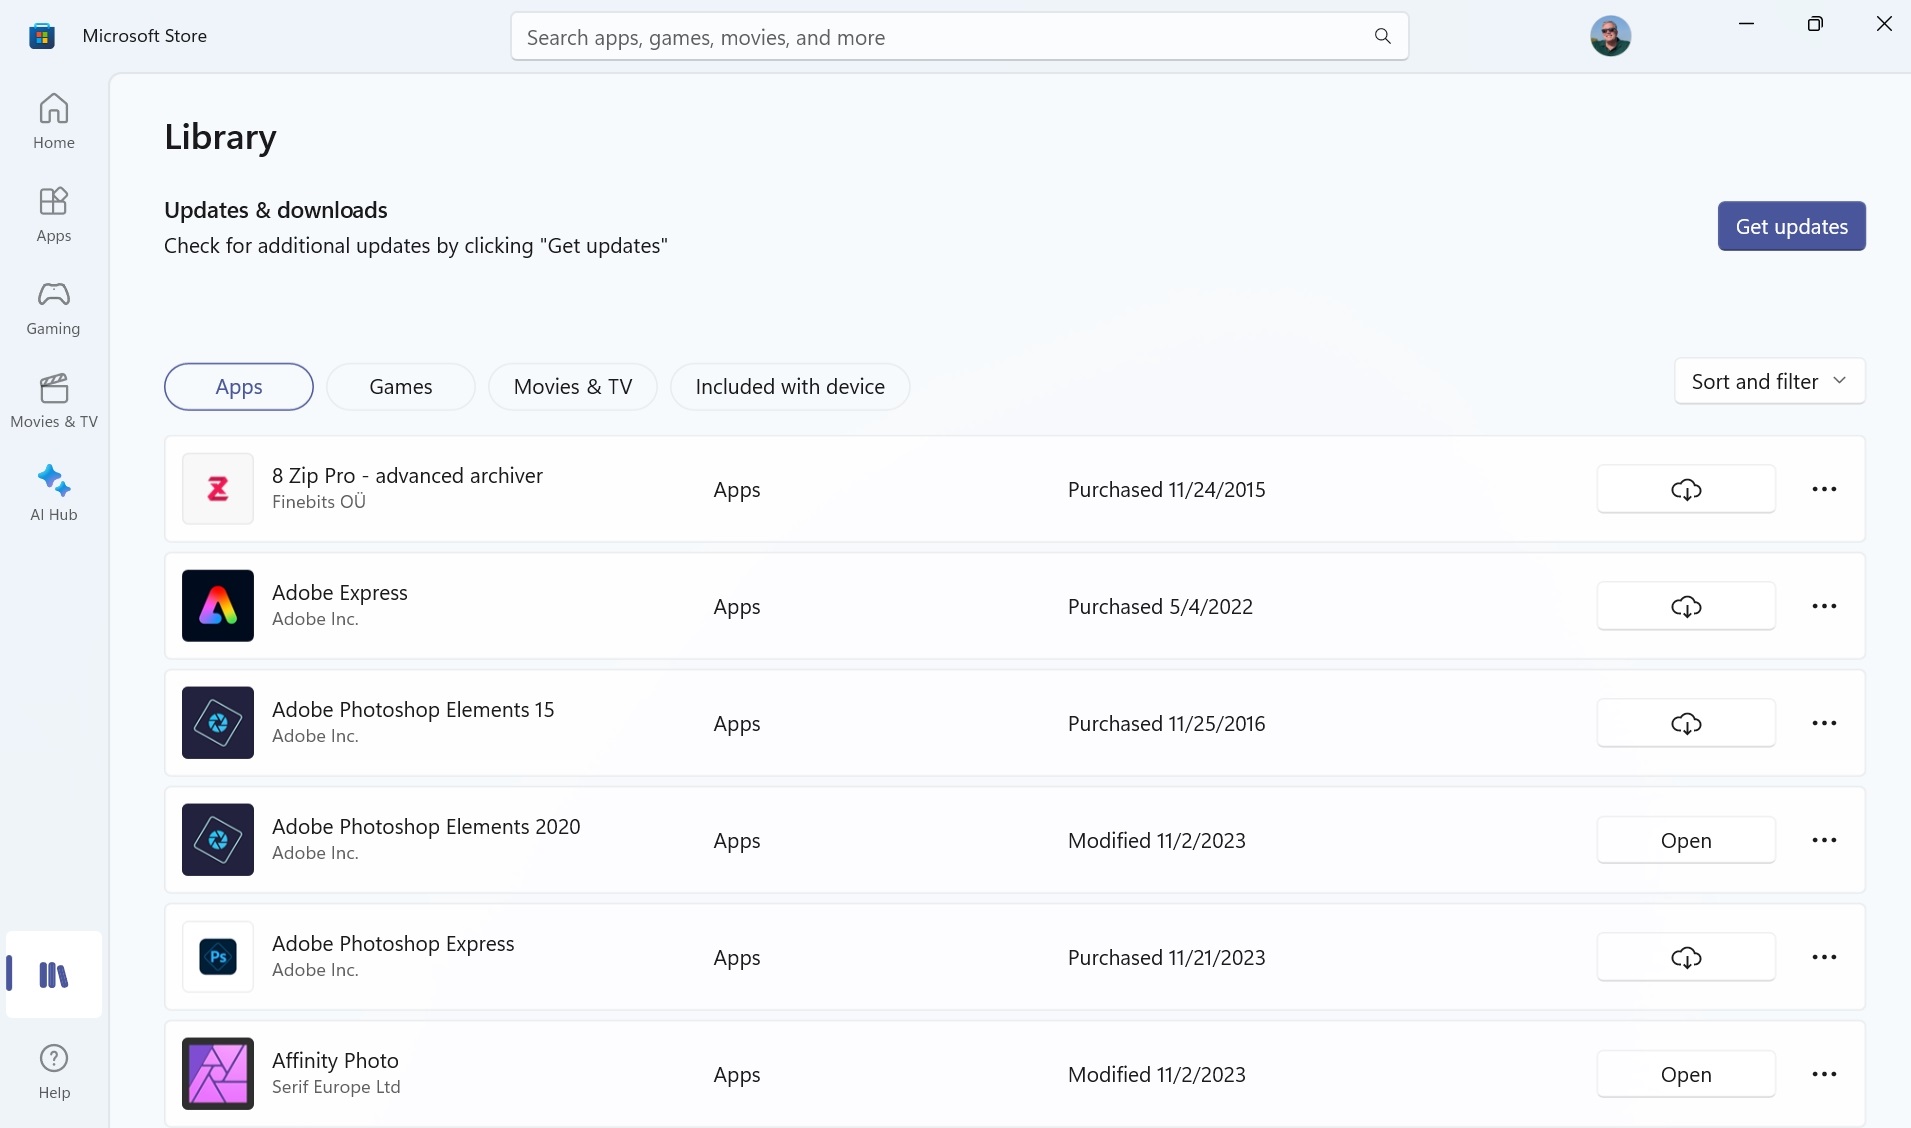
You can also select “Games” to see just the games in your library.
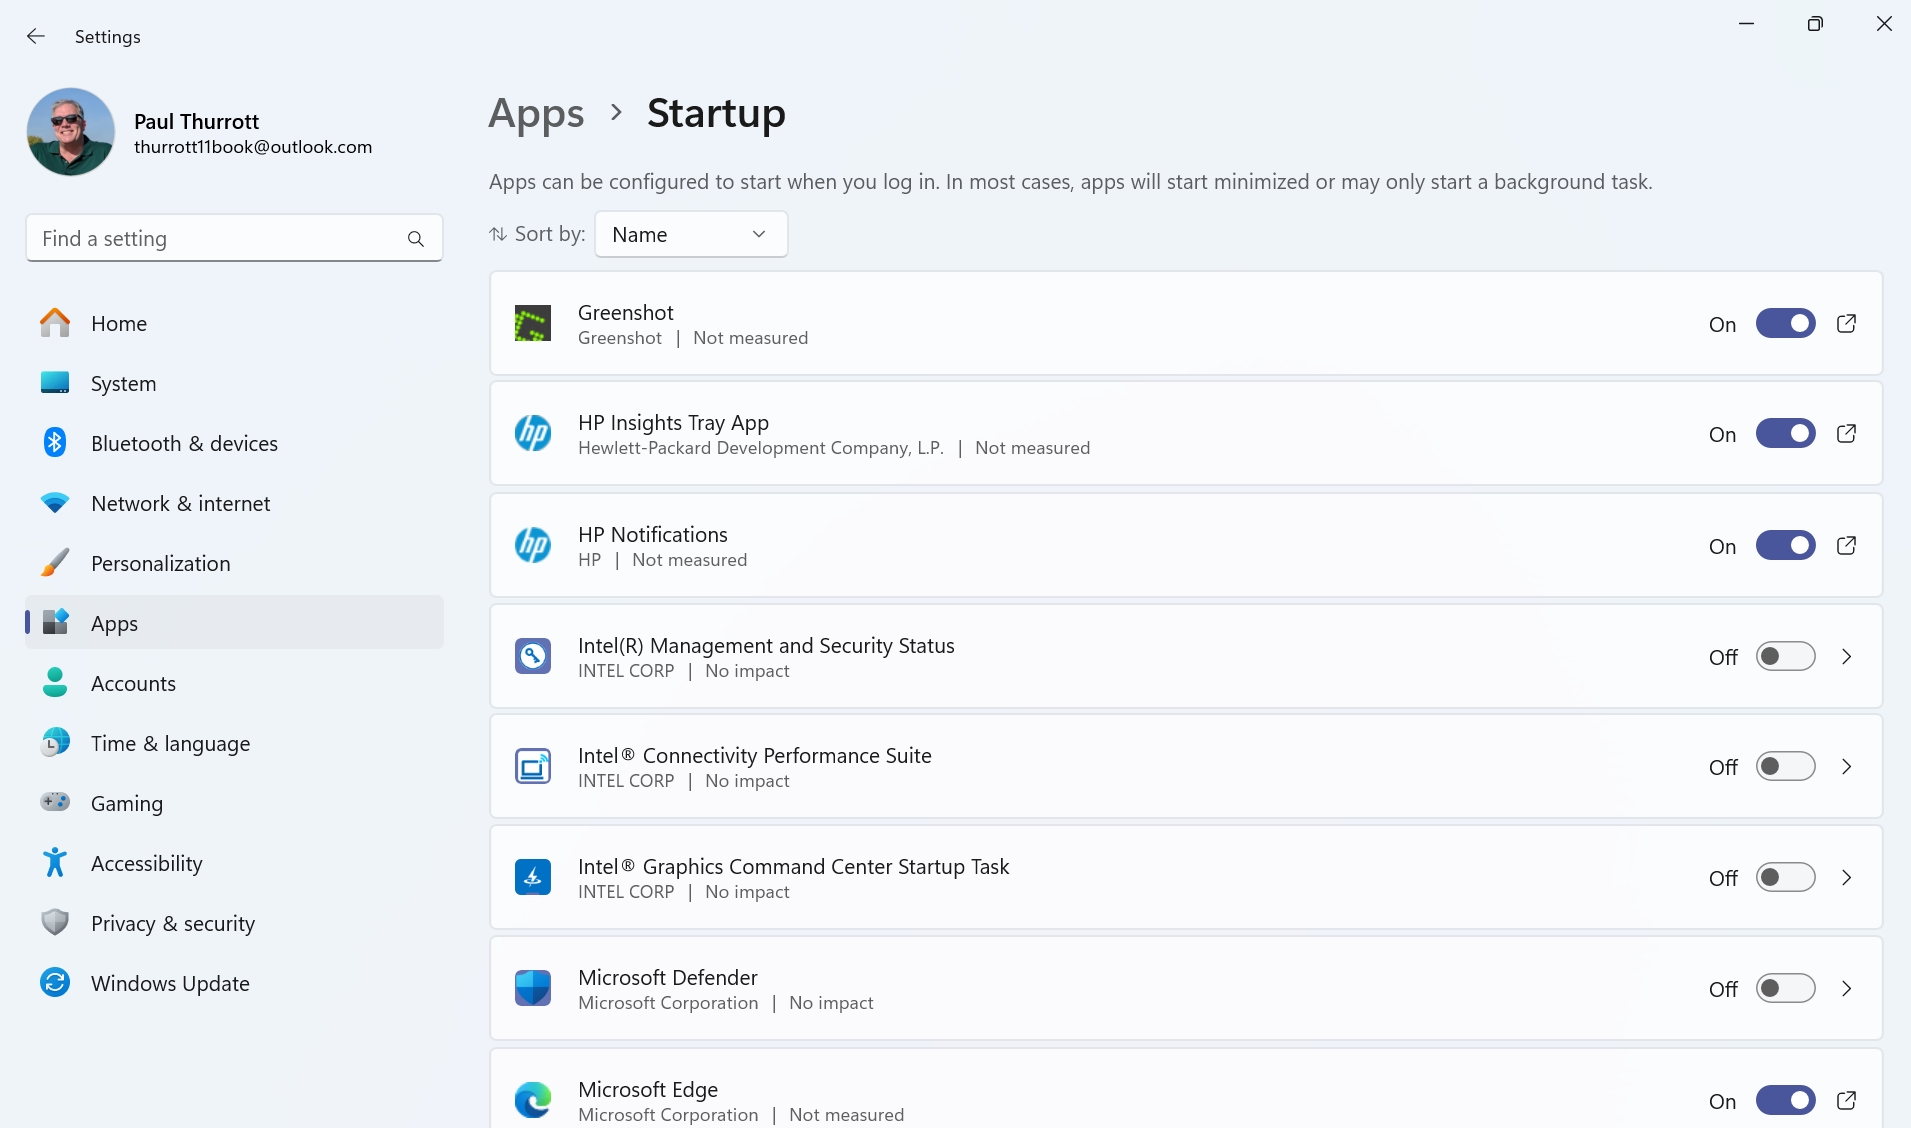
Configure auto-start apps
Once you have installed all the apps you need–and have removed all those you do not–you should examine which of them are configured to run automatically at startup and make some decisions: Many apps configure themselves to auto-start every time you sign into Windows, and if you don’t need them to do so, they will just take up system resources like microprocessor, RAM, and storage for no good reason.
There are a few places where you can configure this behavior, but the most obvious can be found in the Settings app by navigating to Apps > Startup.
We discuss this process in more detail later in the book, in the Apps Basics chapter.
More Windows 11 personalization and configuration tasks
Windows 11 offers many customization capabilities, so be sure to check out the Personalization section in the Settings app (WINKEY + I). But we cover many aspects of personalization throughout this book as well, including how you can customize your PC’s display(s), lock and sign-in screens, and privacy settings.

Gain unlimited access to Premium articles.
With technology shaping our everyday lives, how could we not dig deeper?
Thurrott Premium delivers an honest and thorough perspective about the technologies we use and rely on everyday. Discover deeper content as a Premium member.