Phone Link (23H2)
- Paul Thurrott
- Jun 20, 2024
-
3
Windows 11 provides a Phone Link app you can use to access key iPhone and Android phone features from your PC. These can include, among other things, interacting with notifications, making and receiving text messages, making and receiving phone calls, controlling media playback on the phone, viewing, sharing, and saving phone-based photos, and more.

This is a fantastic idea in theory, but the capabilities vary by phone type, and there is a lot of underlying complexity to deal with.
If you have an iPhone, Phone Link is particularly problematic: You will receive only basic functionality and the experience is buggy, incomplete, and frustrating. Android users will have a better experience, with many more features and deeper integration, especially if you have a recent Samsung flagship phone.
The complexity you will face with Phone Link isn’t entirely Microsoft’s fault: Apple, in particular, limits how third parties can access its closed digital ecosystem, and so the iPhone is locked down in ways that ensure it only works well with Apple’s software, services, and other devices. But even Android users will face a daunting list of challenges when using Phone Link, in particular during initial configuration. And Phone Link is buggy and unreliable, no matter which phone you use.
Understand the complexity of Phone Link
Before you start using Phone Link, you need to understand the underlying complexities noted above. There are three pieces to this puzzle.
Phone Link. You use the Phone Link app in Windows 11 to interact with your smartphone, with the feature set differing depending on which model you use. During initial set up, you will link the phone to your Microsoft account, pair the phone to the PC using Bluetooth, and connect the phone to this instance of the Phone Link app. You will also need to navigate a set of permissions–with Android, many, many permissions–so that Phone Link can access individual phone features.
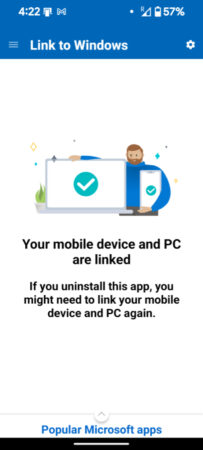
Link to Windows. Microsoft provides a Link to Windows mobile app for iPhone and Android that you must install before using Phone Link. Once it’s configured, Link to Windows doesn’t “do” much, but the app must run in the background on your phone at all times for Phone Link to work.
Select Samsung, Honor, OnePlus, and other Android flagship phones have an integrated Link to Windows experience preinstalled. This makes it a bit easier to configure the phone with Phone Link, but it may not be obvious that this feature is available. (And, if desired, you can still install the standalone mobile app instead.)
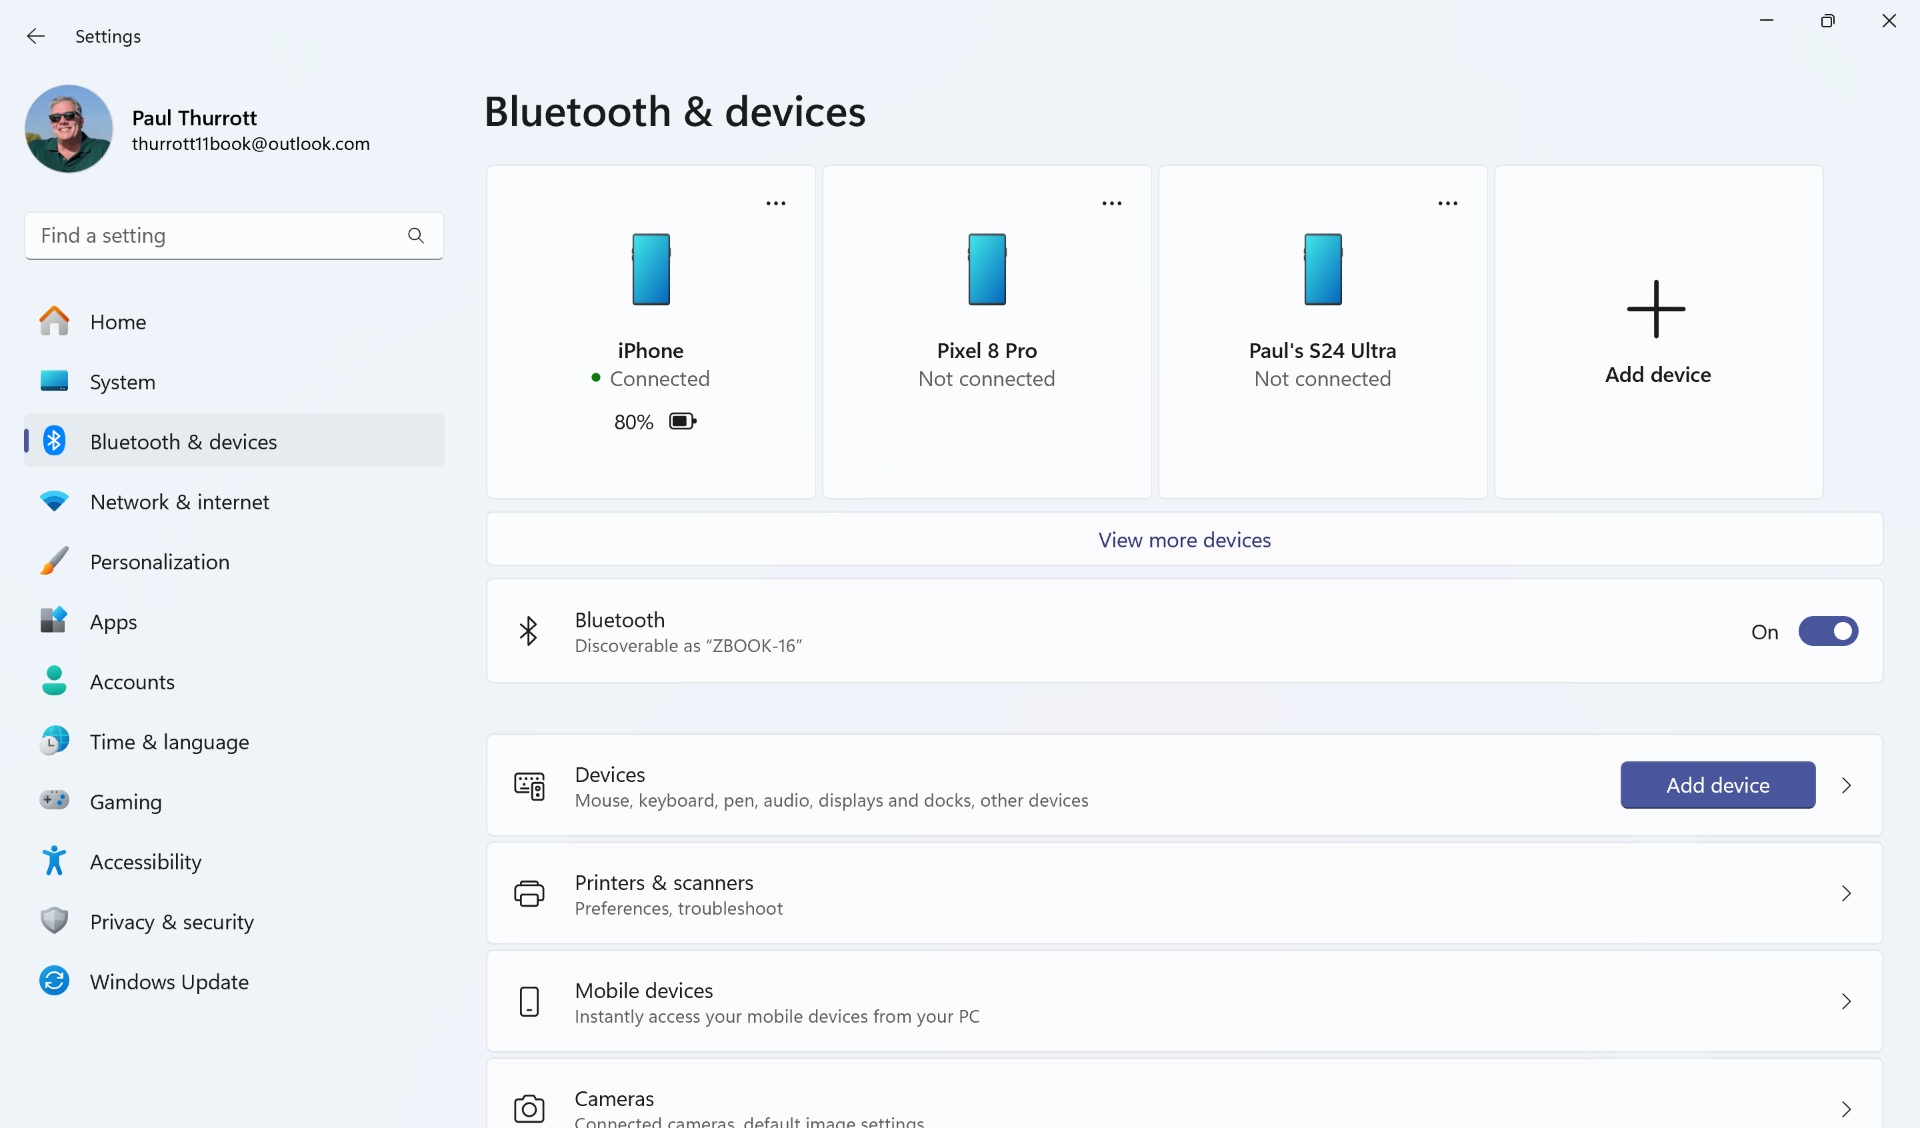
Bluetooth & devices. When you configure your phone to work with Phone Link, you are prompted to pair the phone with your PC using Bluetooth, and Phone Link won’t work until this happens successfully. You can view your phone with the Bluetooth & devices page in the Windows 11 Settings app. If you wish to unpair the phone, click the “More options” (“…”) link in its tile there and choose “Remove device” from the context menu that appears.
Unpairing the phone from your PC isn’t enough: You also need to unpair your PC from your phone. With an iPhone, you do so in Settings > Bluetooth; find your PC in the “My Devices” list, tap its “(i)” button, and then tap “Forget This Device.” With an Android phone, you do so in Settings > Connected (> Bluetooth, if on Samsung); find your PC in the “Saved” (or “Paired”) devices list, tap its “Settings” (gear) button, and then tap “Forget” (or “Unpair”).
You can learn more about Bluetooth devices and pairing in the Bluetooth chapter.
Mobile devices. This interface in the Windows 11 Settings app (Bluetooth & devices > Mobile devices) lets you enable or disable access to the phones linked to your Microsoft and enable or disable the Phone Link app. When the first of these features is enabled, you can use a Manage mobile devices window to add a new (Android only) phone to your Microsoft account (duplicating the functionality in Phone Link, unless you have an iPhone), enable or disable individual phones on this PC, and, oddly, enable or disable a small set of phone features, like “Use as a connected camera” and “Get new photo notifications.” What you cannot do here is unlink a phone from your Microsoft account, as you could in Windows 10.
At the time of this writing, the only way you can unlink a phone from your Microsoft account is via the Link to Windows app on your phone. To do so, open Link to Windows, tap the “Settings” (gear) button, and tap your Microsoft account under “Linked Account.” Then, tap “Sign out and unlink account” in the screen that appears. If you have sold, traded-in, or reset your phone, you’re out of luck: That phone will continue appearing in Mobile devices and elsewhere until and unless Microsoft re-adds this feature to Windows 11.
Microsoft account website. The Microsoft account website has a Devices page that lists the PCs and other devices that are linked to your Microsoft account. This page is useful for various purposes, but an Android & iOS device management page linked to from this page does not display any phones (or other devices) that you’ve linked to your Microsoft in Windows 11 and/or the Phone Link app. If it did, you would be able to unlink a device from here as well, but this page is currently useless.
You can learn more about your Microsoft account in the Microsoft Accounts chapter.
Aside from the reliability problems you’ll almost certainly experience using Phone Link, there are other complexities. You can link multiple phones to your Microsoft account. You can pair multiple phones to any PC you own. You can connect multiple phones to any instance of Phone Link you use on any PC, and switch between them. And your PC and phone must be connected to the same Wi-Fi network.
To make this as simple as possible for you, this chapter documents the quickest and most obvious ways in which you can get up and running with Phone Link and configure your phone and PC correctly to enable the features you wish to use. But you will likely have a frustrating experience setting and using Phone Link, and you need to remember that you can only unlink your phone from your Microsoft account using the Link to Windows app on the phone. There’s no other way to do so at this time.
Undaunted? Cool. Let’s dive in.
Connect your phone to Phone Link
Before you can use Phone Link, you will undergo some number of steps–it varies by phone model–during which you will install Link to Windows on your phone (there are separate versions for iPhone and Android), link the phone to your Microsoft account, pair the phone to this PC, and connect the phone to this instance of Phone Link.
If you’re using Android and the Google Play Store says that Link to Windows is already installed, you may have a flagship Samsung phone or other Android phone with an integrated Link to Windows experience. If so, you’re all set: You don’t need to install the app. Instead, open your phone’s notifications shade, locate “Link to Windows” in the Quick settings icon grid, and tap it to launch the app.
Once Link to Windows is installed, open the app. Then, you can proceed to the appropriate section below to get it configured for use with Phone Link.
Good luck.
Android user? Jump ahead to Add your Android phone to Phone Link.
Add your iPhone to Phone Link
On your PC, open Phone Link and select “iPhone” in the opening screen. The configuration wizard will display a QR code that will help expedite pairing the phone with your PC.
On your iPhone, tap “Scan QR code.” Then, after allowing Link to Windows to use the iPhone’s camera, scan the QR code displayed on your PC. Link to Windows will prompt you to continue pairing with Bluetooth.
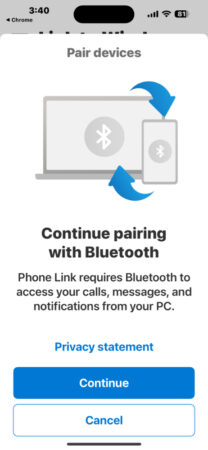
Tap “Continue” in Link to Windows and allow Link to Windows to use Bluetooth when prompted. Then, accept the Bluetooth pairing requests on the iPhone and on the PC. When the devices are paired, Phone Link (on your PC) will display a “You are almost there!” message with a set of configuration steps you must take on your iPhone.
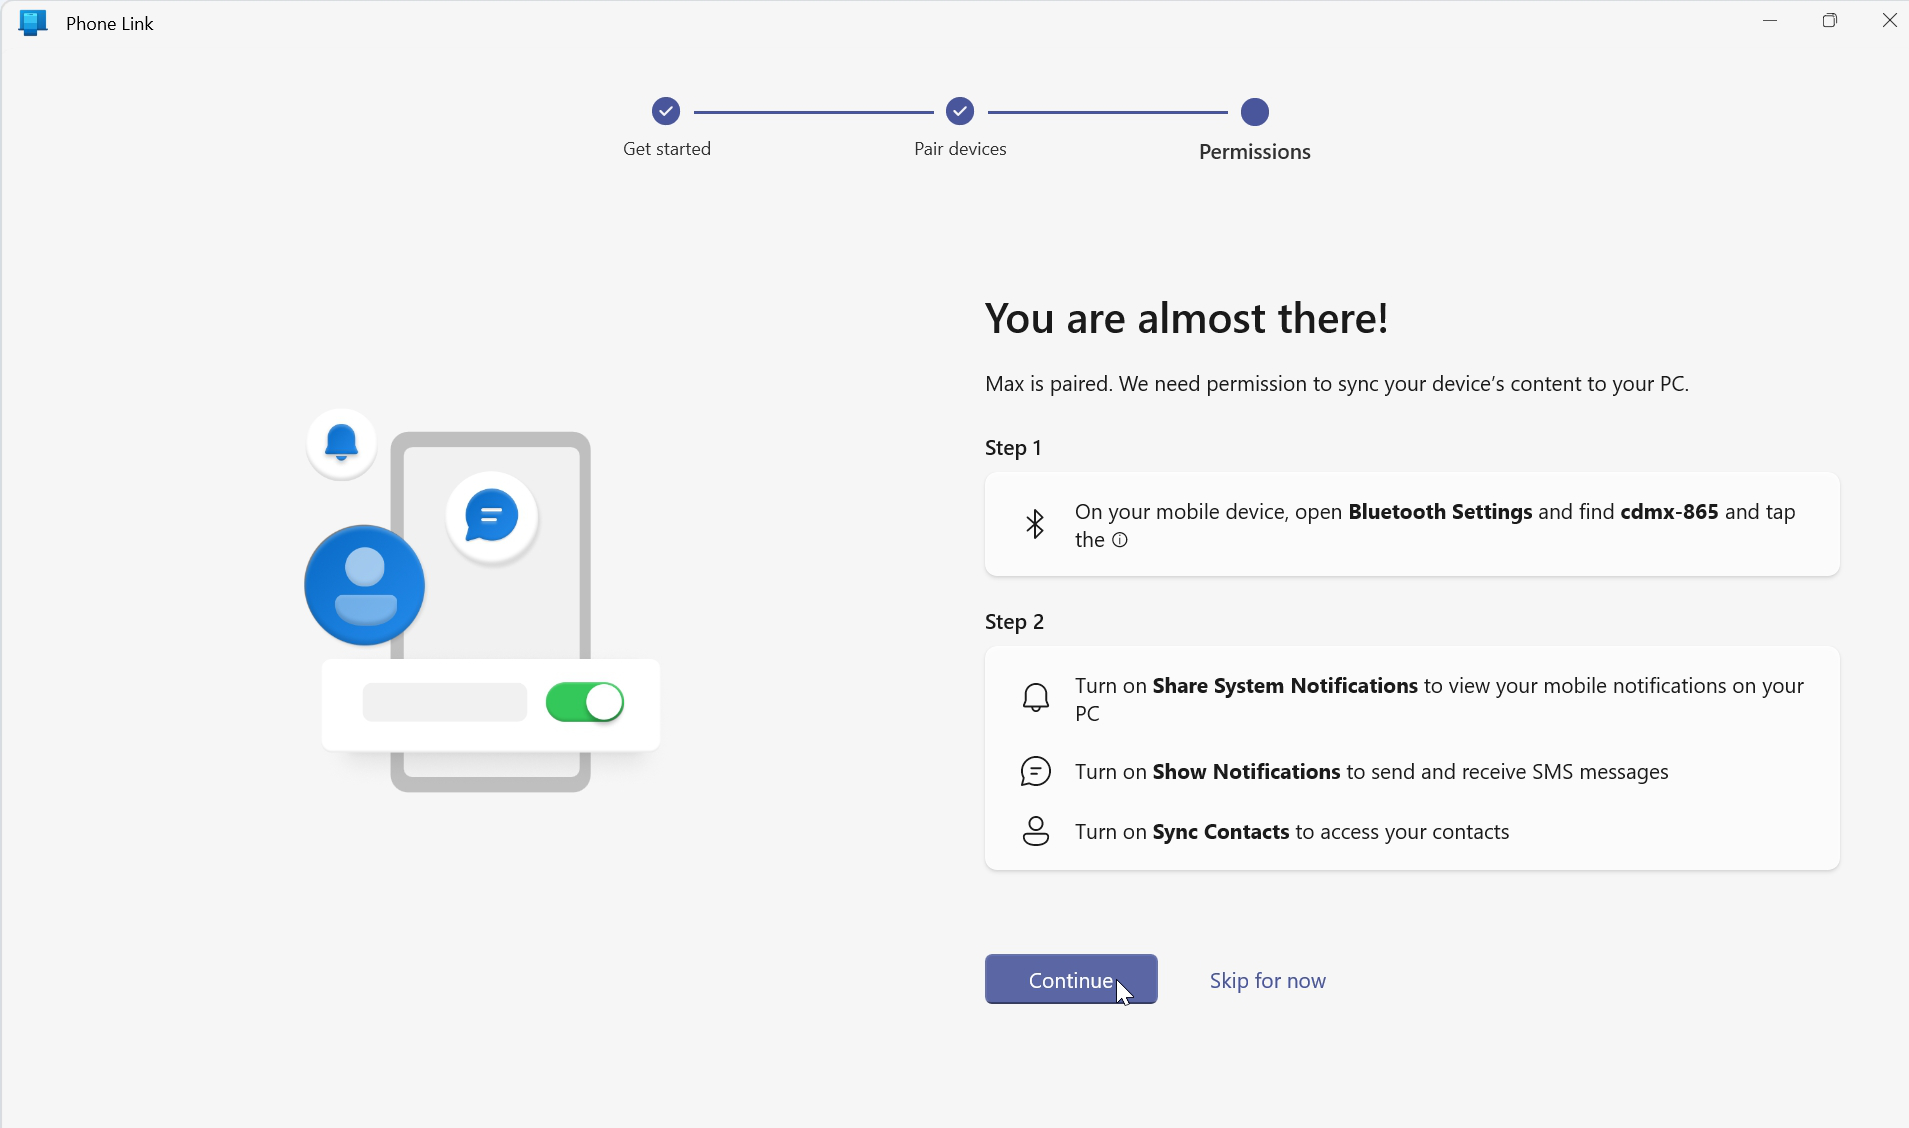
Put simply, you will open the Settings app on your iPhone, navigate to Bluetooth, and then locate your PC in the “My Devices” list. Tap the “(i)” button next to your PC to display a new screen, and then enable the following three options:
- Show Notifications
- Sync Contacts
- Share System Notifications
When this done, turn back to your PC and click the “Continue” button in Phone Link. Phone Link will tell you that “You are all set” and that your iPhone is now paired with your PC. Click “Continue.”
Phone Link will display a “Welcome to Phone Link!” window in which you can optionally enable the option “Open Phone Link when I sign in to Windows” if you intend to use Phone Link regularly. Then, click “Get started” to display the main Phone Link app window.
We discuss configuring and using Phone Link with your iPhone later in the chapter.
You can jump forward to the section Configure Phone Link to get started.
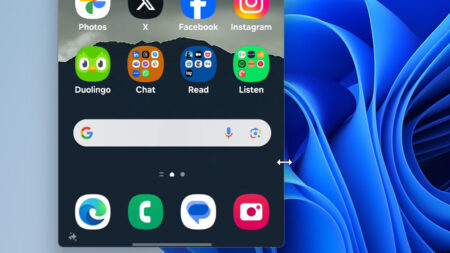
Add your Android phone to Phone Link
On your PC, run Phone Link and click “Android” in the opening screen. The configuration wizard will display a QR code.
In the Link to Windows app on your phone, tap “Sign in using the QR code on your PC” at the bottom of the opening screen. (This option is below the “Sign in” button.) Then, use the in-app camera to scan the QR code displayed on your PC.
On your PC, Phone Link will display a 5-digit alphanumeric PIN you can use to confirm your phone. On your phone, tap “Continue” to sign in to your Microsoft account, and then enter the code shown on your PC as prompted. When that’s done, you will be prompted on your phone to allow a long list of permissions related to Link to Windows. Choose “Allow” for each unless otherwise instructed.
- Send and view SMS messages
- Make and manage phone calls
- Access your contacts
- Access photos and videos on this device (choose “Allow all”)
- Access your phone call logs
- Send you notifications
- Let app always run in the background
![]()
When that’s done, Link to Windows will inform you that device linking is complete. Just tap “Done.”
On your PC, Phone Link will likewise inform you that “You are all set.” Click “Continue” and then enable “Open Phone Link when I sign in to Windows” in the next screen if you intend to use Phone Link regularly. Then, click “Get Started.” A “Select a task to start exploring” window appears. Just click “Skip” to display the main Phone Link app window.
![]()
![]()
You still have more work to do, unfortunately. But the “Unlock all features” entry in the Notifications area on the left can help: Click that to display a “Ready to boost your mobile device and PC?” pane that will step you through the process of completing the initial configuration of your Android phone with Phone Link.
![]()
Click “Get started” and then step through the wizard. What you see here will vary according to how you configured Link to Windows permissions previously, but the wizard will prompt you to allow more permissions on your phone: You’ll see a series of “Link to Windows” notifications on the phone for allowing Link to Windows in Device & app notifications, enabling notification access, and perhaps others.
Next, the Unlock all features pane will instruct you to pair your mobile device and PC. Click “Begin pairing” in Phone Link to display the “Set up your Bluetooth” window. Next, click “Set up” to pair the two devices, keeping an eye out for the Link to Windows notifications that will appear on your phone. Then, accept the pair request on both devices, and be sure to give Link to Windows access to your contacts and call history on the phone if you intend to use Phone Link’s phone calling capabilities.
When you’re done, the Unlock all features pane will congratulate you, and you can click “Close.” If you’re lucky, you’ll never have to deal with that again.
We discuss further configuring and using Phone Link with your Android phone in the next sections.
Configure Phone Link
If you finally connected your phone with Phone Link successfully, congratulations. You understandably want to get started using the app, but you should take a few moments to review Phone Link settings first to ensure that it’s configured for your needs.
To do so, click the Settings (gear) icon in the upper right of the app window.
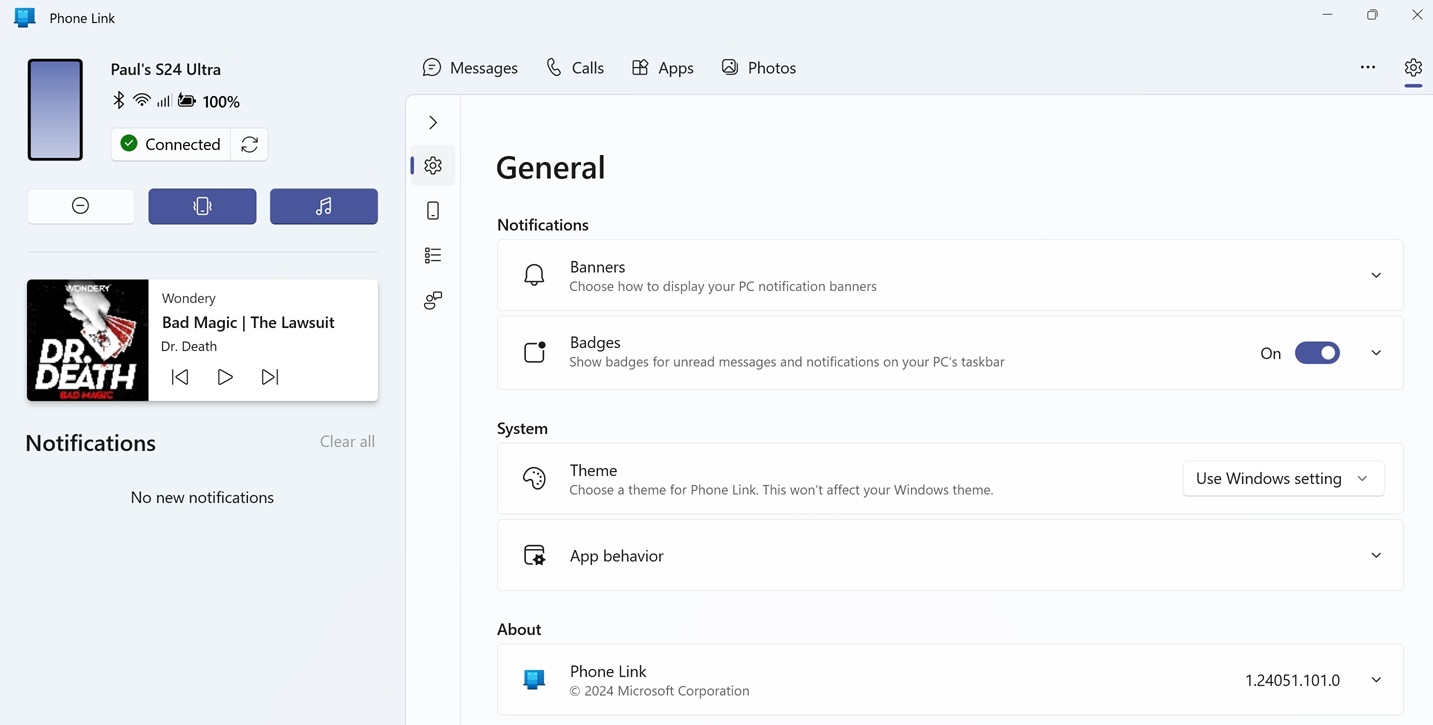
Phone Link settings is divided into three relevant sections: General, Devices, and Features.
The options you see in the default Phone Link settings view are, as promised, general, and apply to basic app settings like how Phone Link banners display, whether the Phone Link shortcut in the Taskbar can display badge overlays, and so on. The App behavior options are interesting: Here, you determine whether Phone Link starts when you open Windows and, if so, whether the app window appears.
Devices is where you can select between the phones and other devices you configured with Phone Link. Most people will only configure a single phone, but you can also add a new device here or remove a configured device. Removing a device will unpair it from the PC (via Bluetooth) and disconnect it from this instance of the Phone Link app.

If you do remove your phone, you will want to make two changes on your phone as well: Unpair the PC in Bluetooth settings and uninstall the Link to Windows app.
We discuss using Phone Link with multiple phones later in this chapter.
The Features view is, in many ways, the most interesting. What you see here is specific to your phone and the capabilities it offers. So you will see only a handful of options if you’re using an iPhone and more options–perhaps many more–if you’re using an Android phone.
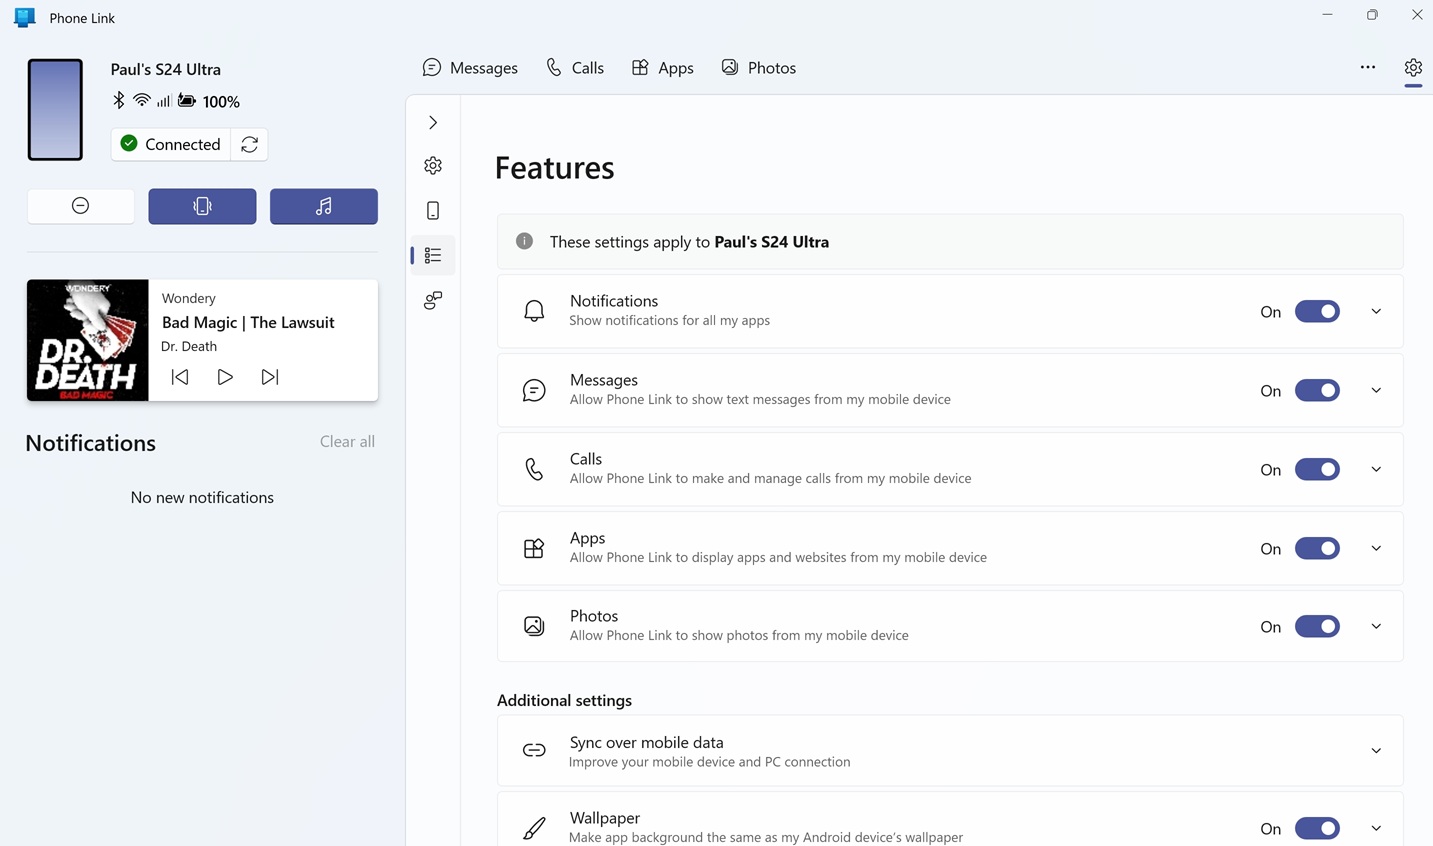
Some key options here include:
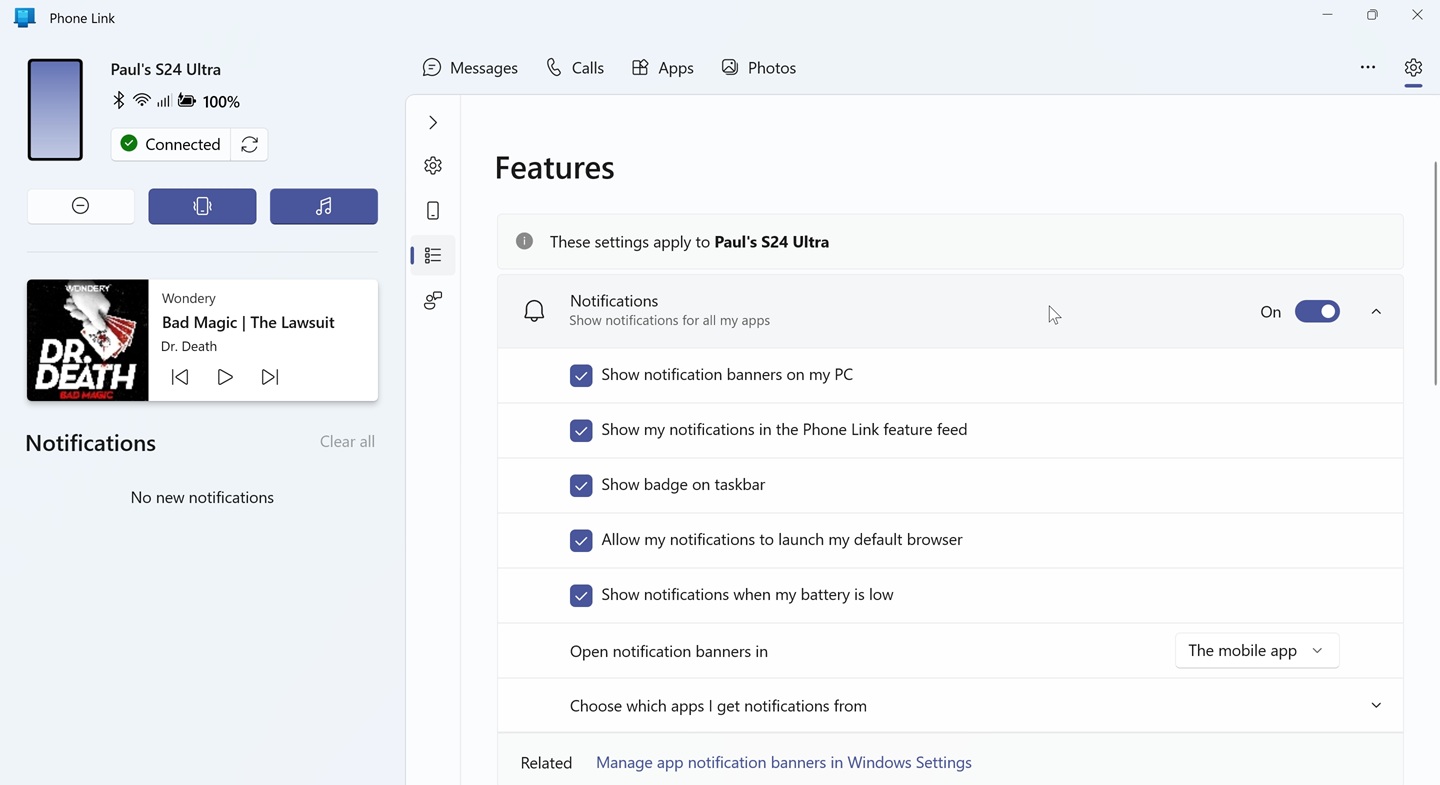
Notifications, Messages, and Calls. Phone Link provides some degree of support for notifications, messages, and calls with all phones. You can toggle these features on/off globally, but you can also expand each option to display specific features within each group for more fine-grained control.
Apps. Recent flagship Samsung Galaxy devices and select other Android phones allow you to remotely display and interact with your phone’s screen and individual apps, each in their own windows alongside your Windows apps.
Photos. Those with Android phones can access and, optionally, delete photos on their phones using Phone Link.
Sync over mobile data. By default, Phone Link syncs with your phone over Wi-Fi only. But those with Android phones can optionally enable this feature, so you can sync using your phone’s cellular connection when Wi-Fi is not available.
Wallpaper. Those with Android phones will display their phone’s wallpaper as a subtle background in the Phone Link left pane by default. You can use this option to toggle off this effect.
Transferred files will save to. Those with Android phones can use Phone Link to transfer files between their phone and their PC. This option lets you configure the destination save folder location on your PC.
Cross-device copy and paste. Recent flagship Samsung Galaxy devices and select other Android phones support copying and pasting text and images between your phone and your PC. This is enabled by default on supported devices.
Instant Hotspot. If you have a recent flagship Samsung Galaxy devices or other supported phone, you can use Phone Link to configure Windows 11 to use its mobile hotspot seamlessly via the Wi-Fi interface in Quick settings.
Audio player. This feature toggles the in-app audio player that lets you control the playback of phone-based media from Windows. If you toggle this to “Off,” the audio player will not appear.
We discuss most of these features later in the chapter.
Manage your Android phone with Windows
Several things happen when you connect your phone to your PC using Phone Link. The app sets up a Bluetooth pair between the two devices, and it exposes a set of phone features that are specific to your phone type. But behind the scenes, Phone Link also links, or associates, your Android phone with your Microsoft account. And because Windows 11 offers some light Microsoft account management capabilities, you can access a limited set of phone features from outside the Phone Link app too.
Phone Link can’t link your iPhone to your Microsoft account because Apple purposefully limits this type of functionality. So this section applies only to Android.
To see this, open the Windows 11 Settings app and navigate to Bluetooth & devices. There, you will see a Mobile devices entry.
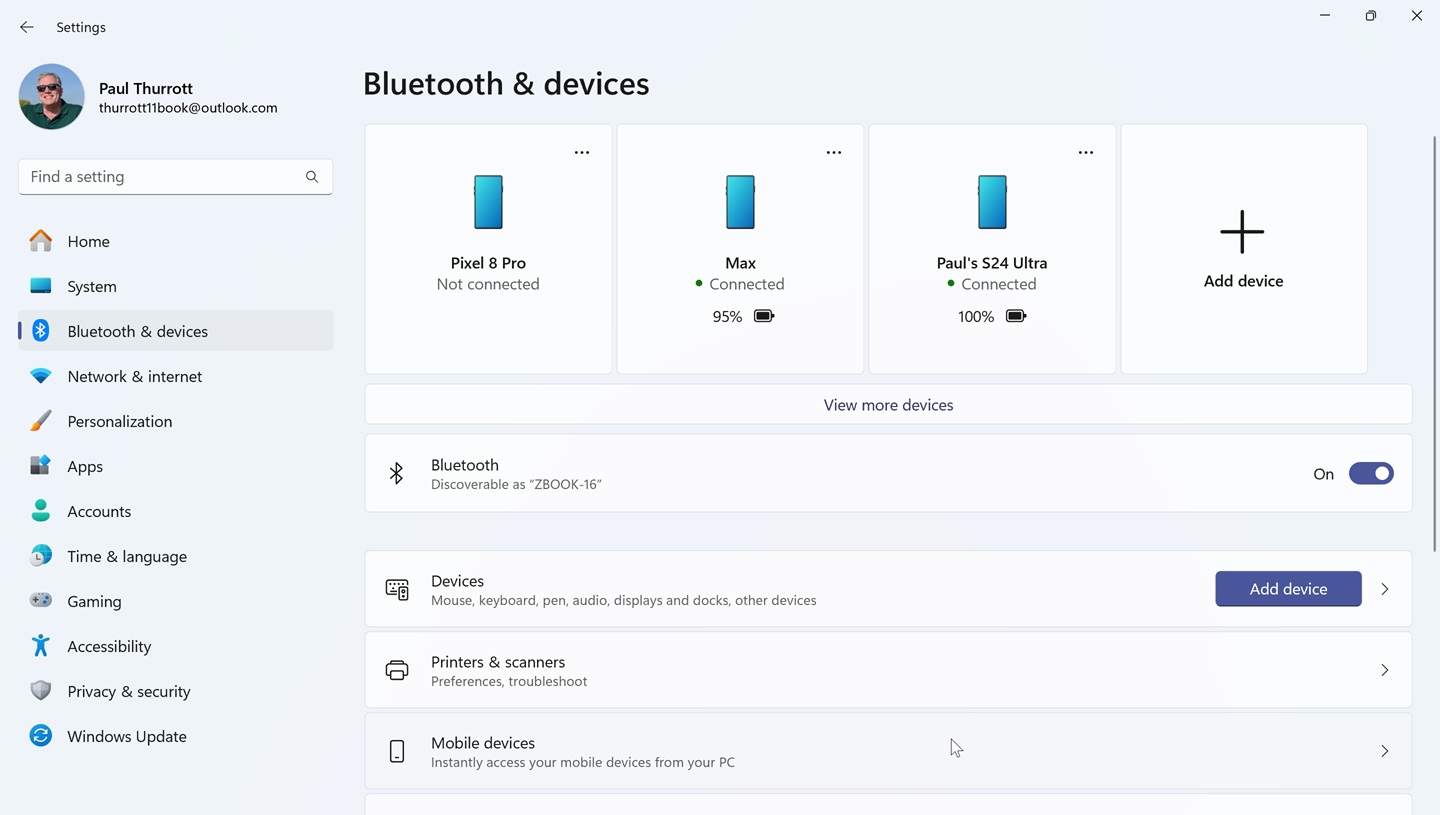
Select this item to display Mobile devices settings.
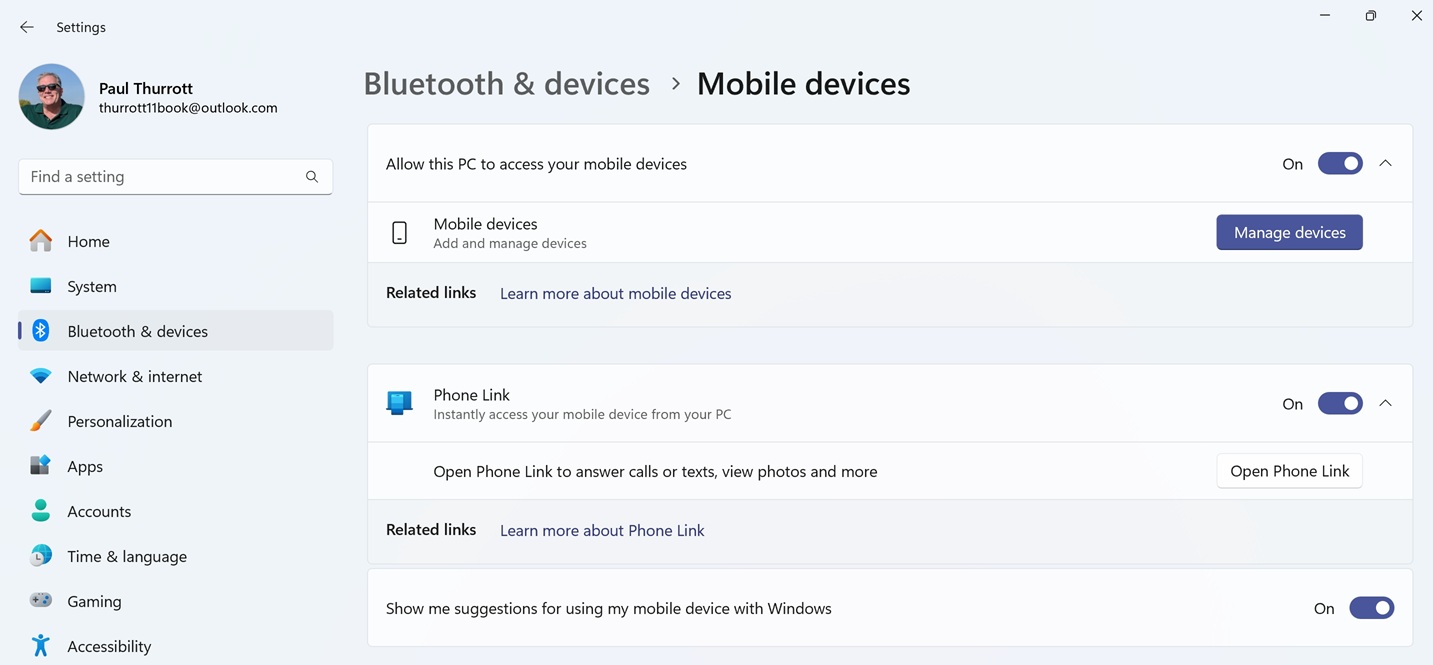
Here, you will see two main settings–“Allow this PC to access your mobile devices” and “Phone Link,” both with global “On/Off” toggles. If the former is enabled, you can perform some management tasks related to the mobile devices associated with your Microsoft account. And if the latter is enabled, you can use the Phone Link app. These options are independent of each other.
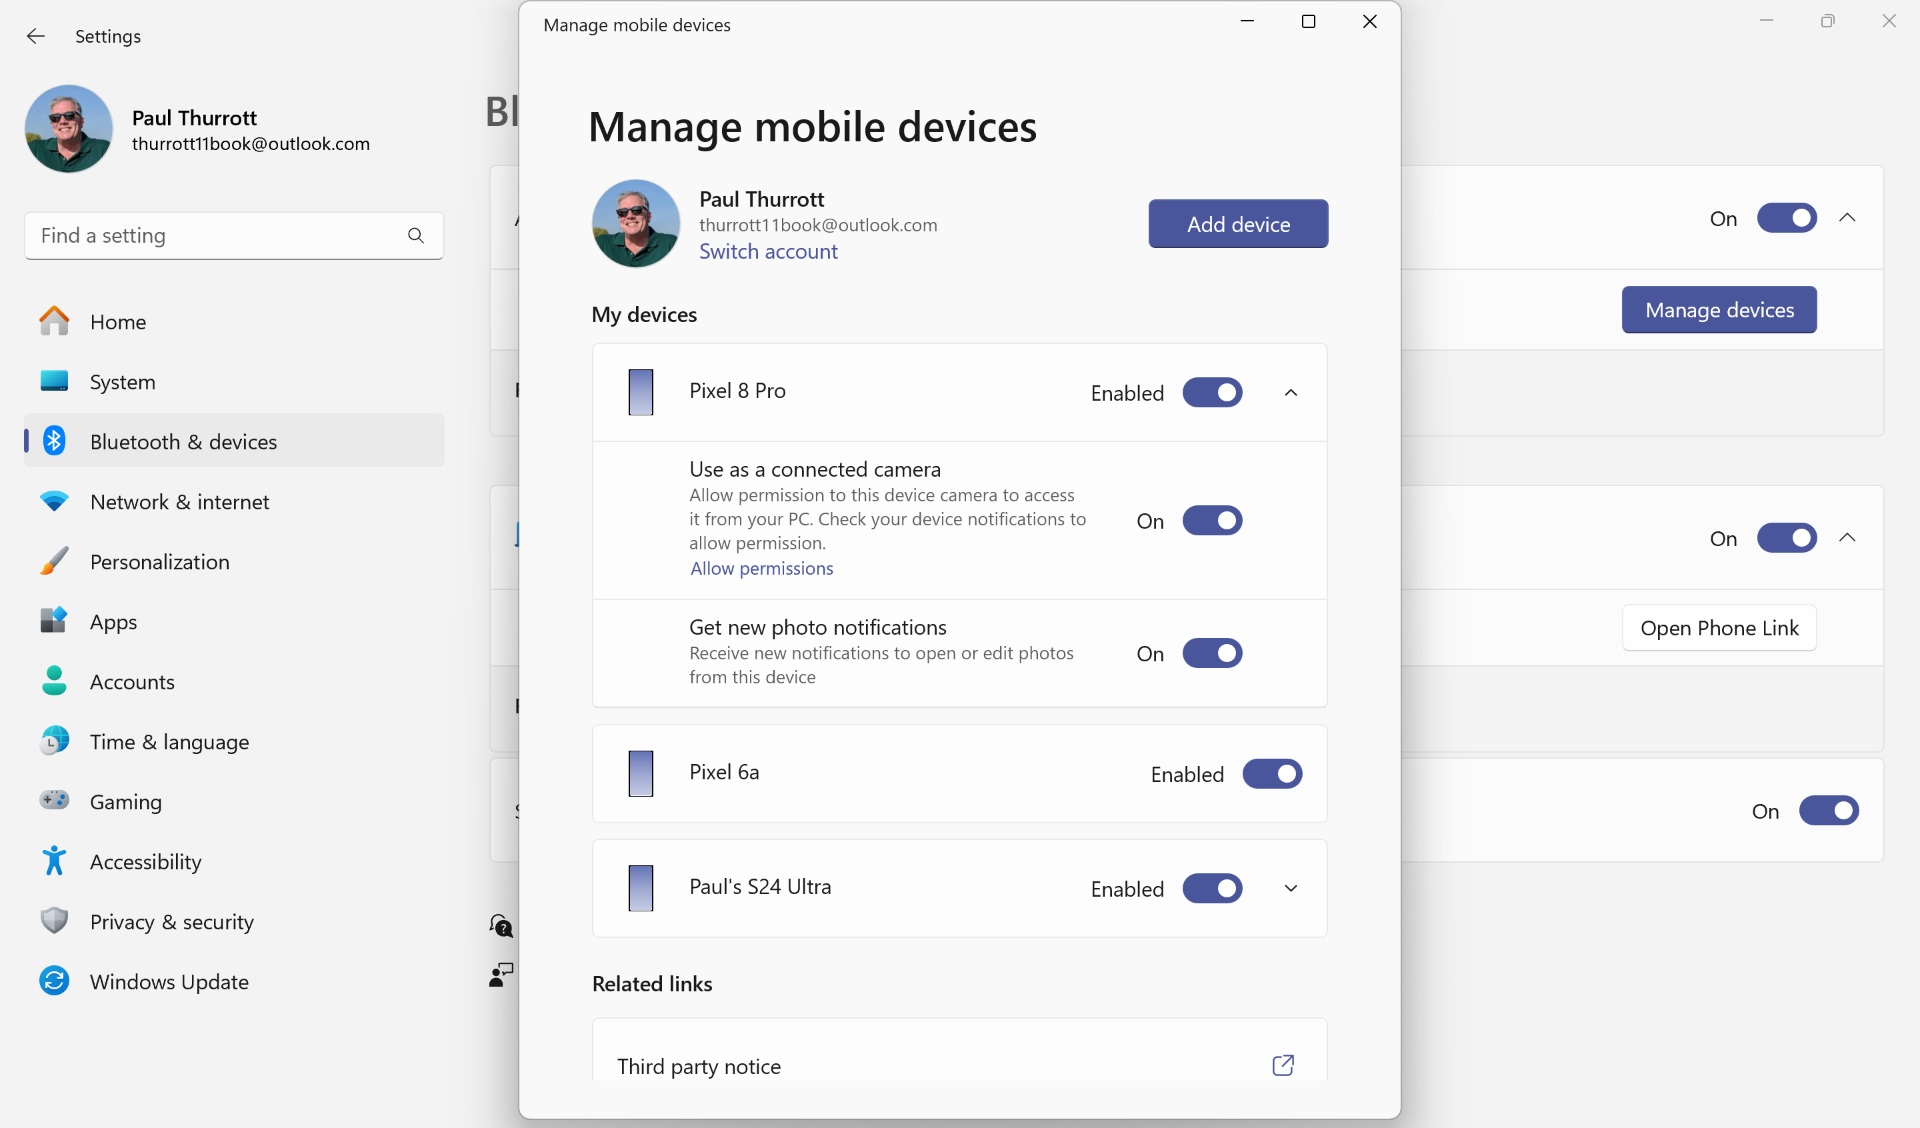
To manage the mobile devices associated with your Microsoft account, click “Manage devices.” The “Manage mobile devices” window appears.
What you see here will vary according to which Android device(s) you’ve configured with your Microsoft account. Here, you can see there are three linked devices.
You can perform the following management tasks here when available (as the capabilities differ by device):
- Enable/disable it. This toggle determines whether this linked phone will be made available to Phone Link. If so, you will see a streamlined experience when you configure Phone Link to use this phone. If you disable the phone and try to configure it with Phone Link, you will get the standard, multistep experience described earlier in the chapter.
- Use as a connected camera. Some Android phones can be used as a webcam by Windows 11. To enable this feature, toggle this option to “On.” Then, in any app that uses a camera, you can choose the phone from the list of available cameras.
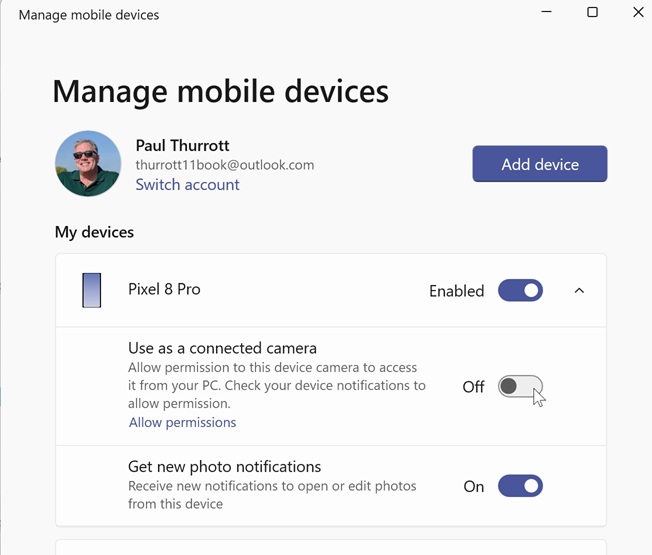
- Get new photo notifications. Some Android phones can deliver a banner notification through Phone Link each time you take a photo with that phone. If you click this notification, it will open a copy of the photo you just took in Snipping Tool, where you can edit it or open it in Paint or another app for further editing.
What you can’t do here, oddly, is remove–that is, unlink–a mobile device from your Microsoft account. This capability is present in the Windows 10 version of this interface, but it’s missing in Windows 11 for unknown reasons. And because there is no way to remove (unlink) a device using the Microsoft account website, despite the presence of an Android & iOS devices management page that should also offer this functionality, your options are limited.
There’s only one way to remove (unlink) an Android phone from your Microsoft, and you have to do it on that device. If you don’t have that device any more–perhaps you sold it, traded it in, or factory reset–then all you can do is disable it using the “Manage mobile devices” window in Windows 11. But it will appear in that list each time you display it, forever, unless Microsoft wakes up and provides other ways to do this.
To remove an Android phone from your Microsoft account, find the Link to Windows app on your phone, open settings, tap your account under “Linked Account,” and then tap “Sign out and unlink account” (or “Unlink account,” depending on the phone).
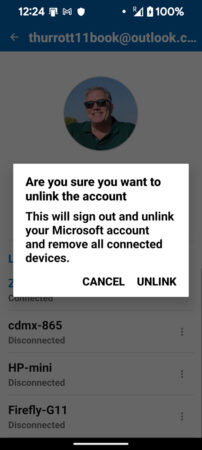
Tap “Unlink” when asked to confirm this decision.
Then, uninstall the Link to Windows app if you don’t expect to use it again.
To be clear, the devices you see in Mobile devices are unrelated to the devices you see at the top of the main Bluetooth & devices page in Settings, though there can be (and often is) overlap. The devices in Mobile devices are Android devices that are associated with your Microsoft account, while the devices at the top of the Bluetooth & devices page are devices paired with this PC.
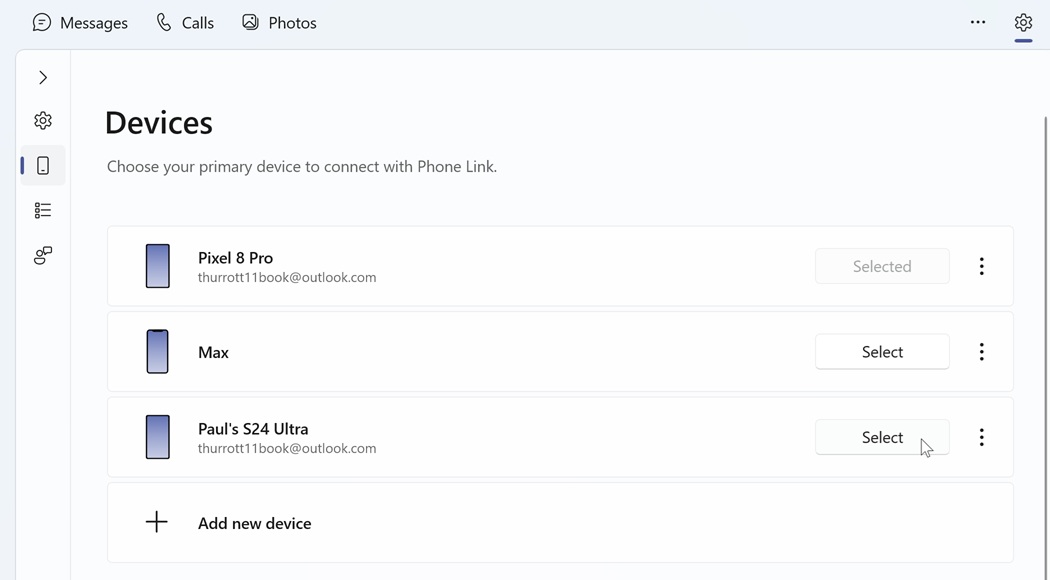
Use Phone Link with two or more mobile devices
While most people have a single phone to use with Phone Link, some have two or more, perhaps for work purposes. And Phone Link supports using multiple phones (and some select Android tablets), though you can only interact with one device at a time in Phone Link.
To add a second phone to Phone Link, open the app settings and navigate to Devices. Then, click “Add new device.”
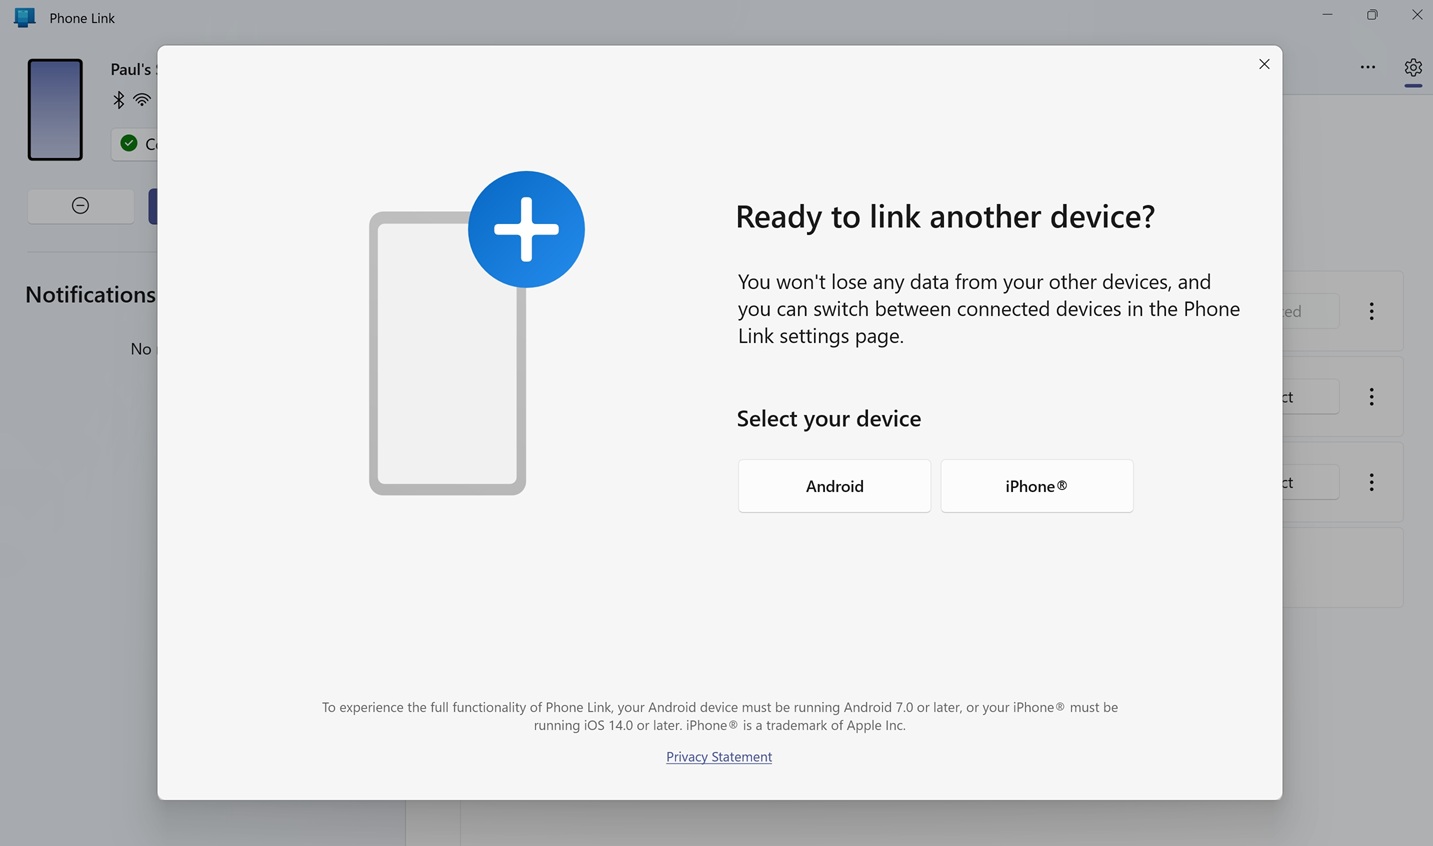
From here, just choose Android or iPhone and follow the prompts. If the (Android) phone was previously linked to your Microsoft account–and thus appears in the “Manage Mobile devices” window described in a previous section, you’ll have a streamlined experience connecting it to Phone Link.
Otherwise, you will go through a series of steps similar to that of configuring your first phone with Phone Link. As with that initial phone setup, it makes sense to install the Link to Windows mobile app first, but the wizard will walk you through that process if needed. And like the normal setup, this will pair your phone to the PC with Bluetooth and connect your phone to Phone Link on this PC.
When you’re done, you’ll see two (or more) phones listed in the Devices view in Phone Link settings. To switch between them–you can only use one interactively at a time–click the “Select” button next to the phone you wish to use.
Remove your phone from Phone Link
Phone Link creates a complex web of interactivity between your phone and your PC. And if it’s working properly, great: You can get whatever benefits Phone Link provides with your specific phone model. But at some point, you may wish to remove your phone from Phone Link because you’re upgrading to a new phone, upgrading to a new PC, or whatever. You start this process in the Phone Link app, naturally. But there are other steps to take as well.
To get started, open Phone Link and navigate to Settings, Devices. Find the phone you wish to remove, click its “More options” (“…”) button, and then choose “Remove.”
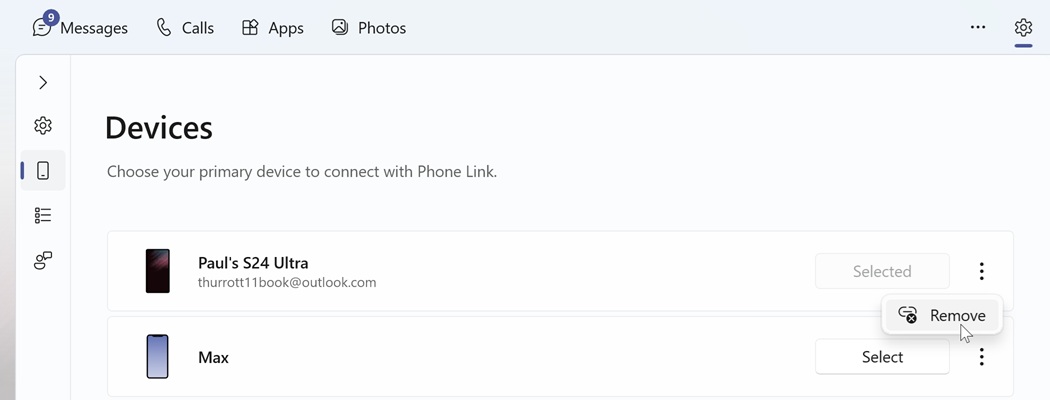
Confirm your choice when prompted.
Next, open the Settings app (WINKEY + I) and navigate to Bluetooth & devices. Locate the phone at the top of this page, click the “More options” (“…”) button, and choose “Remove.”
Next, open the Settings app on your phone and locate your PC in Bluetooth settings. Tap its “Settings” (gear) icon and then tap “Unpair” to remove the Bluetooth pair.
Next, open the Link to Windows app on your phone. Tap your account under “Linked Account,” and then tap “Sign out and unlink account” (or “Unlink account,” depending on the phone). Tap “Unlink” when asked to confirm this decision.
Finally, you can uninstall the Link to Windows app from your phone as well.
Use Phone Link to access your phone’s features
Phone Link supports a wide range of phone features, though it varies by model. Generally speaking, iPhone users will see only basic functionality with a few features, while Android users get a more full-featured experience. To help you understand which features you can expect, each of the following sections calls out which features are compatible with which phones.
View and respond to phone notifications
iPhone: Yes, with limited functionality
Android: Yes
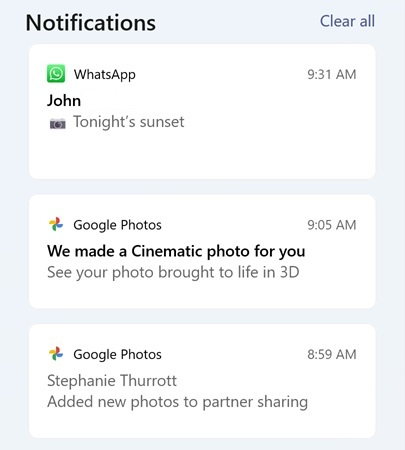
Phone Link displays the latest notifications from your phone at the bottom of the Notifications area that is always visible on the left side of the app.
When your phone receives notifications, a notification banner will appear on the Windows 11 Desktop and the Phone Link icon in the Taskbar will display an overlay that represents the number of unread notifications.

You can remove any notification in the navigation pane by clicking the “Clear” (“X”) button that appears in its top right when you mouse over it. Doing so removes the notification on your phone as well.
![]()
![]()
But some notifications support other actions, too, just as they do in the notification shade on your phone. To see which options are available, click the “More options” (“…”) button that appears in the top right of a notification when you mouse over it.
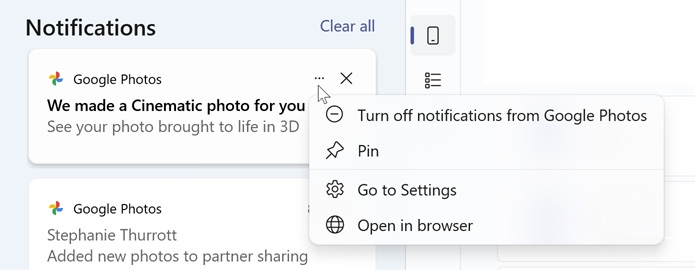
Every notification supports options for turning off notifications from that app, pinning the notification–which will keep it at the top of the Notifications area until you unpin or clear it–and going to notification settings.
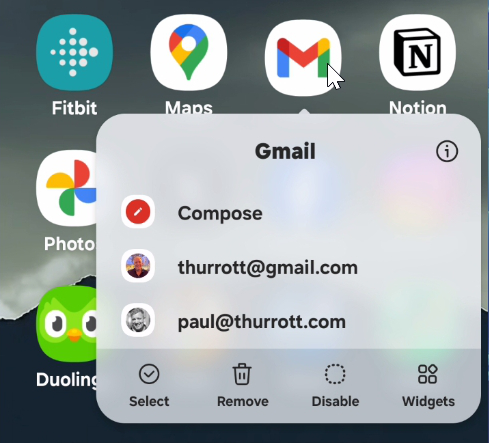
Some apps provide other options. For example, Google Photos and other apps provide an “Open in browser” option so you can view the item that triggered the notification.
Some apps also support in-line commands. For example, Gmail provides “Archive” and “Reply” options when you receive a notification for a new email. Unfortunately, the functionality here is limited: Clicking either choice will prompt you to check your phone to continue.

To clear all the new notifications–in Phone Link and on your phone–just click “Clear all” at the top of the Notifications pane.
Make and receive text messages
iPhone: Yes, with limited functionality
Android: Yes
You can use Phone Link to view, send, and receive text messages on your PC.
To do so, select the Messages tab.
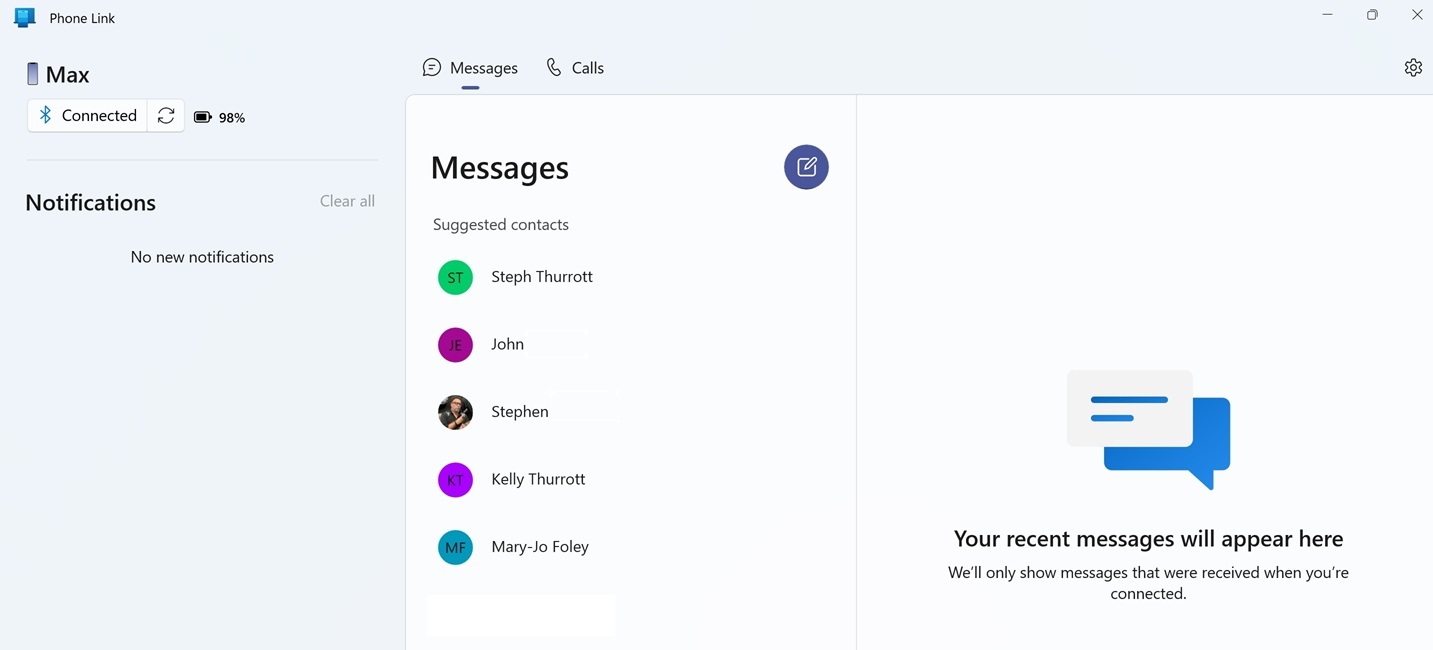
Here, you can perform the following tasks.
Create a new message. Click the “New message” button to start a new text message. A “To” field will appear on the right so you can start typing the name of a contact (or, on Android, a group) using auto-complete. Type your message in the “Send a message” field and then click “Send” (or just tap ENTER) to send it.
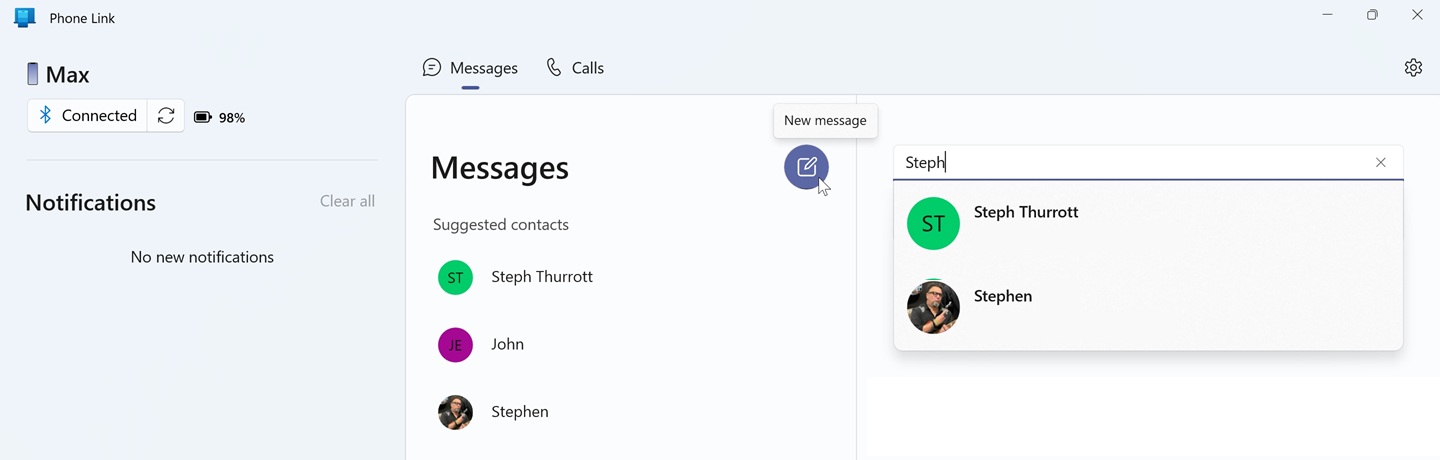
You can also choose from a list of suggested contacts if provided.
You can also add emojis, GIFs, and images to a text message using the icons below the “Send a message” field.
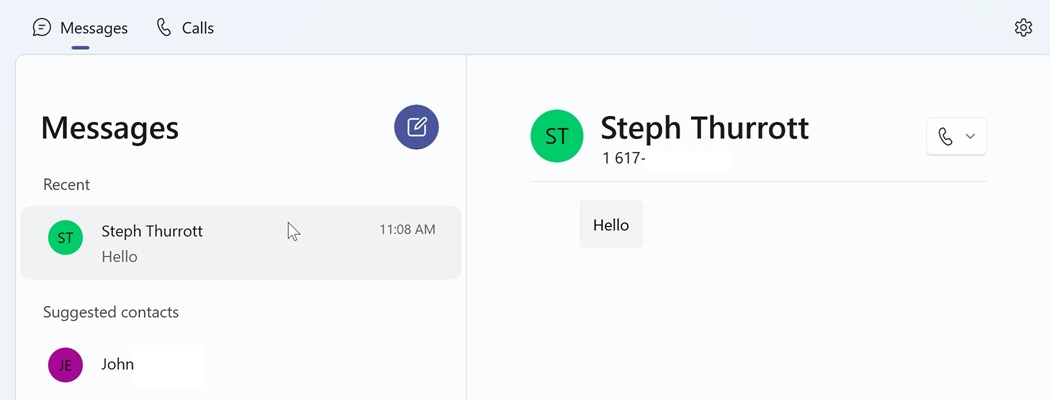
Read a text message. When you receive a new text message, Windows 11 displays a banner notification and the Phone Link app displays a notification in the Notifications area. To read a text message–along with the entire conversation you’ve had with that individual or group as well as any shared media–simply select it in the Recents area in Messages. (Or select either notification.)
This functionality is limited on iPhone: Previous text messages won’t appear in Phone Link until you exchange at least one message using this app.
Respond to a text message. To respond to a text message from your PC, select the conversation, and then click the “Send a message” field. Type your reply and hit Enter–or click the “Send” button–to send the message.

As above, this functionality is limited on the iPhone.
You can also add emojis, GIFs, and images to a text message using the icons below the “Send a message” field.
A “Call” button also appears in the top right so you can make a call to the person you’re texting with.
Make and receive phone calls
iPhone: Yes, with limited functionality
Android: Yes
You can use Phone Link to view your phone’s recent calls and to make and receive phone calls.
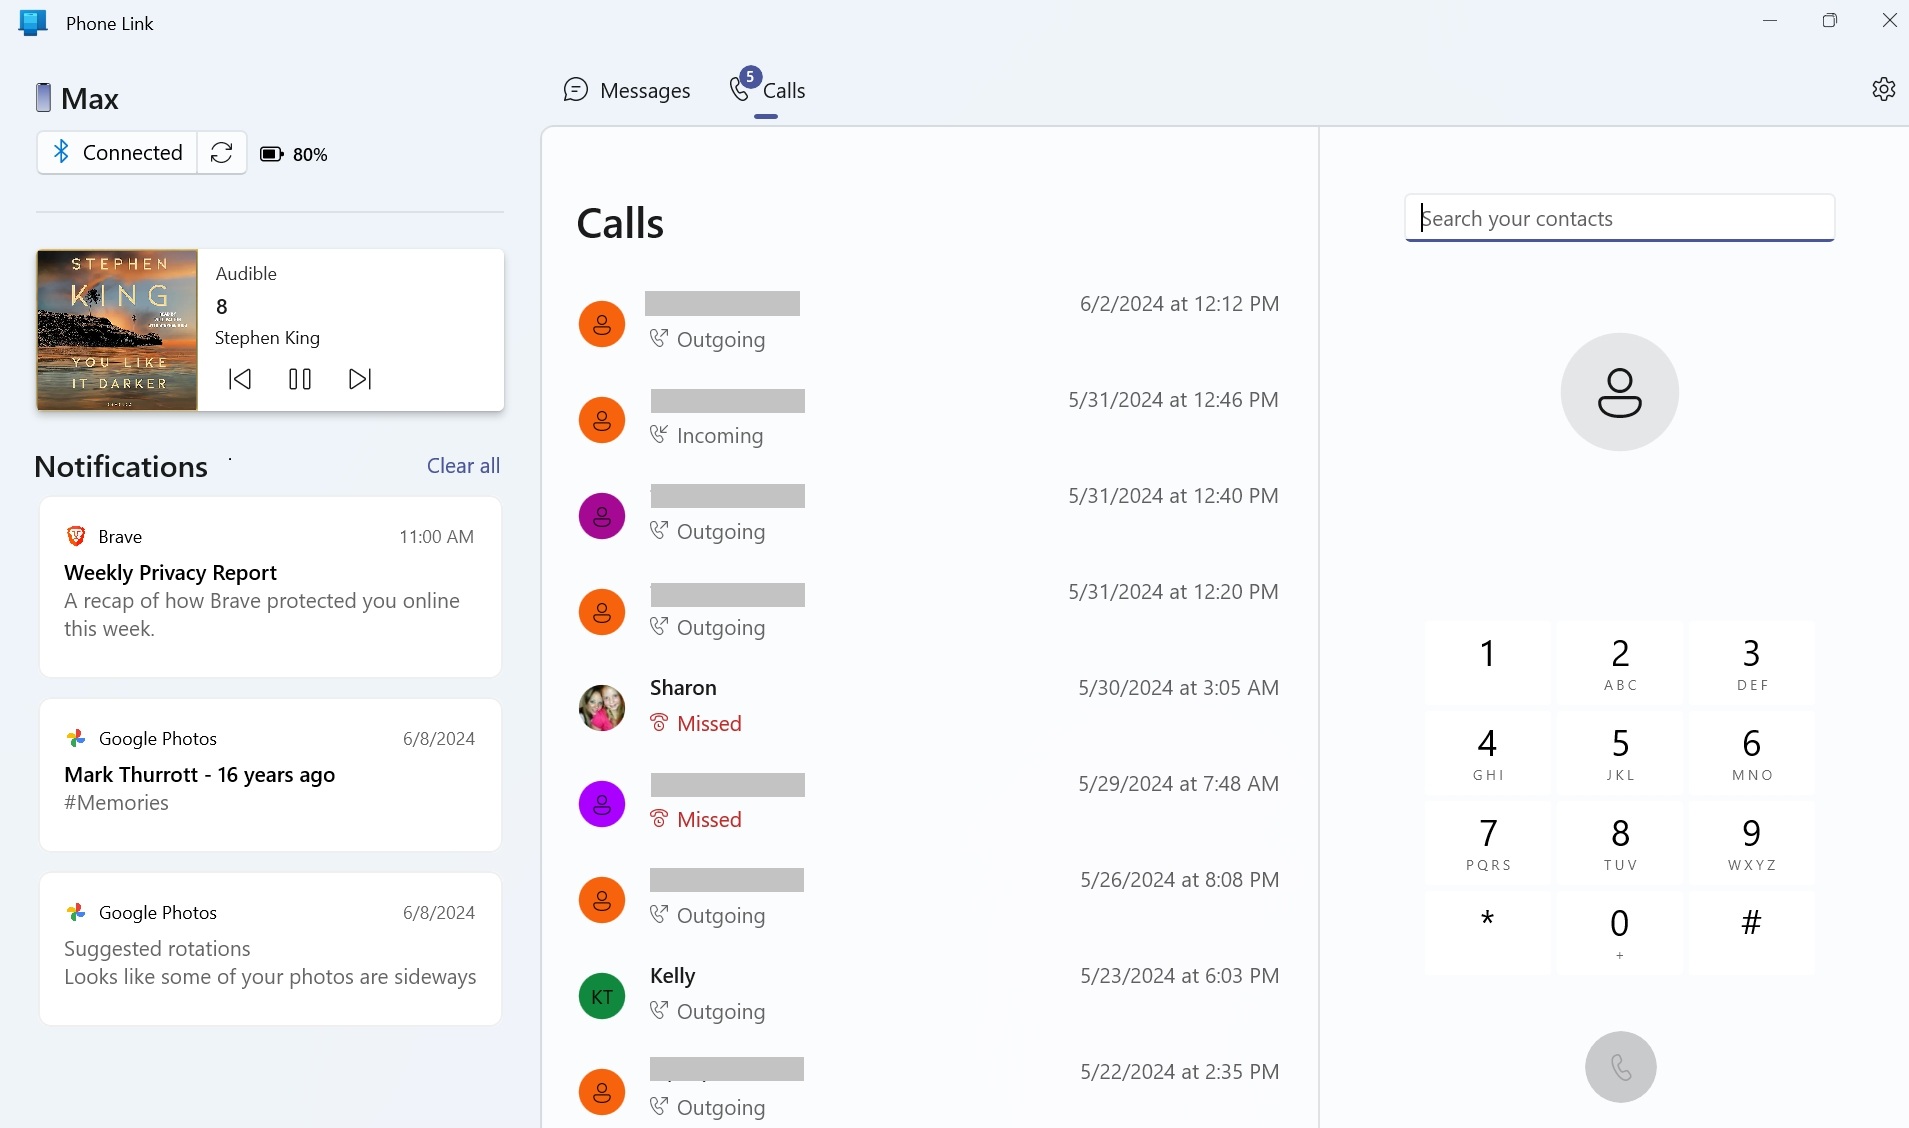
To do so, open My Phone and click the Calls tab.
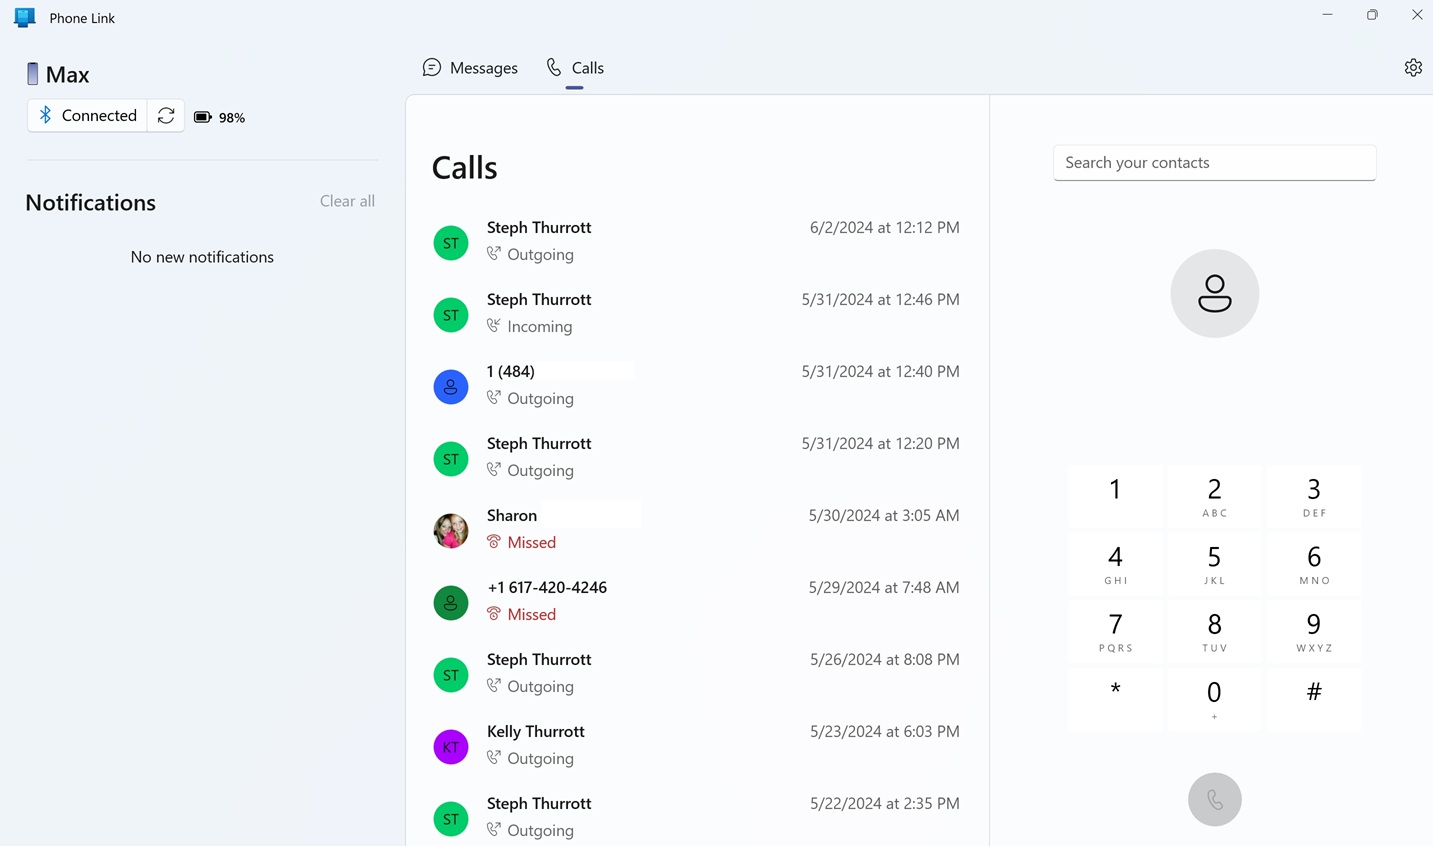
Here, you can perform the following tasks.
View your recent calls. The Calls view displays a list of your most recent phone calls in the center of the display. If you select one of these calls, icons for calling and texting that number will appear.

Make a phone call. To make a phone call through your phone, but using the default microphone and speakers on your PC, use the rightmost pane in the Calls view to search for a contact or manually type in a phone number. A “Call on PC” window will appear for the duration of the call, and when the call ends, it will be added to the top of the Recent calls list.
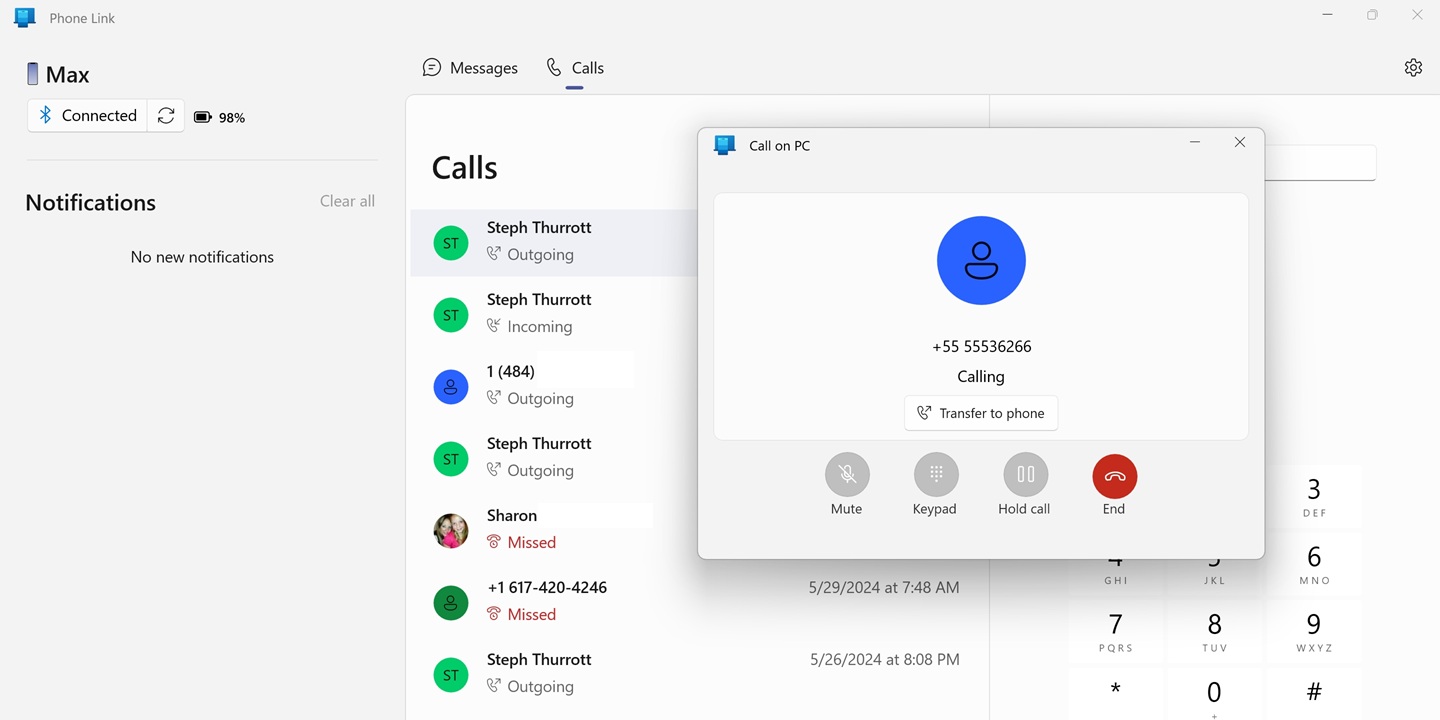
The “Call on PC” window has buttons for transferring the call to your phone, which will switch to the phone’s microphone and speaker, “Mute,” “Keypad,” “Hold call,” and “End,” all of which will be obvious to anyone who’s made a phone call.
Answer a phone call. When someone else calls you, a banner notification appears in Windows 11 so you can answer the call from your PC, decline the call, or send a text message to the person calling. If you accept the call, a “Call on PC” window appears during the call with mute, keypad, hold call, and end call options.
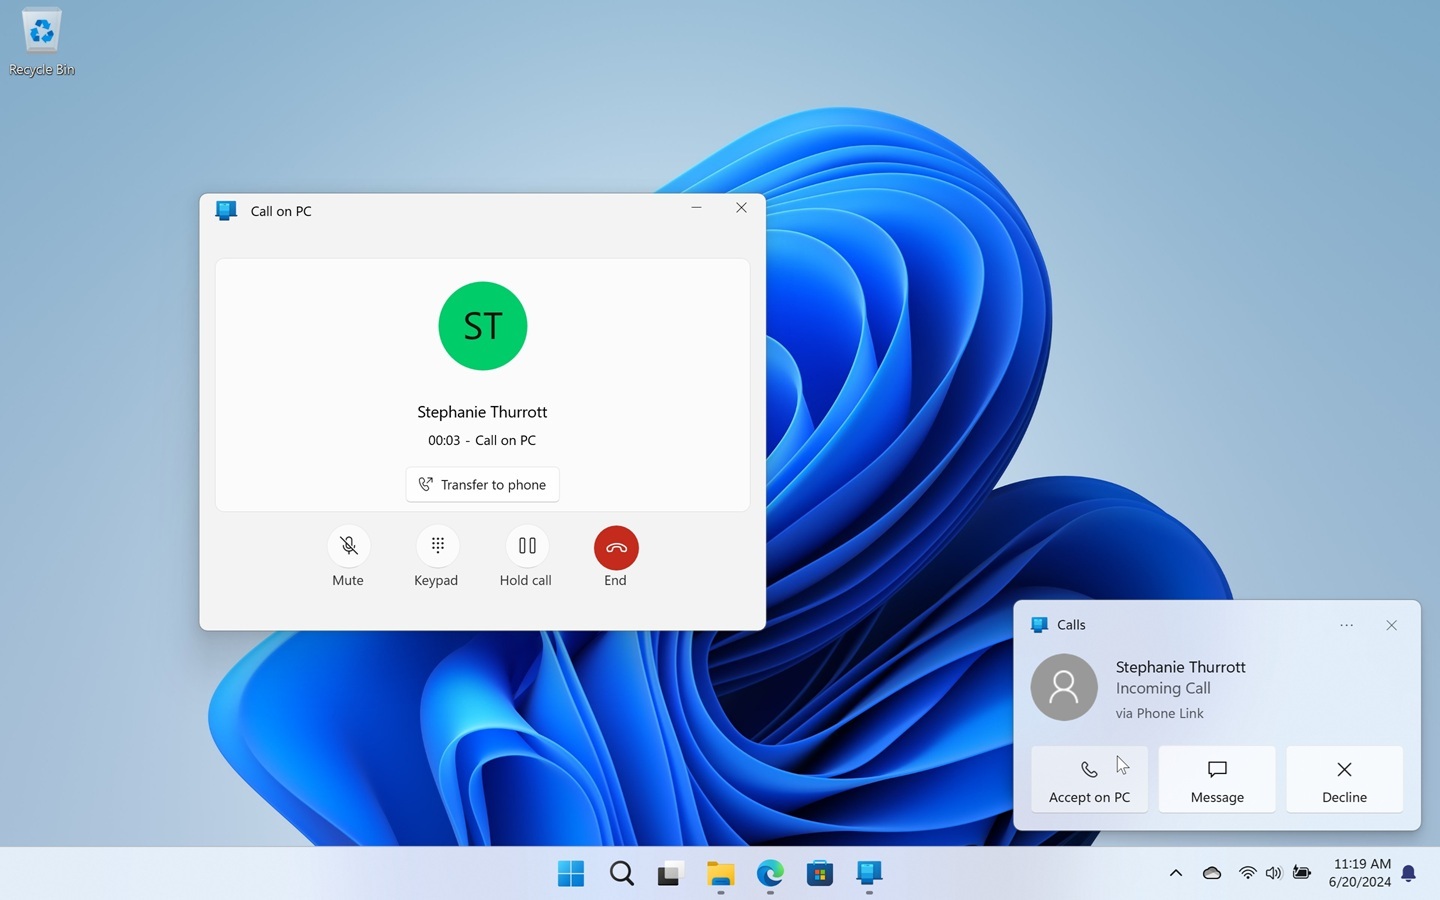
If you decline the call, it will go to voicemail.
What you can’t do here is manage your recent calls list in any way. You can’t remove calls from the list, for example, and there are no right-click options.
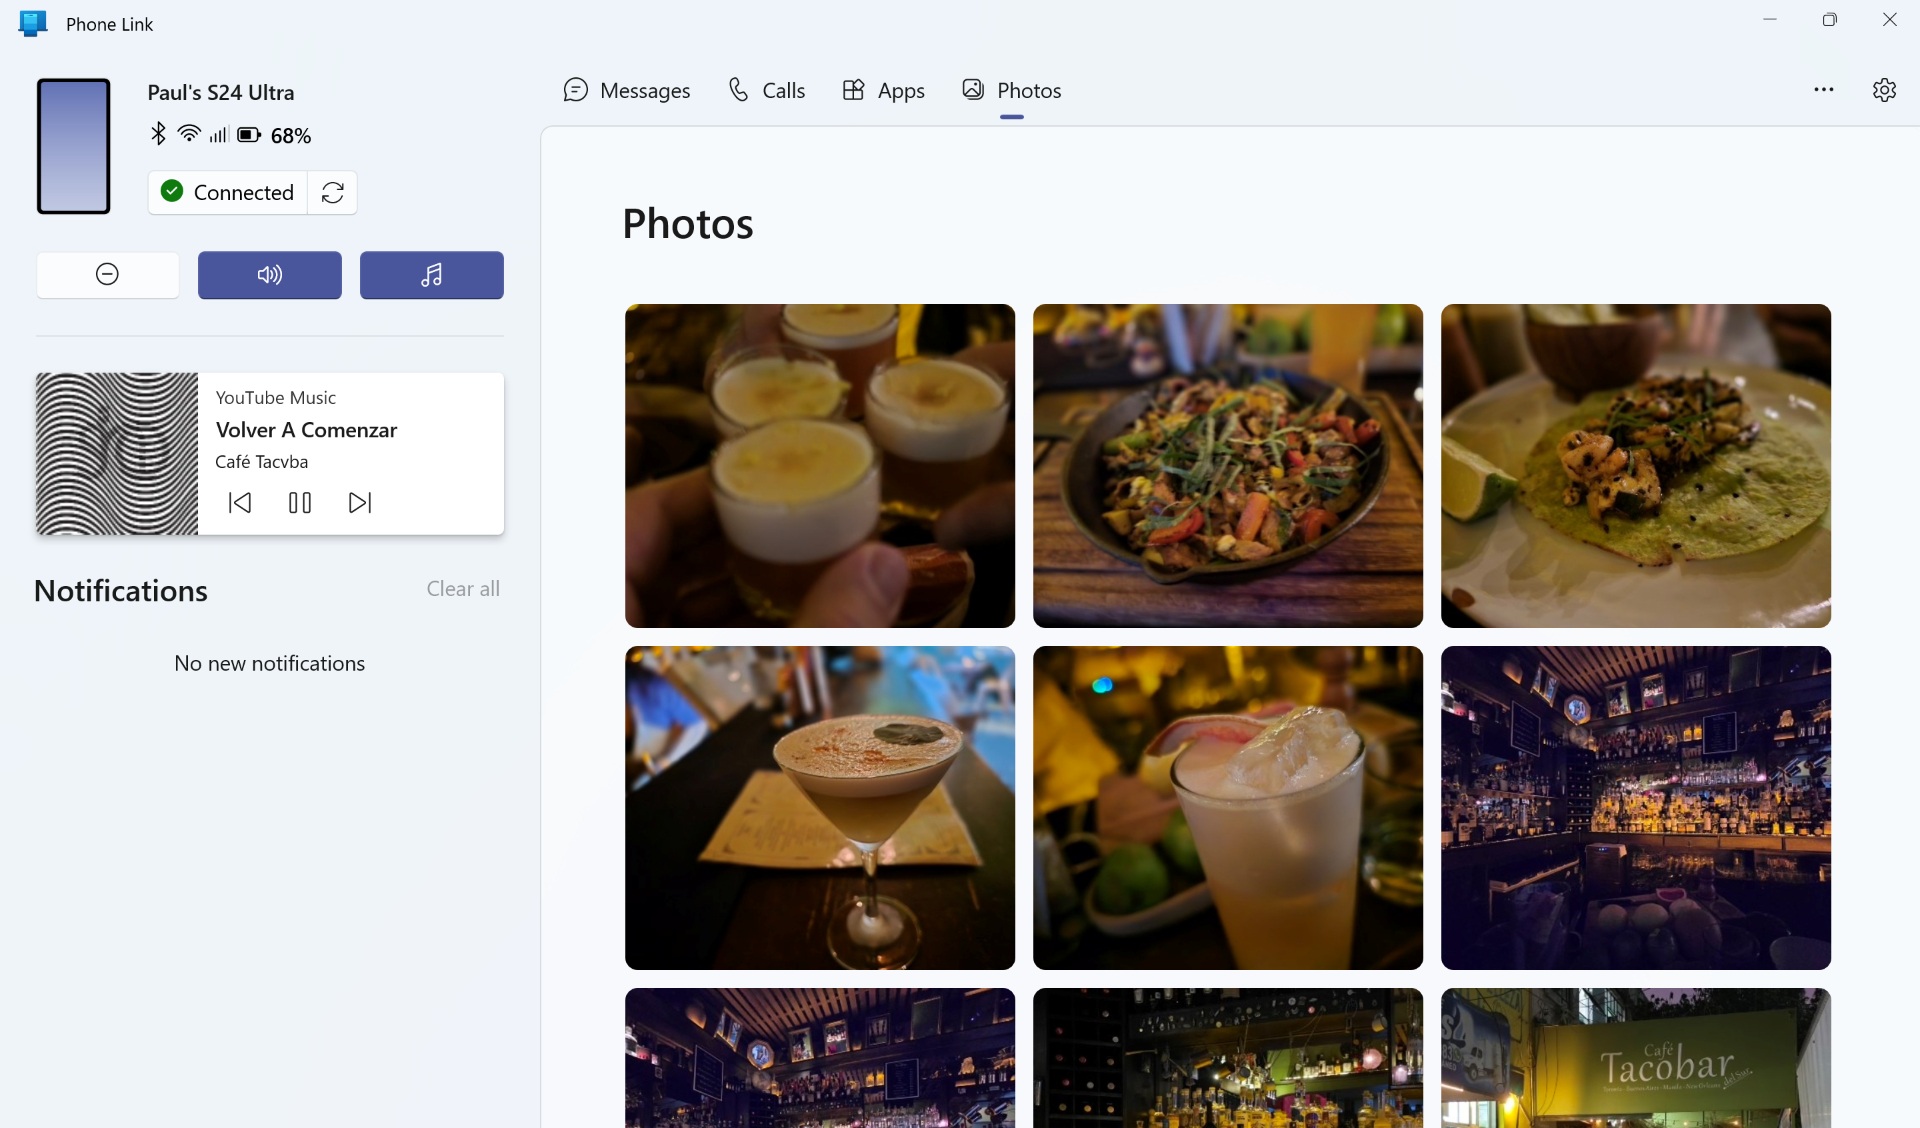
View, share, and save phone-based photos
iPhone: No
Android: Yes
Phone Link displays the most recent photos on your Android phone and lets you view, share, copy, and delete them.
iPhone users can access their phone-based photo collection in Windows 11 using the Photos app and its iCloud account integration. You can learn more in the Photos chapter.
To do so, open Phone Link and navigate to Photos.
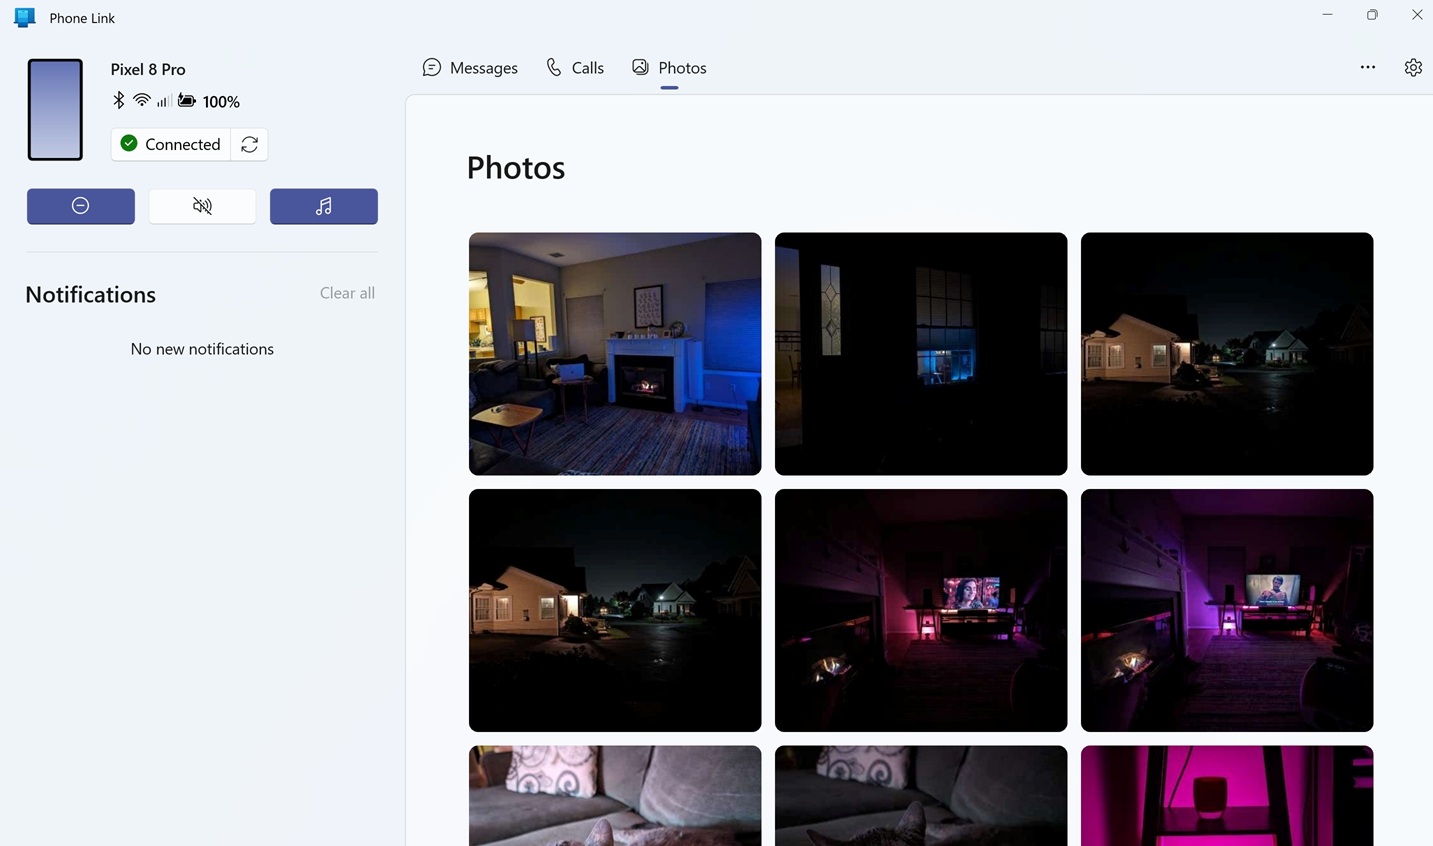

To view a photo, simply click it. A larger version of the photo will take over the Photos view and provide several options.
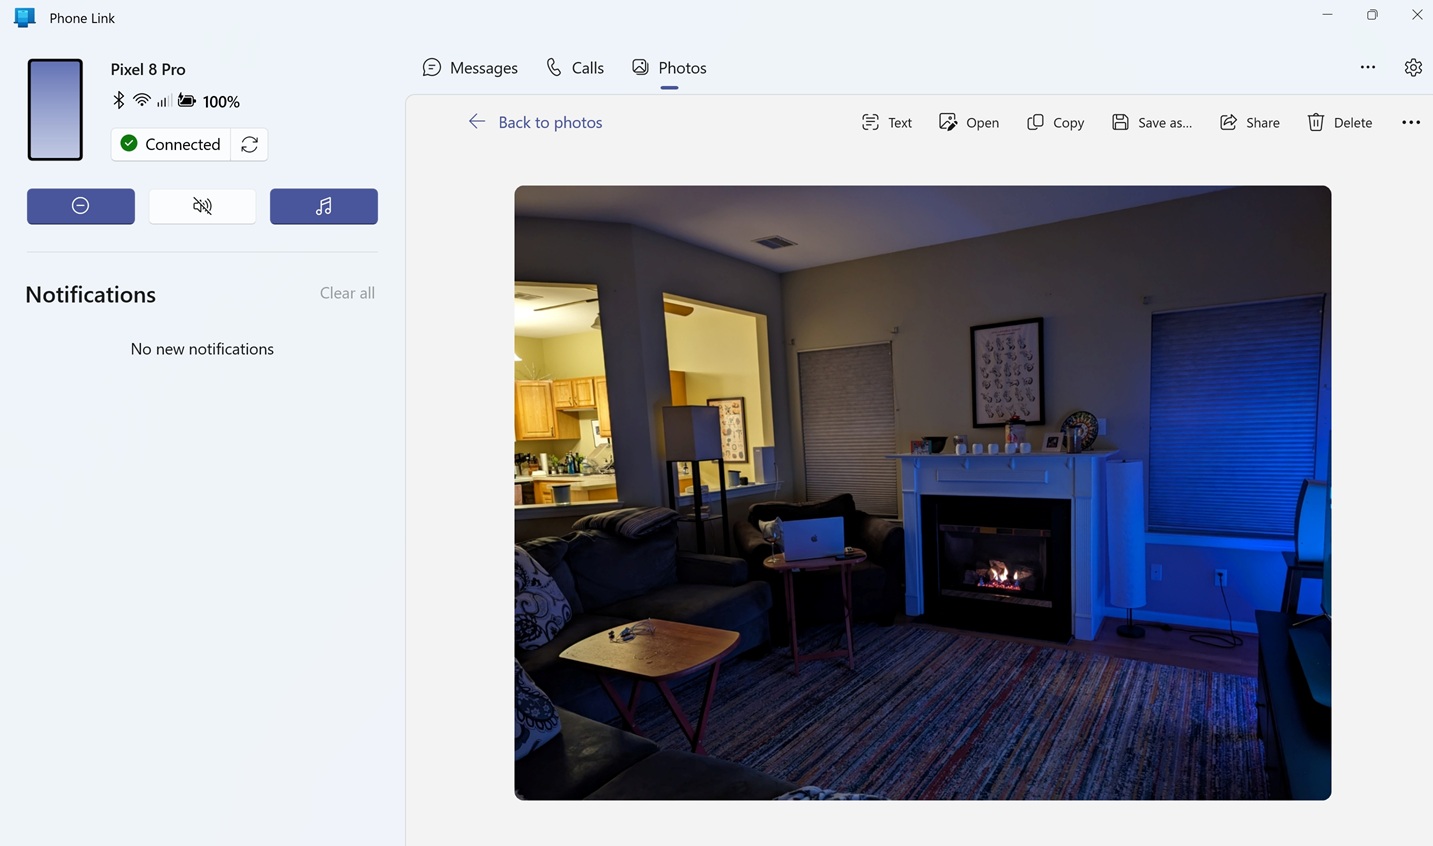
From here, you can perform the following actions:
Return to the main Photos view. Click “Back to photos” to return to the main Photos view.
Navigate to the previous or next photo. Using the left and right arrow keys on your keyboard–or the Back (“<“) and Forward (“>”) buttons that appear when you mouse over the image you’re viewing–you can navigate through the photos on your phone one-by-one.


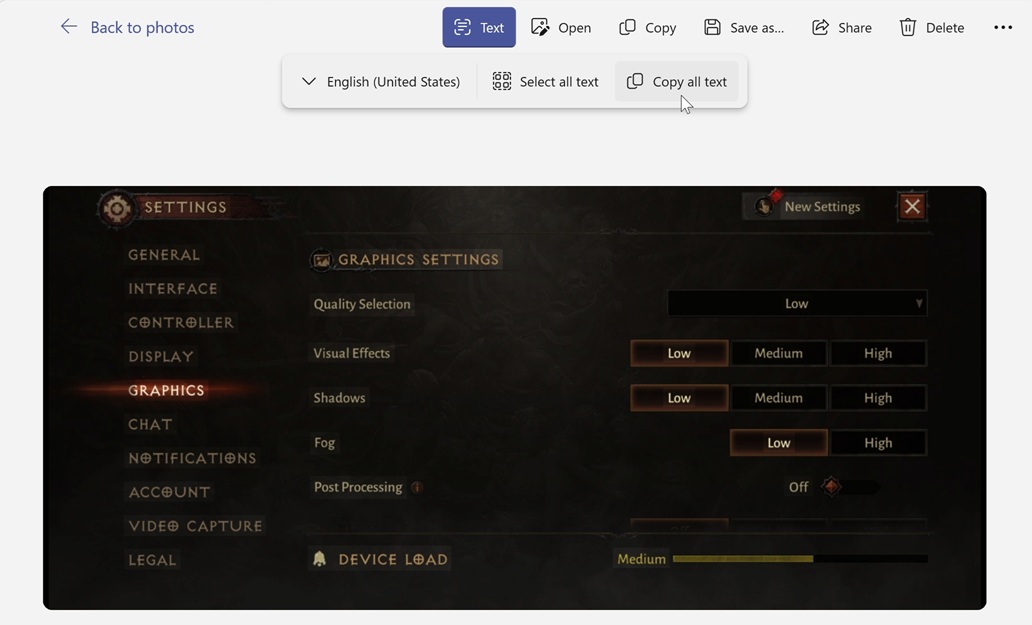
Detect, select, and copy text in the photo. This AI-based feature detects text in a photo and then provides options for language, selecting all text, and copying all text to the Clipboard so it can be pasted into Notepad or another compatible app.
Open in the default photo app. Click the “Open” button to open the photo in the Photos app or whatever default photo app you’ve configured. This app provides a wide range of editing options.
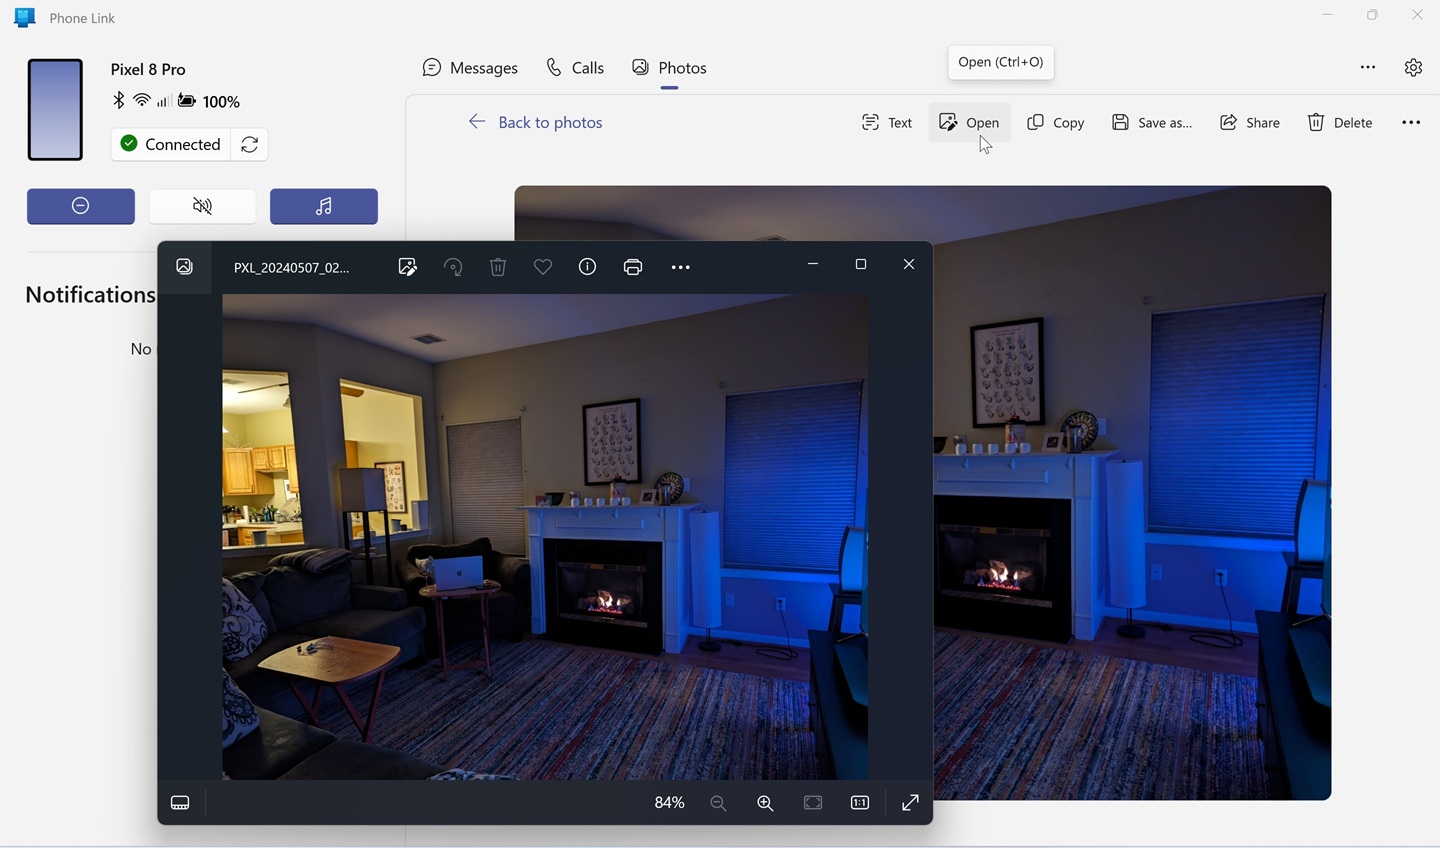
You can learn more about the Photos app and its photo editing capabilities in the Photos chapter.
If you make any changes to the photo via the Edit & Create options, you will be asked to save a copy of the photo to your PC. The changes will be applied only to the copy of the photo, not the original on your phone.
Copy. Click the “Copy” button to copy the photo to the Clipboard so that it can be pasted into another app that supports images, like Paint.
Save as… Click “Save as…” to save a copy of the photo to your PC.
The “Save as…” option is OK for saving the occasional photo to your PC. But if you would like to copy many photos from your phone to your PC, you’re better off using other methods. The most obvious is to connect your phone to the PC via a USB cable and use File Explorer. Alternatively, you can import the photos from your phone using the Photos app.
Share. Click “Share” to display the system Share window and share the image with others using Outlook, Nearby Share, or any compatible apps that are installed on your PC.
Delete. Select “Delete” to permanently delete the selected photo from your phone.
Open with… If you prefer to use a different app for photo editing, choose “Open with…” instead. In this case, you’re presented with a choice of compatible apps that are installed on your PC.
The preceding actions are all available via a right-click menu in the main Photos view as well. Some buttons may be hidden behind a “See more” (“…”) depending on the size, resolution, and scaling of your PC’s display.
View, edit, and share photos as they’re taken
iPhone: No
Android: Yes
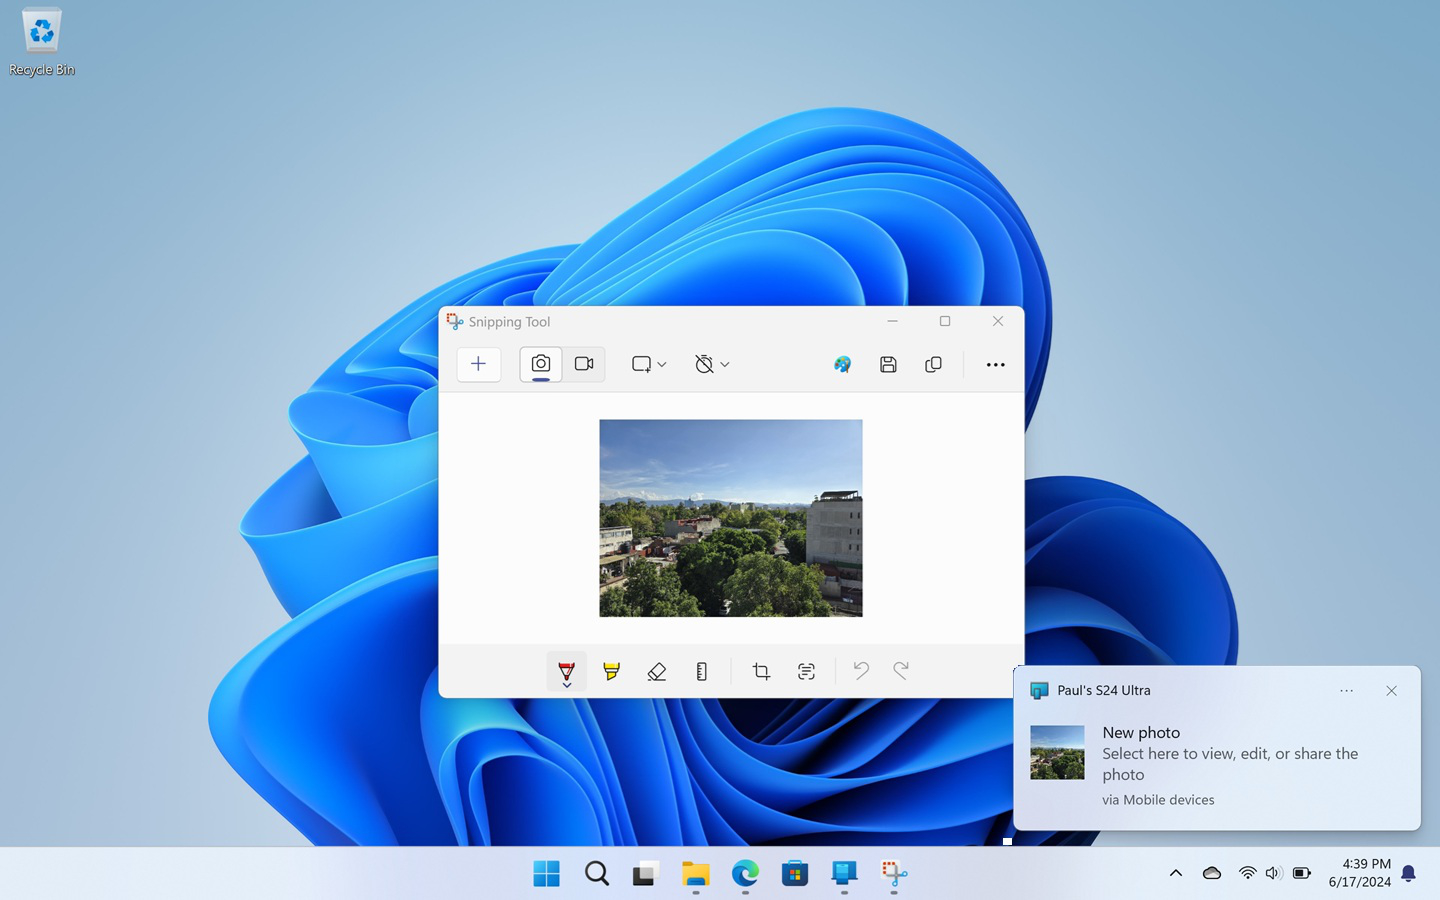
With some recent flagship Android phones, you can optionally enable a feature that will display a banner notification in Windows 11 each time you take a photo with your phone and then view, edit, share, or save the photo directly to your PC using the Snipping Tool.
You enable this feature using the “Manage mobile devices” window described earlier in this chapter. To do so, open the Windows 11 Settings app, navigate to Bluetooth & devices, and click the “Manage devices” button next to “Mobile devices.” In the window that appears, expand the view associated with your phone and enable the option “Get photo notifications.”
When this feature is enabled, you will see a banner notification in Windows 11 when you take a photo with your phone.
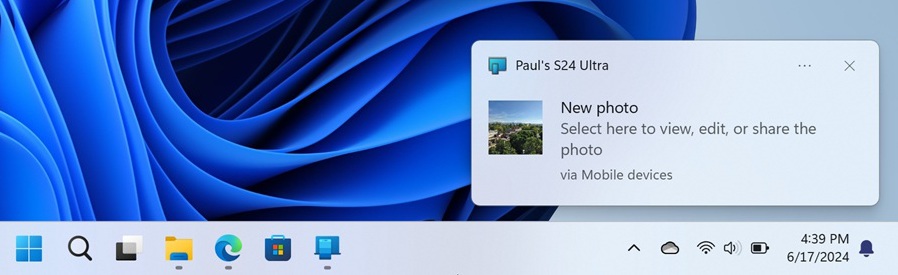
To do something with this photo, click the notification. The Snipping Tool appears, displaying a copy of the photo.
If you miss it, you can access it later in the Notifications window: Just click the time/date display or the Notifications icon in the Taskbar to display it.

From here, you can use Snipping Tool to edit, share, save, and perform other actions with the photo.
You can learn more about the Snipping Tool in the Snipping Tool, Screenshots, and Screen Recordings chapter.
Manage Do not disturb, vibrate/volume, and the audio player
iPhone: No
Android: Yes
If you’re using an Android phone, Phone Link displays three interrelated buttons for controlling your phone’s Do not disturb, Volume/vibrate, and Audio player features above the Notifications area.

Here’s what they do:
Do not disturb. The first button is a toggle for your phone’s Do not disturb feature. If enabled, the second button, “Volume/vibrate,” is set to “Volume off, indicating that your phone’s ring, alarm, and media volumes are all muted. If “Do not disturb” is disabled, your phone’s notifications and sounds will occur normally.
Volume/vibrate. This button acts as a volume toggle for your phone. It can be set to “Volume on,” “Vibrate mode,” or “Volume off.” If you choose the latter option, “Do not disturb” will be enabled too.
Audio player. This option determines whether the Phone Link’s Audio player displays when audio is playing on your phone (from any source, including video apps).
We discuss the Audio player in the next section.
You can also toggle Audio player on or off in Phone Link settings, in the Additional settings are in the Features view.
Control your phone’s media playback
iPhone: Yes, with limited functionality
Android: Yes
The Audio player feature in Phone Link lets you control the playback of audio on your phone. It appears as a panel above the Notifications area when media–audio or video–is playing on your phone.
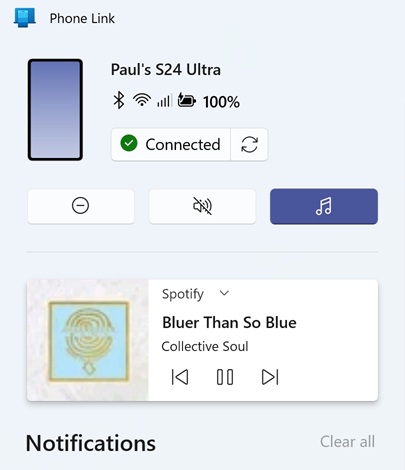
You can toggle the display of the Audio player in Phone Link settings. Or, if you have an Android phone, you can use the “Audio player” button that appears above the Audio player and the Notifications area.
Audio player is straightforward. It looks and works similarly to the media player tile that appears in your phone’s notification shade: You can use it to toggle Play and Pause, and to navigate to the previous or next track.
With an Android phone, you can also use Audio player to switch between multiple recently used audio-playing apps. Other audio apps you’ve used recently can be accessed via the caret at the top of this tile.
![]()
![]()
To switch the playback, select a different app from the list.
With an iPhone and most Android phones, audio playback occurs through your phone, not your PC. But if you have a recent Samsung Galaxy flagship or another select Android phone, you can optionally enable audio playback through your PC instead.
To do so, open Phone Link settings and navigate to Features. When you expand the “Apps” item, you’ll see an option called “Hear audio from.” Change this from “Mobile device” to “Computer.”
Access your phone display remotely
iPhone: No
Android: Select models only
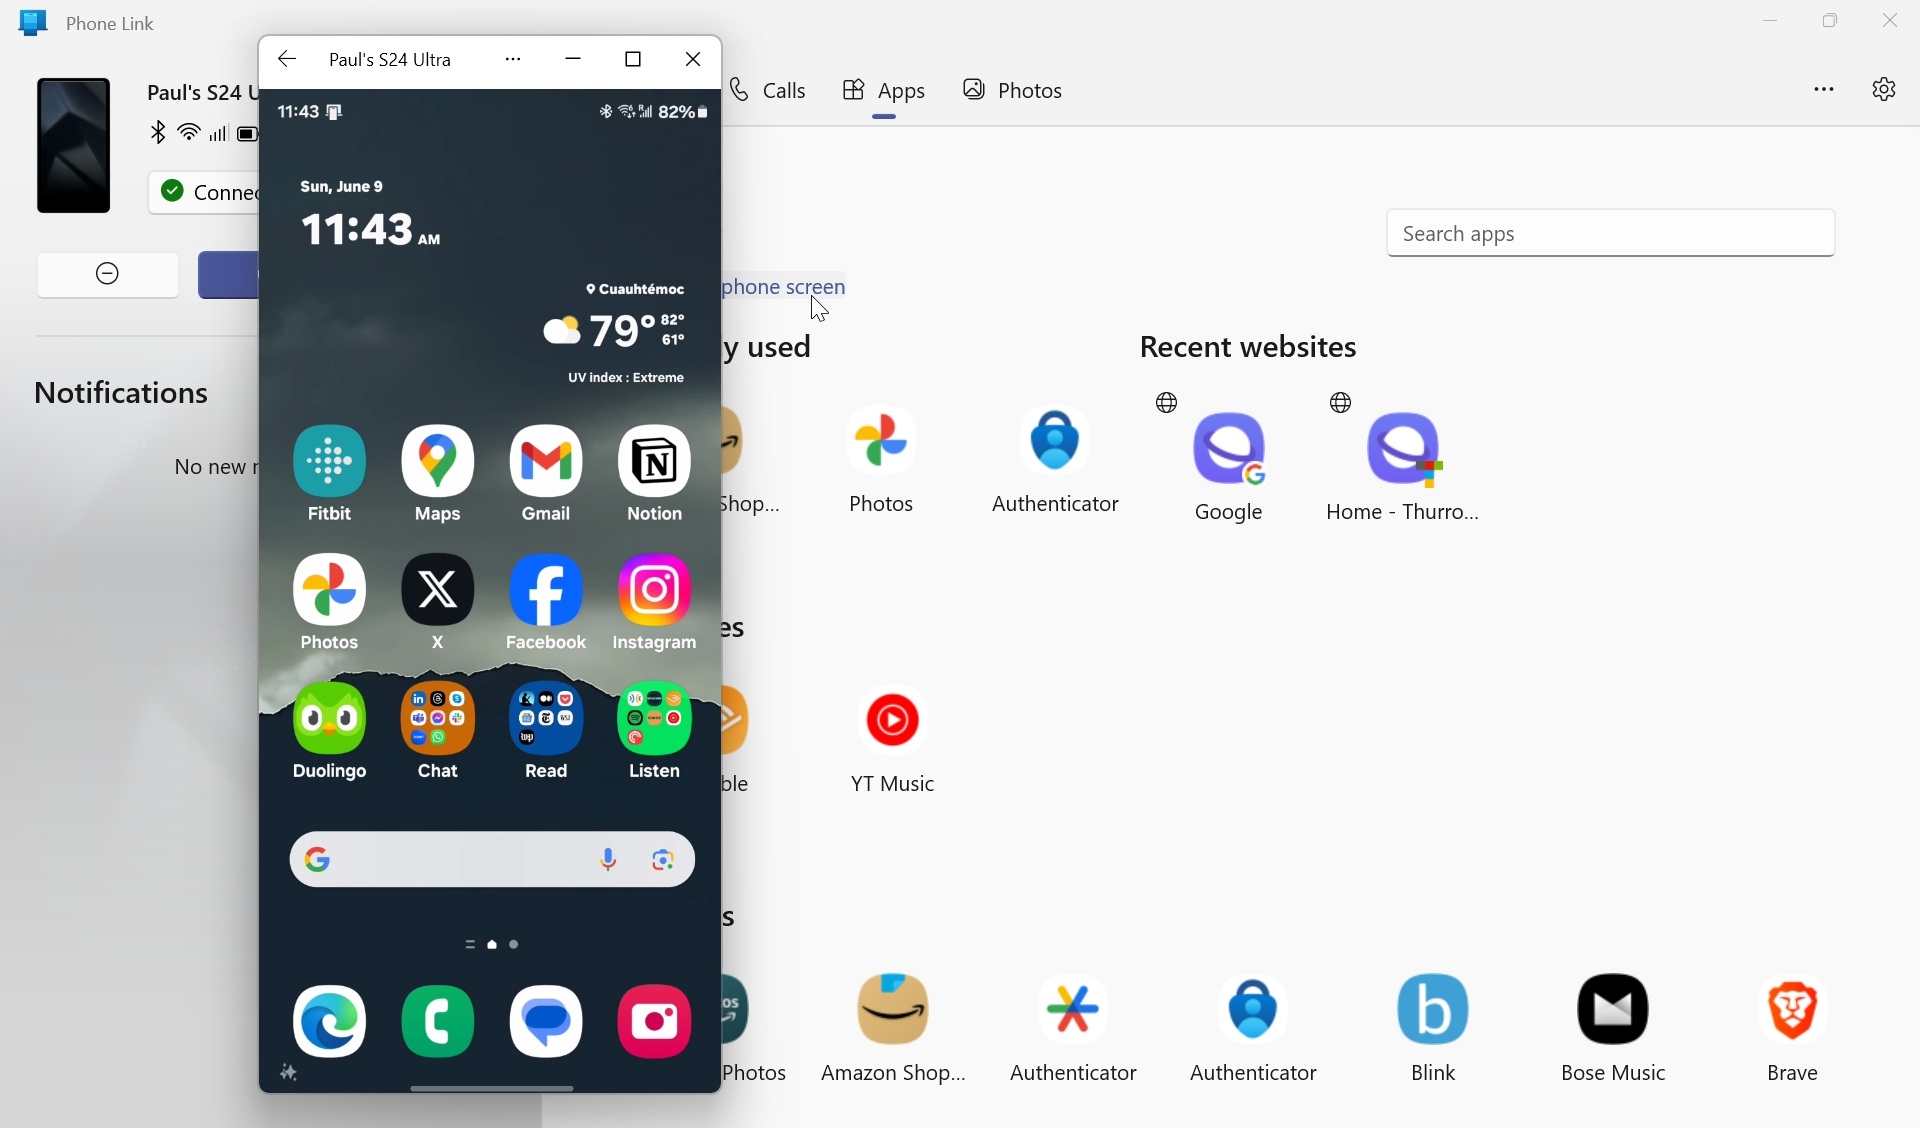
Some Android smartphones–recent flagship Samsung Galaxy devices, plus some phones from Honor, OnePlus, OPPO, and others–allow you to access your phone display remotely in a window in Windows 11. If you see an Apps tab, then you can use this feature.
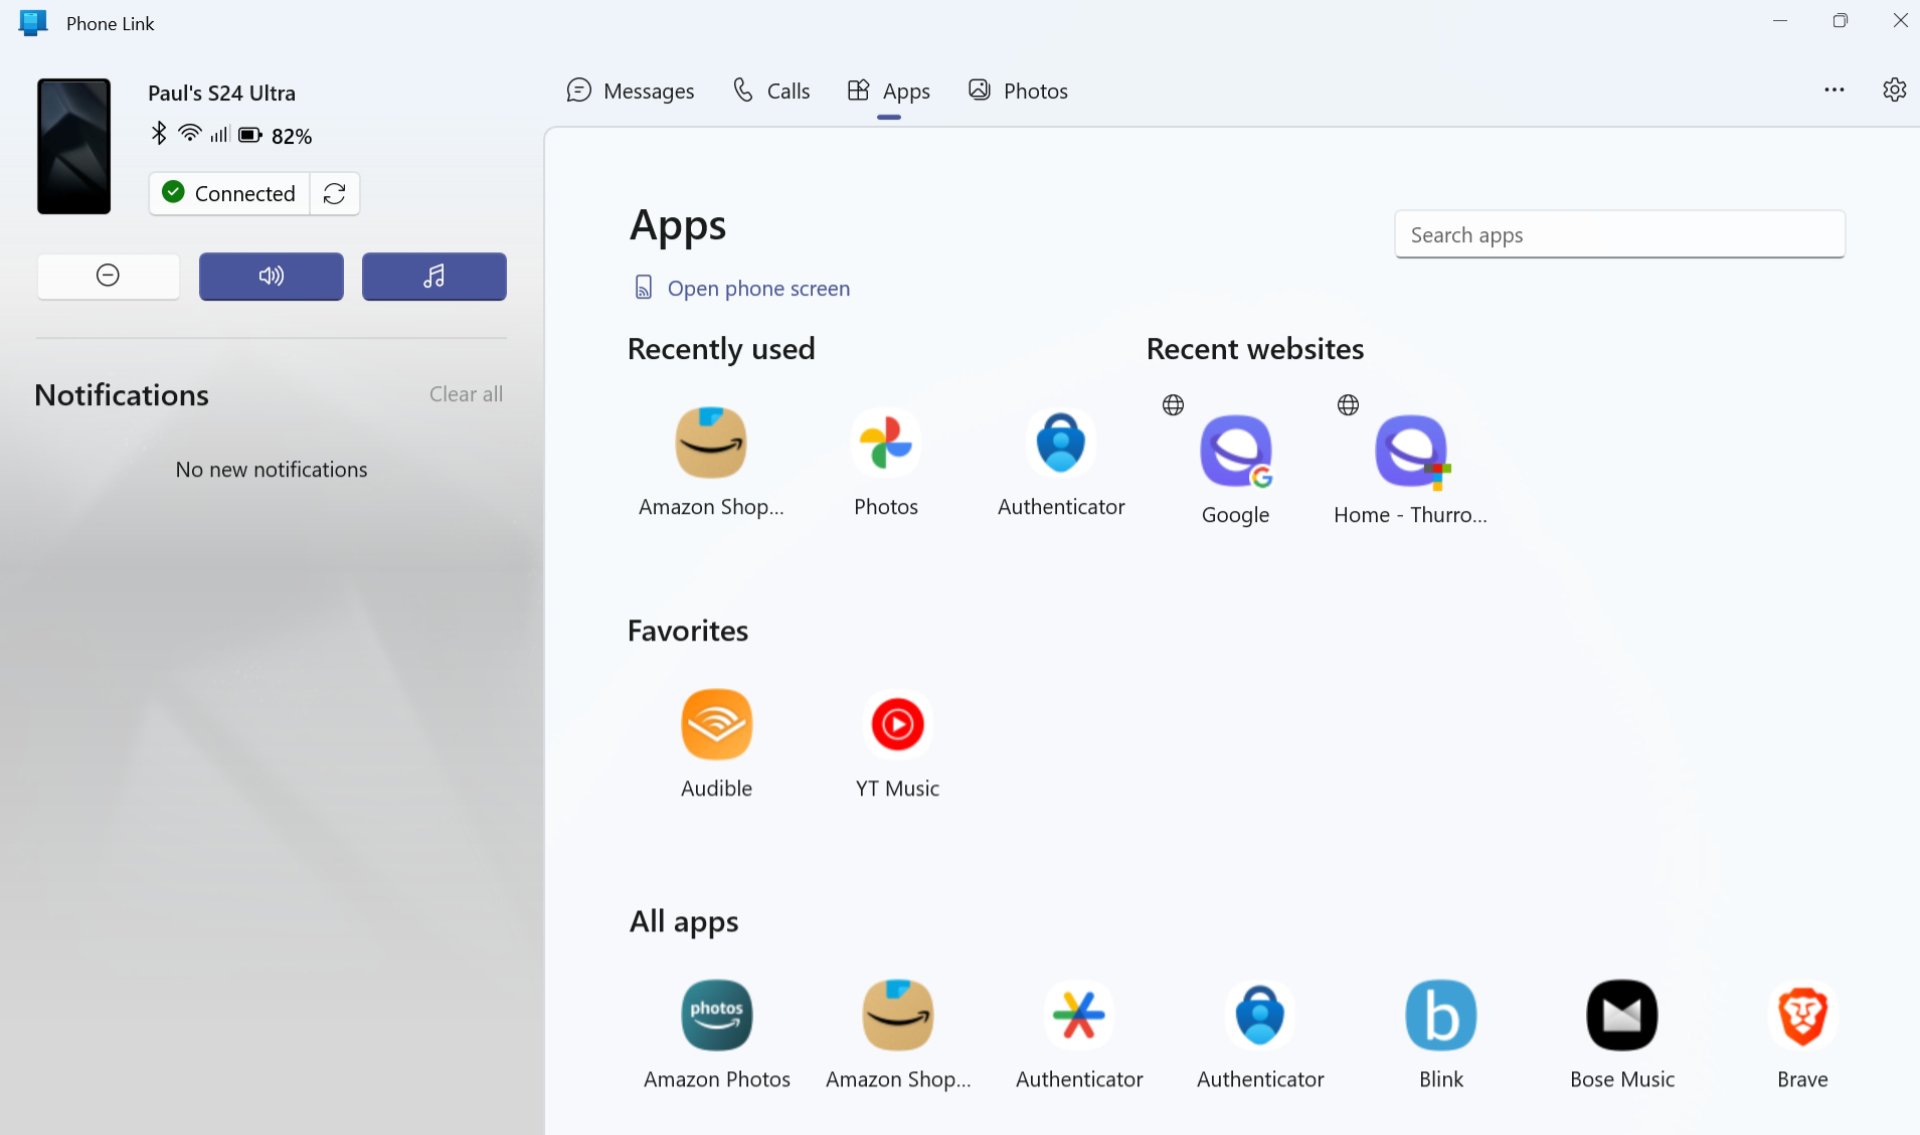
To display your phone’s screen in a window, open Phone Link and navigate to Apps. Then, click the “Open phone screen” link. When you do, you’re prompted to give permission for this remote access on your phone.
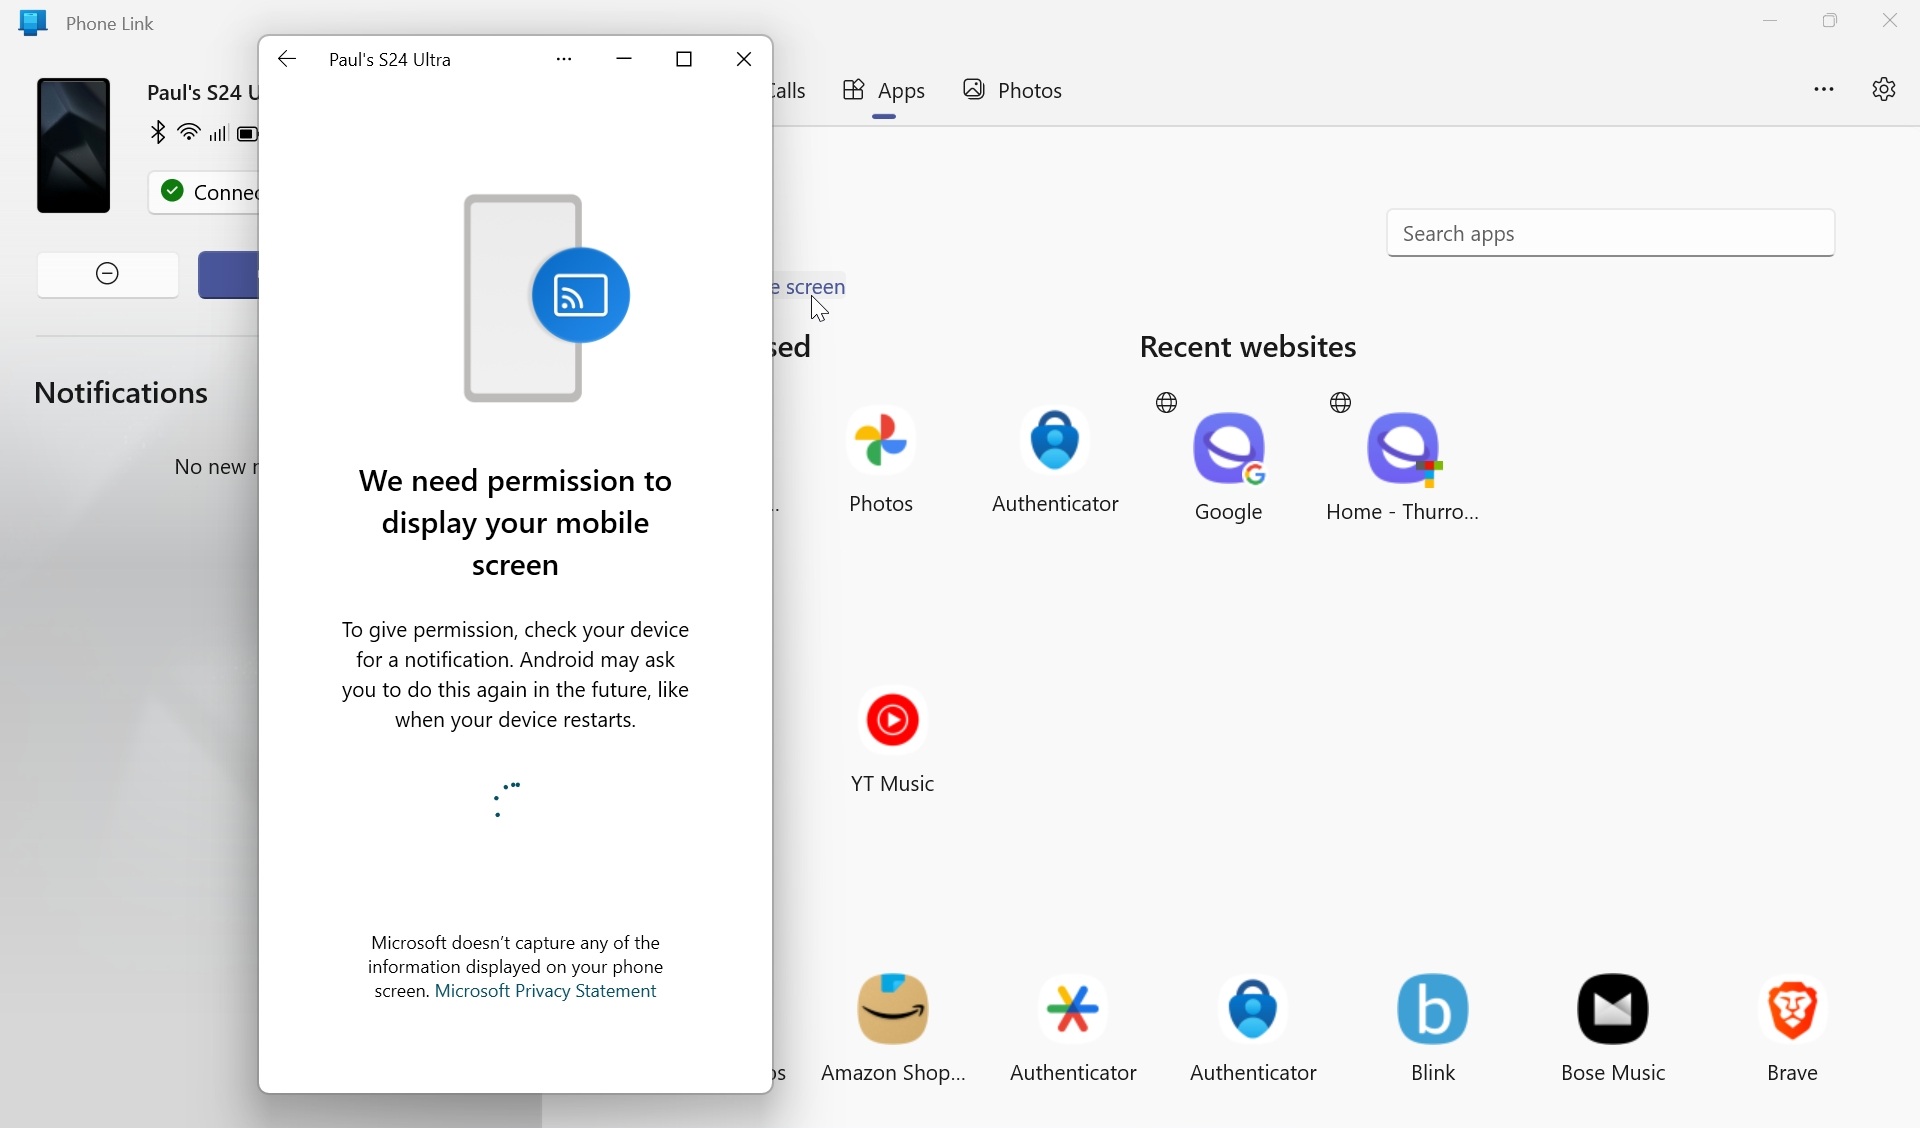

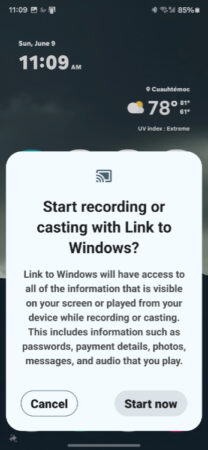
To do so, unlock your phone and tap “Start now” on the “Start recording or casting with Link to Windows?” panel that appears.
When you do so, your phone locks and displays a Link to Windows icon in the center of the lock screen. On your PC, a new window opens, displaying your phone’s home screen.
This window is resizable: Just grab the right or bottom edge of it and drag. It will retain the same aspect ratio as the physical device.
From here, you just use the phone as you would normally, though using the mouse, keyboard, and mouse/touchpad. Key interactions include:
- Click. Using the mouse pointer to select an on-screen item, a single click works like tapping that item on the phone. For example, you can open an app on your home screen by mousing to it and then clicking once.
Click and hold. To emulate the tap and hold action on your phone–for example, to display a home screen app’s context menu–click and hold on the item you want to interact with.
Go back. To return to the previous screen or page, click the “Go back” (“<-“) button in the upper-right corner of the window displaying your phone’s screen.

Drag. To drag an item on-screen, as when you wish to reposition a home screen app icon, click and hold on that item and then drag it normally with the mouse cursor.
Scroll. To scroll up or down in an app, or left to right between home screens, using your mouse’s scroll wheel or your touchpad’s two-finger scroll gesture.
Display All apps, the Notification shade, or the Discovery feed. To display the All apps screen from the home screen, click and drag up. (You can then scroll through each All apps page using the scroll gesture.) To display the Notification shade, click and drag down from the home screen. To display the Google Discovery feed, click and drag to the right from the home screen.
To end the remote session, just click the window’s “Close” button as you would any app window.
Run phone apps remotely
iPhone: No
Android: Select models only
Some Android smartphones–recent flagship Samsung Galaxy devices, plus some phones from Honor, OnePlus, OPPO, and others–allow you to remotely run individual phone apps, each in its own window in Windows 11. If you see an Apps tab, then you can use this feature.
When you select the Apps tab, you will see four sections–Recently used, Recent websites, Favorites, and All apps–that provide access to the apps on your phone. (As its name suggests, Recent websites provides similar access to the websites you’ve viewed on your phone, but it only works with the Samsung’s web browser.)
Recently used and All apps are obvious enough. But if you want to add an app to Favorites so that it’s easily accessible, locate it in All apps, right-click, and choose “Add to favorites” from the context menu that appears.
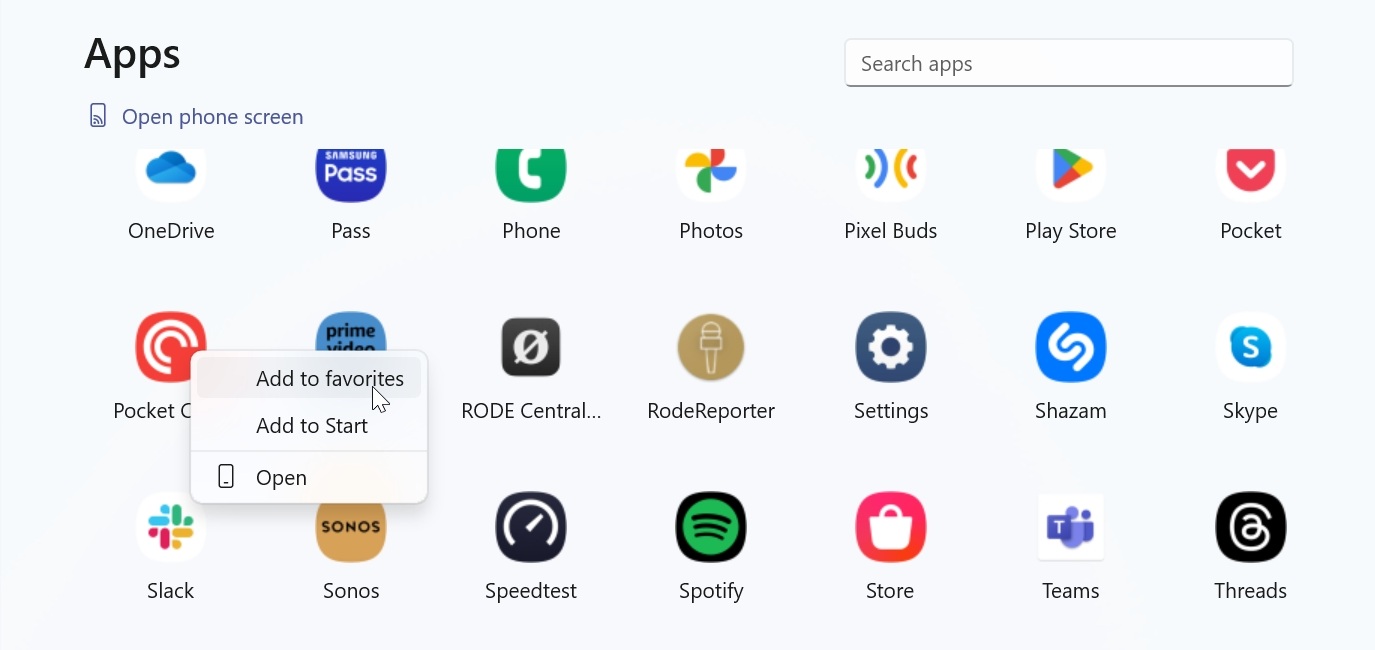
You can also add a shortcut to a phone app to the Windows 11 Start menu. This works the same way–just choose “Add to Start” in the context menu that appears–but requires an extra step. When you complete this action, the app shortcut appears in Start’s Recommended area, not in Pinned.
To move the shortcut to Pinned, right-click it and choose “Pin to Start.”
Remote app access works similarly to remotely displaying the phone screen as described in the previous section: The app appears in a resizable window, and you need to authorize this access by tapping “Start now” on the “Start recording or casting with Link to Windows?” panel that appears on your phone.

You can also run multiple apps simultaneously, each in its own window. To do so, just click each app you wish to use in Phone Link’s Apps view.

Drag and drop content from your phone to your PC
iPhone: No
Android: Select models only
If you have a recent Samsung Galaxy flagship phone or another compatible Android phone that is compatible with the remote apps feature described above, you can transfer content between your phone and PC using drag and drop.
Even when available, this feature doesn’t work with all phone apps. If you try to drag and drop content to or from an incompatible app, a banner notification will tell you why it’s not working.
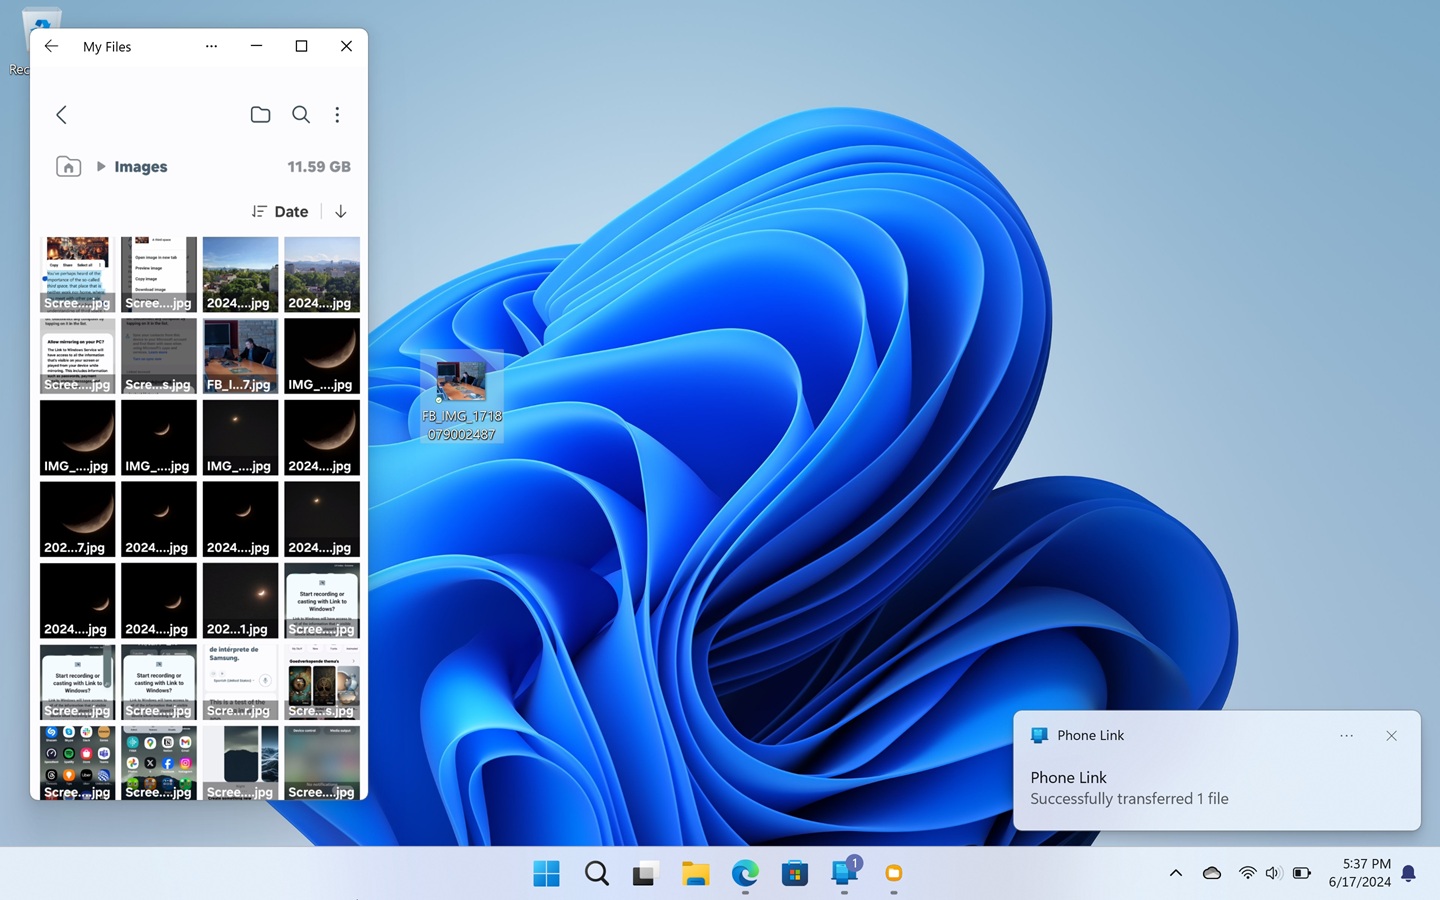
The Samsung My Files app is an example of an app that does support this functionality, albeit in just one direction: To drag one or more files from My Files (on your phone) to your PC, open My Files, select the file(s) you wish to copy, and then drag them to the Windows 11 Desktop or a File Explorer window.
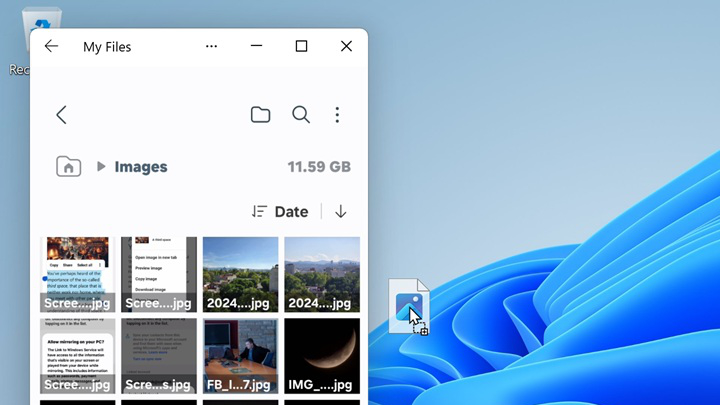
When you release the item(s), they are dropped in the Desktop or File Explorer window you selected. And Phone Link will eventually display a banner notification indicating that the copy was successful. You can now use those file(s) in Windows normally.
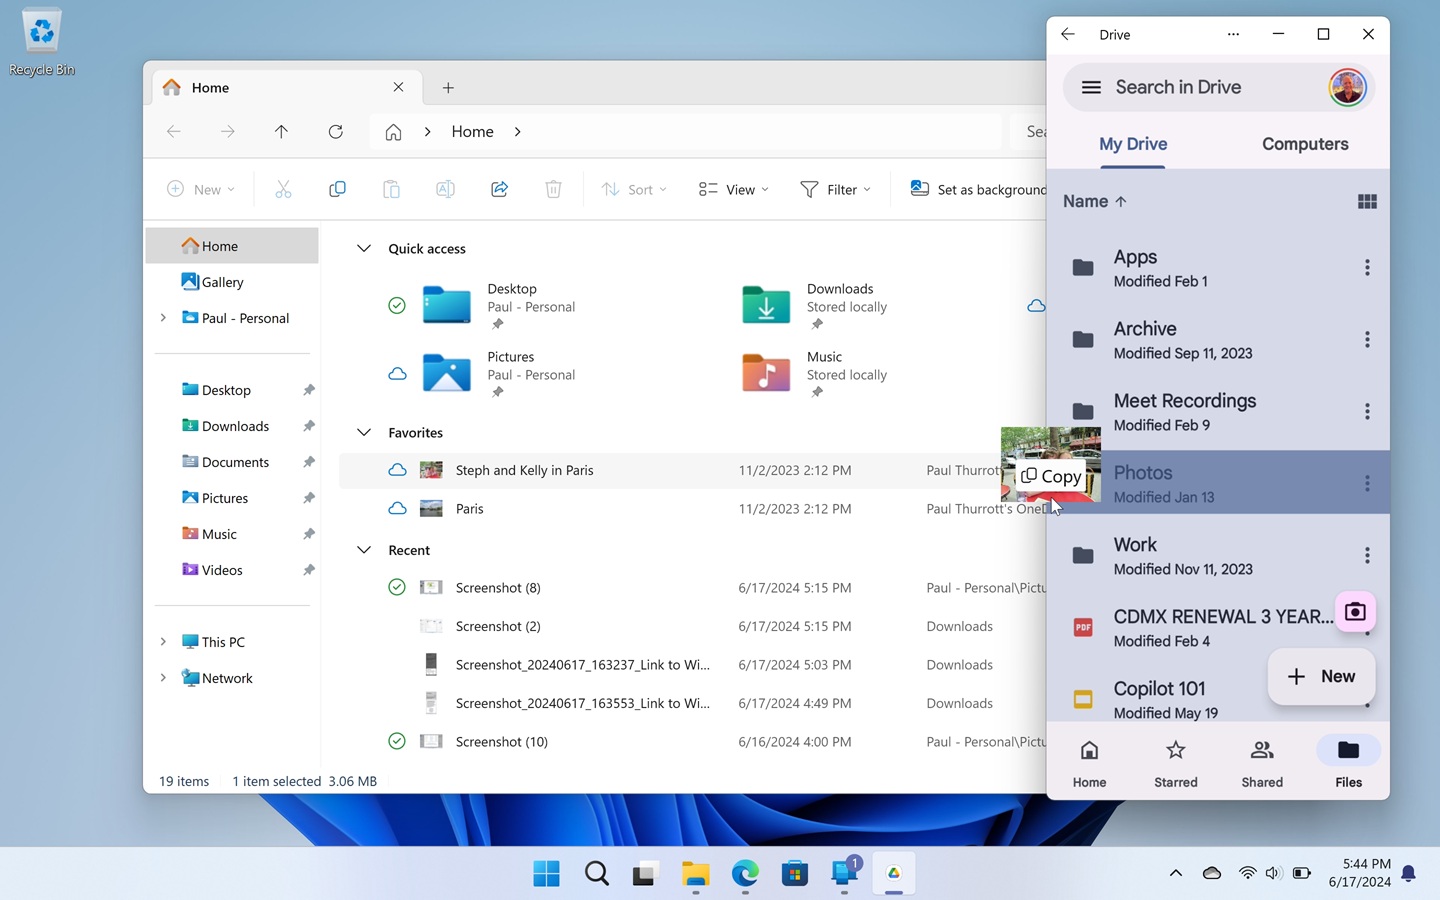
You can likewise copy one or more files in the opposite direction, from your PC to the phone. My Files doesn’t support this feature, but you can drag a file from File Explorer in Windows to other, compatible apps, like Google Drive.
Copy and paste text and images between your PC and phone
iPhone: No
Android: Select models only
If you have a recent Samsung Galaxy flagship phone or another compatible Android phone, you can use Phone Link to configure a useful feature that lets you copy and paste text and images between your phone and your PC.
It’s possible that some copied text will lose formatting. And images that are larger than 1 MB will be resized during this operation.
You may be prompted to enable this feature with a large Phone Link notification. But you can enable it at any time by opening Phone Link settings and navigating to Features > Additional settings. There, you will find an optional titled “Cross-device copy and paste.” Configure it to “On.”

To copy and paste text, select a block of text in any app on your phone and then tap the “Copy” button that appears.

Then, on your PC, open Notepad or another app that can accept pasted text and type CTRL + V. The text you copied on your phone will appear in the app.
To copy and paste an image, press and hold on an image you see on your phone and select “Copy” from the menu that appears.
Then, on your PC, open Paint or another app that can accept a pasted image and type CTRL + V. The image you copied from the phone will appear in the app.
This works in the opposite direction, too: You can copy text or an image on your PC and then paste it into compatible apps on your phone as well.
Configure and use Instant Hotspot
iPhone: No
Android: Select models only
If you have a recent Samsung Galaxy flagship phone or another compatible Android phone, you can use a Phone Link feature called Instant Hotspot to configure your phone’s mobile hotspot functionality as a known Wi-Fi network in Windows 11. That way, you can share your phone’s Wi-Fi connection with your PC more seamlessly.
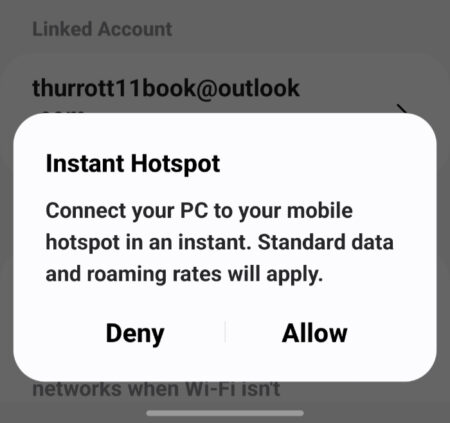
To configure Instant Hotspot, open Phone Link, click the “More options” (“…”) button in the upper-right of the app window, and select “Instant Hotspot” from the menu that appears.
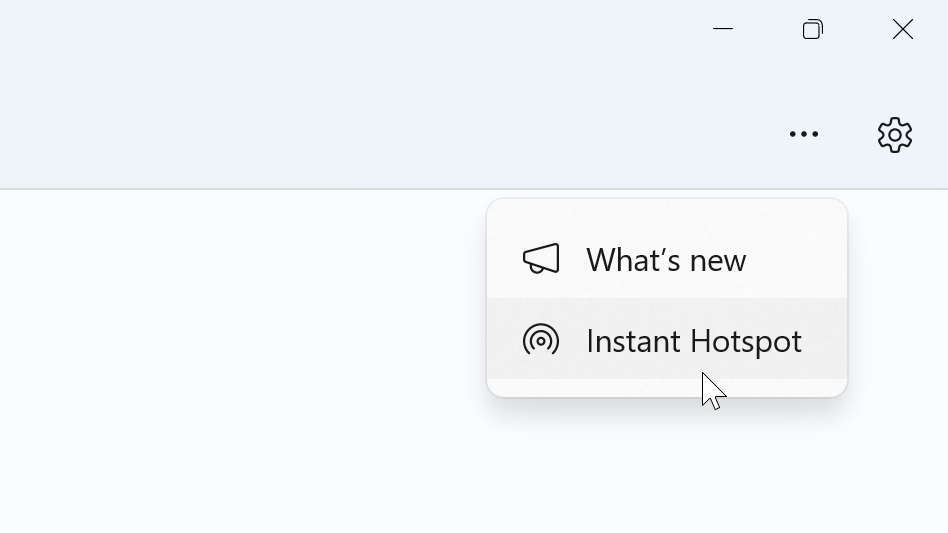
Then, click the “Send notification” button in the “Mobile hotspot permissions” window that appears. When you do, an “Instant Hotspot” notification appears on your phone.
Tap “Allow” on the phone.
On your PC, Phone Link will report that “You’re all set!” Now, your phone’s mobile hotspot is available in Windows 11’s list of available Wi-Fi networks. Better still, it’s configured with the correct password, so you can quickly access it at any time.
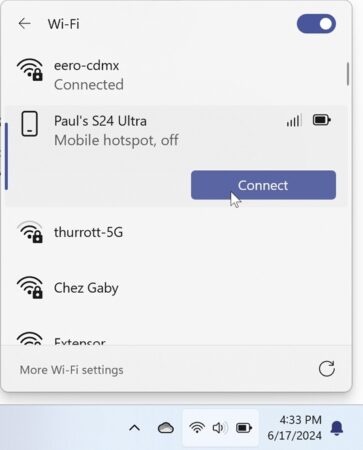
Typically, you will do so using the Wi-Fi quick setting in Windows 11 Quick settings. To see this, open Quick settings (WINKEY + Q) and click the “Manage Wi-Fi connections” button in Wi-Fi quick settings. Your phone’s mobile hotspot will appear just below the Wi-Fi network you are currently connected to.
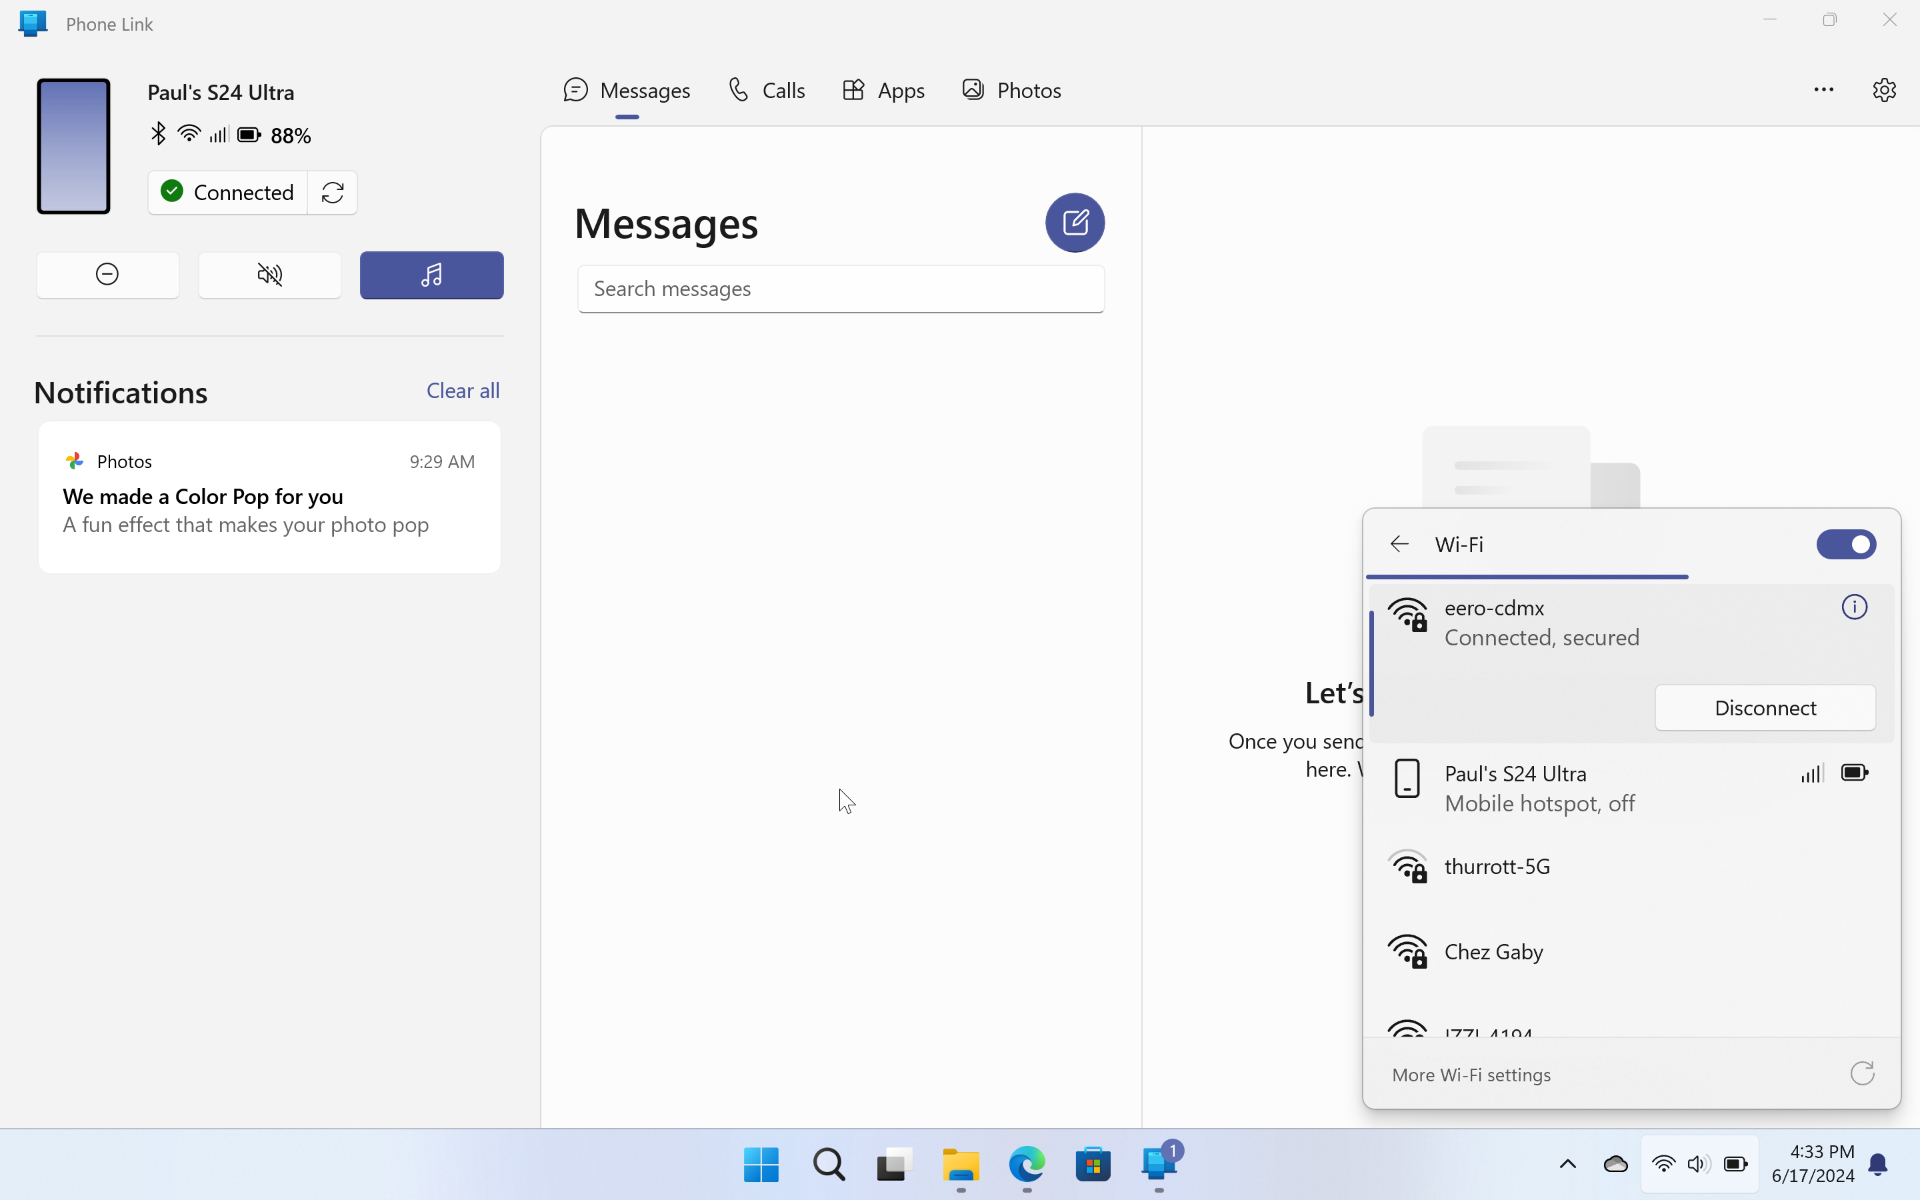
You connect to this network just as you do any other Wi-Fi network: Just click it and then click “Connect.”

Going forward, when you select “Instant Hotspot” from the “More options” menu in Phone Link, the Wi-Fi quick setting menu will appear.
You can also access this network configuration in the Windows 11 Settings app: Navigate to Wi-Fi > Show available networks to see it in the list. A separate entry there, “Manage known networks,” can be used to forget this network or configure it further if needed.
Use your phone as a webcam for your PC
iPhone: No
Android: Select models only
If you have a recent Samsung Galaxy flagship phone or another compatible Android phone, you can configure Windows 11 to use your phone’s camera as a webcam. This is desirable because phones often have better cameras than those built into PCs. But you will need a tripod or some other way to mount your phone properly for regular use.
First, you should find out if this feature is available. To do so, open the Settings app in Windows 11 and navigate to Bluetooth & devices > Mobile devices. Then, click the “Manage devices” button next to “Mobile devices” to display the “Manage mobile devices” window. Locate your phone under “My devices” and expand it if possible. (If you can’t expand it, then this feature isn’t compatible with your phone.)
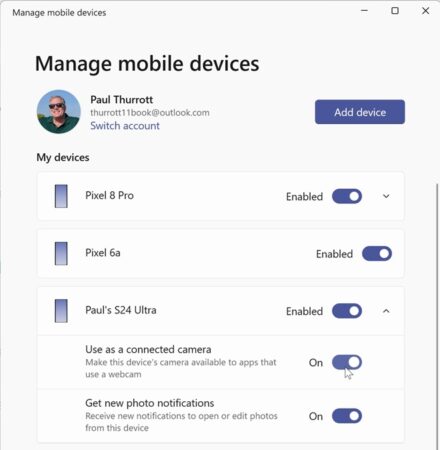
Enable the option titled “Use as a connected camera” if available. Then, close “Manage mobile devices” and the Settings app.
Next, attach your phone to your PC using a USB cable. No configuration is required on the phone.
Next, use a Windows app that requires a webcam. We will use the Windows 11 Camera app as an example. By default, this app will display the view from your PC’s built-in webcam, if available.
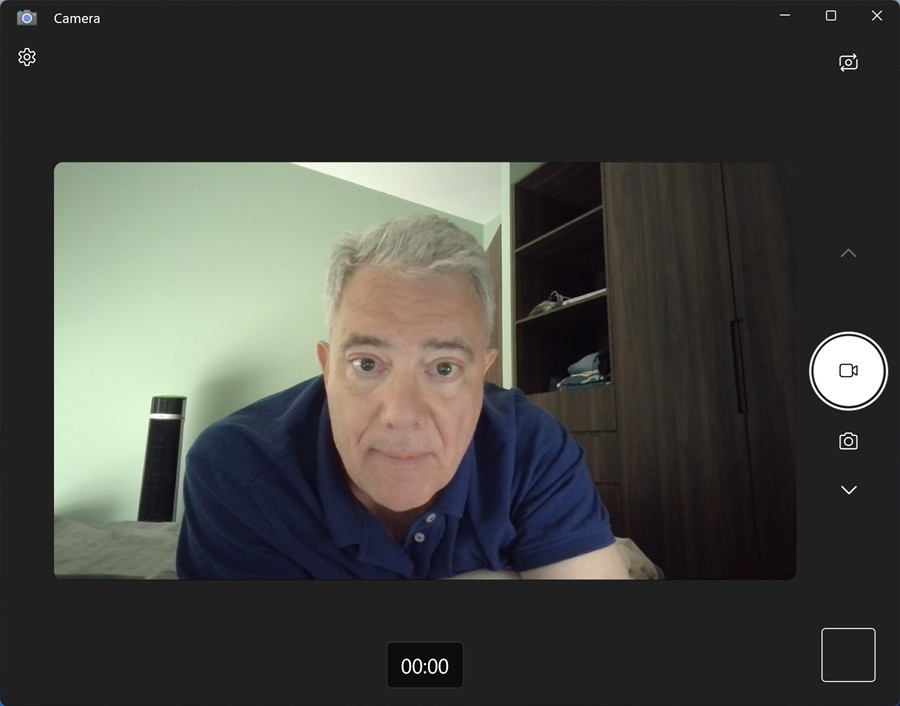
Click the “Change camera” button in the upper-right of the Camera app window. When you do, the Camera app switches to a camera in your phone and displays its output instead. Additionally, a small camera window opens with various controls.
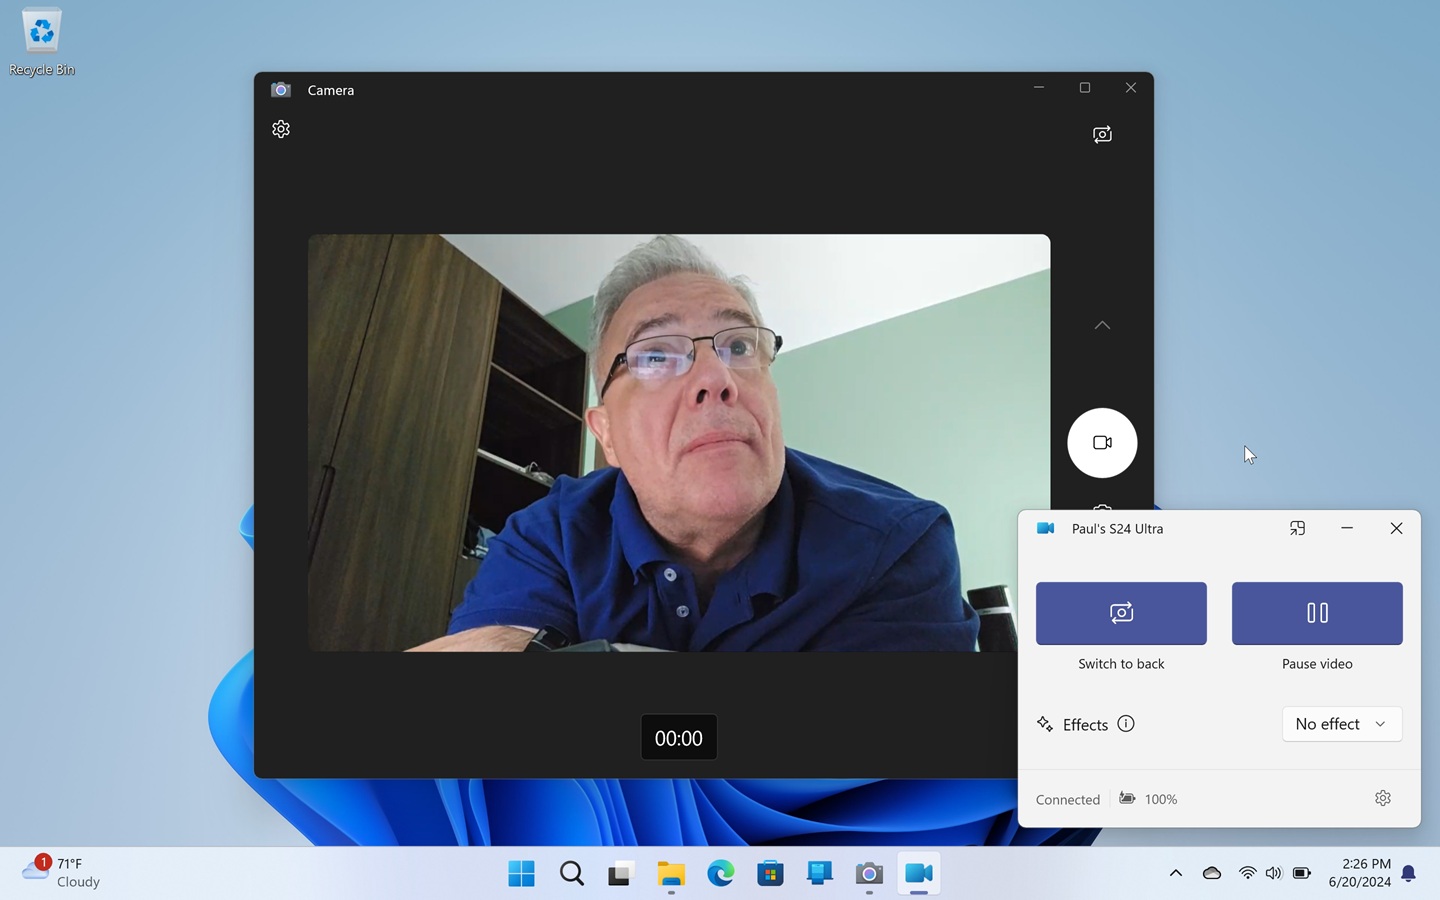
Those controls are:
Switch to front/switch to back. This button toggles between the front-facing and rear cameras on your phone.
Pause video/Resume video. This button pauses and then resumes the video output from your phone camera if you need a moment of privacy.
Effects. Depending on the capabilities of the phone camera you’re using, you can use this control to toggle Blur (background blur), Auto-framing, Soft Focus, and/or HDR.
Manage your phone with the Phone Link widget
Phone Link is one of a handful of in-box Windows 11 apps that provides a widget you can use with the Widgets interface. It doesn’t do much, it’s just a lightweight front-end to Phone Link with some basic phone status icon and a list of notifications.
This widget is not visible by default, however, so you will need to pin it to your widget board first.
To do so, open Widgets (WINKEY + W) and click the “Add widgets” (“+”) button.

When you do, the “Pin widgets” view appears. Select “Phone Link” from the list of widgets on the left.
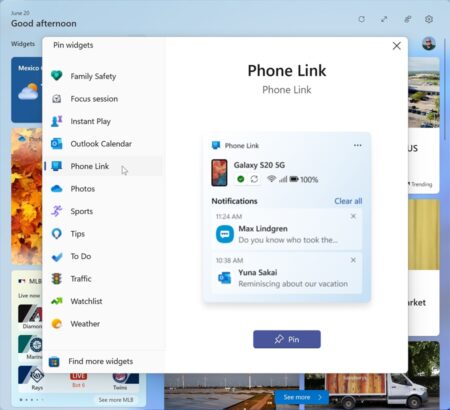

Click “Pin” and the Phone Link widget will appear at the top of your widget board.
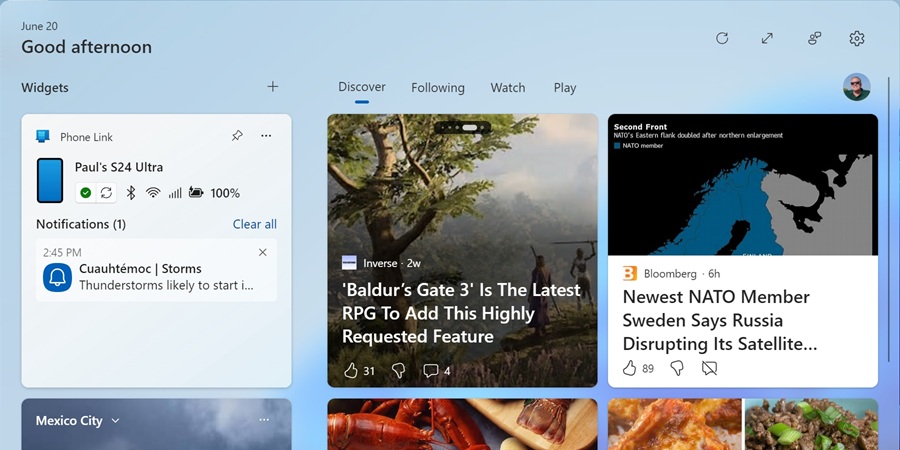
From here, you can click a notification to learn more, click the phone thumbnail to open the full Phone Link app, or click the “Connected/Disconnected” button to connect your phone if needed.

Gain unlimited access to Premium articles.
With technology shaping our everyday lives, how could we not dig deeper?
Thurrott Premium delivers an honest and thorough perspective about the technologies we use and rely on everyday. Discover deeper content as a Premium member.